Downloaded 16 times


![2 Execute the following command: lmutil lmborrow adskflex enddate
[time]
where enddate is the date you will return the license, formatted as follows:
dd-mmm-yyyy. The time argument is optional, but is specified in 24-hour
format (hh:mm).
For example: lmutil lmborrow adskflex 14-oct-2010 [14:00] borrows
a license until October 14, 2010 at 2:00 pm.
3 Launch Maya.
This borrows a Maya license from the server.
4 (Optional) If you plan to use any sub-features of Maya (such as fluid
simulation, mental ray rendering, or the mental ray local batch render)
while using a borrowed license, use those sub-features now while you are
still connected to your license server. This automatically borrows a license
for those sub-features.
After you have used the sub-feature(s) while connected to your license
server, you can then use the sub-features later when you are not
connected.
Stop borrowing a license
Stopping license borrowing is different from returning a license. You can stop
borrowing licenses if you have already checked out all of the licenses you
want, but you still plan to use sub-features while you are connected to the
network server and do not want to borrow those licenses.
For example, you can borrow a Maya license and a mental ray subfeature
license, then stop borrowing so that when you use fluid simulation (and
automatically use a subfeature license for fluid simulation), you do not borrow
the fluid simulation license from the server. In this situation, after you stop
borrowing, your Maya and mental ray licenses are still borrowed until the
return date that you set, but the fluid simulation license you used stays on
the server.
To stop borrowing a license (Windows)
1 Open the LMTOOLS utility by selecting Start > Programs > Autodesk >
Common Utilities > FlexLM License Utilities.
2 In the LMTOOLS utility, switch to the Borrowing tab.
3 Click Don’t Borrow Anymore Today.
Borrow a Maya License | 49](https://image.slidesharecdn.com/maya2010installationlicensingguide-1260450428-phpapp02/85/Maya2010installationlicensingguide-55-320.jpg)


![If you choose Send My Request by Email, an email message will display
for you to complete. If you choose to forward your request by fax or
phone, the Contact Autodesk page will display with pertinent contact
information.
You will be sent your activation code by the method you specified on
the Customer Information page.
5 If you want to print a copy of your registration information, select the
Open Activation Request Form. When you are finished, click Close.
To activate an Autodesk product during launch
1 When you start the program, select Activate the Product in the [Autodesk
Product] Product Activation wizard, and click Next.
2 On the Activation page of Register Today, select Enter an Activation Code.
3 Select the method you would like to use for entering the activation code
you received from Autodesk.
■ Select Paste the Activation Code if you received your activation code
by email or fax. Copy the code from the email and paste it into the
activation code field.
■ Select Type the Activation Code if you received your activation code
by postal mail or printed fax. Carefully enter the code, in groups of
four characters, into the numbered fields.
NOTE The code is not case sensitive and you may not need to use all 14
fields.
4 After entering the activation code, click Next.
5 On the Registration - Activation Confirmation page, click Finish.
To activate Maya from the Help menu
1 Select Help > Licensing.
2 In the Product License Information dialog box that appears, click Activate.
3 In the Autodesk Maya Product Activation wizard, select Activate the
Product, then click Next.
4 On the Register Today page, follow the on-screen instructions.
Register and Activate an Autodesk Product | 61](https://image.slidesharecdn.com/maya2010installationlicensingguide-1260450428-phpapp02/85/Maya2010installationlicensingguide-67-320.jpg)
![2 Install the Autodesk product on any other computer that will be using
the License Transfer utility. You do not have to register or activate the
product on this computer.
See your product's installation instructions for complete details.
Export a License
A license is exported when the License Transfer utility moves a product license
from a computer to the online Autodesk server.
The license can be exported as public or private. Exporting a license as public
means that you are not reserving the license and anyone using the same serial
number and their own user ID and password can import that license. Exporting
a license as private means that you are reserving that license for yourself and
the license can only be imported with the same serial number, your user ID,
and your password.
NOTE An Internet connection is required to export a license.
To export a license
1 On the computer where you want to export the license, do one of the
following:
■ (Windows XP) Click Start ➤ Programs ➤ Autodesk ➤ [Autodesk
Product] ➤ License Transfer Utility.
■ (Windows Vista) Click Start ➤ All Programs ➤ Autodesk ➤
[Autodesk Product] ➤ License Transfer Utility.
■ (Mac OS X or Linux) Double-click the License Transfer Utility shortcut.
The Export the License dialog box displays the Autodesk product name
and serial number.
2 In the Export the License dialog box, click Sign In.
3 On the Log In page, enter your Autodesk user ID and password and click
Log In.
4 On the License Export page, confirm the export information.
5 If you want to make the license available as a public import, click Make
the license available as a public import.
6 Click Export.
Export a License | 65](https://image.slidesharecdn.com/maya2010installationlicensingguide-1260450428-phpapp02/85/Maya2010installationlicensingguide-71-320.jpg)
![7 On the License Export Confirmation page, click Finish.
Import a License
A license is imported when the License Transfer utility moves a previously
exported product license from the online Autodesk server to a computer.
When you have exported a product license from a computer, you complete
the license transfer process by importing that license onto a computer. A
license is imported when the License Transfer utility creates an active license
on a computer, allowing your Autodesk product to run on this computer.
When you use the License Transfer utility to import a license to a computer,
you are not activating the product on the computer; you are simply transferring
your activation to this machine.
NOTE An Internet connection is required to import a license.
To import a license
1 On the computer where you want to import the license, do one of the
following:
■ (Windows XP) Click Start ➤ Programs ➤ Autodesk ➤ [Autodesk
Product] ➤ License Transfer Utility.
■ (Windows Vista) Click Start ➤ All Programs ➤ Autodesk ➤
[Autodesk Product] ➤ License Transfer Utility.
■ (Mac OS X or Linux) Double-click the License Transfer Utility shortcut.
The Import the License dialog box displays the Autodesk product name
and serial number.
2 In the Import the License dialog box, click Sign In.
3 On the Log In page, enter your Autodesk user ID and password and click
Log In.
4 On the License Import Confirmation page, click Finish.
The license is now imported to the computer and you can run your
Autodesk product on this computer. If you want to transfer the license
to another computer, repeat the export and import procedures.
66 | Chapter 6 License Transfer Utility](https://image.slidesharecdn.com/maya2010installationlicensingguide-1260450428-phpapp02/85/Maya2010installationlicensingguide-72-320.jpg)
![To import a license to replace a trial license
1 On the computer where you want to import the license, do one of the
following:
■ (Windows XP) Click Start ➤ Programs ➤ Autodesk ➤ [Autodesk
Product] ➤ License Transfer Utility.
■ (Windows Vista) Click Start ➤ All Programs ➤ Autodesk ➤
[Autodesk Product] ➤ License Transfer Utility.
■ (Mac OS X or Linux) Double-click the License Transfer Utility shortcut.
The Update the Serial Number and Product Key dialog box displays the
Autodesk product name and serial number.
2 In the Update the Serial Number and Product Key dialog box, enter the
serial number and product key to update your Autodesk product. Click
Update.
The Import the License dialog box displays the Autodesk product name
and updated serial number.
3 In the Import the License dialog box, click Sign In.
4 On the Log In page, enter your Autodesk user ID and password and click
Log In.
5 On the License Import Confirmation page, click Finish.
The license is now imported to the computer and you can run your
Autodesk product on this computer. If you want to transfer the license
to another computer, repeat the export and import procedures.
Import a License | 67](https://image.slidesharecdn.com/maya2010installationlicensingguide-1260450428-phpapp02/85/Maya2010installationlicensingguide-73-320.jpg)


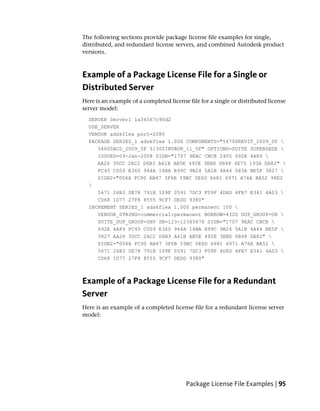
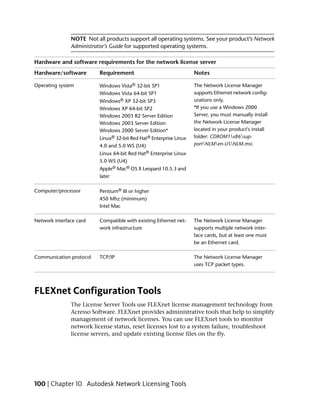
![The following table defines each license file parameter.
Definitions of license file parameters
Line Parameter Definition Example
SERVER Host Name Host name of the server where the LABSERVER
Network License Manager resides
Host ID Ethernet address of the server where 03D054C0149B
the Network License Manager resides
USE_SERVER [None]
VENDOR Vendor Daemon Name of the server-side Autodesk adskflex.exe
vendor daemon
Port Number Network port number reserved and port=2080
assigned for use only by Autodesk
products running the Autodesk
vendor daemon
PACKAGE Name Name of feature code group SERIES_1
Version Internal version number reference 1.000
COMPONENTS List of feature codes supported in the COMPONENTS=
package "526000REVIT_9_OF
51200ACD_2007_OF
513001IN-
VBUN_11_OF"
OPTIONS OPTIONS=SUITE
SUPERSEDE Replacement for any existing Incre- SUPERSEDE
ment line of the same feature code
from any license files on the same li-
cense server that have a date earlier
than the defined Issue Date
SIGN Encrypted signature used to authen- SIGN=0 SIGN2=0
ticate the attributes of the license file
INCREMENT Feature Code Product supported by the license file 51200ACD_2007_0F
License Files | 89](https://image.slidesharecdn.com/maya2010installationlicensingguide-1260450428-phpapp02/85/Maya2010installationlicensingguide-95-320.jpg)


![Create a Report Log
In the Options file, you can create a report log file that is used with
SAMreport-Lite.
To create a report log
1 In a text editor, open the Options file, adskflex.opt.
2 In the Options file, enter the following syntax on its own line (with
REPORTLOG entered in uppercase, as shown):
REPORTLOG [+]report_log_path
For example (Windows), the syntax REPORTLOG +"c:My
Documentsreport.rl" means that a report log named report.rl is located
in the folder c:My Documents.
For example (Mac OS X or Linux), the syntax REPORTLOG +"/Users/<user
id>/NLM/report.rl" means that a report log named report.rl is located in
the folder /Users/<user id>/NLM.
NOTE Path names that contain spaces must be enclosed in quotation marks.
In the REPORTLOG syntax, “[+]” means that entries to the log file you
create are appended rather than replaced each time the Network License
Manager is restarted. (It is recommended that you use this option so that
you retain a history of log entries.)
Configure License Borrowing
If your Autodesk product supports the license borrowing feature, you can use
the Options file to configure license borrowing options. For example, you can
define the maximum number of licenses that cannot be borrowed from your
network at any one time. In addition, you can define which users can borrow
an Autodesk product license. Licenses are borrowed per user, not per machine.
NOTE If your Autodesk product supports license borrowing, and licenses are
borrowed from a redundant license server pool, you must restart the license server
after you stop the Network License Manager.
At the end of a borrow period, the borrowed license is automatically disabled
on the user's computer and becomes available again on the license server.
Users can also return a license before a borrow period has ended.
114 | Chapter 11 Network Licensing Tasks](https://image.slidesharecdn.com/maya2010installationlicensingguide-1260450428-phpapp02/85/Maya2010installationlicensingguide-120-320.jpg)
![To set license borrowing parameters
1 In the Options file, enter the following syntax on its own line (with
BORROW_LOWWATER entered in uppercase, as shown):
BORROW_LOWWATER feature_code n
In the BORROW syntax, “feature_code” is the name of the product in
the license file, and “n” is the number of licenses that cannot be borrowed.
For example, the syntax BORROW_LOWWATER Autodesk_f1 3 means
that for the product Autodesk_f1, three licenses cannot be borrowed from
the license server.
2 Enter the following syntax on the next line (with MAX_BORROW_HOURS
entered in uppercase, as shown):
MAX_BORROW_HOURS feature_code n
In this syntax, “n” is the number of hours that a license can be borrowed.
For example, the syntax MAX_BORROW_HOURS Autodesk_f1 360 means
that for product Autodesk_f1, licenses can be borrowed for 360 hours, or
15 days.
NOTE Licenses are borrowed in increments of 24 hours only. Any number
that is more than a 24-hour increment is not used. For example, the number
365 would be rounded down to 360 hours, or 15 days.
For more information about setting up the license borrowing feature, see the
FLEXnet documentation in the C:Program FilesAutodesk Network License
ManagerDocsFlexUser folder.
NOTE Users can borrow a license in an Autodesk product by clicking the Tools
menu ➤ License Borrowing, or by entering borrowlicense on the Autodesk product
command line. Help for this feature is available in the Borrow a License for [Autodesk
Product] window and in C:Program Files[Autodesk Product]Helpadsk_brw.chm.
Set Up License Timeout
License timeout is set in the Options file to determine how long a product
session can be idle before the license is reclaimed by the license server. When
you set this flag in the Options file, a user's license is reclaimed by the license
server if the product is idle on a workstation for more than the timeout period
you define.
Set Up License Timeout | 115](https://image.slidesharecdn.com/maya2010installationlicensingguide-1260450428-phpapp02/85/Maya2010installationlicensingguide-121-320.jpg)


This document provides instructions for installing and licensing Autodesk Maya 2010 software. It covers preparing for installation, installing Maya on Windows, Mac OS X and Linux, as well as uninstalling Maya. Additional chapters discuss licensing Maya for both network and stand-alone use, troubleshooting licensing errors, and installing related applications like MatchMover, Toxik and Backburner.