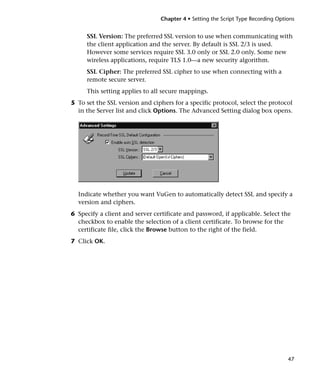
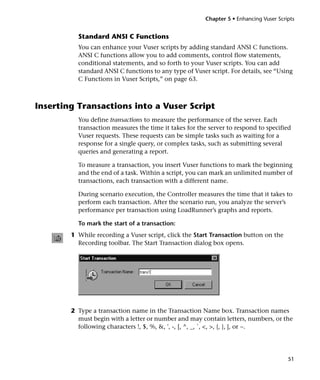
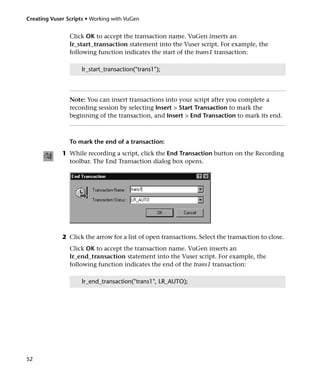
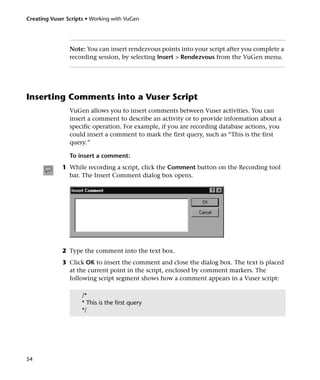
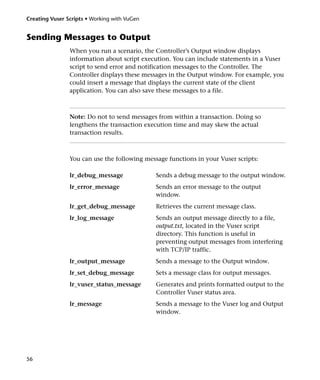
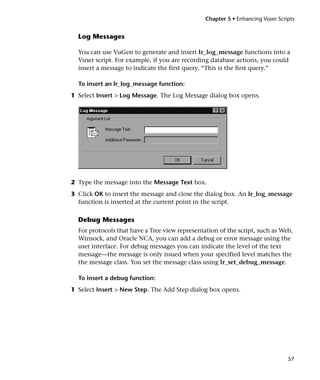
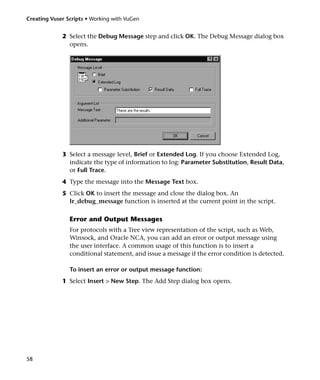
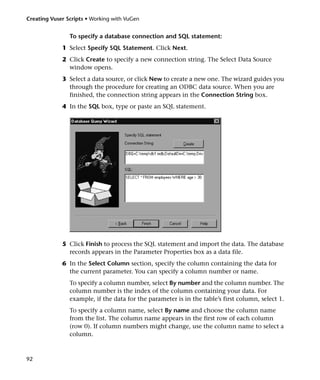
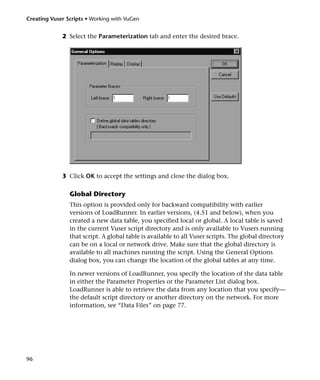
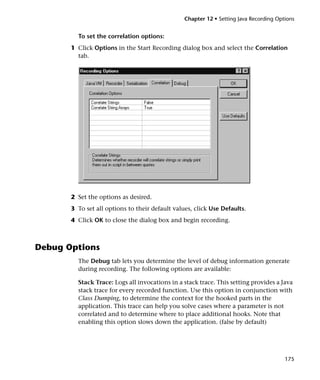
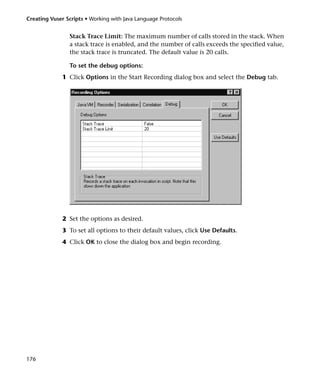
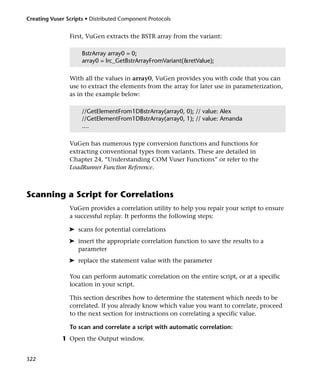
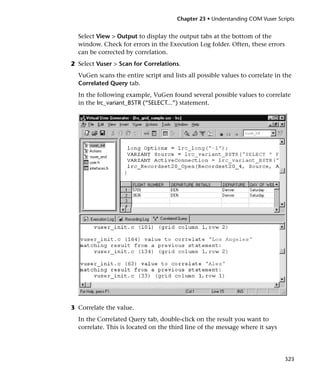
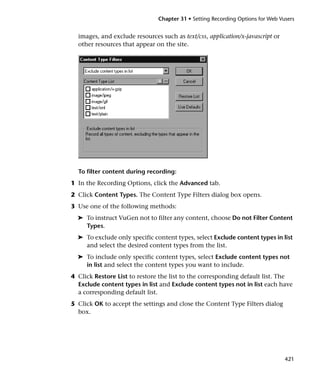
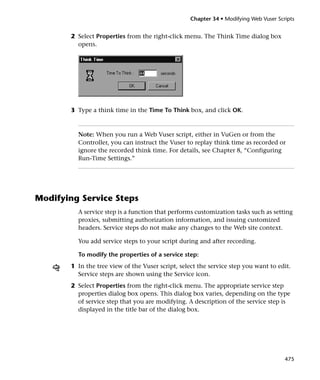
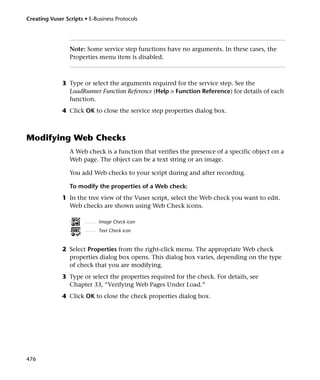
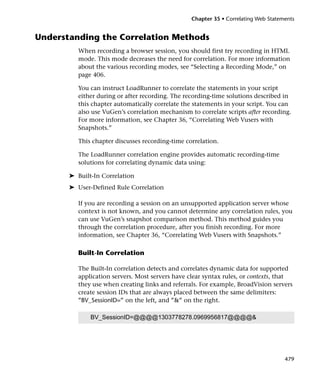
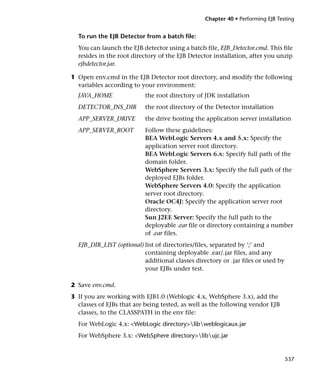
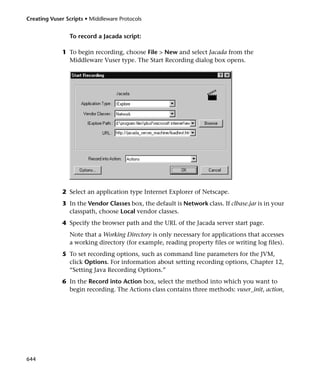
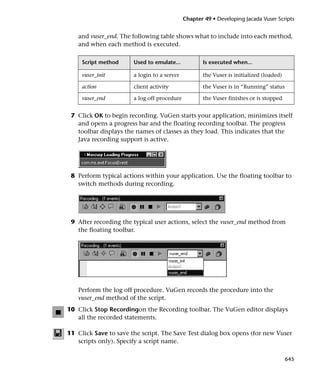
This document provides instructions for creating Vuser scripts using LoadRunner. It discusses recording scripts with VuGen, enhancing scripts, defining parameters, correlating statements, and configuring run-time settings. It is protected by copyright and is intended to help users develop effective load tests using LoadRunner.


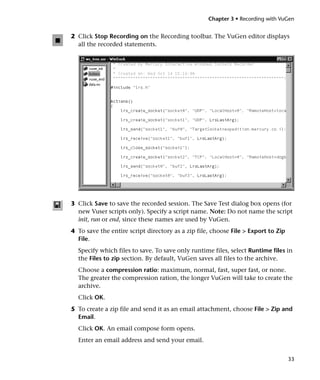
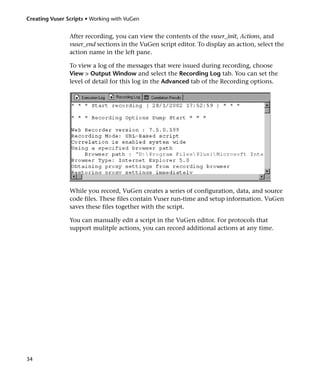
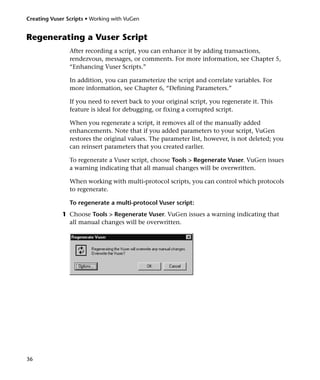
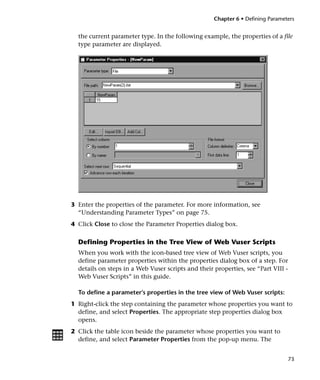
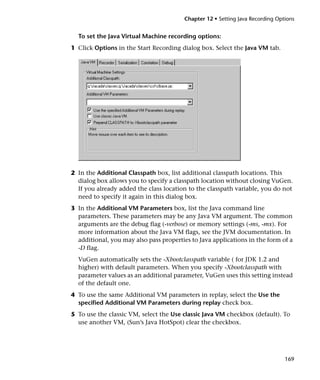
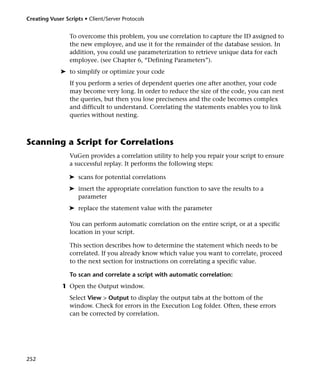
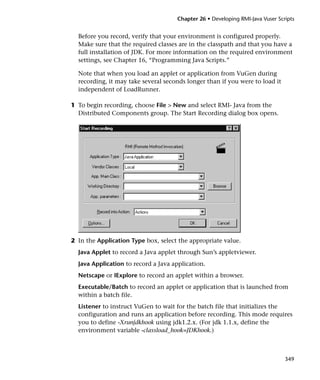
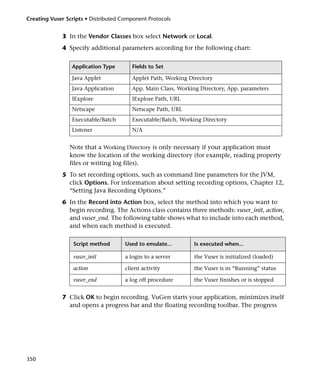
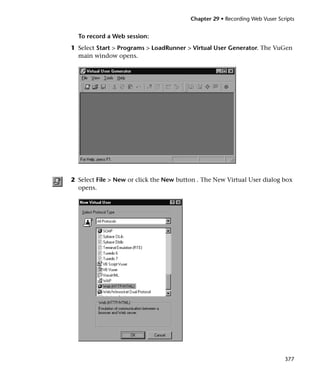
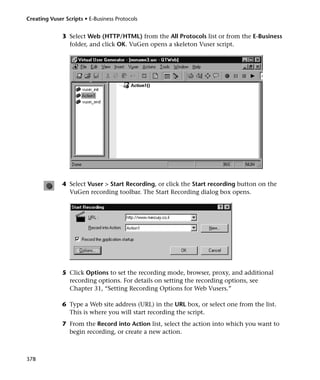
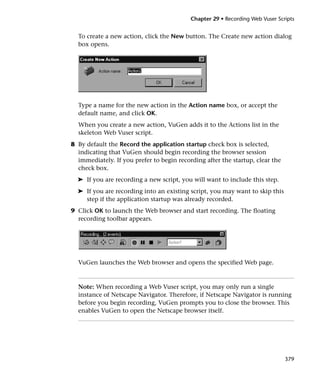
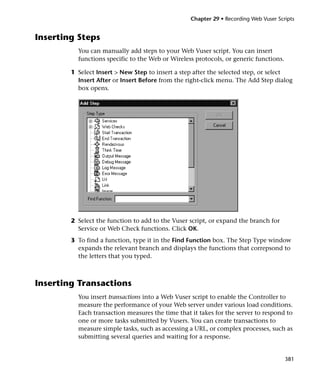
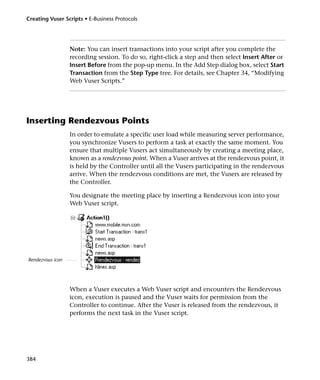
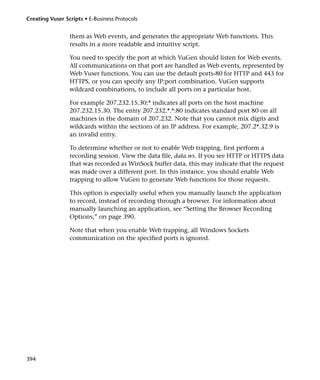
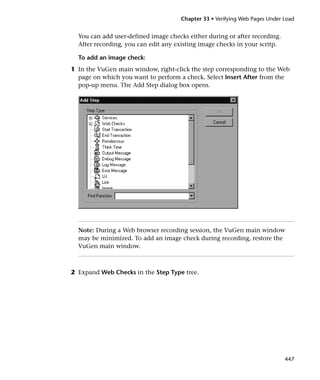
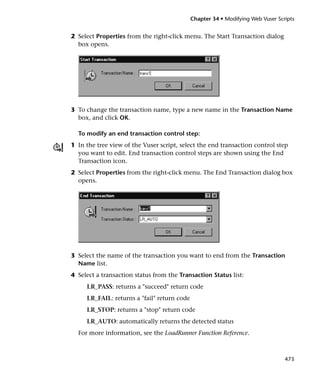
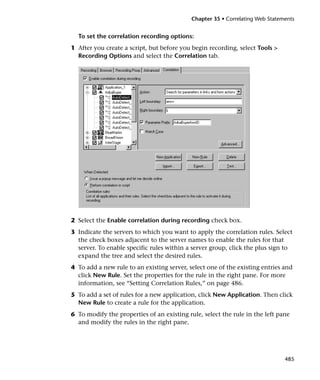
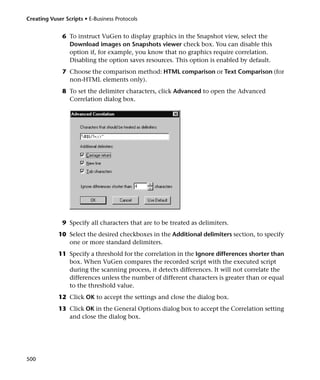
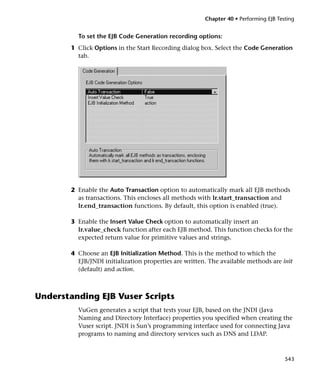
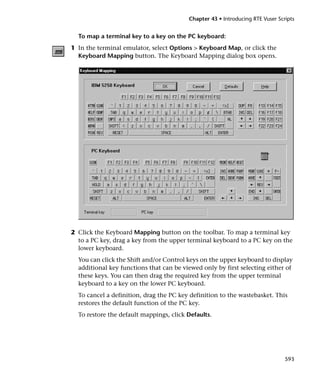
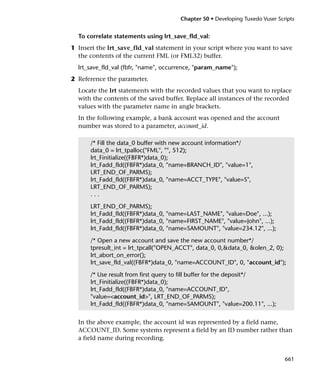
![Creating Vuser Scripts
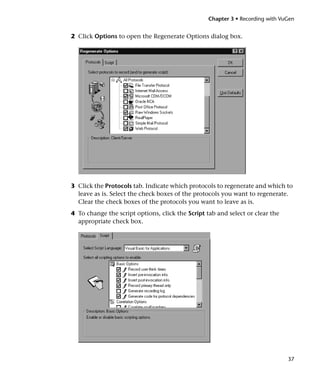
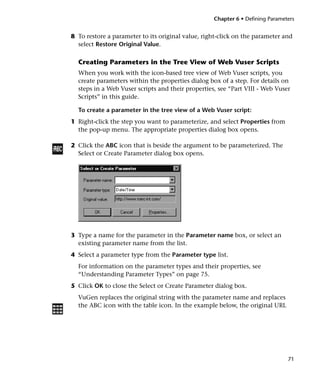
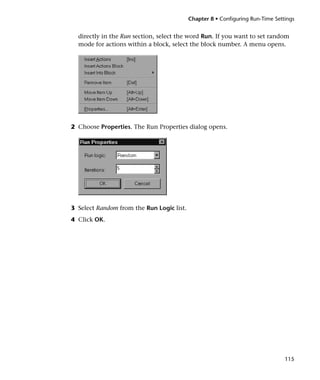
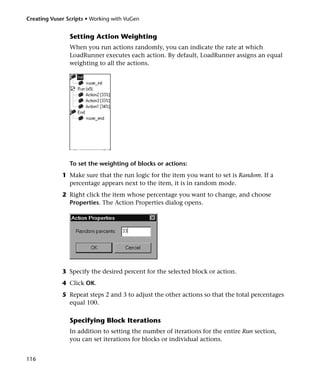
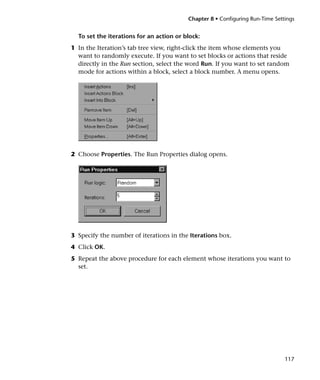
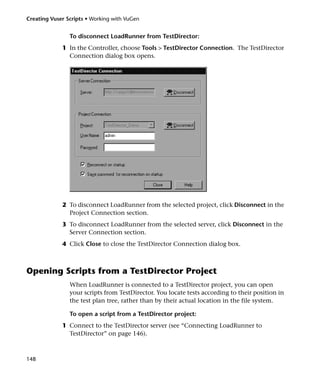
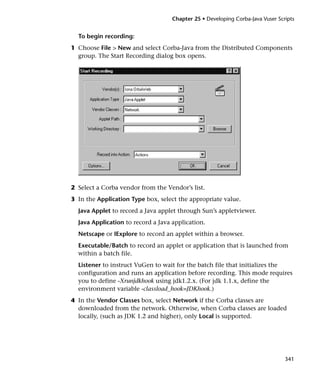
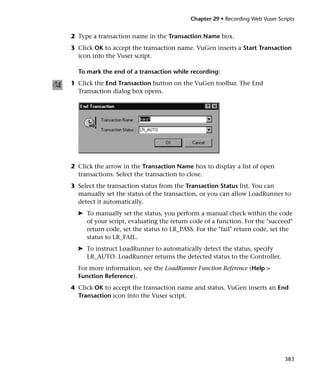
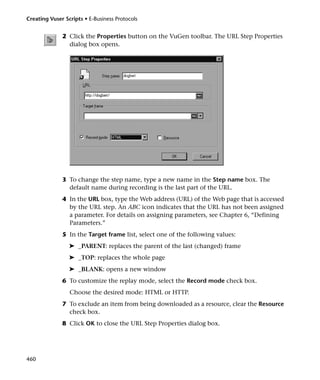
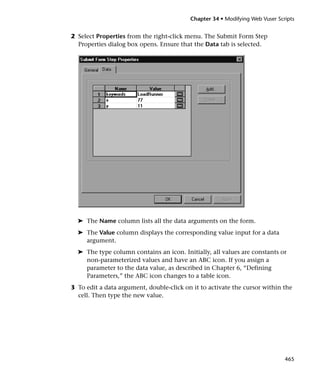
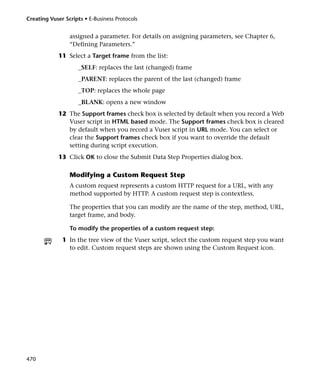
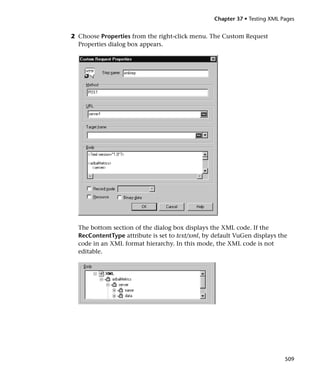
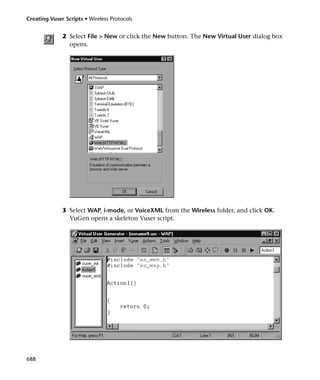
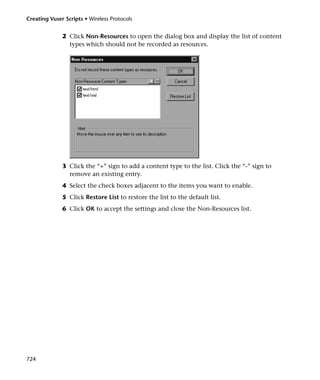
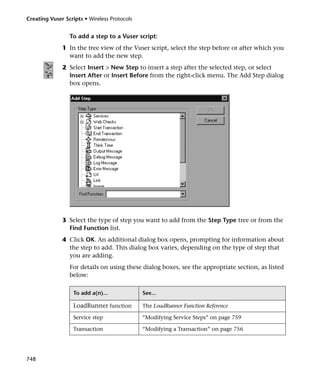
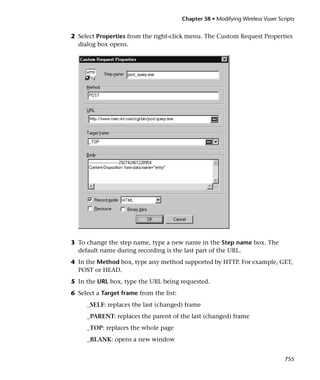
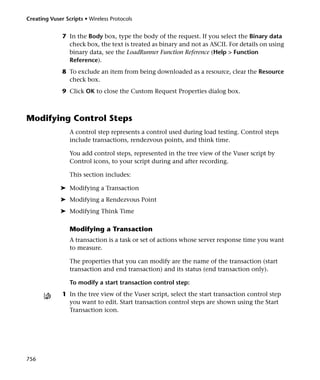
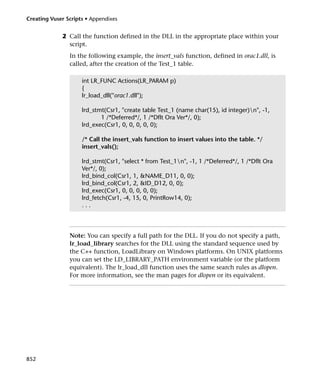
Typographical Conventions
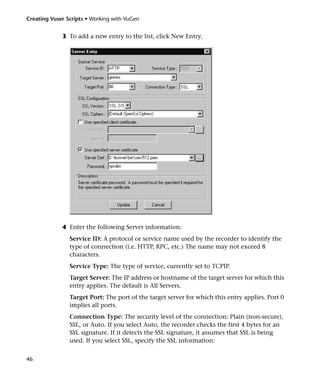
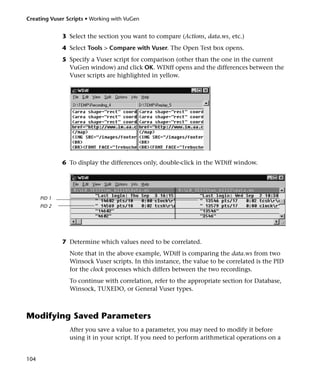
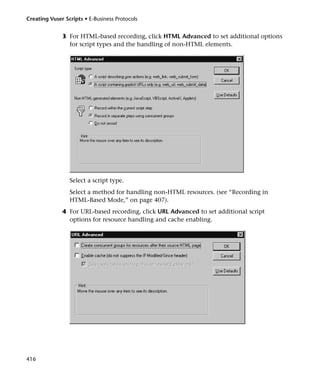
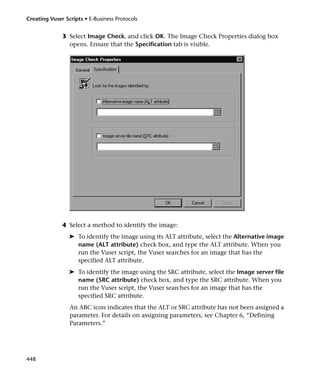
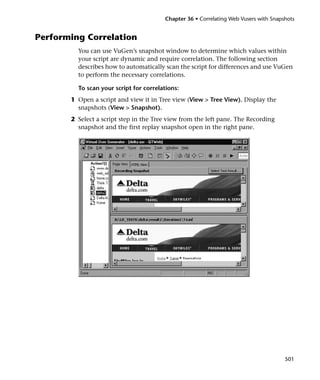
This book uses the following typographical conventions:
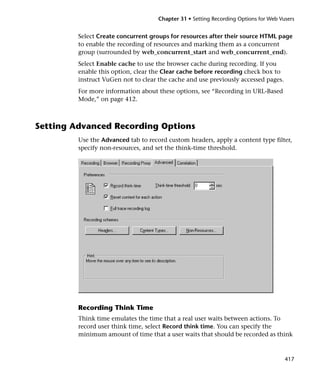
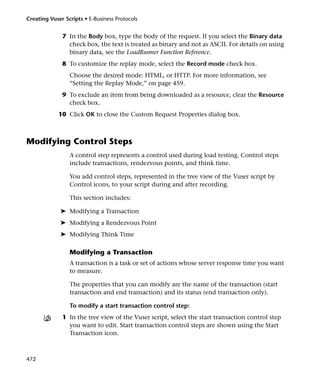
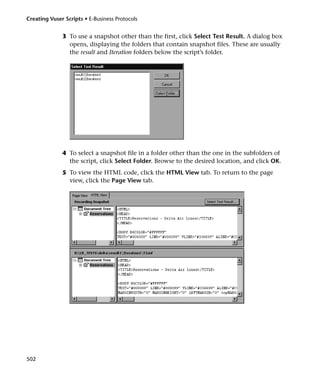
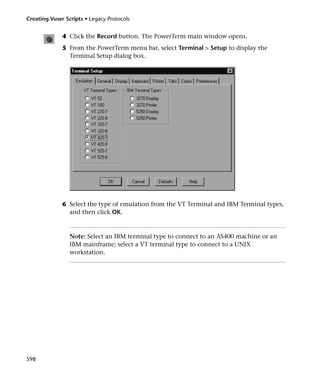
1, 2, 3 Bold numbers indicate steps in a procedure.
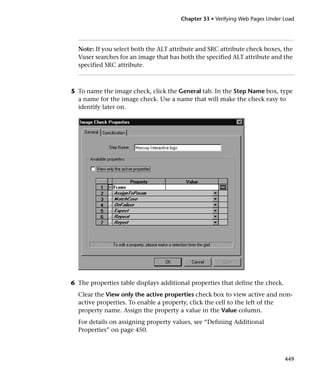
➤ Bullets indicate options and features.
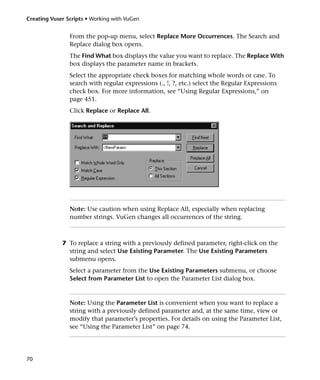
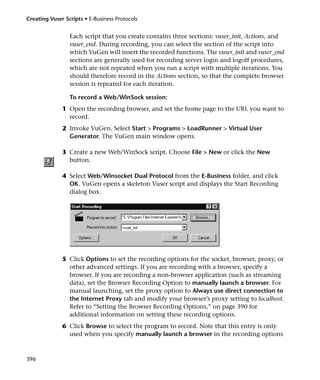
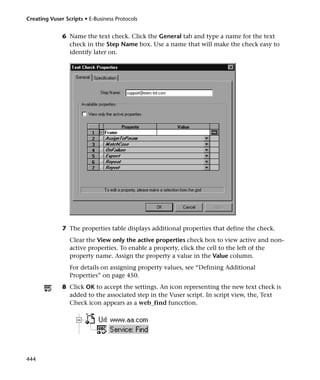
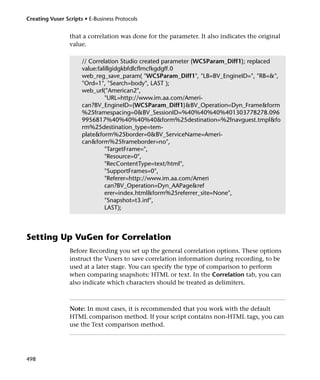
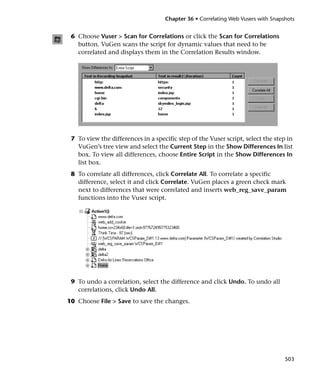
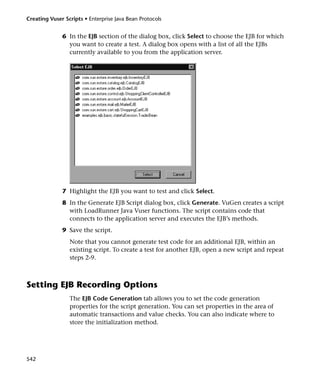
> The greater than sign separates menu levels (for
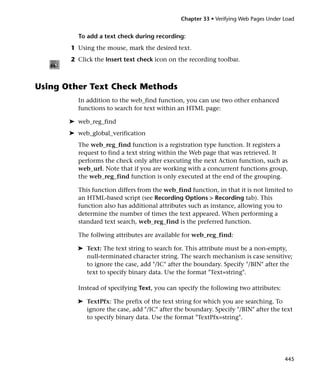
example, File > Open).
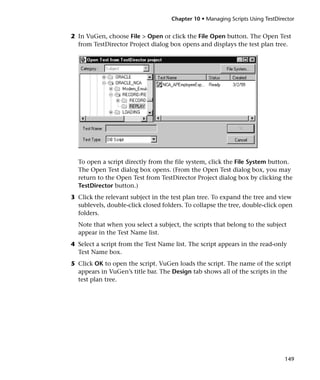
Stone Sans The Stone Sans font indicates names of interface
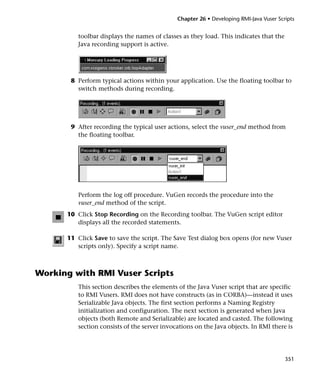
elements on which you perform actions (for example,
“Click the Run button.”).
Bold Bold text indicates method or function names
Italics Italic text indicates method or function arguments, file
names or paths, and book titles.
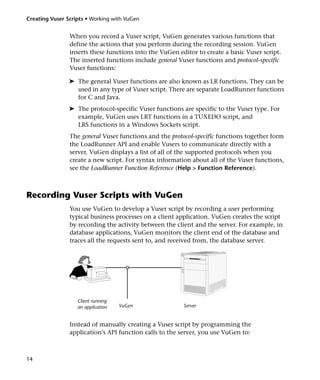
Helvetica The Helvetica font is used for examples and text that is
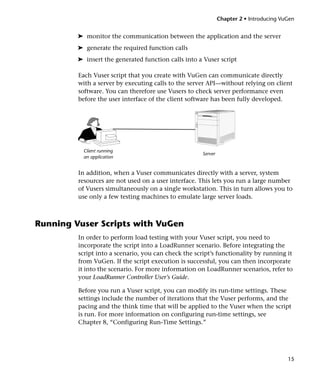
to be typed literally.
<> Angle brackets enclose a part of a file path or URL
address that can vary (for example, <Product installation
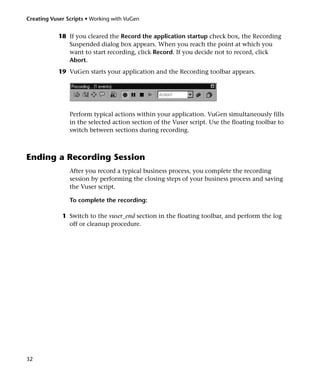
folder>/bin).
[ ] Square brackets enclose optional arguments.
{} Curly brackets indicate that one of the enclosed values
must be assigned to the current argument.
... In a line of syntax, an ellipsis indicates that more items
of the same format may be included.
xxii](https://image.slidesharecdn.com/loadrunnergenerator-121007004236-phpapp01/85/Load-runner-generator-22-320.jpg)


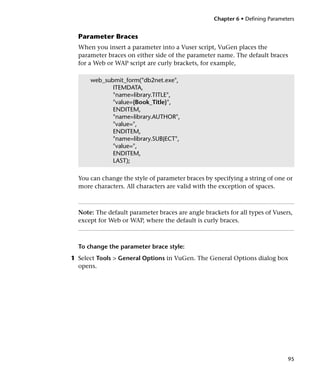
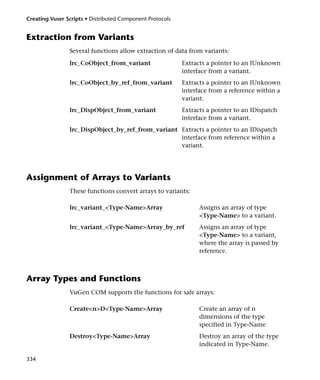
![Chapter 6 • Defining Parameters
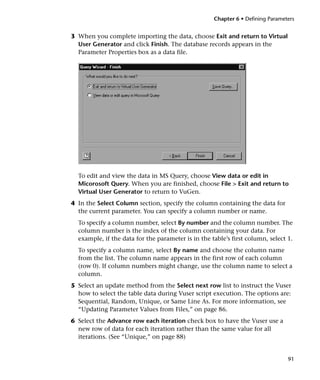
7 Select an update method from the Select next row list to instruct the Vuser
how to select the table data during Vuser script execution. The options are:
Sequential, Random, Unique, or Same Line As. For more information, see
“Updating Parameter Values from Files,” on page 86.
8 Select the Advance row each iteration check box to have the Vuser use a
new row of data for each iteration rather than the same value for all
iterations. (See “Unique,” on page 88)
User-Defined Functions
A user-defined function replaces the parameter with a value returned from a
function located in an external DLL.
Before you assign a user-defined function as a parameter, you create the
external library (DLL) with the function. The function should have the
following format:
__declspec( dllexport ) char *<functionName>( char *, char * )
The arguments sent to this function are both NULL.
When you create the library, it is recommended that you use the default
dynamic library path. That way, you do not have to enter a full path name
for the library, but rather, just the library name. The Virtual User Generator
bin directory is on the default dynamic library path. You can add your
library to this directory.
The following are examples of user-defined functions:
__declspec( dllexport ) char *UF_GetVersion( char *x1, char *x2 ) {return
"Ver2.0";}
__declspec( dllexport ) char *UF_GetCurrentTime( char *x1, char *x2 ) {
time_t x = time( NULL ); static char t[35]; strcpy( t, ctime( &x ) ); t[24] =
'0'; return t;}
93](https://image.slidesharecdn.com/loadrunnergenerator-121007004236-phpapp01/85/Load-runner-generator-115-320.jpg)


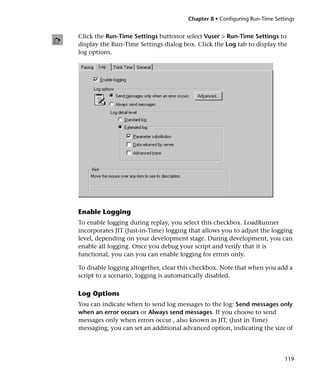
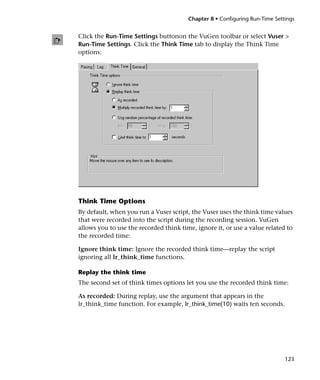
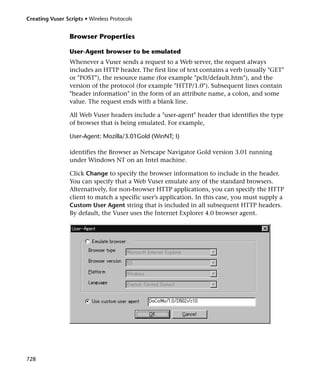
![Chapter 8 • Configuring Run-Time Settings
➤ At fixed/random intervals, every .../ to ... seconds.
As soon as the previous iteration ends
The new iteration begins as soon as possible after the previous iteration
ends.
After the previous iteration ends with a fixed or random delay of ...
Starts each new iteration a specified amount of time after the end of the
previous iteration. Specify either an exact number of seconds or a range of
time. For example, you can specify to begin a new iteration at any time
between 60 and 90 seconds after the previous iteration ends.
The actual amount of time that the Vuser waits between the end of one
iteration and the start of the next one appears in the Execution Log when
you run the script.
At fixed or random intervals, every ... [to ...] seconds.
You specify the time between iteration—either a fixed number of seconds or
a range of seconds from the beginning of the previous iteration. For
example, you can specify to begin a new iteration every 30 seconds, or at a
random rate ranging from 30 to 45 seconds from the beginning of the
previous iteration. Each scheduled iterations will only begin when the
previous iteration is complete.
The actual amount of time that the Vuser waits between the end of one
iteration and the start of the next one appears in the Execution Log when
you run the script.
Each scheduled iteration will only begin when the previous iteration is
complete. For example, assume that you specify to start a new iteration
every four seconds:
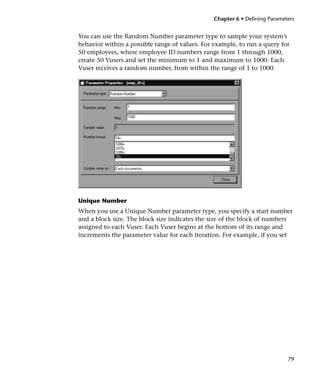
➤ If the first iteration takes three seconds, the Vuser waits one second.
➤ If the first iteration takes two seconds to complete, the Vuser waits two
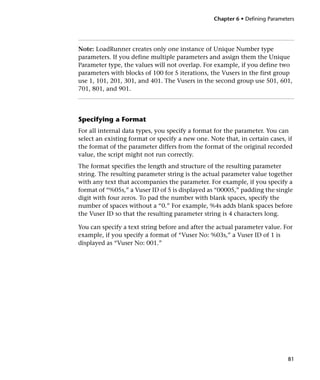
seconds.
➤ If the first iteration takes 8 seconds to complete, then the second
iteration will start 8 seconds after the first iteration began. LoadRunner
displays a message in the Execution Log to indicate that the iteration
pacing could not be achieved.
111](https://image.slidesharecdn.com/loadrunnergenerator-121007004236-phpapp01/85/Load-runner-generator-133-320.jpg)


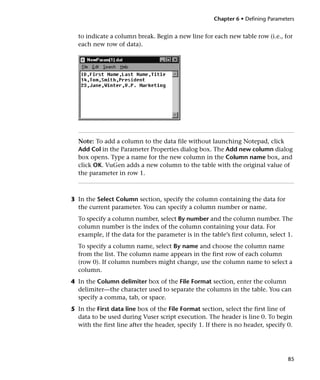
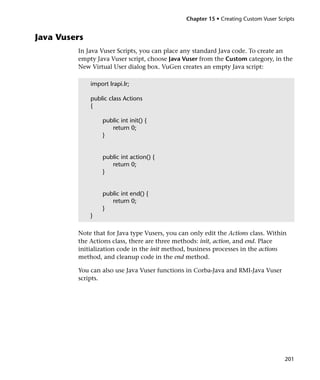
![Chapter 11 • Recording Java Language Vuser Scripts
12 Modify the parameters of the methods. If the script generation settings
DefaultValues is set to true, you can use the default values inserted by
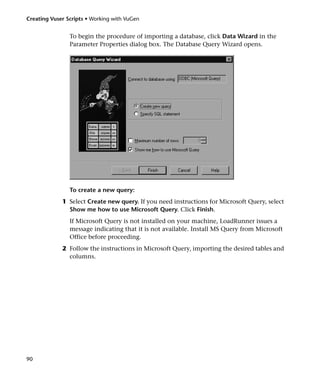
VuGen. If DefaultValues is set to false, you must add parameters for all
methods you insert into the script.
In addition, modify any return values. For example, if your script generated
the following statement “(String)=LavaVersion.getVersionId();”, replace (String)
with a string type variable.
13 Add any necessary statements to your script such as imports or LoadRunner
Java functions (described in Chapter 16, “Programming Java Scripts.”)
14 Save the script and run it from VuGen.
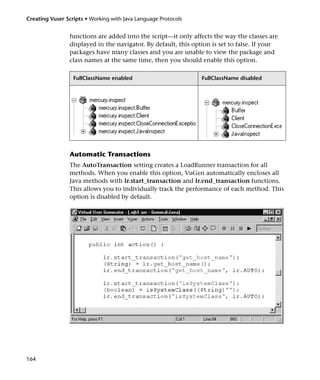
Configuring Script Generation Settings
You can customize the way the navigator adds methods to your script in the
following areas:
➤ Class Name path
➤ Automatic Transactions
➤ Default Parameter Values
➤ Class Pasting
To view the configuration setting, open the jquery.ini file in LoadRunner’s
dat directory.
[Display]
FullClassName=False
[Insert]
AutoTransaction=False
DefaultValues=True
CleanClassPaste=False
Class Name path
The FullClassName option displays the complete package and class name in
the Java Function navigator. This option does not affect the way the
163](https://image.slidesharecdn.com/loadrunnergenerator-121007004236-phpapp01/85/Load-runner-generator-185-320.jpg)
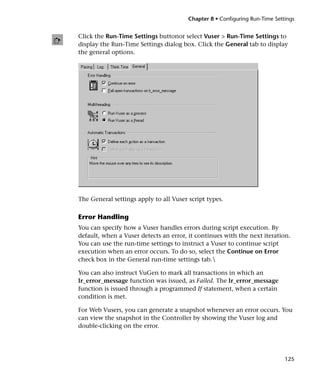
![Chapter 11 • Recording Java Language Vuser Scripts
Default Parameter Values
The DefaultValues setting includes default values for all methods you paste
into your script. This option is enabled by default and inserts a null for all
objects. If you disable this option, you must manually insert parameter
values for all functions in the script. The following table illustrates the
DefaultValues flag enabled and disabled.
DefaultValues enabled DefaultValues disabled
lr.message((String)""); lr.message((String));
lr.think_time((int)0); lr.think_time((int));
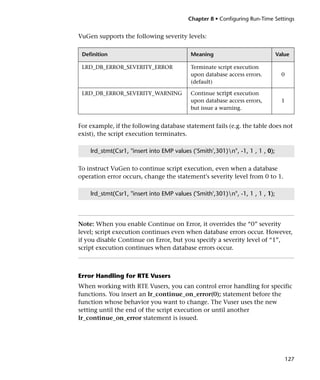
lr.enable_redirection((boolean)false); lr.enable_redirection((boolean));
lr.save_data((byte[])null, (String)""); lr.save_data((byte[]), (String));
Class Pasting
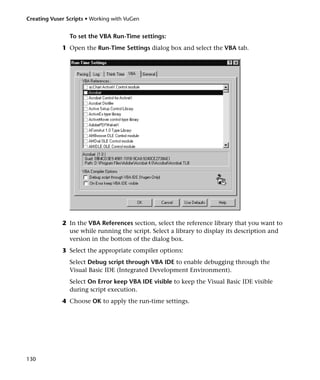
The CleanClassPaste setting pastes a class so that it will compile cleanly:
with an instance returning from the constructor, with default values as
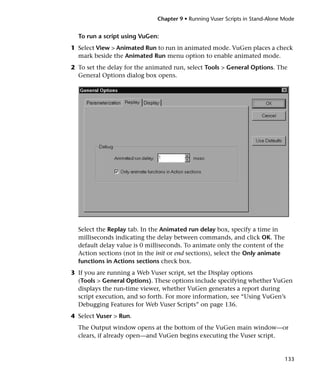
parameters, and without a need for import statements. Using this option,
you will most likely be able to run your script without any further
modifications. If you disable this option (default), you may need to
manually define parameters and include import statements. Note that this
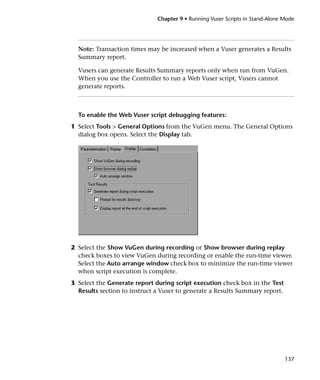
setting is only effective when you paste an entire class into your script—not
when you paste a single method.
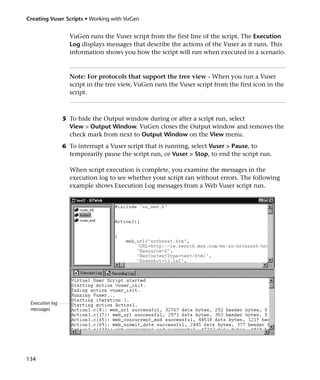
The following segment shows the toString method pasted into the script
with the CleanClassPaste option enabled.
_class.toString();
// Returns: java.lang.String
The same method with the CleanClassPaste option disabled is pasted as
follows:
(String) = toString();
165](https://image.slidesharecdn.com/loadrunnergenerator-121007004236-phpapp01/85/Load-runner-generator-187-320.jpg)


![Chapter 13 • Correlating Java Scripts
Advanced Correlation
Advanced or deep correlation refers to the automatic correlation performed
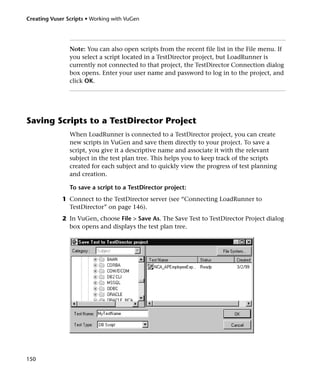
during recording for complex objects, such as object arrays and Corba
container constructs.
The deep correlation mechanism handles Corba constructs (structures,
unions, sequences, arrays, holders, ‘any’s) as containers. This allows it to
reference inner members of containers, additional objects, or different
containers. Whenever an object is invoked or passed as a parameter, it is also
compared against the inner members of the containers.
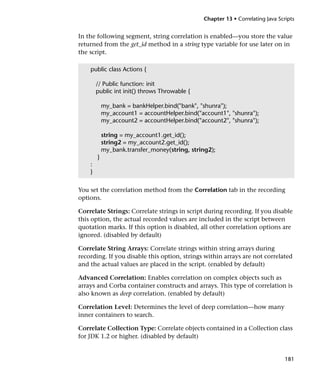
In the following example, VuGen performs deep correlation by referencing
an element of an array. The remove_account object receives an account object
as a parameter. During recording, the correlation mechanism searches the
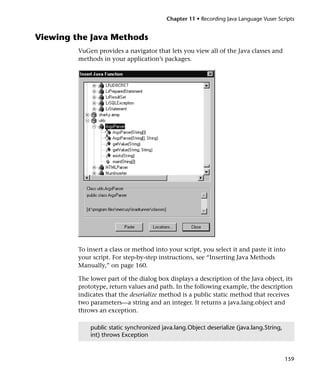
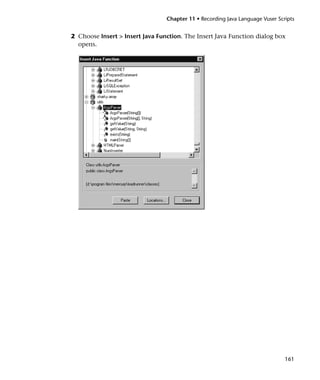
returned array my_accounts and determines that its sixth element should be
passed as a parameter.
public class Actions {
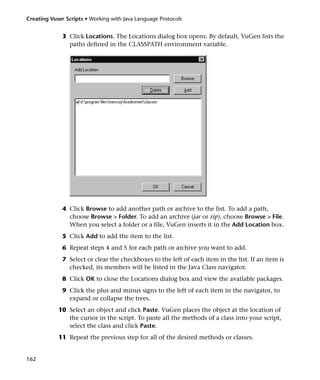
// Public function: init
public int init() throws Throwable {
my_banks[] = bankHelper.bind("banks", "shunra");
my_accounts[] = accountHelper.bind("accounts","shunra");
my_banks[2].remove_account(my_accounts[6]);
}
:
}
The following segment further illustrates enhanced correlation. The script
invokes the send_letter object that received an address type argument. The
179](https://image.slidesharecdn.com/loadrunnergenerator-121007004236-phpapp01/85/Load-runner-generator-201-320.jpg)
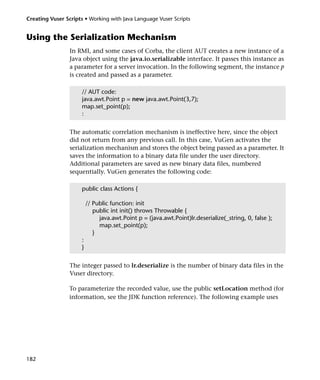
![Creating Vuser Scripts • Working with Java Language Vuser Scripts
correlation mechanism retrieves the inner member, address, in the sixth
element of the my_accounts array.
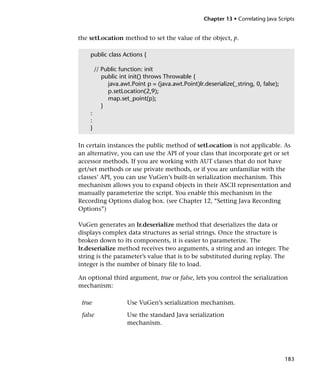
public class Actions {
// Public function: init
public int init() throws Throwable {
my_banks = bankHelper.bind("bank", "shunra");
my_accounts = accountHelper.bind("account", "shunra");
my_banks[2].send_letter(my_accounts[6].address);
}
:
}
String Correlation
String correlation refers to the representation of a recorded value as an
actual string or a variable. When you disable string correlation (the default
setting), the actual recorded value of the string is indicated explicitly within
the script. When you enable string correlation, it creates a variable for each
string, allowing you to use it at a later point in the script.
180](https://image.slidesharecdn.com/loadrunnergenerator-121007004236-phpapp01/85/Load-runner-generator-202-320.jpg)

![Chapter 13 • Correlating Java Scripts
In the following segment, a vector contains two elements.
public class Actions {
// Public function: init
public int init() throws Throwable {
_string = "java.util.Vector CURRENTOBJECT = {" +
"int capacityIncrement = "#0#" +
"int elementCount = #2#" +
"java/lang/Object elementData[] = {" +
"elementData[0] = #First Element#" +
"elementData[1] = #Second Element#" +
"elementData[2] = _NULL_" +
....
"elementData[9] = _NULL_" +
"}" +
"}";
_vector = (java.util.Vector)lr.deserialize(_string,0);
map.set_vector(_vector);
}
:
}
185](https://image.slidesharecdn.com/loadrunnergenerator-121007004236-phpapp01/85/Load-runner-generator-207-320.jpg)
![Creating Vuser Scripts • Working with Java Language Vuser Scripts
In the following example, one of the vector’s elements was changed—a
"_NULL_" value was changed to "Third element". In coordination with the
addition of the new element, the "elementCount" member was modified to
"3".
public class Actions {
// Public function: init
public int init() throws Throwable {
_string = "java.util.Vector CURRENTOBJECT = {" +
"int capacityIncrement = "#0#" +
"int elementCount = #3#" +
"java/lang/Object elementData[] = {" +
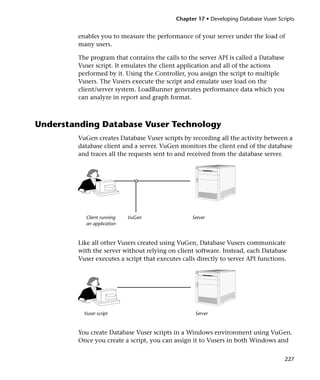
"elementData[0] = #First Element#" +
"elementData[1] = #Second Element#" +
"elementData[2] = #Third Element#" +
....
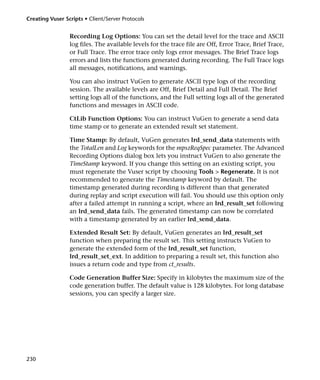
"elementData[9] = _NULL_" +
"}" +
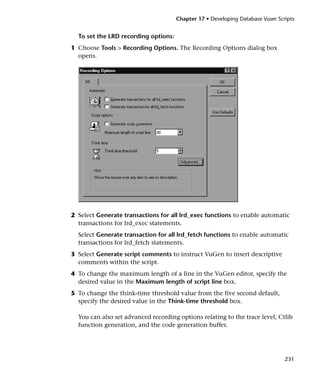
"}";
_vector = (java.util.Vector)lr.deserialize(_string,0);
map.set_vector(_vector);
}
:
}
Due to the complexity of the serialization mechanism, which opens up the
objects to ASCII representation, opening large objects while recording may
increase the time required for script generation. To decrease this time, you
can specify flags which will improve the performance of the serialization
mechanism.
When adding lr.deserialize to your script, it is recommended that you add it
to the init method—not the action method. This will improve performance
since VuGen will only deserialize the strings once. If it appears in the action
method, VuGen would deserialize strings for every iteration.
186](https://image.slidesharecdn.com/loadrunnergenerator-121007004236-phpapp01/85/Load-runner-generator-208-320.jpg)


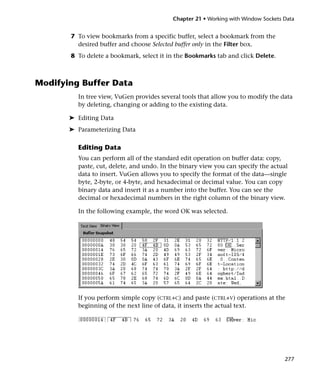


![Creating Vuser Scripts • Client/Server Protocols
In the default settings, long and short formats are set, and a dot is specified
for non-printable characters.
[BufferFormats]
LongBufferFormat=nnnnnnnn XX XX XX XX XX XX XX XX XX XX XX
XX XX XX XX XX aaaaaaaaaaaaaaaarn
LongBufferHeader=
LongBufferFooter=
ShortBufferFormat=ASCII:ttt%arnttNetwork OrderttLittle
Endianrntt (Big Edian)rnHex:tt%BXtt%LXrnOc-
tal:tt%BOtt%LOrnDecimal:t%BDtt%LDrn
AnyBufferHeader=
AnyBufferFooter=----------------------------------------------------------------------
rn
NonPrintableChar=.
PrintAllAscii=0
The default LongBufferFormat is displayed as:
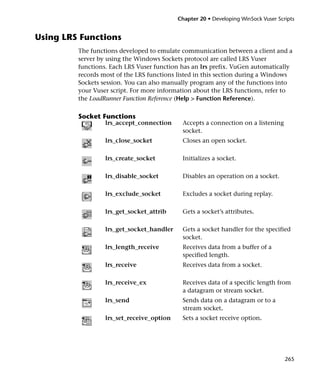
Offset Hexadecimal representation ASCII format
The default ShortBufferFormat is displayed as:
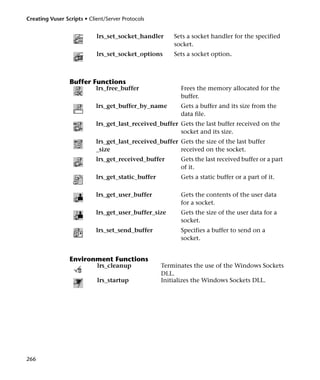
290](https://image.slidesharecdn.com/loadrunnergenerator-121007004236-phpapp01/85/Load-runner-generator-312-320.jpg)
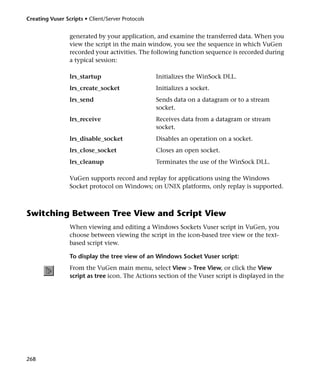
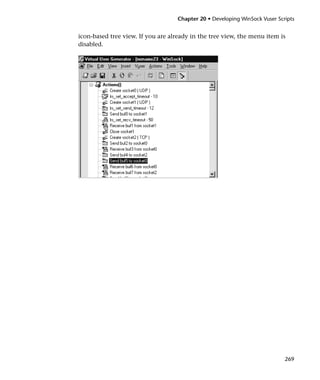
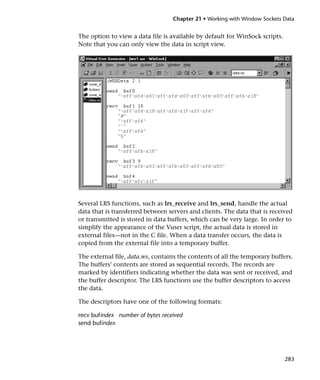
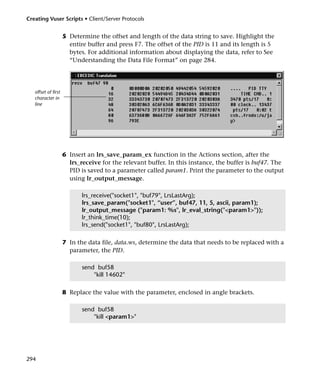
![Chapter 21 • Working with Window Sockets Data
In the following example, a user performed a telnet session. The user used a
ps command to determine the process ID (PID), and killed an application
based on that PID.
frodo:/u/jay>ps
PID TTY TIME CMD
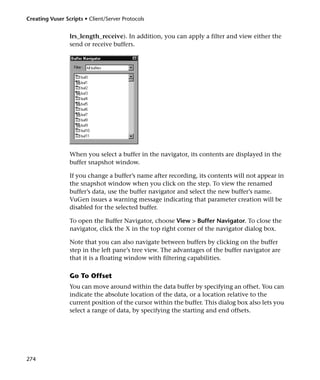
14602 pts/18 0:00 clock
14569 pts/18 0:03 tcsh
frodo:/u/jay>kill 14602
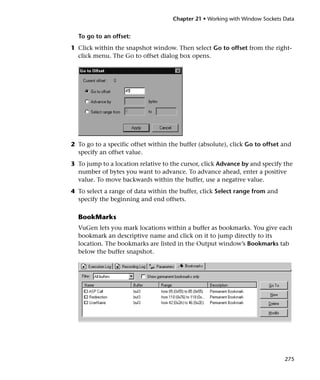
[3] Exit 1 clock
frodo:/u/jay>
During execution, the PID of the procedure is different (UNIX assigns
unique PIDs for every execution), so killing the recorded PID will be
ineffective. To overcome this problem, use lrs_save_param_ex to save the
current PID to a parameter. Replace the constant with the parameter.
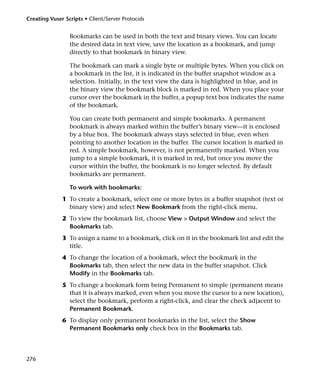
3 In the data.ws file, determine the buffer in which the data was received,
buf47.
recv buf47 98
"r"
"x00"
"rn"
" PID TTY TIME CMDrn"
" 14602 pts/18 0:00 clockrn"
" 14569 pts/18 0:02 tcshrn"
"frodo:/u/jay>"
.
.
.
send buf58
"kill 14602"
4 In the Actions section, determine the socket used by buf47. In this example
it is socket1.
lrs_receive("socket1", "buf47", LrsLastArg);
293](https://image.slidesharecdn.com/loadrunnergenerator-121007004236-phpapp01/85/Load-runner-generator-315-320.jpg)


![Creating Vuser Scripts • E-Business Protocols
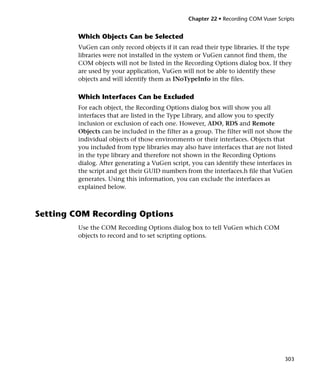
Working with FTP Functions
You can indicate the programming language in which to create a Vuser
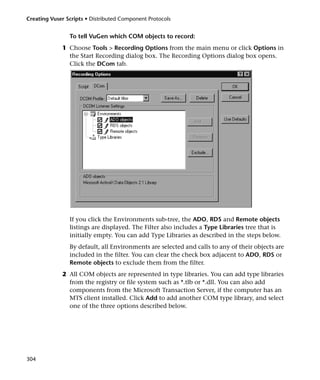
script —either C or Visual Basic scripting. For more information, see
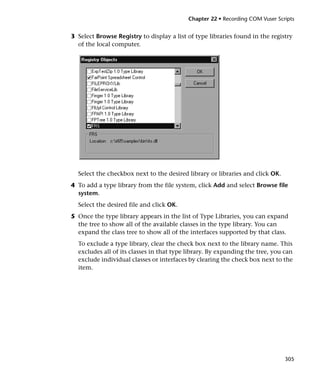
Chapter 4, “Setting the Script Type Recording Options.” The following
section describes the functions that are generated for C language type
Virtual User scripts.
FTP Vuser script functions record the File Transfer Protocol (FTP). Each FTP
function begins with an ftp prefix. For detailed syntax information on these
functions, see the LoadRunner Function Reference (Help > Function Reference).
Most FTP functions come in pairs—one for global sessions and one where
you can indicate a specific mail session. To apply the action to all sessions,
use the version without the ex suffix. To apply the action to a specific
session, use the version with the session identifier with the ex suffix. For
example, ftp_logon logs on to the FTP server globally, while ftp_logon_ex
logs on to the FTP server for a specific session.
Function Name Description
ftp_delete[_ex] Deletes a file from an FTP server.
ftp_dir[_ex] Runs the dir command on the FTP server.
ftp_get[_ex] Gets a file from an FTP server.
ftp_get_last_error Retrieves the last error received from the FTP server.
ftp_get_last_error_id Retrieves the ID of the last error that was received
from the FTP server.
ftp_logon[_ex] Performs a logon to an FTP server.
ftp_logout[_ex] Performs a logout from an FTP server.
ftp_mkdir[_ex] Creates a directory on the FTP server machine.
ftp_put[_ex] Puts a file on an FTP server.
ftp_rendir[_ex] Renames a directory on the FTP server machine.
ftp_rmdir[_ex] Deletes a directory on the FTP server machine.
356](https://image.slidesharecdn.com/loadrunnergenerator-121007004236-phpapp01/85/Load-runner-generator-378-320.jpg)

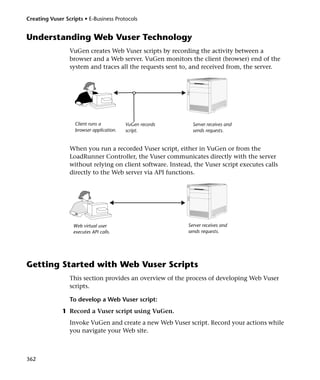
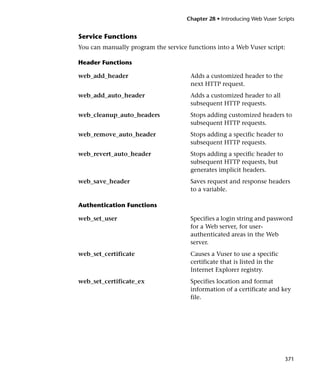
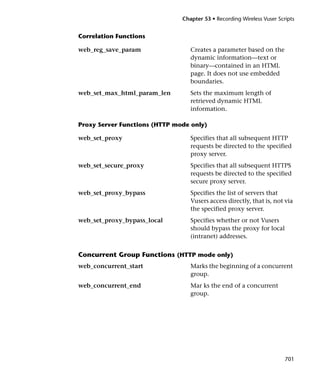
![Chapter 28 • Introducing Web Vuser Scripts
Correlation Functions
web_create_html_param Saves dynamic information on an
HTML page to a parameter.
web_create_html_param[_ex] Creates a parameter based on the
dynamic information contained in
an HTML page - uses embedded
boundaries.
web_reg_save_param Creates a parameter based on the
dynamic information contained in
an HTML page - does not use
embedded boundaries.
web_set_max_html_param_len Sets the maximum length of
retrieved dynamic HTML
information.
Proxy Server Functions
web_set_proxy Specifies that all subsequent HTTP
requests be directed to the specified
proxy server.
web_set_secure_proxy Specifies that all subsequent HTTPS
requests be directed to the specified
secure proxy server.
web_set_proxy_bypass Specifies the list of servers that
Vusers access directly, that is, not via
the specified proxy server.
web_set_proxy_bypass_local Specifies whether or not Vusers
should bypass the proxy for local
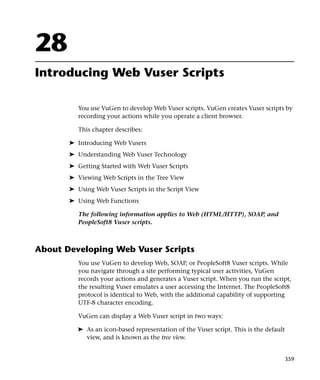
(intranet) addresses.
373](https://image.slidesharecdn.com/loadrunnergenerator-121007004236-phpapp01/85/Load-runner-generator-395-320.jpg)


![Creating Vuser Scripts • E-Business Protocols
Matching Any Single Character
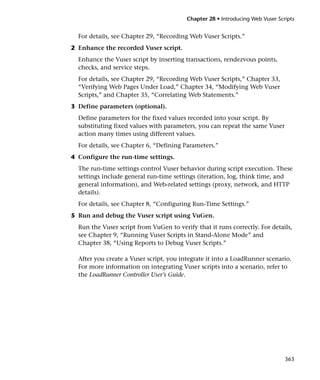
A question mark (?) instructs VuGen to search for any single character. For
example,
welcome?
matches welcomes, welcomed, or welcome followed by a space or any other
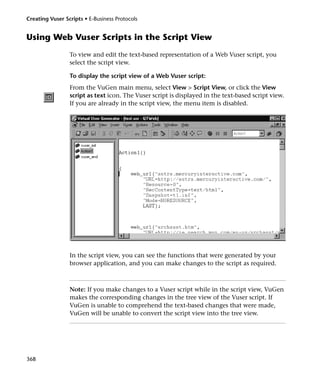
single character. A series of question marks indicates a sequence of
unspecified characters. The length of the sequence is equal to the number of
periods.
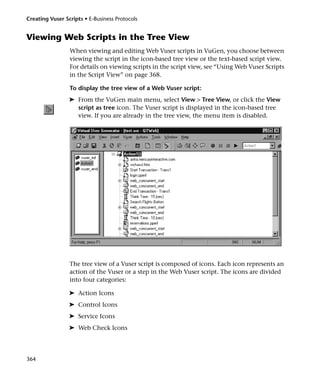
Matching Any Single Character within a Range
In order to match a single character within a range, you can use square
brackets ([ ]). For example, to search for a date that is either 1968 or 1969,
write:
196[89]
You can use a hyphen (-) to indicate an actual range. For instance, to match
any year in the 1960s, write:
196[0-9]
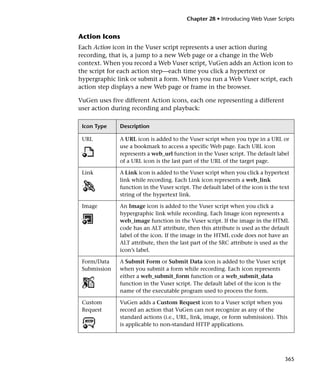
A hyphen does not signify a range if it appears as the first or last character
within brackets, or after a caret (^).
A caret (^) instructs VuGen to match any character except for the ones
specified in the string. For example:
[^A-Za-z]
matches any non-alphabetic character. The caret has this special meaning
only when it appears first within the brackets.
Note that within brackets, the following characters are literal:
period (.)
asterisk (*)
452](https://image.slidesharecdn.com/loadrunnergenerator-121007004236-phpapp01/85/Load-runner-generator-474-320.jpg)
![Chapter 33 • Verifying Web Pages Under Load
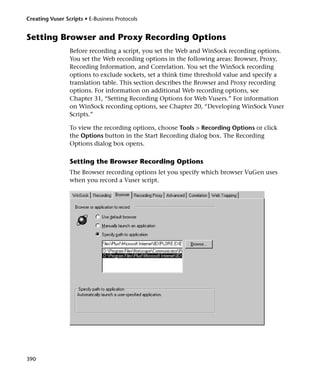
left bracket ([)
backslash ()
If the right bracket is the first character in the range, it is also literal. For
example:
[]g-m]
matches the right bracket, and g through m.
Matching One or More Specific Characters
An asterisk (*) instructs VuGen to match zero or more occurrences of the
preceding character. For example:
Q*
causes VuGen to match Q, QQ, QQQ, and so forth.
453](https://image.slidesharecdn.com/loadrunnergenerator-121007004236-phpapp01/85/Load-runner-generator-475-320.jpg)

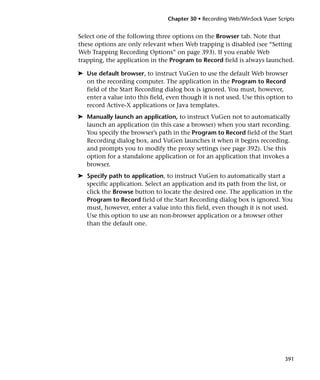
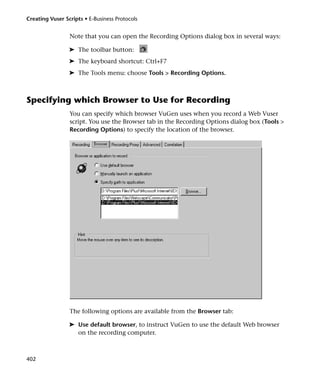
![Creating Vuser Scripts • E-Business Protocols
Adding Binary Data
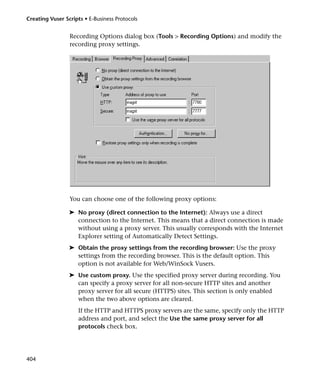
To include binary coded data in the body of a Web request, use the
following format:
x[char1][char2]
This represents the hexadecimal value that is represented by [char1][char2].
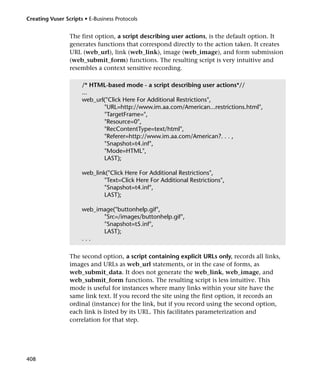
For example, x24 is 16*2+4=36, is a $ sign, and x2B is a + sign.
Do not use single-character hexadecimal sequences. For example, x2 is not
a valid sequence but x02 is.
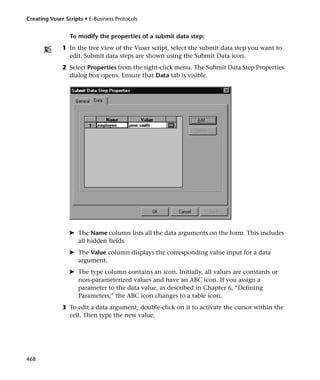
Adding a Step to a Web Vuser Script
In addition to the steps that VuGen records during the Web browser
recording session, you can add steps to a recorded script.
To add a step to a Web Vuser script:
1 In the tree view of the Vuser script, select the step before or after which you
want to add the new step.
456](https://image.slidesharecdn.com/loadrunnergenerator-121007004236-phpapp01/85/Load-runner-generator-478-320.jpg)


![Chapter 39 • Power User Tips for Web Vusers
➤ The certificate that is issued is not for the site to which the user is
connecting.
➤ The certificate is issued by an unknown authority.
These security violations cause the recording browser to display the pop-up
warnings messages.
If you are using Netscape 3.0 or higher, or Internet Explorer 4.0 or higher,
then you have the option of ignoring these warnings. You can safely ignore
the messages.
Note: The pop-up messages appear only when you record the script, not
when you execute it.
You can suppress some of the pop-up messages—not all of them.
Question 4: I am using a Web application other than IE and Netscape.
When I access a secure site without a recognized certificate, the application
automatically aborts. Can I record this application?
Answer: When you access a secure site without a recognized certificate, IE
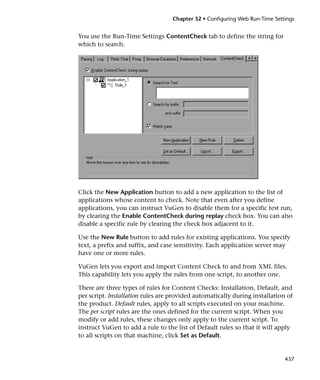
and Netscape issue a warning. Certain browsers and applications do not
issue a warning for unrecognized certificates—they simply exit the secure
site. To record these sites you must obtain the pem file(s) of the certificate
and key, and add it to the certs directory under LoadRunner/bin. List the pem
files to the index.txt file in a format similar to the existing entries: a section
name with the hostname and port followed by the name of the pem file(s).
[demoserver:443]
Certfile=xxx.pem
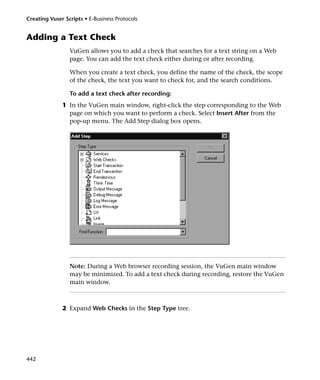
Keyfile=yyy.pem
Question 5: Does VuGen support 128-bit encryption?
Answer: Yes, but you must install a US-only version of Internet Explorer on
the recording machine and on any load generators that run the Vuser
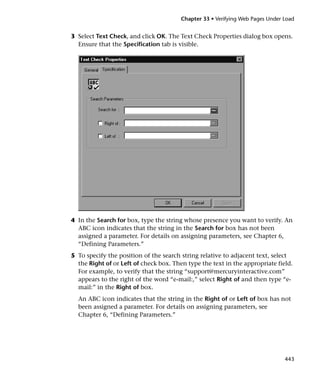
scripts. Both Netscape and Internet Explorer use 40-bit encryption keys in
the international versions of their browsers.
521](https://image.slidesharecdn.com/loadrunnergenerator-121007004236-phpapp01/85/Load-runner-generator-543-320.jpg)

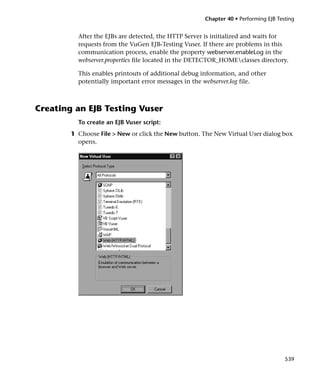
![Chapter 40 • Performing EJB Testing
server or on the client machine (in this case, make sure to mount to the
application server from the EJB Detector (client) machine, specify the
mount directory in the search root directory, and change the generated
script to connect to the mounted machine, instead of the local machine).
The EJB Detector can run from the command-line, or from a batch file.
To run the EJB Detector from the command line:
1 Before running the EJB Detector from the command line, add the
DETECTOR_HOMEclasses and the DETECTOR_HOMEclassesxerces.jar to
the CLASSPATH environment variable.
2 If you are working with EJB1.0 (Weblogic 4.x, WebSphere 3.x), add the
classes of EJBs that are being tested as well as the following vendor EJB
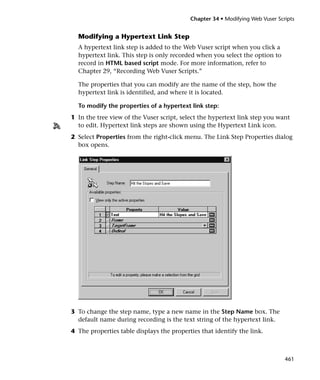
classes to the CLASSPATH:
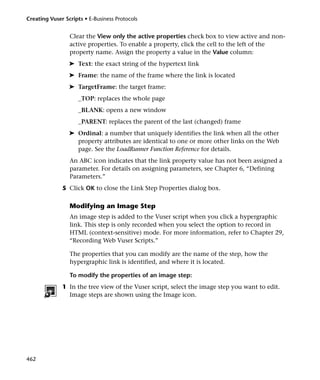
For WebLogic 4.x: <WebLogic directory>libweblogicaux.jar
For WebSphere 3.x: <WebSphere directory>libujc.jar
3 If your EJBs use additional classes directory or .jar files, add them to the
CLASSPATH.
4 To run the EJB Detector from the command-line, use the following string:
java EJBDetector [search root dir] [listen port]
535](https://image.slidesharecdn.com/loadrunnergenerator-121007004236-phpapp01/85/Load-runner-generator-557-320.jpg)
![Creating Vuser Scripts • Enterprise Java Bean Protocols
4 Run the EJB_Detector.cmd or EJB_Detector.sh (Unix platforms) batch file to
collect information about the deployable applications containing EJBs, for
example:
C:>EJB_Detector [listen_port]
where listen_port is an optional argument specifying a port number on
which the EJB Detector will listen for incoming requests (default is 2001).
EJB Detector Output and Log Files
You can examine the output of the EJB Detector to see if it has detected all
the active EJBs. The output log shows the paths being checked for EJBs. At
the end of the scan, it displays a list of the EJBs that were found, their names
and locations.
For Example:
Checking EJB Entry: f:/weblogic/myserver/ejb_basic_beanManaged.jar .....
Checking EJB Entry: f:/weblogic/myserver/ejb_basic_statefulSession.jar .....
Checking EJB Entry: f:/weblogic/myserver/ejb_basic_statelessSession.jar .....
------------------------- Found 3 EJBs ---------------------------
** PATH: f:/weblogic/myserver/ejb_basic_beanManaged.jar
- BEAN: examples.ejb.basic.beanManaged.AccountBean
** PATH: f:/weblogic/myserver/ejb_basic_statefulSession.jar
- BEAN: examples.ejb.basic.statefulSession.TraderBean
** PATH: f:/weblogic/myserver/ejb_basic_statelessSession.jar
- BEAN: examples.ejb.basic.statelessSession.TraderBean
If no EJBs were detected (that is, "Found 0 EJBs"), check that the EJB jar files
are listed in the "Checking EJB Entry: ..." lines. If they are not listed, check
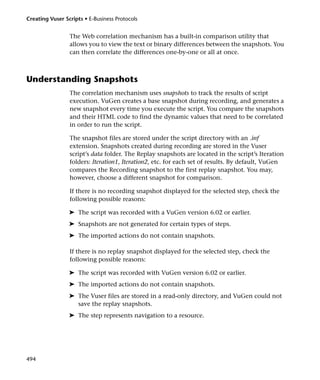
that the search root dir path is correct. If they are being inspected but still no
EJBs are detected, check that these EJB jar files are deployable (can be
successfully deployed into an application server). A deployable jar file
should contain the Home Interface, Remote Interface, Bean
implementation, the Deployment Descriptor files (xml files, or .ser files),
and additional vendor-specific files.
If you still encounter problems, set the debug properties in the
detector.properties file, located in the DETECTOR_HOMEclasses directory, to
retrieve additional debug information.
538](https://image.slidesharecdn.com/loadrunnergenerator-121007004236-phpapp01/85/Load-runner-generator-560-320.jpg)
![Creating Vuser Scripts • Enterprise Java Bean Protocols
For Entity Beans - use the findByPrimaryKey method to locate the EJB
instance in an existing database, and if not found, then use the create
method, to create it there.
In the following example, the script attempts to locate an instance for the
account EJB, and if it fails then creates it.
// find Bean instance
try {
com.ibm.ejs.doc.account.AccountKey _accountkey = new
com.ibm.ejs.doc.account.AccountKey();
_accountkey.accountId = (long)0;
lr.start_transaction("findByPrimaryKey");
_account = _accounthome.findByPrimaryKey(_accountkey);
lr.end_transaction("findByPrimaryKey", lr.AUTO);
} catch (Throwable thr) {
lr.end_transaction("findByPrimaryKey", lr.FAIL);
lr.message("Couldn't locate the EJB object using a primary key.
Attempting to manually create the object... ["+thr+"]");
// create Bean instance
try {
lr.start_transaction("create");
_account = _accounthome.cre-
ate((com.ibm.ejs.doc.account.AccountKey)null);
lr.end_transaction("create", lr.AUTO);
} catch (Throwable t) {
lr.end_transaction("create", lr.FAIL);
t.printStackTrace();
}
}
546](https://image.slidesharecdn.com/loadrunnergenerator-121007004236-phpapp01/85/Load-runner-generator-568-320.jpg)
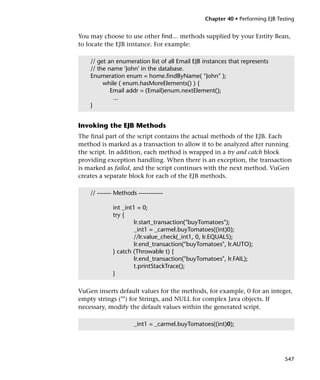
![Creating Vuser Scripts • Enterprise Java Bean Protocols
The following example shows how to change the default value of a non-
primitive type using parameterization:
Detail details = new Details(<city>,<street>,<zip>,<phone>);
JobProfile job = new JobProfile(<department>,<position>,<job_type>);
Employee employee=new Employee(<first>,<last>, details, job, <salary>);
_int1 = _empbook.addEmployee((Employee)employee);
For methods that return a primitive, non-complex value or string, VuGen
inserts a commented method lr.value_check. This LoadRunner method
allows you to specify an expected value for the EJB method. To use this
verification method, remove the comment marks (//) and specify the
expected value. For example, the carmel.buyTomatoes method returns an
integer.
_int1 = _carmel.buyTomatoes((int)0);
//lr.value_check(_int1, 0, lr.EQUALS);
If you expect the method to return a value of 500, modify the code as
follows
_int1 = _carmel.buyTomatoes((int)0);
lr.value_check(_int1, 500, lr.EQUALS);
If you want to check if the method does not return a certain value, modify
the code as follows:
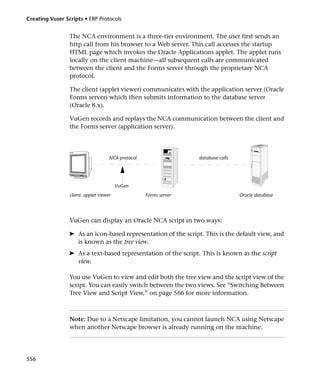
_int1 = _carmel.buyTomatoes((int)0);
lr.value_check(_int1, 10, lr.NOT_EQUALS);
If the expected value is not detected, an exception occurs and the
information is logged in the output window.
System.err: java.lang.Exception: lr.value_check failed.[Expected:500 Actual:5000]
548](https://image.slidesharecdn.com/loadrunnergenerator-121007004236-phpapp01/85/Load-runner-generator-570-320.jpg)

![Creating Vuser Scripts • ERP Protocols
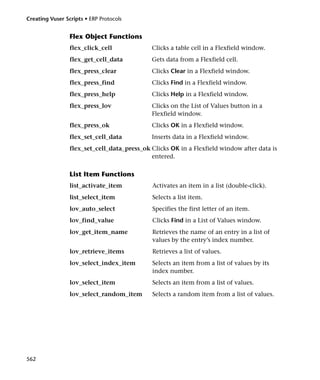
Recording Guidelines
When you record an Oracle NCA Vuser script, follow these guidelines:
➤ To enable VuGen to record the names of NCA objects, you must configure
the application server to provide additional data. Edit the startup.html file
that is called when the applet viewer begins. Locate the code:
<PARAM “Vuser Script Sections,” on page 24serverArgs ............
fndnam=APPS”>
and add the Oracle key “record=names”:
<PARAM name="serverArgs ............ fndnam=APPS record=names">
If you do not have access to the startup.html file, or on servers that run CGI
scripts with NCA objects, add "?record=names" at the end of the URL. For
example, replace the original URL,
<http://OracleApps>
with
<http://OracleApps?record=names>.
Note: This only works if the startup HTML file doe not reference another file
while loading.
➤ By default, LoadRunner uses forms 6 support for Oracle NCA replay. To
change the replay to forms 4.5 support, set the following in the mdrv.dat file:
[Oracle_NCA]
ExtPriorityType=protocol
WINNT_EXT_LIBS=ncarp110.dll
WIN95_EXT_LIBS=ncarp110.dll
LINUX_EXT_LIBS=liboranca.so
SOLARIS_EXT_LIBS=liboranca.so
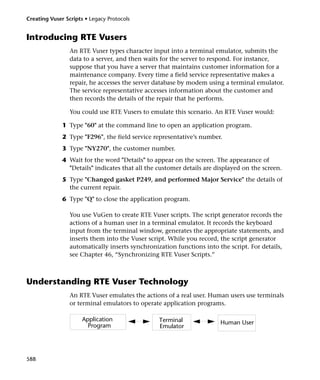
558](https://image.slidesharecdn.com/loadrunnergenerator-121007004236-phpapp01/85/Load-runner-generator-580-320.jpg)

![Chapter 41 • Creating Oracle NCA Vuser Scripts
To enable multi-protocol recording, locate the vugen.ini file in the Windows
folder. Add the following line to the General section:
[GENERAL]
EnableMulti=1
Testing Secure Oracle NCA Applications
For testing secure sites that use HTTPS with Oracle NCA, you must work
with the multi-protocol mode.
When selecting the protocols to record, only select Oracle NCA—not Web
Protocol from the protocol list. VuGen records the security information
internally and therefore does not need the explicit Web functions.
If you encounter problems when replaying an NCA HTTPS script during the
connect_server command, insert the following function at the beginning of
the script.
web_set_sockets_option(“SSL_VERSION”,”3”);
Before recording HTTPS, you must disable the protocol dependency option.
This instructs VuGen not to record Web functions that are implicitly called
by Oracle NCA actions.
569](https://image.slidesharecdn.com/loadrunnergenerator-121007004236-phpapp01/85/Load-runner-generator-591-320.jpg)
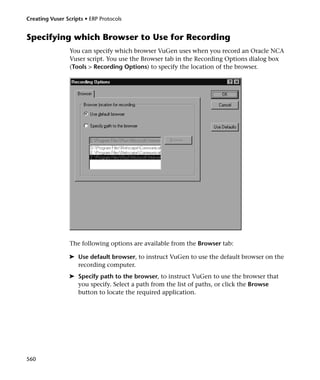
![Chapter 41 • Creating Oracle NCA Vuser Scripts
In certain tests, such as those performed on Oracle Configurator
applications, information returned by one function is required throughout
the session. VuGen automatically saves the dynamic information to a
parameter, by inserting a web_reg_save_param function into the script. In
the following example, the connection information is saves to a parameter
called NCAJServSessionID.
web_url("f60servlet",
"URL=http://usscifforms05.sfb.na.abnamro.com/servlet/f60servlet?config=mult",
LAST);
web_reg_save_param ("NCAJServSessionId", "LB=rnrn", "RB=r",
LAST);
Before recording, make sure to servlet recording in VuGen. Locate the
vugen.ini file in the Windows folder and make the following change:
[HttpConnectMode]
RelativeURL=<NCAJServSessionId>
UseServletMode=1
For testing servlets (and all testing objectives, except HTTPS) you need to
enable the generation of Web functions. You can enable the generation of
Web functions in one of the following ways:
Multi-protocol: When selecting Create virtual user script to record multiple
protocols in the New Virtual User dialog box, choosing both Oracle NCA
and Web.
Single protocol: When selecting Create virtual user script to record single
protocol or Create virtual user script to record multiple protocols in the
New Virtual User dialog box, choosing only Oracle NCA. When recording in
this mode, you must enable the scripting option that allows the generation
of protocol dependent functions.
To enable the generation of protocol dependent functions:
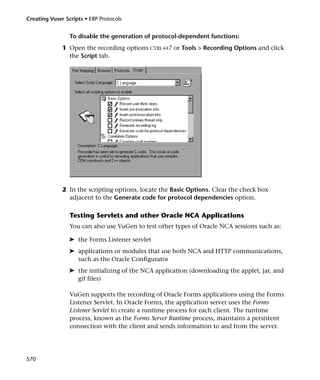
1 Open the recording options CTRL+F7 or Tools > Recording Options and select
the Script tab.
2 In the scripting options, locate the Basic Options. Select the check box
adjacent to the Generate code for protocol dependencies option.
571](https://image.slidesharecdn.com/loadrunnergenerator-121007004236-phpapp01/85/Load-runner-generator-593-320.jpg)


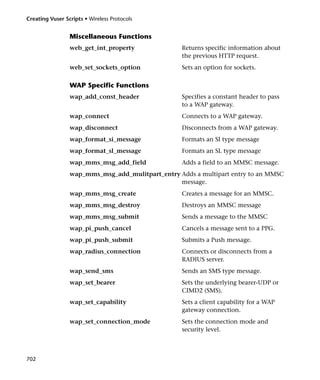
![Creating Vuser Scripts • ERP Protocols
Miscellaneous Functions
wait Causes test execution to pause for a specified
amount of time.
You can further enhance your script with general Vuser functions such as
lr_output_message and lr_rendezvous. For information on the Vuser
functions, refer to the LoadRunner Function Reference.
Creating a Baan Vuser Script
After you create a Baan template, you begin recording user actions.
To create a new Baan Vuser script:
1 Select the vuser_init section, in order to record the login procedure into that
section.
2 Click the Record button and specify the location of the Baan application in
the Start Recording dialog box.
3 Switch to the Actions section and record typical user actions.
4 Insert Baan Vuser functions for think time, handling exceptions, and setting
timeouts.
set_think_time(MINTHINK,MAXTHINK);
set_window ("Menu browser [User: bsp ] [812]", 10);
menu_select_item ("File;Run Program...");
...
5 Add transactions to the script. Choose Insert > Start Transaction to specify
the beginning of a transaction, and Insert > End Transaction to specify the
end of a transaction.
lr_start_transaction("all_str_ses");
button_press0 ("F1_OK");
set_window ("tdpur4101m000 : Maintain Purchase Orders [812]", 300);
lr_end_transaction("all_str_ses", LR_PASS);
580](https://image.slidesharecdn.com/loadrunnergenerator-121007004236-phpapp01/85/Load-runner-generator-602-320.jpg)
![Chapter 42 • Creating Baan Vuser Scripts
6 Use the Insert menu to add rendezvous points, comments or messages to the
script.
7 Parameterize your script. Click the string (in quotation marks) that you
want to replace with a parameter, perform a right-click and choose Replace
with Parameter. For more information see Chapter 6, “Defining
Parameters.”
8 Set the appropriate run-time settings for iterations and logging.
9 Save the script and run it from VuGen.
Understanding Baan Vuser Scripts
The recorded script shows all the actions performed by the user during
recording. The Context Sensitive functions show all the actions performed on
the application’s objects. In the following example, VuGen recorded the
focus to a window, the selection of a menu item, and the clicking of a
button. In addition, a transaction was marked to analyze the time it takes
for the object Form1 to become in focus.
set_window ("tccom1501m000 : Display Customers [550]", 30);
menu_select_item ("Edit;Find... Ctrl+F");
set_window ("Display Customers - Find", 300);
type ("100004");
lr_start_transaction("rses_find");
button_press0 ("F1_OK");
set_window ("tccom1501m000 : Display Customers [550]", 30);
obj_wait_info("Form 1","focused","1",100);
lr_end_transaction("rses_find", LR_PASS);
581](https://image.slidesharecdn.com/loadrunnergenerator-121007004236-phpapp01/85/Load-runner-generator-603-320.jpg)
![Creating Vuser Scripts • ERP Protocols
You can add control flow logic to create loops within your script, instead of
performing an iteration on the entire script.
for (loop = 0 ; loop < READLOOP; loop++)
{
set_window ("tccom1501m000 : Display Customers [550]", 30);
menu_select_item ("Edit;Find... Ctrl+F");
set_window ("Display Customers - Find", 300);
type ("100004");
lr_start_transaction("rses_find");
button_press0 ("F1_OK");
set_window ("tccom1501m000 : Display Customers [550]", 30);
obj_wait_info("Form 1","focused","1",100);
lr_end_transaction("rses_find", LR_PASS);
....
Note that you may need to parameterize statements, in order to avoid
duplicating data to a database. For more information, see Chapter 6,
“Defining Parameters.”
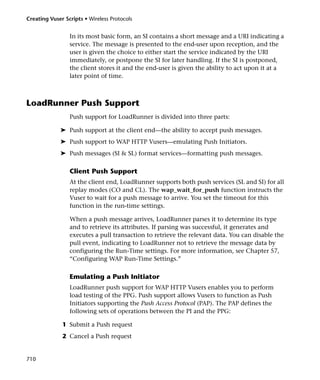
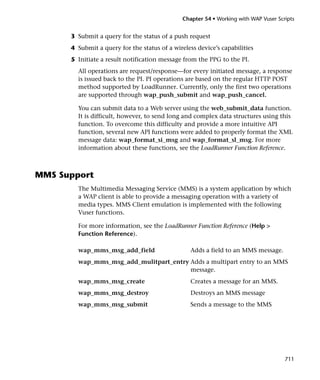
Customizing Baan Vuser Scripts
You can view and edit your script from within VuGen at any time. You can
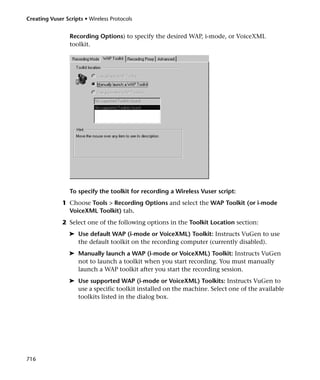
use the Baan-specific functions to customize the script execution in the
following areas:
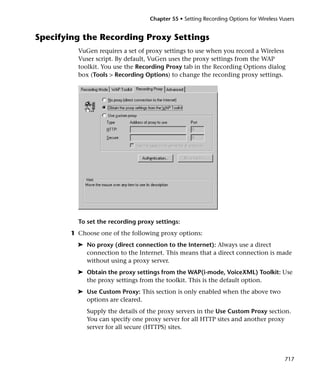
➤ Think Time
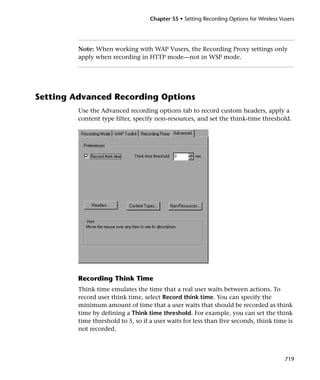
➤ Handling Exceptions
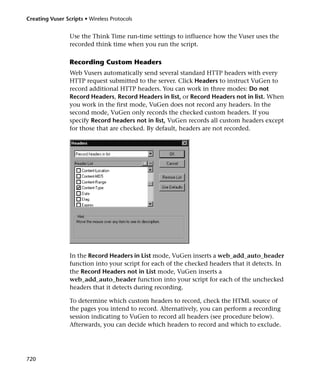
➤ Setting Timeouts
Think Time
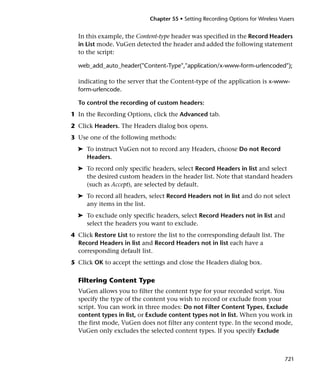
You can set the think time range for script execution. The think time
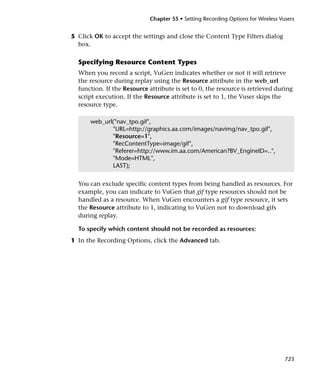
emulates the work pattern of an actual user—the time the user pauses
between actions. You set the beginning and end of a think time range using
the set_think_time function. After each statement the Vuser pauses for the
duration of the think time, a random value within the specified range.
582](https://image.slidesharecdn.com/loadrunnergenerator-121007004236-phpapp01/85/Load-runner-generator-604-320.jpg)
![Chapter 42 • Creating Baan Vuser Scripts
If your desired think time range is constant throughout the script, you can
define the beginning and end ranges as constants as shown in the example
below.
In the following example, the think time range was set from 500 to 1000
milliseconds:
#define MINTHINK 500
#define MAXTHINK 1000
int LR_FUNC Actions(LR_PARAM p)
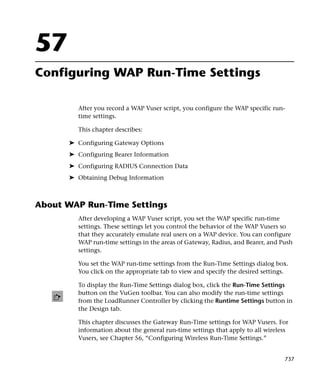
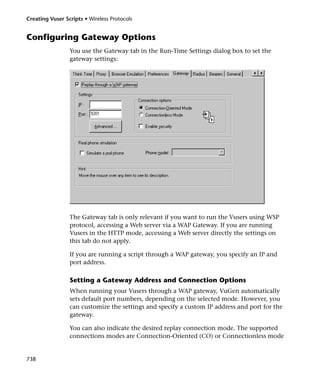
{
set_think_time(MINTHINK,MAXTHINK);
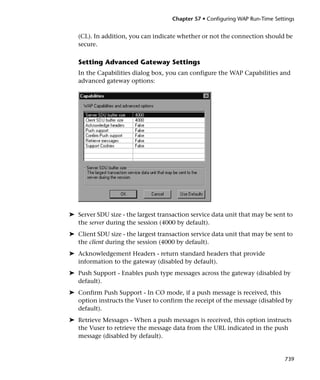
set_window ("Menu browser [User: bsp ] [812]", 10);
...
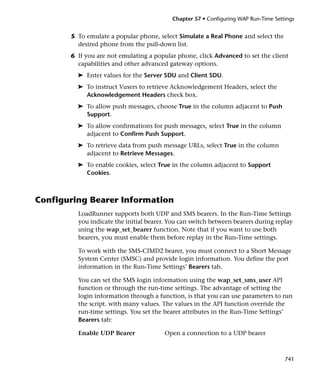
Handling Exceptions
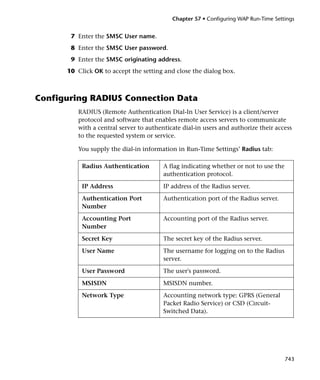
You can instruct a Baan Vuser how to handle exceptions that occur during
replay, such as a message or error windows.
Using the set_exception function, you specify a function to be executed
when the exception is encountered.
In the following example, the set_exception function instructs the Vuser to
execute the close function when the Print Sales Invoices window opens. The
close function is defined earlier in the script.
int close(char title[])
{
win_close(title);
}
Actions( )
{
set_exception("ttstps0014 : Print Sales Invoices",close);
set_window ("Menu browser [User: bsp ] [812]", 10);
menu_select_item ("File;Run Program...");
set_window ("ttdsk2080m000 : Run Program [812]", 10);
type ("tdsls4101m000");
...;
583](https://image.slidesharecdn.com/loadrunnergenerator-121007004236-phpapp01/85/Load-runner-generator-605-320.jpg)
![Creating Vuser Scripts • ERP Protocols
Setting Timeouts
You can set the default timeout period for your functions. This timeout is
applied to all functions using synchronization, such as obj_wait_info,
win_wait_info, etc.
In functions containing a parameter specifying a timeout period (such as
set_window), the specified timeout overrides the default timeout.
button_press ("F3_Continue");
win_wait_info("ttstpsplopen : Select Device [000]","displayed","0",10);
584](https://image.slidesharecdn.com/loadrunnergenerator-121007004236-phpapp01/85/Load-runner-generator-606-320.jpg)


![Chapter 44 • Recording RTE Vuser Scripts
You set the typing style using the TE_typing_style function. The syntax of
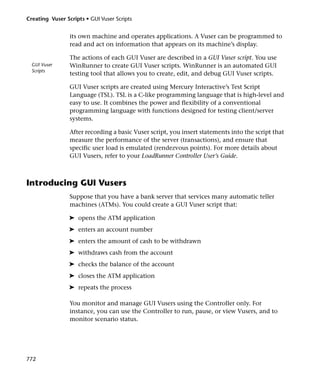
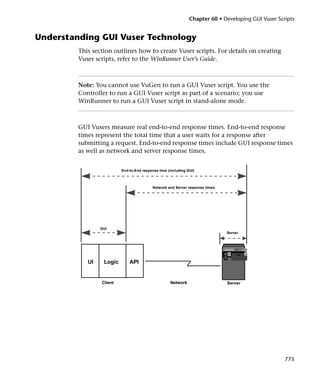
the TE_typing_style function is:
int TE_typing_style (char *style );
where style can be FAST or HUMAN. The default typing style is HUMAN. If
you select the HUMAN typing style, the format is:
HUMAN, delay [,first_delay]
The delay indicates the interval (in milliseconds) between keystrokes. The
optional parameter first_delay indicates the wait (in milliseconds) before
typing the first character in the string. For example,
TE_typing_style ("HUMAN, 100, 500");
TE_type ("ABC");
means that the Vuser will wait 0.5 seconds before typing the letter A; it will
then wait 0.1 seconds before typing “B” and then a further 0.1 seconds
before typing “C”.
For more information about the TE_typing_style function and its
conventions, refer to the LoadRunner Function Reference (Help > Function
Reference).
In addition to setting the typing style by using the TE_typing_style
function, you can also use the run-time settings. For details, see
“Configuring RTE Run-Time Settings,” on page 611.
Generating Unique Device Names
Some protocols, such as APPC, require a unique device name for each
terminal that logs on to the system. Using the run-time settings, you can
specify that the TE_connect function generate a unique 8-character device
name for each Vuser, and connect using this name. Although this solves the
requirement for uniqueness, some systems have an additional requirement:
The device names must conform to a specific format. For details about the
run-time settings, see Chapter 8, “Configuring Run-Time Settings.”
607](https://image.slidesharecdn.com/loadrunnergenerator-121007004236-phpapp01/85/Load-runner-generator-629-320.jpg)
![Creating Vuser Scripts • Legacy Protocols
To define the format of the device names that the TE_connect function uses
to connect a Vuser to the system, add an RteGenerateDeviceName function
to the Vuser script. The function has the following prototype:
void RteGenerateDeviceName(char buf[32])
The device name should be written into buf.
If an RteGenerateDeviceName function exists in a Vuser script, the Vuser
calls the function each time a new device name is needed. If no
RteGenerateDeviceName function is defined in the script—and unique
device names are required—the TE_connect function generates the required
names.
In the following example, the RteGenerateDeviceName function generates
unique device names with the format “TERMx”. The first name is TERM0,
followed by TERM1, TERM2 etc.
RteGenerateDeviceName(char buf[32])
{
static int n=0;
sprintf(buf, "TERM%d", n);
n=n+1;
}
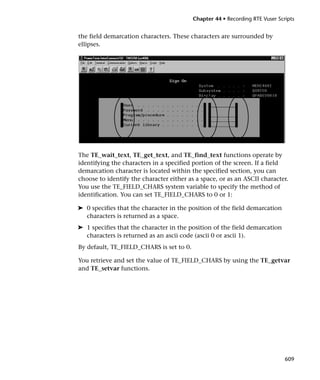
Setting the Field Demarcation Characters
Some terminal emulators use demarcation characters to mark the beginning
and the end of each field. These demarcation characters are not visible—
appearing on the screen as spaces. In the terminal emulator shown below,
the colors in the middle section of the screen have been inverted to display
608](https://image.slidesharecdn.com/loadrunnergenerator-121007004236-phpapp01/85/Load-runner-generator-630-320.jpg)

![Chapter 46 • Synchronizing RTE Vuser Scripts
In the following example, the Vuser types in its name, and then waits for
the application to respond.
/* Declare variables for TE_wait_text */
int ret_row;
int ret_col;
char ret_text [80];
/* Type in user name. */
TE_type ( "John" );
/* Wait for teller to respond. */
TE_wait_text ( "Enter secret code:", 30, 29, 13, 1, 13, &ret_col, &ret_row,
ret_text );
You can instruct VuGen to automatically generate TE_wait_text statements,
and insert them into a script, while you record the script.
To instruct VuGen to automatically generate TE_wait_text statements, and
insert them into a script while recording:
1 Select Vuser > Recording Options. The Recording Settings dialog box
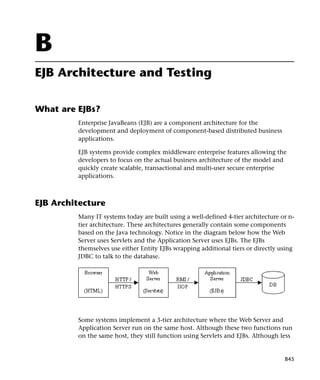
appears.
2 Under Generate Automatic Synchronization Commands, select the Prompt
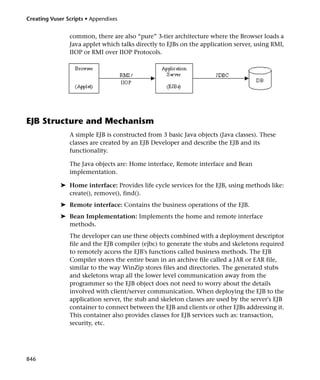
check box, and then click OK.
The following is an example of a TE_wait_text statement that was
automatically generated by VuGen. The function waits up to 20 seconds for
the string “keys” to appear anywhere on the screen. Note that VuGen omits
all the optional parameters when it generates a TE_wait_text function.
TE_wait_text("keys", 20);
Waiting for the Terminal to be Silent
In instances when neither cursor synchronization nor text synchronization
are effective, you can use “silent synchronization” to synchronize the script.
With “silent synchronization,” the Vuser waits for the terminal emulator to
be silent for a specified period of time. The emulator is considered to be
623](https://image.slidesharecdn.com/loadrunnergenerator-121007004236-phpapp01/85/Load-runner-generator-645-320.jpg)

![Chapter 48 • Developing Vuser Scripts for Mailing Services
Define parameters for the fixed-values recorded into your script. By
substituting fixed-values with parameters, you can repeat the same business
process many times using different values.
For details, see Chapter 6, “Defining Parameters.”
5 Correlate statements (optional).
Correlating statements enables you to use the result of one business process
in a subsequent one.
For details, see Chapter 7, “Correlating Statements.”
6 Configure the run-time settings.
The run-time settings control the Vuser behavior during script execution.
These settings include loop, log, and timing information.
For details, see Chapter 8, “Configuring Run-Time Settings.”
7 Run the script from VuGen.
Save and run the script from VuGen to verify that it runs correctly.
For details, see Chapter 9, “Running Vuser Scripts in Stand-Alone Mode.”
After you create a Virtual User script, you integrate it into a scenario on
either a Windows or UNIX platform. For more information on integrating
Virtual User scripts in a scenario, refer to your LoadRunner Controller User’s
Guide.
Working with IMAP Functions
IMAP Vuser script functions record the Internet Mail Application Protocol.
Each IMAP function begins with an imap prefix. For detailed syntax
information on these functions, see the LoadRunner Function Reference
(Help > Function Reference).
Function Name Description
imap_append[_ex] Appends a message to the end of a mailbox.
imap_check[_ex] Requests a checkpoint for the current
mailbox.
631](https://image.slidesharecdn.com/loadrunnergenerator-121007004236-phpapp01/85/Load-runner-generator-653-320.jpg)
![Creating Vuser Scripts • Mailing Services Protocols
imap_close[_ex] Closes the current mailbox.
imap_copy[_ex] Copies mail messages to another mailbox.
imap_create[_ex] Creates a mailbox.
imap_custom_request[_ex] Executes a custom IMAP request.
imap_delete[_ex] Deletes the specified mailbox.
imap_examine[_ex] Examines a mailbox.
imap_expunge[_ex] Removes all messages that are marked to be
deleted.
imap_fetch[_ex] Retrieves data associated with a mailbox
message.
imap_free_ex Frees an IMAP session descriptor.
imap_get_attribute_int[_ex] Returns a mailbox attribute.
imap_get_attribute_sz[_ex] Returns a mailbox attribute as a string.
imap_get_result[_ex] Gets an IMAP server return code.
imap_list_mailboxes[_ex] Lists the available mailboxes.
imap_list_subscriptions[_ex] Lists the mailboxes that are subscribed or
active.
imap_logon[_ex] Logs in to an IMAP server.
imap_logout[_ex] Logs off from an IMAP server.
imap_noop[_ex] Performs a noop operation.
imap_search[_ex] Searches a mailbox by keywords.
imap_select[_ex] Selects a mailbox.
imap_status[_ex] Requests the status of a mailbox.
imap_store[_ex] Alters data associated with a mailbox
message.
imap_subscribe[_ex] Subscribes to or activates a mailbox.
imap_unsubscribe[_ex] Unsubscribes from or deactivates a mailbox.
632](https://image.slidesharecdn.com/loadrunnergenerator-121007004236-phpapp01/85/Load-runner-generator-654-320.jpg)
![Chapter 48 • Developing Vuser Scripts for Mailing Services
In the following example, the imap_create function creates several new
mailboxes: Products, Solutions, and FAQs.
Actions()
{
imap_logon( "ImapLogon",
"URL=imap://johnd:letmein@exchange.mycom-
pany.com",
LAST);
imap_create("CreateMailboxes",
"Mailbox=Products",
"Mailbox=Solutions",
"Mailbox=FAQs",
LAST);
imap_logout( );
return 1;
}
Working with MAPI Functions
MAPI Vuser script functions record activity to and from an MS Exchange
server. Each MAPI function begins with an mapi prefix For detailed syntax
information on these functions, see the LoadRunner Function Reference
(Help > Function Reference).
Function Name Description
mapi_delete_mail[_ex] Deletes the current or selected email entries.
mapi_get_property_sz[_ex] Obtain a property value from the MAPI
sessions.
mapi_logon[_ex] Logs on to MS Exchange.
mapi_logout[_ex] Logs out of MS Exchange.
mapi_read_next_mail[_ex] Reads the next mail in the mailbox.
633](https://image.slidesharecdn.com/loadrunnergenerator-121007004236-phpapp01/85/Load-runner-generator-655-320.jpg)
![Creating Vuser Scripts • Mailing Services Protocols
mapi_send_mail[_ex] Sends an email to recipients.
mapi_set_property_sz[_ex] Sets a MAPI attribute.
In the following example, the mapi_send_mail function sends a sticky note
through an MS Exchange server.
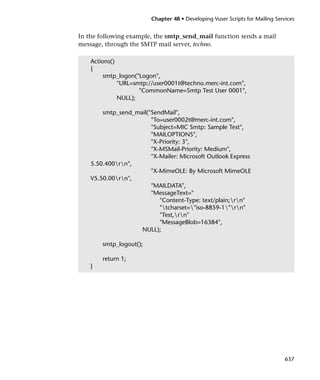
Actions()
{
mapi_logon("Logon",
"ProfileName=John Smith",
"ProfilePass=Tiger",
LAST);
//Send a Sticky Note message
mapi_send_mail("SendMail",
"To=user1@techno.merc-int.com",
"Cc=user0002t@techno.merc-int.com",
"Subject=<GROUP>:<VUID> @ <DATE>",
"Type=Ipm.StickyNote",
"Body=Please update your profile today.",
LAST);
mapi_logout( );
return 1;
}
Working with POP3 Functions
POP3 Vuser script functions emulate actions using the Post Office Protocol,
POP3. Each function begins with a POP3 prefix. For detailed syntax
information on these functions, see the LoadRunner Function Reference
(Help > Function Reference).
Function Name Description
pop3_command[_ex] Sends a command to a POP3 server.
pop3_delete[_ex] Deletes a message on the server.
634](https://image.slidesharecdn.com/loadrunnergenerator-121007004236-phpapp01/85/Load-runner-generator-656-320.jpg)
![Chapter 48 • Developing Vuser Scripts for Mailing Services
pop3_free[_ex] Frees the POP3 server from its commands.
pop3_list[_ex] Lists the messages on the POP3 server.
pop3_logoff[_ex] Logs off from a POP3 server.
pop3_logon[_ex] Logs on to a POP3 server.
pop3_retrieve[_ex] Retrieves messages from the POP3 server.
In the following example, the pop3_retrieve function retrieves five
messages from the POP3 server.
Actions()
{
pop3_logon( "Login", "
URL=pop3://user0004t:my_pwd@techno.merc-int.com",
LAST);
// List all messages on the server and receive that value
totalMessages = pop3_list("POP3", LAST);
// Display the received value (It is also displayed by the pop3_list function)
lr_log_message("There are %d total messages on the server.rnrn",
totalMessages);
// Retrieve 5 messages on the server without deleting them
pop3_retrieve("POP3", "RetrieveList=1:5", "DeleteMail=false", LAST);
pop3_logoff();
return 1;
}
635](https://image.slidesharecdn.com/loadrunnergenerator-121007004236-phpapp01/85/Load-runner-generator-657-320.jpg)
![Creating Vuser Scripts • Mailing Services Protocols
Working with SMTP Functions
SMTP Vuser script functions emulates the Single Mail Transfer Protocol
traffic. Each SMTP function begins with an smtp prefix. For detailed syntax
information on these functions, see the LoadRunner Function Reference
(Help > Function Reference).
Function Name Description
smtp_abort_mail[_ex] Aborts the transmission of an SMTP message.
smtp_free[_ex] Frees the SMTP server from its commands.
smtp_logon[_ex] Logs on to an SMTP server.
smtp_logout[_ex] Logs off from an SMTP server.
smtp_send_mail[_ex] Sends an SMTP message.
smtp_translate[_ex] Translates an SMTP message.
636](https://image.slidesharecdn.com/loadrunnergenerator-121007004236-phpapp01/85/Load-runner-generator-658-320.jpg)


![Creating Vuser Scripts • Middleware Protocols
Note: Some of the FML buffer functions indicate an optional “32” in the
function name. These are the FML32 versions of the functions.
Buffer Manipulation Functions
lrt_Fadd[32]_fld Adds a new field to an FML buffer.
lrt_Finitialize[32] Initializes an existing FML buffer fbfr.
lrt_Fldid[32] Maps a field name to a field identifier.
lrt_Fname[32] Provides a map field identifier to field name.
lrt_memcpy Copies the specified amount of bytes from
the source to the destination.
lrt_strcpy Copies a string like the C function strcpy.
lrt_tpalloc Returns a pointer to a buffer of type type.
lrt_tprealloc Changes the size of a typed buffer.
lrt_tpfree Frees a typed buffer.
lrt_tptypes Determines information about a typed buffer.
Client/Server Session Functions
lrt_tpchkauth Checks if authentication is required by the
application.
lrt_tpinitialize Enables a client to join a System/T
application.
lrt_tpterm Removes a client from a System/T
application.
Communication Functions
lrt_tpacall Sends a service request.
lrt_tpbroadcast Broadcasts notification by name.
lrt_tpcall Sends a service request and awaits its reply.
652](https://image.slidesharecdn.com/loadrunnergenerator-121007004236-phpapp01/85/Load-runner-generator-674-320.jpg)
![Creating Vuser Scripts • Middleware Protocols
lrt_tuxputenv Modifies an existing environment value or
adds a value to the environment.
lrt_tuxreadenv Adds variables to the environment from a
file.
Error Processing Functions
lrt_abort_on_error Aborts the current transaction, if the
previous Tuxedo function call resulted in
an error.
lrt_Fstrerror[32] Retrieves error message string for FML
error.
lrt_getFerror[32] Retrieves the error status code for the last
FML operation that failed.
lrt_gettperrno Retrieves the error status code for the last
Tuxedo transaction monitor function.
lrt_gettpurcode Retrieves the application return code.
lrt_tpstrerror Retrieves error message string for System/T
error.
Transaction Handling Functions
lrt_tpabort Aborts the current transaction.
lrt_tpbegin Begins a transaction.
lrt_tpcommit Commits the current transaction.
lrt_tpgetlev Checks if a transaction is in progress.
lrt_tpresume Resumes a global transaction.
lrt_tpscmt Sets when lrt_tpcommit should return.
lrt_tpsuspend Suspends a global transaction.
lrt_tx_begin Begins a global transaction.
lrt_tx_close Closes a set of resource managers.
lrt_tx_commit Commits a global transaction.
654](https://image.slidesharecdn.com/loadrunnergenerator-121007004236-phpapp01/85/Load-runner-generator-676-320.jpg)
![Chapter 50 • Developing Tuxedo Vuser Scripts
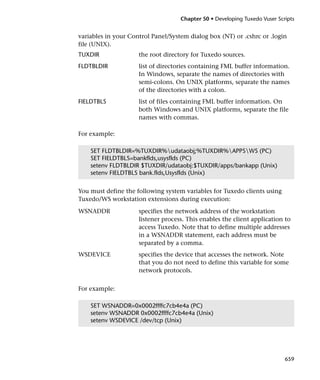
lrt_tx_info Returns global transaction information.
lrt_tx_open Opens a set of resource managers.
lrt_tx_rollback Rolls back a global transaction.
lrt_tx_set_commit_return Sets the commit_return characteristic to the
value specified in when_return.
lrt_tx_set_transaction_control Sets the transaction_control characteristic to
the value specified in control.
lrt_tx_set_transaction_timeout Sets the transaction_timeout characteristic
to the value specified in timeout.
Correlating Statement Functions
lrt_display_buffer Stores buffer information in a file.
lrt_save[32]_fld_val Saves the current value of an FML buffer to
a parameter.
lrt_save_parm Saves a portion of a character array (such as
a STRING or CARRAY buffer) to a
parameter.
lrt_save_searched_string Searches for an occurrence of a string in a
buffer and saves a portion of the buffer,
relative to the string occurrence, to a
parameter.
Note: In general, it is recommended to use lrt_save_parm to save a portion
of a character array to a parameter. Use lrt_save_searched_string when you
want to save information, relative to the position of a particular string in a
character array. For PeopleSoft Vusers, it is recommended to use
lrt_save_searched_string, since the reply buffers returned from the
PeopleSoft server often differ in size during replay from what was seen
during recording.
655](https://image.slidesharecdn.com/loadrunnergenerator-121007004236-phpapp01/85/Load-runner-generator-677-320.jpg)
![Creating Vuser Scripts • Middleware Protocols
Debugging Tuxedo Applications
In general, use Tuxedo 6 to record applications using Tuxedo 6.x or earlier,
and use Tuxedo 7 to record applications using Tuxedo 7.1.
If you encounter problems recording or replaying Tuxedo applications, or
the script is missing a call to lrt_tpinitialize, contact Customer Support to
check which DLLs are used with the application:
If the application uses wtuxws32.dll, instead of libwsc.dll,contact Customer
Support to obtain a patch to enable the recording.
Correlating Tuxedo Scripts
VuGen supports correlation for Vuser scripts recorded with Tuxedo
applications. Correlated statements enable you to link statements by saving
a portion of a buffer and use it in subsequent statements.
To correlate statements, you modify your recorded script within the VuGen
editor using one of the following LRT functions:
➤ lrt_save[32]_fld_val saves the current value of an FML or FML32 buffer
(a string in the form “name=<NAME>” or “id=<ID>”) to a parameter.
➤ lrt_save_parm saves a portion of a character array (such as a STRING or
CARRAY buffer) to a parameter.
➤ lrt_save_searched_string searches for an occurrence of a string in a
buffer and saves a portion of the buffer, relative to the string occurrence,
to a parameter.
For additional information about the syntax of these functions, refer to the
LoadRunner Function Reference.
Correlating FML and FML32 Buffers
Use lrt_save_fld_val or lrt_save32_fld_val to save the contents of the FML
or FML32 buffer.
660](https://image.slidesharecdn.com/loadrunnergenerator-121007004236-phpapp01/85/Load-runner-generator-682-320.jpg)
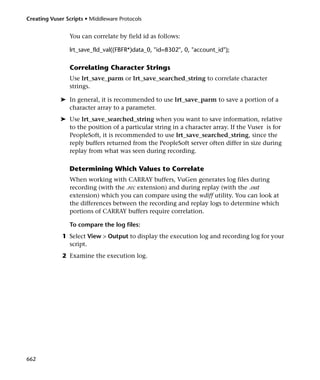
![Creating Vuser Scripts • Middleware Protocols
In the following example, an employee ID from a CARRAY buffer must be
saved for later use. The recorded value was “G001” as shown in the output.
lrt_tpcall:227, PprLoad, 1782
Reply Buffer received.
…
123 “G001”
126 “…”
134 “Claudia”
Insert lrt_save_parm using the offset, 123, immediately after the request
buffer that sends “PprLoad” and 227 bytes.
/* Request CARRAY buffer 57 */
lrt_memcpy(data_0, buf_143, 227);
tpresult_int = lrt_tpcall("PprLoad",
data_0, 227, &data_1, &olen, TPSIGRSTRT);
lrt_save_parm(data_1, 123, 9, "empid");
In the replay.vdf file, replace the recorded value, “G001”, with the parameter,
empid.
char buf_143[] =
"xf5x0x0x0x4x3x2x1x1x0x0x0xbcx2x0x0x0x0x0
x0"
"X"
"x89x0x0x0xbx0"
"SPprLoadReq"
"xffx0x10x0x0x4x3x6"
”<empid>” // G001
"x7"
”Claudia”
"xe"
"LAST_NAME_SRCH"
...
This function can also be used to save a portion of a character array within
an FML buffer. In the following example, the phone number is a character
array, and the area code is the first three characters. First, the
664](https://image.slidesharecdn.com/loadrunnergenerator-121007004236-phpapp01/85/Load-runner-generator-686-320.jpg)

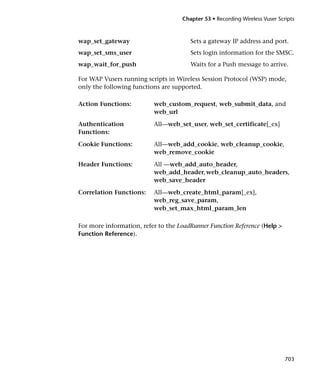
![Creating Vuser Scripts • E-Business Protocols
To play the clip until the end, use any negative value for mulTimeToPlay. To
play the clip for a specific duration number of milliseconds, specify the
number of milliseconds. miplayerID represents a unique ID of a RealPlayer
instance.
Using Media Player MMS Functions
The functions developed to emulate client/server communication for Media
Player’s MMS protocol, are called MMS Virtual User functions—each
function has an mms prefix.
All MMS functions come in pairs—one for global sessions and one for a
specific session. For example, mms_close closes the Media Player globally,
while mms_close_ex closes the Media Player for a specific session.
For detailed syntax information on these functions, see the LoadRunner
Function Reference (Help > Function Reference).
Function Name Description
mms_close[_ex] Closes the Media Player.
mms_get_property[_ex] Retrieves a property of a Media Player clip.
mms_isactive[_ex] Verifies that the Media Player is active.
mms_pause[_ex] Pauses the playing of a Media Player clip.
mms_play[_ex] Plays a Media Player clip.
mms_resume[_ex] Resumes playing a Media Player clip.
mms_sampling[_ex] Samples a Media Player clip.
mms_set_property[_ex] Sets a Media Player clip property.
mms_set_timeout[_ex] Sets a timeout value for a Media Player clip.
mms_stop[_ex] Stops playing a Media Player clip.
For example, the mms_play function takes the form:
int mms_play (char message, <List of Attributes>, LAST);
672](https://image.slidesharecdn.com/loadrunnergenerator-121007004236-phpapp01/85/Load-runner-generator-694-320.jpg)


![Cimco edit 5 user guide[1]](https://cdn.slidesharecdn.com/ss_thumbnails/cimcoedit5userguide1-110305112440-phpapp01-thumbnail.jpg?width=640&height=640&fit=bounds)