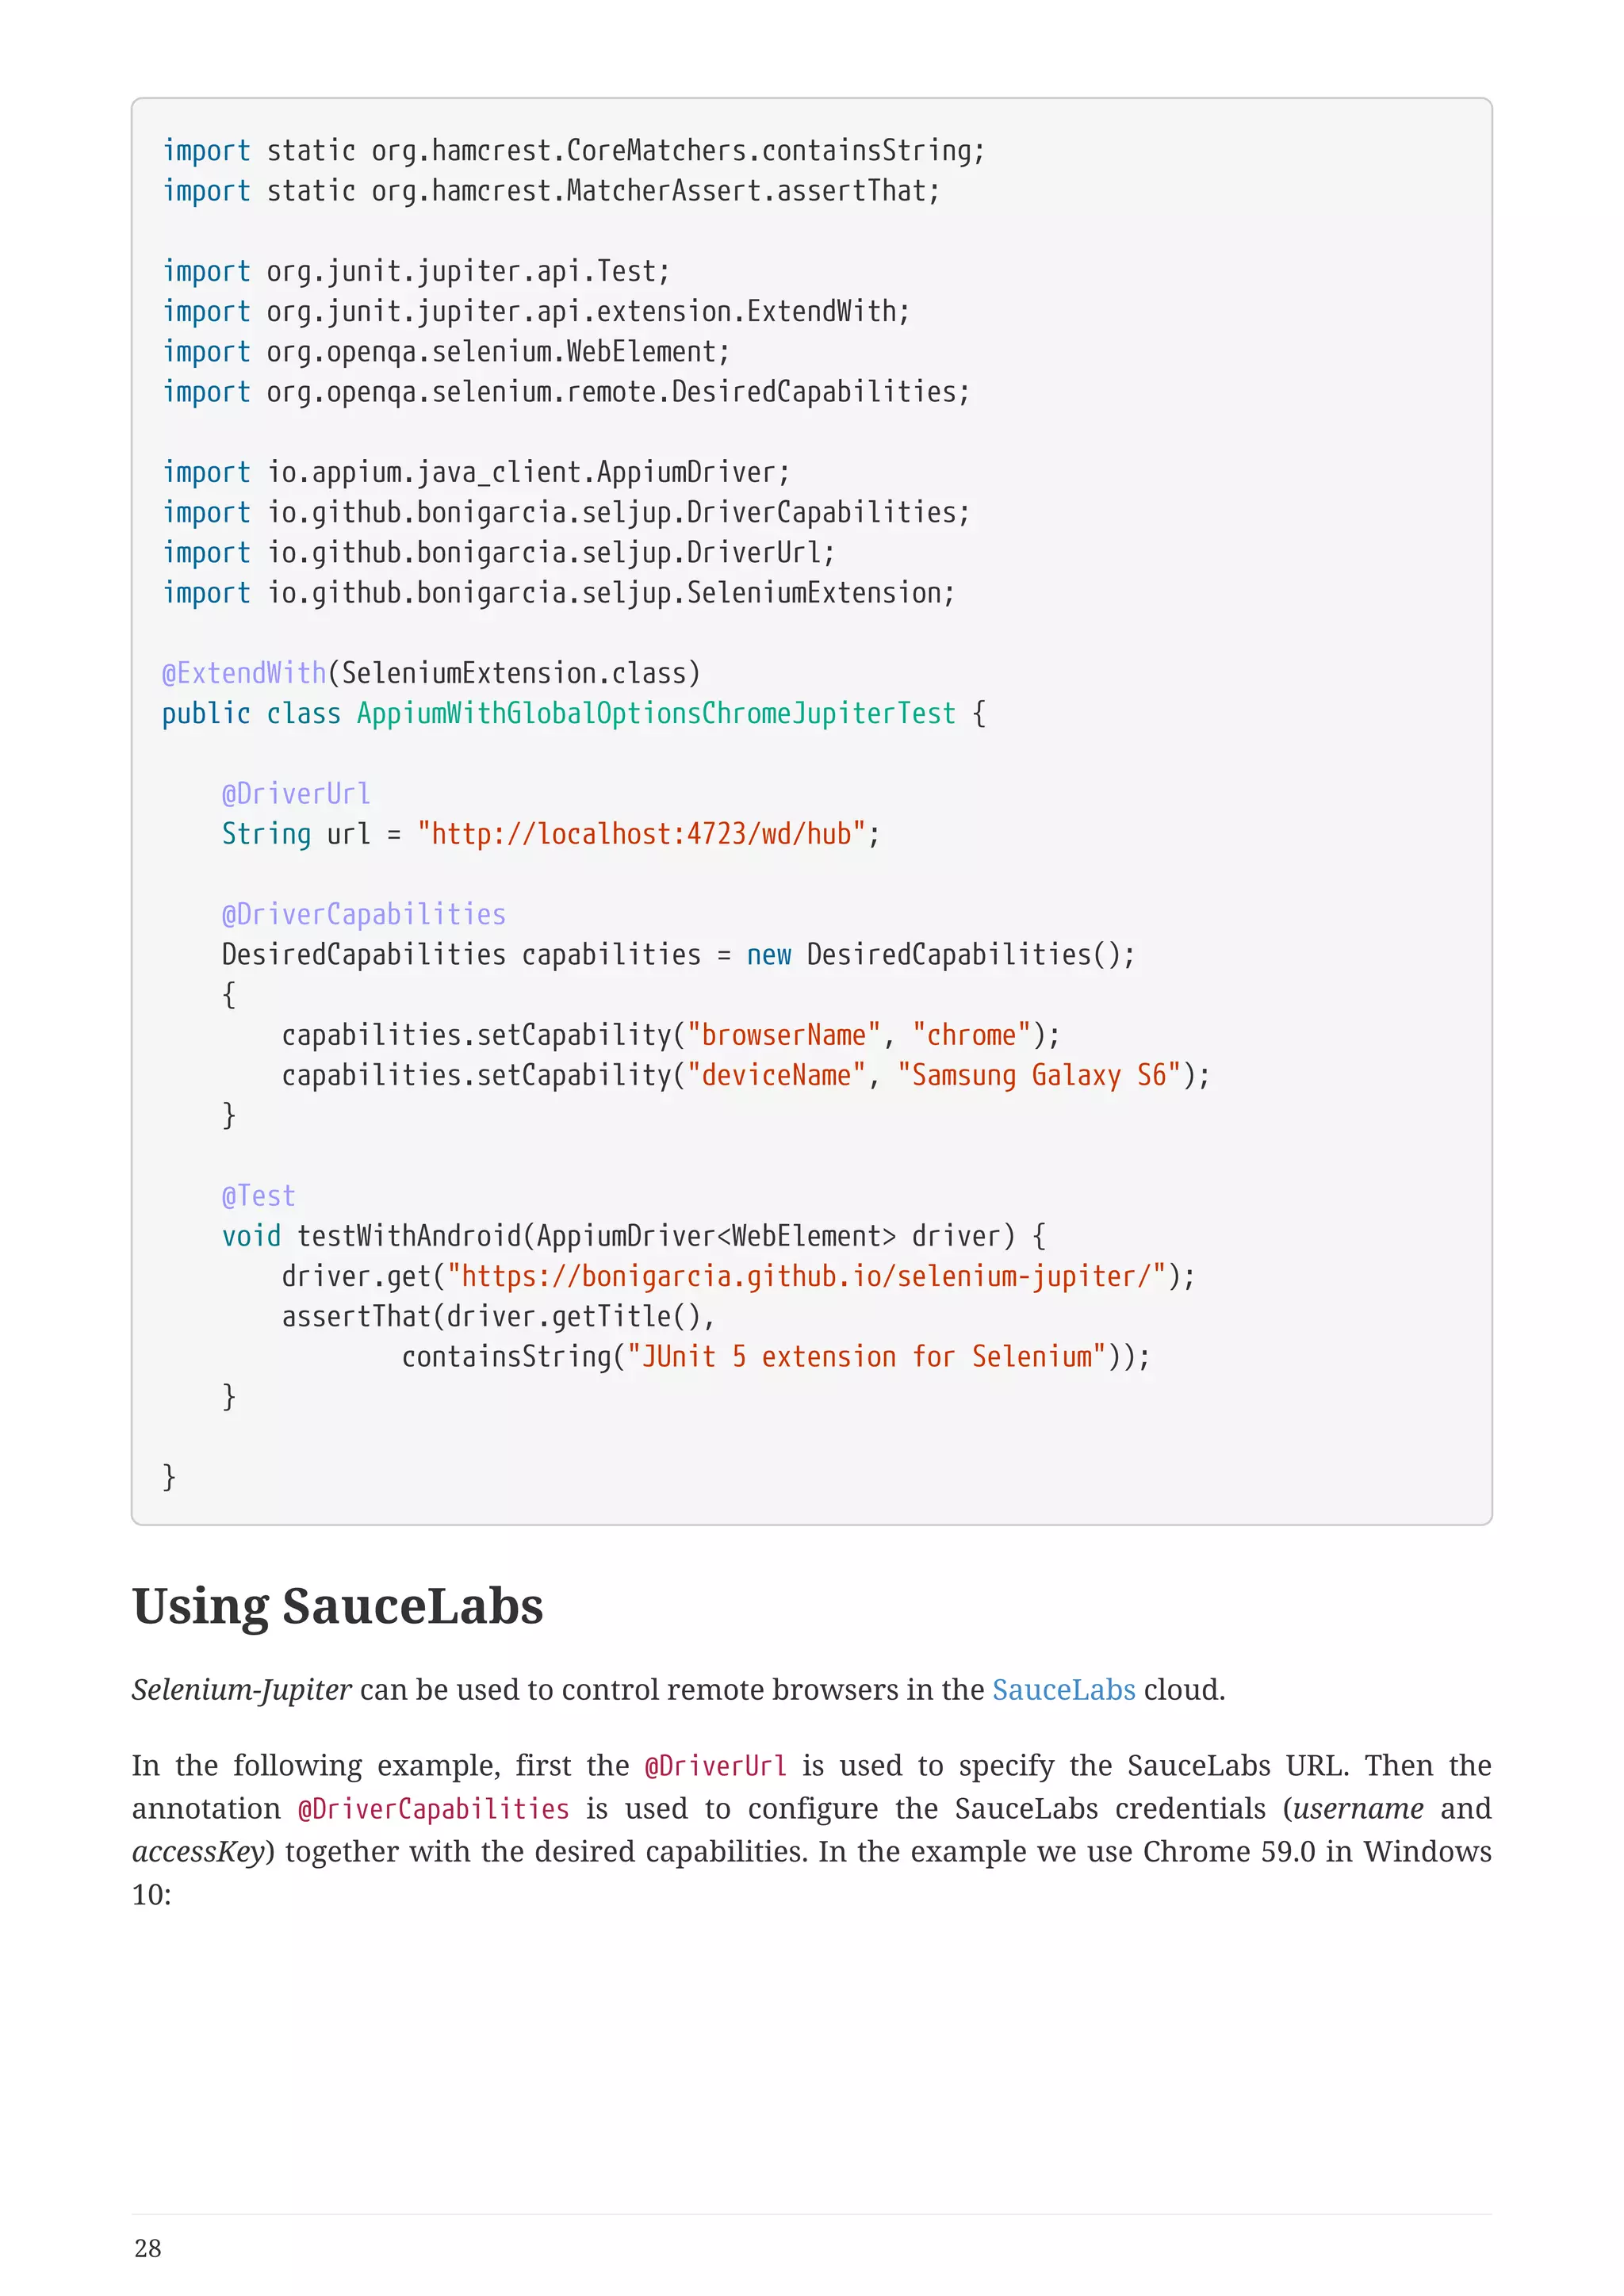
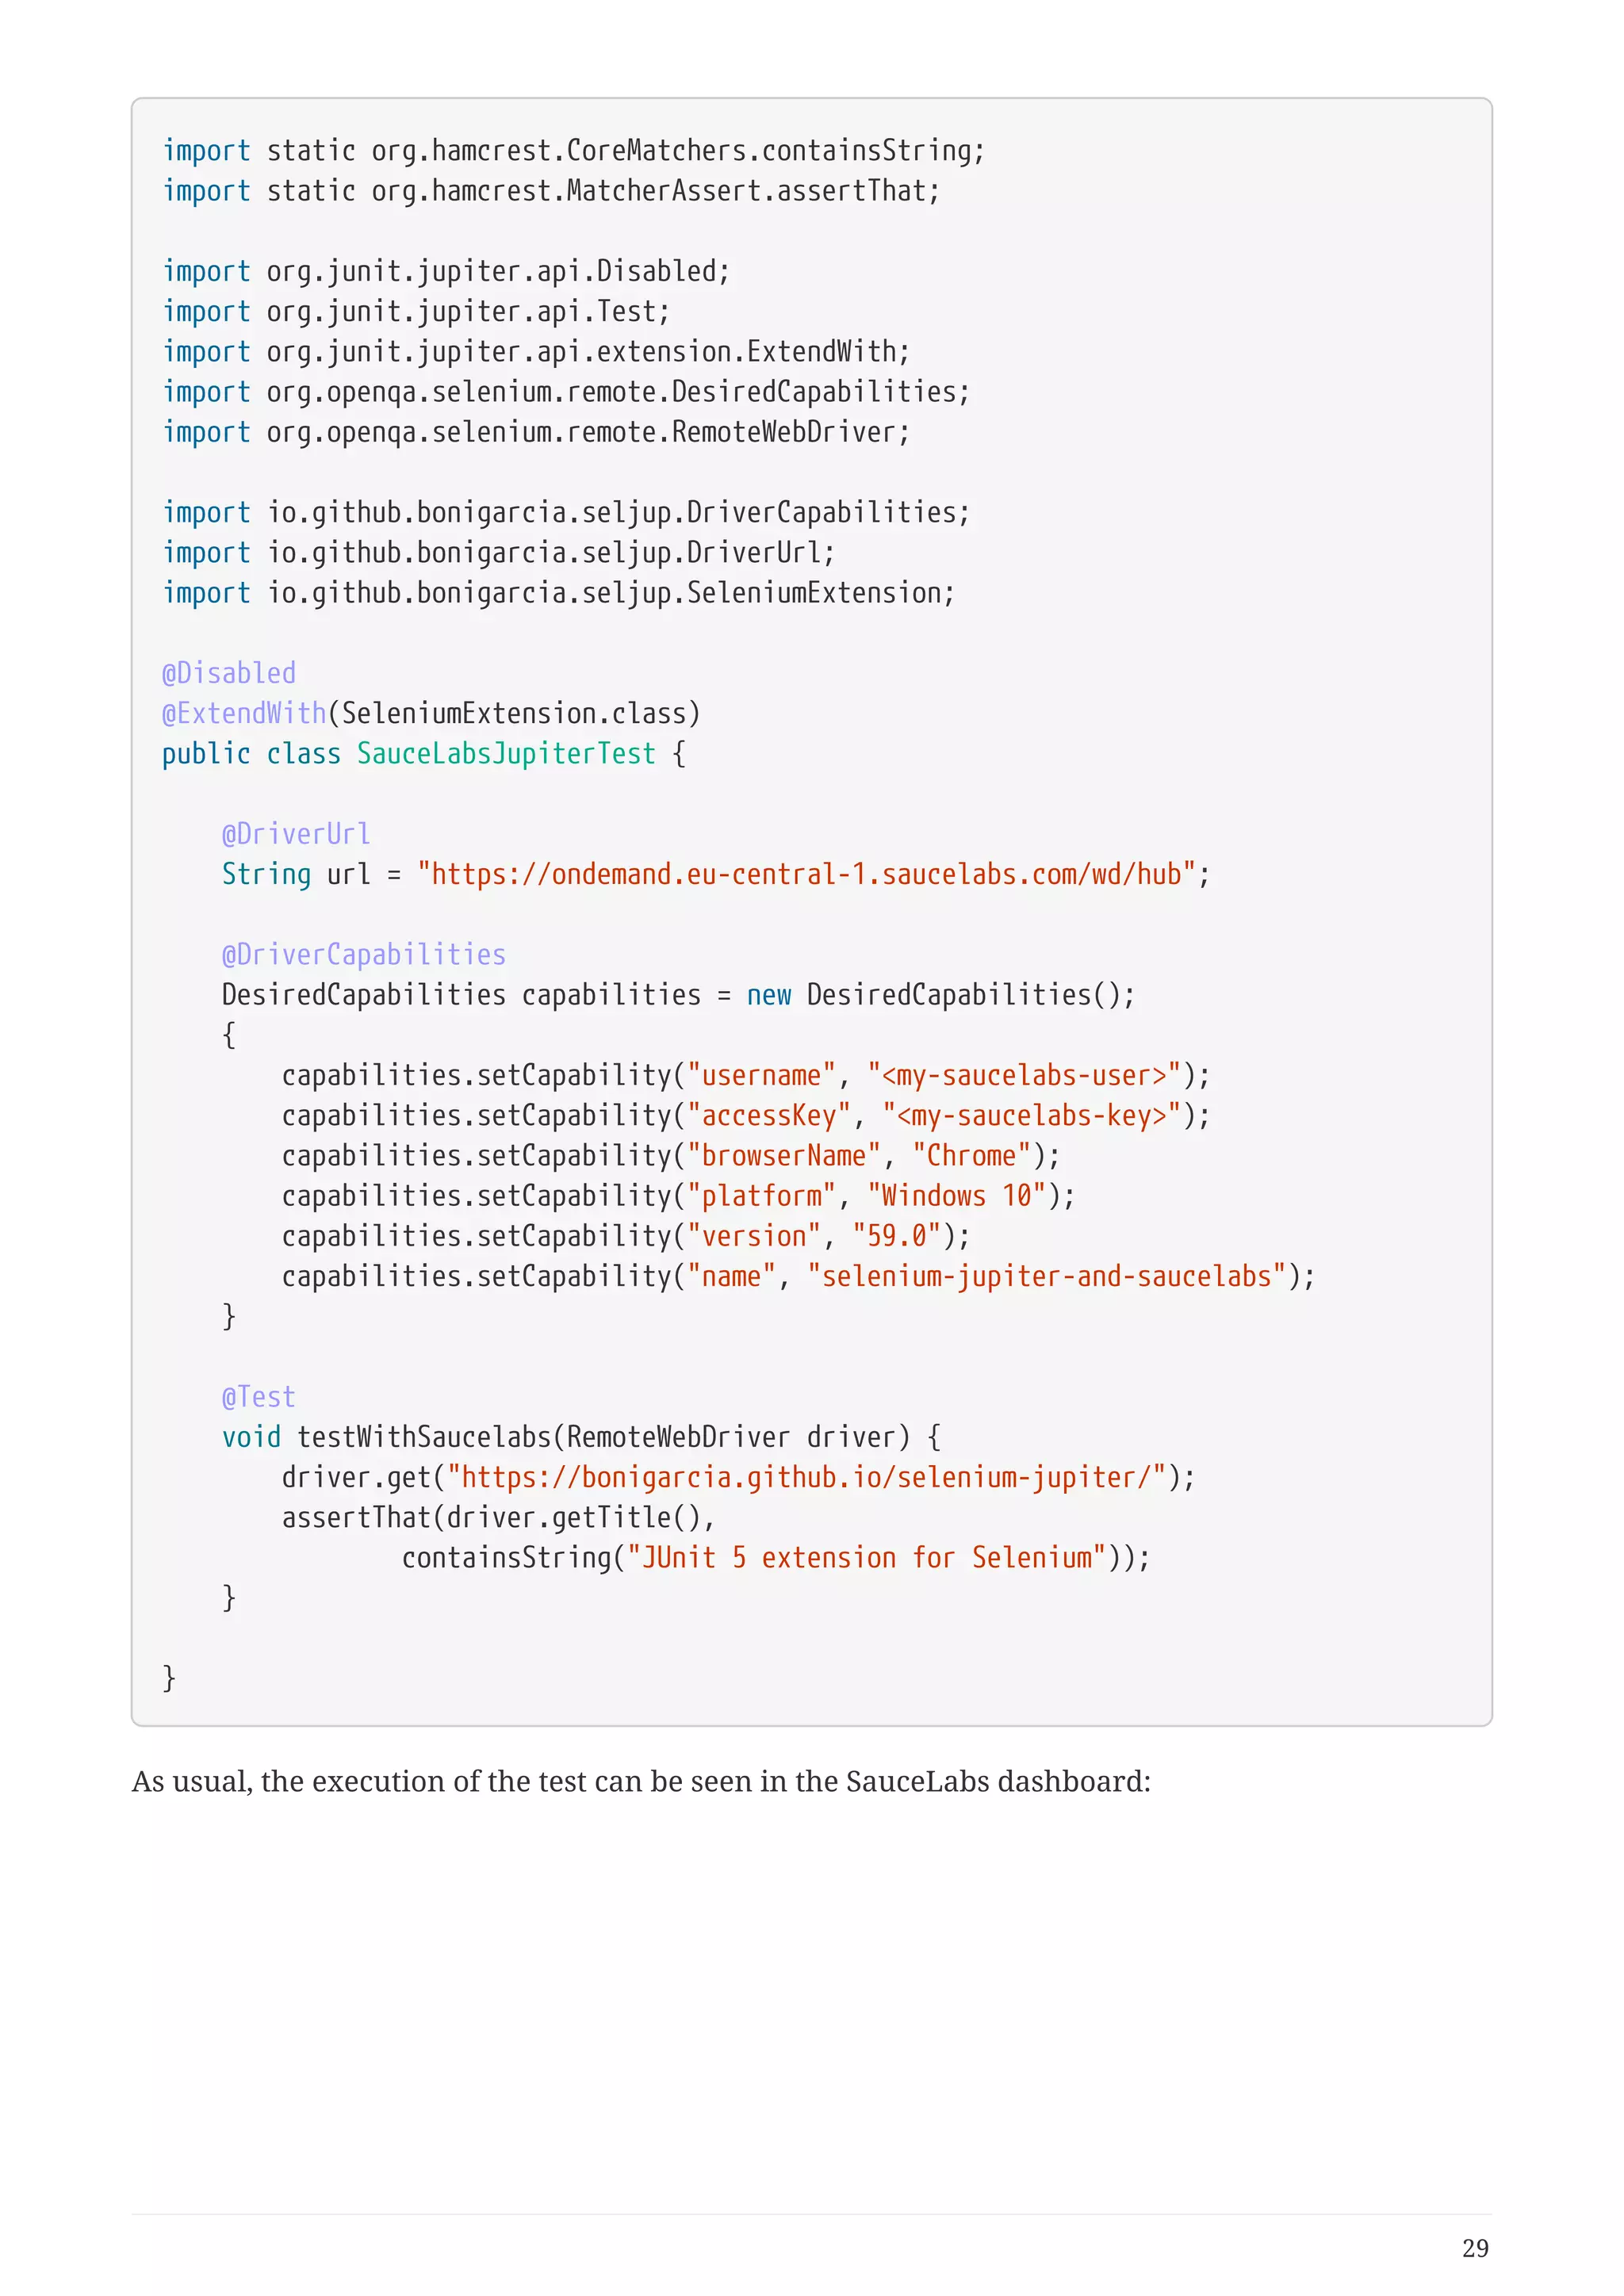
This document describes Selenium-Jupiter, a JUnit 5 extension that provides integration of Selenium and Appium testing frameworks. It allows injecting WebDriver instances like ChromeDriver and FirefoxDriver into JUnit 5 tests. Selenium-Jupiter is open source and hosted on GitHub. It supports local and remote browser testing, mobile testing with Appium, and integrates with tools like Jenkins.
ZebraNet Bridge Enterprise - Manual do SoftwareUseZ
Manual do Software da Zebra para configuração e gerenciamento de impressoras em rede, ZebraNet Bride Enterprise.
Para conferir outros modelos acesse: www.usez.com.br
DevOps and Testing slides at DASA ConnectKari Kakkonen
My and Rik Marselis slides at 30.5.2024 DASA Connect conference. We discuss about what is testing, then what is agile testing and finally what is Testing in DevOps. Finally we had lovely workshop with the participants trying to find out different ways to think about quality and testing in different parts of the DevOps infinity loop.
State of ICS and IoT Cyber Threat Landscape Report 2024 previewPrayukth K V
The IoT and OT threat landscape report has been prepared by the Threat Research Team at Sectrio using data from Sectrio, cyber threat intelligence farming facilities spread across over 85 cities around the world. In addition, Sectrio also runs AI-based advanced threat and payload engagement facilities that serve as sinks to attract and engage sophisticated threat actors, and newer malware including new variants and latent threats that are at an earlier stage of development.
The latest edition of the OT/ICS and IoT security Threat Landscape Report 2024 also covers:
State of global ICS asset and network exposure
Sectoral targets and attacks as well as the cost of ransom
Global APT activity, AI usage, actor and tactic profiles, and implications
Rise in volumes of AI-powered cyberattacks
Major cyber events in 2024
Malware and malicious payload trends
Cyberattack types and targets
Vulnerability exploit attempts on CVEs
Attacks on counties – USA
Expansion of bot farms – how, where, and why
In-depth analysis of the cyber threat landscape across North America, South America, Europe, APAC, and the Middle East
Why are attacks on smart factories rising?
Cyber risk predictions
Axis of attacks – Europe
Systemic attacks in the Middle East
Download the full report from here:
https://sectrio.com/resources/ot-threat-landscape-reports/sectrio-releases-ot-ics-and-iot-security-threat-landscape-report-2024/
Key Trends Shaping the Future of Infrastructure.pdfCheryl Hung
Keynote at DIGIT West Expo, Glasgow on 29 May 2024.
Cheryl Hung, ochery.com
Sr Director, Infrastructure Ecosystem, Arm.
The key trends across hardware, cloud and open-source; exploring how these areas are likely to mature and develop over the short and long-term, and then considering how organisations can position themselves to adapt and thrive.
UiPath Test Automation using UiPath Test Suite series, part 4DianaGray10
Welcome to UiPath Test Automation using UiPath Test Suite series part 4. In this session, we will cover Test Manager overview along with SAP heatmap.
The UiPath Test Manager overview with SAP heatmap webinar offers a concise yet comprehensive exploration of the role of a Test Manager within SAP environments, coupled with the utilization of heatmaps for effective testing strategies.
Participants will gain insights into the responsibilities, challenges, and best practices associated with test management in SAP projects. Additionally, the webinar delves into the significance of heatmaps as a visual aid for identifying testing priorities, areas of risk, and resource allocation within SAP landscapes. Through this session, attendees can expect to enhance their understanding of test management principles while learning practical approaches to optimize testing processes in SAP environments using heatmap visualization techniques
What will you get from this session?
1. Insights into SAP testing best practices
2. Heatmap utilization for testing
3. Optimization of testing processes
4. Demo
Topics covered:
Execution from the test manager
Orchestrator execution result
Defect reporting
SAP heatmap example with demo
Speaker:
Deepak Rai, Automation Practice Lead, Boundaryless Group and UiPath MVP
Software Delivery At the Speed of AI: Inflectra Invests In AI-Powered QualityInflectra
In this insightful webinar, Inflectra explores how artificial intelligence (AI) is transforming software development and testing. Discover how AI-powered tools are revolutionizing every stage of the software development lifecycle (SDLC), from design and prototyping to testing, deployment, and monitoring.
Learn about:
• The Future of Testing: How AI is shifting testing towards verification, analysis, and higher-level skills, while reducing repetitive tasks.
• Test Automation: How AI-powered test case generation, optimization, and self-healing tests are making testing more efficient and effective.
• Visual Testing: Explore the emerging capabilities of AI in visual testing and how it's set to revolutionize UI verification.
• Inflectra's AI Solutions: See demonstrations of Inflectra's cutting-edge AI tools like the ChatGPT plugin and Azure Open AI platform, designed to streamline your testing process.
Whether you're a developer, tester, or QA professional, this webinar will give you valuable insights into how AI is shaping the future of software delivery.
Builder.ai Founder Sachin Dev Duggal's Strategic Approach to Create an Innova...Ramesh Iyer
In today's fast-changing business world, Companies that adapt and embrace new ideas often need help to keep up with the competition. However, fostering a culture of innovation takes much work. It takes vision, leadership and willingness to take risks in the right proportion. Sachin Dev Duggal, co-founder of Builder.ai, has perfected the art of this balance, creating a company culture where creativity and growth are nurtured at each stage.
GraphRAG is All You need? LLM & Knowledge GraphGuy Korland
Guy Korland, CEO and Co-founder of FalkorDB, will review two articles on the integration of language models with knowledge graphs.
1. Unifying Large Language Models and Knowledge Graphs: A Roadmap.
https://arxiv.org/abs/2306.08302
2. Microsoft Research's GraphRAG paper and a review paper on various uses of knowledge graphs:
https://www.microsoft.com/en-us/research/blog/graphrag-unlocking-llm-discovery-on-narrative-private-data/
Essentials of Automations: Optimizing FME Workflows with ParametersSafe Software
Are you looking to streamline your workflows and boost your projects’ efficiency? Do you find yourself searching for ways to add flexibility and control over your FME workflows? If so, you’re in the right place.
Join us for an insightful dive into the world of FME parameters, a critical element in optimizing workflow efficiency. This webinar marks the beginning of our three-part “Essentials of Automation” series. This first webinar is designed to equip you with the knowledge and skills to utilize parameters effectively: enhancing the flexibility, maintainability, and user control of your FME projects.
Here’s what you’ll gain:
- Essentials of FME Parameters: Understand the pivotal role of parameters, including Reader/Writer, Transformer, User, and FME Flow categories. Discover how they are the key to unlocking automation and optimization within your workflows.
- Practical Applications in FME Form: Delve into key user parameter types including choice, connections, and file URLs. Allow users to control how a workflow runs, making your workflows more reusable. Learn to import values and deliver the best user experience for your workflows while enhancing accuracy.
- Optimization Strategies in FME Flow: Explore the creation and strategic deployment of parameters in FME Flow, including the use of deployment and geometry parameters, to maximize workflow efficiency.
- Pro Tips for Success: Gain insights on parameterizing connections and leveraging new features like Conditional Visibility for clarity and simplicity.
We’ll wrap up with a glimpse into future webinars, followed by a Q&A session to address your specific questions surrounding this topic.
Don’t miss this opportunity to elevate your FME expertise and drive your projects to new heights of efficiency.
Epistemic Interaction - tuning interfaces to provide information for AI supportAlan Dix
Paper presented at SYNERGY workshop at AVI 2024, Genoa, Italy. 3rd June 2024
https://alandix.com/academic/papers/synergy2024-epistemic/
As machine learning integrates deeper into human-computer interactions, the concept of epistemic interaction emerges, aiming to refine these interactions to enhance system adaptability. This approach encourages minor, intentional adjustments in user behaviour to enrich the data available for system learning. This paper introduces epistemic interaction within the context of human-system communication, illustrating how deliberate interaction design can improve system understanding and adaptation. Through concrete examples, we demonstrate the potential of epistemic interaction to significantly advance human-computer interaction by leveraging intuitive human communication strategies to inform system design and functionality, offering a novel pathway for enriching user-system engagements.
Encryption in Microsoft 365 - ExpertsLive Netherlands 2024Albert Hoitingh
In this session I delve into the encryption technology used in Microsoft 365 and Microsoft Purview. Including the concepts of Customer Key and Double Key Encryption.
4. JUnit 5 is the next generation of the well-known testing framework JUnit. Jupiter
is the name given to the new programming and extension model provided by
JUnit 5. The extension model of JUnit 5, it allows to incorporate extra capabilities
for JUnit 5 tests. On the other hand, Selenium is a testing framework which
allows to control local (Selenium WebDriver) or remote (Selenium Grid) browsers
(e.g. Chrome, Firefox, and so on) programmatically to carry out automated
testing of web applications. This documentation presents Selenium-Jupiter, a
JUnit 5 extension aimed to provide seamless integration of Selenium (WebDriver
and Grid) and Appium for JUnit 5 tests. Selenium-Jupiter is open source (Apache
2.0 license) and is hosted on GitHub.
Quick reference
Selenium-Jupiter has been built using the dependency injection capability provided by the
extension model of JUnit 5. Thank to this feature, different types objects can be injected in JUnit 5 as
methods or constructor parameters in @Test classes. Concretely, Selenium-Jupiter allows to inject
subtypes of the WebDriver interface (e.g. ChromeDriver, FirefoxDriver, and so on).
Using Selenium-Jupiter is very easy. First, you need to import the dependency in your project
(typically as test dependency). In Maven, it is done as follows:
<dependency>
<groupId>io.github.bonigarcia</groupId>
<artifactId>selenium-jupiter</artifactId>
<version>3.2.0</version>
<scope>test</scope>
</dependency>
The dependency (typically test) to be declared in a Gradle project is as follows:
dependencies {
testCompile("io.github.bonigarcia:selenium-jupiter:3.2.0")
}
NOTE
Selenium-Jupiter 3.2.0 depends on selenium-java 3.141.59, webdrivermanager
3.4.0, appium java-client 7.0.0, and spotify docker-client 8.15.1. Therefore, by
using the Selenium-Jupiter dependency, these libraries will be added as transitive
dependencies to your project.
Then, you need to declare Selenium-Jupiter extension in your JUnit 5 test, simply annotating your
test with @ExtendWith(SeleniumExtension.class). Finally, you need to include one or more
parameters in your @Test methods (or constructor) whose types implements the WebDriver interface
(e.g. ChromeDriver to use Chrome, FirefoxDriver for Firefox, and so for). That’s it. Selenium-Jupiter
1
5. control the lifecycle of the WebDriver object internally, and you just need to use the WebDriver object
in your test to drive the browser(s) you want. For example:
import org.junit.jupiter.api.Test;
import org.junit.jupiter.api.extension.ExtendWith;
import org.openqa.selenium.chrome.ChromeDriver;
import org.openqa.selenium.firefox.FirefoxDriver;
import io.github.bonigarcia.seljup.SeleniumExtension;
@ExtendWith(SeleniumExtension.class)
public class ChromeAndFirefoxJupiterTest {
@Test
public void testWithOneChrome(ChromeDriver chromeDriver) {
// Use Chrome in this test
}
@Test
public void testWithFirefox(FirefoxDriver firefoxDriver) {
// Use Firefox in this test
}
@Test
public void testWithChromeAndFirefox(ChromeDriver chromeDriver,
FirefoxDriver firefoxDriver) {
// Use Chrome and Firefox in this test
}
}
NOTE
As of JUnit 5.1, extensions can be registered programmatically via
@RegisterExtension or automatically via Java’s ServiceLoader. Both mechanisms can
be used with Selenium-Jupiter.
The WebDriver subtypes supported by Selenium-Jupiter are the following:
• ChromeDriver: Used to control Google Chrome browser.
• FirefoxDriver: Used to control Firefox browser.
• EdgeDriver: Used to control Microsoft Edge browser.
• OperaDriver: Used to control Opera browser.
• SafariDriver: Used to control Apple Safari browser (only possible in OSX El Capitan or greater).
• HtmlUnitDriver: Used to control HtmlUnit (headless browser).
• PhantomJSDriver: Used to control PhantomJS (headless browser).
• InternetExplorerDriver: Used to control Microsoft Internet Explorer.
2
6. • RemoteWebDriver: Used to control remote browsers (Selenium Grid).
• AppiumDriver: Used to control mobile devices (Android, iOS).
WARNING
The browser to be used must be installed in the machine running the test
beforehand (except in the case of RemoteWebDriver, in which the requirement is
to known a Selenium Server URL). In the case of mobile devices (AppiumDriver),
the emulator should be up and running in local or available in a Appium
Server identified by an URL.
You can also inject WebDriver objects declaring them as constructor parameters, instead of as test
method parameters. For example as follows:
import static org.hamcrest.CoreMatchers.containsString;
import static org.hamcrest.MatcherAssert.assertThat;
import org.junit.jupiter.api.Test;
import org.junit.jupiter.api.extension.ExtendWith;
import org.openqa.selenium.chrome.ChromeDriver;
import io.github.bonigarcia.seljup.SeleniumExtension;
@ExtendWith(SeleniumExtension.class)
public class ChromeInConstructorJupiterTest {
ChromeDriver driver;
public ChromeInConstructorJupiterTest(ChromeDriver driver) {
this.driver = driver;
}
@Test
public void testGlobalChrome() {
driver.get("https://bonigarcia.github.io/selenium-jupiter/");
assertThat(driver.getTitle(),
containsString("JUnit 5 extension for Selenium"));
}
}
This documentation contains a comprehensive collection of basic examples demonstrating the
basic usage of Selenium-Jupiter in JUnit 5 tests using different types of browsers. All these examples
are part of the test suite of Selenium-Jupiter and are executed on Travis CI.
Local browsers
Selenium WebDriver allows to control different types of browsers (such as Chrome, Firefox, Edge,
and so on) programmatically using different programming languages. This is very useful to
3
7. implement automated tests for web applications. Nevertheless, in order to use WebDriver, we need
to pay a prize. For security reasons, the automated manipulation of a browser can only be done
using native features of the browser. In practical terms, it means that a binary file must be placed
in between the test using the WebDriver API and the actual browser. One the one hand, the
communication between the WebDriver object and that binary is done using the (W3C WebDriver
specification, formerly called JSON Wire Protocol. It consists basically on a REST service using JSON
for requests and responses. On the other hand, the communication between the binary and the
browser is done using native capabilities of the browser. Therefore, the general schema of
Selenium WebDriver can be illustrated as follows:
Figure 1. WebDriver general scenario
From a tester point of view, the need of this binary component is a pain in the neck, since it should
be downloaded manually for the proper platform running the test (i.e. Windows, Linux, Mac).
Moreover, the binary version should be constantly updated. The majority of browsers evolve quite
fast, and the corresponding binary file required by WebDriver needs to be also updated. The
following picture shows a fine-grained diagram of the different flavor of WebDriver binaries and
browsers:
Figure 2. WebDriver scenario for Chrome, Firefox, Opera, PhantomJS, Edge, and Internet Explorer
4
8. Concerning Java, in order to locate these drivers, the absolute path of the binary controlling the
browser should be exported in a given environment variable before creating a WebDriver instance,
as follows:
System.setProperty("webdriver.chrome.driver", "/path/to/chromedriver");
System.setProperty("webdriver.opera.driver", "/path/to/operadriver");
System.setProperty("webdriver.ie.driver", "C:/path/to/IEDriverServer.exe");
System.setProperty("webdriver.edge.driver", "C:/path/to/MicrosoftWebDriver.exe");
System.setProperty("phantomjs.binary.path", "/path/to/phantomjs");
System.setProperty("webdriver.gecko.driver", "/path/to/geckodriver");
In order to simplify the life of Java WebDriver users, in March 2015 the utility WebDriverManager
was first released. WebDriverManager is a library which automates all this process (download the
proper binary and export the proper variable) for Java in runtime. The WebDriverManager API is
quite simple, providing a singleton object for each of the above mentioned browsers:
WebDriverManager.chromedriver().setup();
WebDriverManager.firefoxdriver().setup();
WebDriverManager.operadriver().setup();
WebDriverManager.phantomjs().setup();
WebDriverManager.edgedriver().setup();
WebDriverManager.iedriver().setup();;
The solution implemented by WebDriverManager is today supported by similar tools for other
languages, such as webdriver-manager for Node.js or WebDriverManager.Net for .NET.
On September 2017, a new major version of the well-know testing JUnit framework was released.
This leads to Selenium-Jupiter, which can be seen as the natural evolution of WebDriverManager
for JUnit 5 tests. Internally, Selenium-Jupiter is built using two foundations:
1. It uses WebDriverManager to manage the binaries requires by WebDriver.
2. It uses the dependency injection feature of the extension model of JUnit 5 to inject WebDriver
objects within @Test methods.
All in all, using Selenium WebDriver to control browsers using Java was never that easy. Using JUnit
5 and Selenium-Jupiter, you simply need to declare the flavor of browser you want to use in your
test method (or constructor) and use it.
Chrome
The following example contains a simple usage of Chrome in JUnit 5. The complete source code of
this test is hosted on GitHub. Notice that this class contains two tests (methods annotated with
@Test). The first one (testWithOneChrome) declares just one ChromeDriver parameter, and therefore
this test controls a single Chrome browser. On the other hand, the second @Test (
testWithTwoChromes) declares two different ChromeDriver parameters, and so, it controls two Chrome
browsers.
5
9. import static org.hamcrest.CoreMatchers.containsString;
import static org.hamcrest.CoreMatchers.equalTo;
import static org.hamcrest.CoreMatchers.startsWith;
import static org.hamcrest.MatcherAssert.assertThat;
import org.junit.jupiter.api.Test;
import org.junit.jupiter.api.extension.ExtendWith;
import org.openqa.selenium.chrome.ChromeDriver;
import io.github.bonigarcia.seljup.SeleniumExtension;
@ExtendWith(SeleniumExtension.class)
public class ChromeJupiterTest {
@Test
public void testWithOneChrome(ChromeDriver driver) {
driver.get("https://bonigarcia.github.io/selenium-jupiter/");
assertThat(driver.getTitle(),
containsString("JUnit 5 extension for Selenium"));
}
@Test
public void testWithTwoChromes(ChromeDriver driver1, ChromeDriver driver2) {
driver1.get("http://www.seleniumhq.org/");
driver2.get("http://junit.org/junit5/");
assertThat(driver1.getTitle(), startsWith("Selenium"));
assertThat(driver2.getTitle(), equalTo("JUnit 5"));
}
}
Firefox
The following test uses Firefox as browser(s). To that aim, @Test methods simply need to include
FirefoxDriver parameters.
6
10. import static org.hamcrest.CoreMatchers.containsString;
import static org.hamcrest.CoreMatchers.equalTo;
import static org.hamcrest.CoreMatchers.startsWith;
import static org.hamcrest.MatcherAssert.assertThat;
import org.junit.jupiter.api.Test;
import org.junit.jupiter.api.extension.ExtendWith;
import org.openqa.selenium.firefox.FirefoxDriver;
import io.github.bonigarcia.seljup.SeleniumExtension;
@ExtendWith(SeleniumExtension.class)
public class FirefoxJupiterTest {
@Test
public void testWithOneFirefox(FirefoxDriver driver) {
driver.get("https://bonigarcia.github.io/selenium-jupiter/");
assertThat(driver.getTitle(),
containsString("JUnit 5 extension for Selenium"));
}
@Test
public void testWithTwoFirefoxs(FirefoxDriver driver1,
FirefoxDriver driver2) {
driver1.get("http://www.seleniumhq.org/");
driver2.get("http://junit.org/junit5/");
assertThat(driver1.getTitle(), startsWith("Selenium"));
assertThat(driver2.getTitle(), equalTo("JUnit 5"));
}
}
Opera
Are you one of the few using Opera? No problem, you can still make automated tests with JUnit 5,
WebDriver, and Selenium-Jupiter, as follows:
7
11. import static org.hamcrest.CoreMatchers.containsString;
import static org.hamcrest.MatcherAssert.assertThat;
import org.junit.jupiter.api.Test;
import org.junit.jupiter.api.extension.ExtendWith;
import org.openqa.selenium.opera.OperaDriver;
import io.github.bonigarcia.seljup.SeleniumExtension;
@ExtendWith(SeleniumExtension.class)
public class OperaJupiterTest {
@Test
public void test(OperaDriver driver) {
driver.get("https://bonigarcia.github.io/selenium-jupiter/");
assertThat(driver.getTitle(),
containsString("JUnit 5 extension for Selenium"));
}
}
Edge
The following example uses one Edge browser. This test should be executed on a Windows machine
with Edge.
import static org.hamcrest.CoreMatchers.containsString;
import static org.hamcrest.MatcherAssert.assertThat;
import org.junit.jupiter.api.Test;
import org.junit.jupiter.api.extension.ExtendWith;
import org.openqa.selenium.edge.EdgeDriver;
import io.github.bonigarcia.seljup.SeleniumExtension;
@ExtendWith(SeleniumExtension.class)
public class EdgeJupiterTest {
@Test
void edgeTest(EdgeDriver driver) {
driver.get("https://bonigarcia.github.io/selenium-jupiter/");
assertThat(driver.getTitle(),
containsString("JUnit 5 extension for Selenium"));
}
}
8
12. Internet Explorer
The following example uses one Internet Explorer browser. This test should be executed on a
Windows machine with Internet Explorer.
import static org.hamcrest.CoreMatchers.containsString;
import static org.hamcrest.MatcherAssert.assertThat;
import org.junit.jupiter.api.Disabled;
import org.junit.jupiter.api.Test;
import org.junit.jupiter.api.extension.ExtendWith;
import org.openqa.selenium.ie.InternetExplorerDriver;
import io.github.bonigarcia.seljup.SeleniumExtension;
@ExtendWith(SeleniumExtension.class)
public class IExplorerJupiterTest {
@Test
void iExplorerTest(InternetExplorerDriver driver) {
driver.get("https://bonigarcia.github.io/selenium-jupiter/");
assertThat(driver.getTitle(),
containsString("JUnit 5 extension for Selenium"));
}
}
Safari
You can also use Safari in conjunction with Selenium-Jupiter. Take into account that SafariDriver
requires Safari 10 running on OSX El Capitan or greater.
9
13. import static org.hamcrest.CoreMatchers.containsString;
import static org.hamcrest.MatcherAssert.assertThat;
import org.junit.jupiter.api.Test;
import org.junit.jupiter.api.extension.ExtendWith;
import org.openqa.selenium.safari.SafariDriver;
import io.github.bonigarcia.seljup.SeleniumExtension;
@ExtendWith(SeleniumExtension.class)
public class SafariJupiterTest {
@Test
public void test(SafariDriver driver) {
driver.get("http://www.seleniumhq.org/");
assertThat(driver.getTitle(),
containsString("JUnit 5 extension for Selenium"));
}
}
PhamtomJS
PhamtomJS is a headless browser (i.e. a browser without GUI), and it can be convenient for
different types of tests. The following example demonstrates how to use PhamtomJS with Selenium-
Jupiter.
import static org.hamcrest.CoreMatchers.notNullValue;
import static org.hamcrest.MatcherAssert.assertThat;
import org.junit.jupiter.api.Test;
import org.junit.jupiter.api.extension.ExtendWith;
import org.openqa.selenium.phantomjs.PhantomJSDriver;
import io.github.bonigarcia.seljup.SeleniumExtension;
@ExtendWith(SeleniumExtension.class)
public class PhantomjsJupiterTest {
@Test
public void test(PhantomJSDriver driver) {
driver.get("https://bonigarcia.github.io/selenium-jupiter/");
assertThat(driver.getPageSource(), notNullValue());
}
}
10
14. HtmlUnit
HtmlUnit is another headless browser that can be used easily in a Jupiter test, for example like this:
import static org.hamcrest.CoreMatchers.containsString;
import static org.hamcrest.MatcherAssert.assertThat;
import org.junit.jupiter.api.Test;
import org.junit.jupiter.api.extension.ExtendWith;
import org.openqa.selenium.htmlunit.HtmlUnitDriver;
import io.github.bonigarcia.seljup.SeleniumExtension;
@ExtendWith(SeleniumExtension.class)
public class HtmlUnitJupiterTest {
@Test
public void test(HtmlUnitDriver driver) {
driver.get("https://bonigarcia.github.io/selenium-jupiter/");
assertThat(driver.getTitle(),
containsString("JUnit 5 extension for Selenium"));
}
}
Docker browsers
As of version 2.0.0, Selenium-Jupiter allows to ask for browsers in Docker containers. The only
requirement to use this feature is to install Docker Engine in the machine running the tests.
Internally, Selenium-Jupiter uses a docker-client and different Docker images for browsers, namely:
• Stable versions of Docker browser, provided by Selenoid.
• Beta and nightly versions of Docker browser, provided by ElasTest.
• Browsers in Android devices, provided by Budi Utomo.
As shown in the following section, the mode of operation is similar to local browser. We simply asks
for browsers in Docker simply declaring parameters in our @Test methods, and Selenium-Jupiter
will make magic for us: it downloads the proper Docker image for the browser, start it, and
instantiate the object of type WebDriver or RemoteWebDriver to control the browser from our test. The
annotation @DockerBrowser need to be declared in the parameter to mark the WebDriver object as a
browser in Docker.
Chrome
The following example contains a simple test example using Chrome browsers in Docker. Check out
the code here. As you can see, the first @Test method (called testChrome) declares a parameter of
11
15. type RemoteWebDriver. This parameter is annotated with @DockerBrowser. This annotation requires to
set the browser type, in this case CHROME. If no version is specified, then the latest version of the
browser will be used. This feature is known as evergreen Docker browsers, and it is implementing
by consuming the REST API of Docker Hub, asking for the list of Selenoid browsers. On the other
hand, the second @Test (called testChromeWithVersion) a fixed version is set, in this case 67.0.
import static io.github.bonigarcia.seljup.BrowserType.CHROME;
import static org.hamcrest.CoreMatchers.containsString;
import static org.hamcrest.MatcherAssert.assertThat;
import org.junit.jupiter.api.Test;
import org.junit.jupiter.api.extension.ExtendWith;
import org.openqa.selenium.remote.RemoteWebDriver;
import io.github.bonigarcia.seljup.DockerBrowser;
import io.github.bonigarcia.seljup.SeleniumExtension;
@ExtendWith(SeleniumExtension.class)
public class DockerChromeJupiterTest {
@Test
public void testChrome(
@DockerBrowser(type = CHROME) RemoteWebDriver driver) {
driver.get("https://bonigarcia.github.io/selenium-jupiter/");
assertThat(driver.getTitle(),
containsString("JUnit 5 extension for Selenium"));
}
@Test
public void testChromeWithVersion(
@DockerBrowser(type = CHROME, version = "73.0") RemoteWebDriver driver) {
driver.get("https://bonigarcia.github.io/selenium-jupiter/");
assertThat(driver.getTitle(),
containsString("JUnit 5 extension for Selenium"));
}
}
In this other example, wildcards are used to set the browser version. In the first @Test (method
testLatestChrome), we use the literal latest to mark the use of the latest version (in fact the use of
latest is exactly the same that not declaring the version attribute). The second @Test (method
testFormerChrome) sets the version as latest-1. This should be read as latest version minus one, in
other words, the previous version to the stable version at the time of the test execution. Notice that
the concrete versions for both test will evolve in time, since new versions are released constantly.
All in all, you have the certainty of using the latest versions of the browser without any kind of
extra configuration nor maintenance of the underlying infrastructure.
Moreover, in third (testBetaChrome) and fourth (testUnstableChrome) test beta and unstable (i.e.
development) versions are used. This feature is available both for Chrome and Firefox, thanks to
12
16. the Docker images provided by the ElasTest project.
import org.junit.jupiter.api.Test;
import org.junit.jupiter.api.extension.ExtendWith;
import org.openqa.selenium.WebDriver;
import io.github.bonigarcia.seljup.DockerBrowser;
import io.github.bonigarcia.seljup.SeleniumExtension;
@ExtendWith(SeleniumExtension.class)
public class DockerChromeLatestJupiterTest {
@Test
public void testLatestChrome(
@DockerBrowser(type = CHROME, version = "latest") WebDriver driver) {
// Use stable version of Chrome in this test
}
@Test
public void testFormerChrome(
@DockerBrowser(type = CHROME, version = "latest-1") WebDriver driver) {
// Use previous to stable version of Chrome in this test
}
@Test
public void testBetaChrome(
@DockerBrowser(type = CHROME, version = "beta") WebDriver driver) {
// Use beta version of Chrome in this test
}
@Test
public void testUnstableChrome(
@DockerBrowser(type = CHROME, version = "unstable") WebDriver driver) {
// Use development version of Chrome in this test
}
}
NOTE
The label latest-* is supported, where * is a number for a former version to the
current stable. For instance, latest-2 means the two previous version to the stable
(for instance, if at the time of running a test the latest version is 63.0, latest-2 will
mean version 61.0).
Firefox
The use of Firefox is equivalent. With respect to the previous example, it simply change the type of
browser. Versioning works exactly the same.
13
17. import static io.github.bonigarcia.seljup.BrowserType.FIREFOX;
import static org.hamcrest.CoreMatchers.containsString;
import static org.hamcrest.MatcherAssert.assertThat;
import org.junit.jupiter.api.Test;
import org.junit.jupiter.api.extension.ExtendWith;
import org.openqa.selenium.remote.RemoteWebDriver;
import io.github.bonigarcia.seljup.DockerBrowser;
import io.github.bonigarcia.seljup.SeleniumExtension;
@ExtendWith(SeleniumExtension.class)
public class DockerFirefoxJupiterTest {
@Test
public void testLatest(
@DockerBrowser(type = FIREFOX) RemoteWebDriver driver) {
driver.get("https://bonigarcia.github.io/selenium-jupiter/");
assertThat(driver.getTitle(),
containsString("JUnit 5 extension for Selenium"));
}
@Test
public void testVersion(
@DockerBrowser(type = FIREFOX, version = "64") RemoteWebDriver driver) {
driver.get("https://bonigarcia.github.io/selenium-jupiter/");
assertThat(driver.getTitle(),
containsString("JUnit 5 extension for Selenium"));
}
}
NOTE
Notice that the version of the second test is simply 64. The actual version of the
image is 64.0, but Selenium-Jupiter supposes that version is .0 if not specified.
Opera
Again, the use of Opera browsers in Docker is the same, simply changing the browser type to OPERA.
14
18. import static io.github.bonigarcia.seljup.BrowserType.OPERA;
import static org.hamcrest.CoreMatchers.containsString;
import static org.hamcrest.MatcherAssert.assertThat;
import org.junit.jupiter.api.Test;
import org.junit.jupiter.api.extension.ExtendWith;
import org.openqa.selenium.remote.RemoteWebDriver;
import io.github.bonigarcia.seljup.DockerBrowser;
import io.github.bonigarcia.seljup.SeleniumExtension;
@ExtendWith(SeleniumExtension.class)
public class DockerOperaJupiterTest {
@Test
public void testOpera(@DockerBrowser(type = OPERA) RemoteWebDriver driver) {
driver.get("https://bonigarcia.github.io/selenium-jupiter/");
assertThat(driver.getTitle(),
containsString("JUnit 5 extension for Selenium"));
}
}
Edge
Selenium-Jupiter can be used to control a Microsoft Edge browser in a Docker container. Due to
licensing issues, the required Docker image is not available in Docker Hub, and it must be built in
local, following the tutorial provided by Aerokube. If that tutorial is followed step by step, a Docker
image named windows/edge:18 will be available in the local machine. Then, Selenium_Jupiter can be
used to control the Edge browser as follows:
15
19. import static io.github.bonigarcia.seljup.BrowserType.EDGE;
import static org.hamcrest.CoreMatchers.containsString;
import static org.hamcrest.MatcherAssert.assertThat;
import org.junit.jupiter.api.BeforeAll;
import org.junit.jupiter.api.Test;
import org.junit.jupiter.api.extension.RegisterExtension;
import org.openqa.selenium.WebDriver;
import io.github.bonigarcia.seljup.DockerBrowser;
import io.github.bonigarcia.seljup.SeleniumExtension;
public class DockerEdgeJupiterTest {
@RegisterExtension
static SeleniumExtension seleniumExtension = new SeleniumExtension();
@BeforeAll
static void setup() {
seleniumExtension.getConfig().setVnc(true);
seleniumExtension.getConfig().setRecording(true);
}
@Test
public void testEdge(@DockerBrowser(type = EDGE) WebDriver driver) {
driver.get("https://bonigarcia.github.io/selenium-jupiter/");
assertThat(driver.getTitle(),
containsString("JUnit 5 extension for Selenium"));
}
}
Internet Explorer
The same way than Edge, Selenium-Jupiter can also be used to control a Internet Explorer browser
in a Docker container. This time, the tutorial provided by Aerokube need to be used to build the
windows/ie:11 image. Then, Selenium_Jupiter uses that image, for example as follows:
16
20. import static io.github.bonigarcia.seljup.BrowserType.IEXPLORER;
import static org.hamcrest.CoreMatchers.containsString;
import static org.hamcrest.MatcherAssert.assertThat;
import org.junit.jupiter.api.BeforeAll;
import org.junit.jupiter.api.Test;
import org.junit.jupiter.api.extension.RegisterExtension;
import org.openqa.selenium.WebDriver;
import io.github.bonigarcia.seljup.DockerBrowser;
import io.github.bonigarcia.seljup.SeleniumExtension;
public class DockerIExplorerJupiterTest {
@RegisterExtension
static SeleniumExtension seleniumExtension = new SeleniumExtension();
@BeforeAll
static void setup() {
seleniumExtension.getConfig().setVnc(true);
seleniumExtension.getConfig().setRecording(true);
}
@Test
public void testIExplorer(
@DockerBrowser(type = IEXPLORER) WebDriver driver) {
driver.get("https://bonigarcia.github.io/selenium-jupiter/");
assertThat(driver.getTitle(),
containsString("JUnit 5 extension for Selenium"));
}
}
Android
The use of browser devices in Selenium-Jupiter is straightforward. Simply change the browser type
to ANDROID as follows.
17
21. import org.junit.jupiter.api.Test;
import org.junit.jupiter.api.extension.RegisterExtension;
import org.openqa.selenium.remote.RemoteWebDriver;
import io.github.bonigarcia.seljup.DockerBrowser;
import io.github.bonigarcia.seljup.SeleniumExtension;
public class AndroidJupiterTest {
@RegisterExtension
static SeleniumExtension seleniumExtension = new SeleniumExtension();
@BeforeAll
static void setup() {
seleniumExtension.getConfig().setVnc(true);
seleniumExtension.getConfig().setRecording(true);
seleniumExtension.getConfig().setAndroidLogging(true);
}
@Test
public void testAndroid(
@DockerBrowser(type = ANDROID) RemoteWebDriver driver) {
driver.get("https://bonigarcia.github.io/selenium-jupiter/");
assertThat(driver.getTitle(),
containsString("JUnit 5 extension for Selenium"));
}
}
The supported Android devices are summarized in the following table:
Table 1. Android devices in Selenium-Jupiter
Android version API level Browser name
5.0.1 21 browser
5.1.1 22 browser
6.0 23 chrome
7.0 24 chrome
7.1.1 25 chrome
8.0 26 chrome
8.1 27 chrome
9.0 28 chrome
Moreover, the type of devices are the following:
Table 2. Android devices types in Selenium-Jupiter
18
22. Type Device name
Phone Samsung Galaxy S6
Phone Nexus 4
Phone Nexus 5
Phone Nexus One
Phone Nexus S
Tablet Nexus 7
Android (9.0) with Chrome in Samsung Galaxy S6 is the default setup for Android devices. These
values can be changed using the configuration capabilities or by means of the the following
parameters in the @DockerBrowser annotation
import org.junit.jupiter.api.Test;
import org.junit.jupiter.api.extension.ExtendWith;
import org.openqa.selenium.remote.RemoteWebDriver;
import io.github.bonigarcia.seljup.DockerBrowser;
import io.github.bonigarcia.seljup.SeleniumExtension;
@ExtendWith(SeleniumExtension.class)
public class AndroidCustomJupiterTest {
@Test
public void testAndroid(@DockerBrowser(type = ANDROID, version = "9.0",
deviceName = "Nexus S") RemoteWebDriver driver) {
driver.get("https://bonigarcia.github.io/selenium-jupiter/");
assertThat(driver.getTitle(),
containsString("JUnit 5 extension for Selenium"));
}
}
Remote sessions (VNC)
Selenium-Jupiter allows to track the evolution of our browsers in Docker using Virtual Network
Computing (VNC) sessions. This feature is disabled by default, but it can activated using the
configuration key sel.jup.vnc to true (more info on section Configuration).
When it is activated, the VNC URL of a browser in Docker is printed in the test log, concretely using
the DEBUG level (see example below). Simply copying and pasting that URL in a real browser we
can take a look to the browser while the test is being executed. We can even interact with the
Docker browser.
19
23. 2018-03-31 17:07:03 [main] INFO i.g.b.handler.DockerDriverHandler - VNC URL (copy and
paste in a browser navigation bar to interact with remote session)
2018-03-31 17:07:03 [main] INFO i.g.b.handler.DockerDriverHandler -
http://192.168.99.100:32769/vnc.html?host=192.168.99.100&port=32768&path=vnc/aa39e2562
bf0f58bfbad0924d22ca958&resize=scale&autoconnect=true&password=selenoid
Figure 3. Example of VNC session of Chrome (desktop)
20
24. Figure 4. Example of VNC session of Chrome (Android)
NOTE
In addition to log the VNC URL, as of Selenium-Jupiter 2.1.0, the value of this URL is
exported as Java property as vnc.session.url (i.e.
System.setProperty("vnc.session.url", vncUrl);).
Recordings
Selenium-Jupiter allows to record the sessions of browsers in Docker. This capability is not activated
by default, but it activated simply setting the configuration key sel.jup.recording to true (see
section Configuration for further details about configuration).
This way, a recording in MP4 format will be stored at the end of the test which uses one or several
browsers in Docker. The output folder in which the recording is stored is configured by means of
the configuration key sel.jup.output.folder, whose default value is . (i.e. the current folder in
which the test is executed). The following picture shows an example of recording.
21
25. Figure 5. Example of recording played in VLC
Performance tests
Another important new feature of browsers in Docker is the possibility of asking for many of them
by the same test. This can be used to implement performance tests in a seamless way. To use this
feature, we need into account two aspects. First of all, the attribute size of the annotation
@DockerBrowser should be declared. This numeric value sets the number of browsers demanded by
the test. Second, the test declares a List<RemoteWebDriver> (or List<WebDriver>). For example as
follows:
import static io.github.bonigarcia.seljup.BrowserType.CHROME;
import static java.lang.invoke.MethodHandles.lookup;
import static java.util.concurrent.Executors.newFixedThreadPool;
import static java.util.concurrent.TimeUnit.SECONDS;
import static org.hamcrest.CoreMatchers.containsString;
import static org.hamcrest.MatcherAssert.assertThat;
import static org.slf4j.LoggerFactory.getLogger;
import java.util.List;
22
26. import java.util.concurrent.CountDownLatch;
import java.util.concurrent.ExecutorService;
import org.junit.jupiter.api.Test;
import org.junit.jupiter.api.extension.ExtendWith;
import org.openqa.selenium.remote.RemoteWebDriver;
import org.slf4j.Logger;
import io.github.bonigarcia.seljup.DockerBrowser;
import io.github.bonigarcia.seljup.SeleniumExtension;
@ExtendWith(SeleniumExtension.class)
public class PerformenceDockerChromeJupiterTest {
static final int NUM_BROWSERS = 3;
final Logger log = getLogger(lookup().lookupClass());
@Test
public void testPerformance(
@DockerBrowser(type = CHROME, version = "73.0", size = NUM_BROWSERS) List
<RemoteWebDriver> driverList)
throws InterruptedException {
ExecutorService executorService = newFixedThreadPool(NUM_BROWSERS);
CountDownLatch latch = new CountDownLatch(NUM_BROWSERS);
driverList.forEach((driver) -> {
executorService.submit(() -> {
try {
log.info("Session id {}",
((RemoteWebDriver) driver).getSessionId());
driver.get(
"https://bonigarcia.github.io/selenium-jupiter/");
assertThat(driver.getTitle(), containsString(
"JUnit 5 extension for Selenium"));
} finally {
latch.countDown();
}
});
});
latch.await(50, SECONDS);
executorService.shutdown();
}
}
This example requires a list of 3 Chrome browsers in Docker. Then, it executed in parallel a given
logic. Notice that if the number of browsers is high, the CPU and memory consumption of the test
23
27. running the machine will increase accordingly.
Remote browsers
Selenium-Jupiter also supports remote browsers, using a Selenium Grid server. To that aim, a couple
of custom annotations can be used:
• DriverUrl (parameter-level or field-level): Annotation used to identify the URL value needed to
instantiate a RemoteWebDriver object. This URL can be setup using the configuration key
sel.jup.selenium.server.url. This value can be used to use browsers from cloud providers, such
as Saucelabs or BrowserStack.
• DriverCapabilities (parameter-level or field-level): Annotation to configure the desired
capabilities (WebDriver’s object DesiredCapabilities).
Using capabilities
The annotation @DriverCapabilities is used to specify WebDriver capabilities (i.e. type browser,
version, platform, etc.). These capabilities are typically used for Selenium Grid tests (i.e. tests using
remote browsers). To that aim, a Selenium Hub (also known as Selenium Server) should be up an
running, and its URL should known. This URL will be specified using the Selenium-Jupiter
annotation @DriverUrl.
The following example provides a complete example about this. As you can see, in the test setup
(@BeforeAll) a Selenium Grid is implemented, first starting a Hub (a.k.a. Selenium Server), and then
a couple of nodes (Chrome a Firefox) are registered in the Hub. Therefore, remote test using
RemoteWebDriver can be executed, simply pointing to the Hub (whose URL in this case is
http://localhost:4444/wd/hub in this example) and selecting the browser to be used using the
Capabilities.
24
28. import static org.hamcrest.CoreMatchers.containsString;
import static org.hamcrest.MatcherAssert.assertThat;
import static org.openqa.selenium.remote.DesiredCapabilities.firefox;
import org.junit.jupiter.api.Test;
import org.junit.jupiter.api.extension.ExtendWith;
import org.openqa.selenium.Capabilities;
import org.openqa.selenium.WebDriver;
import org.openqa.selenium.remote.RemoteWebDriver;
import io.github.bonigarcia.seljup.DriverCapabilities;
import io.github.bonigarcia.seljup.DriverUrl;
import io.github.bonigarcia.seljup.SeleniumExtension;
@ExtendWith(SeleniumExtension.class)
public class RemoteWebDriverJupiterTest {
@DriverUrl
String url = "http://localhost:4444/wd/hub";
@DriverCapabilities
Capabilities capabilities = firefox();
@Test
void testWithRemoteChrome(@DriverUrl("http://localhost:4444/wd/hub")
@DriverCapabilities("browserName=chrome") RemoteWebDriver driver) {
exercise(driver);
}
@Test
void testWithRemoteFirefox(RemoteWebDriver driver) {
exercise(driver);
}
void exercise(WebDriver driver) {
driver.get("https://bonigarcia.github.io/selenium-jupiter/");
assertThat(driver.getTitle(),
containsString("JUnit 5 extension for Selenium"));
}
}
The following class contains an example which uses Chrome as browser and capabilities defined
using @DriverCapabilities. Concretely, this example uses the mobile emulation feature provided out
of the box by Chrome (i.e. render the web page using small screen resolutions to emulate
smartphones).
25
29. import static org.hamcrest.CoreMatchers.containsString;
import static org.hamcrest.MatcherAssert.assertThat;
import java.util.HashMap;
import java.util.Map;
import org.junit.jupiter.api.Test;
import org.junit.jupiter.api.extension.ExtendWith;
import org.openqa.selenium.chrome.ChromeDriver;
import org.openqa.selenium.chrome.ChromeOptions;
import io.github.bonigarcia.seljup.Options;
import io.github.bonigarcia.seljup.SeleniumExtension;
@ExtendWith(SeleniumExtension.class)
public class ChromeWithGlobalCapabilitiesJupiterTest {
@Options
ChromeOptions options = new ChromeOptions();
{
Map<String, String> mobileEmulation = new HashMap<>();
mobileEmulation.put("deviceName", "Nexus 5");
options.setExperimentalOption("mobileEmulation", mobileEmulation);
}
@Test
void chromeTest(ChromeDriver driver) {
driver.get("https://bonigarcia.github.io/selenium-jupiter/");
assertThat(driver.getTitle(),
containsString("JUnit 5 extension for Selenium"));
}
}
Mobile testing with Appium
The annotation @DriverCapabilities can be also used to specify the desired capabilities to create an
instances of AppiumDriver to drive mobile devices (Android or iOS). If not @DriverUrl is specified,
Selenium-Jupiter will start automatically an instance of Appium Server (by default in port 4723) in
the localhost after each test execution (this server is shutdown before each test). For example:
26
30. import static org.junit.jupiter.api.Assertions.assertTrue;
import org.junit.jupiter.api.Test;
import org.junit.jupiter.api.extension.ExtendWith;
import org.openqa.selenium.By;
import org.openqa.selenium.WebElement;
import io.appium.java_client.AppiumDriver;
import io.github.bonigarcia.seljup.DriverCapabilities;
import io.github.bonigarcia.seljup.SeleniumExtension;
@ExtendWith(SeleniumExtension.class)
public class AppiumChromeJupiterTest {
@Test
void testWithAndroid(
@DriverCapabilities({ "browserName=chrome",
"deviceName=Android" }) AppiumDriver<WebElement> driver)
throws InterruptedException {
String context = driver.getContext();
driver.context("NATIVE_APP");
driver.findElement(By.id("com.android.chrome:id/terms_accept")).click();
driver.findElement(By.id("com.android.chrome:id/negative_button"))
.click();
driver.context(context);
driver.get("https://bonigarcia.github.io/selenium-jupiter/");
assertTrue(driver.getTitle().contains("JUnit 5 extension"));
}
}
We can also specify a custom Appium Server URL changing the value of @DriverUrl, at field-level or
parameter-level:
27
31. import static org.hamcrest.CoreMatchers.containsString;
import static org.hamcrest.MatcherAssert.assertThat;
import org.junit.jupiter.api.Test;
import org.junit.jupiter.api.extension.ExtendWith;
import org.openqa.selenium.WebElement;
import org.openqa.selenium.remote.DesiredCapabilities;
import io.appium.java_client.AppiumDriver;
import io.github.bonigarcia.seljup.DriverCapabilities;
import io.github.bonigarcia.seljup.DriverUrl;
import io.github.bonigarcia.seljup.SeleniumExtension;
@ExtendWith(SeleniumExtension.class)
public class AppiumWithGlobalOptionsChromeJupiterTest {
@DriverUrl
String url = "http://localhost:4723/wd/hub";
@DriverCapabilities
DesiredCapabilities capabilities = new DesiredCapabilities();
{
capabilities.setCapability("browserName", "chrome");
capabilities.setCapability("deviceName", "Samsung Galaxy S6");
}
@Test
void testWithAndroid(AppiumDriver<WebElement> driver) {
driver.get("https://bonigarcia.github.io/selenium-jupiter/");
assertThat(driver.getTitle(),
containsString("JUnit 5 extension for Selenium"));
}
}
Using SauceLabs
Selenium-Jupiter can be used to control remote browsers in the SauceLabs cloud.
In the following example, first the @DriverUrl is used to specify the SauceLabs URL. Then the
annotation @DriverCapabilities is used to configure the SauceLabs credentials (username and
accessKey) together with the desired capabilities. In the example we use Chrome 59.0 in Windows
10:
28
32. import static org.hamcrest.CoreMatchers.containsString;
import static org.hamcrest.MatcherAssert.assertThat;
import org.junit.jupiter.api.Disabled;
import org.junit.jupiter.api.Test;
import org.junit.jupiter.api.extension.ExtendWith;
import org.openqa.selenium.remote.DesiredCapabilities;
import org.openqa.selenium.remote.RemoteWebDriver;
import io.github.bonigarcia.seljup.DriverCapabilities;
import io.github.bonigarcia.seljup.DriverUrl;
import io.github.bonigarcia.seljup.SeleniumExtension;
@Disabled
@ExtendWith(SeleniumExtension.class)
public class SauceLabsJupiterTest {
@DriverUrl
String url = "https://ondemand.eu-central-1.saucelabs.com/wd/hub";
@DriverCapabilities
DesiredCapabilities capabilities = new DesiredCapabilities();
{
capabilities.setCapability("username", "<my-saucelabs-user>");
capabilities.setCapability("accessKey", "<my-saucelabs-key>");
capabilities.setCapability("browserName", "Chrome");
capabilities.setCapability("platform", "Windows 10");
capabilities.setCapability("version", "59.0");
capabilities.setCapability("name", "selenium-jupiter-and-saucelabs");
}
@Test
void testWithSaucelabs(RemoteWebDriver driver) {
driver.get("https://bonigarcia.github.io/selenium-jupiter/");
assertThat(driver.getTitle(),
containsString("JUnit 5 extension for Selenium"));
}
}
As usual, the execution of the test can be seen in the SauceLabs dashboard:
29
33. Figure 6. SauceLabs dashboard
Advanced features
Using options
So far, we have discovered how to use different local browsers (Chrome, Firefox, Edge, Opera,
Safari, PhamtomJS, HtmlUnit), Docker browsers (Chrome, Firefox, Opera), or even remote browsers
with Selenium Grid. In any case, the default options are used. Nevertheless, if you have used
intensively Selenium WebDriver, different questions might come to your mind:
• What if I need to specify options (e.g. ChromeOptions, FirefoxOptions, etc) to my WebDriver
object?
• What if need to specify desired capabilities (e.g. browser type, version, platform)?
In order to support the advance features of Selenium WebDriver, Selenium-Jupiter provides several
annotations aimed to allow a fine-grained control of the WebDriver object instantiation. These
annotations are:
• Options (field-level): Annotation to configure options (e.g. ChromeOptions for Chrome,
FirefoxOptions for Firefox, EdgeOptions for Edge, OperaOptions for Opera, and SafariOptions for
Safari).
• Arguments (parameter-level) : Used to add arguments to the options.
30
34. • Preferences (parameter-level) : Used to set preferences to the options.
• Binary (parameter-level) : Used to set the location of the browser binary.
• Extensions (parameter-level) : User to add extensions to the browser.
The annotations marked as parameter-level are applied to a single WebDriver parameter. The
annotations marked as field-level are applied globally in a test class.
The following example shows how to specify options for Chrome. In the first test (called
headlessTest), we are setting the argument --headless, used in Chrome to work as a headless
browser. In the second test (webrtcTest), we are using two different arguments: --use-fake-device
-for-media-stream and --use-fake-ui-for-media-stream, used to fake user media (i.e. camera and
microphone) in WebRTC applications. In the third test (extensionTest), we are adding an extension
to Chrome using the @Extensions annotation. The value of this field is an extension file that will be
searched: i) using value as its relative/absolute path; ii) using value as a file name in the project
classpath.
31
35. import static org.hamcrest.CoreMatchers.containsString;
import static org.hamcrest.CoreMatchers.equalTo;
import static org.hamcrest.MatcherAssert.assertThat;
import org.junit.jupiter.api.Test;
import org.junit.jupiter.api.extension.ExtendWith;
import org.openqa.selenium.By;
import org.openqa.selenium.chrome.ChromeDriver;
import io.github.bonigarcia.seljup.Arguments;
import io.github.bonigarcia.seljup.Extensions;
import io.github.bonigarcia.seljup.SeleniumExtension;
@ExtendWith(SeleniumExtension.class)
public class ChromeWithOptionsJupiterTest {
@Test
void headlessTest(@Arguments("--headless") ChromeDriver driver) {
driver.get("https://bonigarcia.github.io/selenium-jupiter/");
assertThat(driver.getTitle(),
containsString("JUnit 5 extension for Selenium"));
}
@Test
void webrtcTest(@Arguments({ "--use-fake-device-for-media-stream",
"--use-fake-ui-for-media-stream" }) ChromeDriver driver) {
driver.get(
"https://webrtc.github.io/samples/src/content/devices/input-output/");
assertThat(driver.findElement(By.id("video")).getTagName(),
equalTo("video"));
}
@Test
void extensionTest(@Extensions("hello_world.crx") ChromeDriver driver) {
driver.get("https://bonigarcia.github.io/selenium-jupiter/");
assertThat(driver.getTitle(),
containsString("JUnit 5 extension for Selenium"));
}
}
As introduced before, this annotation @Options can be used also at field-level, as shown in this other
example. This test is setting to true the Firefox preferences media.navigator.streams.fake and
media.navigator.permission.disabled, used also for WebRTC.
32
36. import static org.hamcrest.CoreMatchers.equalTo;
import static org.hamcrest.MatcherAssert.assertThat;
import org.junit.jupiter.api.Test;
import org.junit.jupiter.api.extension.ExtendWith;
import org.openqa.selenium.By;
import org.openqa.selenium.firefox.FirefoxDriver;
import org.openqa.selenium.firefox.FirefoxOptions;
import io.github.bonigarcia.seljup.Options;
import io.github.bonigarcia.seljup.SeleniumExtension;
@ExtendWith(SeleniumExtension.class)
public class FirefoxWithGlobalOptionsJupiterTest {
@Options
FirefoxOptions firefoxOptions = new FirefoxOptions();
{
// Flag to use fake media for WebRTC user media
firefoxOptions.addPreference("media.navigator.streams.fake", true);
// Flag to avoid granting access to user media
firefoxOptions.addPreference("media.navigator.permission.disabled",
true);
}
@Test
public void webrtcTest(FirefoxDriver driver) {
driver.get(
"https://webrtc.github.io/samples/src/content/devices/input-output/");
assertThat(driver.findElement(By.id("video")).getTagName(),
equalTo("video"));
}
}
Template tests
Selenium-Jupiter takes advantage on the standard feature of JUnit 5 called test templates. Test
templates can be seen as an special kind of parameterized tests, in which the test is executed
several times according to the data provided by some extension. In our case, the extension is
Selenium-Jupiter itself, and the test template is configured using a custom file in JSON called
browsers scenario.
Let’s see some examples. Consider the following test. A couple of things are new in this test. First of
all, instead of declaring the method with the usual @Test annotation, we are using the JUnit 5’s
annotation @TestTemplate. With this we are saying to JUnit that this method is not a regular test case
but a template. Second, the parameter type of the method templateTest is WebDriver. This is the
33
37. generic interface of Selenium WebDriver, and the concise type (i.e. ChromeDriver, FirefoxDriver,
RemoteWebDriver, etc.) will be determined by Selenium-Jupiter in runtime.
import static org.hamcrest.CoreMatchers.containsString;
import static org.hamcrest.MatcherAssert.assertThat;
import org.junit.jupiter.api.BeforeAll;
import org.junit.jupiter.api.TestTemplate;
import org.junit.jupiter.api.extension.RegisterExtension;
import org.openqa.selenium.WebDriver;
import io.github.bonigarcia.seljup.SeleniumExtension;
public class TemplateTest {
@RegisterExtension
static SeleniumExtension seleniumExtension = new SeleniumExtension();
@TestTemplate
void templateTest(WebDriver driver) {
driver.get("https://bonigarcia.github.io/selenium-jupiter/");
assertThat(driver.getTitle(),
containsString("JUnit 5 extension for Selenium"));
}
}
The last piece we need in this test template is what we call browser scenario. As introduced before,
this scenario is defined in a JSOn file following a simple notation.
The path of the JSON browser scenario is established in the configuration key called
sel.jup.browser.template.json.file. By default, this key has the value classpath:browsers.json. This
means that the JSON scenario is defined in a file called browsers.json located in the classpath (see
section Configuration for further details about configuration).
NOTE
If the configuration key sel.jup.browser.template.json.file do not start with the
word classpath:, the file will be searched using relative of absolute paths.
Now imagine that the content of the file browsers.json is as follows:
34
38. {
"browsers": [
[
{
"type": "chrome-in-docker",
"version": "latest"
}
],
[
{
"type": "chrome-in-docker",
"version": "latest-1"
}
],
[
{
"type": "chrome-in-docker",
"version": "beta"
}
],
[
{
"type": "chrome-in-docker",
"version": "unstable"
}
]
]
}
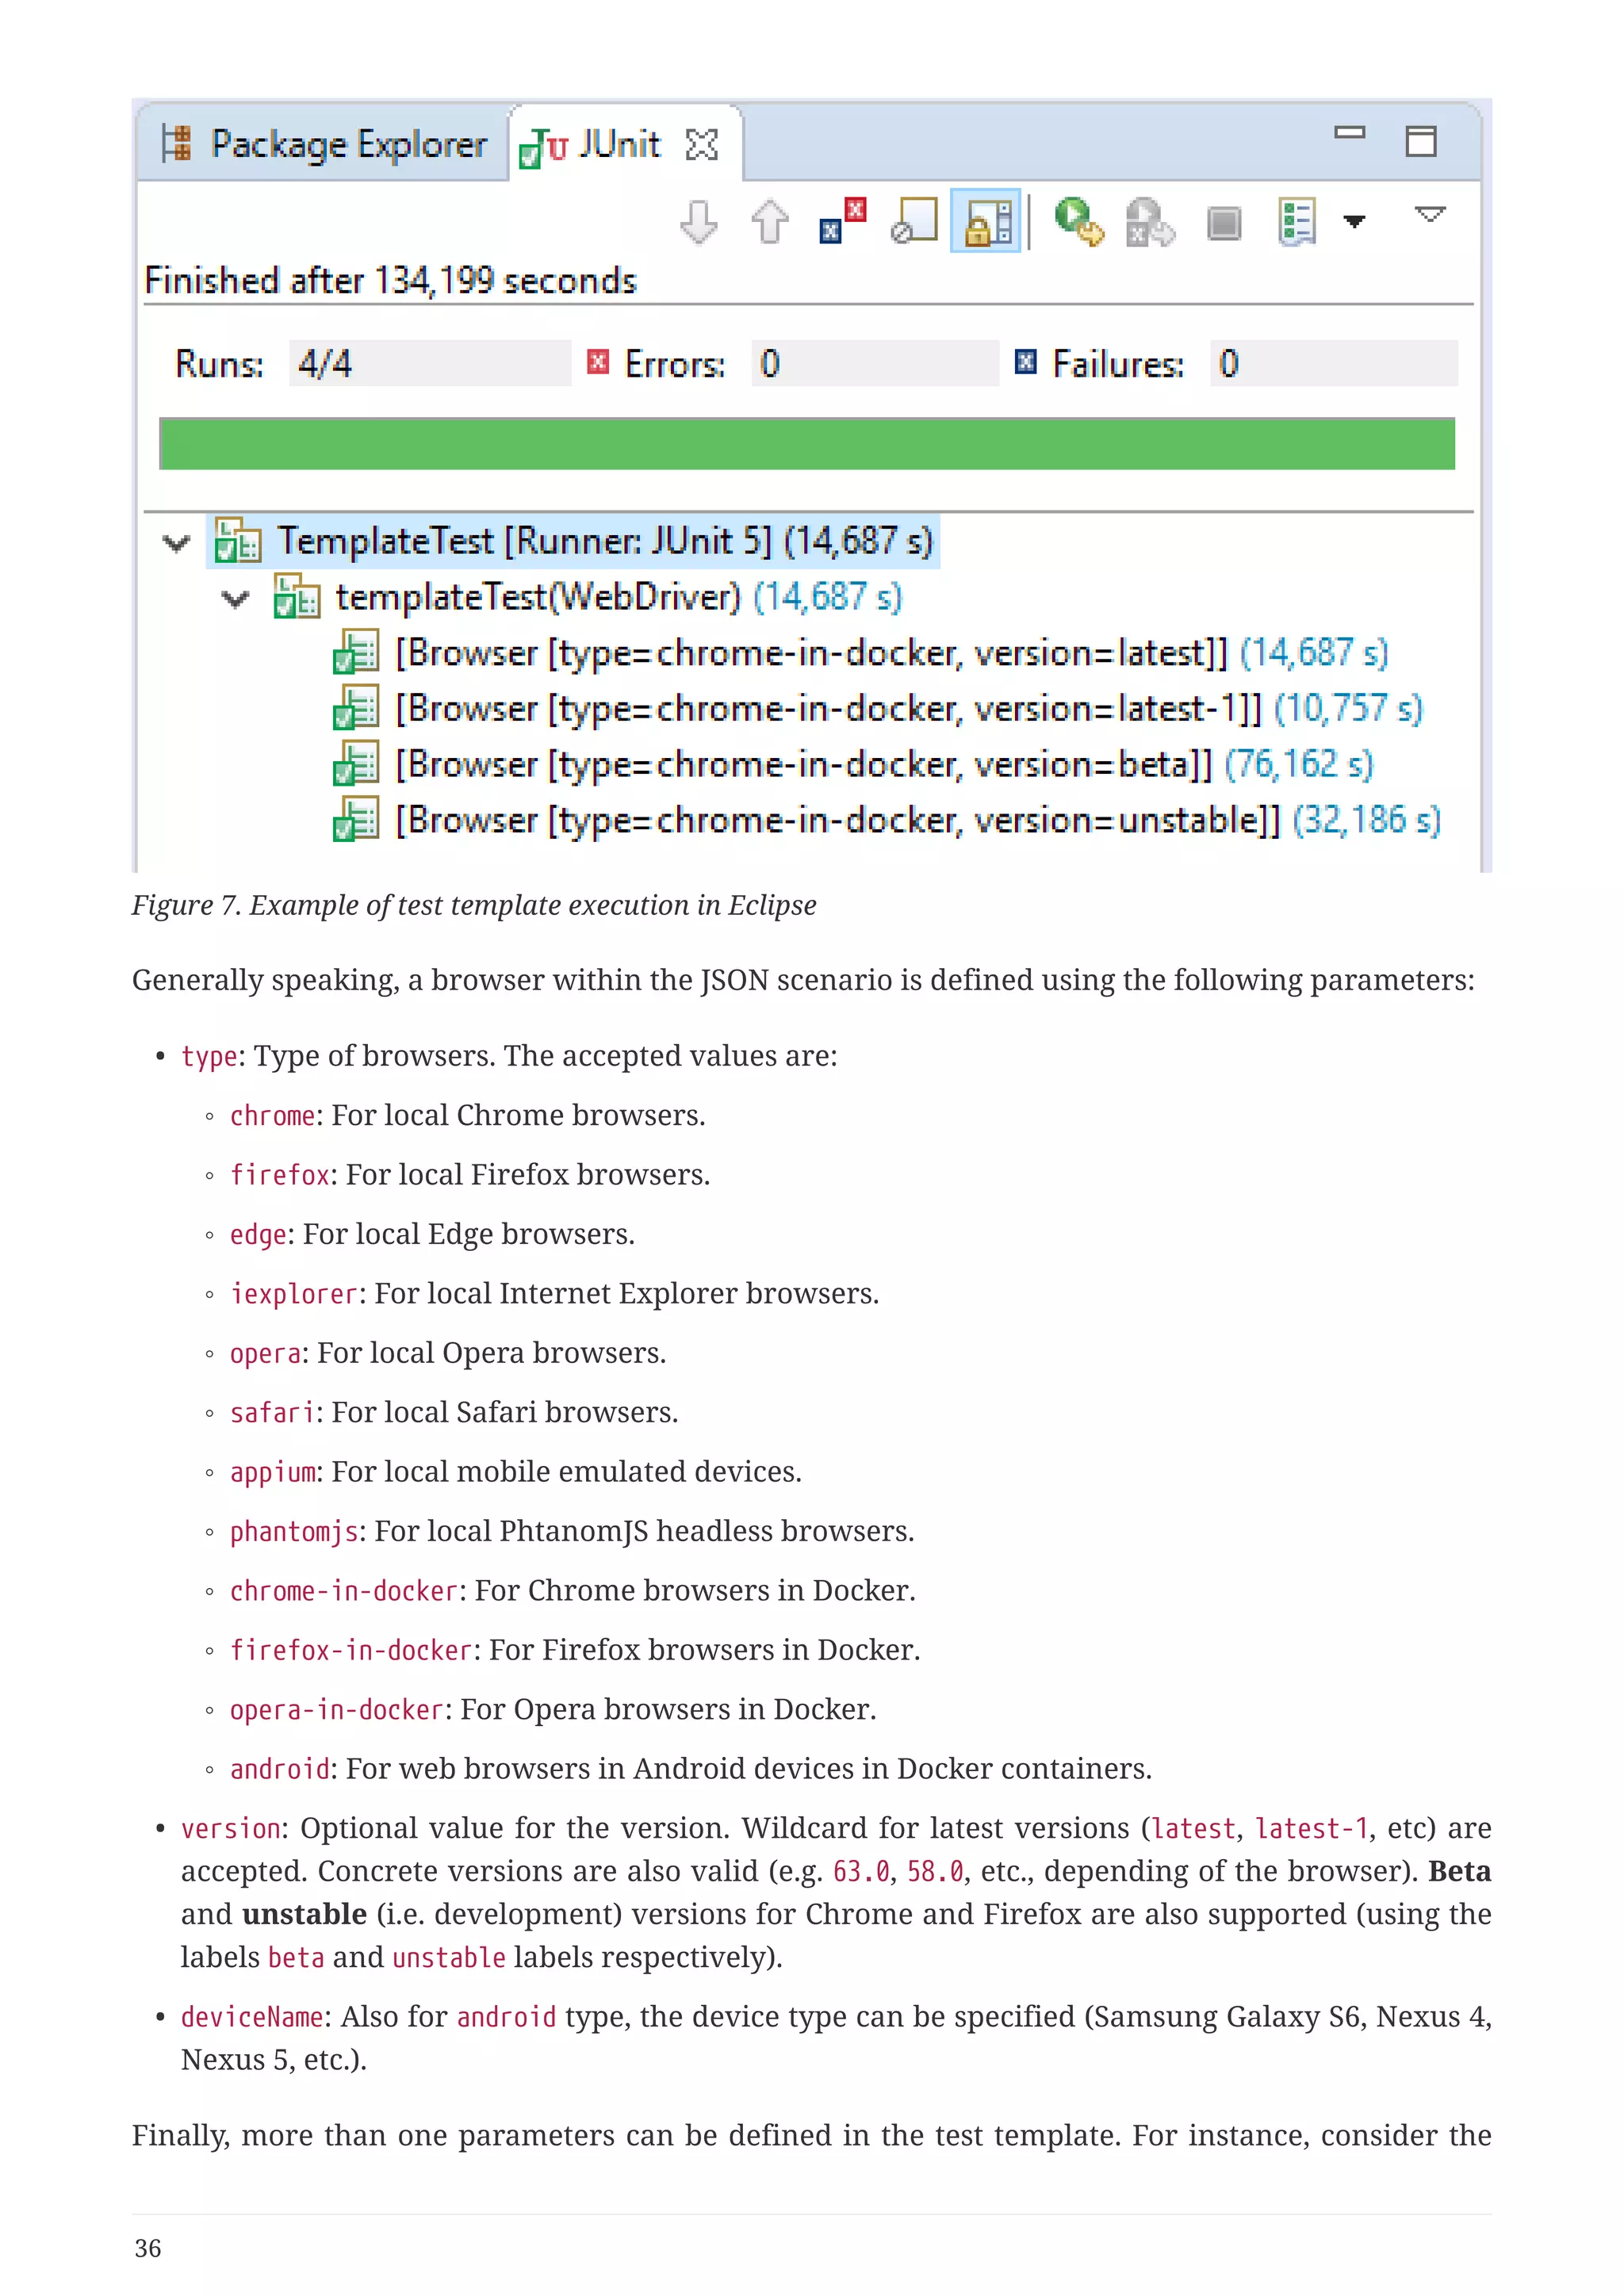
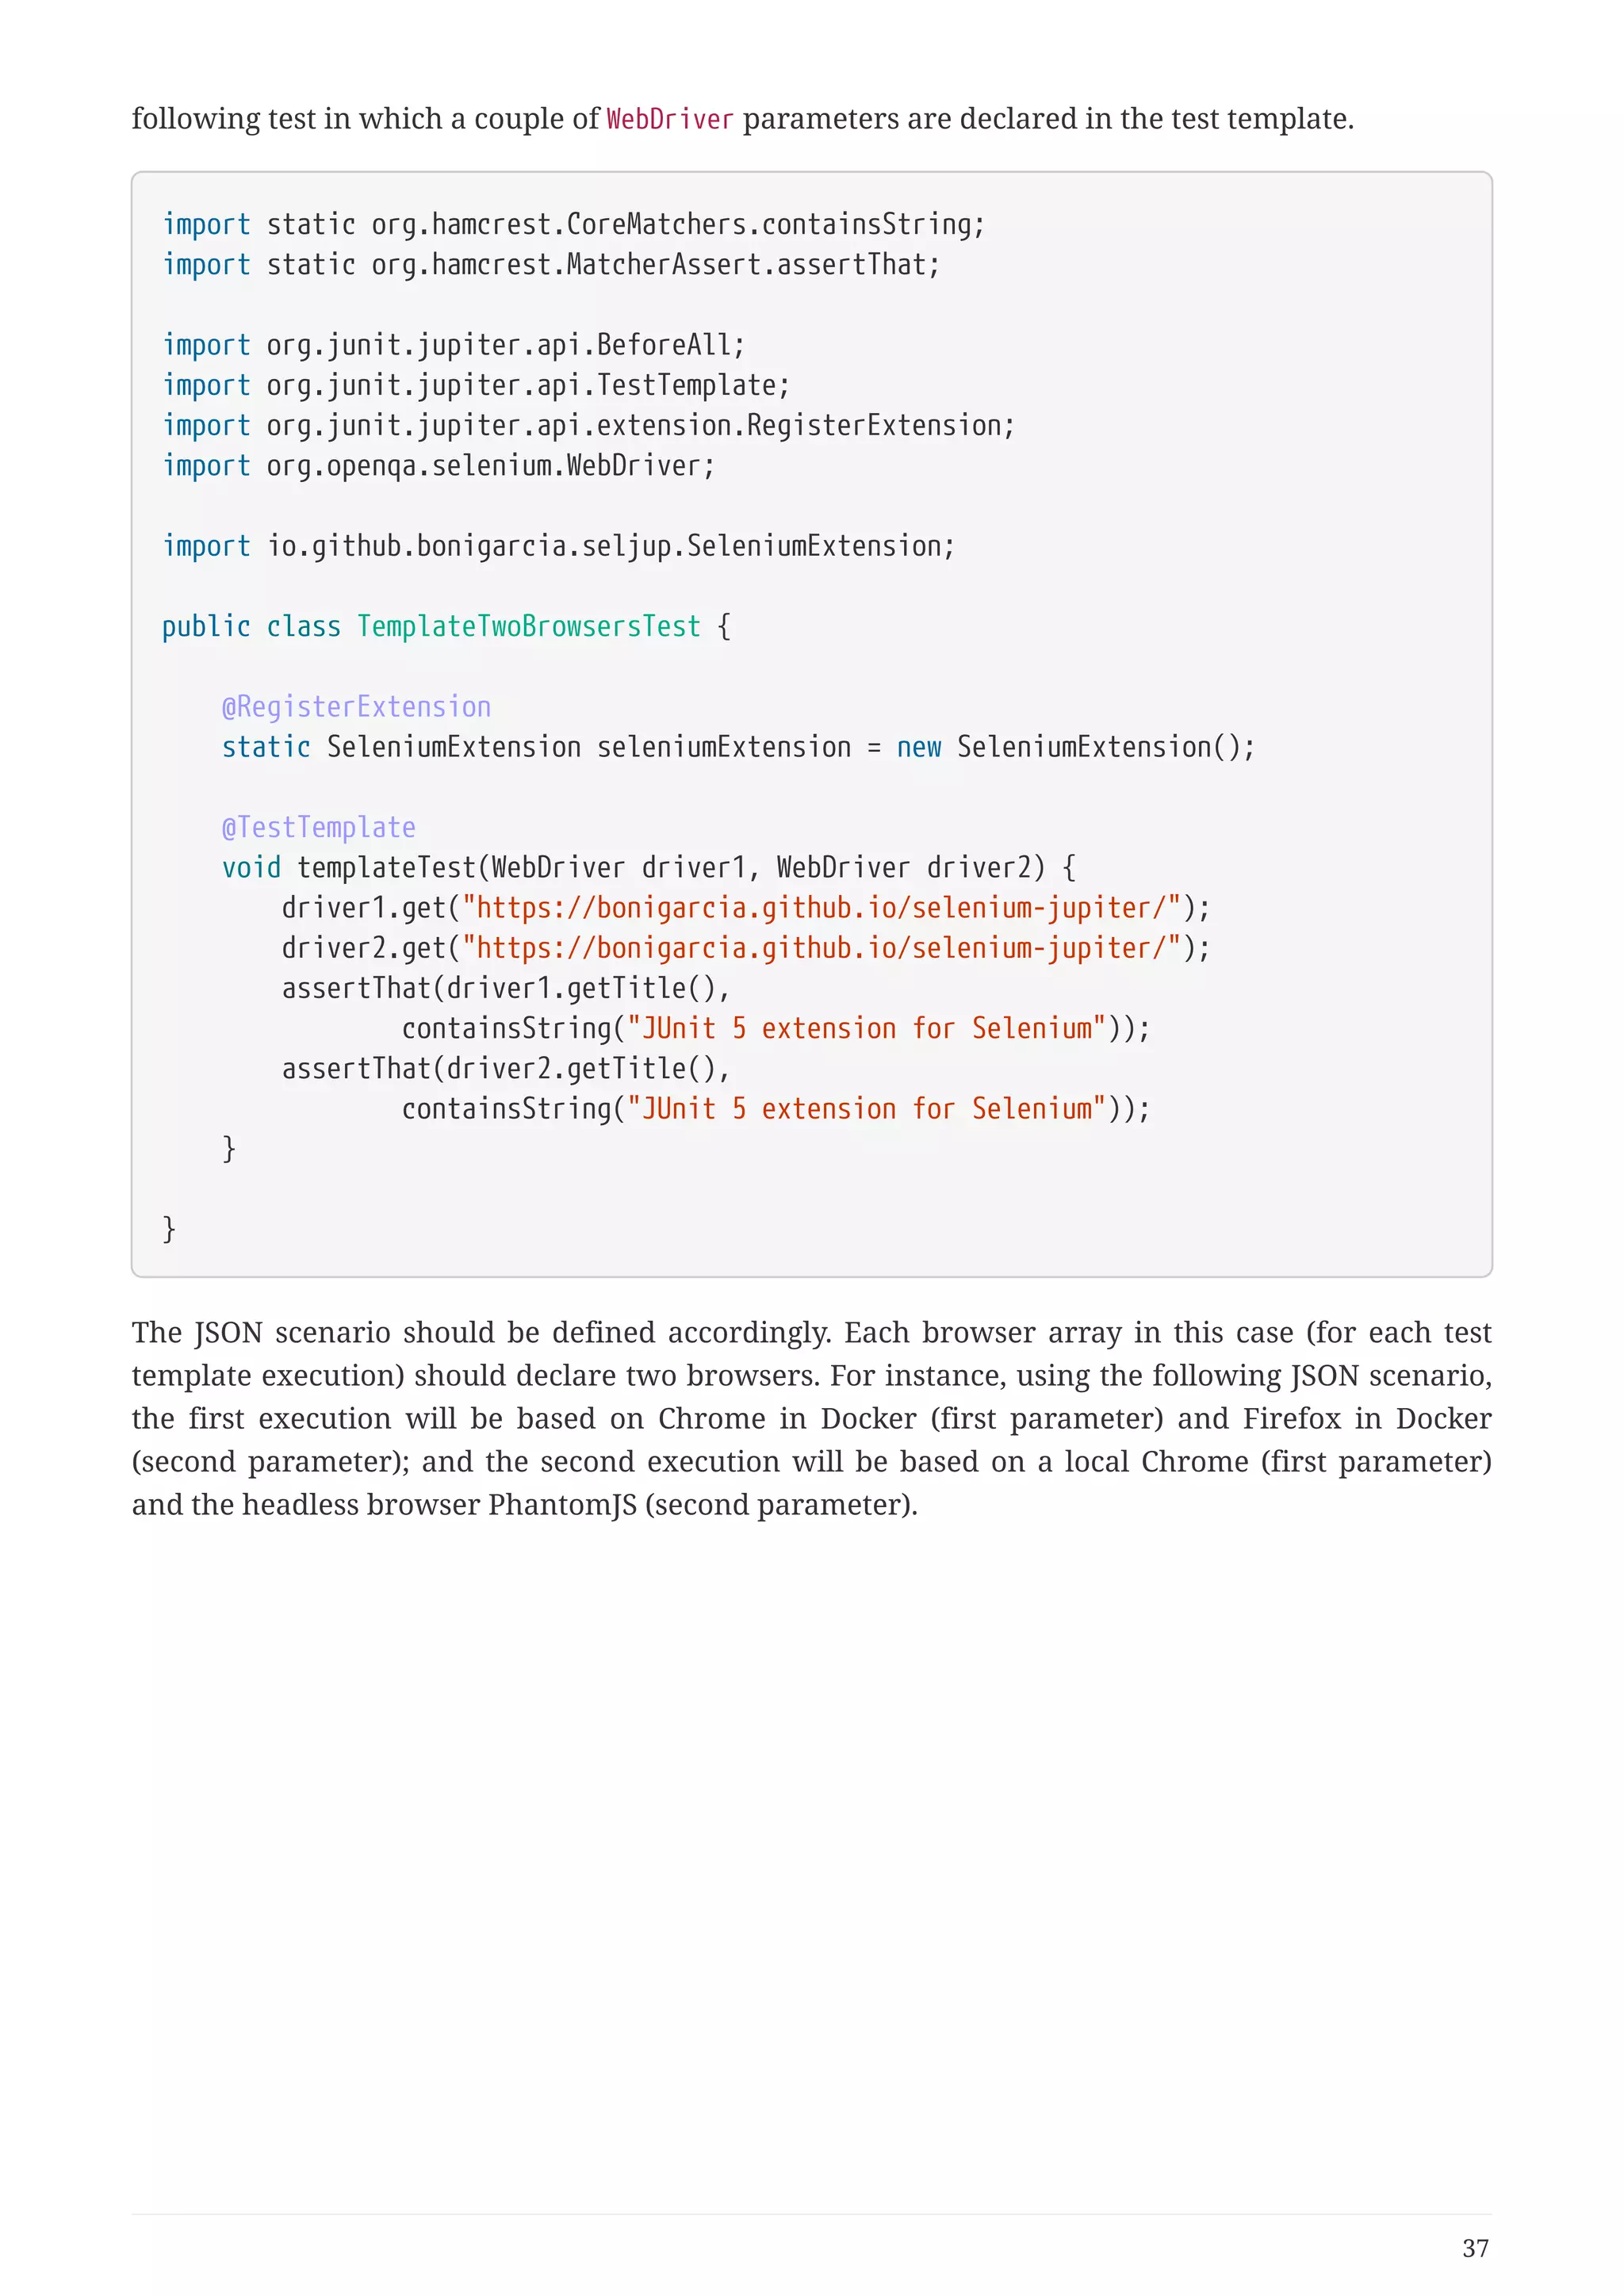
When we execute the template test, in this case we will have four actual tests: the first using the
latest version of Chrome, the second using the previous to stable version of Chrome (latest-1), the
third using the beta version of Chrome (beta), and another test using the development version of
Chrome (unstable). For instance, if we run the test in Eclipse, we will get the following output:
35
39. Figure 7. Example of test template execution in Eclipse
Generally speaking, a browser within the JSON scenario is defined using the following parameters:
• type: Type of browsers. The accepted values are:
◦ chrome: For local Chrome browsers.
◦ firefox: For local Firefox browsers.
◦ edge: For local Edge browsers.
◦ iexplorer: For local Internet Explorer browsers.
◦ opera: For local Opera browsers.
◦ safari: For local Safari browsers.
◦ appium: For local mobile emulated devices.
◦ phantomjs: For local PhtanomJS headless browsers.
◦ chrome-in-docker: For Chrome browsers in Docker.
◦ firefox-in-docker: For Firefox browsers in Docker.
◦ opera-in-docker: For Opera browsers in Docker.
◦ android: For web browsers in Android devices in Docker containers.
• version: Optional value for the version. Wildcard for latest versions (latest, latest-1, etc) are
accepted. Concrete versions are also valid (e.g. 63.0, 58.0, etc., depending of the browser). Beta
and unstable (i.e. development) versions for Chrome and Firefox are also supported (using the
labels beta and unstable labels respectively).
• deviceName: Also for android type, the device type can be specified (Samsung Galaxy S6, Nexus 4,
Nexus 5, etc.).
Finally, more than one parameters can be defined in the test template. For instance, consider the
36
40. following test in which a couple of WebDriver parameters are declared in the test template.
import static org.hamcrest.CoreMatchers.containsString;
import static org.hamcrest.MatcherAssert.assertThat;
import org.junit.jupiter.api.BeforeAll;
import org.junit.jupiter.api.TestTemplate;
import org.junit.jupiter.api.extension.RegisterExtension;
import org.openqa.selenium.WebDriver;
import io.github.bonigarcia.seljup.SeleniumExtension;
public class TemplateTwoBrowsersTest {
@RegisterExtension
static SeleniumExtension seleniumExtension = new SeleniumExtension();
@TestTemplate
void templateTest(WebDriver driver1, WebDriver driver2) {
driver1.get("https://bonigarcia.github.io/selenium-jupiter/");
driver2.get("https://bonigarcia.github.io/selenium-jupiter/");
assertThat(driver1.getTitle(),
containsString("JUnit 5 extension for Selenium"));
assertThat(driver2.getTitle(),
containsString("JUnit 5 extension for Selenium"));
}
}
The JSON scenario should be defined accordingly. Each browser array in this case (for each test
template execution) should declare two browsers. For instance, using the following JSON scenario,
the first execution will be based on Chrome in Docker (first parameter) and Firefox in Docker
(second parameter); and the second execution will be based on a local Chrome (first parameter)
and the headless browser PhantomJS (second parameter).
37
41. {
"browsers": [
[
{
"type": "chrome-in-docker"
},
{
"type": "firefox-in-docker"
}
],
[
{
"type": "chrome"
},
{
"type": "phantomjs"
}
]
]
}
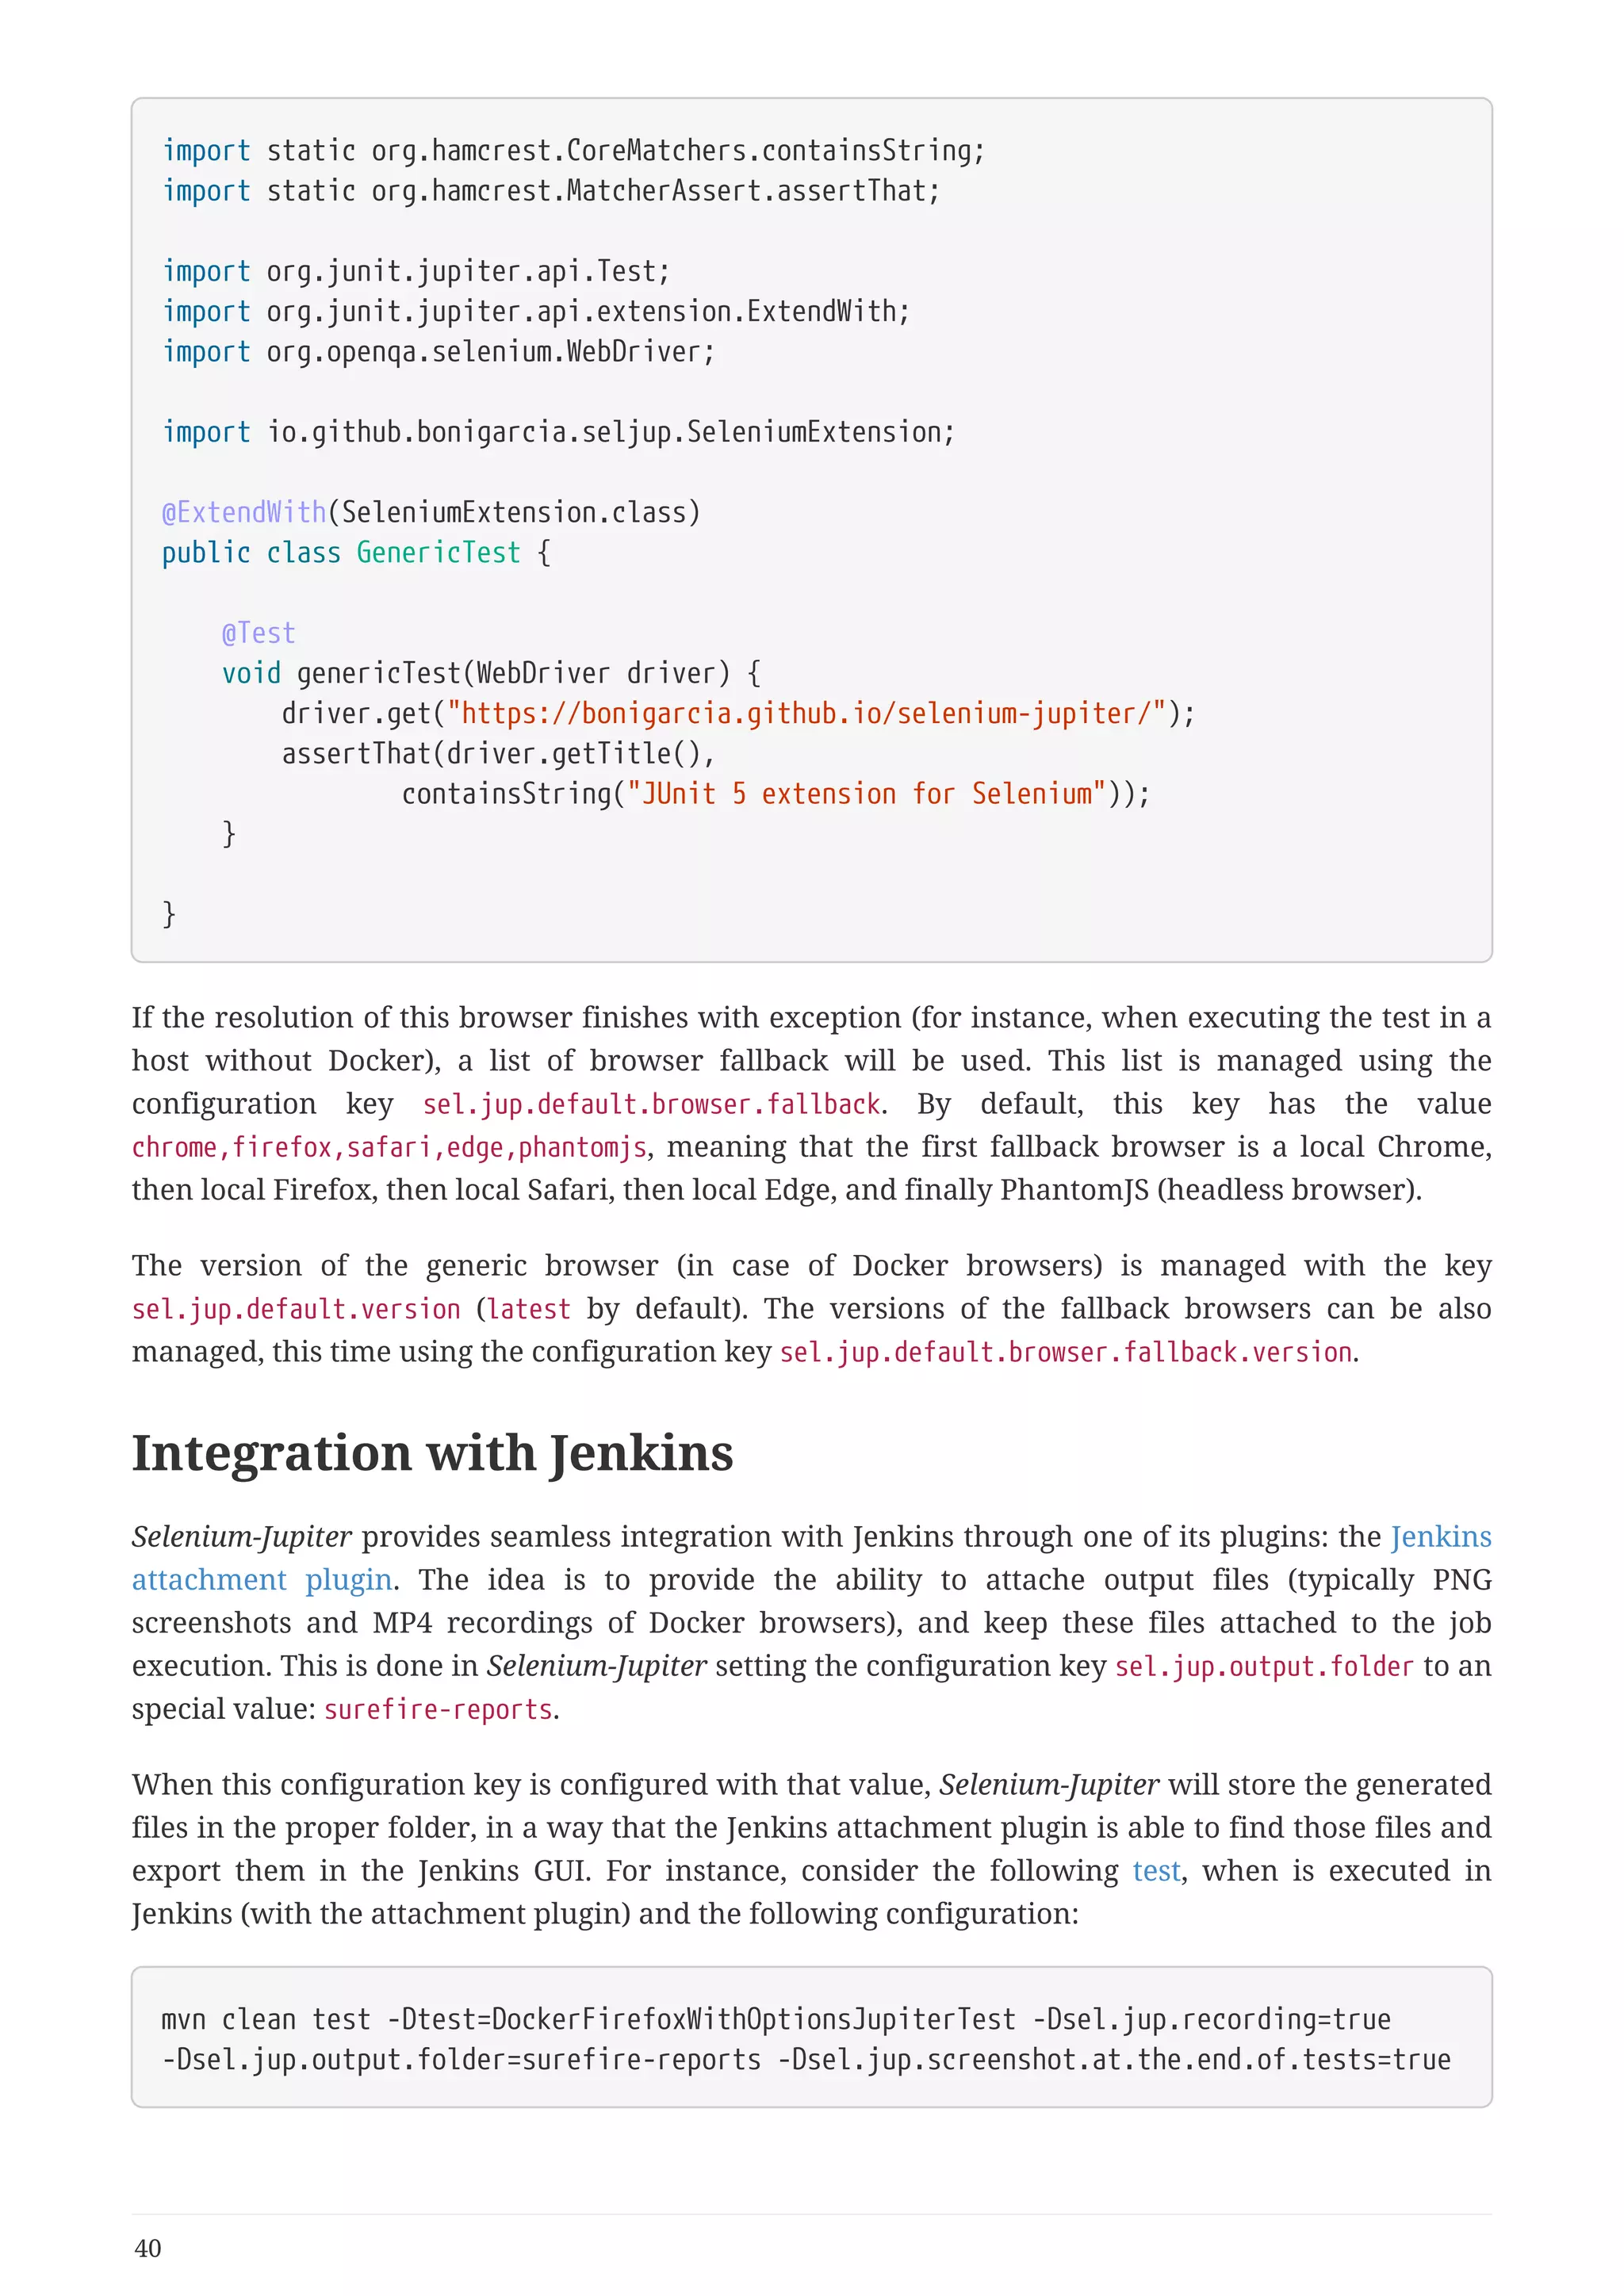
If we execute this test using in GUI, the JUnit tab shows two tests executed with the values defined
in the JSON scenario.
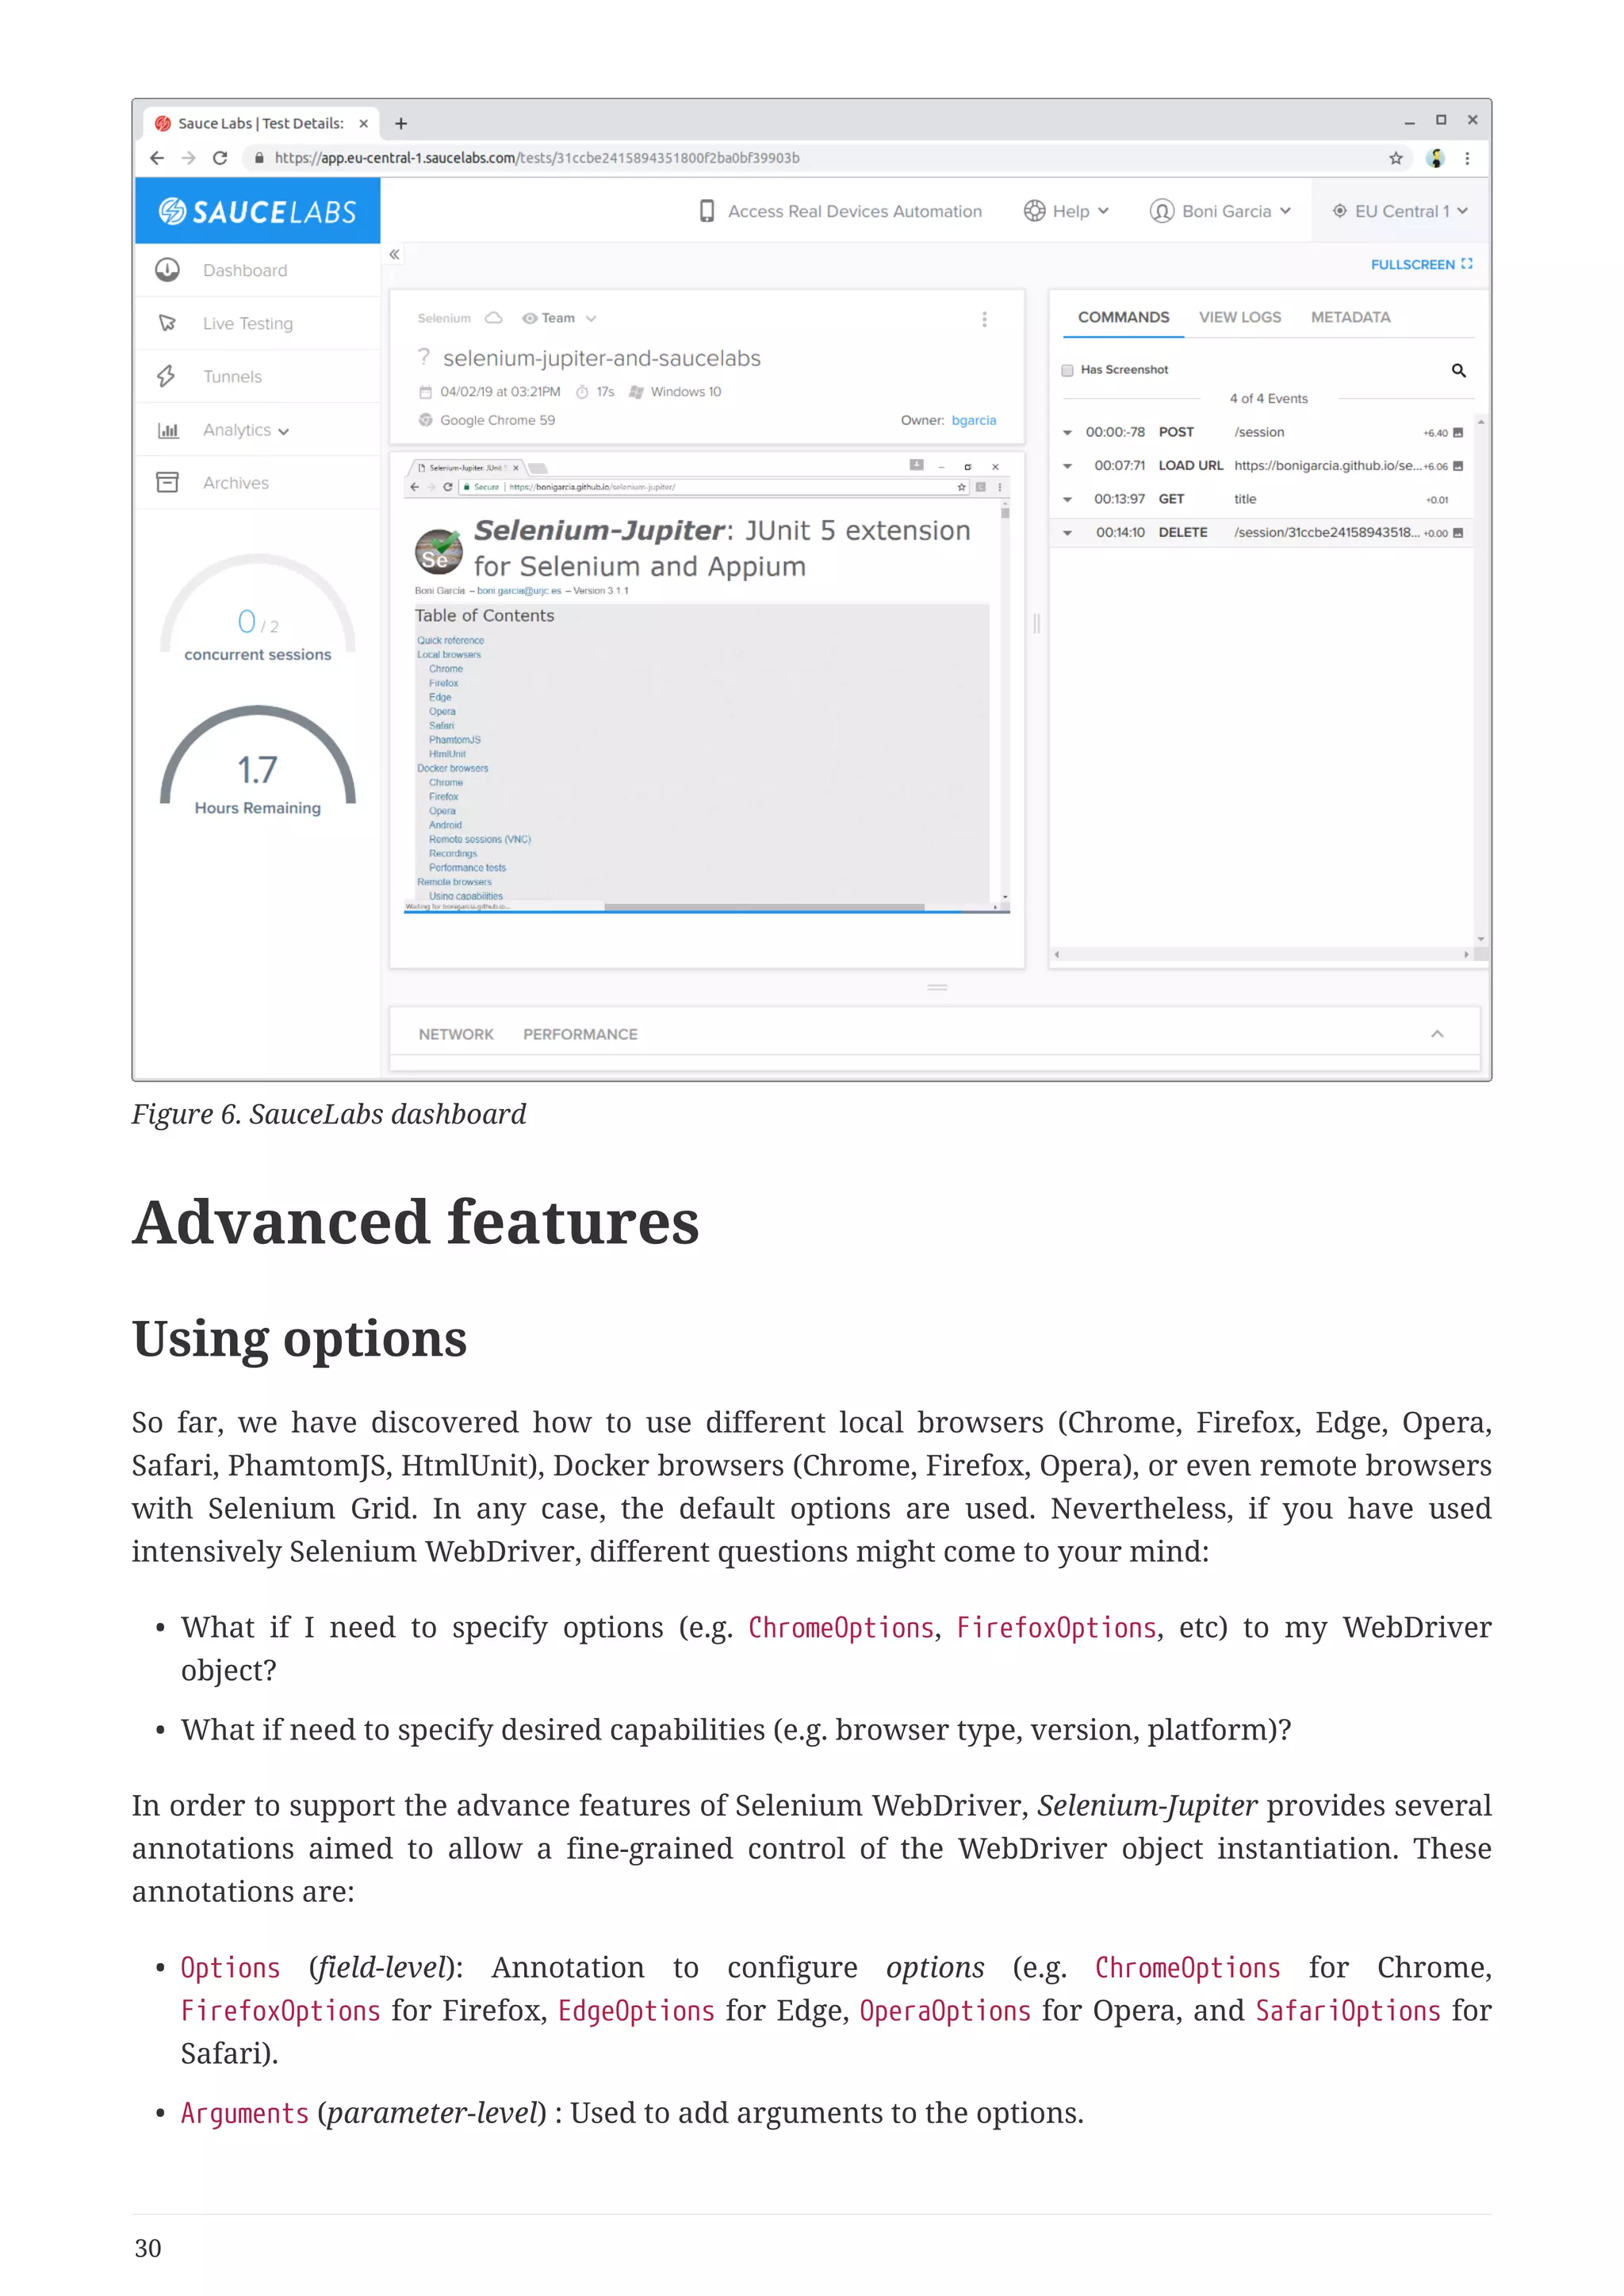
Figure 8. Example of test template execution (with two parameters) in Eclipse
As of version 2.2.0, Selenium-Jupiter allows to configure the browser scenario programmatically
using the JUnit 5 @RegisterExtension annotation. To that aim, the method addBrowsers of the
SeleniumExtension instance is used to add different browser(s) to the scenario. In the following
example the test is executed twice, one using Chrome and the second using Firefox.
38
42. import static org.hamcrest.CoreMatchers.containsString;
import static org.hamcrest.MatcherAssert.assertThat;
import org.junit.jupiter.api.BeforeAll;
import org.junit.jupiter.api.TestTemplate;
import org.junit.jupiter.api.extension.RegisterExtension;
import org.openqa.selenium.WebDriver;
import io.github.bonigarcia.seljup.BrowserBuilder;
import io.github.bonigarcia.seljup.BrowsersTemplate.Browser;
import io.github.bonigarcia.seljup.SeleniumExtension;
public class TemplateRegisterTest {
@RegisterExtension
static SeleniumExtension seleniumExtension = new SeleniumExtension();
@BeforeAll
static void setup() {
Browser chrome = BrowserBuilder.chrome().build();
Browser firefox = BrowserBuilder.firefox().build();
seleniumExtension.addBrowsers(chrome);
seleniumExtension.addBrowsers(firefox);
}
@TestTemplate
void templateTest(WebDriver driver) {
driver.get("https://bonigarcia.github.io/selenium-jupiter/");
assertThat(driver.getTitle(),
containsString("JUnit 5 extension for Selenium"));
}
}
Generic driver
As of version 2.1.0, Selenium-Jupiter allows to use a configurable WebDriver object. This generic
driver is declared as usual (i.e. as test method or constructor parameter) using the type
RemoteWebDriver or WebDriver. The concrete type of browser to be used is established using the
configuration key sel.jup.default.browser. The default value for this key is chrome-in-docker. All the
values used in the template test defined in the previous section (i.e. chrome, firefox, edge, chrome-in-
docker, firefox-in-docker, android, etc.) can be used also to define the type of browser in this mode.
For instance, the following test, if no additional configuration is done, will use Chrome in Docker as
browser:
39
43. import static org.hamcrest.CoreMatchers.containsString;
import static org.hamcrest.MatcherAssert.assertThat;
import org.junit.jupiter.api.Test;
import org.junit.jupiter.api.extension.ExtendWith;
import org.openqa.selenium.WebDriver;
import io.github.bonigarcia.seljup.SeleniumExtension;
@ExtendWith(SeleniumExtension.class)
public class GenericTest {
@Test
void genericTest(WebDriver driver) {
driver.get("https://bonigarcia.github.io/selenium-jupiter/");
assertThat(driver.getTitle(),
containsString("JUnit 5 extension for Selenium"));
}
}
If the resolution of this browser finishes with exception (for instance, when executing the test in a
host without Docker), a list of browser fallback will be used. This list is managed using the
configuration key sel.jup.default.browser.fallback. By default, this key has the value
chrome,firefox,safari,edge,phantomjs, meaning that the first fallback browser is a local Chrome,
then local Firefox, then local Safari, then local Edge, and finally PhantomJS (headless browser).
The version of the generic browser (in case of Docker browsers) is managed with the key
sel.jup.default.version (latest by default). The versions of the fallback browsers can be also
managed, this time using the configuration key sel.jup.default.browser.fallback.version.
Integration with Jenkins
Selenium-Jupiter provides seamless integration with Jenkins through one of its plugins: the Jenkins
attachment plugin. The idea is to provide the ability to attache output files (typically PNG
screenshots and MP4 recordings of Docker browsers), and keep these files attached to the job
execution. This is done in Selenium-Jupiter setting the configuration key sel.jup.output.folder to an
special value: surefire-reports.
When this configuration key is configured with that value, Selenium-Jupiter will store the generated
files in the proper folder, in a way that the Jenkins attachment plugin is able to find those files and
export them in the Jenkins GUI. For instance, consider the following test, when is executed in
Jenkins (with the attachment plugin) and the following configuration:
mvn clean test -Dtest=DockerFirefoxWithOptionsJupiterTest -Dsel.jup.recording=true
-Dsel.jup.output.folder=surefire-reports -Dsel.jup.screenshot.at.the.end.of.tests=true
40
44. In this case, at the the execution of this test, two recordings in MP4 and two screenshots in PNG will
be attached to the job as follows.
Figure 9. Example of test execution through Jenkins with attachments
We can watch the recording simply clicking in the attached MP4 files.
41
45. Figure 10. Example of test execution through Jenkins with attachments
Test template are also compatible with this feature. For instance, consider the following test test.
When is executed in Jenkins using the configuration below, the following attachments will be
available on Jenkins:
mvn clean test -Dtest=TemplateTest -Dsel.jup.recording=true
-Dsel.jup.output.folder=surefire-reports -Dsel.jup.screenshot.at.the.end.of.tests=true
42
46. Figure 11. Example of template test execution through Jenkins with attachments
And we will be able to watch the recording:
43
47. Figure 12. Example of template test execution through Jenkins with attachments
Using Genymotion
The use of Genymotion for using Android devices in the cloud is possible as of Selenium-Jupiter
3.1.0. This feature is used using a Software as a Service (SaaS) approach. In order to use this feature,
we need to select GENYMOTION_SAAS in the cloud parameter of @DockerBrowser in a test. First, we need a
valid Genymotion account. This account will be configured using the methods
setAndroidGenymotionUser(), setAndroidGenymotionPassword() and setAndroidGenymotionLicense() for
user, password, and license respectively. Moreover, we need to specify the following values:
• Genymotion template name (method setAndroidGenymotionTemplate()).
• Android version (method setAndroidGenymotionAndroidVersion()).
• Android API level (method setAndroidGenymotionAndroidApi()).
• Android screen size (method setAndroidGenymotionScreenSize()).
All this values will be internally managed using a label specified with
setAndroidGenymotionDeviceName(). This label will be used later in the actual test in the deviceName
value. The following test shows an example:
44
48. import static io.github.bonigarcia.seljup.BrowserType.ANDROID;
import static io.github.bonigarcia.seljup.CloudType.GENYMOTION_SAAS;
import static org.hamcrest.CoreMatchers.containsString;
import static org.hamcrest.MatcherAssert.assertThat;
import org.junit.jupiter.api.BeforeAll;
import org.junit.jupiter.api.Test;
import org.junit.jupiter.api.extension.RegisterExtension;
import org.openqa.selenium.remote.RemoteWebDriver;
import io.github.bonigarcia.seljup.DockerBrowser;
import io.github.bonigarcia.seljup.SeleniumExtension;
import io.github.bonigarcia.seljup.config.Config;
public class AndroidGenymotionJupiterTest {
@RegisterExtension
static SeleniumExtension seleniumExtension = new SeleniumExtension();
@BeforeAll
static void setup() {
Config config = seleniumExtension.getConfig();
config.setAndroidGenymotionDeviceName("SamsungS7V6");
config.setAndroidGenymotionTemplate("Samsung Galaxy S7");
config.setAndroidGenymotionAndroidVersion("6.0.0");
config.setAndroidGenymotionAndroidApi("23");
config.setAndroidGenymotionScreenSize("1440x2560");
// The following values need to be set (it can be overridden using Java
// properties or environment variables)
config.setAndroidGenymotionUser("my-genymotion-user");
config.setAndroidGenymotionPassword("my-genymotion-pass");
config.setAndroidGenymotionLicense("my-genymotion-license");
}
@Test
public void testAndroidInGenymotionSaas(
@DockerBrowser(type = ANDROID, cloud = GENYMOTION_SAAS, deviceName =
"SamsungS7V6", browserName = "browser")
RemoteWebDriver driver) {
driver.get("https://bonigarcia.github.io/selenium-jupiter/");
assertThat(driver.getTitle(),
containsString("JUnit 5 extension for Selenium"));
}
}
We can see the execution of the test in the Genymotion dashboard while the test is being executed.
For the example before, we see the following Android device:
45
49. Figure 13. Example of test execution in Genymotion
Notice that Selenium_Jupiter downloads the chromedriver binary required by internal Appium
server contained in the internal Docker container which is used to connect with Genymotion SaaS.
By default, the version of the chromedriver binary is related with the installed browser. The
following table shows a summary of the chromedriver versions managed by Selenium_Jupiter
depending on the Android API level. It other version of chromedriver is required, it can specified
using the method setAndroidGenymotionChromedriver().
Table 3. Versions of chromedriver handled by Selenium-Jupiter for Genymotion
Android API level chromedriver version
21 2.21
22 2.13
23 2.18
24 2.23
25 2.28
26 2.31
27 2.33
28 2.40
Single session
By default, the instances provided by Selenium_Jupiter (e.g. ChromeDriver, FirefoxDriver, etc) are
created before each test, and are disposed after each test. As of Selenium_Jupiter 3.2.0, this default
behavior can be changed using the class-level annotation @SingleSession. The instances provided in
this case will be created before all tests, and are disposed after all tests.
46
50. The following test shows an example of this feature. As you can seen, this test uses the ordering
capability provided as of JUnit 5.4. The browser (Chrome in this case) is available at the beginning
for the tests. According to the given order, first testStep1() is executed. Then, the session (i.e. the
same browser in the same state) is used by the second test, testStep2(). An the end of all tests, the
browser is closed.
import static java.lang.invoke.MethodHandles.lookup;
import static org.hamcrest.CoreMatchers.containsString;
import static org.hamcrest.MatcherAssert.assertThat;
import static org.junit.jupiter.api.Assertions.assertTrue;
import static org.slf4j.LoggerFactory.getLogger;
import org.junit.jupiter.api.MethodOrderer.OrderAnnotation;
import org.junit.jupiter.api.Order;
import org.junit.jupiter.api.Test;
import org.junit.jupiter.api.TestMethodOrder;
import org.junit.jupiter.api.extension.ExtendWith;
import org.openqa.selenium.WebElement;
import org.openqa.selenium.chrome.ChromeDriver;
import org.openqa.selenium.remote.RemoteWebDriver;
import org.slf4j.Logger;
import io.github.bonigarcia.seljup.SeleniumExtension;
import io.github.bonigarcia.seljup.SingleSession;
@ExtendWith(SeleniumExtension.class)
@TestMethodOrder(OrderAnnotation.class)
@SingleSession
public class OrderedJupiterTest {
final Logger log = getLogger(lookup().lookupClass());
RemoteWebDriver driver;
public OrderedJupiterTest(ChromeDriver driver) {
this.driver = driver;
}
@Test
@Order(1)
public void testStep1() {
log.debug("Step 1: {}", driver);
driver.get("https://bonigarcia.github.io/selenium-jupiter/");
assertThat(driver.getTitle(),
containsString("JUnit 5 extension for Selenium"));
}
@Test
@Order(2)
public void testStep2() {
47
51. log.debug("Step 2: {}", driver);
WebElement about = driver.findElementByLinkText("About");
assertTrue(about.isDisplayed());
about.click();
}
}
Selenium-Jupiter CLI
As of version 2.1.0, Selenium-Jupiter can used interactively from the shell as a regular command line
interface (CLI) tool. In this mode, Selenium-Jupiter allows to get the VNC session of Docker browser.
There are two ways of using this feature:
• Directly from the source code, using Maven. The command to be used is mvn exec:java
-Dexec.args="browserName <version>". For instance:
48
52. $ mvn exec:java -Dexec.args="chrome beta"
[INFO] Scanning for projects...
[INFO]
[INFO] ------------------------------------------------------------------------
[INFO] Building selenium-jupiter 3.2.0
[INFO] ------------------------------------------------------------------------
[INFO]
[INFO] --- exec-maven-plugin:1.6.0:java (default-cli) @ selenium-jupiter ---
[INFO] Using SeleniumJupiter to execute chrome beta in Docker
[INFO] Using CHROME version beta
[INFO] Starting Docker container aerokube/selenoid:1.8.4
[DEBUG] Creating WebDriver for CHROME at http://172.17.0.1:32911/wd/hub
Jan 24, 2019 1:09:04 AM org.openqa.selenium.remote.ProtocolHandshake createSession
INFO: Detected dialect: OSS
[INFO] Starting Docker container psharkey/novnc:3.3-t6
[INFO] Session id ee7200775c466c8526c77e7eb2495557
[INFO] VNC URL (copy and paste in a browser navigation bar to interact with remote
session)
[INFO]
http://172.17.0.1:32912/vnc.html?host=172.17.0.1&port=32911&path=vnc/ee7200775c466c852
6c77e7eb2495557&resize=scale&autoconnect=true&password=selenoid
[INFO] Press ENTER to exit
[INFO] Stopping Docker container aerokube/selenoid:1.8.4
[INFO] Stopping Docker container psharkey/novnc:3.3-t6
[INFO] ------------------------------------------------------------------------
[INFO] BUILD SUCCESS
[INFO] ------------------------------------------------------------------------
[INFO] Total time: 01:10 min
[INFO] Finished at: 2018-03-31T17:51:15+02:00
[INFO] Final Memory: 27M/390M
[INFO] ------------------------------------------------------------------------
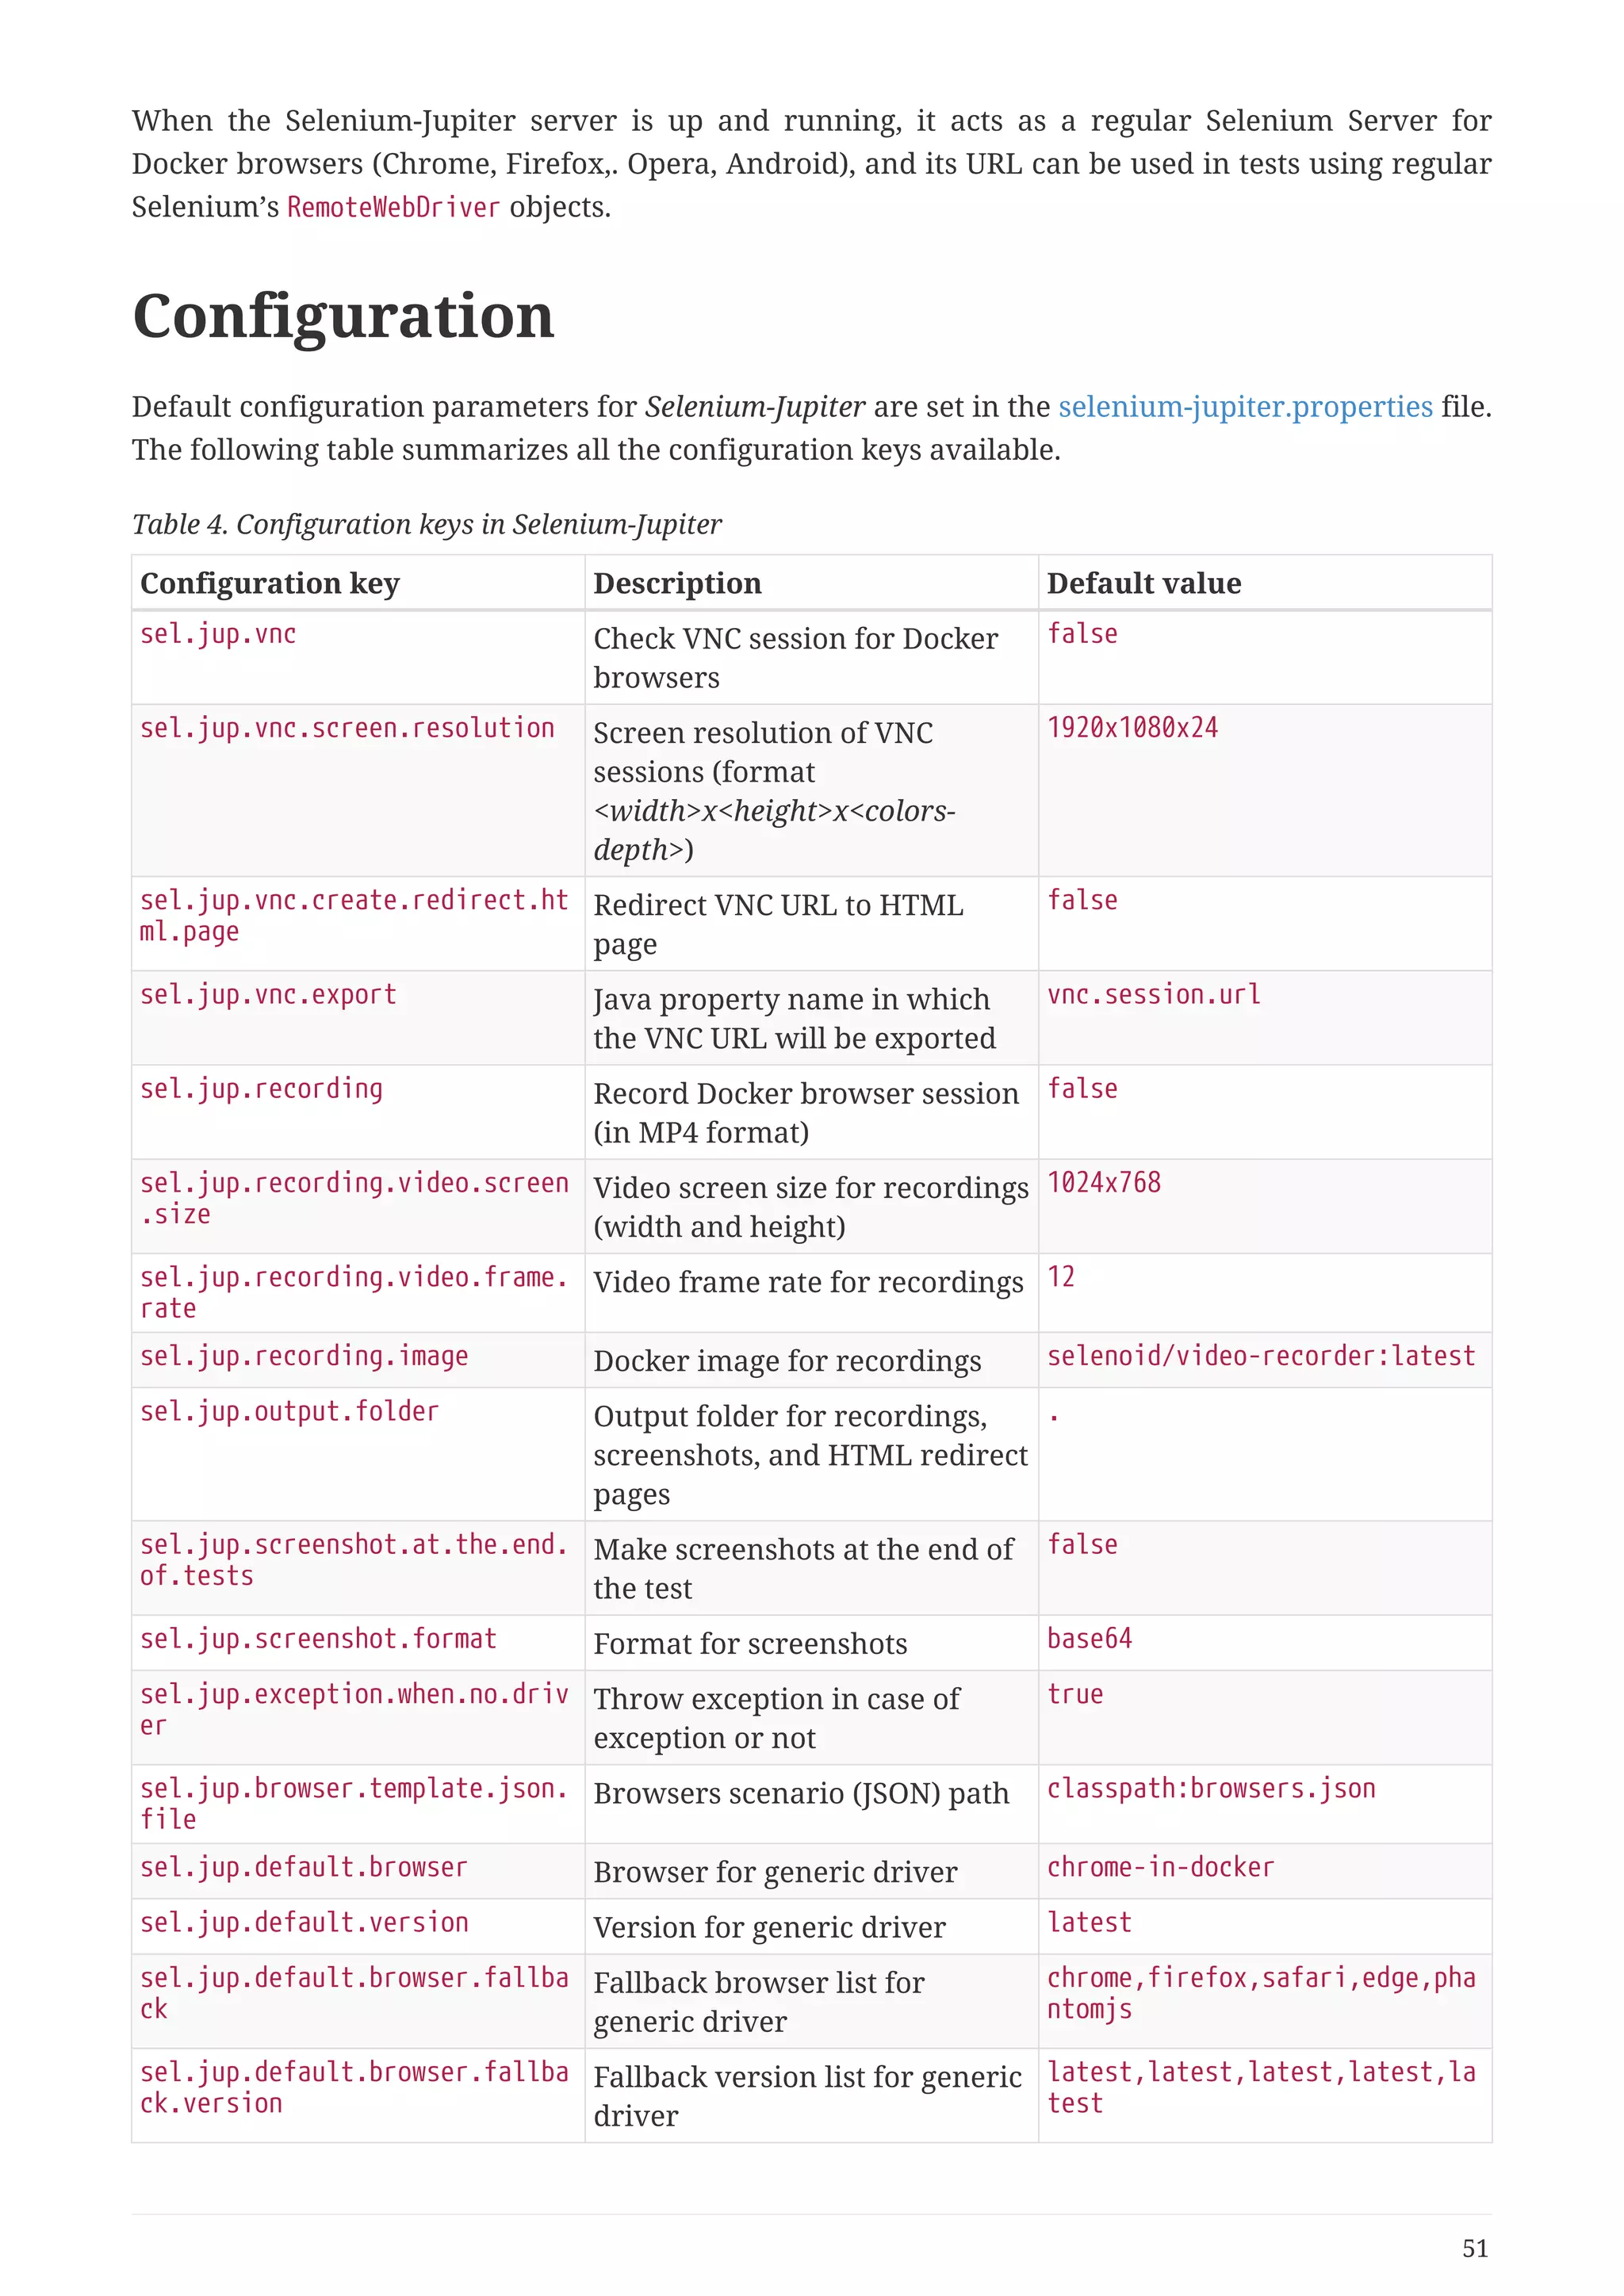
• Using Selenium-Jupiter as a fat-jar. This jar can be created using the command mvn compile
assembly:single from the source code, and then java -jar selenium-jupiter.jar browserName
<version>. For instance:
49
53. $ java -jar selenium-jupiter-3.2.0-fat.jar firefox
[INFO] Using SeleniumJupiter to execute firefox (latest) in Docker
[INFO] Using FIREFOX version 66.0 (latest)
[INFO] Pulling Docker image aerokube/selenoid:1.8.4
[INFO] Starting Docker container aerokube/selenoid:1.8.4
[DEBUG] Creating WebDriver for FIREFOX at http://172.17.0.1:32909/wd/hub
Jan 24, 2019 1:08:15 AM org.openqa.selenium.remote.ProtocolHandshake createSession
INFO: Detected dialect: W3C
[INFO] Starting Docker container psharkey/novnc:3.3-t6
[INFO] Session id 2356ceb4-53f6-49d5-bae0-3072faa47ad2
[INFO] VNC URL (copy and paste in a browser navigation bar to interact with remote
session)
[INFO] http://172.17.0.1:32910/vnc.html?host=172.17.0.1&port=32909&path=vnc/2356ceb4-
53f6-49d5-bae0-3072faa47ad2&resize=scale&autoconnect=true&password=selenoid
[INFO] Press ENTER to exit
[INFO] Stopping Docker container aerokube/selenoid:1.8.4
[INFO] Stopping Docker container psharkey/novnc:3.3-t6
NOTE
As of version 2.2.0, the parameter browserName can be used to select an android
device. In this case, an addition parameter can be specified: deviceName for the
device type (Samsung Galaxy S6, Nexus 4, Nexus 5, etc.).
Selenium-Jupiter Server
As of version 3.0.0, Selenium-Jupiter can used as a server. To start this mode, the shell is used. Once
again, two options are allowed:
• Directly from the source code and Maven. The command to be used is mvn exec:java
-Dexec.args="server <port>". If the second argument is not specified, the default port will be
used (4042):
$ mvn exec:java -Dexec.args="server"
[INFO] Scanning for projects...
[INFO]
[INFO] ------------------------------------------------------------------------
[INFO] Building Selenium-Jupiter 3.2.0
[INFO] ------------------------------------------------------------------------
[INFO]
[INFO] --- exec-maven-plugin:1.6.0:java (default-cli) @ selenium-jupiter ---
[INFO] Selenium-Jupiter server listening on http://localhost:4042/wd/hub
• Using Selenium-Jupiter as a fat-jar. For instance:
> java -jar webdrivermanager-3.2.0-fat.jar server
[INFO] Selenium-Jupiter server listening on http://localhost:4042/wd/hub
50
54. When the Selenium-Jupiter server is up and running, it acts as a regular Selenium Server for
Docker browsers (Chrome, Firefox,. Opera, Android), and its URL can be used in tests using regular
Selenium’s RemoteWebDriver objects.
Configuration
Default configuration parameters for Selenium-Jupiter are set in the selenium-jupiter.properties file.
The following table summarizes all the configuration keys available.
Table 4. Configuration keys in Selenium-Jupiter
Configuration key Description Default value
sel.jup.vnc Check VNC session for Docker
browsers
false
sel.jup.vnc.screen.resolution Screen resolution of VNC
sessions (format
<width>x<height>x<colors-
depth>)
1920x1080x24
sel.jup.vnc.create.redirect.ht
ml.page
Redirect VNC URL to HTML
page
false
sel.jup.vnc.export Java property name in which
the VNC URL will be exported
vnc.session.url
sel.jup.recording Record Docker browser session
(in MP4 format)
false
sel.jup.recording.video.screen
.size
Video screen size for recordings
(width and height)
1024x768
sel.jup.recording.video.frame.
rate
Video frame rate for recordings 12
sel.jup.recording.image Docker image for recordings selenoid/video-recorder:latest
sel.jup.output.folder Output folder for recordings,
screenshots, and HTML redirect
pages
.
sel.jup.screenshot.at.the.end.
of.tests
Make screenshots at the end of
the test
false
sel.jup.screenshot.format Format for screenshots base64
sel.jup.exception.when.no.driv
er
Throw exception in case of
exception or not
true
sel.jup.browser.template.json.
file
Browsers scenario (JSON) path classpath:browsers.json
sel.jup.default.browser Browser for generic driver chrome-in-docker
sel.jup.default.version Version for generic driver latest
sel.jup.default.browser.fallba
ck
Fallback browser list for
generic driver
chrome,firefox,safari,edge,pha
ntomjs
sel.jup.default.browser.fallba
ck.version
Fallback version list for generic
driver
latest,latest,latest,latest,la
test
51
55. Configuration key Description Default value
sel.jup.remote.webdriver.wait.
timeout.sec
Time in seconds to wait the
creating of RemoteWebDriver
objects
20
sel.jup.remote.webdriver.poll.
time.sec
Poll time in seconds to wait
while creating
RemoteWebDriver objects
2
sel.jup.wdm.use.preferences As of Selenium-Jupiter, the
latest version of Docker
browsers are stored
persistently as Java preferences.
Its use can be deactivated using
this flag
true
sel.jup.ttl.sec The resolved Docker browsers
versions has attached a time-to-
live in secods, configurable
using this key
3600
sel.jup.browser.list.from.dock
er.hub
Update Docker images list from
Docker Hub
true
sel.jup.browser.session.timeou
t.duration
Session timeout for Docker
browsers (in Golang duration
format)
1m0s
sel.jup.selenoid.image Selenoid (Golang Selenium
Hub) Docker image
aerokube/selenoid:1.6.0
sel.jup.selenoid.port Selenoid port 4444
sel.jup.selenoid.vnc.password VNC password for Selenoid
sessions
selenoid
sel.jup.novnc.image noVNC Docker image psharkey/novnc:3.3-t6
sel.jup.novnc.port noVNC Docker port 8080
sel.jup.chrome.image.format Selenoid Docker images format
for Chrome with VNC
selenoid/vnc:chrome_%s
sel.jup.chrome.first.version First version of Docker Chrome
(used when
sel.jup.browser.list.from.dock
er.hub =false)
48.0
sel.jup.chrome.latest.version Latest version of Docker
Chrome (used when
sel.jup.browser.list.from.dock
er.hub =false)
73.0
sel.jup.chrome.path Path for Hub when using
Chrome in Docker as browser
/
sel.jup.chrome.beta.image Selenoid Docker image format
for Chrome beta
elastestbrowsers/chrome:beta-
2.0.1
52
56. Configuration key Description Default value
sel.jup.chrome.beta.path Path for Hub when using
Chrome beta in Docker as
browser
/wd/hub
sel.jup.chrome.unstable.image Selenoid Docker image format
for Chrome unstable
elastestbrowsers/chrome:unstab
le-2.0.1
sel.jup.chrome.unstable.path Path for Hub when using
Chrome unstable in Docker as
browser
/wd/hub
sel.jup.firefox.image.format Selenoid Docker images format
for Firefox with VNC
selenoid/vnc:firefox_%s
sel.jup.firefox.first.version First version of Docker Firefox
(used when
sel.jup.browser.list.from.dock
er.hub =false)
3.6
sel.jup.firefox.latest.version Latest version of Docker Firefox
(used when
sel.jup.browser.list.from.dock
er.hub =false)
66.0
sel.jup.firefox.path Path for Hub when using
Firefox in Docker as browser
/wd/hub
sel.jup.firefox.beta.image Selenoid Docker image format
for Firefox beta
elastestbrowsers/firefox:beta-
2.0.1
sel.jup.firefox.beta.path Path for Hub when using
Firefox beta in Docker as
browser
/wd/hub
sel.jup.firefox.unstable.image Selenoid Docker image format
for Firefox unstable
elastestbrowsers/firefox:night
ly-2.0.1
sel.jup.firefox.unstable.path Path for Hub when using
Firefox beta in Docker as
unstable
/wd/hub
sel.jup.opera.image.format Selenoid Docker images format
for Opera with VNC
selenoid/vnc:opera_%s
sel.jup.opera.first.version First version of Docker Opera
(used when
sel.jup.browser.list.from.dock
er.hub =false)
33.0
sel.jup.opera.latest.version Latest version of Docker Opera
(used when
sel.jup.browser.list.from.dock
er.hub =false)
58.0
sel.jup.opera.path Path for Hub when using Opera
in Docker as browser
/
sel.jup.edge.image Docker image format for Edge windows/edge:%s
sel.jup.edge.latest.version Latest version of Docker Edge 18
53
57. Configuration key Description Default value
sel.jup.edge.path Path for Hub when using Opera
in Docker as browser
/
sel.jup.iexplorer.image Docker image format for Edge windows/ie:%s
sel.jup.iexplorer.latest.versi
on
Latest version of Docker Edge 11
sel.jup.iexplorer.path Path for Hub when using Opera
in Docker as browser
/
sel.jup.android.default.versio
n
Default version of Android
devices in Docker
9.0
sel.jup.android.image.5.0.1 Docker image for version 5.0.1
of Android devices
butomo1989/docker-android-x86-
5.0.1:1.5-p6
sel.jup.android.image.5.1.1 Docker image for version 5.1.1
of Android devices
butomo1989/docker-android-x86-
5.1.1:1.5-p6
sel.jup.android.image.6.0 Docker image for version 6.0 of
Android devices
butomo1989/docker-android-x86-
6.0:1.5-p6
sel.jup.android.image.7.0 Docker image for version 7.0 of
Android devices
butomo1989/docker-android-x86-
7.0:1.5-p6
sel.jup.android.image.7.1.1 Docker image for version 7.1.1
of Android devices
butomo1989/docker-android-x86-
7.1.1:1.5-p6
sel.jup.android.image.8.0 Docker image for version 8.0 of
Android devices
butomo1989/docker-android-x86-
8.0:1.5-p6
sel.jup.android.image.8.1 Docker image for version 8.1 of
Android devices
butomo1989/docker-android-x86-
8.1:1.5-p6
sel.jup.android.image.9.0 Docker image for version 9.0 of
Android devices
butomo1989/docker-android-x86-
9.0:1.5-p6
sel.jup.android.image.genymoti
on
Docker image for Genymotion
usage
budtmo/docker-android-
genymotion:1.7-p0
sel.jup.android.genymotion.use
r
Genymotion SaaS user
sel.jup.android.genymotion.pas
sword
Genymotion SaaS password
sel.jup.android.genymotion.lic
ense
Genymotion SaaS license
sel.jup.android.genymotion.tem
plate
Genymotion SaaS template
sel.jup.android.genymotion.dev
ice.name
Genymotion SaaS device
sel.jup.android.genymotion.and
roid.version
Genymotion SaaS Android
version
sel.jup.android.genymotion.and
roid.api
Genymotion SaaS Android API
level
sel.jup.android.genymotion.scr
een.size
Genymotion SaaS Android
screen size
54
58. Configuration key Description Default value
sel.jup.android.genymotion.chr
omedriver
Genymotion SaaS chromedriver
version
sel.jup.android.novnc.port Internal port of noVNC in
Docker containers for Android
devices
6080
sel.jup.android.appium.port Internal port of Appium server
in Docker containers for
Android devices
4723
sel.jup.android.device.name Default device name for
Android in Docker
Samsung Galaxy S6
sel.jup.android.browser.name Default browser name for
Android in Docker
chrome
sel.jup.android.device.timeout
.sec
Timeout (in seconds) to wait
Android devices to be available
200
sel.jup.android.device.startup
.timeout.sec
Amount of time that should
pass between start of container
and the first attempt to connect
to Appium in container
75
sel.jup.android.appium.ping.pe
riod.sec
Amount of time that should
pass after failed attempt to
initialize Appium before the
next attempt
10
sel.jup.android.logging If true Android and Appium log
files will be written into
sel.jup.android.logs.folder
directory
false
sel.jup.android.logs.folder Folder with Android logs
relative to
sel.jup.output.folder. It
contains files such as
appium.log (Appium server log)
or docker-android.stdout.log
(Android emulator log)
androidLogs
sel.jup.android.screen.width Android device screen width (in
pixels)
1900
sel.jup.android.screen.height Android device screen height
(in pixels)
900
sel.jup.android.screen.depth Android device screen color
depth
24+32
sel.jup.docker.server.url URL to connect with the Docker
Host
sel.jup.docker.wait.timeout.se
c
Timeout (in seconds) to wait for
Docker container
20
55
59. Configuration key Description Default value
sel.jup.docker.poll.time.ms Poll time (in ms) for asking to
Docker container if alive
200
sel.jup.docker.default.socket Default Docker socket path /var/run/docker.sock
sel.jup.docker.hub.url Docker Hub URL https://hub.docker.com/
sel.jup.docker.stop.timeout.se
c
Timeout in seconds to stop
Docker containers at the end of
tests
0
sel.jup.docker.api.version Docker API version 1.35
sel.jup.docker.network Docker network bridge
sel.jup.docker.timezone Timezone for browsers in
Docker containers
Europe/Madrid
sel.jup.docker.lang Language for Docker containers en
sel.jup.docker.startup.timeout
.duration
Docker startup timeout in
duration format
2m
sel.jup.properties Location of the properties files
(in the project classpath)
/selenium-jupiter.properties
sel.jup.selenium.server.url Selenium Server URL, to be
used instead of @DriverUrl or
for browsers in Docker
sel.jup.server.port Selenium-Jupiter Server port 4042
sel.jup.server.path Selenium-Jupiter Server path /wd/hub
These properties can be overwritten in different ways. As of version 2.1.0 of Selenium-Jupiter, the
configuration manager can be used:
SeleniumExtension seleniumExtension = new SeleniumExtension();
seleniumExtension.getConfig().setVnc(true);
seleniumExtension.getConfig().setRecording(true);
seleniumExtension.getConfig().useSurefireOutputFolder();
seleniumExtension.getConfig().setBrowserListFromDockerHub(false);
seleniumExtension.getConfig().chromedriver().setForceCache(true);
seleniumExtension.getConfig().chromedriver().setOverride(true);
We can also use Java system properties, for example:
System.setProperty("sel.jup.recording", "true");
i. or by command line, for example:
-Dsel.jup.recording=true
56
60. Moreover, the value of these properties can be overridden by means of environmental variables.
The name of these variables result from putting the name in uppercase and replacing the symbol .
by _. For example, the property sel.jup.recording can be overridden by the environment variable
SEL_JUP_RECORDING.
Tuning WebDriverManager
As introduced before, Selenium-Jupiter internally uses WebDriverManager to manage the required
binary to control local browsers. This tool can be configured in several ways, for example to force
using a given version of the binary (by default it tries to use the latest version), or force to use the
cache (instead of connecting to the online repository to download the binary artifact). For further
information about this configuration capabilities, please take a look to the WebDriverManager
documentation.
In this section we are going to present a couple of simple examples tuning somehow
WebDriverManger. The following example shows how to force a version number for a binary,
concretely for Edge:
import org.junit.jupiter.api.Test;
import org.junit.jupiter.api.extension.RegisterExtension;
import org.openqa.selenium.edge.EdgeDriver;
import io.github.bonigarcia.seljup.SeleniumExtension;
public class EdgeSettingVersionJupiterTest {
@RegisterExtension
static SeleniumExtension seleniumExtension = new SeleniumExtension();
@BeforeAll
static void setup() {
seleniumExtension.getConfig().edgedriver().version("3.14393");
}
@Test
void webrtcTest(EdgeDriver driver) {
driver.get("https://bonigarcia.github.io/selenium-jupiter/");
assertThat(driver.getTitle(),
containsString("JUnit 5 extension for Selenium"));
}
}
This other example shows how to force cache (i.e. binaries previously downloaded by
WebDriverManager) to avoid the connection with online repository to check the latest version:
57
61. import org.junit.jupiter.api.Test;
import org.junit.jupiter.api.extension.RegisterExtension;
import org.openqa.selenium.chrome.ChromeDriver;
import io.github.bonigarcia.seljup.SeleniumExtension;
public class ForceCacheJupiterTest {
@RegisterExtension
static SeleniumExtension seleniumExtension = new SeleniumExtension();
@BeforeAll
static void setup() {
seleniumExtension.getConfig().chromedriver().config()
.setForceCache(true);
}
@Test
public void test(ChromeDriver driver) {
driver.get("https://bonigarcia.github.io/selenium-jupiter/");
assertThat(driver.getTitle(),
containsString("JUnit 5 extension for Selenium"));
}
}
Screenshots
Selenium-Jupiter provides several built-in features for making screenshots for each of the browser
sessions at the end of the test. These screenshots, can be encoded as Base64 or stored as PNG
images. The following configuration keys are used to control the way and format in which
screenshots are made:
• sel.jup.screenshot.at.the.end.of.tests: This key indicates whether or not screenshots will be
made at the end of every browser session. The accepted valued for this configuration key are:
◦ true : Screenshots are always taken at the end of tests.
◦ false : Screenshots are not taken at the end of tests.
◦ whenfailure : Screenshots are only taken if the test fails.
• sel.jup.screenshot.format: Format for the screenshot. The accepted values for this key are two:
◦ base64 : Base64 screenshots are logged using the debug level of (Simple Logging Facade for
Java (SLF4J). You can copy&paste the resulting Base 64 string in the URL bar of any browser
and watch the screenshot.
◦ png : Screenshots are stored as PNG images. The output folder for these images is configured
using the configuration key sel.jup.output.folder (the default value of this property is ., i.e.
the local folder).
58
62. Take into account that a big base64 string will be added to your logs if this option if configured. This
feature can be especially useful for build server in the cloud (such as Travis CI), in which we don’t
have access to the server file system but can track easily the test output log.
-------------------------------------------------------
T E S T S
-------------------------------------------------------
Running io.github.bonigarcia.test.basic.ChromeJupiterTest
...
2017-12-13 02:41:53 [main] DEBUG i.g.bonigarcia.SeleniumExtension - Screenshot (in
Base64) at the end of session 5712cce700bb76d8f5f5d65a00e2c7bc (copy&paste this string
as URL in browser to watch it)
data:image/png;base64,iVBORw0KGgoAAAANSUhEUgAAAykAAANaCAIAAAACvpRSAAAgAElEQVR4nOy9e3xV
1Zn//1lr384t5+RyCDmBhJBwSRACBAqhXFQsYlGLZeygrWVGbalTtVU72gv9fgfnK3Yq36mdqTqOLTL1R8fyq2
Wk3kCGSqEMlxKQiyQICZAAJySHnJyT5Nz2ZX3/ODGEk71DDuSCuN4vXrySnXX2WWfvtc767Od51vMQxhg4HA6H
w+FwOOkTDofTfQkdiH5wOBwOh8PhcEzh2ovD4XA4HA5n8ODai8PhcDgcDmfw4NqLw+FwOBwOZ/Dg2ovD4XA4HA
5n8ODai8PhcDgcDmfw4NqLw+FwOBwOp5/5wx/+YPUnrr04HA6Hw+Fw+pOk8LKSX1x7cTgcDofD4fQb3SWXqfzi
2o
...
nr2SgWY2TMdyRZMNENknWYTIo75WxuUWNCij9k178gCKO3BHLtkeQjiMYEgXy66/8f5nl+x57/98mYAvFysJUm
ckrGBLMv/dC0SlJSUjrXpwn3Ba6MgAlILbL+//8/5fAruDfRSl08WQBr2oDm4uNtmZOPKRm7GSgptWXBFJPrAA
AAl0lEQVS4/biJEm74sxVmrvz///+U468MXDMRZc7zY5Aj1uDndWEG2gCWk+R5ARMgl5aZrga3N7XBT9vCbxrB
WPjx/3/96tsQz8LL4foDPzSVlH4crofHwrFXxyDZx1xHaWN7EjwAiT/f69Gf/8G1O5SUDCBnj2EW8huvfnTLaF
NSMsD043+89QUmwCz/yUhp9AFYT/DCDwBA0OZPpbBVqwAAAABJRU5ErkJggg==
Tests run: 2, Failures: 1, Errors: 0, Skipped: 1, Time elapsed: 7.219 sec <<< FAILURE!
- in io.github.bonigarcia.test.basic.ChromeJupiterTest
testWithOneChrome(ChromeDriver) Time elapsed: 6.594 sec <<< FAILURE!
Known issues
Testing localhost
A daily use case in web development is testing an web application deployed in a local server
(http://localhost:port/path). In the case of using Docker browsers to test this web application, we
need to be aware that localhost inside a Docker container is not the local host anymore, but the
container. To handle this issue, different approaches can be taken.
• If your host (i.e. the local machine running the tests and hosting the web application under test)
is Linux, Docker creates a bridge named docker0 by default. Both the Docker host and the Docker
containers have an IP address on that bridge. We can find out the equivalent IP address to
localhost using the following command (in this example, the address 172.17.0.1 will be used to
replace localhost in our tests):
59
63. $ ip addr show docker0
4: docker0: <NO-CARRIER,BROADCAST,MULTICAST,UP> mtu 1500 qdisc noqueue state DOWN
group default
link/ether 02:42:b4:83:10:c8 brd ff:ff:ff:ff:ff:ff
inet 172.17.0.1/16 scope global docker0
valid_lft forever preferred_lft forever
• If your host is Mac and using Docker for Mac, we can use the special DNS name
docker.for.mac.host.internal which will resolve to the internal IP address used by the host.
• If your host is Windows and using Docker for Windows, we can use the special DNS name
docker.for.win.host.internal.
Using old versions of Selenium
Selenium-Jupiter requires Selenium 3. In fact, selenium-java 3.x is incorporated as transitive
dependency when using Selenium-Jupiter. Nevertheless, it might occur that an old version of
Selenium (e.g. 2.x) is used in a project. In that case, Selenium-Jupiter will typically fail as follows:
org.junit.jupiter.api.extension.ParameterResolutionException: Failed to resolve
parameter [...] in executable [...]
at
org.junit.jupiter.engine.execution.ExecutableInvoker.resolveParameter(ExecutableInvoke
r.java:221)
...
Caused by: java.lang.NoClassDefFoundError: org/openqa/selenium/MutableCapabilities
at java.lang.Class.getDeclaredConstructors0(Native Method)
at java.lang.Class.privateGetDeclaredConstructors(Unknown Source)
at java.lang.Class.getConstructor0(Unknown Source)
at java.lang.Class.getDeclaredConstructor(Unknown Source)
at
io.github.bonigarcia.SeleniumExtension.getDriverHandler(SeleniumExtension.java:228)
at
io.github.bonigarcia.SeleniumExtension.resolveParameter(SeleniumExtension.java:175)
at
org.junit.jupiter.engine.execution.ExecutableInvoker.resolveParameter(ExecutableInvoke
r.java:207)
The solution is forcing the latest version of selenium-java to 3.x.
For example, this issue is likely to happen in Spring-Boot 1.x projects. When using a Spring-Boot 1.x
parent, Selenium 2 artifacts versions are established by default. To solve it, we need to force at least
the following Selenium artifacts:
60
64. <properties>
<selenium.version>3.11.0</selenium.version>
</properties>
<dependencies>
<dependency>
<groupId>org.seleniumhq.selenium</groupId>
<artifactId>selenium-java</artifactId>
<version>${selenium.version}</version>
<scope>test</scope>
</dependency>
<dependency>
<groupId>org.seleniumhq.selenium</groupId>
<artifactId>selenium-api</artifactId>
<version>${selenium.version}</version>
<scope>test</scope>
</dependency>
<dependency>
<groupId>org.seleniumhq.selenium</groupId>
<artifactId>selenium-chrome-driver</artifactId>
<version>${selenium.version}</version>
<scope>test</scope>
</dependency>
<dependency>
<groupId>org.seleniumhq.selenium</groupId>
<artifactId>selenium-firefox-driver</artifactId>
<version>${selenium.version}</version>
<scope>test</scope>
</dependency>
<dependency>
<groupId>org.seleniumhq.selenium</groupId>
<artifactId>selenium-remote-driver</artifactId>
<version>${selenium.version}</version>
<scope>test</scope>
</dependency>
</dependencies>
Recordings in Windows or Mac
Docker for Windows/Mac only mounts by default the home of your user (e.g. C:Usersyour-user in
Windows). If Selenium-Jupiter is executed from a different parent folder of that home, it won’t be
possible to write the MP4 recording (by default it uses the current folder, i.e. .). This configuration
can be changed using the default mappings of in Docker for Windows/Mac settings.
As an alternative, the value of the configuration key sel.jup.output.folder of Selenium-Jupiter can
be used to some path inside the user folder (e.g. C:Useryour-userwhatever). The MP4 recording
should end in there.
61