


![Hardware acceleration
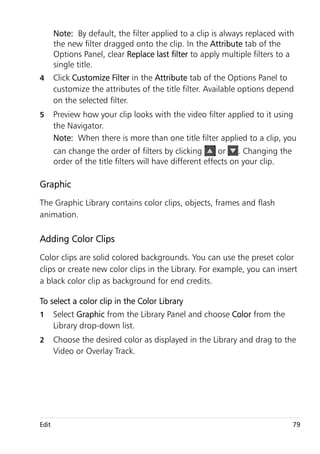
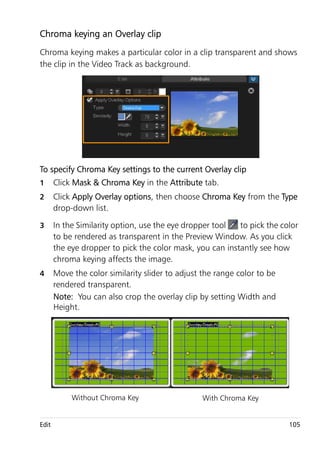
Depending on your hardware specifications, Corel VideoStudio Pro lets
you optimize the performance of your system through hardware
acceleration.
Hardware decoder and encoder acceleration is supported only by
Windows Vista and later versions of Windows operating system
software and requires at least 512 MB of VRAM.
To change hardware acceleration settings
1 Select Settings > Preferences [F6] to open the Preferences dialog
box.
2 Click the Performance tab and select the following options under
Editing Process and File Creation:
• Use Hardware Decoder acceleration — Enhances editing
performance, and improves clip and project playback, by using
video graphics acceleration technologies with your available
hardware.
Note: For optimum performance, VGA cards must support DXVA2
VLD mode with Vertex and Pixel Shader 2.0 or later.
• Use Hardware Encoder acceleration — Improves the rendering
time required for producing your movies.
The program automatically detects the hardware acceleration
capabilities of your system. If the feature is not supported, this
option will be grayed out.
Installing and uninstalling the application
The Corel VideoStudio Pro DVD has an autorun feature that is designed
to start installing the application automatically.
6 Corel VideoStudio Pro User Guide](https://image.slidesharecdn.com/corelvsprox4ug-120212220521-phpapp02/85/Corel-vs-pro_x4_ug-modul-corel-draw-14-320.jpg)


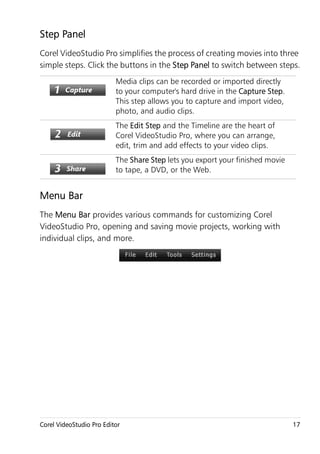


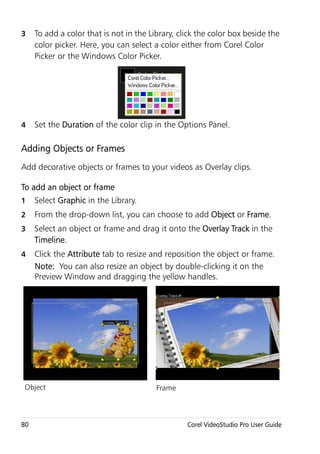
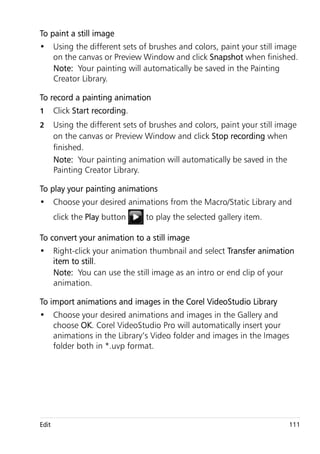
![Library
The Library is a storage depot for everything you need to create a movie:
video clips, photos, transitions, titles, filters, color clips, and audio files.
Right-click a clip in the Library to view the clip's properties as well
as copy, delete, or Split by Scene.
You can also trim a clip in the Library by using the Trim markers.
Hold [Ctrl] or [Shift] to select multiple clips.
To add media clips to the Library
1 Click Add to create a new library folder where your media clips will
be saved.
Note: You can add custom folders to separate your personal media
clips from sample media clips for more efficient editing or to keep all
clips that belong to one project in a single folder.
Corel VideoStudio Pro Editor 25](https://image.slidesharecdn.com/corelvsprox4ug-120212220521-phpapp02/85/Corel-vs-pro_x4_ug-modul-corel-draw-33-320.jpg)
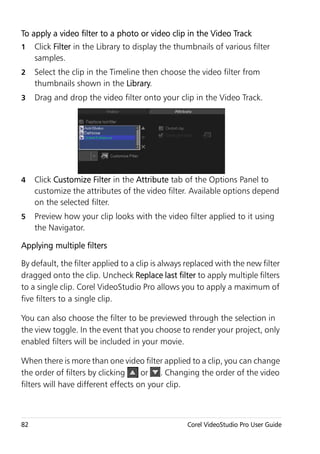
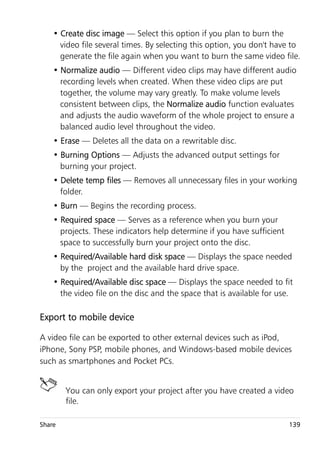
![2 Click Import Media Files to locate your files.
3 Select all files you want to import.
4 Click Open.
Click Browse from the Library Panel to open the File Explorer
where you can drag and drop files to the Library or Timeline
directly. You can also drag and drop files from Windows Explorer
straight to the Library.
To delete media clips from the Library
1 Select the clip to remove from the Library, then press [Delete].
Or, right-click the clip in the Library and select Delete.
Note: This action only deletes the Library media clip entry in the
program. You can still access the actual file from the path where it is
saved.
2 When prompted, verify whether you want to delete the thumbnail
from the Library.
You can also import your exported Library to restore media files and
other library information. Click on Settings > Library Manager >
Import Library and find the directory you specified.
Note: To reset your Library to the default settings, select Settings >
Library Manager > Reset Library.
3 To automatically locate and relink the files in your library, click File >
Relink. A notification on the number of clips relinked successfully will
be displayed.
If there are clips left unlinked, you can manually relink them by
browsing for the corresponding file in your computer.
26 Corel VideoStudio Pro User Guide](https://image.slidesharecdn.com/corelvsprox4ug-120212220521-phpapp02/85/Corel-vs-pro_x4_ug-modul-corel-draw-34-320.jpg)


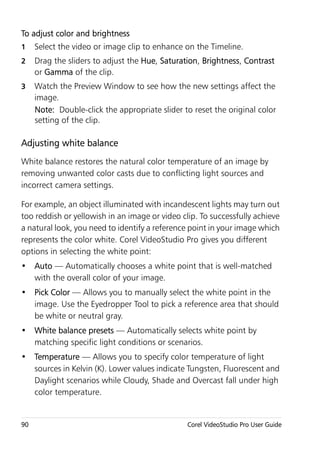
![To play the preview area only
1 Use the Trim Markers or the Mark-in/out buttons to select the
preview range.
2 To preview the selected range, select what you want to preview
(Project or Clip), then click Play. To preview the entire clip, hold
[Shift], then click Play.
Undoing and redoing actions
You can undo or redo the last set of actions that you performed while
working on your movie by clicking Undo [Ctrl+Z] or Redo [Ctrl+Y] in the
toolbar. You can adjust the number of undo levels in the Preferences
dialog box.
Showing and hiding grid lines
You can use grid lines to guide you when repositioning OR resizing
photos and videos or when adding titles to your movie.
To show grid lines
1 In the Edit step, double-click a clip to display the Options Panel.
2 Click the Attribute tab and choose Distort clip.
3 Check Show grid lines.
34 Corel VideoStudio Pro User Guide](https://image.slidesharecdn.com/corelvsprox4ug-120212220521-phpapp02/85/Corel-vs-pro_x4_ug-modul-corel-draw-42-320.jpg)
![Click to adjust grid line settings.
Saving projects
To save your project
• Click File > Save [Ctrl + S].
Note: Corel VideoStudio Pro project files are saved in *.vsp file
format.
To automatically save your work
1 Click Settings > Preferences and click the General tab.
2 Choose Automatic save interval: and specify the time interval
between saves.
Note: This setting is set at 10 minutes by default.
To open an existing project
• Click File > Open Project [Ctrl + O].
To create a new project
• Click File > New Project [Ctrl + N].
Save your project frequently to avoid accidental loss of work.
Starting a new movie project 35](https://image.slidesharecdn.com/corelvsprox4ug-120212220521-phpapp02/85/Corel-vs-pro_x4_ug-modul-corel-draw-43-320.jpg)


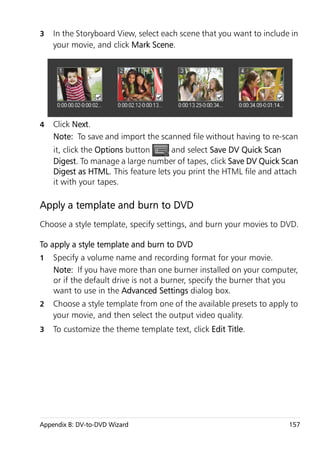
![3 Select your capture device from the Source drop-down list.
4 Select a file format to use for saving your captured video from the
Format drop-down list. Browse the folder location where the files
will be saved under Capture folder.
Note: Click Options to customize capture settings specific to your
video device.
5 Scan your video to search the part for capture.
Note: If you are capturing video from a DV or HDV camcorder, use
the Navigation Panel to play your video tape.
6 Click Capture Video, when your video for capture is already on cue.
Click Stop Capture or press [Esc] to stop capturing.
7 To capture a photo from the video footage, pause the video on the
desired photo then click Take a Snapshot.
Note: When your camcorder is in Record mode (usually named
CAMERA or MOVIE), you can capture live video.
Note: The available settings in the Video properties dialog box vary,
depending on the capture file format that you have chosen.
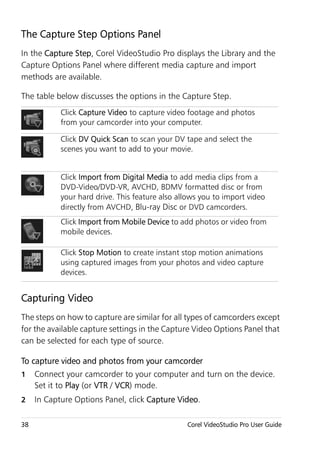
Capture Video Options Panel
• Duration — Sets the length of time for the capture.
• Source — Displays the detected capture device and lists other
capture devices installed in your computer.
• Format — Gives you a list of options where you select a file format
for saving your captured video.
• Capture folder — This feature allows you to specify a folder where
you want your captured files to be saved.
• Split by scene — Automatically separates captured video into several
files based on changes in shooting date and time when capturing
video from a DV camcorder.
• Capture to library — Choose or create a Library folder where you
want your video to be saved.
Capture 39](https://image.slidesharecdn.com/corelvsprox4ug-120212220521-phpapp02/85/Corel-vs-pro_x4_ug-modul-corel-draw-47-320.jpg)


![3 Click Start and the Import from Digital Media dialog box appears.
4 Choose the media clips you want to import and click Start import. All
imported videos will be added to the thumbnail list in the Library.
To enable timecode retrieval for AVCHD
1 In the Capture Step Options Panel, click Import from Digital Media.
2 Select the thumbnail of the video file. Click Start import to launch
Import Settings.
3 In Import Destination, select Insert to Timeline or select Add video
date information as title.
4 Choose Entire video to import the timecode of video file to appear as
a title spanning the entire duration of the video. Choose Duration to
import the timecode as a title within a specified duration. Click OK to
apply the settings.
Note: You can apply the same settings for all video files for
importing. Click the Apply this setting and never ask me again box or
press [F6] to turn on the settings.
46 Corel VideoStudio Pro User Guide](https://image.slidesharecdn.com/corelvsprox4ug-120212220521-phpapp02/85/Corel-vs-pro_x4_ug-modul-corel-draw-54-320.jpg)


![Working with clips
Clips whether audio, video, or photos are the foundation of your project
and manipulating them is the most important skill you can master.
Adding video clips
There are several ways of inserting video clips to the Timeline:
• Select a clip in the Library and drag and drop it to the Video Track or
Overlay Track. Multiple clips can be selected by pressing [Shift].
• Right-click a clip in the Library then select Insert To: Video Track or
Insert To: Overlay Track.
• Select one or more video files in Windows Explorer then drag and
drop to the Video Track or Overlay Track.
• To insert a clip from a file folder directly to the Video Track or Overlay
Track, right-click the Timeline, select Insert Video and locate the
video to use.
Aside from video files, you can also add video from DVD or DVD-
VR formatted discs.
Adding photos
Photo clips are added to the Video Track the same way as video clips.
Before you start adding photos to your project, determine first the photo
size that you want for all your photos. By default, Corel VideoStudio Pro
adjusts the size to keep the photo’s aspect ratio.
To make the size of all inserted photos the same as your project’s
frame size
1 Select Settings > Preferences > Edit.
2 Change the Image resampling option default to Fit to project size.
52 Corel VideoStudio Pro User Guide](https://image.slidesharecdn.com/corelvsprox4ug-120212220521-phpapp02/85/Corel-vs-pro_x4_ug-modul-corel-draw-60-320.jpg)


![If the value of Frame Frequency is more than 1 and clip duration
is the same, Strobe effect will be produced. If the value of Frame
Frequency is more than 1 and clip duration is shortened, Time-
lapse effect will be produced.
Hold [Shift] then drag the end of the clip on the Timeline to
change the playback speed.
The black arrow means you are trimming or extending the clip,
while the white arrow means that you are changing the playback
speed.
Reversing video playback
You can reverse the playback of video clips.
To reverse video playback
• Click Reverse video in the Options Panel.
Replacing media clips
Media clips in the Timeline can be replaced in its current position. When
you replace a clip, the attributes of the original clip are applied to the new
clip.
56 Corel VideoStudio Pro User Guide](https://image.slidesharecdn.com/corelvsprox4ug-120212220521-phpapp02/85/Corel-vs-pro_x4_ug-modul-corel-draw-64-320.jpg)
![To replace a clip
1 In the Timeline, right-click the media clips you want to replace.
2 Choose Replace clip from the right-click menu.
The Replace/relink clip dialog box appears.
3 Browse for the replacement media clips and click Open.
The clip in the Timeline is automatically replaced.
The duration of the replacement clip must be equal to or longer
than the duration of the original clip.
Hold [Shift] and click multiple clips to select two or more clips in
the Timeline and repeat the process for replacing multiple clips.
The number of replacement clips must match the number of clips
that you selected in the Timeline.
You can also drag a video clip from the Library to the Timeline and
hold the [Ctrl] key to automatically snap on a clip to be replaced.
Edit 57](https://image.slidesharecdn.com/corelvsprox4ug-120212220521-phpapp02/85/Corel-vs-pro_x4_ug-modul-corel-draw-65-320.jpg)
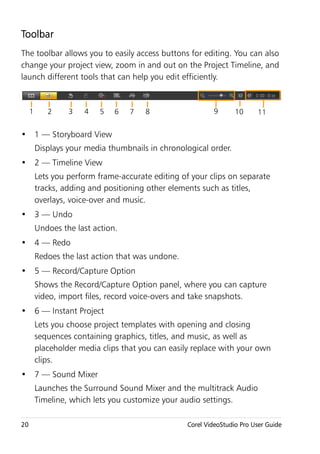
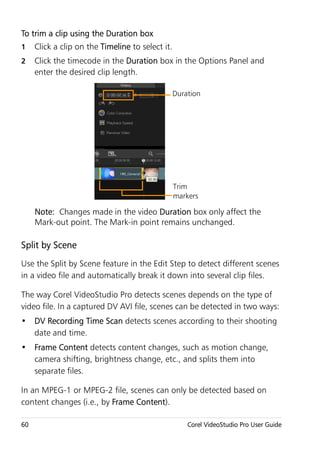
![Trimming a clip
The best part of editing your movie on your computer is the ease with
which you can split and trim your clips with frame accuracy.
To split a clip into two
1 In Storyboard View or Timeline View, select the clip you want to split.
2 Drag the Scrubber to the point where you want to split the clip.
Note: Click or to set the cutting point more precisely.
3 Click to split the clip into two clips. To remove one of these clips,
select the unwanted clip and press [Delete].
To trim a clip with the Trim markers using Single Clip Trimmer
1 Double-click a video clip in the Library or right-click on a video clip
and choose Single Clip Trim to launch the Single Clip Trim dialog box.
2 Click and drag the Trim markers to set the Mark-in/Mark-out points
on the clip.
3 For more precise trimming, click on a Trim marker, hold it, and use
the left or right arrow keys on your keyboard to trim one frame at a
time. The Mark-in/Mark-out points can also be set by pressing [F3]
and [F4], respectively.
Trim markers Mark-in/
Mark-out
58 Corel VideoStudio Pro User Guide](https://image.slidesharecdn.com/corelvsprox4ug-120212220521-phpapp02/85/Corel-vs-pro_x4_ug-modul-corel-draw-66-320.jpg)
![4 To preview the trimmed clip only, press [Shift + Space] or hold [Shift]
and click the Play button.
Note: You can also use zoom controls to display each frame of your
video on the Timeline and trim one frame at a time. The Scroll Bar
makes navigating through your project quicker and easier. A wheel
mouse can also be used to scroll, and to zoom by pressing [Ctrl].
To trim a clip directly on the Timeline
1 Click a clip on the Timeline to select it.
2 Drag the Trim markers on either side of the clip to change its length.
The Preview Window reflects the position of the Trim marker in the
clip.
Note: Instant timecode tip is a feature of Corel VideoStudio Pro that
allows you to add clips with a specific timecode. It appears while
trimming and inserting overlapping clips on the Timeline, enabling
you to make adjustments based on the timecode shown. For
example, the instant timecode tip appears with the format
00:00:00.00 (00 - 04.25). 00:00:00.00 indicates the current
timecode where the selected clip is located. The (00 - 04.25) start-
end range represents the duration of one overlapping clip with the
previous clip and another overlapping with the next clip.
Instant timecode tip
Edit 59](https://image.slidesharecdn.com/corelvsprox4ug-120212220521-phpapp02/85/Corel-vs-pro_x4_ug-modul-corel-draw-67-320.jpg)
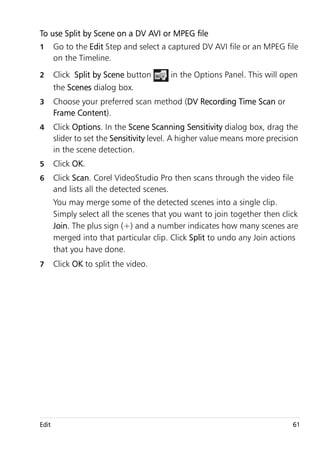

![To trim a video file into multiple clips
1 Go to the Edit Step and select the clip that you want to trim.
2 Double click the clip to open the Options Panel.
3 Click Multi-trim Video in the Options Panel.
4 View the whole clip first by clicking Play to determine how you want
to mark segments in the Multi-trim Video dialog box.
5 Choose the number of frames to display by dragging the Timeline
zoom. You can choose to display the smallest subdivision of one
frame per second.
6 Drag the Scrubber until you get to the part of the video that you
want to use as the beginning frame of the first segment. Click Set
Mark-in button .
7 Drag the Scrubber again, this time, to the point where you want the
segment to end. Click Set Mark-out button .
8 Do steps 4 and 5 repeatedly until you have marked all the segments
you want keep or remove.
Note: To mark segments in and out, you can press [F3] and [F4]
while playing the video. You can also click the Invert Selection button
or press [Alt+I] to toggle between marking segments that you
want to retain or marking segments that you want taken out from
the clip.
Quick search interval allows you to set a fixed interval between
frames and browse through the movie using the set value.
9 Click OK when finished. The video segments that you kept are then
inserted onto the Timeline.
Edit 63](https://image.slidesharecdn.com/corelvsprox4ug-120212220521-phpapp02/85/Corel-vs-pro_x4_ug-modul-corel-draw-71-320.jpg)
![Navigation controls in the Multi-trim Video dialog box
Reverses or advances through the video in fixed
increments. By default, these buttons move up or
[F5] [F6] down through the video in increments of 15
seconds.
Plays a preview of the final trimmed video.
Plays the video file. Hold [Shift] then click to play only
the selected segments.
Moves to the start or end frame of a trimmed
segment.
Moves to the previous/next frame in the video.
Repeats playback of video
Saving trimmed clips
Frequently, when you make changes (i.e., after auto-splitting clips using
Split by Scene, extracting clips using Multi-trim Video, or manually
trimming clips), you may wish to make a permanent change to the clip
and save the edited file. Corel VideoStudio Pro gives you a margin of
safety since it saves the trimmed video to a new file and does not alter the
original file.
To save a trimmed clip
1 In the Storyboard View, Timeline View, or the Library, select a
trimmed clip.
• Click File > Save Trimmed Video.
64 Corel VideoStudio Pro User Guide](https://image.slidesharecdn.com/corelvsprox4ug-120212220521-phpapp02/85/Corel-vs-pro_x4_ug-modul-corel-draw-72-320.jpg)


![To customize a preset transition
1 Double-click a transition effect in the Timeline.
2 Modify the attributes or behavior of the transition in the Options
Panel.
To delete a transition
• Click on the transition to be removed and press [Delete].
• Right-click on the transition and select Delete.
• Drag to separate two clips with transition effect.
Adding transitions to My Favorites
You can collect your favorite transitions from different categories and
save them in the My Favorites folder. This way, you can easily find the
transitions you use most often.
To save a transition in My Favorites
1 Select the thumbnail of the transition.
2 Click the Add to My Favorites button to add the transition in the
Favorites Library list.
72 Corel VideoStudio Pro User Guide](https://image.slidesharecdn.com/corelvsprox4ug-120212220521-phpapp02/85/Corel-vs-pro_x4_ug-modul-corel-draw-80-320.jpg)


![When you select the green node, the cursor becomes a smaller arrow
with a small black box at its tail.
Hold [Shift] while dragging the green nodes to keep the distortion
within the outline box of the current clip.
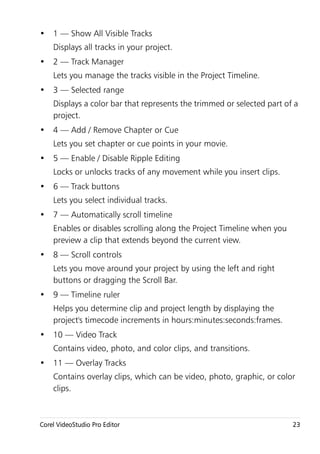
Applying motion to an Overlay clip
To apply motion to an Overlay clip
1 In the Attribute tab, select the direction and style by which the
Overlay clip will move to or from the screen under Direction/Style
option.
2 Click a specific arrow to set where you want your clip to enter and
exit in your movie.
You can rotate the clip or fade it in and out.
Pause duration determines how long your pause will be in the
designated area before the clip exits the screen. If you applied
motion to the Overlay clip, drag the Trim markers to set the Pause
duration.
Pause duration
Edit 103](https://image.slidesharecdn.com/corelvsprox4ug-120212220521-phpapp02/85/Corel-vs-pro_x4_ug-modul-corel-draw-111-320.jpg)


![Adding voice-over narration
Documentaries, news and travel features often use narrations to help the
audience understand what is going on in the video. Corel VideoStudio
Pro allows you to record your own narration.
To add voice-over narration
1 Move the scrubber to the section of the video where you want to
insert your voice-over.
2 In Timeline view, click the Record/Capture Option button and select
Voice-over. The Adjust Volume dialog box appears.
Note: You cannot record over an existing clip. When a clip is
selected, recording is disabled. Make sure that a clip is not selected
by clicking on an empty area on the Timeline.
3 Speak into the microphone and check if the meter responds
accordingly. You can use the Windows audio mixer to adjust the level
of the microphone.
4 Click Start and begin speaking into the microphone.
5 Press [Esc] or [Space] to end recording.
Note: The best way to record narrations is to do the recording in 10
to 15-second sessions. This makes it easier to remove a badly
recorded narration and redo it. To remove, just select the clip on the
Timeline and press [Delete].
Adding background music
Corel VideoStudio Pro can record and convert sound tracks from your CD
into WAV files and then insert them onto the Timeline.
Corel VideoStudio Pro also supports WMA, AVI, and other popular audio
file formats which you can directly insert onto the Music Track.
Edit 113](https://image.slidesharecdn.com/corelvsprox4ug-120212220521-phpapp02/85/Corel-vs-pro_x4_ug-modul-corel-draw-121-320.jpg)


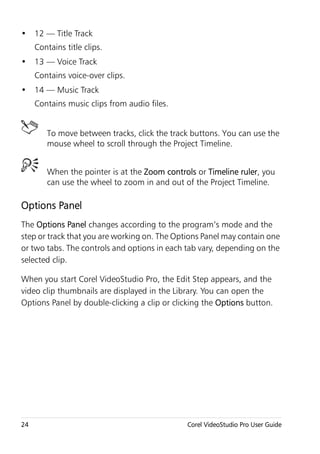
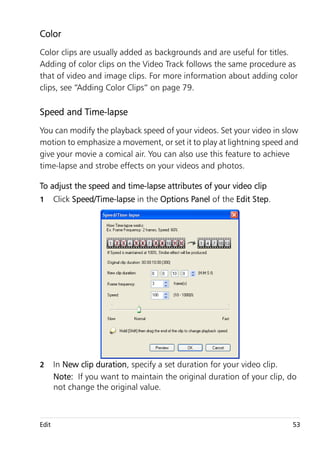
![Stretching audio duration
The time stretch feature allows you to stretch an audio clip to match
video duration without distorting its pitch. Normally, stretching audio
clips to fit the project results in a distorted sound. The time stretch feature
will make the audio clip sound like it is just played in a slower tempo.
When you stretch an audio clip by 50-150%, the sound will not
be distorted however, if stretched below or above that range the
sound may be distorted.
To stretch the duration of an audio clip
1 Click on an audio clip in the Timeline or Library and open the Options
Panel.
2 In the Music & Voice tab panel, click Playback Speed to open the
Playback Speed dialog box.
3 Enter a value in Speed or drag the slider to change the speed of the
audio clip. A slower speed makes the clip’s duration longer while a
faster speed makes it shorter.
Note: You can specify how long the clip will play in Time stretch
duration. The speed of the clip will automatically adjust to the
specified duration. This feature will not trim the clip when you
specify a shorter time.
You can stretch the time of an audio clip on the Timeline
by holding [Shift] then dragging the handles on the
selected clip.
Edit 117](https://image.slidesharecdn.com/corelvsprox4ug-120212220521-phpapp02/85/Corel-vs-pro_x4_ug-modul-corel-draw-125-320.jpg)


![You can also render your project partially. SmartRender technology saves
time when generating previews by rendering only the parts that have
been modified from your last render operation.
You can click Pause on the progress bar to stop rendering, and you
can resume whenever you are ready. You can also enable playback
while rendering or stop the preview for a faster and more efficient
rendering of your project.
To create a video file of the preview range
1 Make sure that no clip is selected by clicking on the Timeline or by
clicking Project in the Preview Window.
2 Select a preview range using the Trim Markers. You may also drag
the triangle along the ruler then press [F3] and [F4] to mark the start
and end points respectively.
Trim markers
126 Corel VideoStudio Pro User Guide](https://image.slidesharecdn.com/corelvsprox4ug-120212220521-phpapp02/85/Corel-vs-pro_x4_ug-modul-corel-draw-134-320.jpg)


![Project Playback
Project Playback is used to output your entire project or part of it to a DV
camcorder. This also gives you an actual size preview of your movie using
the entire screen of either a PC or TV monitor. You can only output your
project on a DV camcorder if your project is using a DV AVI template.
How your video is played back will depend on the Playback method
option that you selected in Preferences.
To play back your project in actual size
1 In the Share Step Options Panel, click the Project Playback button
.
2 In the Project Playback - Options dialog box, select Entire project or
Preview range, then click Finish to start viewing the project in full
screen.
3 To stop the play back, press [Esc].
Note: If you only want to output the preview range of your project,
select Preview range.
Record to a DV camcorder
After editing your project and creating a video file, Corel VideoStudio Pro
allows you to record the video to your DV camcorder. You can only record
a video that is using DV AVI format to your DV camcorder.
To record a movie to your DV camcorder
1 Turn your camcorder ON and set it to Play mode (or VTR / VCR
mode). See your camcorder's manual for specific instructions.
2 Select a compatible DV AVI file from the Library.
3 In the Share Step Options Panel, click the DV Recording button .
4 The DV Recording - Preview Window dialog box opens. You can
preview the video file here. After you are done previewing, click Next.
Share 141](https://image.slidesharecdn.com/corelvsprox4ug-120212220521-phpapp02/85/Corel-vs-pro_x4_ug-modul-corel-draw-149-320.jpg)


![Tab Toggle between the Trim Handles
and Scrubber.
Enter When the left Trim Handle is active,
pressing [Tab] or [Enter] switches
to the right handle.
Left If you pressed [Tab] or [Enter] to
make the Trim Handles or Scrubber
active, use the Left-arrow key to
move to the previous frame.
Right If you pressed [Tab] or [Enter] to
make the Trim Handles or Scrubber
active, use the Right-arrow key to
move to the next frame.
ESC If you pressed [Tab] or [Enter] to
activate and toggle between the
Trim Handles and Scrubber, you
can press [Esc] to deactivate the
Trim Handles / Scrubber.
Timeline shortcuts
Ctrl + A Select all clips on the Timeline.
Single title: Select all characters in
the on-screen edit mode.
Ctrl + X Single title: Cut selected characters
in the on-screen edit mode.
Shift + Click Select multiple clips in the same
track. (To select multiple clips in the
Library, [Shift] + [Click] or [Ctrl] +
[Click] the clips.)
Left Select the previous clip on the
Timeline.
Right Select the next clip on the Timeline.
Appendix A: Shortcuts 151](https://image.slidesharecdn.com/corelvsprox4ug-120212220521-phpapp02/85/Corel-vs-pro_x4_ug-modul-corel-draw-159-320.jpg)

![Layout settings shortcuts
F7 Switch to Default
Ctrl + 1 Switch to Custom #1
Ctrl + 2 Switch to Custom #2
Ctrl + 3 Switch to Custom #3
Alt + 1 Save to Custom #1
Alt + 2 Save to Custom #2
Alt + 3 Save to Custom #3
Others
ESC Stop capturing, recording,
rendering, or close a dialog box
without making any changes.
If you switched to Full Screen
Preview, press [Esc] to return to the
Corel VideoStudio Pro workspace.
Double-click a transition in the Double-clicking a transition in the
Effects Library Library automatically inserts it into
the first empty transition slot
between two clips. Repeating this
process will insert a transition into
the next empty transition slot.
Appendix A: Shortcuts 153](https://image.slidesharecdn.com/corelvsprox4ug-120212220521-phpapp02/85/Corel-vs-pro_x4_ug-modul-corel-draw-161-320.jpg)


This document provides a user guide for Corel VideoStudio Pro. It includes sections on installing and using the application, capturing and importing video, editing video clips, adding titles and effects, and more. The guide outlines the main interface elements and provides instructions for common tasks like starting a new project, trimming clips, adding transitions, and saving finished projects.