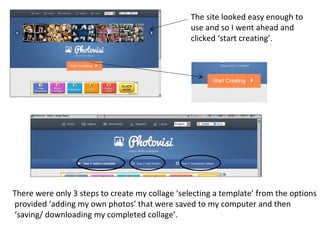
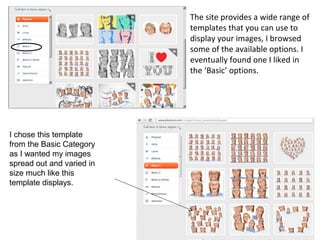
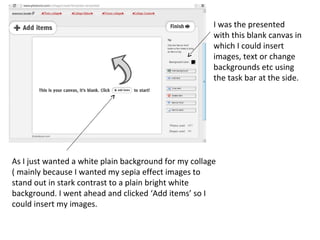
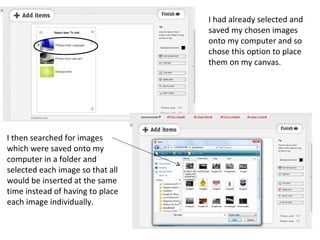
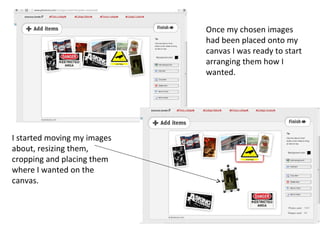
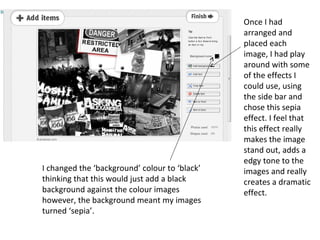
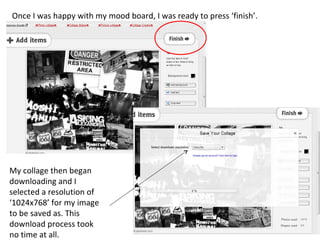
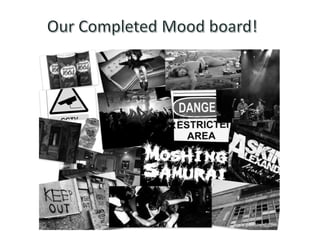
Using ‘Photovisi’ to create my
         Mood board
I browsed online to find a programme I could
either download or a site that would allow me
to essentially make a collage. Ideally one that
was free to use, and easy to navigate.
                               I simply entered ‘make a
                               collage online’ into Google.


                                     ‘Photovisi’ an online
                               collage maker was the first
                               to appear.
The site looked easy enough to
                                                 use and so I went ahead and
                                                 clicked ‘start creating’.


There were only 3 steps to create my collage ‘selecting a template’ from the options
provided ‘adding my own photos’ that were saved to my computer and then
‘saving/ downloading my completed collage’.
The site provides a wide range of
                           templates that you can use to
                           display your images, I browsed
                           some of the available options. I
                           eventually found one I liked in
                           the ‘Basic’ options.


I chose this template
from the Basic Category
as I wanted my images
spread out and varied in
size much like this
template displays.
I was the presented
                                                       with this blank canvas in
                                                       which I could insert
                                                       images, text or change
                                                       backgrounds etc using
                                                       the task bar at the side.


As I just wanted a white plain background for my collage
( mainly because I wanted my sepia effect images to
stand out in stark contrast to a plain bright white
background. I went ahead and clicked ‘Add items’ so I
could insert my images.
I had already selected and
                                  saved my chosen images
                                  onto my computer and so
                                  chose this option to place
                                  them on my canvas.


I then searched for images
which were saved onto my
computer in a folder and
selected each image so that all
would be inserted at the same
time instead of having to place
each image individually.
Once my chosen images
                             had been placed onto my
                             canvas I was ready to start
                             arranging them how I
                             wanted.


I started moving my images
about, resizing them,
cropping and placing them
where I wanted on the
canvas.
Once I had
                                               arranged and
                                               placed each
                                               image, I had play
                                               around with some
                                               of the effects I
                                               could use, using
                                               the side bar and
                                               chose this sepia
                                               effect. I feel that
                                               this effect really
                                               makes the image
                                               stand out, adds a
                                               edgy tone to the
I changed the ‘background’ colour to ‘black’   images and really
thinking that this would just add a black      creates a dramatic
background against the colour images           effect.
however, the background meant my images
turned ‘sepia’.
Once I was happy with my mood board, I was ready to press ‘finish’.


My collage then began
downloading and I
selected a resolution of
‘1024x768’ for my image
to be saved as. This
download process took
no time at all.
My completed collage
                         took no time at all to
                         download and once
                         the process had
                         reached ‘100%’ I
                         clicked to ‘Continue’
                         button to move on to
                         the next stage.


This message then
appeared and so I
pressed ‘click here to
download your
collage’, my collage
downloaded and I
saved the file in ‘my
pictures’ as JPEG file
so that I could use it
anywhere on my
blog work or in
Making our moodbaord

Making our moodbaord

  • 1.
    Using ‘Photovisi’ tocreate my Mood board
  • 2.
    I browsed onlineto find a programme I could either download or a site that would allow me to essentially make a collage. Ideally one that was free to use, and easy to navigate. I simply entered ‘make a collage online’ into Google. ‘Photovisi’ an online collage maker was the first to appear.
  • 3.
    The site lookedeasy enough to use and so I went ahead and clicked ‘start creating’. There were only 3 steps to create my collage ‘selecting a template’ from the options provided ‘adding my own photos’ that were saved to my computer and then ‘saving/ downloading my completed collage’.
  • 4.
    The site providesa wide range of templates that you can use to display your images, I browsed some of the available options. I eventually found one I liked in the ‘Basic’ options. I chose this template from the Basic Category as I wanted my images spread out and varied in size much like this template displays.
  • 5.
    I was thepresented with this blank canvas in which I could insert images, text or change backgrounds etc using the task bar at the side. As I just wanted a white plain background for my collage ( mainly because I wanted my sepia effect images to stand out in stark contrast to a plain bright white background. I went ahead and clicked ‘Add items’ so I could insert my images.
  • 6.
    I had alreadyselected and saved my chosen images onto my computer and so chose this option to place them on my canvas. I then searched for images which were saved onto my computer in a folder and selected each image so that all would be inserted at the same time instead of having to place each image individually.
  • 7.
    Once my chosenimages had been placed onto my canvas I was ready to start arranging them how I wanted. I started moving my images about, resizing them, cropping and placing them where I wanted on the canvas.
  • 8.
    Once I had arranged and placed each image, I had play around with some of the effects I could use, using the side bar and chose this sepia effect. I feel that this effect really makes the image stand out, adds a edgy tone to the I changed the ‘background’ colour to ‘black’ images and really thinking that this would just add a black creates a dramatic background against the colour images effect. however, the background meant my images turned ‘sepia’.
  • 9.
    Once I washappy with my mood board, I was ready to press ‘finish’. My collage then began downloading and I selected a resolution of ‘1024x768’ for my image to be saved as. This download process took no time at all.
  • 10.
    My completed collage took no time at all to download and once the process had reached ‘100%’ I clicked to ‘Continue’ button to move on to the next stage. This message then appeared and so I pressed ‘click here to download your collage’, my collage downloaded and I saved the file in ‘my pictures’ as JPEG file so that I could use it anywhere on my blog work or in