This document summarizes the process of rendering an architectural model of Iwasa House using Vray and Sketchup. It describes: (1) Choosing the camera angle to focus on, (2) Setting up ambient lighting and HDRI to establish mood, (3) Texturing the walls, floors, and stairs by remodeling for realism, (4) Positioning IES lights, (5) Adding trees and accessories, (6) Setting render options and doing a raw render, (7) Applying post-production in Photoshop. The full process is explained over several sections to achieve a realistic final rendered image of the house.
How to Combine Drawing, SketchUp & PhotographystudioINSITE
Quick visualization project for a studioINSITE client who wanted simply to understand what a sidewalk in front of his development might look like if it had landscape planters integrated into the streetscape. This is a simple way to produce an image with context for your clients! It creates a hybrid image with drawing, SketchUp and a photograph.
See the blog post here: http://jimleggitt.typepad.com/jim-leggitt-drawing-shortcuts/2013/11/composite-sketch-from-sketchup-and-photography.html
The Art created from the manipulation of two or more photographic images combined in whole or in part to create something new. Photo manipulation is an excellent example of a mixture of a traditional art form with the latest technologies to create an illusion of two or more photographic images combined.There are several ways in which image manipulation services can be used to improve the quality of images.
ICPS offer Exclusive photo manipulation service for your company or business, we request you to have a free trial or contact us. We process images in 24 hours.
How to: Digital Watercolor with SketchUpstudioINSITE
I really enjoy discovering new methods of combining SketchUp models with hand drawing. My new “Digital Watercolor” method takes the hybrid process one step further and adds filtering with Photoshop to give the image a soft watercolor-like appearance.
This studioINSITE project was for a new hospital healing garden. The outdoor space was filled with variations in surface textures, different visual experiences and sculpted topography for patients to explore. The two digital watercolors I created were used for fund raising purposes. This is my step-by-step process.
Find the blog of this slideshare here: http://jimleggitt.typepad.com/jim-leggitt-drawing-shortcuts/2013/12/hand-drawn-digital-watercolor-with-a-sketchup-model.html
HOW TO: Transform SketchUp Models into Digital Hybrid Watercolor RenderingsstudioINSITE
Digital SketchUp Watercolor is an amazing hybrid visualization technique for transforming a Google SketchUp model view into a digital watercolor. The idea involves a combination of digital image manipulation and traditional hand coloring with markers. For anyone who enjoys modeling in SketchUp, this process enables you to create beautiful renderings that have a "hand crafted" character resembling a watercolor painting.
SketchUp for Design, Marketing and MoreMARKITECT.me
Think of SketchUp not as CAD or BIM software. It’s really design, marketing and communication software. If you need to share with clients, your design team and subcontractors, SketchUp Pro and LayOut can make your day! We’ll take it further and look at ideas for marketing with SketchUp!
Included are a few examples of past project plans, descriptions, exterior pictures, SketchUp renderings and colored elevations. Also a brief description of production standards.
This is a slide presentation used in Udemy teaching course explaining the use of sketchup to produce the Preliminary Design Document as part of the Architects Regular Design Service. It includes other Preliminary Design Presentation Documents submitted by the architect to the client.
SketchUp is an affordable, easy-to-learn digital design software that can be used for Kitchen Design as well as for designing the rest of the home. This makes it a useful, versatile tool for designing and documenting all stages of your home design project.
This presentation shows how SketchUp Pro with LayOut from Trimble works as a powerful design and communications software program for designing homes. The case study features a complete work-flow for home design to construction drawings, by Nick Sonder, Architect. In the second half, Mark Johnson FAIA Architect, shows how to optimize SketchUp 3D models for social media marketing, where to download SketchUp, and where to find video tutorials to learn SketchUp.
SKETCHUP TEXTURE.COM Mtm tutorial forest house by empoy medinasketchuptexture
mini tutorial sketchup 2013 - vray 1.6
make a Forest House.
we invite you to visit our new site
many innovations and thousands of new indie texture ^-^
http://www.sketchuptextureclub.com/textures
Welcome to the Program Your Destiny course. In this course, we will be learning the technology of personal transformation, neuroassociative conditioning (NAC) as pioneered by Tony Robbins. NAC is used to deprogram negative neuroassociations that are causing approach avoidance and instead reprogram yourself with positive neuroassociations that lead to being approach automatic. In doing so, you change your destiny, moving towards unlocking the hypersocial self within, the true self free from fear and operating from a place of personal power and love.
https://bit.ly/BabeSideDoll4u Babeside is a company that specializes in creating handcrafted reborn dolls. These dolls are designed to be incredibly lifelike, with realistic skin tones and hair, and they have become increasingly popular among collectors and those who use them for therapeutic purposes. At Babeside, we believe that our reborn dolls can provide comfort and healing to anyone who needs it.
The Healing Power of Babeside's Handcrafted Creations
Our reborn dolls are more than just beautiful pieces of art - they can also help alleviate stress, anxiety, depression, and other mental health conditions. Studies have shown that holding or cuddling a soft object like a stuffed animal or a reborn doll can release oxytocin, which is often referred to as the "love hormone." This hormone helps us feel calm and relaxed, reducing feelings of stress and anxiety.
In addition to their physical benefits, reborn dolls can also offer emotional support. For many people, having something to care for and nurture can bring a sense of purpose and fulfillment. Reborn dolls can also serve as a reminder of happy memories or loved ones who have passed away.
Collocation thường gặp trong đề thi THPT Quốc gia.pdf
Making of iwasa house render by ferry sugianto
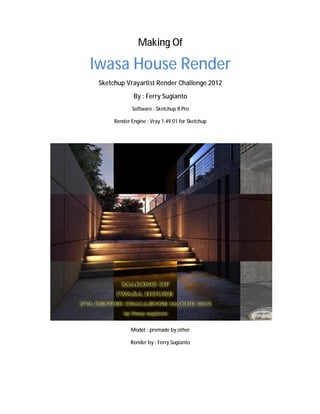
1. Making Of
Iwasa House Render
Sketchup Vrayartist Render Challenge 2012
By : Ferry Sugianto
Software : Sketchup 8 Pro
Render Engine : Vray 1.49.01 for Sketchup
Model : premade by other
Render by : Ferry Sugianto
2. Hai all .. thanks again to all for the support, also for SVA for choosing me as one of Iwasa challenge
finalist, but all the participant is truly the winner .. In this time, nothing special with the render
settings, its all actually the same concept like my previous tutorial, but i will try explain the method
how i doing from the begining.
A. Learning the model
When i download this model from the link given by SVA, i opened, and then i confused, because
almost all of the sides is very beautiful camera angle. Its very various and huge building. Trying
from the stair, but its too dark, i tried another from upper balcony, but need a vocal point to
shown whats the special of Iwasa House. Ahaa.. i choose from the downstair .. like the original
photo, its nice i think .. Actually, why i am telling you this phase? Because, for me, choosing the
camera angle is important, about 75% sense of the scene is depend on how we take the angle
shot.
Here is my view angle, so i will focus on this view only.
Make sure you adjust the angle especially the vertical line is exactly straight. This model can be
downloaded on SVA website or on the 3dwarehouse site.
3. B. Preparing the Ambience
If you notice from the original model, this scene dominantly consist with concrete material. And I
dont want to change it because Iwasa House is has this special concrete type. Then, testing
render for the first time, like this:
4. Usually, for the first step of work, i set out the lighting (ambience). Why? because the scene is
not to heavy to testing render to get a better ambience mood. Thats why i didnt touch the
material until I got the scene mood.
This time, i use HDRI. Here is the preview of the HDRI i am using.
And here is the setting on the render option
And here is the test render with HDRI applied:
5. C. Setting out the Texturing
Now, after i get the "afternoon mood" in my scene, now I learning the texturing.
The Wall
I didnt change the setting out point from the original scene because its already correct. I just
create a new bitmap for the texture of the wall. Here is the map i used :
7. And here is the preview render with concrete wall material applied.
The arrow on the image is the points that i dont satisfied with the material setting. Although i
already set the bump, but still need more deep on these part. So? i re-model the wall, so the gap
and the holes is really based on the texture i used. Here is the scene after i re-model the wall
(including re-model the stair and the floor).
So, you can noticed that almost all the wall, floor and the stair is re-modelled, and here is the full
preview of the scene.
8. I know this is not the best way by re-modelling, but, for me, to get the exactly to match to the
reality, i am realy satisfied .. you can check here is the render test..
10. And here is the material setting for the floor
11.
12. D. Lighting
I use IES light in this scene, the position is like the image below
Each of those light using this setting
13. E. Adding environment
Adding some trees and accessories to avoid the scene from "emptiness" .. ^_^
F. Render
Until all done, now is setting the render option. I use simple setting like the following images
14.
15.
16.
17.
18. And here it RAW Render
G. Post Production
I use some tools on photoshop, like :
- Exposure
- Color Balance
- Brightness contrast
- Magic Bullet Photolooks
- Knoll light to make the lens effect on the downlight
I am not explaining this part, because this is the same like my previous tutorial " THE MAKING OF
ATIKAH LIVING ROOM INTERIOR" you can find on this SVA website. ^_^