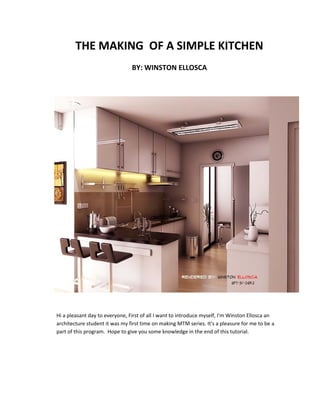
THE MAKING OF A SIMPLE KITCHEN
                                BY: WINSTON ELLOSCA


Hi a pleasant day to everyone, First of all I want to introduce myself, I'm Winston Ellosca an
architecture student it was my first time on making MTM series. It's a pleasure for me to be a
part of this program. Hope to give you some knowledge in the end of this tutorial.
Here is the main model. As you can see its simple, few colors I just used detailed
 components which I downloaded from Google 3d warehouse.


OTHER VIEW
ELEVATION/SECTIONAL VIEW:


                                       A VIEW OF PANTRY


TOP VIEW
TEXTURE, MATERIALS and SETTINGS

Underneath the kitchen cabinet I put some cove light which has an emissive layer and
an intensity of 200. The RGB value is 200,161,52. This setting is same with the louver
type fluorescent, except the color. Just change it to white.


RED: 200
GREEN: 161
BLUE: 52
Here is an aerial view of the model showing the rectangular lights which I used
to illuminate the interior. I didn't used sun for the illumination because of some factors.
One factor is the position of the scene and other is ; when I used sun, the output of
render is dark. I don't want to use the shutter speed under the camera setting to lighten
the interior because I want the output to become more natural.
VIEW 1:


                                                                 VRAY RECTANGULAR LIGHT


                                                                        RGB VALUE IS SET TO
                                                                         DEFAULT : WHITE


VIEW 2:


                                                                         UNCHECK "AFFECT
                                                                        REFLECTIONS" under
                                                                        "AFFECT SPECULAR"


                                                              VRAY RECTANGULAR LIGHT
GRANITE COUNTER TOP TEXTURE and MATERIAL SETTING                    TEX FRESNEL:
                                                                VALUE: DEFAULT TO 1.55


                               H.G: 0.8              R.G: 0.8


                                TEX FRESNEL:
                            VALUE: DEFAULT TO 1.55


                                 H.G: 0.8                R.G: 0.9
YELLOW CUP TEXTURE and MATERIAL SETTING


               DIFFUSE COLOR:
                   R: 184
                    G:134
                                                              R.G: 0.8
                    B:11
                                                              H.G: 0.75
FLOOR TEXTURE and MATERIAL SETTING


                 R.G: 0.8                         H.G: 0.75


                                       IOR: 3.0
CHROME MATERIAL

           Just add REFLECTION layer to material. I used this setting to all chrome. SINK, FAUCET ,
           ETC. The value if H.G and R.G is default to 1.0 . Others used 0.9 for R.G and they set the
           SUBDIVISION value to 300. I recommend not to use this setting if you have a lower
           specification of pc because it affects the rendering time. The higher the subdivision the
           longer you'll wait for the render to finish.


GLASS MATERIAL
           Add REFLECTION LAYER and REFRACTION LAYER. Change the IOR value under refraction
           layer. Set it to 1.44. Under the reflection layer set the "M" to "texfresnel" the value is
           default to 1.55.
M = TEXFRESNEL               H.G: 0.75              R.G: 0.7


      CHAIR


                     M = TEXFRESNEL             H.G: 1.0                R.G: 1.0
CABINET and PANTRY

                                 OTHER OPTION::::H.G: 1.0               R.G: 0.9
RENDER SETTINGS: VRAY 1.49.01


           UNDER SYSTEM: IF YOU HAVE 8GB MEMORY
         CHANGE YOUR DYNAMIC MEMORY UNIT LIMIT TO
                                4000.
          below is a very helpful link and the reason why I
                     change the value of D.M.L
            http://renderstuff.com/best-vray-settings-
                       raycasting-cg-tutorial/


                                                   UNDER IMAGE SAMPLER: I CHANGED COLOR
                                                          THRESHOLD VALUE TO : 0.0


                                                          ANTIALIASING FILTER: CATMULL ROOM
                                                                        SIZE: 2.0
UNDER DMC SAMPLER: I CHANGE THE NOISE
                                       THRESHOLD VALUE TO 0.001


UNDER COLOR MAPPING: TYPE:
    HSV EXPONENTIAL


                                    THICK CLAMP OUTPUT


UNDER LIGHT CACHE: CHANGED THE
     SUBDIVS VALUE TO 900
UNDER IRRADIANCE MAP: I CHANGED THE
    HSph.SUBDIVS VALUE TO 100
    AND SAMPLES VALUE TO : 30


    UNDER INDIRECT ILLUMINATION: THICK
    AMBIENT OCCLUSION ON. CHANGE THE
   RADIUS VALUE TO 25.0 SUBDIVS TO 75 AND
              AMOUNT TO 1.0
RAW RENDER OUTPUT
PHOTOSHOP RETOUCH
   Import your final vray raw render in Photoshop CS6 or lower version /3/4/5.


                                                                    THIS WINDOW WILL APPEAR
   Under layer tab choose >New Adjustment Layer then > Curves.      CHOOSE THE COLOR : GRAY
                                                                        MODE: SOFT LIGHT
                                                                          THEN PRESS OK


          AFTER PRESSING "OK" BUTTON
            AFTER PRESSING THE "OK"
           THIS WINDOW WILL APPEAR,
           BUTTON THIS WINDOW WILL
         ADJUST/BEND THE LINE . DEPENDS
         APPEAR, ADJUST/BEND THE LINE .
                 ON YOUR TASTE.
            DEPENDS ON YOUR TASTE.
AND FOR ANOTHER EDITING.
                                         UNDER LAYER TAB. CHOOSE>NEW
                                         FILL LAYER THEN CHOOSE> SOLID
                                             COLOR. THIS WILL APPEAR


            CHANGE THE COLOR VALUE TO:
                     ORANGE
                MODE: SOFT LIGHT


AFTER THE NEW FILL LAYER. I ALSO
USED COLOR BALANCE. BUT THIS IS
          OPTIONAL.
THIS IS THE FINAL EDITOR I USED ,THE PHOTOSHOP PLUGIN "TOPAZ". Under Filter tab
choose > Topaz labs and > Topaz Clean 3.


after that the window editor will appear. on the left side upper corner choose
CRISPSTYLE then on the right side change the STRENGTH value to 1.
PHOTOSHOP RETOUCH OUTPUT
TIPS: AS YOU NOTICE IN THIS IMAGE THE EDGE IS ROUND AND NOT SHARP.THIS IS A BIG
FACTOR WHICH CAN AFFECT REALISM. I USED ROUND CORNER 3D PLUGINS WHICH
CAN BE DOWNLOADED IN sketchupvrayresources.blogspot.com UNDER STYLES and RUBIES.


                                                                  ROUND EDGE


other helpful links:
http://www.cad-addict.com/2009/07/sketchup-list-of-plugins.html
http://renderstuff.com/best-vray-settings-raycasting-cg-tutorial/
TIPS 2: MAKE YOUR MODEL AS DETAILED AS POSSIBLE EVEN THE COMPONENTS. IF YOUR PC
CAN HANDLE LARGE POLYGONS THEN THIS IS A WAY TO GO TO DO DETAILED SCENES.

TIPS 3: AVOID DEAD SPACE

TIPS 4: THE LAST IS BE SURE YOU'RE SERIOUS AND YOU LOVE WHAT YOU'RE DOING. LOVE YOUR
WORK!


               THAT'S ALL THANKS AND ENJOY :)
              special thanks to sir Nomer for letting me to do this MTM

Winston ellosca kitchen

  • 1.
    THE MAKING OFA SIMPLE KITCHEN BY: WINSTON ELLOSCA Hi a pleasant day to everyone, First of all I want to introduce myself, I'm Winston Ellosca an architecture student it was my first time on making MTM series. It's a pleasure for me to be a part of this program. Hope to give you some knowledge in the end of this tutorial.
  • 2.
    Here is themain model. As you can see its simple, few colors I just used detailed components which I downloaded from Google 3d warehouse. OTHER VIEW
  • 3.
    ELEVATION/SECTIONAL VIEW: A VIEW OF PANTRY TOP VIEW
  • 4.
    TEXTURE, MATERIALS andSETTINGS Underneath the kitchen cabinet I put some cove light which has an emissive layer and an intensity of 200. The RGB value is 200,161,52. This setting is same with the louver type fluorescent, except the color. Just change it to white. RED: 200 GREEN: 161 BLUE: 52
  • 5.
    Here is anaerial view of the model showing the rectangular lights which I used to illuminate the interior. I didn't used sun for the illumination because of some factors. One factor is the position of the scene and other is ; when I used sun, the output of render is dark. I don't want to use the shutter speed under the camera setting to lighten the interior because I want the output to become more natural. VIEW 1: VRAY RECTANGULAR LIGHT RGB VALUE IS SET TO DEFAULT : WHITE VIEW 2: UNCHECK "AFFECT REFLECTIONS" under "AFFECT SPECULAR" VRAY RECTANGULAR LIGHT
  • 6.
    GRANITE COUNTER TOPTEXTURE and MATERIAL SETTING TEX FRESNEL: VALUE: DEFAULT TO 1.55 H.G: 0.8 R.G: 0.8 TEX FRESNEL: VALUE: DEFAULT TO 1.55 H.G: 0.8 R.G: 0.9
  • 7.
    YELLOW CUP TEXTUREand MATERIAL SETTING DIFFUSE COLOR: R: 184 G:134 R.G: 0.8 B:11 H.G: 0.75 FLOOR TEXTURE and MATERIAL SETTING R.G: 0.8 H.G: 0.75 IOR: 3.0
  • 8.
    CHROME MATERIAL Just add REFLECTION layer to material. I used this setting to all chrome. SINK, FAUCET , ETC. The value if H.G and R.G is default to 1.0 . Others used 0.9 for R.G and they set the SUBDIVISION value to 300. I recommend not to use this setting if you have a lower specification of pc because it affects the rendering time. The higher the subdivision the longer you'll wait for the render to finish. GLASS MATERIAL Add REFLECTION LAYER and REFRACTION LAYER. Change the IOR value under refraction layer. Set it to 1.44. Under the reflection layer set the "M" to "texfresnel" the value is default to 1.55.
  • 9.
    M = TEXFRESNEL H.G: 0.75 R.G: 0.7 CHAIR M = TEXFRESNEL H.G: 1.0 R.G: 1.0 CABINET and PANTRY OTHER OPTION::::H.G: 1.0 R.G: 0.9
  • 10.
    RENDER SETTINGS: VRAY1.49.01 UNDER SYSTEM: IF YOU HAVE 8GB MEMORY CHANGE YOUR DYNAMIC MEMORY UNIT LIMIT TO 4000. below is a very helpful link and the reason why I change the value of D.M.L http://renderstuff.com/best-vray-settings- raycasting-cg-tutorial/ UNDER IMAGE SAMPLER: I CHANGED COLOR THRESHOLD VALUE TO : 0.0 ANTIALIASING FILTER: CATMULL ROOM SIZE: 2.0
  • 11.
    UNDER DMC SAMPLER:I CHANGE THE NOISE THRESHOLD VALUE TO 0.001 UNDER COLOR MAPPING: TYPE: HSV EXPONENTIAL THICK CLAMP OUTPUT UNDER LIGHT CACHE: CHANGED THE SUBDIVS VALUE TO 900
  • 12.
    UNDER IRRADIANCE MAP:I CHANGED THE HSph.SUBDIVS VALUE TO 100 AND SAMPLES VALUE TO : 30 UNDER INDIRECT ILLUMINATION: THICK AMBIENT OCCLUSION ON. CHANGE THE RADIUS VALUE TO 25.0 SUBDIVS TO 75 AND AMOUNT TO 1.0
  • 13.
  • 14.
    PHOTOSHOP RETOUCH Import your final vray raw render in Photoshop CS6 or lower version /3/4/5. THIS WINDOW WILL APPEAR Under layer tab choose >New Adjustment Layer then > Curves. CHOOSE THE COLOR : GRAY MODE: SOFT LIGHT THEN PRESS OK AFTER PRESSING "OK" BUTTON AFTER PRESSING THE "OK" THIS WINDOW WILL APPEAR, BUTTON THIS WINDOW WILL ADJUST/BEND THE LINE . DEPENDS APPEAR, ADJUST/BEND THE LINE . ON YOUR TASTE. DEPENDS ON YOUR TASTE.
  • 15.
    AND FOR ANOTHEREDITING. UNDER LAYER TAB. CHOOSE>NEW FILL LAYER THEN CHOOSE> SOLID COLOR. THIS WILL APPEAR CHANGE THE COLOR VALUE TO: ORANGE MODE: SOFT LIGHT AFTER THE NEW FILL LAYER. I ALSO USED COLOR BALANCE. BUT THIS IS OPTIONAL.
  • 16.
    THIS IS THEFINAL EDITOR I USED ,THE PHOTOSHOP PLUGIN "TOPAZ". Under Filter tab choose > Topaz labs and > Topaz Clean 3. after that the window editor will appear. on the left side upper corner choose CRISPSTYLE then on the right side change the STRENGTH value to 1.
  • 17.
  • 18.
    TIPS: AS YOUNOTICE IN THIS IMAGE THE EDGE IS ROUND AND NOT SHARP.THIS IS A BIG FACTOR WHICH CAN AFFECT REALISM. I USED ROUND CORNER 3D PLUGINS WHICH CAN BE DOWNLOADED IN sketchupvrayresources.blogspot.com UNDER STYLES and RUBIES. ROUND EDGE other helpful links: http://www.cad-addict.com/2009/07/sketchup-list-of-plugins.html http://renderstuff.com/best-vray-settings-raycasting-cg-tutorial/ TIPS 2: MAKE YOUR MODEL AS DETAILED AS POSSIBLE EVEN THE COMPONENTS. IF YOUR PC CAN HANDLE LARGE POLYGONS THEN THIS IS A WAY TO GO TO DO DETAILED SCENES. TIPS 3: AVOID DEAD SPACE TIPS 4: THE LAST IS BE SURE YOU'RE SERIOUS AND YOU LOVE WHAT YOU'RE DOING. LOVE YOUR WORK! THAT'S ALL THANKS AND ENJOY :) special thanks to sir Nomer for letting me to do this MTM