Downloaded 197 times


![Provisioning on Windows
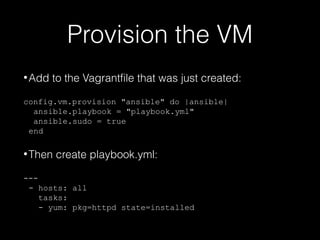
•
Shell script provisioning works on Windows
•
Use shell script to set up Ansible dependencies,
then run Ansible playbook from within VM:
config.vm.provision "shell" do |sh|
sh.path = "windows.sh"
sh.args = "playbook.yml inventory"
end
•
Since it’s Ruby, you can use ruby if/else for which
provisioner to use, with RbConfig::CONFIG['host_os']](https://image.slidesharecdn.com/localdevelopmentonvms-vagrantvirtualboxandansible-140114145649-phpapp01/85/Local-Dev-on-Virtual-Machines-Vagrant-VirtualBox-and-Ansible-19-320.jpg)


The document discusses the challenges of traditional prepackaged development environments and highlights the benefits of using Vagrant and Ansible for local development. Vagrant facilitates the easy creation and management of virtual machines, while Ansible simplifies automation and configuration management without complex scripting. It also provides instructions for setting up a CentOS development environment using these tools, as well as considerations for Windows users.