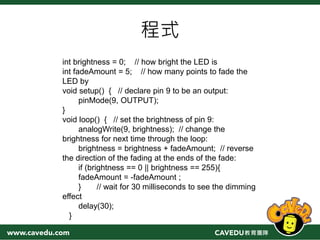
introduction of LinkIt Smart 7688 Duo and MCS basics. Contents includes environments setup (Arduino IDE and Web UI); SSH log in; How to program nodejs and python on 7688; Mediatek Cloud Snadbox introduction.
And finally let your 7688 duo interact with MCS.
More interesting: http://www.cavedu.com
Tutorial of LinkIt 7697 IoT dev board, including Arduino IDE setup, BlocklyDuino GUI, Mediatel Cloud Sandbox and how to interact throught BLE (App Inventor).
LinkIt 7697物聯網開發板教學,包含Arduino IDE、BlocklyDuino圖形化介面、MCS雲服務以及使用 App Inventor 進行 BLE 互動.
Power by CAVEDU Education http://www.cavedu.com;
App Inventor TW http://www.appinventor.tw
Brief introduction of Education RobotArm, you can control it with most version of Arduino (including contemptible boards) and Raspberry Pi.
This robotarm was direved from MeArm v0.4.
LinkIt 7697 outer case - DesignSpark Mechanical / OnkscapeCAVEDU Education
This topic will show how to design a outer case of LinkIt 7697 board.
Today we use DesignSpark Mechanical 2.0 to desgn it and use Inkspace convert to *.PDF file.
PDF files can support almost all kinds of drawing program and export to laser beam cutting machine.
designer: yulun @CAVEDU
file download: https://www.thingiverse.com/thing:2400953
How to write an app with App Inventor, you can use it to control Arduino 101 board by BLE (Bluetooth Low Energy).
Tutorial and source code: http://www.appinventor.tw/ble_lesson1_blink
Workshop @ maker FAire Singapore 2016
34. 程式
int brightness = 0; // how bright the LED is
int fadeAmount = 5; // how many points to fade the
LED by
void setup() { // declare pin 9 to be an output:
pinMode(9, OUTPUT);
}
void loop() { // set the brightness of pin 9:
analogWrite(9, brightness); // change the
brightness for next time through the loop:
brightness = brightness + fadeAmount; // reverse
the direction of the fading at the ends of the fade:
if (brightness == 0 || brightness == 255){
fadeAmount = -fadeAmount ;
} // wait for 30 milliseconds to see the dimming
effect
delay(30);
}