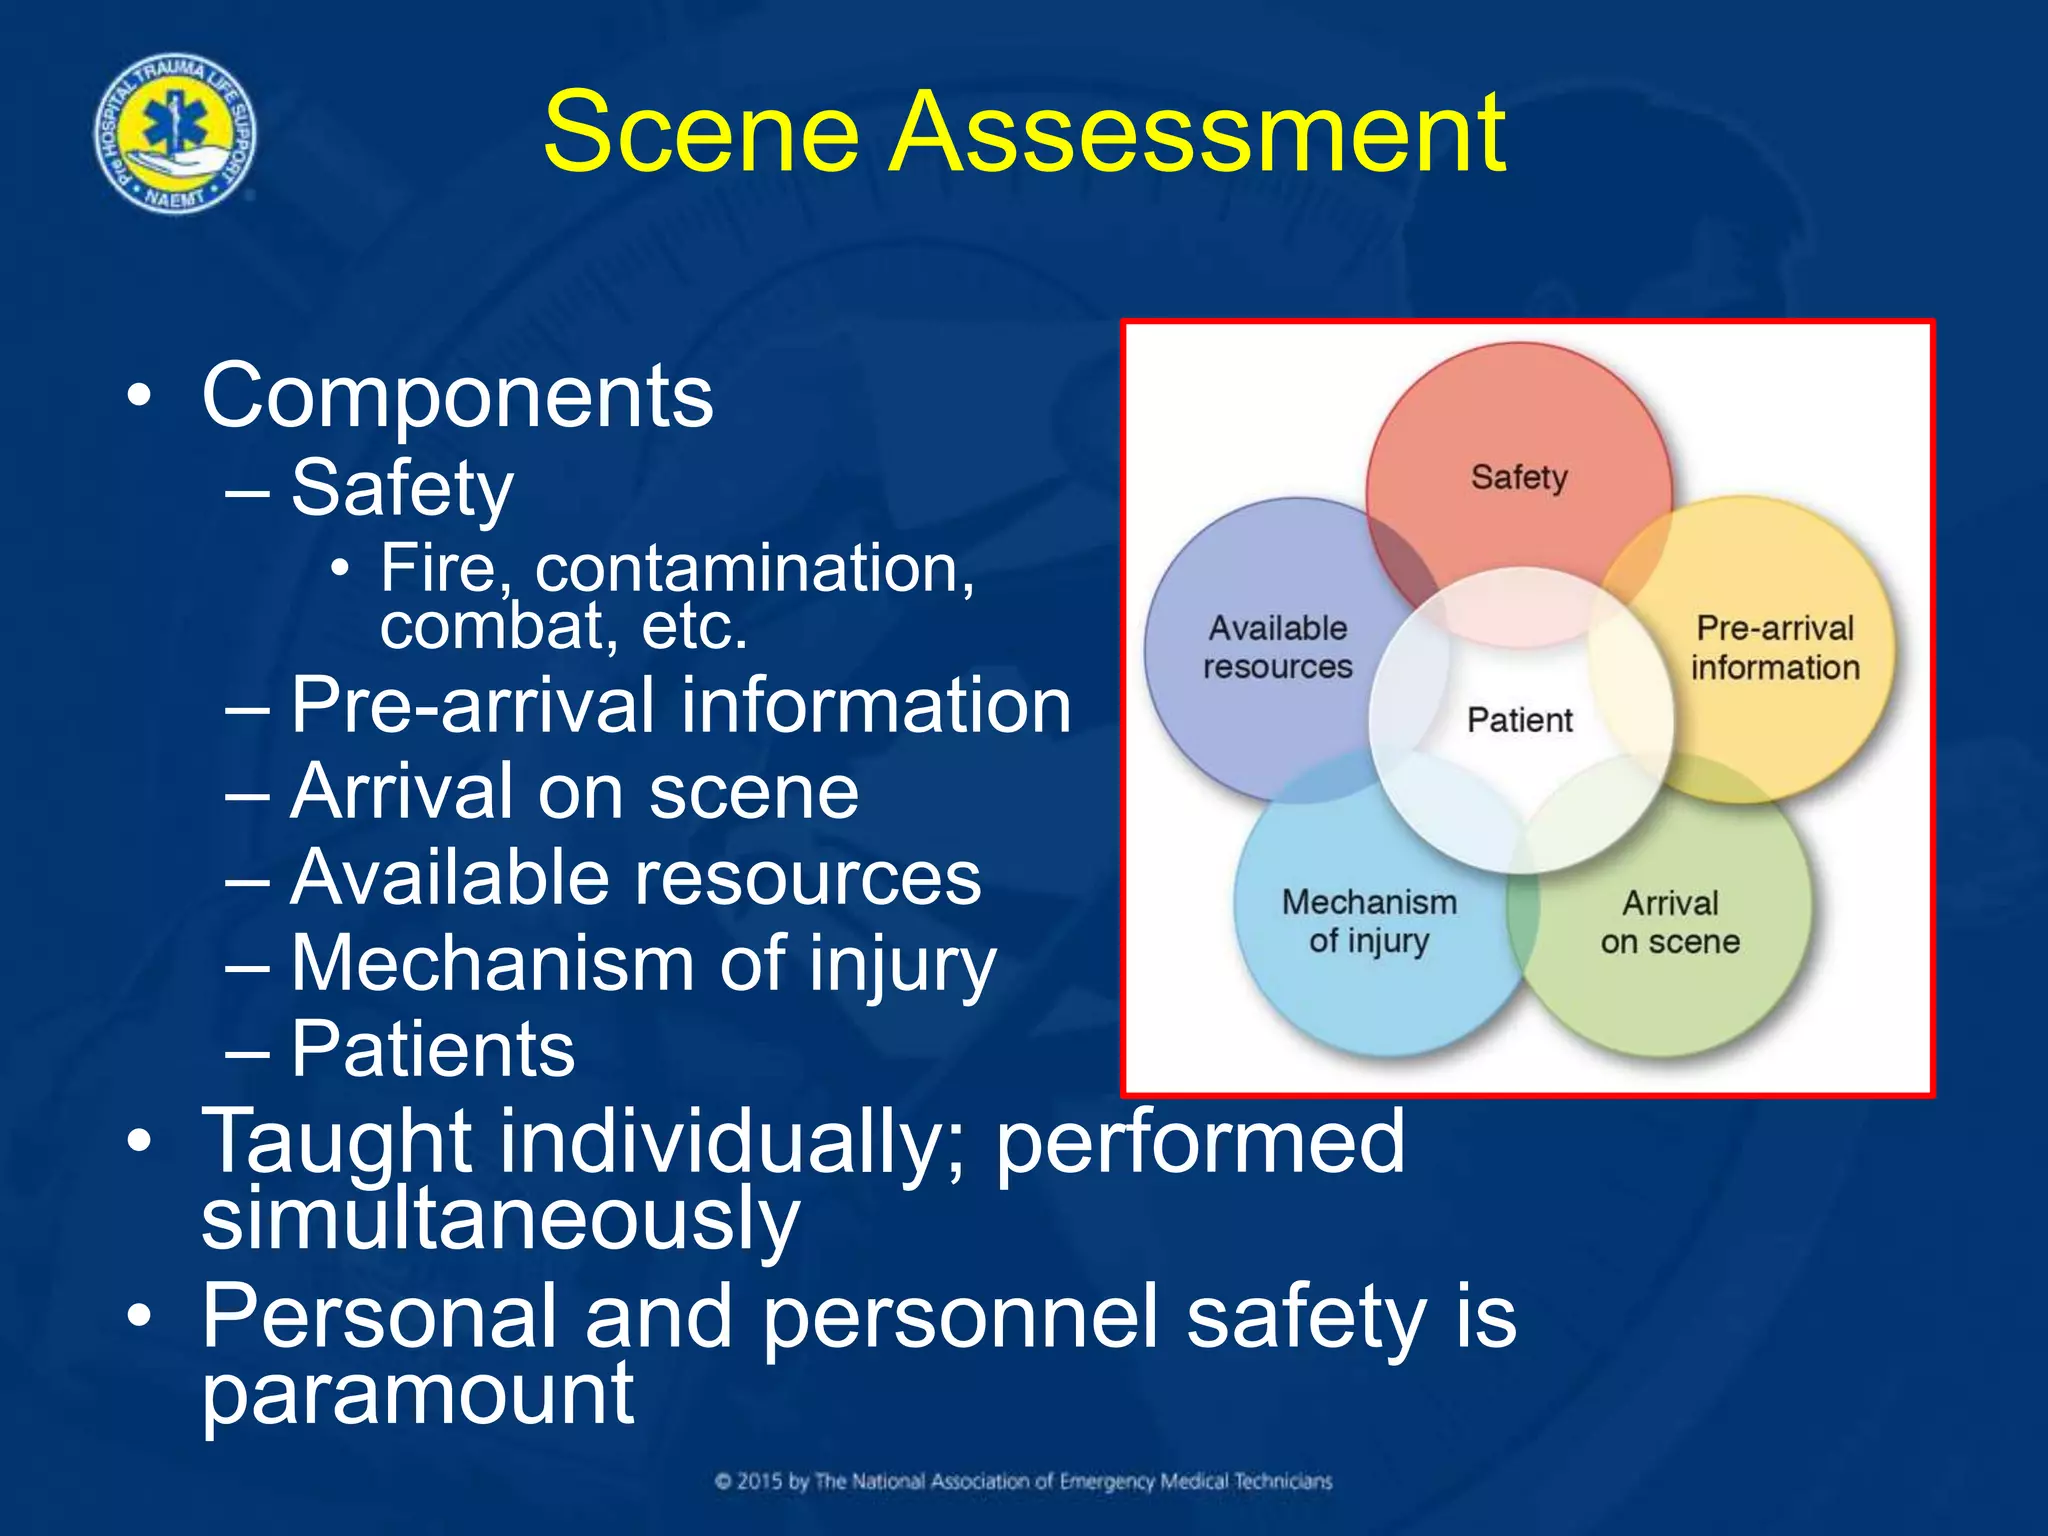
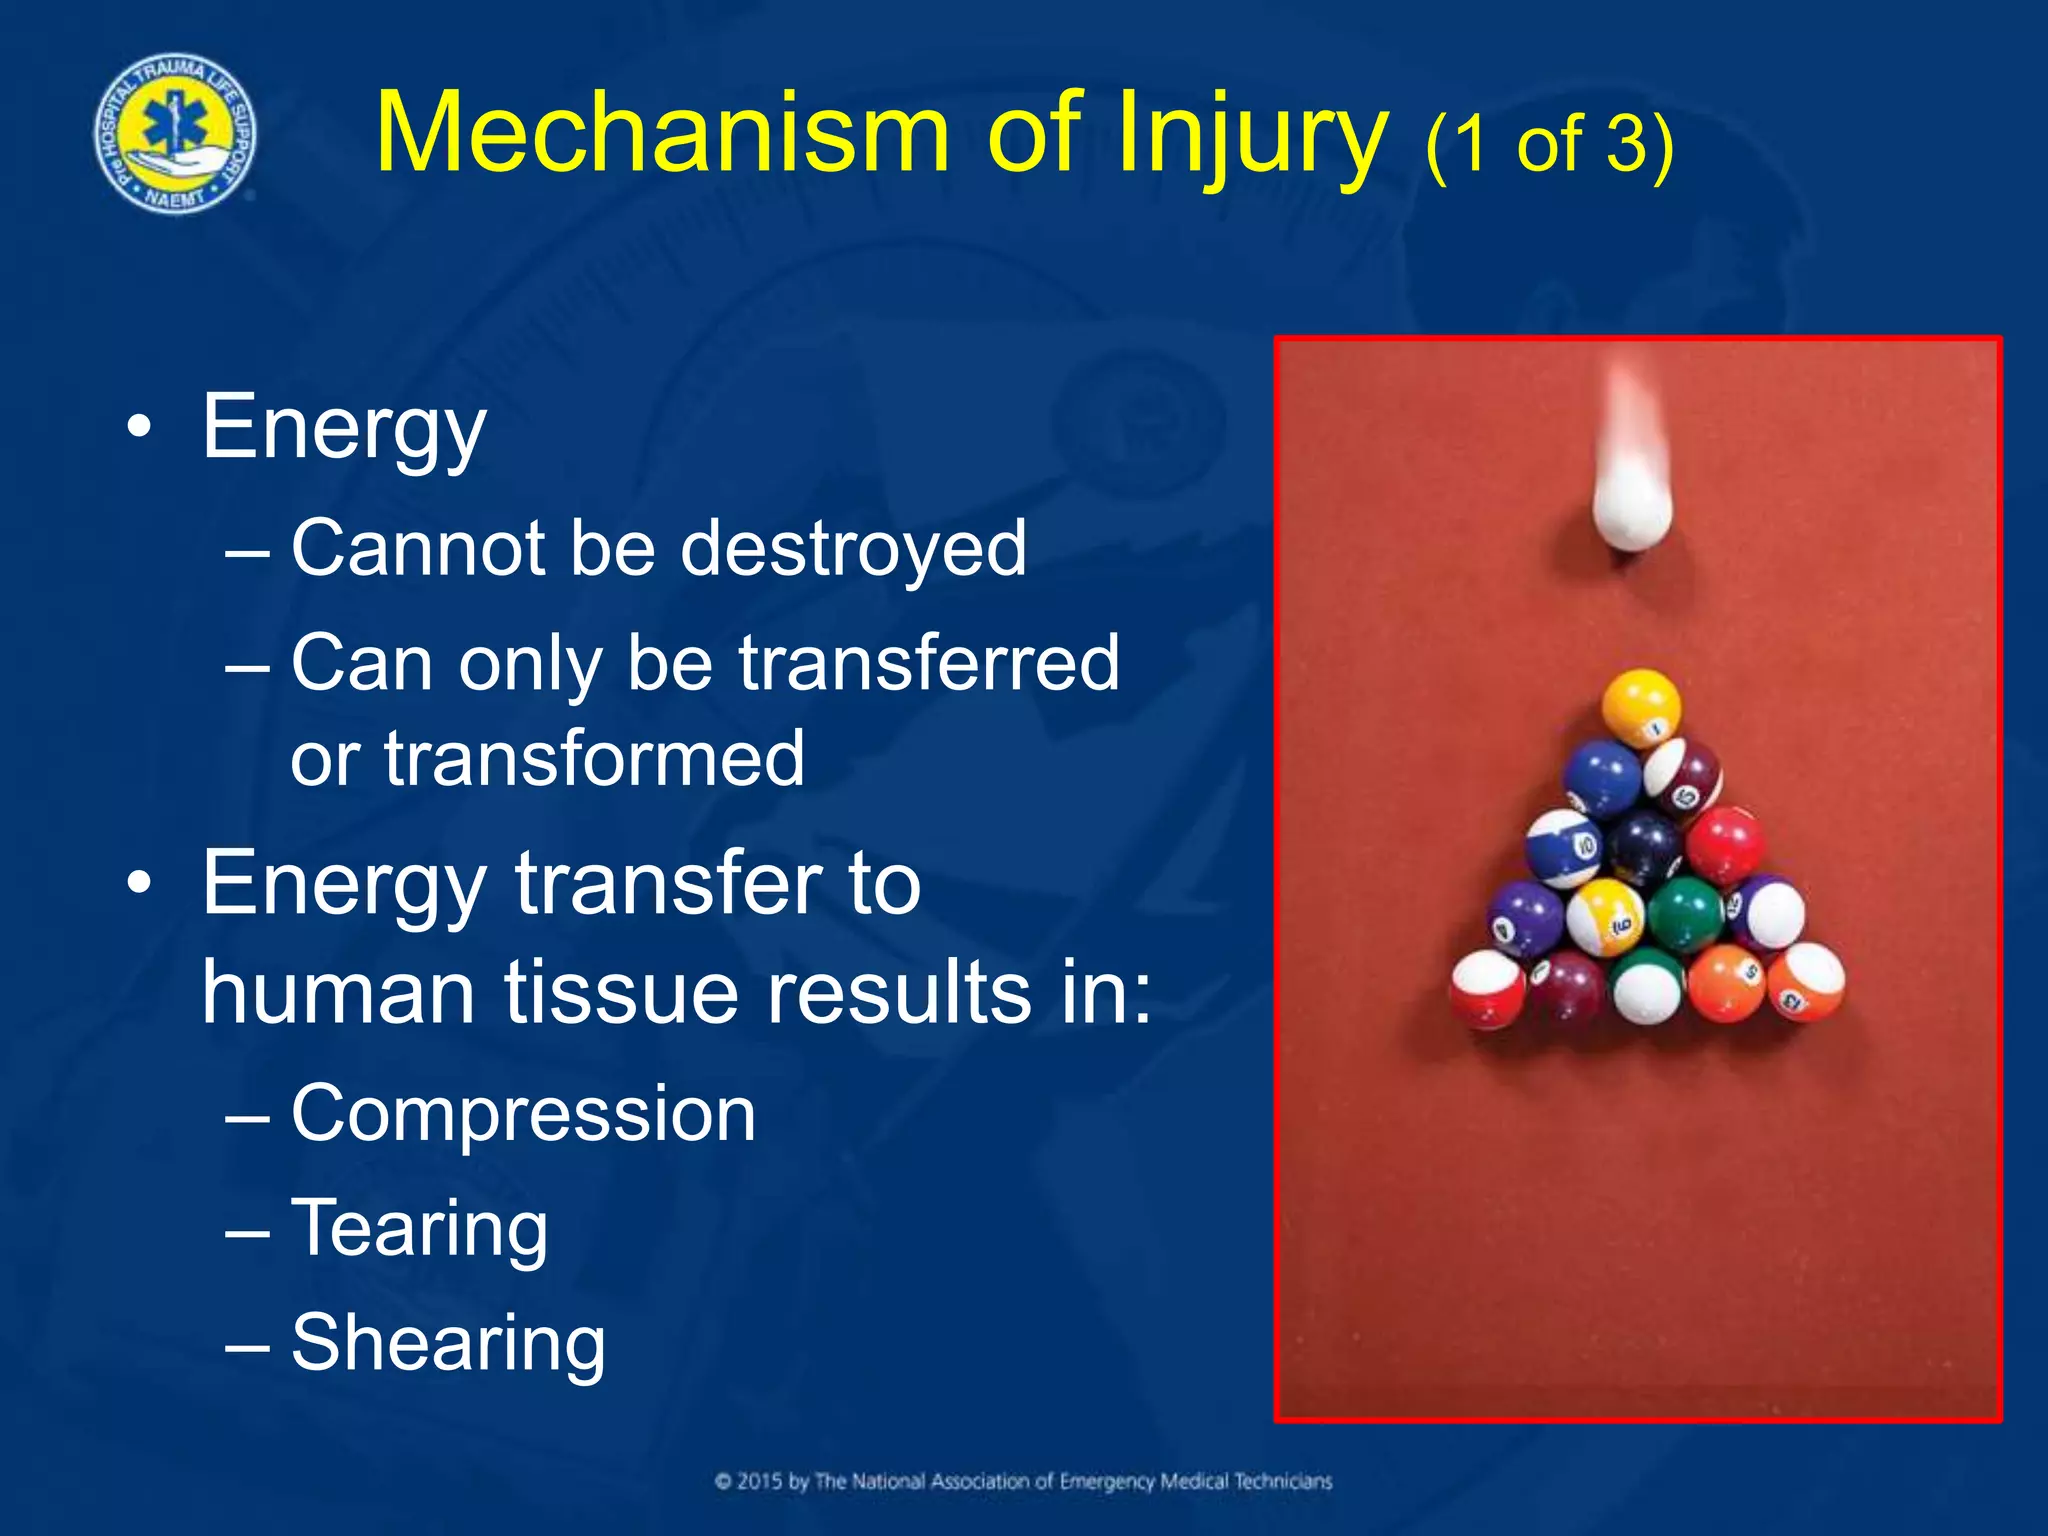
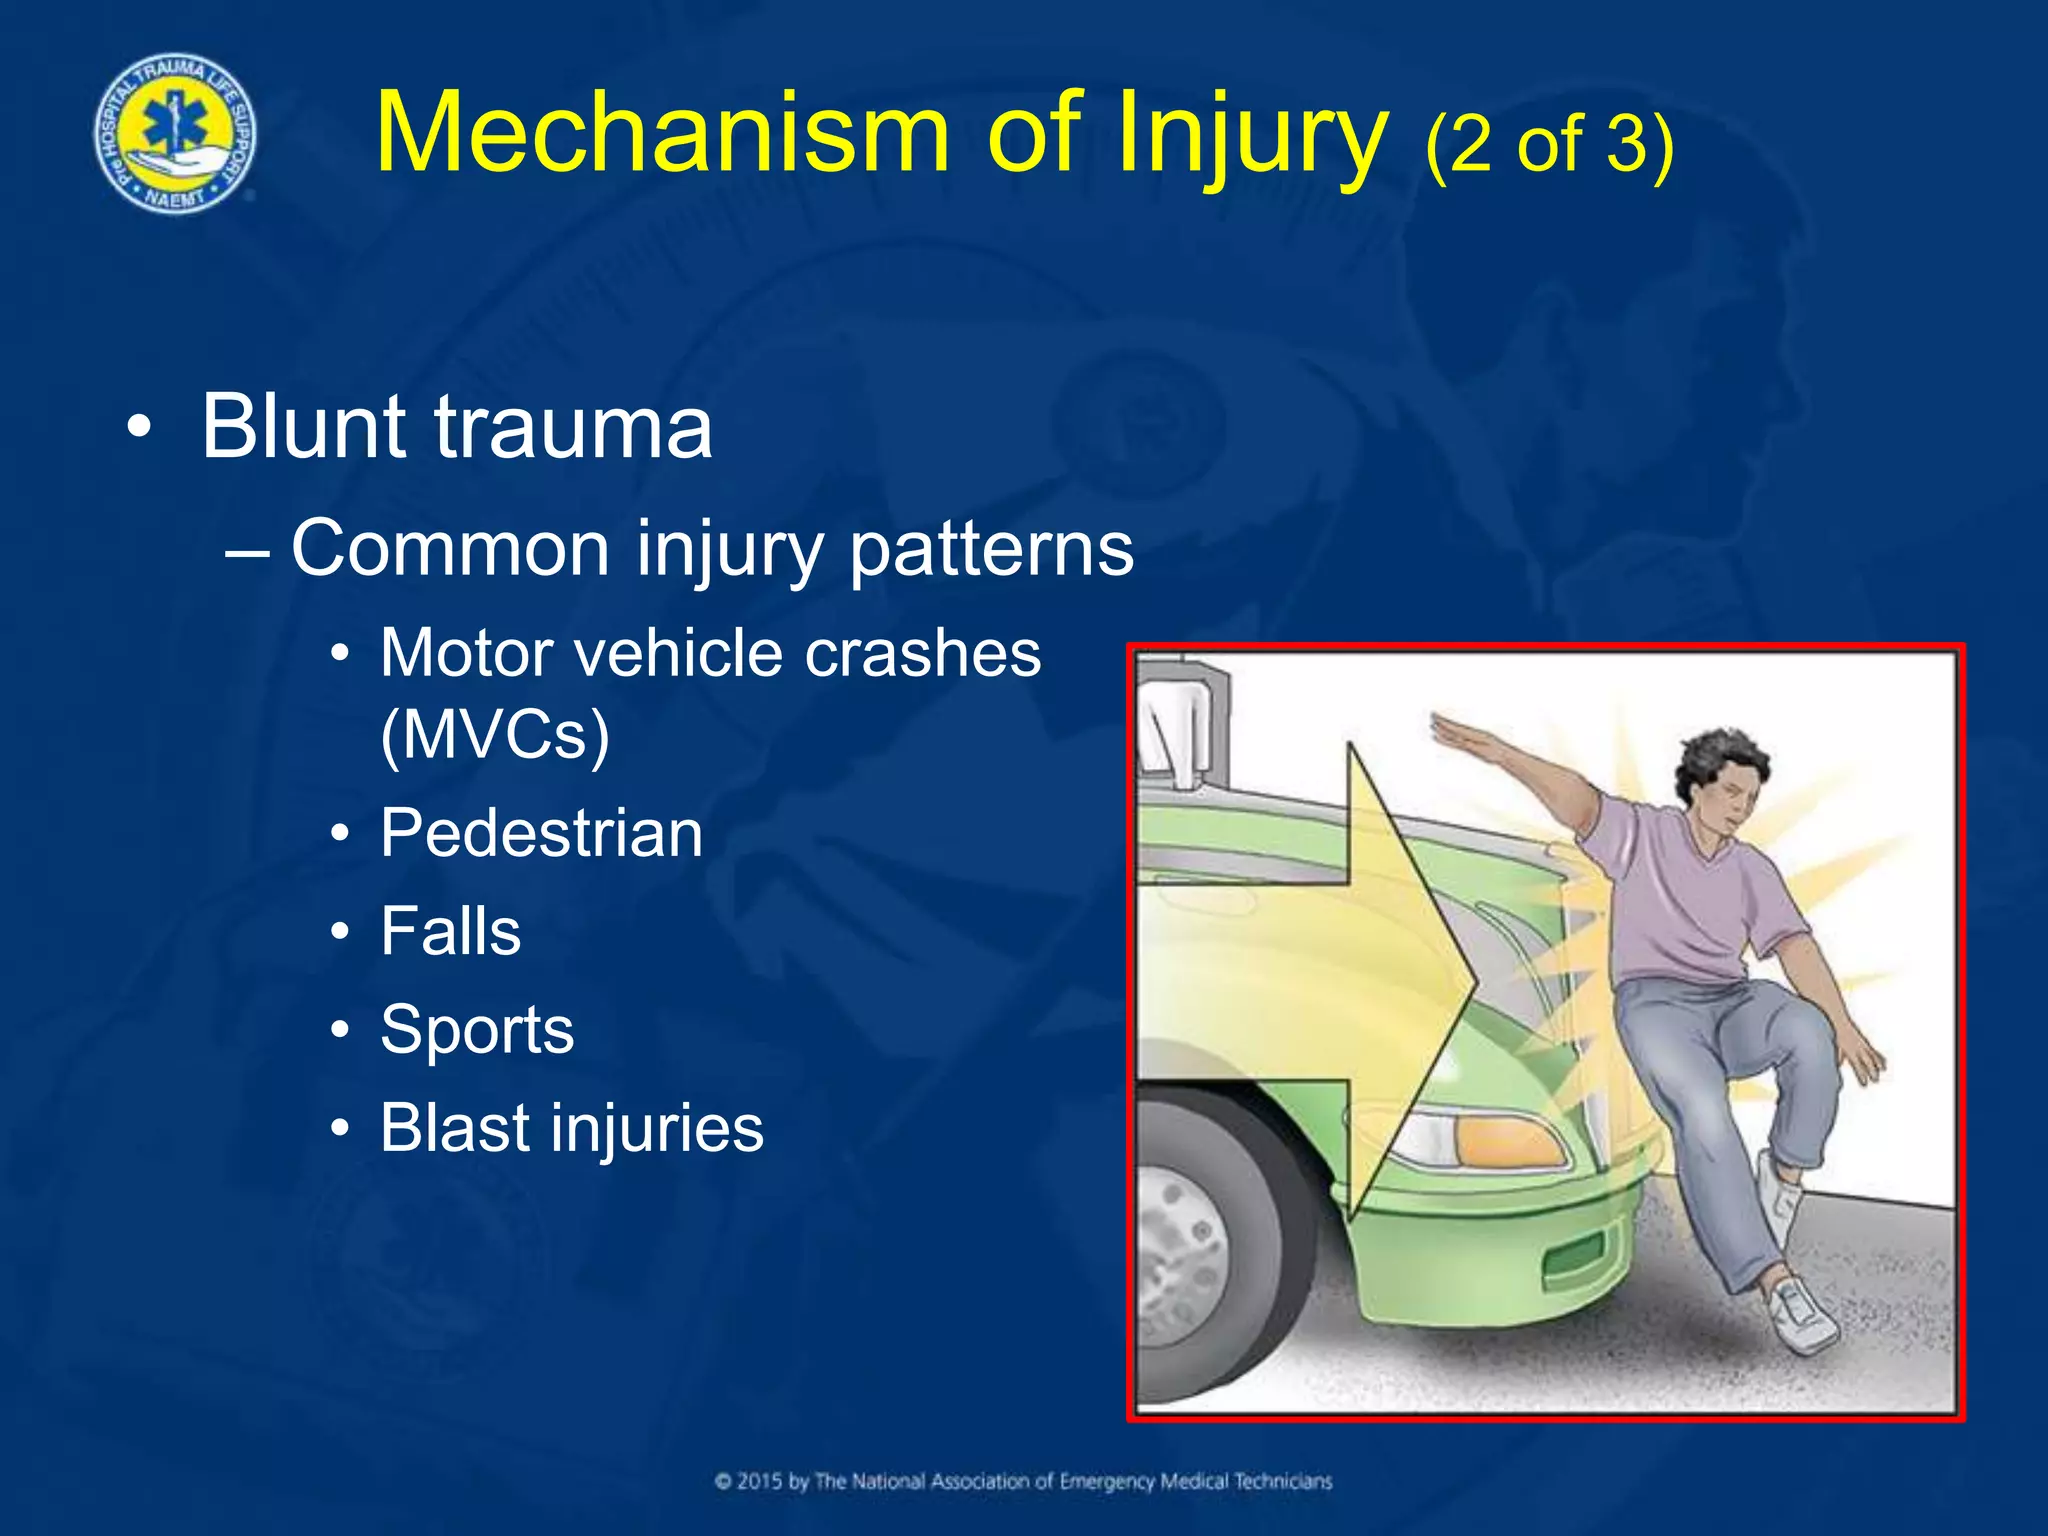
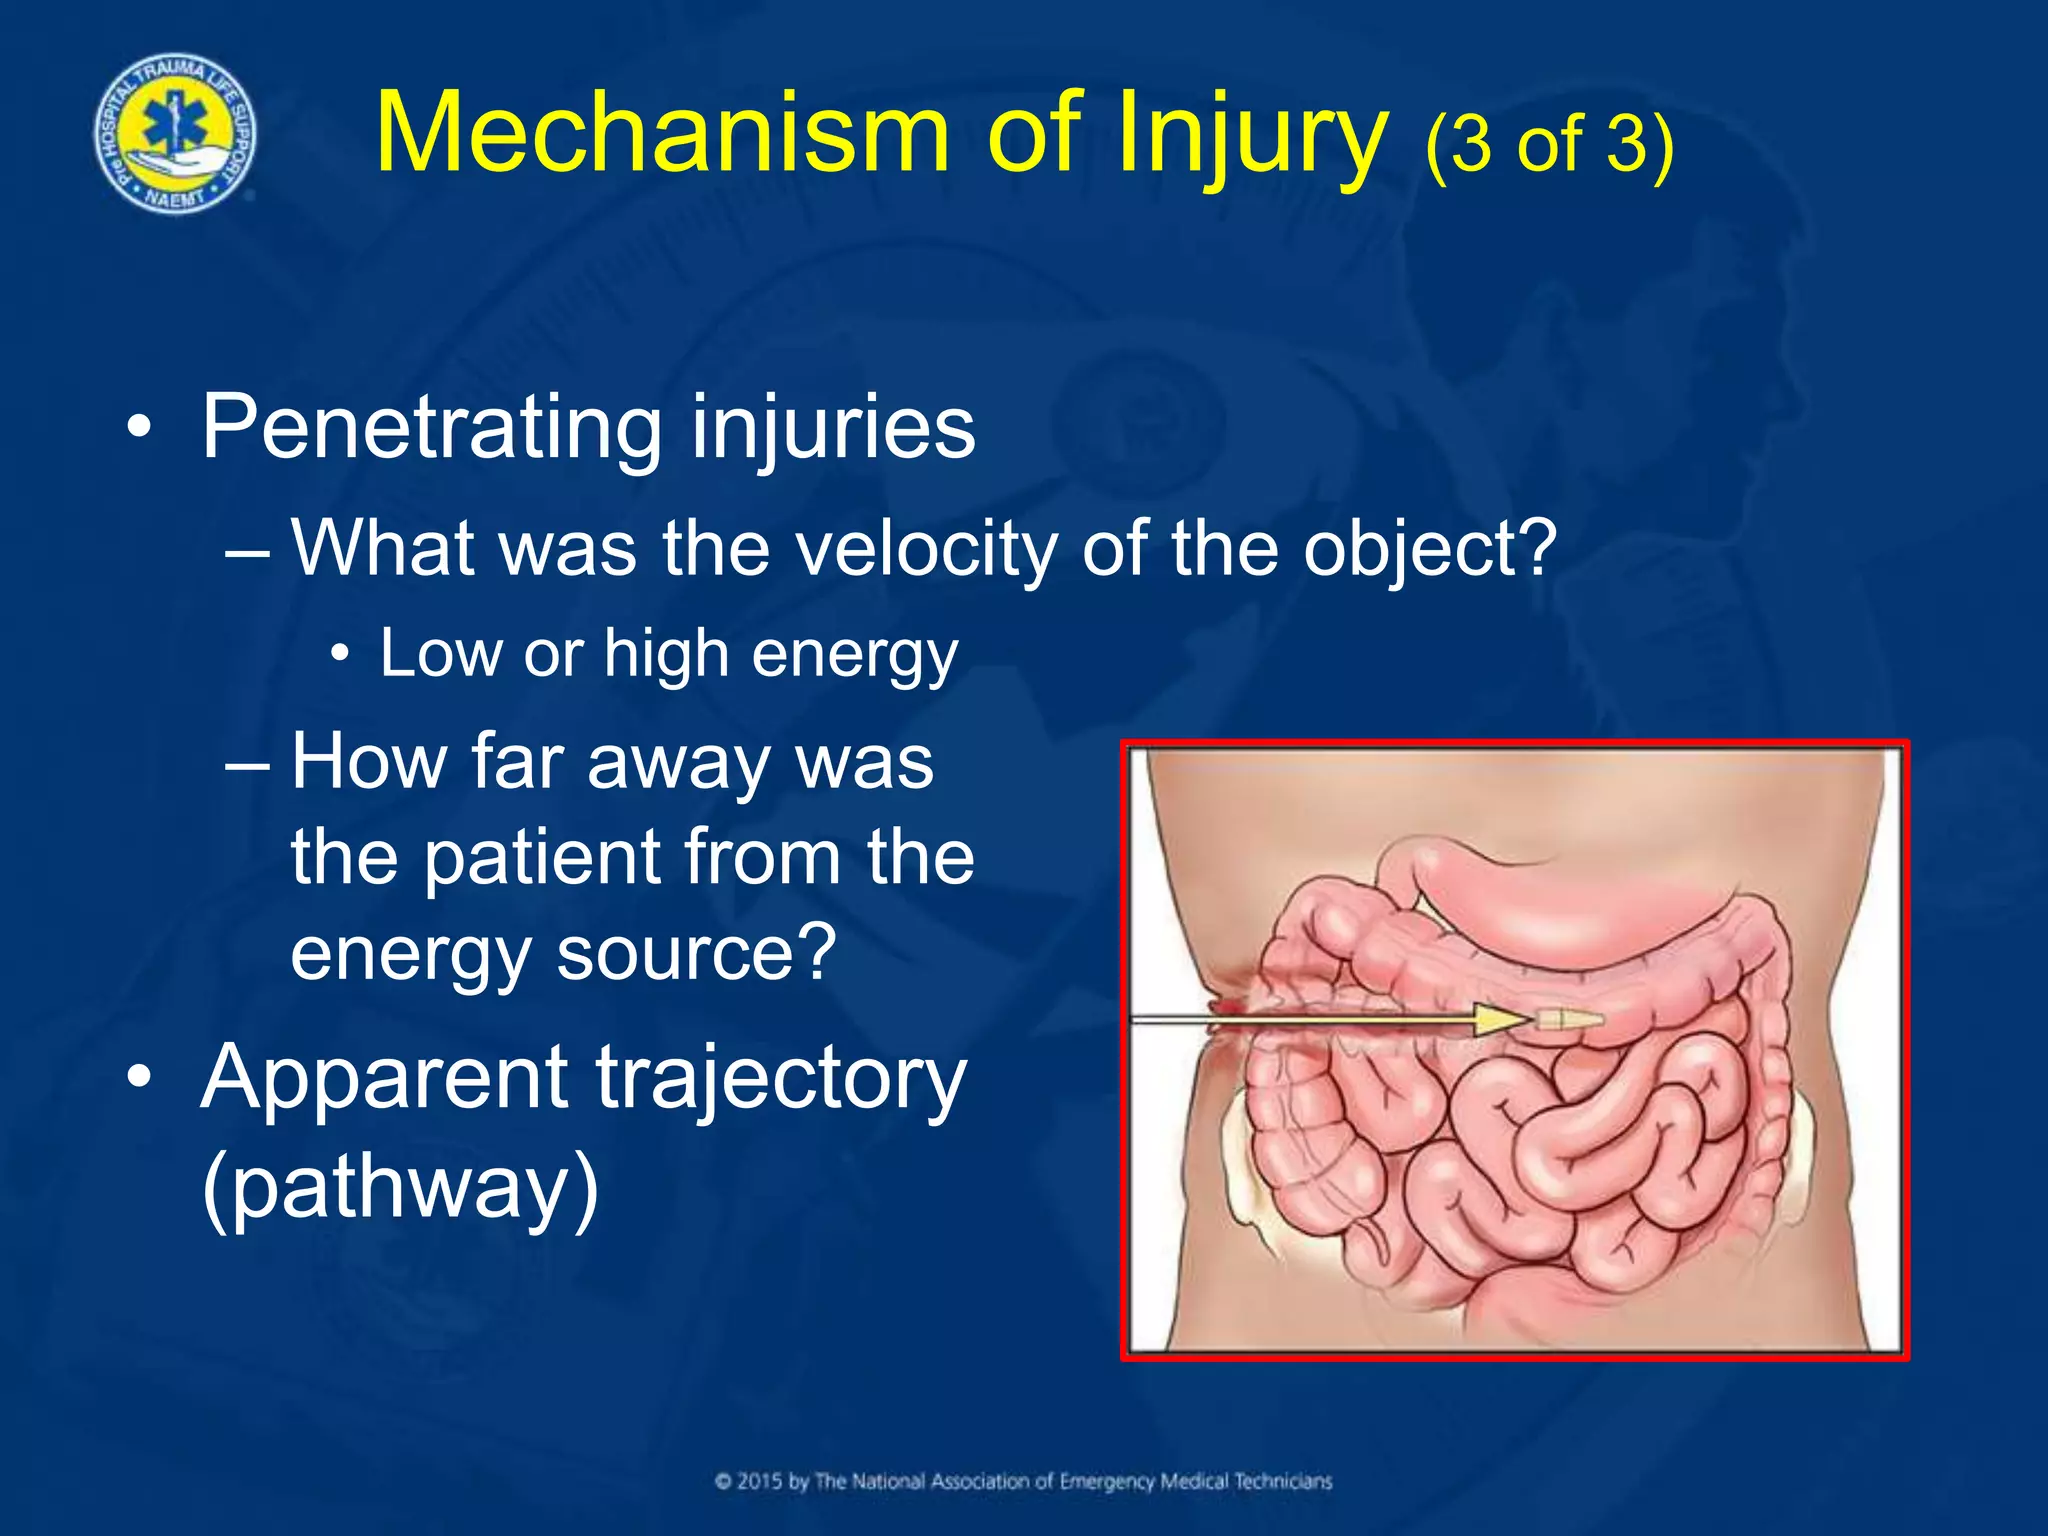
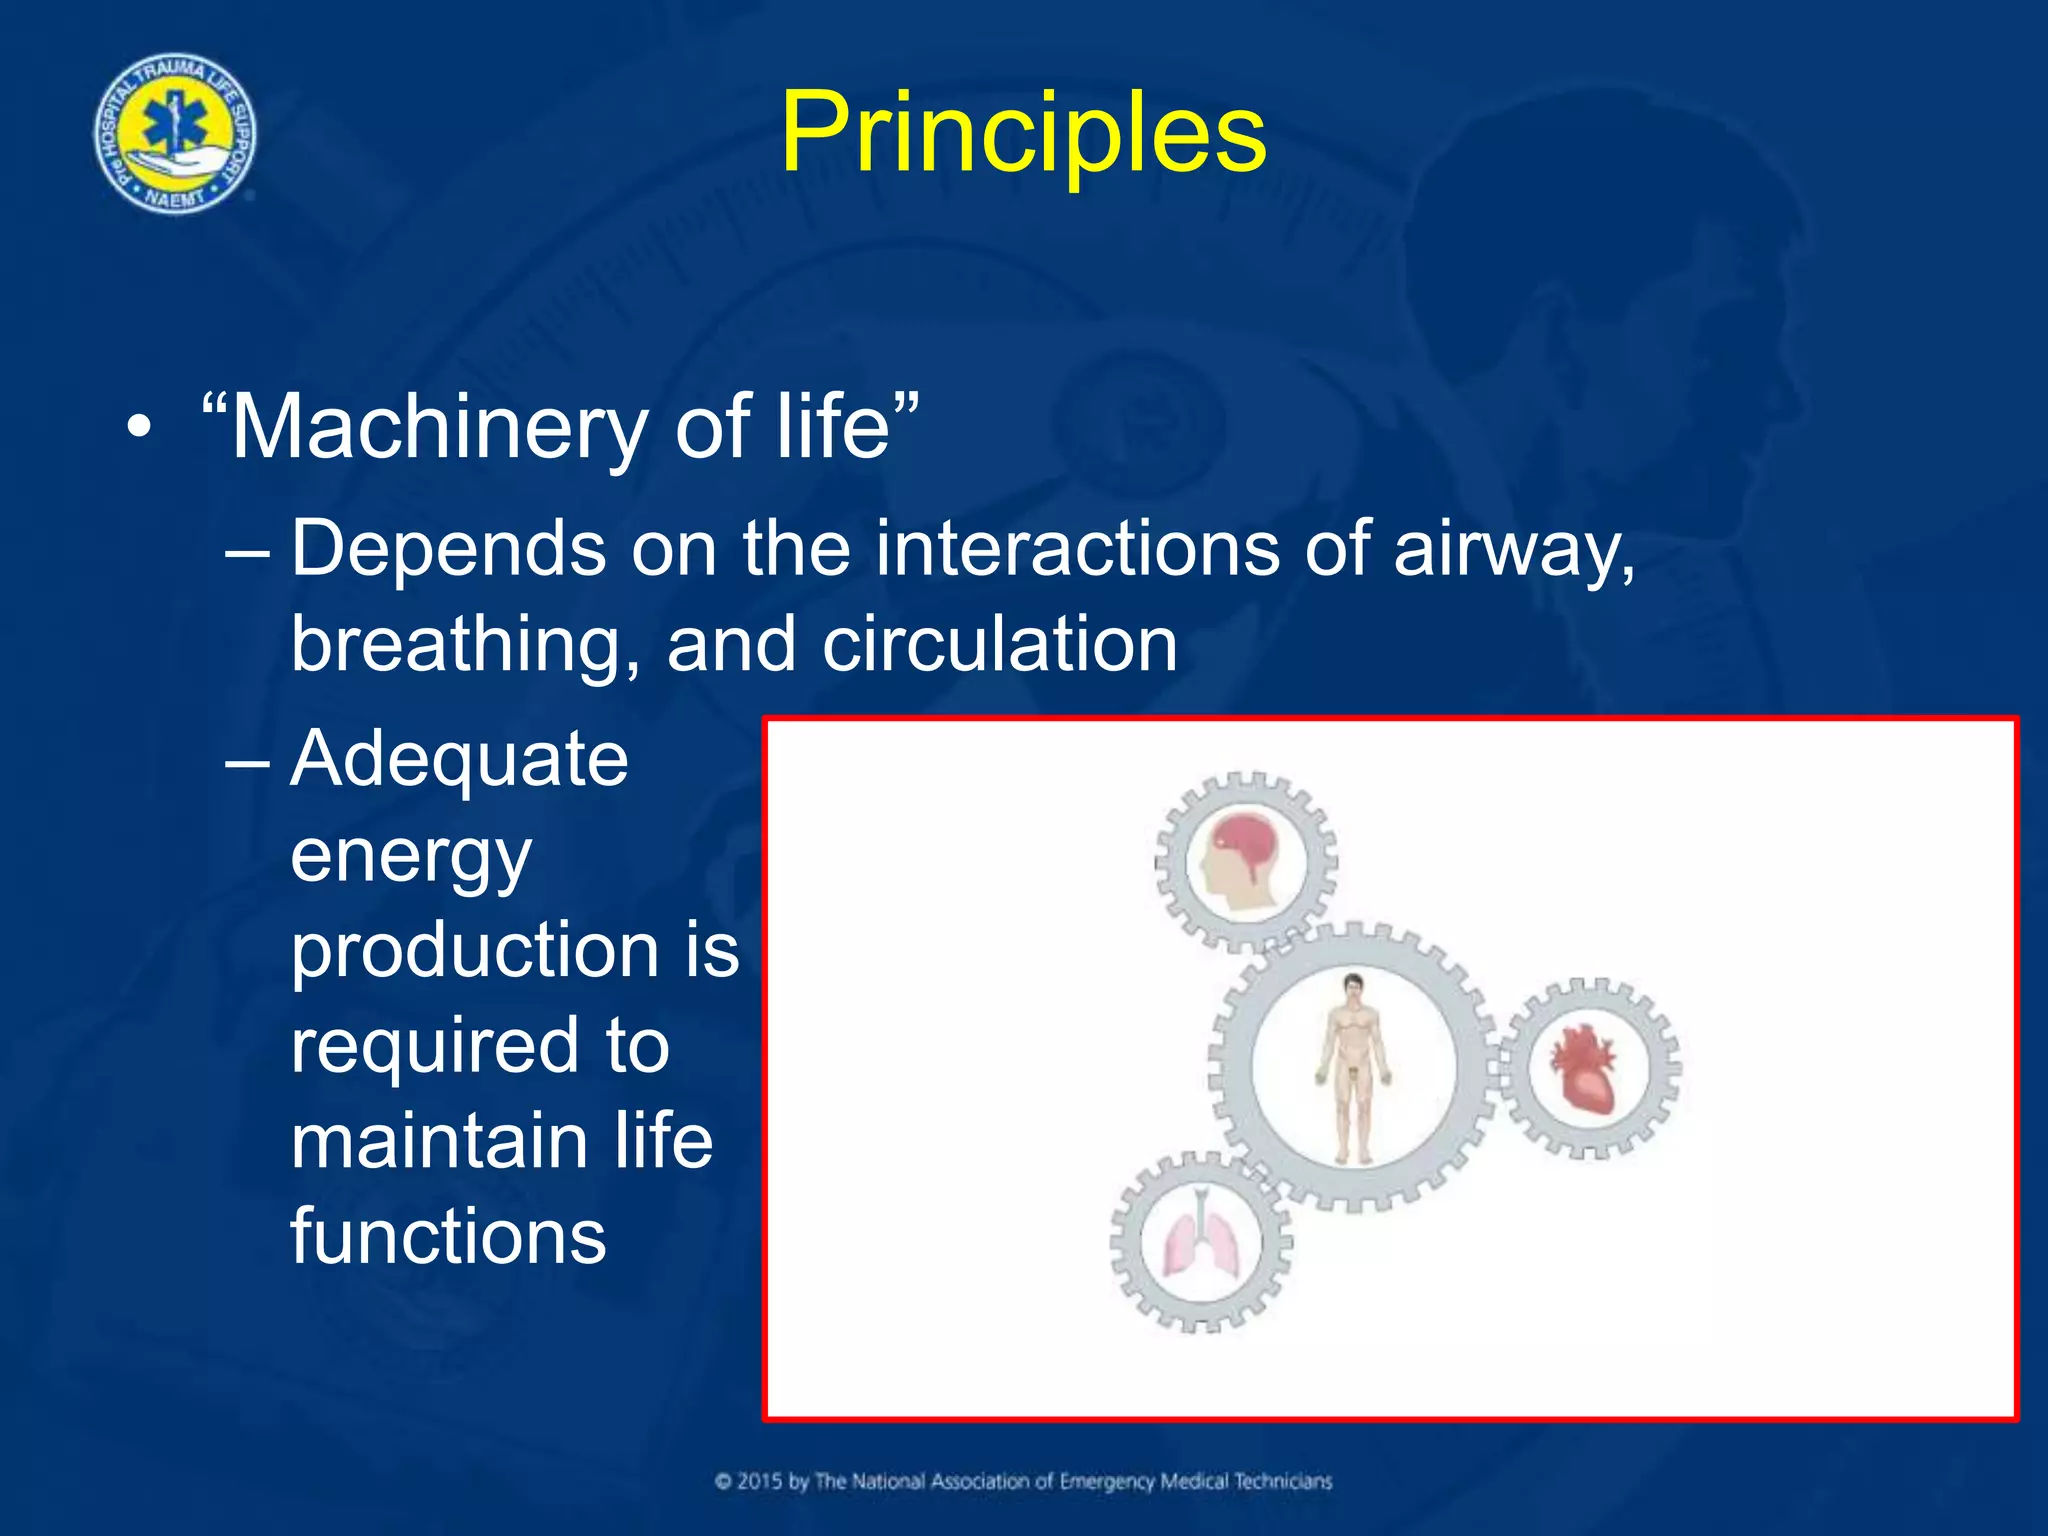
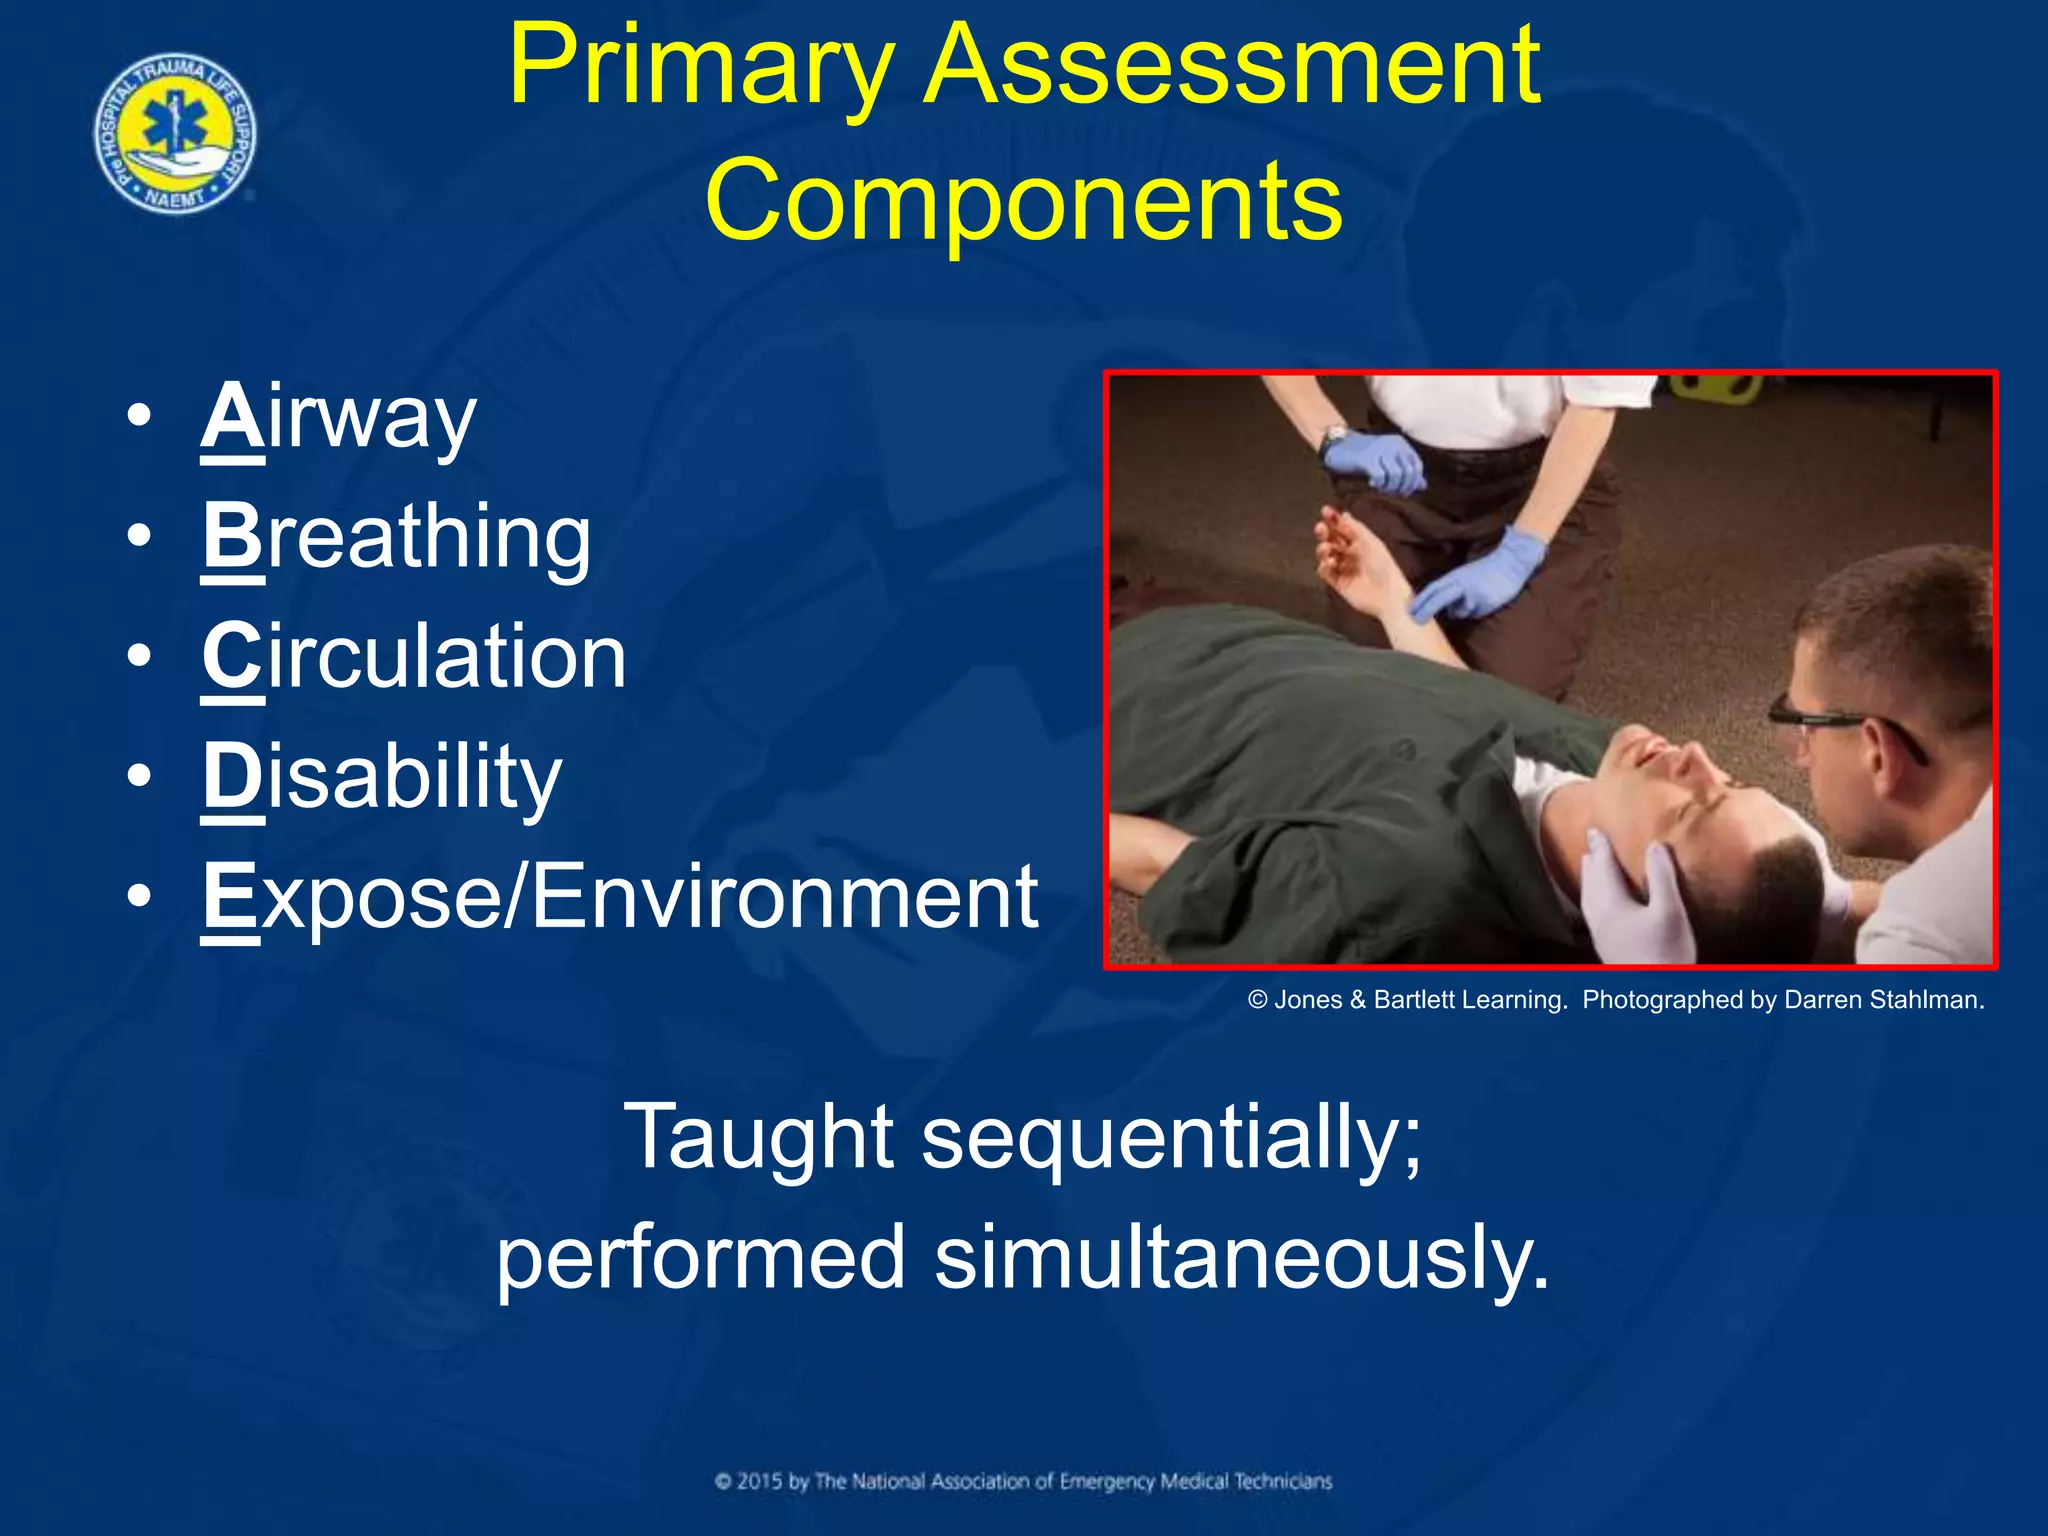
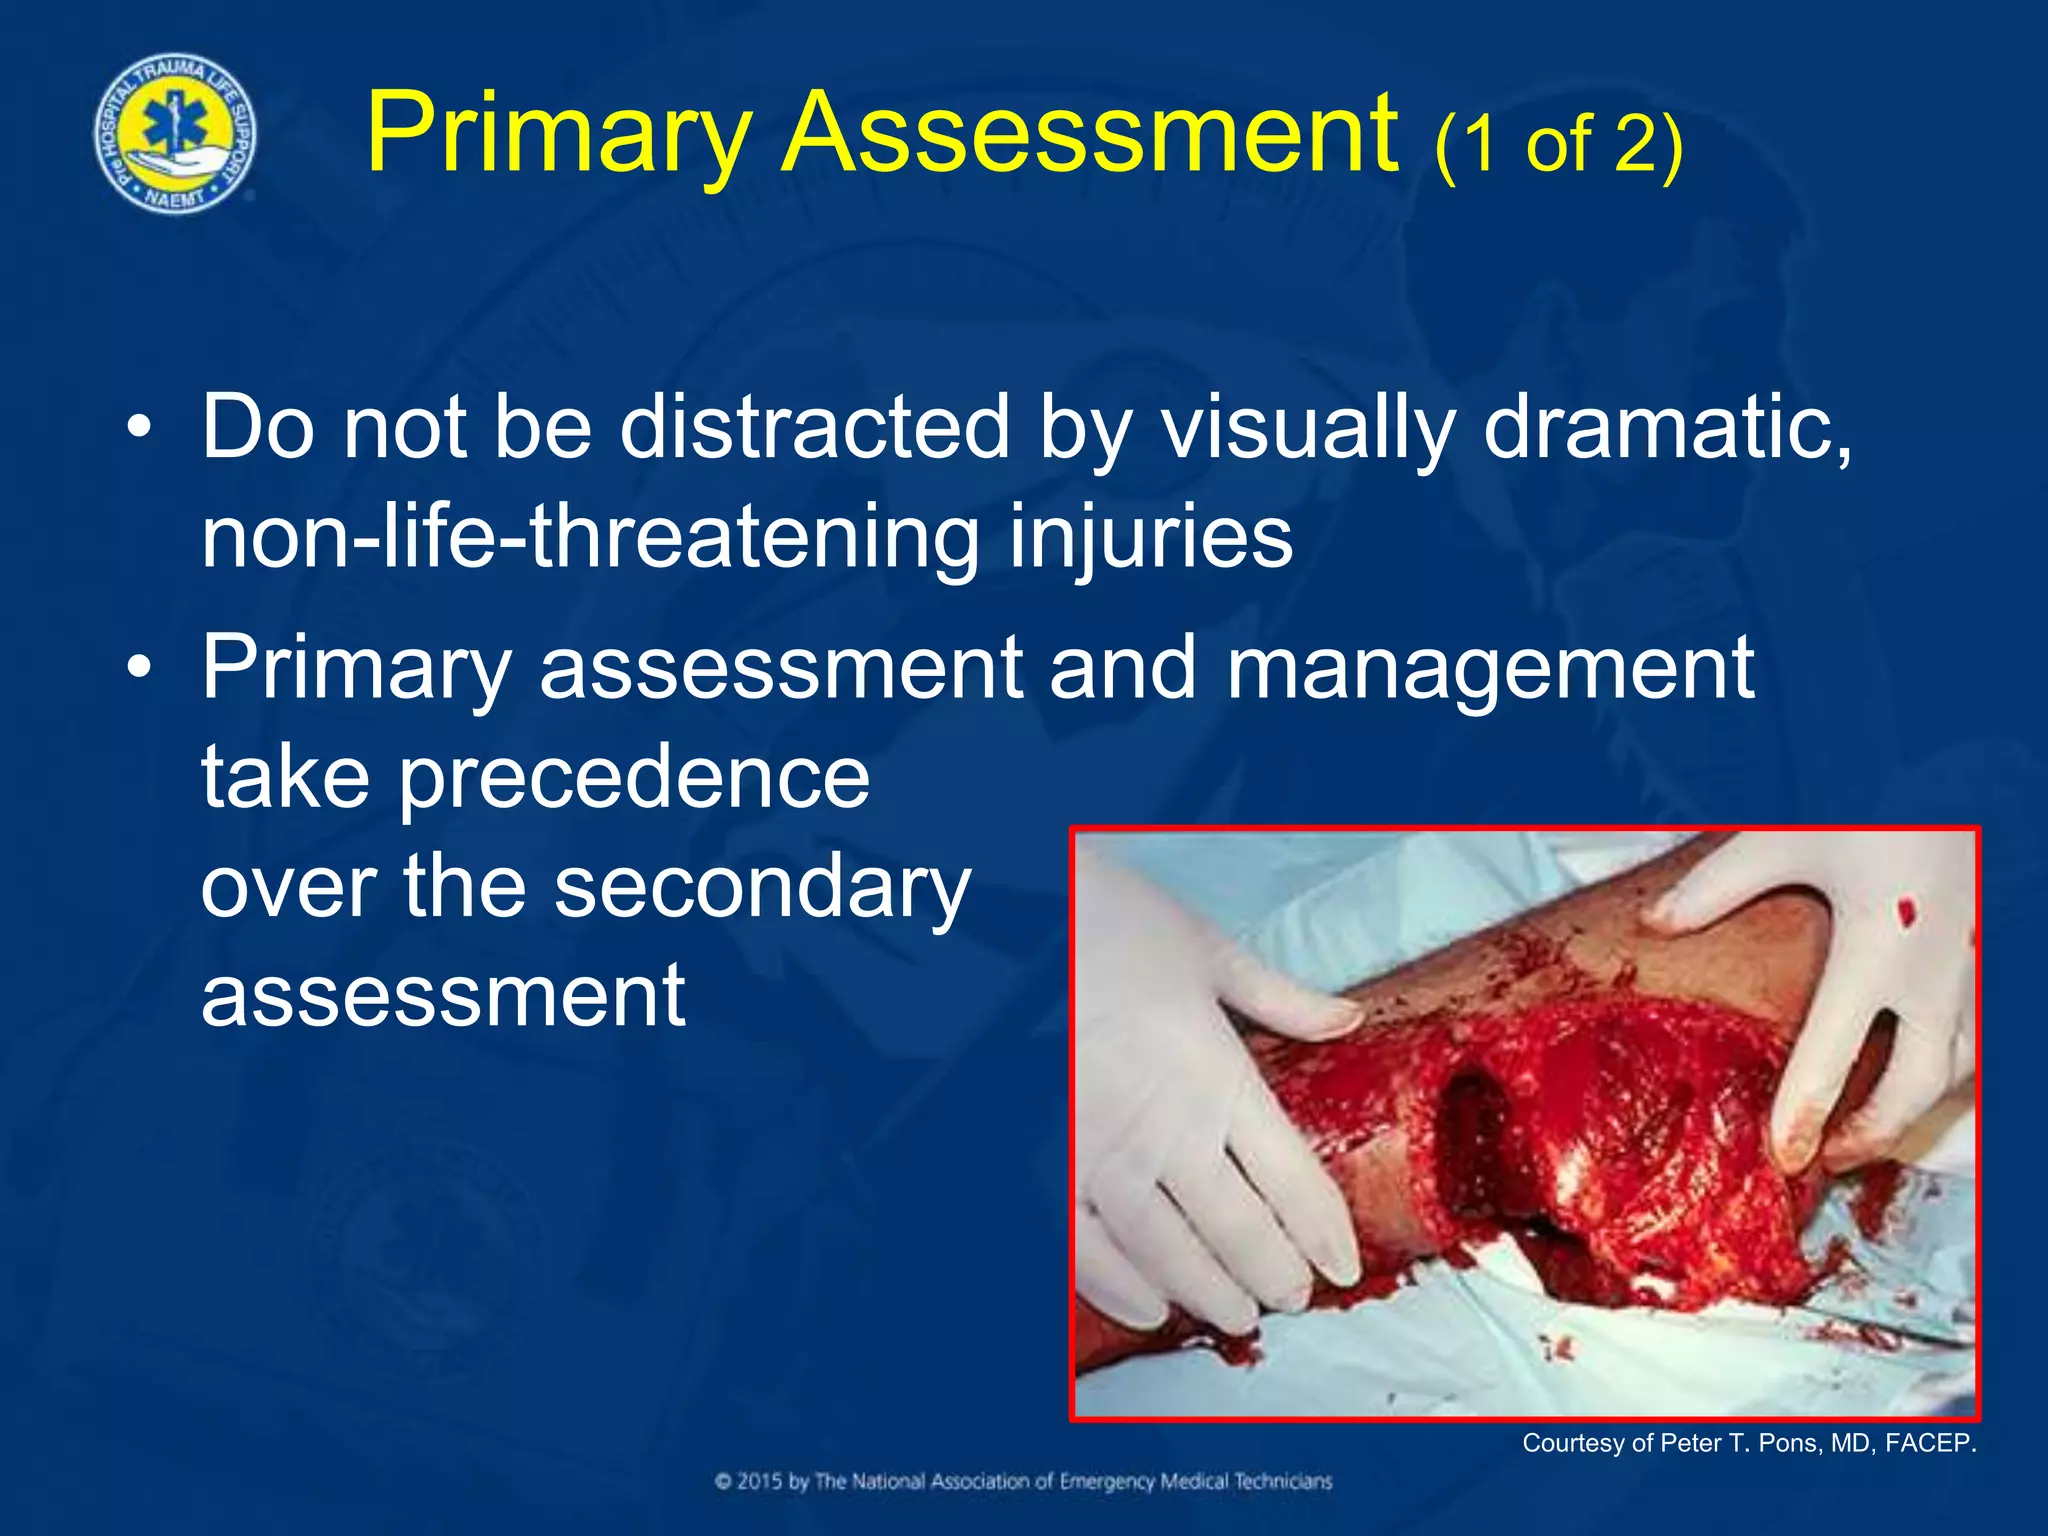
Lesson 3
Scene Assessment
and
Primary Assessment
Scene Assessment
• Components
– Safety
• Fire, contamination,
combat, etc.
– Pre-arrival information
– Arrival on scene
– Available resources
– Mechanism of injury
– Patients
• Taught individually; performed
simultaneously
• Personal and personnel safety is
paramount
Safety (1 of 3)
• Preincident safety
– Prophylaxis
• Recommended vaccinations
– Training
© Jones and Bartlett Learning. Photographed by Glen E. Ellman.
Safety (2 of 3)
• Incident
– Situational awareness
• Do not enter scene if there is an imminent hazard
• Crime scene
– “Bad guys” still in the area
– Safety measures
• Proper PPE
• Incident and patient-specific
• Proper disposal of blood, body fluids, sharps
Safety (3 of 3)
• Postincident
– Exposures, including:
• Tuberculosis (TB)
• Blood or body fluids
– HIV
– Hepatitis
– Exposure prophylaxis
Pre-arrival Information
• Dispatch information
– Location of incident
– Nature of incident
– Reported situational issues
• Hazards
• Number of patients
– Co-responders
• Assessment begins with this information
Pre-arrival Factors
• Weather conditions
• Traffic conditions
• Time of day
Courtesy of Bryan Dahlberg/FEMA News Photo
Arrival on Scene
• Global assessment
– As you arrive at the scene
– Before you get out of the vehicle
• “What do I see, feel, hear, smell, . . . ?”
– Are there any hazards?
– What happened?
– Who, what, and how many are involved?
– Are there any access issues?
– What additional resources may be needed?
Mechanism of Injury (1 of 3)
• Energy
– Cannot be destroyed
– Can only be transferred
or transformed
• Energy transfer to
human tissue results in:
– Compression
– Tearing
– Shearing
Mechanism of Injury (2 of 3)
• Blunt trauma
– Common injury patterns
• Motor vehicle crashes
(MVCs)
• Pedestrian
• Falls
• Sports
• Blast injuries
Mechanism of Injury (3 of 3)
• Penetrating injuries
– What was the velocity of the object?
• Low or high energy
– How far away was
the patient from the
energy source?
• Apparent trajectory
(pathway)
Patient(s) (1 of 2)
• How many patients are involved?
– Principles of triage
– Who needs attention first?
– Adequate resources available?
• Can you gain access?
• Can you get the patient out?
Patient(s) (2 of 2)
• Initial impression
– Prior to formal primary assessment
– Is the patient:
• “Sick” — critical
• “Not yet sick” — potential for critical or serious
injuries
• “Not sick” — minor or no injuries
Principles
• “Machinery of life”
– Depends on the interactions of airway,
breathing, and circulation
– Adequate
energy
production is
required to
maintain life
functions
Primary Assessment
• Primary assessment is performed to
immediately identify life-threatening
conditions
– Life-threatening conditions should be
managed as they are identified
• Some life-threatening situations are not
visually apparent
– Internal hemorrhage
– Traumatic brain injury (TBI)
Primary Assessment
Components
• Airway
• Breathing
• Circulation
• Disability
• Expose/Environment
Taught sequentially;
performed simultaneously.
© Jones & Bartlett Learning. Photographed by Darren Stahlman.
Airway, Breathing, and
Circulation
• Airway
– Open and patent?
• Breathing
– Breathing pattern adequate?
• Circulation
– Is there a pulse?
Disability and Expose
• Disability
– Determine patient’s level of consciousness (LOC)
– Glasgow Coma Scale (GCS)
– AVPU
• Expose/Environment
– Maintain patient privacy whenever possible
– Visualization for injury identification
– Prevent patient body heat loss
Disability and expose are desired — but not required
— components of the primary assessment that
should not be conducted until the ABCs have been
assessed and managed.
Primary Assessment (1 of 2)
• Do not be distracted by visually dramatic,
non-life-threatening injuries
• Primary assessment and management
take precedence
over the secondary
assessment
Courtesy of Peter T. Pons, MD, FACEP.
Primary Assessment (2 of 2)
• Decision-making considerations
– Situation
– Assessment
• MOI (kinematics)
• Patient
– A-B-C-D-E
– Patient severity
• “Sick”
• “Not yet sick”
• “Not sick”
Transport Decision (1 of 2)
• Does the patient’s condition warrant
immediate transport?
– If yes, consider:
• Method and mode of transportation
– Ground versus air
– Emergent versus non-emergent
• Patient packaging
– Spinal immobilization as indicated
– Consider use of long backboard as a full body
splint
Transport Decision (2 of 2)
• Does the patient’s condition warrant
immediate transport? (cont’d)
– If no:
• Continue with the secondary assessment if
indicated
Transport Considerations
• Receiving facility selection
– Choice of destination
• Level of care needed
• Trauma center versus the closest hospital
– Early communication and notification
• Allows the facility to prepare
Summary (1 of 4)
• Assessment of the incident begins before
arriving at the patient’s side
• Gather as much information as possible
prior to arrival, and use all information to
begin planning your response
• Read the scene. Start with a broad global
assessment and then narrow to the
specific incident
Summary (2 of 4)
• Form an initial impression prior to
beginning your assessment
• Observe for hazards at all times
• Remember the main components of the
primary assessment:
– Airway, Breathing, Circulation, Disability,
Expose/Environment
– Treat all abnormalities as they are found
Summary (3 of 4)
• Combine the findings of the scene
assessment and primary assessment to
determine if the patient is:
– “Sick”
– “Not yet sick”
– “Not sick”
Summary (4 of 4)
• Does the patient require immediate
transport?
• Should the secondary assessment be
completed?
• Perform patient packaging
• Determine transport method and mode
• Determine receiving facility
Questions?

Lesson 3

  • 1.
  • 2.
    Scene Assessment • Components –Safety • Fire, contamination, combat, etc. – Pre-arrival information – Arrival on scene – Available resources – Mechanism of injury – Patients • Taught individually; performed simultaneously • Personal and personnel safety is paramount
  • 3.
    Safety (1 of3) • Preincident safety – Prophylaxis • Recommended vaccinations – Training © Jones and Bartlett Learning. Photographed by Glen E. Ellman.
  • 4.
    Safety (2 of3) • Incident – Situational awareness • Do not enter scene if there is an imminent hazard • Crime scene – “Bad guys” still in the area – Safety measures • Proper PPE • Incident and patient-specific • Proper disposal of blood, body fluids, sharps
  • 5.
    Safety (3 of3) • Postincident – Exposures, including: • Tuberculosis (TB) • Blood or body fluids – HIV – Hepatitis – Exposure prophylaxis
  • 6.
    Pre-arrival Information • Dispatchinformation – Location of incident – Nature of incident – Reported situational issues • Hazards • Number of patients – Co-responders • Assessment begins with this information
  • 7.
    Pre-arrival Factors • Weatherconditions • Traffic conditions • Time of day Courtesy of Bryan Dahlberg/FEMA News Photo
  • 8.
    Arrival on Scene •Global assessment – As you arrive at the scene – Before you get out of the vehicle • “What do I see, feel, hear, smell, . . . ?” – Are there any hazards? – What happened? – Who, what, and how many are involved? – Are there any access issues? – What additional resources may be needed?
  • 9.
    Mechanism of Injury(1 of 3) • Energy – Cannot be destroyed – Can only be transferred or transformed • Energy transfer to human tissue results in: – Compression – Tearing – Shearing
  • 10.
    Mechanism of Injury(2 of 3) • Blunt trauma – Common injury patterns • Motor vehicle crashes (MVCs) • Pedestrian • Falls • Sports • Blast injuries
  • 11.
    Mechanism of Injury(3 of 3) • Penetrating injuries – What was the velocity of the object? • Low or high energy – How far away was the patient from the energy source? • Apparent trajectory (pathway)
  • 12.
    Patient(s) (1 of2) • How many patients are involved? – Principles of triage – Who needs attention first? – Adequate resources available? • Can you gain access? • Can you get the patient out?
  • 13.
    Patient(s) (2 of2) • Initial impression – Prior to formal primary assessment – Is the patient: • “Sick” — critical • “Not yet sick” — potential for critical or serious injuries • “Not sick” — minor or no injuries
  • 14.
    Principles • “Machinery oflife” – Depends on the interactions of airway, breathing, and circulation – Adequate energy production is required to maintain life functions
  • 15.
    Primary Assessment • Primaryassessment is performed to immediately identify life-threatening conditions – Life-threatening conditions should be managed as they are identified • Some life-threatening situations are not visually apparent – Internal hemorrhage – Traumatic brain injury (TBI)
  • 16.
    Primary Assessment Components • Airway •Breathing • Circulation • Disability • Expose/Environment Taught sequentially; performed simultaneously. © Jones & Bartlett Learning. Photographed by Darren Stahlman.
  • 17.
    Airway, Breathing, and Circulation •Airway – Open and patent? • Breathing – Breathing pattern adequate? • Circulation – Is there a pulse?
  • 18.
    Disability and Expose •Disability – Determine patient’s level of consciousness (LOC) – Glasgow Coma Scale (GCS) – AVPU • Expose/Environment – Maintain patient privacy whenever possible – Visualization for injury identification – Prevent patient body heat loss Disability and expose are desired — but not required — components of the primary assessment that should not be conducted until the ABCs have been assessed and managed.
  • 19.
    Primary Assessment (1of 2) • Do not be distracted by visually dramatic, non-life-threatening injuries • Primary assessment and management take precedence over the secondary assessment Courtesy of Peter T. Pons, MD, FACEP.
  • 20.
    Primary Assessment (2of 2) • Decision-making considerations – Situation – Assessment • MOI (kinematics) • Patient – A-B-C-D-E – Patient severity • “Sick” • “Not yet sick” • “Not sick”
  • 21.
    Transport Decision (1of 2) • Does the patient’s condition warrant immediate transport? – If yes, consider: • Method and mode of transportation – Ground versus air – Emergent versus non-emergent • Patient packaging – Spinal immobilization as indicated – Consider use of long backboard as a full body splint
  • 22.
    Transport Decision (2of 2) • Does the patient’s condition warrant immediate transport? (cont’d) – If no: • Continue with the secondary assessment if indicated
  • 23.
    Transport Considerations • Receivingfacility selection – Choice of destination • Level of care needed • Trauma center versus the closest hospital – Early communication and notification • Allows the facility to prepare
  • 24.
    Summary (1 of4) • Assessment of the incident begins before arriving at the patient’s side • Gather as much information as possible prior to arrival, and use all information to begin planning your response • Read the scene. Start with a broad global assessment and then narrow to the specific incident
  • 25.
    Summary (2 of4) • Form an initial impression prior to beginning your assessment • Observe for hazards at all times • Remember the main components of the primary assessment: – Airway, Breathing, Circulation, Disability, Expose/Environment – Treat all abnormalities as they are found
  • 26.
    Summary (3 of4) • Combine the findings of the scene assessment and primary assessment to determine if the patient is: – “Sick” – “Not yet sick” – “Not sick”
  • 27.
    Summary (4 of4) • Does the patient require immediate transport? • Should the secondary assessment be completed? • Perform patient packaging • Determine transport method and mode • Determine receiving facility
  • 28.

Editor's Notes

  • #2 Instructor Notes Lesson 3 will provide participants with an overview on the safe assessment of the scene and how to perform a primary assessment on a trauma patient.
  • #3 Instructor Notes Expand on the following points: Trauma scene assessment can be broken into six primary components: Safety (e.g., fire, contamination, combat) Pre-arrival information Arrival on scene Available resources Mechanism of injury Patients Although the components of scene assessment are taught individually, most of the components are performed simultaneously and continuously. All of the components combine to give you a “picture” of what may have happened to the patient(s) and guide you through the patient assessment and management process. Regardless of the situation, SAFETY for yourself, the patient(s), and all others on scene and en route to the patient’s final destination should always be your guiding focus.
  • #4 Instructor Notes Expand on the following points: Safety begins before the incident, continues during the response, and may continue after the incident. During the preincident phase, the focus is on preventing illness and injury through prophylaxis and training. Through prophylaxis, we protect ourselves from diseases we may be exposed to in the field. The CDC establishes recommendations for immunizations for health care workers. Training provides us with the proper techniques for use of equipment and skills. Training provides protection for us and our patients.
  • #5 Instructor Notes Expand on the following points: During the incident, maintain constant awareness of the situation and the surroundings. If the scene poses an immediate danger, DO NOT ENTER until the scene is made safe or until adequate measures for your safety are in place. Additional resources (e.g., law enforcement, fire) may be required to make the scene safe. At crime scenes, preserve evidence when possible without jeopardizing patient care. Utilize the appropriate safety measures based on your impression of the incident. If there is the potential for exposure to blood or other body fluids, don PPE before entering the scene. Certain disease processes or other underlying conditions may require respiratory protection measures, including: Cleaning and disinfecting contaminated equipment. Practice proper disposal of used expendable supplies. Pick up used supplies and equipment from the scene. Blood and other body fluids, as well as sharps, should be properly disposed of.
  • #6 Instructor Notes Expand on the following points: To maintain safety postincident: If you are exposed to any blood or body fluids or to a patient with airborne diseases such as tuberculosis, notify your appropriate supervisory or infection control personnel. Exposures may require additional follow-up.
  • #7 Instructor Notes Expand on the following points: The dispatch staff will help in obtaining and relaying critical information, including: The location of the incident and the exact location of where the patients are (e.g., the second floor bedroom, not just the street address) What happened or the nature of the incident (e.g., the collision of two automobiles, fight between three persons, gunshots) Any situational issues: Are any hazardous situations or hazardous materials involved? Are any leaking fluids or gases present on the scene? How many patients are involved? Who else is on scene or has been dispatched Gathered information from dispatch can be used to start planning your response. Assessment begins with this information. Be flexible; not all of the information provided may be correct.
  • #8 Instructor Notes Expand on the following points: Also keep in mind the weather conditions, the traffic conditions, and the time of day. What the weather conditions are. Raining, sunny, fog, etc. What the traffic conditions/patterns are. Rush hour, after hour, local sporting event, etc. What the time of day is. Daytime conditions, nighttime conditions, the sun rising or setting, etc. Each of these factors will impact travel to and from the scene.
  • #9 Instructor Notes Expand on the following points: As you get close to the scene and before you get out of the vehicle, conduct a global assessment. Begin with taking in a “big picture” view and then start to narrow your vision on the specific incident. Read the scene. What does the scene tell you? Ask, “What do I see, feel, hear, smell, . . . ?” Are there any hazards? What happened? Who, what, and how many are involved? Are there any access issues? What additional resources may be needed? This is an acquired skill.
  • #10 Instructor Notes Expand on the following points: Integrating the mechanism of injury into the assessment of a trauma patient is key to discovering the potential for severe or life-threatening injuries. To review the principles behind the mechanism of injury: Energy cannot be destroyed. It can be transferred from one object to another object. For example, a cue ball hitting the other pool balls Or it can be transformed into another form of energy. For example, a car is moving forward, the brakes are applied and the forward motion/energy is transformed into thermal energy or friction heat onto brake pads on the brake drum. The transfer of energy onto human tissue results in: Compression Tearing Shearing
  • #11 Instructor Notes Expand on the following points: Common injury patterns are associated with most blunt trauma. Knowing how the patient was injured will help you focus. Review the five types of motor vehicle crashes and the common injury patterns for each. Review the Kinematics of Trauma chapter in PHTLS: Prehospital Trauma Life Support, Eighth Edition for greater detail on the specific injury patterns for each type of crash. Frontal impacts Rear impacts Rotational impacts Lateral/side impacts Rollover Pedestrian versus motor vehicle Review the Kinematics of Trauma chapter for greater detail on the common injury patterns. Children will turn and face the oncoming vehicle, so the vehicle will strike major body areas. Adults will turn away from the oncoming vehicle, so the vehicle will strike the lower extremities. Falls Review the Kinematics of Trauma chapter for greater detail on the specific injury patterns from falls. The height of the fall, the type of surface on which the victim landed, and the part of the body struck first are important factors to determine in predicting the injury pattern. Sports Review the Kinematics of Trauma chapter for greater detail on the specific injury patterns from sports. To help predict the common injury patterns, determine the velocity and mass of the involved objects. Blast injuries Review the Kinematics of Trauma chapter for greater detail on the common injury patterns. Three phases of the blast: Primary Injuries are caused by shock waves. Secondary Injuries are caused by fragmentation. Tertiary The victim strikes a larger object after being propelled by blast. The victim is crushed by collapsing structures.
  • #12 Instructor Notes Expand on the following points: Penetrating injuries Review the Kinematics of Trauma chapter for greater detail on the specific injury patterns for penetrating injuries. What was the velocity (energy) of the object that penetrated the body? Low energy For example, a knife or other objects propelled by a person High energy For example, a gun projectile/bullet How far away was the patient from the energy source? Low-energy projectiles have a predictable trajectory or pathway. Higher-energy projectiles have a less predictable pathway.
  • #13 Instructor Notes Expand on the following points: Determine how many patients are involved. Is the triage process required? Who gets your attention first? Are adequate resources available or are additional resources required? Are you able to gain access to the patient without using special equipment? Move from simple to complex access techniques. Can you get the patients out of their current location? What equipment will be needed?
  • #14 Instructor Notes Expand on the following points: What is your initial impression of the patient before your primary assessment? “Sick” The patient is critical. “Not yet sick” There is the potential for critical injuries, but the patient may not be symptomatic yet. “Not sick” The patient has minor or no injuries.
  • #15 Instructor Notes Expand on the following points: Keep in mind the following principles while assessing the patient: The “machinery of life” depends on the interactions of airway, breathing, and circulation. Adequate energy production is required to maintain the functions of life. The interactions of all of the body’s components must work in synch with each other to maintain life.
  • #16 Instructor Notes Expand on the following points: Primary assessment is performed to immediately identify life-threatening conditions. Life-threatening conditions should be managed as they are identified during the primary assessment. Use information gathered from the scene assessment to help anticipate possible internal injuries. Some life-threatening situations are not visually apparent, including: Internal hemorrhage Traumatic brain injury (TBI)
  • #17 Instructor Notes Expand on the following points: The primary assessment components are: Airway Breathing Circulation Disability Expose/Environment Although the components of the primary assessment are taught in a sequential form, they are often performed simultaneously. For example, asking the patient a question while checking for a pulse. If the patient answers, then the patient has an open airway and is breathing. Touching the patient’s wrist for the pulse allows the skin parameters to be checked while scanning for hemorrhage.
  • #18 Instructor Notes Expand on the following points: Step A = Airway: Is the airway open and patent? If the answer is “no,” what is the least invasive method that can be applied to maintain an open airway? Step B = Breathing: Is the breathing pattern adequate to maintain oxygenation of the blood and gas exchange (ventilation)? If the answer is “no,” what is the least invasive method that can be applied to maintain adequate breathing and ventilation? If assisting the patient’s breathing and ventilation, do not hyperventilate the patient. Any trauma patient with significant injury should receive high-flow supplemental oxygen. Step C = Circulation: Is there a pulse? Location: Radial Carotid Strength Rate: Fast, slow, all right? Numbers are not gathered during the primary assessment. Rhythm: Regular Irregular Are there signs or symptoms of life-threatening hemorrhage? Internal External How much blood loss? Skin parameters Color Temperature
  • #19 Instructor Notes Expand on the following points: Step D = Disability: The goal is to determine the patient’s level of consciousness (LOC) and ascertain the potential for hypoxia. A decreased LOC alerts a prehospital care provider to the following four possibilities: Decreased cerebral oxygenation (caused by hypoxia/hypoperfusion) Central nervous system (CNS) injury Drug or alcohol overdose Metabolic derangement (diabetes, seizure, cardiac arrest) The Glasgow Coma Scale (GCS) score is a quick, simple method for determining cerebral function and is predictive of patient outcome. The GCS score is divided into three sections: (1) eye opening, (2) best verbal response, and (3) best motor response (EVM). The maximum GCS score is 15, indicating a patient with no disability. The lowest score of 3 is generally an ominous sign. The mnemonic AVPU is often used to describe the patient’s LOC. A stands for alert, V for responds to verbal stimulus, P for responds to painful stimulus, and U for unresponsive. This simple approach fails to provide information as to specifically how the patient responds to verbal or painful stimuli. Because of its lack of precision, the use of AVPU has fallen into disfavor. Although the GCS is more complicated to remember than AVPU, repeated practice will make this crucial assessment second nature. Step E = Expose/Environment Expose only those parts of the body needed for visual assessment based on the scene assessment and other assessed components of the primary assessment. Conserve the patient’s body heat. Although not main components of the primary assessment, Disability and Expose/Environment can assist in determining a critical trauma patient.
  • #20 Instructor Notes Expand on the following points: Do not allow visually dramatic injuries that are non-life-threatening (e.g., uncomplicated fracture of an extremity, minor bleeding) to district from performing the primary assessment. Do not proceed to the secondary assessment until all components of the primary assessment have been assessed and managed. Based on the findings of the primary assessment and the required management to correct or manage the primary assessment findings, the secondary assessment might not be completed in the prehospital setting.
  • #21 Instructor Notes Expand on the following points: The decision to continue on to the secondary assessment or transport the patient depends upon: the situation, the results of the scene assessment and primary assessment, and the severity of the patient’s condition. Combine all of the assessment findings, including: What caused the trauma? What are the available resources? Scene assessment Primary assessment, including A-B-C-D-E The patient should then be categorized as: “Sick” — The patient is critical and needs immediate life-sustaining assistance. “Not yet sick” — The patient is maintaining the components of the primary assessment, but there is potential for deterioration from his or her current condition. “Not sick” — The patient’s trauma is not life-threatening. Patient will need to be monitored and re-evaluated continuously.
  • #22 Instructor Notes Expand on the following points: Transportation: Does the patient's condition warrant immediate transport? If the answer is “yes,” what method of transport will best assist the patient? Consider ground versus air transport. Consider the level of prehospital care provider required to provide the proper level of patient care. Consider if the patient is emergent versus non-emergent If you determine that it is time to transport the patient, package the patient for transport. Use spinal immobilization as indicated. Consider the use of a long backboard as a full body splint.
  • #23 Instructor Notes Expand on the following points: Transportation (continued): Does the patient's condition warrant immediate transport? If the answer is “no,” continue to the secondary assessment if indicated.
  • #24 Instructor Notes Expand on the following points: Determine where to take the patient. This is just as important as treating the patient’s life-threatening conditions. The receiving facility should have the capability to treat the patient’s condition or be able to immediately stabilize the patient before transport to another facility. Weigh the pros and cons of taking the patient to a trauma center that is farther away as opposed to the closest hospital without a trauma surgeon at the ready. Notify the receiving facility as early as possible that they will be receiving one or more critical trauma patients. This will allow the facility to prepare for the patient(s).
  • #25 Instructor Notes Expand on the following points: Assessment of the incident begins before arriving at the patient’s side. Gather as much information as possible prior to your arrival. Use all of the information to begin planning your response. Read the scene. Start with a broad global assessment and then narrow to the specific incident.
  • #26 Instructor Notes Expand on the following points: Form an initial impression prior to beginning your assessment. Observe for hazards at all times. Remember the main components of the primary assessment: Airway, Breathing, Circulation, Disability, Expose/Environment Treat all abnormalities as they are found. Disability and Expose/Environment can be completed once the ABCs have been assessed and managed.
  • #27 Instructor Notes Expand on the following points: Combine the findings of the scene assessment and primary assessment to determine if the patient is: “Sick” “Not yet sick” “Not sick”
  • #28 Instructor Notes Expand on the following points: Does the patient require immediate transport? Should the secondary assessment be completed? Perform proper patient packaging before transport. Determine the best transport method and mode for your patient. Determine the best receiving facility for your patient.
  • #29 Instructor Notes Allow time for a question and answer session to answer any questions about the topics presented in the lesson.