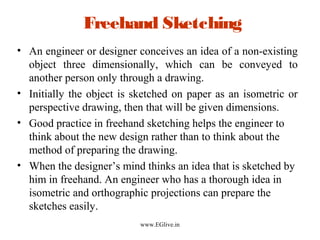
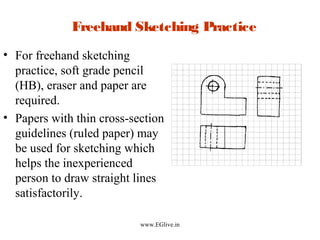
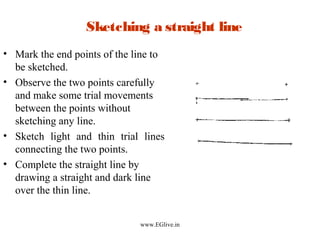
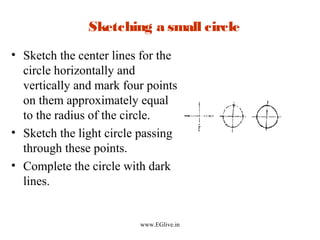
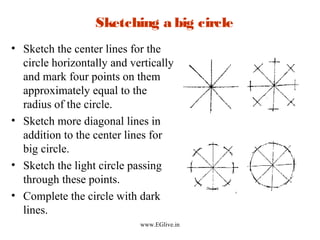
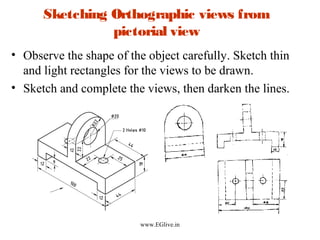
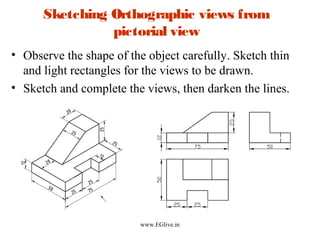
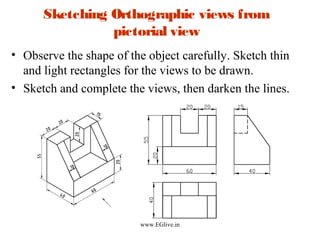
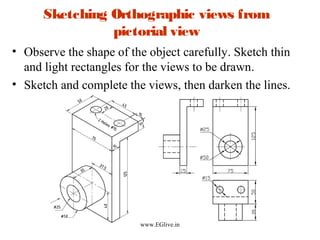
FREEHAND SKETCHING
Part I

Prof.T.JEYAPOOVAN
Department of Mechanical Engineering
Hindustan Institute of Technology and Science
Chennai-603103, India
www.EGlive.in
Freehand Sketching
• An engineer or designer conceives an idea of a non-existing
object three dimensionally, which can be conveyed to
another person only through a drawing.
• Initially the object is sketched on paper as an isometric or
perspective drawing, then that will be given dimensions.
• Good practice in freehand sketching helps the engineer to
think about the new design rather than to think about the
method of preparing the drawing.
• When the designer’s mind thinks an idea that is sketched by
him in freehand. An engineer who has a thorough idea in
isometric and orthographic projections can prepare the
sketches easily.
www.EGlive.in
Freehand Sketching Practice
• For freehand sketching
practice, soft grade pencil
(HB), eraser and paper are
required.
• Papers with thin cross-section
guidelines (ruled paper) may
be used for sketching which
helps the inexperienced
person to draw straight lines
satisfactorily.
www.EGlive.in
Sketching a straight line
• Mark the end points of the line to
be sketched.
• Observe the two points carefully
and make some trial movements
between the points without
sketching any line.
• Sketch light and thin trial lines
connecting the two points.
• Complete the straight line by
drawing a straight and dark line
over the thin line.
www.EGlive.in
Sketching a small circle
• Sketch the center lines for the
circle horizontally and
vertically and mark four points
on them approximately equal
to the radius of the circle.
• Sketch the light circle passing
through these points.
• Complete the circle with dark
lines.

www.EGlive.in
Sketching a big circle
• Sketch the center lines for the
circle horizontally and vertically
and mark four points on them
approximately equal to the
radius of the circle.
• Sketch more diagonal lines in
addition to the center lines for
big circle.
• Sketch the light circle passing
through these points.
• Complete the circle with dark
lines.
www.EGlive.in
Sketching Orthographic views from
pictorial view
• Observe the shape of the object carefully. Sketch thin
and light rectangles for the views to be drawn.
• Sketch and complete the views, then darken the lines.

www.EGlive.in
Sketching Orthographic views from
pictorial view
• Observe the shape of the object carefully. Sketch thin
and light rectangles for the views to be drawn.
• Sketch and complete the views, then darken the lines.

www.EGlive.in
Sketching Orthographic views from
pictorial view
• Observe the shape of the object carefully. Sketch thin
and light rectangles for the views to be drawn.
• Sketch and complete the views, then darken the lines.

www.EGlive.in
Sketching Orthographic views from
pictorial view
• Observe the shape of the object carefully. Sketch thin
and light rectangles for the views to be drawn.
• Sketch and complete the views, then darken the lines.

www.EGlive.in
Tips to draw Freehand sketching
• The visible and invisible edges are usually identified
through visualization and understanding.
• Note that the dimensions of the lines sketched in the
views are taken in proportion to the dimensions of the
object.
• Sketches are not prepared to scale/actual dimensions.
• The rectangle to enclose the views can be omitted after
practicing many sketching exercises with an eye on
taking the proportional dimensions of the object.
• Complete the sketching of the object by drawing dark
lines.
www.EGlive.in
REFERENCE BOOKS
1. Jeyapoovan T, “Lesson Plans for Engineering
Graphics”, 2010, Vikas Publishing House Pvt
Ltd, New Delhi.
2. Jeyapoovan T, “Engineering Drawing and
Graphics”, 2011, Vikas Publishing House Pvt
Ltd, New Delhi.

www.EGlive.in
End of Lesson 14
Thank You

www.EGlive.in

Lesson 14-freehand-sketching-i

  • 1.
    FREEHAND SKETCHING Part I Prof.T.JEYAPOOVAN Departmentof Mechanical Engineering Hindustan Institute of Technology and Science Chennai-603103, India www.EGlive.in
  • 2.
    Freehand Sketching • Anengineer or designer conceives an idea of a non-existing object three dimensionally, which can be conveyed to another person only through a drawing. • Initially the object is sketched on paper as an isometric or perspective drawing, then that will be given dimensions. • Good practice in freehand sketching helps the engineer to think about the new design rather than to think about the method of preparing the drawing. • When the designer’s mind thinks an idea that is sketched by him in freehand. An engineer who has a thorough idea in isometric and orthographic projections can prepare the sketches easily. www.EGlive.in
  • 3.
    Freehand Sketching Practice •For freehand sketching practice, soft grade pencil (HB), eraser and paper are required. • Papers with thin cross-section guidelines (ruled paper) may be used for sketching which helps the inexperienced person to draw straight lines satisfactorily. www.EGlive.in
  • 4.
    Sketching a straightline • Mark the end points of the line to be sketched. • Observe the two points carefully and make some trial movements between the points without sketching any line. • Sketch light and thin trial lines connecting the two points. • Complete the straight line by drawing a straight and dark line over the thin line. www.EGlive.in
  • 5.
    Sketching a smallcircle • Sketch the center lines for the circle horizontally and vertically and mark four points on them approximately equal to the radius of the circle. • Sketch the light circle passing through these points. • Complete the circle with dark lines. www.EGlive.in
  • 6.
    Sketching a bigcircle • Sketch the center lines for the circle horizontally and vertically and mark four points on them approximately equal to the radius of the circle. • Sketch more diagonal lines in addition to the center lines for big circle. • Sketch the light circle passing through these points. • Complete the circle with dark lines. www.EGlive.in
  • 7.
    Sketching Orthographic viewsfrom pictorial view • Observe the shape of the object carefully. Sketch thin and light rectangles for the views to be drawn. • Sketch and complete the views, then darken the lines. www.EGlive.in
  • 8.
    Sketching Orthographic viewsfrom pictorial view • Observe the shape of the object carefully. Sketch thin and light rectangles for the views to be drawn. • Sketch and complete the views, then darken the lines. www.EGlive.in
  • 9.
    Sketching Orthographic viewsfrom pictorial view • Observe the shape of the object carefully. Sketch thin and light rectangles for the views to be drawn. • Sketch and complete the views, then darken the lines. www.EGlive.in
  • 10.
    Sketching Orthographic viewsfrom pictorial view • Observe the shape of the object carefully. Sketch thin and light rectangles for the views to be drawn. • Sketch and complete the views, then darken the lines. www.EGlive.in
  • 11.
    Tips to drawFreehand sketching • The visible and invisible edges are usually identified through visualization and understanding. • Note that the dimensions of the lines sketched in the views are taken in proportion to the dimensions of the object. • Sketches are not prepared to scale/actual dimensions. • The rectangle to enclose the views can be omitted after practicing many sketching exercises with an eye on taking the proportional dimensions of the object. • Complete the sketching of the object by drawing dark lines. www.EGlive.in
  • 12.
    REFERENCE BOOKS 1. JeyapoovanT, “Lesson Plans for Engineering Graphics”, 2010, Vikas Publishing House Pvt Ltd, New Delhi. 2. Jeyapoovan T, “Engineering Drawing and Graphics”, 2011, Vikas Publishing House Pvt Ltd, New Delhi. www.EGlive.in
  • 13.
    End of Lesson14 Thank You www.EGlive.in

Editor's Notes