06-92-590-34/ 06-91-590-34
Lean Manufacturing and Process Improvement,
Fall 2018
PROJECT REPORT
On,
“REDUCING DOWNTIME USING LEAN TOOLS”
Submitted by (Group 8)
Jenish Patel (104902994)
Yashkumar Patel (104860504)
Mayank Shantilal Patel (104884207)
Malay Yogeshbhai Mistry (104904064)
Urvishkumar Pradipkumar Raval (104907168)
Jay Majmudar (104938319)
Nisarg Chauhan (104709449)
Viral Hitenkumar Naik (104927700)
Submitted to
Sardar Asif Khan
Submission date
30th
November 2018
Page | I
Table of Contents
1. Acknowledgement ...............................................................................................................................IV
2. Abstract.................................................................................................................................................V
3. Introduction ..........................................................................................................................................1
4. Project Timeline....................................................................................................................................2
5. Problem Description .............................................................................................................................3
6. Literature Review..................................................................................................................................4
7. Plant layout and work flow...................................................................................................................5
8. 5 Why analysis.......................................................................................................................................6
9. Time Study ............................................................................................................................................7
9.1 Time study of Gantry ....................................................................................................................7
9.2 Statistical information of all gantry...............................................................................................8
9.3 Calculation of gantry capability to feed the part at machine, calculation of machine cycle
time, Picture of gantry capability calculation, Histogram.......................................................................10
9.4 Data analysis and Comparison of (30, 50, 70) series of machine data ......................................12
9.5 Improvement .............................................................................................................................12
10. Line Balancing .................................................................................................................................13
11. Kaizen steps.....................................................................................................................................15
11.1 Problem Description ..................................................................................................................15
11.2 5W1H ..........................................................................................................................................15
11.3 Fishbone diagram........................................................................................................................15
11.4 Sketch of the problem................................................................................................................16
11.5 5-Why analysis ...........................................................................................................................17
11.6 Problem Brainstorming..............................................................................................................17
11.7 Solution description...................................................................................................................18
11.8 Conclusion..................................................................................................................................18
12. Result ..............................................................................................................................................21
13. References ......................................................................................................................................22
Page | II
List of Figures
Figure 1: Timeline of Project.........................................................................................................................2
Figure 2 : Flow chart......................................................................................................................................5
Figure 3 : 5why..............................................................................................................................................6
Figure 4 : Parts are over feed on conveyor belt 1…………………………………………………………………………………..13
Figure 5 :Parts are feed less on conveyor belt 2 ......................................................................................13
Figure 6 : Significant layout where sensors needs to be placed.................................................................14
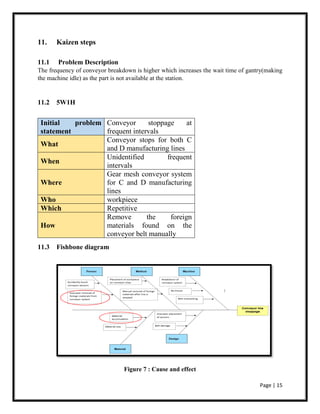
Figure 7 : Cause and effect..........................................................................................................................15
Figure 8 : Chips on the line..........................................................................................................................16
Figure 9 : Chips on part………………………………………………………………………………………………………………………….16
Figure 10 : man at work..............................................................................................................................16
Figure 11 : Plunger placement....................................................................................................................18
Page | III
List of Tables
Table 1: Time study of machine 302.............................................................................................................7
Table 2 : Time study of operation 50............................................................................................................8
Table 3 : Time study of operation 30............................................................................................................9
Table 4 : Time study of operation 70............................................................................................................9
Table 5 : Comparison of cycle efficiency and gantry cycle time .................................................................10
Table 6 : Histogram of gantry Capability.....................................................................................................11
Table 7 : Histogram of Improved capability................................................................................................21
Table 8 : Result............................................................................................................................................21
Page | IV
1. Acknowledgement
We have taken efforts in this project. However, it would not have been possible without the kind
support and help of many individuals and organizations. We would like to extend our sincere
thanks to all of them.
We are highly indebted to Prof. Sardar Asif Khan for his guidance and constant supervision as
well as for providing necessary information regarding the project and for his assistance in the
completing the project.
We would like to express our gratitude towards, Mr. Kirtan Gohel the project manager of Exkor
Manufacturing. for their kind co-operation and encouragement which helped us in completion of
this project.
We would like to express our special gratitude and recognition to the employees of the company
for giving their valuable time and knowledge.
Our thanks and appreciations also go to our colleague in developing the project and people who
have willingly helped us out with their abilities.
Sincerely,
Malay Mistry
Mayank Patel
Urvish Raval
Jay Majmudar
Yash Patel
Viral Naik
Nisharg Chauhan
Jenish Patel
Page | V
2. Abstract
Every manufacturing industry has an end goal to keep up the situation in the focused condition.
For that, each organization must move forward in terms of good administration and improved
nature of processes. In Industrial and Mechanical engineering, it has turned out to be more critical
to apply lean concepts to enhance its procedures and to reduce wastes. In a fast-moving industrial
environment, lean manufacturing is considered as a vital component in any market-driven
business. Lean manufacturing utilizes various tools and methodologies for the assessment of
framework and processes. This project focuses on the process improvement, waste reduction, and
enhancing overall line efficiency of the produce system. The analysis of the work station was done
by performing time study for gantry’s capability to feed all the machines, machine cycle time,
gantry cycle time, conveyor breakdown, raw material availability and efficiency of the gantry and
machine. Moreover, a kaizen sheet has been provided, addressing both the problem and solution
for reducing the conveyor breakdown. Other lean tools have been used to perform the project such
as time study, 5 why, flow chart and line balancing. The outcome of all the process performed is
the improved part distribution, reduced cycle breakdown and overall increased efficiency of the
line. In conclusion, we have introduced solutions for the problems and recommendations for the
firm to implement it in the manufacturing line.
Page | 1
3. Introduction
A division of Guelph Ontario based automotive parts giant Linamar, Exkor provides machining
services preparing cast aluminum cylinder heads for final machining.
Linamar Corporation is a publicly traded Canadian manufacturing company which operates
worldwide. It is Canada's second-largest automobile parts manufacturer (after Magna
International). Linamar manufactures and supplies automotive and industrial markets with
factories across North America, Europe, and Asia. Linamar has two divisions,
Powertrain/Driveline and Industrial. These are further divided into the areas of machining and
assembly, light metal casting (Montupet), forging (Seissenschmidt), aerial work platforms
(Skyjack), and agricultural equipment (Harvestec).
Based in Guelph, Ontario, The company's various operations employ nearly 26,000 persons
worldwide in a total of 59 manufacturing plants, 6 R&D centers and 21 sales offices in 17
countries, most located in North America. Total sales in 2016 were $6 billion.
Linamar provides products that power vehicles, power motion, power work and power lives. From
the core precision metallic components used in automotive powertrains to Skyjacks aerial work
platforms, to the agricultural products that Harvestec and OROS designs and builds, Linamar has
a diversified product line up delivered by a workforce that has the "Power to Perform”.
As a leading-edge Tier 1 supplier to the automotive markets, Linamar provides core engine
components including cylinder blocks & heads, camshafts and connecting rods. For transmission,
Linamar builds differential assemblies, gear sets, shaft & shell assemblies, as well as clutch
modules. For the vehicle's driveline, Linamar is a full-service supplier of gears and gear driven
systems such as PTUs and RDUs for use in all-wheel drive systems. From single machine
components to complex assemblies, Linamar is the supplier of choice for OEM customers.
Page | 2
4. Project Timeline
Figure 1: Timeline of Project
9-25 10-5 10-15 10-25 11-4 11-14
Company visit and safety training
Study of process and product flow
Conveyor and part flow study
Kaizen design and suggestion
Meeting with project engineer
Time study of gantry
Time study for gantry & calculation
Micro motion study of machine
Presentation in company
Company
visit and
safety
training
Study of
process and
product
flow
Conveyor
and part
flow study
Kaizen
design and
suggestion
Meeting
with
project
engineer
Time study
of gantry
Time study
for gantry
&
calculation
Micro
motion
study of
machine
Presentatio
n in
company
START DATE 9-27-189-28-1810-5-1810-12-1810-19-1810-25-1811-1-1811-9-1811-16-18
DURATION (days) 166655761
Project Timeline
Page | 3
5. Problem Description
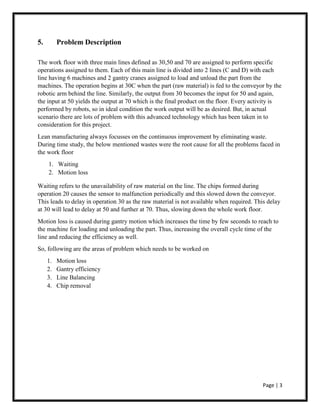
The work floor with three main lines defined as 30,50 and 70 are assigned to perform specific
operations assigned to them. Each of this main line is divided into 2 lines (C and D) with each
line having 6 machines and 2 gantry cranes assigned to load and unload the part from the
machines. The operation begins at 30C when the part (raw material) is fed to the conveyor by the
robotic arm behind the line. Similarly, the output from 30 becomes the input for 50 and again,
the input at 50 yields the output at 70 which is the final product on the floor. Every activity is
performed by robots, so in ideal condition the work output will be as desired. But, in actual
scenario there are lots of problem with this advanced technology which has been taken in to
consideration for this project.
Lean manufacturing always focusses on the continuous improvement by eliminating waste.
During time study, the below mentioned wastes were the root cause for all the problems faced in
the work floor
1. Waiting
2. Motion loss
Waiting refers to the unavailability of raw material on the line. The chips formed during
operation 20 causes the sensor to malfunction periodically and this slowed down the conveyor.
This leads to delay in operation 30 as the raw material is not available when required. This delay
at 30 will lead to delay at 50 and further at 70. Thus, slowing down the whole work floor.
Motion loss is caused during gantry motion which increases the time by few seconds to reach to
the machine for loading and unloading the part. Thus, increasing the overall cycle time of the
line and reducing the efficiency as well.
So, following are the areas of problem which needs to be worked on
1. Motion loss
2. Gantry efficiency
3. Line Balancing
4. Chip removal
Page | 4
6. Literature Review
Lean manufacturing is about “doing more with less”. It is continuing process improvement method. Its
main objective could be adding value in products, eliminating waste. Lean manufacturing has different
kind of tools to address different issues. It is said that before dealing a problem, study until one would
have enough knowledge to apply those theory in practical applications. To utilize those tools in solving
our problem, we studied classroom lectures and searched lean tools on internet. We have used line
balancing, time study, and Kaizen for process improvement.
Process improvement begins with defining problem. 5W1H tool used to define
problem statement. One can’t get to solution without knowing the exact
problem. To understand problem, inquires with what, why, who, where, when
and how asked.
5 Whys is also known as fishbone diagram, cause and effect
diagram. This is simple tool which helps to identify the root
cause of problem. It does not require statistical knowledge. In
this tool one need to ask why questions 5 times to get to root
cause. Each answer of those questions then verified to check its
validity. It also shows relations among different root causes.
Once the root cause is identified the further analysis could be
done to eliminate that cause.
Kaizen is continuous improvement methodology. It has seven steps including problem description,
potential phenomena, root cause, smart target, do, check and act. It can apply in any kind of process with
all type of problems. A short-term kaizen is known as kaizen blitz.
Flow Chart is a type of process map. It is graphical representation of workflow. It also
shows start and stop point, decision point. It represents overall idea about general plant
layout and process flow.
Page | 5
7. Plant layout and work flow
Figure 2 : Flow chart
The work floor with three main lines defined as 30,50 and 70 are assigned to perform specific
operations assigned to them. Each of this main line is divided into 2 lines (C and D) with each line
having 6 machines and 2 gantry cranes assigned to load and unload the part from the machines.
The operation begins at 30C when the part (raw material) is fed to the conveyor by the robotic arm
behind the line. Similarly, the output from 30 becomes the input for 50 and again, the input at 50
yields the output at 70 which is the final product on the floor
Page | 6
8. 5 Why analysis
Why 1 Why 2 Why 3 Why 4 Why 5
Daily
requirement
does not meet
Machine Idle Gantry is
incapable
Motion Loss
Part not
available at
station
Fluid and air
leakage in
cylinder
Conveyor
frequently
stops
Chips and
sensor issues
Figure 3 : 5why
Page | 7
9. Time Study
By doing 5-why analysis it was found that gantry’s capability may be one of the cause for not
fulfilling the daily output. Hence, it was necessary to be sure that gantry would be capable to feed
the part at every machine without any delay. This whole process is divided in to following seven
steps.
9.1 Time study of Gantry
• Analyze the gantry motion was difficult so the gantry motion was divided into eight different steps
and the data is showed below
Table 1: Time study of machine 302
Page | 8
• As shown in figure, 5 reading for each motion of gantry was performed. This activity was
performed for all the 6 gantries required to feed 36 machines.
• Then after range and average of time was calculated, which is taken by gantry to feed one part at
machine.
9.2 Statistical information of all gantry
• There are three operation required on line 30, 50, and 70 to produce final part. Each line has 6
machines on C and D respectively which perform the same operation. Figure below shows the data
of 12 machine on each line.
Table 2 : Time study of operation 50
Page | 9
Table 3 : Time study of operation 30
Table 4 : Time study of operation 70
Page | 10
9.3 Calculation of gantry capability to feed the part at machine, calculation of
machine cycle time, Picture of gantry capability calculation, Histogram
• There are two gantries on each line, one on the either side of conveyor as shown in plant layout.
Gantry cycle time is the sum of total time taken by all eight processes. Each gantry takes around
one minute on every machine to feed the part. So, altogether it takes approximately 3 minutes to
feed all three machines.
• Then, the machine cycle time of each machine was noted for calculating the gantry capacity.
• Following figure illustrates information about the cycle time of each gantry and machine.
Table 5 : Comparison of cycle efficiency and gantry cycle time
Page | 11
• Gantry capacity can be calculated by the ratio of gantry cycle time to the minimum machine cycle
time.
Table 6 : Histogram of gantry Capability
• As shown in figure, gantry at 30 and 50D is not capable.
Page | 12
9.4 Data analysis and Comparison of (30, 50, 70) series of machine data
• In bar charts red pillars shows the opportunity of improvement as those gantry are not capable to
put the part on machine without a second of waiting.
• Blue pillars represent the excellent capability of gantry in which gantry capability of 70D machine
line can be taken as ideal capability.
9.5 Improvement
• After accumulating data and comparing it, it was found that those gantry, which have more cycle
time, also have more down-unclamped-up motion. So, took a video while gantry approaching that
motion. Through that video it was clear that gantry speed was down when it went up after
unclamping the part.
• After that, focus was shifted to motion. We discussed it with machines-hop supervisor and he
arranged a meeting with all concern person. After analyzing we have came to know that due to the
fluid and air leakage in cylinder gantry could not work on desired speed. Hence, maintenance
engineer has decided to change that cylinder and after that we noticed that gantry started working
as per designed speed.
• Ultimately, the overall cycle time of all gantry has decreased and all those uncapable gantry have
been capable as their capability has increased.
Page | 13
10. Line Balancing
During observation on the floor, it was found that the two conveyors were used to feed the part by
the robot. But due to improper programing, parts on conveyor 1 was feed at higher rate as
compared to conveyor 2, due to which accumulation of parts on conveyor was seen and overall
production affects due to it.
Figure 4 : Parts are over feed on conveyor belt 1 Figure 5 : Parts are feed less on conveyor
belt 2.
Page | 14
To avoid these type of situation, it was suggested to place a G20 ZPA roller module intelligent buffer
system for conveyor technology sensor on the conveyor belt at particular fixed location, once the part
reached at particular location, the sensor will sense the part and it would stop to allocate the dish attach to
it and robot would start feeding the part at next conveyor, these would lead to continuous feeding of material
on both conveyor without overfeeding on one.
Figure 6 : Significant layout where sensors needs to be placed.
By introducing this technology, the gantry does not have to wait for the part and the downtime of
it would also reduce to some extent and hence the rate of production would also affect as it is
directly proportional to it.
Page | 15
11. Kaizen steps
11.1 Problem Description
The frequency of conveyor breakdown is higher which increases the wait time of gantry(making
the machine idle) as the part is not available at the station.
11.2 5W1H
11.3 Fishbone diagram
Figure 7 : Cause and effect
Initial problem
statement
Conveyor stoppage at
frequent intervals
What
Conveyor stops for both C
and D manufacturing lines
When
Unidentified frequent
intervals
Where
Gear mesh conveyor system
for C and D manufacturing
lines
Who workpiece
Which Repetitive
How
Remove the foreign
materials found on the
conveyor belt manually
Page | 16
11.4 Sketch of the problem
Figure 8 : Chips on the line
Figure 9 : Chips on part Figure 10 : man at work
Page | 17
11.5 5-Why analysis
Main cause
Why 1
Accumulation of foreign material on the conveyor system
and sensors
Why 2
Chips found between gear mesh and sensors
why 3
Chips coming from the previous operation which were
manually removed on the conveyor
Why 4
Chips gathers on the centre of the work piece after machining
operation
why 5
No full proof process to remove the chips from the centre of
the workpiece after machining operation is completed
11.6 Problem Brainstorming
We need to make the conveyor free from chips for which we require an automated device to
remove the chips from the center of the work piece.
A plunger is designed with the help of 3D modelling. This plunger is operated with the help of
hydraulic mechanism to remove the chips and sensors are placed to detect the part.
This whole mechanism is placed before the conveyor system to eliminate chips accumulation and
hence stoppage of conveyor line.
Also by this, manpower is reduced, thus direct reduction in cost to company and manual process.
.
Page | 18
11.7 Solution description
An automatic plunger mechanism is applied to remove the chips from the centre of the work piece.
Figure 11 : Plunger placement
Since the operation is automated, operator who is manually removing the chips is removed and
hence reduction in manpower.
11.8 Conclusion
By implementing the Plunger mechanism, conveyor line stoppage has been reduced drastically.
Page | 19
Lean Manufacturing and process
Improvement
STANDARD KAIZEN
Student ID: Group 8
Kaizen
Number:
1Sunday, November 25, 2018
Project
Name:
Chip Removal for reducing wait time Machine/Area/St
ation
Station 30C
1 - Problem Description
(Mandatory) -
2 - 4M1D - Potential Phenomena -
5) DO
Actions and Countermeasures
Initial Problem
Statement: Conveyor stoppage at frequent
intervals
Solution Description A
f
t
e
r
S
k
e
t
c
h
What: Conveyor stops for both C and
D manufacturing lines
An automatic plunger mechanism is
applied to remove the chips from the
center of the work piece.When: Unidentified frequent
intervals
Where: Gear mesh conveyor system
for C and D manufacturing
lines
Who:
Chips attached to work piece
Which:
Repetitive
Task Responsibility Target Date Expected Results
Status
How: Remove the foreign materials
found on the conveyor belt
manually
Inform the Project
manager
Students 10/10/2018 Action to be taken for
improvement
Agreed
Revised Problem
Description:
Chip removal before placing the work
piece on conveyor
3 - 5 Why - Root Cause 4 - SMART Target Talk to the
industrial engineer
Project
Manager
10/10/2018 Discuss about the new
concept and its pros and
cons
Performed
Provide a sketch of the problem Why 1
Accumulation of foreign
material on the conveyor
system and sensors
Permission from
manager
Industrial
engineer
10/12/2018 Discussing the time for
installing and ordering
Performed
Why 2
Chips found between gear
mesh and sensors
Ordering the
equipment
Manager 10/14/2018 Equipment ordered Performed
Why 3
Chips coming from the
previous operation which
were manually removed on
the conveyor
Installing the
uqipment
Technician 10/18/2018 Equipment installed Performed
Why 4
Chips gathers on the center
of the work piece after
machining operation
Why 5
No full proof process to
remove the chips from the
center of the workpiece
after machining operation
is completed
Page | 20
Action
7) Act 6) Check (Results)
E
x
p
a
n
s
i
o
n
Sustain B
e
n
e
f
i
t
The breakdown of the conveyor has reduced drastically as the chips are
removed at efficient rate.
No more manpower
required for chip
removal process
C
o
s
t
The cost of the
equipment and
installation
P
r
o
j
e
c
t
L
e
a
d
e
r
:
Starting Date: B
e
n
e
f
i
t
(
$
)
:
Co
st
($)
:
2000
Savings
($):
4080
Benefit/Cost Ratio:
2.04
Verifier & Date:
Page | 21
12. Result
• By replacing the cylinder, the leakage stopped and thus the motion loss of gantry was eliminated,
improving the gantry capability which is shown below
Table 7 : Histogram of Improved capability
• The new chip removal machine lead to the improved availability of the part to the station and the
result obtained is as follows:
Table 8 : Result
Page | 22
13. References
1. E.J.Vinarcik. (2009). “Applying Lean Manufacturing Principles & amp; Tools to Laboratory".
SAE Technical Paper Series.
2. Smart Draw Software , LLC. (1994). Smart Draw. Retrieved from
https://www.smartdraw.com/about/

Lean manufacturing project

  • 1.
    06-92-590-34/ 06-91-590-34 Lean Manufacturingand Process Improvement, Fall 2018 PROJECT REPORT On, “REDUCING DOWNTIME USING LEAN TOOLS” Submitted by (Group 8) Jenish Patel (104902994) Yashkumar Patel (104860504) Mayank Shantilal Patel (104884207) Malay Yogeshbhai Mistry (104904064) Urvishkumar Pradipkumar Raval (104907168) Jay Majmudar (104938319) Nisarg Chauhan (104709449) Viral Hitenkumar Naik (104927700) Submitted to Sardar Asif Khan Submission date 30th November 2018
  • 2.
    Page | I Tableof Contents 1. Acknowledgement ...............................................................................................................................IV 2. Abstract.................................................................................................................................................V 3. Introduction ..........................................................................................................................................1 4. Project Timeline....................................................................................................................................2 5. Problem Description .............................................................................................................................3 6. Literature Review..................................................................................................................................4 7. Plant layout and work flow...................................................................................................................5 8. 5 Why analysis.......................................................................................................................................6 9. Time Study ............................................................................................................................................7 9.1 Time study of Gantry ....................................................................................................................7 9.2 Statistical information of all gantry...............................................................................................8 9.3 Calculation of gantry capability to feed the part at machine, calculation of machine cycle time, Picture of gantry capability calculation, Histogram.......................................................................10 9.4 Data analysis and Comparison of (30, 50, 70) series of machine data ......................................12 9.5 Improvement .............................................................................................................................12 10. Line Balancing .................................................................................................................................13 11. Kaizen steps.....................................................................................................................................15 11.1 Problem Description ..................................................................................................................15 11.2 5W1H ..........................................................................................................................................15 11.3 Fishbone diagram........................................................................................................................15 11.4 Sketch of the problem................................................................................................................16 11.5 5-Why analysis ...........................................................................................................................17 11.6 Problem Brainstorming..............................................................................................................17 11.7 Solution description...................................................................................................................18 11.8 Conclusion..................................................................................................................................18 12. Result ..............................................................................................................................................21 13. References ......................................................................................................................................22
  • 3.
    Page | II Listof Figures Figure 1: Timeline of Project.........................................................................................................................2 Figure 2 : Flow chart......................................................................................................................................5 Figure 3 : 5why..............................................................................................................................................6 Figure 4 : Parts are over feed on conveyor belt 1…………………………………………………………………………………..13 Figure 5 :Parts are feed less on conveyor belt 2 ......................................................................................13 Figure 6 : Significant layout where sensors needs to be placed.................................................................14 Figure 7 : Cause and effect..........................................................................................................................15 Figure 8 : Chips on the line..........................................................................................................................16 Figure 9 : Chips on part………………………………………………………………………………………………………………………….16 Figure 10 : man at work..............................................................................................................................16 Figure 11 : Plunger placement....................................................................................................................18
  • 4.
    Page | III Listof Tables Table 1: Time study of machine 302.............................................................................................................7 Table 2 : Time study of operation 50............................................................................................................8 Table 3 : Time study of operation 30............................................................................................................9 Table 4 : Time study of operation 70............................................................................................................9 Table 5 : Comparison of cycle efficiency and gantry cycle time .................................................................10 Table 6 : Histogram of gantry Capability.....................................................................................................11 Table 7 : Histogram of Improved capability................................................................................................21 Table 8 : Result............................................................................................................................................21
  • 5.
    Page | IV 1.Acknowledgement We have taken efforts in this project. However, it would not have been possible without the kind support and help of many individuals and organizations. We would like to extend our sincere thanks to all of them. We are highly indebted to Prof. Sardar Asif Khan for his guidance and constant supervision as well as for providing necessary information regarding the project and for his assistance in the completing the project. We would like to express our gratitude towards, Mr. Kirtan Gohel the project manager of Exkor Manufacturing. for their kind co-operation and encouragement which helped us in completion of this project. We would like to express our special gratitude and recognition to the employees of the company for giving their valuable time and knowledge. Our thanks and appreciations also go to our colleague in developing the project and people who have willingly helped us out with their abilities. Sincerely, Malay Mistry Mayank Patel Urvish Raval Jay Majmudar Yash Patel Viral Naik Nisharg Chauhan Jenish Patel
  • 6.
    Page | V 2.Abstract Every manufacturing industry has an end goal to keep up the situation in the focused condition. For that, each organization must move forward in terms of good administration and improved nature of processes. In Industrial and Mechanical engineering, it has turned out to be more critical to apply lean concepts to enhance its procedures and to reduce wastes. In a fast-moving industrial environment, lean manufacturing is considered as a vital component in any market-driven business. Lean manufacturing utilizes various tools and methodologies for the assessment of framework and processes. This project focuses on the process improvement, waste reduction, and enhancing overall line efficiency of the produce system. The analysis of the work station was done by performing time study for gantry’s capability to feed all the machines, machine cycle time, gantry cycle time, conveyor breakdown, raw material availability and efficiency of the gantry and machine. Moreover, a kaizen sheet has been provided, addressing both the problem and solution for reducing the conveyor breakdown. Other lean tools have been used to perform the project such as time study, 5 why, flow chart and line balancing. The outcome of all the process performed is the improved part distribution, reduced cycle breakdown and overall increased efficiency of the line. In conclusion, we have introduced solutions for the problems and recommendations for the firm to implement it in the manufacturing line.
  • 7.
    Page | 1 3.Introduction A division of Guelph Ontario based automotive parts giant Linamar, Exkor provides machining services preparing cast aluminum cylinder heads for final machining. Linamar Corporation is a publicly traded Canadian manufacturing company which operates worldwide. It is Canada's second-largest automobile parts manufacturer (after Magna International). Linamar manufactures and supplies automotive and industrial markets with factories across North America, Europe, and Asia. Linamar has two divisions, Powertrain/Driveline and Industrial. These are further divided into the areas of machining and assembly, light metal casting (Montupet), forging (Seissenschmidt), aerial work platforms (Skyjack), and agricultural equipment (Harvestec). Based in Guelph, Ontario, The company's various operations employ nearly 26,000 persons worldwide in a total of 59 manufacturing plants, 6 R&D centers and 21 sales offices in 17 countries, most located in North America. Total sales in 2016 were $6 billion. Linamar provides products that power vehicles, power motion, power work and power lives. From the core precision metallic components used in automotive powertrains to Skyjacks aerial work platforms, to the agricultural products that Harvestec and OROS designs and builds, Linamar has a diversified product line up delivered by a workforce that has the "Power to Perform”. As a leading-edge Tier 1 supplier to the automotive markets, Linamar provides core engine components including cylinder blocks & heads, camshafts and connecting rods. For transmission, Linamar builds differential assemblies, gear sets, shaft & shell assemblies, as well as clutch modules. For the vehicle's driveline, Linamar is a full-service supplier of gears and gear driven systems such as PTUs and RDUs for use in all-wheel drive systems. From single machine components to complex assemblies, Linamar is the supplier of choice for OEM customers.
  • 8.
    Page | 2 4.Project Timeline Figure 1: Timeline of Project 9-25 10-5 10-15 10-25 11-4 11-14 Company visit and safety training Study of process and product flow Conveyor and part flow study Kaizen design and suggestion Meeting with project engineer Time study of gantry Time study for gantry & calculation Micro motion study of machine Presentation in company Company visit and safety training Study of process and product flow Conveyor and part flow study Kaizen design and suggestion Meeting with project engineer Time study of gantry Time study for gantry & calculation Micro motion study of machine Presentatio n in company START DATE 9-27-189-28-1810-5-1810-12-1810-19-1810-25-1811-1-1811-9-1811-16-18 DURATION (days) 166655761 Project Timeline
  • 9.
    Page | 3 5.Problem Description The work floor with three main lines defined as 30,50 and 70 are assigned to perform specific operations assigned to them. Each of this main line is divided into 2 lines (C and D) with each line having 6 machines and 2 gantry cranes assigned to load and unload the part from the machines. The operation begins at 30C when the part (raw material) is fed to the conveyor by the robotic arm behind the line. Similarly, the output from 30 becomes the input for 50 and again, the input at 50 yields the output at 70 which is the final product on the floor. Every activity is performed by robots, so in ideal condition the work output will be as desired. But, in actual scenario there are lots of problem with this advanced technology which has been taken in to consideration for this project. Lean manufacturing always focusses on the continuous improvement by eliminating waste. During time study, the below mentioned wastes were the root cause for all the problems faced in the work floor 1. Waiting 2. Motion loss Waiting refers to the unavailability of raw material on the line. The chips formed during operation 20 causes the sensor to malfunction periodically and this slowed down the conveyor. This leads to delay in operation 30 as the raw material is not available when required. This delay at 30 will lead to delay at 50 and further at 70. Thus, slowing down the whole work floor. Motion loss is caused during gantry motion which increases the time by few seconds to reach to the machine for loading and unloading the part. Thus, increasing the overall cycle time of the line and reducing the efficiency as well. So, following are the areas of problem which needs to be worked on 1. Motion loss 2. Gantry efficiency 3. Line Balancing 4. Chip removal
  • 10.
    Page | 4 6.Literature Review Lean manufacturing is about “doing more with less”. It is continuing process improvement method. Its main objective could be adding value in products, eliminating waste. Lean manufacturing has different kind of tools to address different issues. It is said that before dealing a problem, study until one would have enough knowledge to apply those theory in practical applications. To utilize those tools in solving our problem, we studied classroom lectures and searched lean tools on internet. We have used line balancing, time study, and Kaizen for process improvement. Process improvement begins with defining problem. 5W1H tool used to define problem statement. One can’t get to solution without knowing the exact problem. To understand problem, inquires with what, why, who, where, when and how asked. 5 Whys is also known as fishbone diagram, cause and effect diagram. This is simple tool which helps to identify the root cause of problem. It does not require statistical knowledge. In this tool one need to ask why questions 5 times to get to root cause. Each answer of those questions then verified to check its validity. It also shows relations among different root causes. Once the root cause is identified the further analysis could be done to eliminate that cause. Kaizen is continuous improvement methodology. It has seven steps including problem description, potential phenomena, root cause, smart target, do, check and act. It can apply in any kind of process with all type of problems. A short-term kaizen is known as kaizen blitz. Flow Chart is a type of process map. It is graphical representation of workflow. It also shows start and stop point, decision point. It represents overall idea about general plant layout and process flow.
  • 11.
    Page | 5 7.Plant layout and work flow Figure 2 : Flow chart The work floor with three main lines defined as 30,50 and 70 are assigned to perform specific operations assigned to them. Each of this main line is divided into 2 lines (C and D) with each line having 6 machines and 2 gantry cranes assigned to load and unload the part from the machines. The operation begins at 30C when the part (raw material) is fed to the conveyor by the robotic arm behind the line. Similarly, the output from 30 becomes the input for 50 and again, the input at 50 yields the output at 70 which is the final product on the floor
  • 12.
    Page | 6 8.5 Why analysis Why 1 Why 2 Why 3 Why 4 Why 5 Daily requirement does not meet Machine Idle Gantry is incapable Motion Loss Part not available at station Fluid and air leakage in cylinder Conveyor frequently stops Chips and sensor issues Figure 3 : 5why
  • 13.
    Page | 7 9.Time Study By doing 5-why analysis it was found that gantry’s capability may be one of the cause for not fulfilling the daily output. Hence, it was necessary to be sure that gantry would be capable to feed the part at every machine without any delay. This whole process is divided in to following seven steps. 9.1 Time study of Gantry • Analyze the gantry motion was difficult so the gantry motion was divided into eight different steps and the data is showed below Table 1: Time study of machine 302
  • 14.
    Page | 8 •As shown in figure, 5 reading for each motion of gantry was performed. This activity was performed for all the 6 gantries required to feed 36 machines. • Then after range and average of time was calculated, which is taken by gantry to feed one part at machine. 9.2 Statistical information of all gantry • There are three operation required on line 30, 50, and 70 to produce final part. Each line has 6 machines on C and D respectively which perform the same operation. Figure below shows the data of 12 machine on each line. Table 2 : Time study of operation 50
  • 15.
    Page | 9 Table3 : Time study of operation 30 Table 4 : Time study of operation 70
  • 16.
    Page | 10 9.3Calculation of gantry capability to feed the part at machine, calculation of machine cycle time, Picture of gantry capability calculation, Histogram • There are two gantries on each line, one on the either side of conveyor as shown in plant layout. Gantry cycle time is the sum of total time taken by all eight processes. Each gantry takes around one minute on every machine to feed the part. So, altogether it takes approximately 3 minutes to feed all three machines. • Then, the machine cycle time of each machine was noted for calculating the gantry capacity. • Following figure illustrates information about the cycle time of each gantry and machine. Table 5 : Comparison of cycle efficiency and gantry cycle time
  • 17.
    Page | 11 •Gantry capacity can be calculated by the ratio of gantry cycle time to the minimum machine cycle time. Table 6 : Histogram of gantry Capability • As shown in figure, gantry at 30 and 50D is not capable.
  • 18.
    Page | 12 9.4Data analysis and Comparison of (30, 50, 70) series of machine data • In bar charts red pillars shows the opportunity of improvement as those gantry are not capable to put the part on machine without a second of waiting. • Blue pillars represent the excellent capability of gantry in which gantry capability of 70D machine line can be taken as ideal capability. 9.5 Improvement • After accumulating data and comparing it, it was found that those gantry, which have more cycle time, also have more down-unclamped-up motion. So, took a video while gantry approaching that motion. Through that video it was clear that gantry speed was down when it went up after unclamping the part. • After that, focus was shifted to motion. We discussed it with machines-hop supervisor and he arranged a meeting with all concern person. After analyzing we have came to know that due to the fluid and air leakage in cylinder gantry could not work on desired speed. Hence, maintenance engineer has decided to change that cylinder and after that we noticed that gantry started working as per designed speed. • Ultimately, the overall cycle time of all gantry has decreased and all those uncapable gantry have been capable as their capability has increased.
  • 19.
    Page | 13 10.Line Balancing During observation on the floor, it was found that the two conveyors were used to feed the part by the robot. But due to improper programing, parts on conveyor 1 was feed at higher rate as compared to conveyor 2, due to which accumulation of parts on conveyor was seen and overall production affects due to it. Figure 4 : Parts are over feed on conveyor belt 1 Figure 5 : Parts are feed less on conveyor belt 2.
  • 20.
    Page | 14 Toavoid these type of situation, it was suggested to place a G20 ZPA roller module intelligent buffer system for conveyor technology sensor on the conveyor belt at particular fixed location, once the part reached at particular location, the sensor will sense the part and it would stop to allocate the dish attach to it and robot would start feeding the part at next conveyor, these would lead to continuous feeding of material on both conveyor without overfeeding on one. Figure 6 : Significant layout where sensors needs to be placed. By introducing this technology, the gantry does not have to wait for the part and the downtime of it would also reduce to some extent and hence the rate of production would also affect as it is directly proportional to it.
  • 21.
    Page | 15 11.Kaizen steps 11.1 Problem Description The frequency of conveyor breakdown is higher which increases the wait time of gantry(making the machine idle) as the part is not available at the station. 11.2 5W1H 11.3 Fishbone diagram Figure 7 : Cause and effect Initial problem statement Conveyor stoppage at frequent intervals What Conveyor stops for both C and D manufacturing lines When Unidentified frequent intervals Where Gear mesh conveyor system for C and D manufacturing lines Who workpiece Which Repetitive How Remove the foreign materials found on the conveyor belt manually
  • 22.
    Page | 16 11.4Sketch of the problem Figure 8 : Chips on the line Figure 9 : Chips on part Figure 10 : man at work
  • 23.
    Page | 17 11.55-Why analysis Main cause Why 1 Accumulation of foreign material on the conveyor system and sensors Why 2 Chips found between gear mesh and sensors why 3 Chips coming from the previous operation which were manually removed on the conveyor Why 4 Chips gathers on the centre of the work piece after machining operation why 5 No full proof process to remove the chips from the centre of the workpiece after machining operation is completed 11.6 Problem Brainstorming We need to make the conveyor free from chips for which we require an automated device to remove the chips from the center of the work piece. A plunger is designed with the help of 3D modelling. This plunger is operated with the help of hydraulic mechanism to remove the chips and sensors are placed to detect the part. This whole mechanism is placed before the conveyor system to eliminate chips accumulation and hence stoppage of conveyor line. Also by this, manpower is reduced, thus direct reduction in cost to company and manual process. .
  • 24.
    Page | 18 11.7Solution description An automatic plunger mechanism is applied to remove the chips from the centre of the work piece. Figure 11 : Plunger placement Since the operation is automated, operator who is manually removing the chips is removed and hence reduction in manpower. 11.8 Conclusion By implementing the Plunger mechanism, conveyor line stoppage has been reduced drastically.
  • 25.
    Page | 19 LeanManufacturing and process Improvement STANDARD KAIZEN Student ID: Group 8 Kaizen Number: 1Sunday, November 25, 2018 Project Name: Chip Removal for reducing wait time Machine/Area/St ation Station 30C 1 - Problem Description (Mandatory) - 2 - 4M1D - Potential Phenomena - 5) DO Actions and Countermeasures Initial Problem Statement: Conveyor stoppage at frequent intervals Solution Description A f t e r S k e t c h What: Conveyor stops for both C and D manufacturing lines An automatic plunger mechanism is applied to remove the chips from the center of the work piece.When: Unidentified frequent intervals Where: Gear mesh conveyor system for C and D manufacturing lines Who: Chips attached to work piece Which: Repetitive Task Responsibility Target Date Expected Results Status How: Remove the foreign materials found on the conveyor belt manually Inform the Project manager Students 10/10/2018 Action to be taken for improvement Agreed Revised Problem Description: Chip removal before placing the work piece on conveyor 3 - 5 Why - Root Cause 4 - SMART Target Talk to the industrial engineer Project Manager 10/10/2018 Discuss about the new concept and its pros and cons Performed Provide a sketch of the problem Why 1 Accumulation of foreign material on the conveyor system and sensors Permission from manager Industrial engineer 10/12/2018 Discussing the time for installing and ordering Performed Why 2 Chips found between gear mesh and sensors Ordering the equipment Manager 10/14/2018 Equipment ordered Performed Why 3 Chips coming from the previous operation which were manually removed on the conveyor Installing the uqipment Technician 10/18/2018 Equipment installed Performed Why 4 Chips gathers on the center of the work piece after machining operation Why 5 No full proof process to remove the chips from the center of the workpiece after machining operation is completed
  • 26.
    Page | 20 Action 7)Act 6) Check (Results) E x p a n s i o n Sustain B e n e f i t The breakdown of the conveyor has reduced drastically as the chips are removed at efficient rate. No more manpower required for chip removal process C o s t The cost of the equipment and installation P r o j e c t L e a d e r : Starting Date: B e n e f i t ( $ ) : Co st ($) : 2000 Savings ($): 4080 Benefit/Cost Ratio: 2.04 Verifier & Date:
  • 27.
    Page | 21 12.Result • By replacing the cylinder, the leakage stopped and thus the motion loss of gantry was eliminated, improving the gantry capability which is shown below Table 7 : Histogram of Improved capability • The new chip removal machine lead to the improved availability of the part to the station and the result obtained is as follows: Table 8 : Result
  • 28.
    Page | 22 13.References 1. E.J.Vinarcik. (2009). “Applying Lean Manufacturing Principles & amp; Tools to Laboratory". SAE Technical Paper Series. 2. Smart Draw Software , LLC. (1994). Smart Draw. Retrieved from https://www.smartdraw.com/about/