Downloaded 12 times
![5
Solution Guide
A layer 3 only design simplifies the network and improves network stability and scalability, as well as
localizing the failure domain (confined to the L2 broadcast domain). Seamless virtual mobility can be achieved
in a L3 only based data center by using L2 overlay networks. From experiment and analysis, External BGP
(EBGP) is considered ideal compared to IGPs due to the following [See Reference]:
■■ Less complex protocol, simple state machine
■■ Information flooding overhead is less, no frequent updates unlike IGPs
■■ Network failure recovery is very fast. Although BGP convergence is slower than IGP, in a Clos topology
with ECMP links, the failure is masked as soon as an alternate path is found.
■■ Failure domain is minimized in a Clos topology with EBGP. Some of the failures are local/hidden/not
propagated if the failed link was not selected/advertised as the best path among the ECMP paths by the
BGP speaker. The failures, where all devices have to withdraw some prefixes or update the ECMP groups
in the FIB, are very limited and in those failures the failed link/node does not impact the re-convergence
process.
■■ Administrator can define the application traffic path. BGP provides services like prefix distribution, prefix
filtering, traffic engineering, traffic tagging, and multi-vendor stability better than other IGPs.
■■ Easier to troubleshoot.
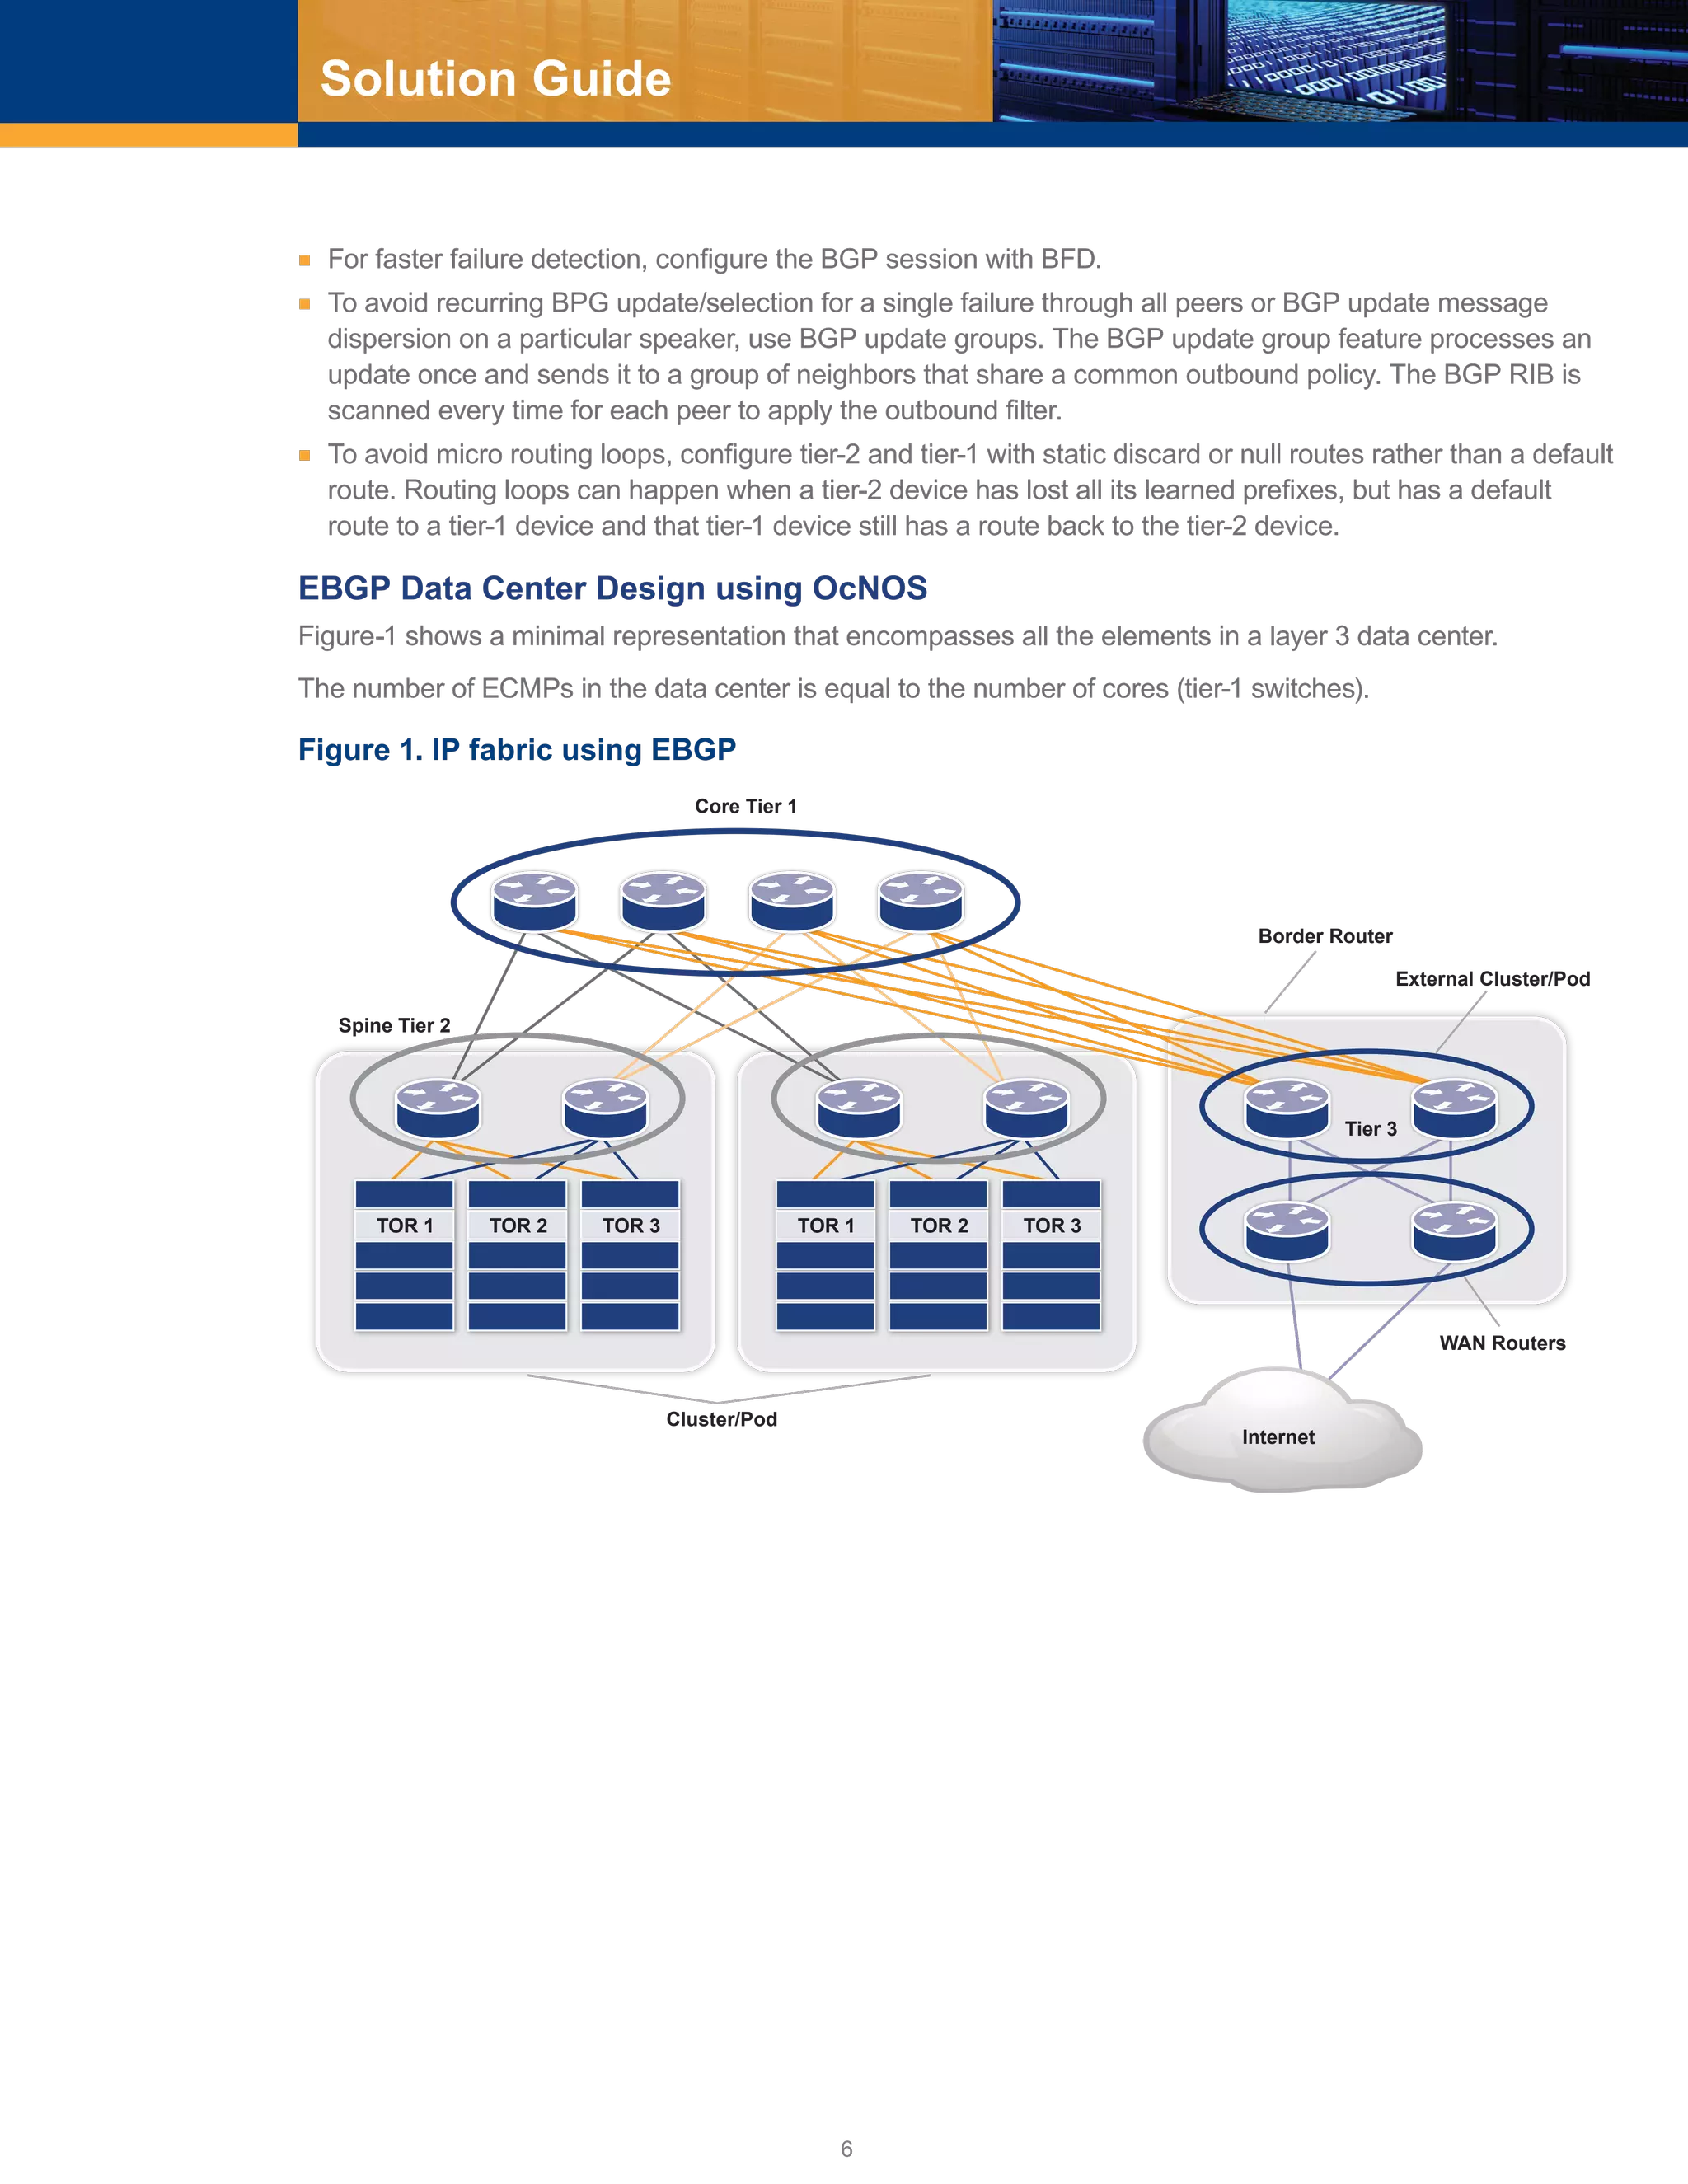
EBGP-Routed CLOS Topology-Based Data Center
EBGP-routed CLOS topology is considered the best choice for laying the IP fabric in a data center because
of the horizontal scalability feature of Clos topology and the ease of use and services provided by EBGP
especially prefix-filtering, prefix distribution, and traffic engineering which are required extensively in a
data center.
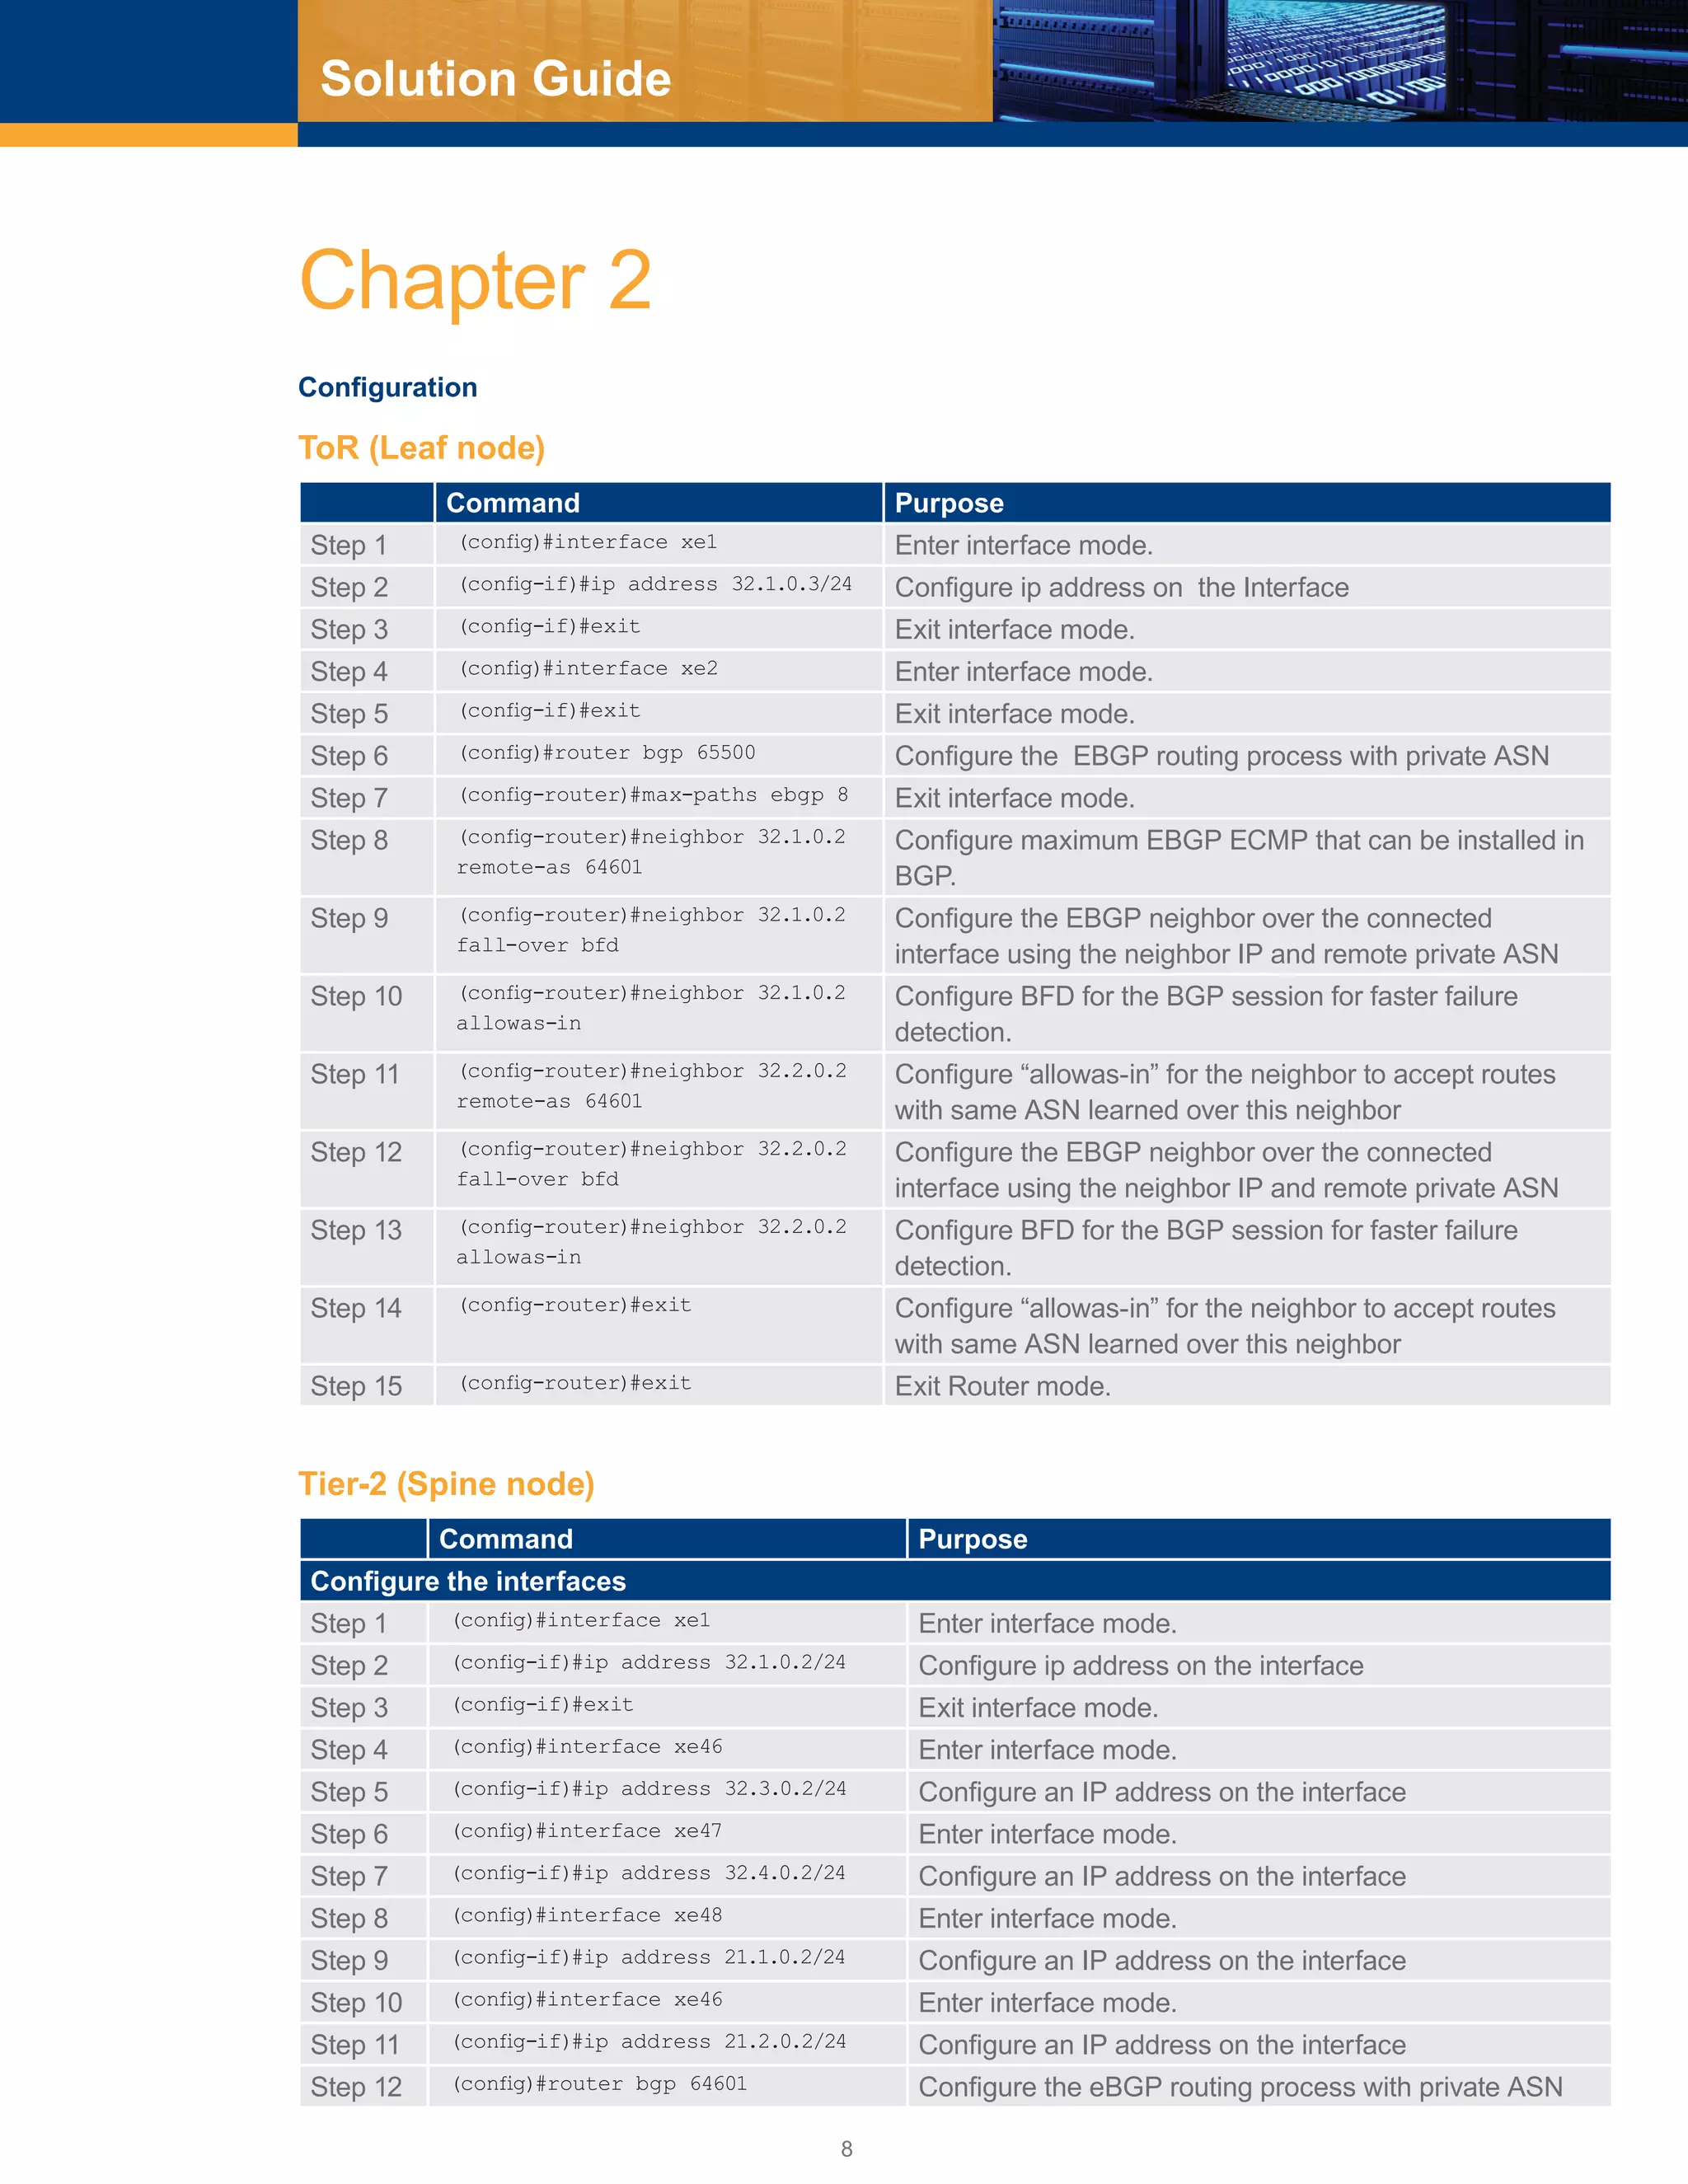
Configuration Guidelines
Configuration guidelines for laying IP fabric using EBGP efficiently are as follows:
■■ Run all EBGP sessions over single-hop point-to-point links.
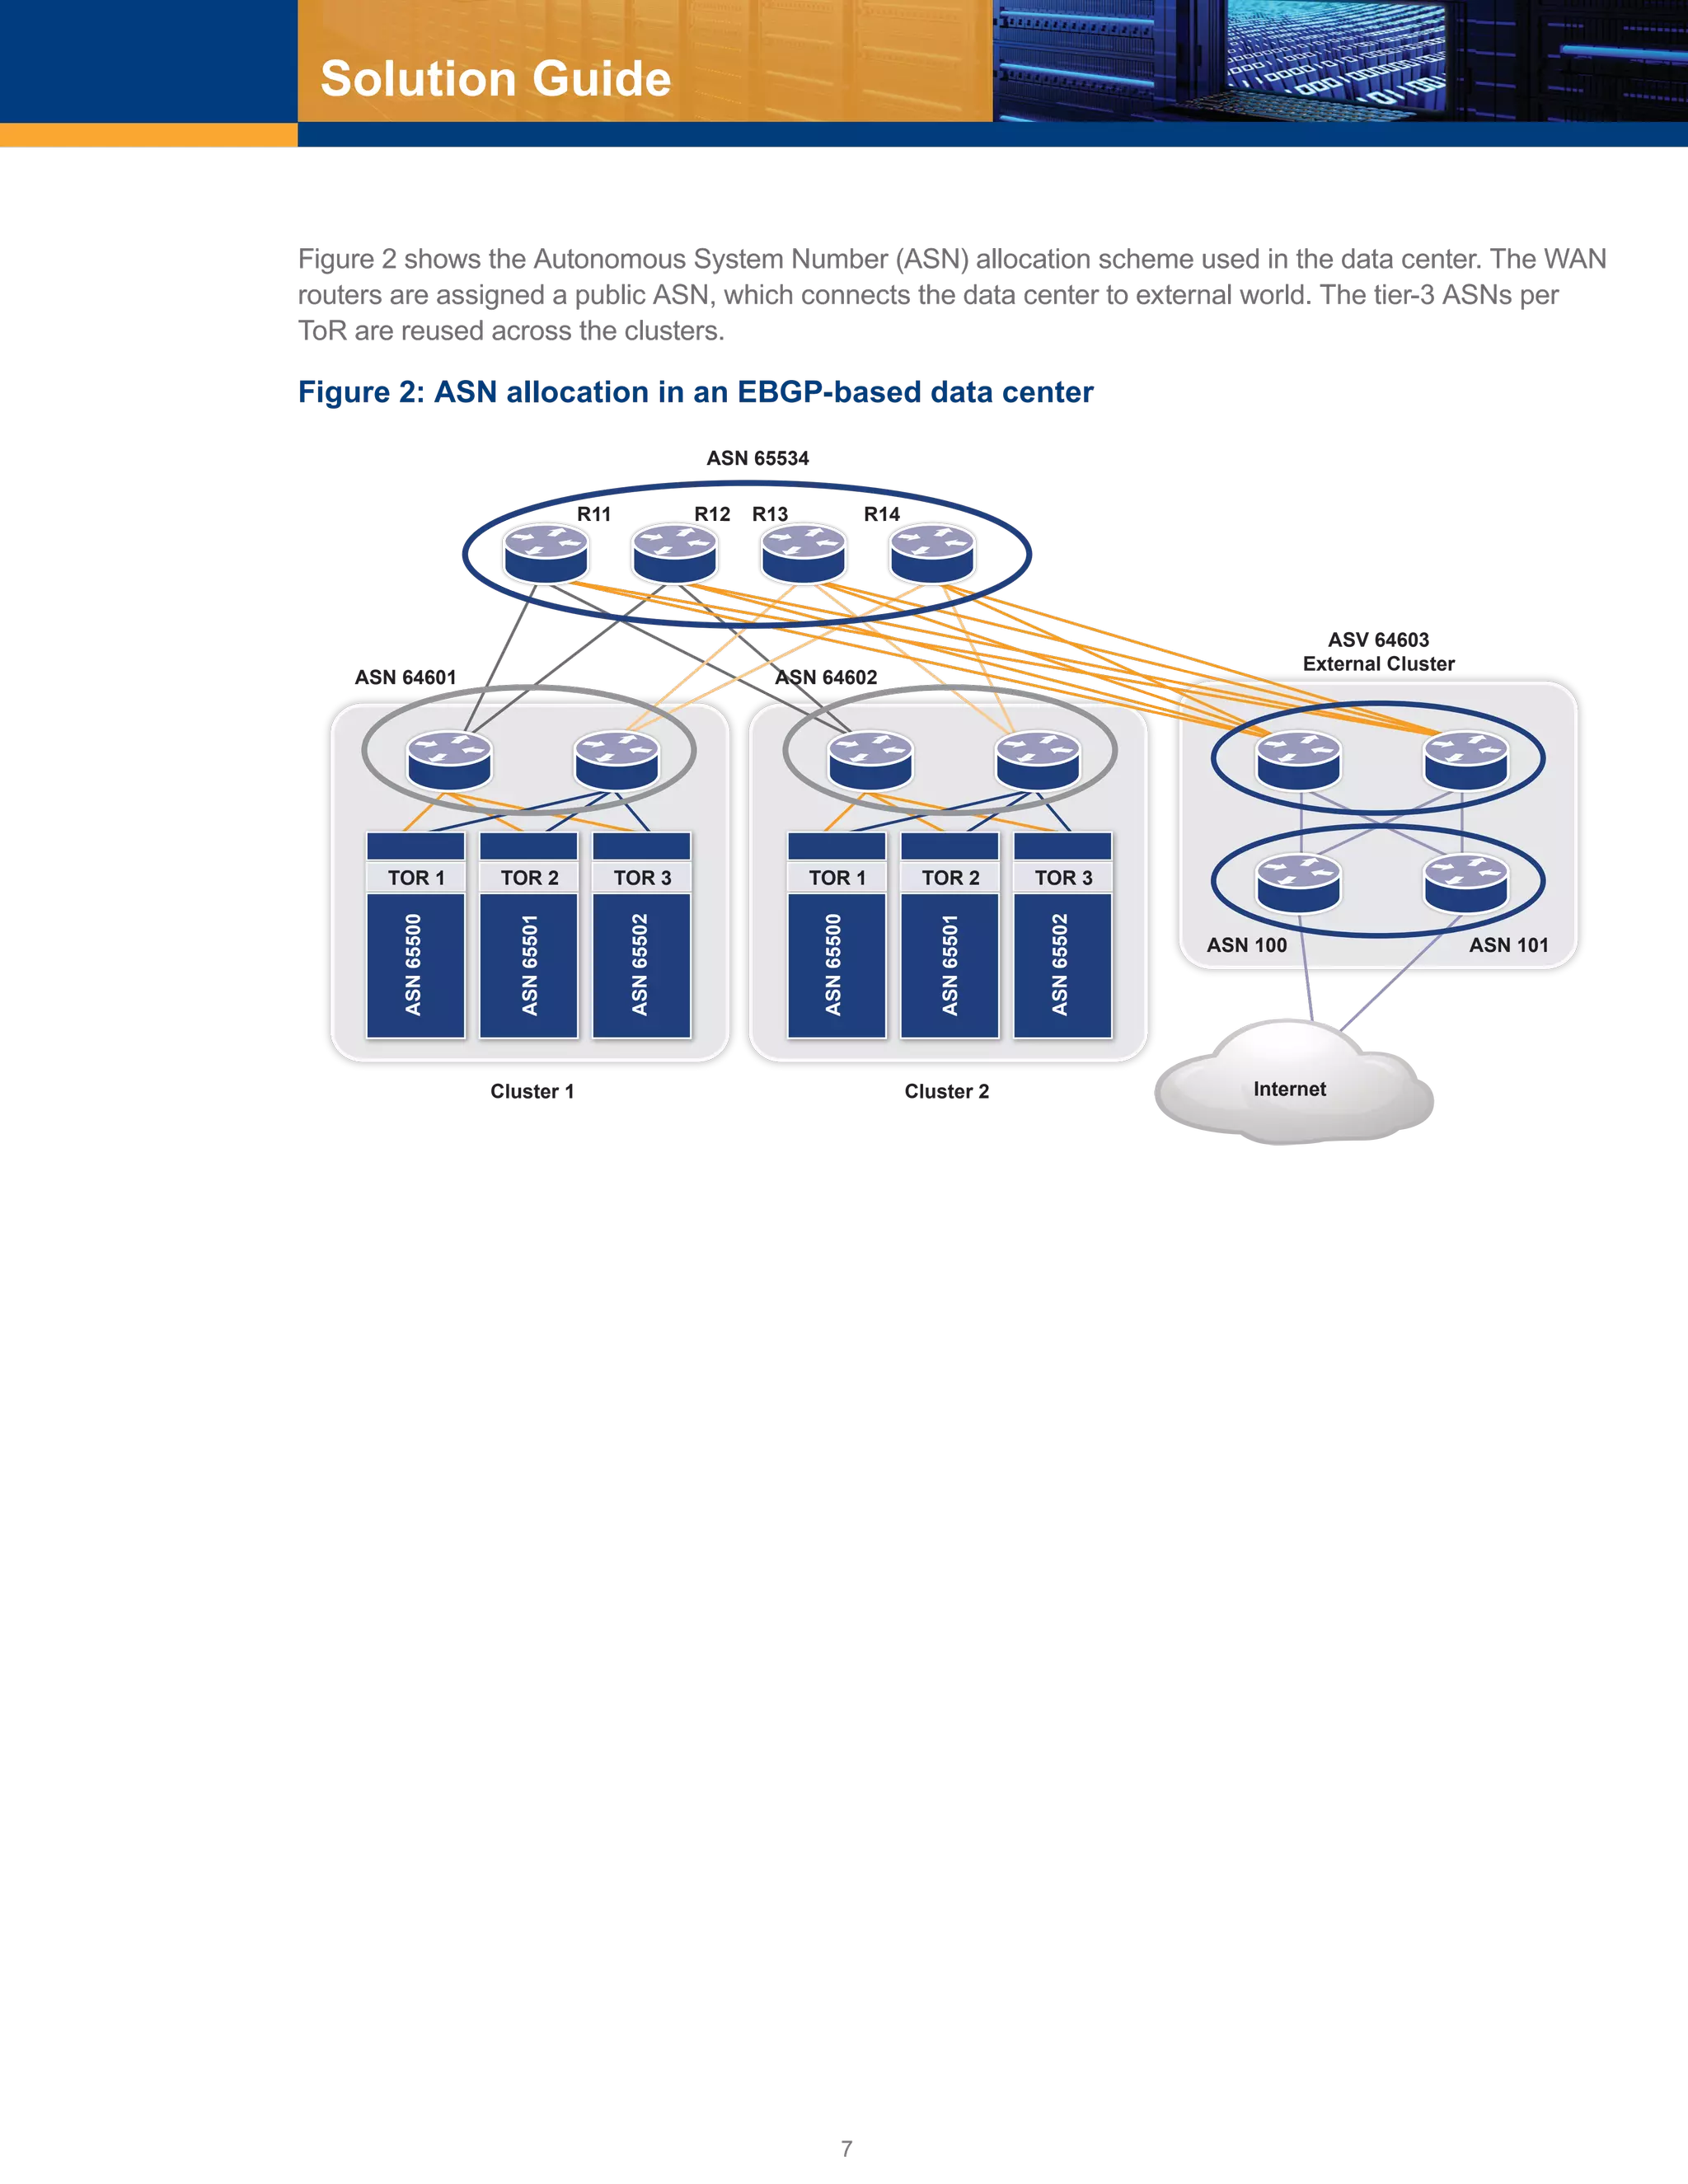
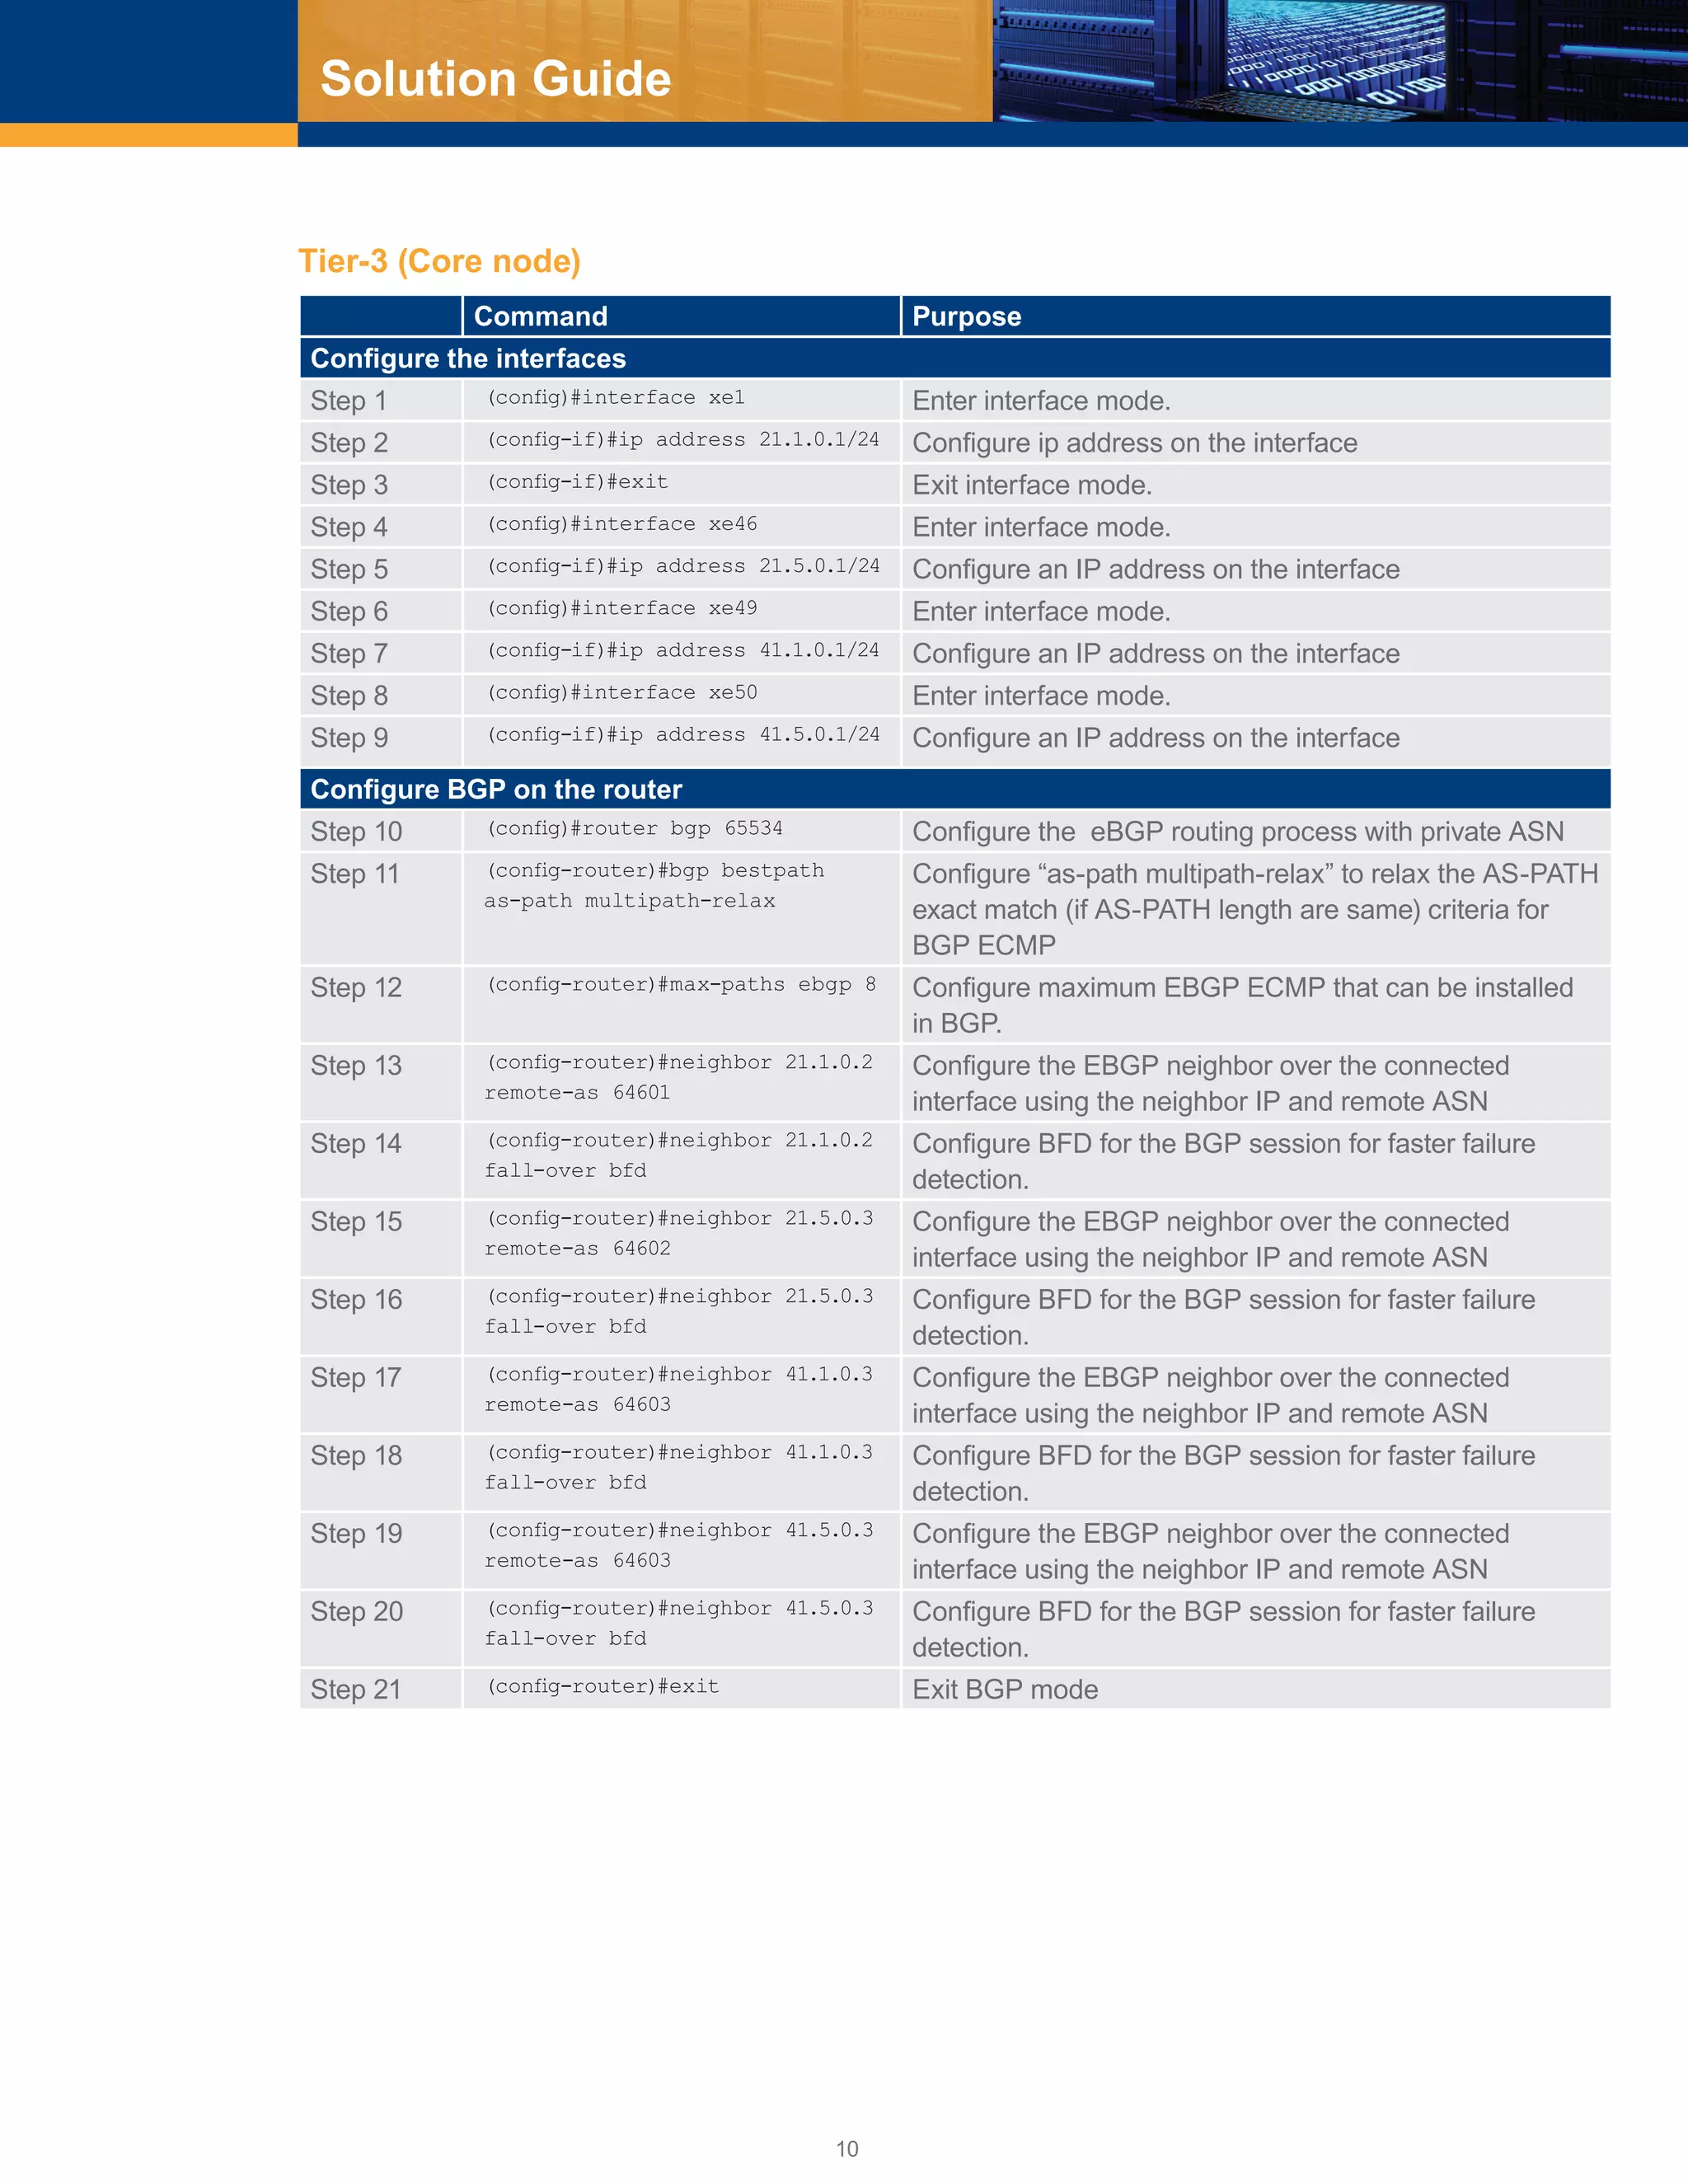
■■ Use private Autonomous System Numbers (ASNs) (64512-65534) to avoid ASN conflicts.
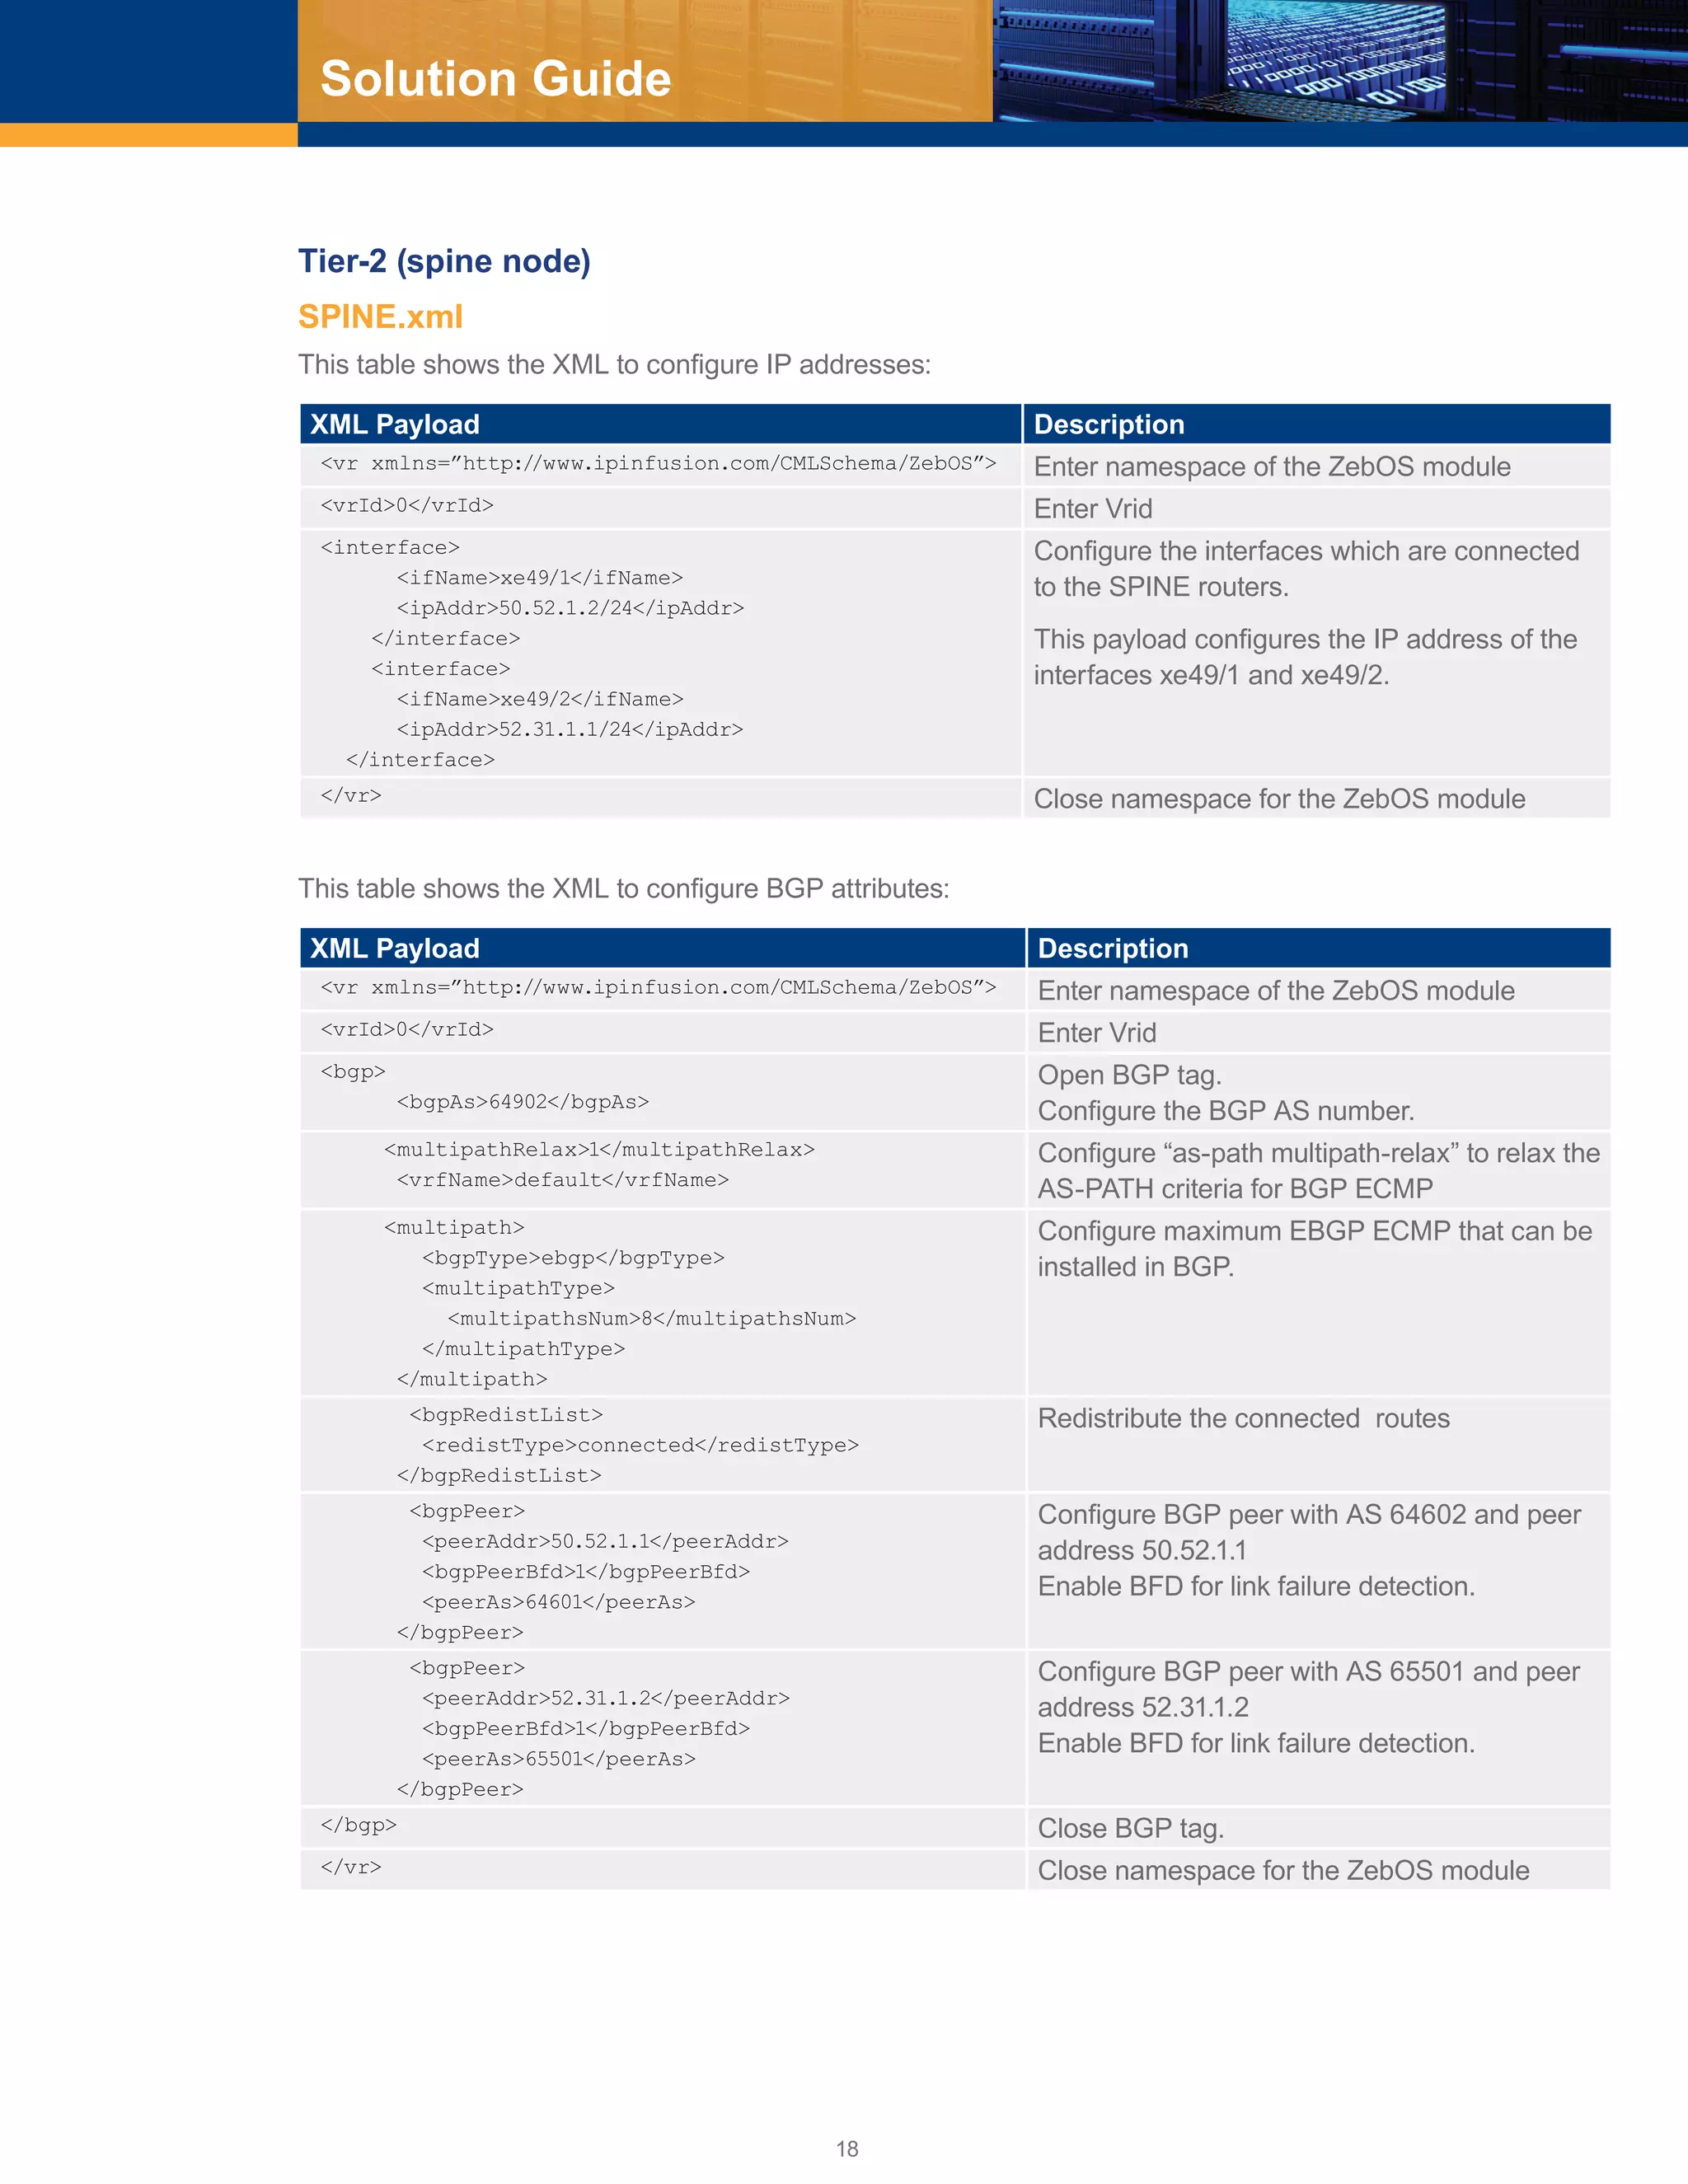
■■ Give all tier 1 (core) devices a single ASN.
■■ Give all tier 2 devices in the same cluster the same unique ASN. A cluster or pod is a group of tier 2 (spine
switches) + tier 3 switches (ToR/leaf) + servers.
■■ Give every tier 3 (ToR) device in a cluster a unique ASN.
■■ Reuse tier-3 ASNs across clusters. Configure tier-3 devices with the BGP “allowas-in” feature to allow route
learning of prefixes from the same ASNs in other clusters.
■■ Announce server subnets on tier-3 devices via BGP without using route summarization on tier-2 and tier-1
devices.
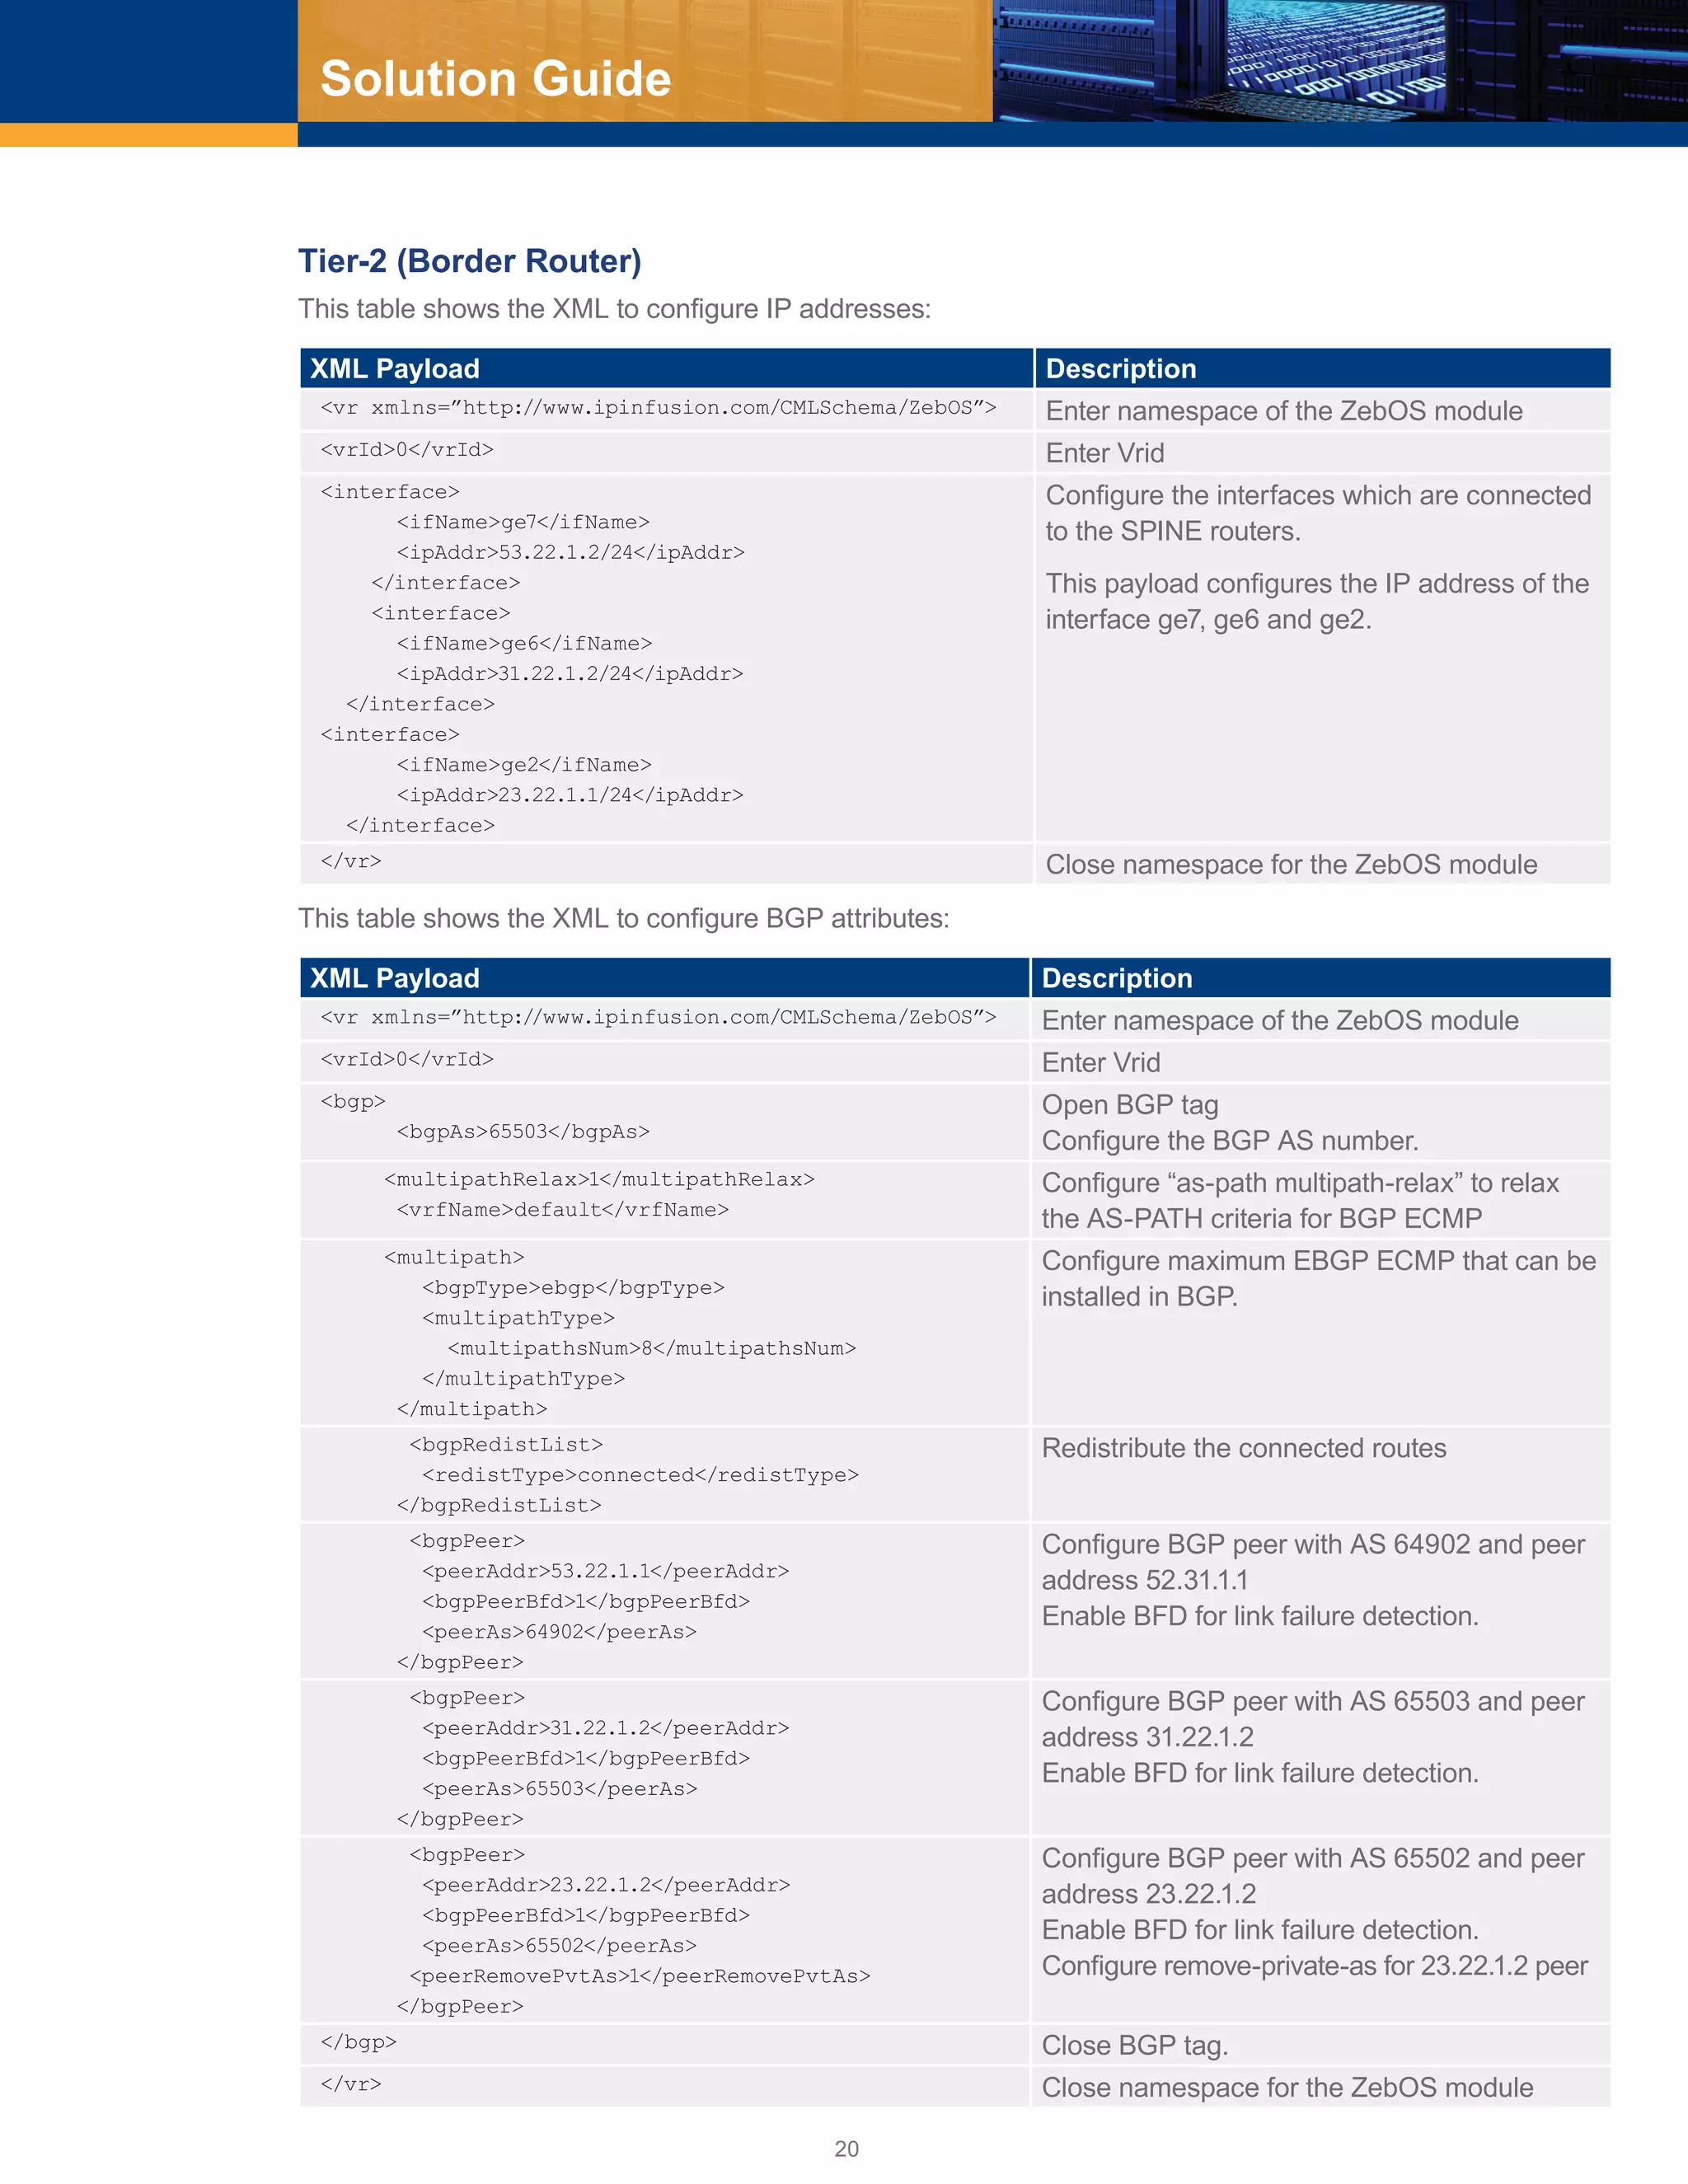
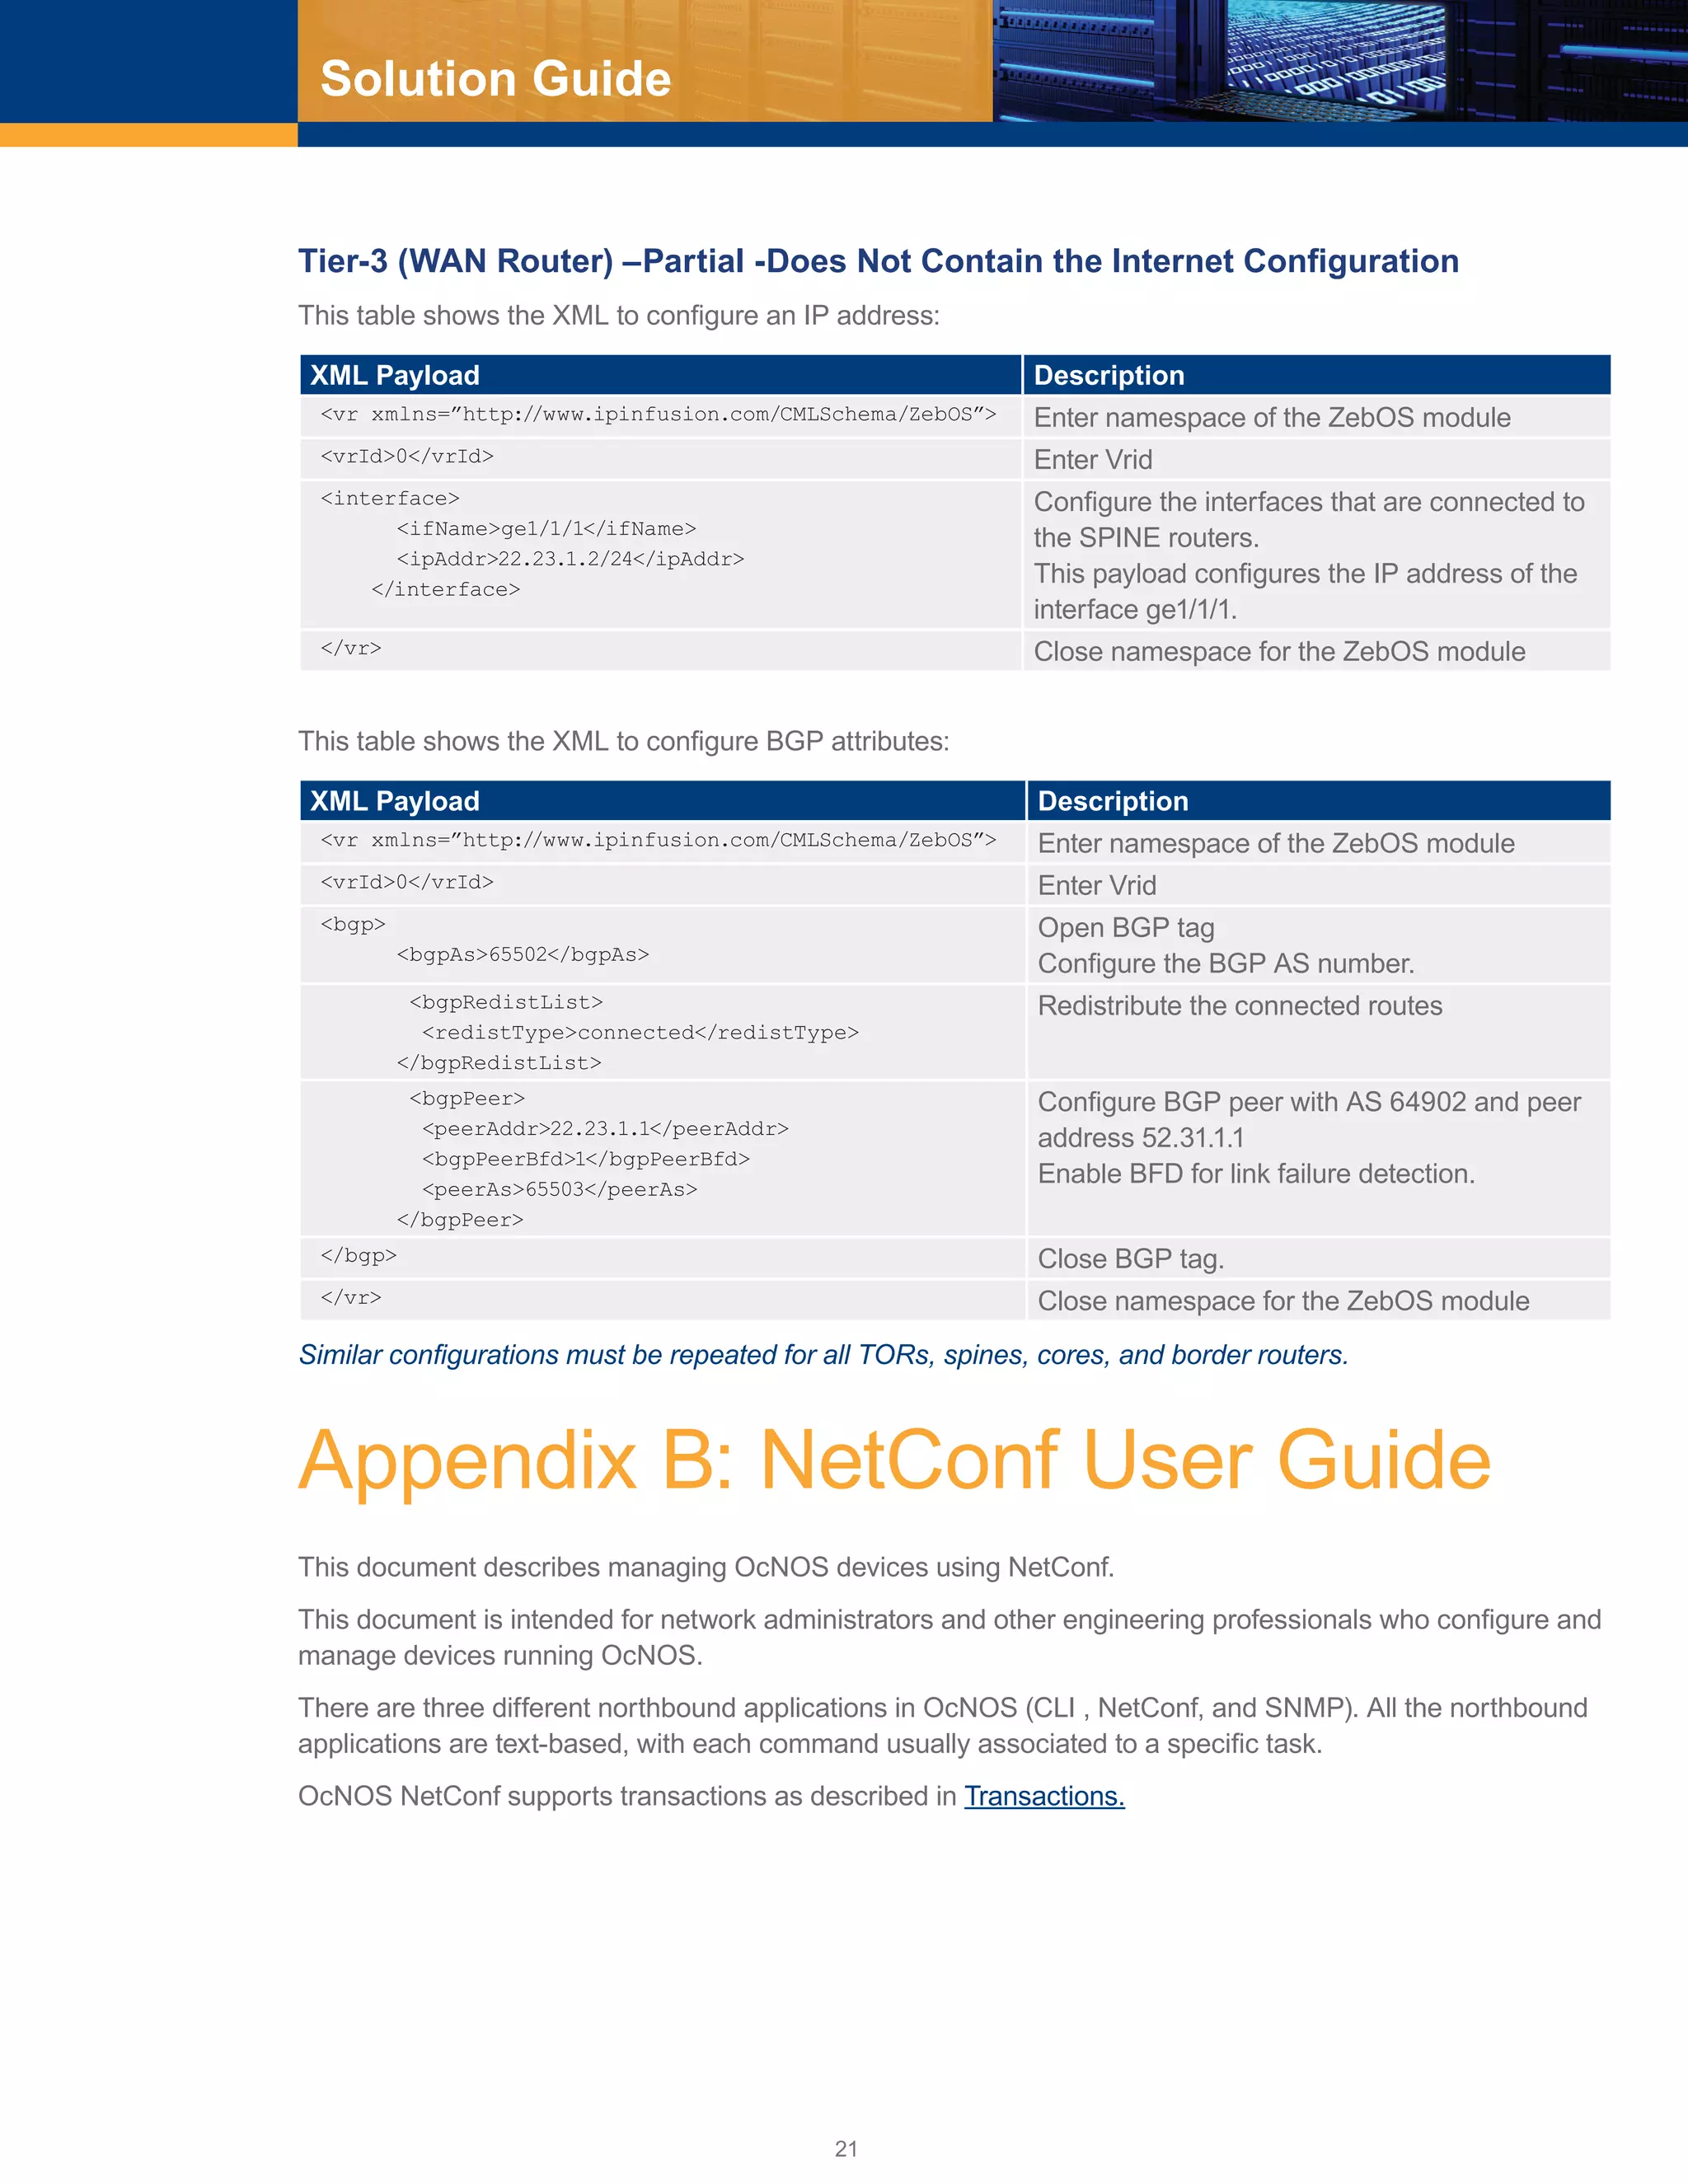
■■ Use edge clusters (pods) for external connectivity. Each edge cluster consists of border routers (tier-2) and WAN
routers (tier-3). Give each WAN router a unique public ASN to connect the data center to the external world.
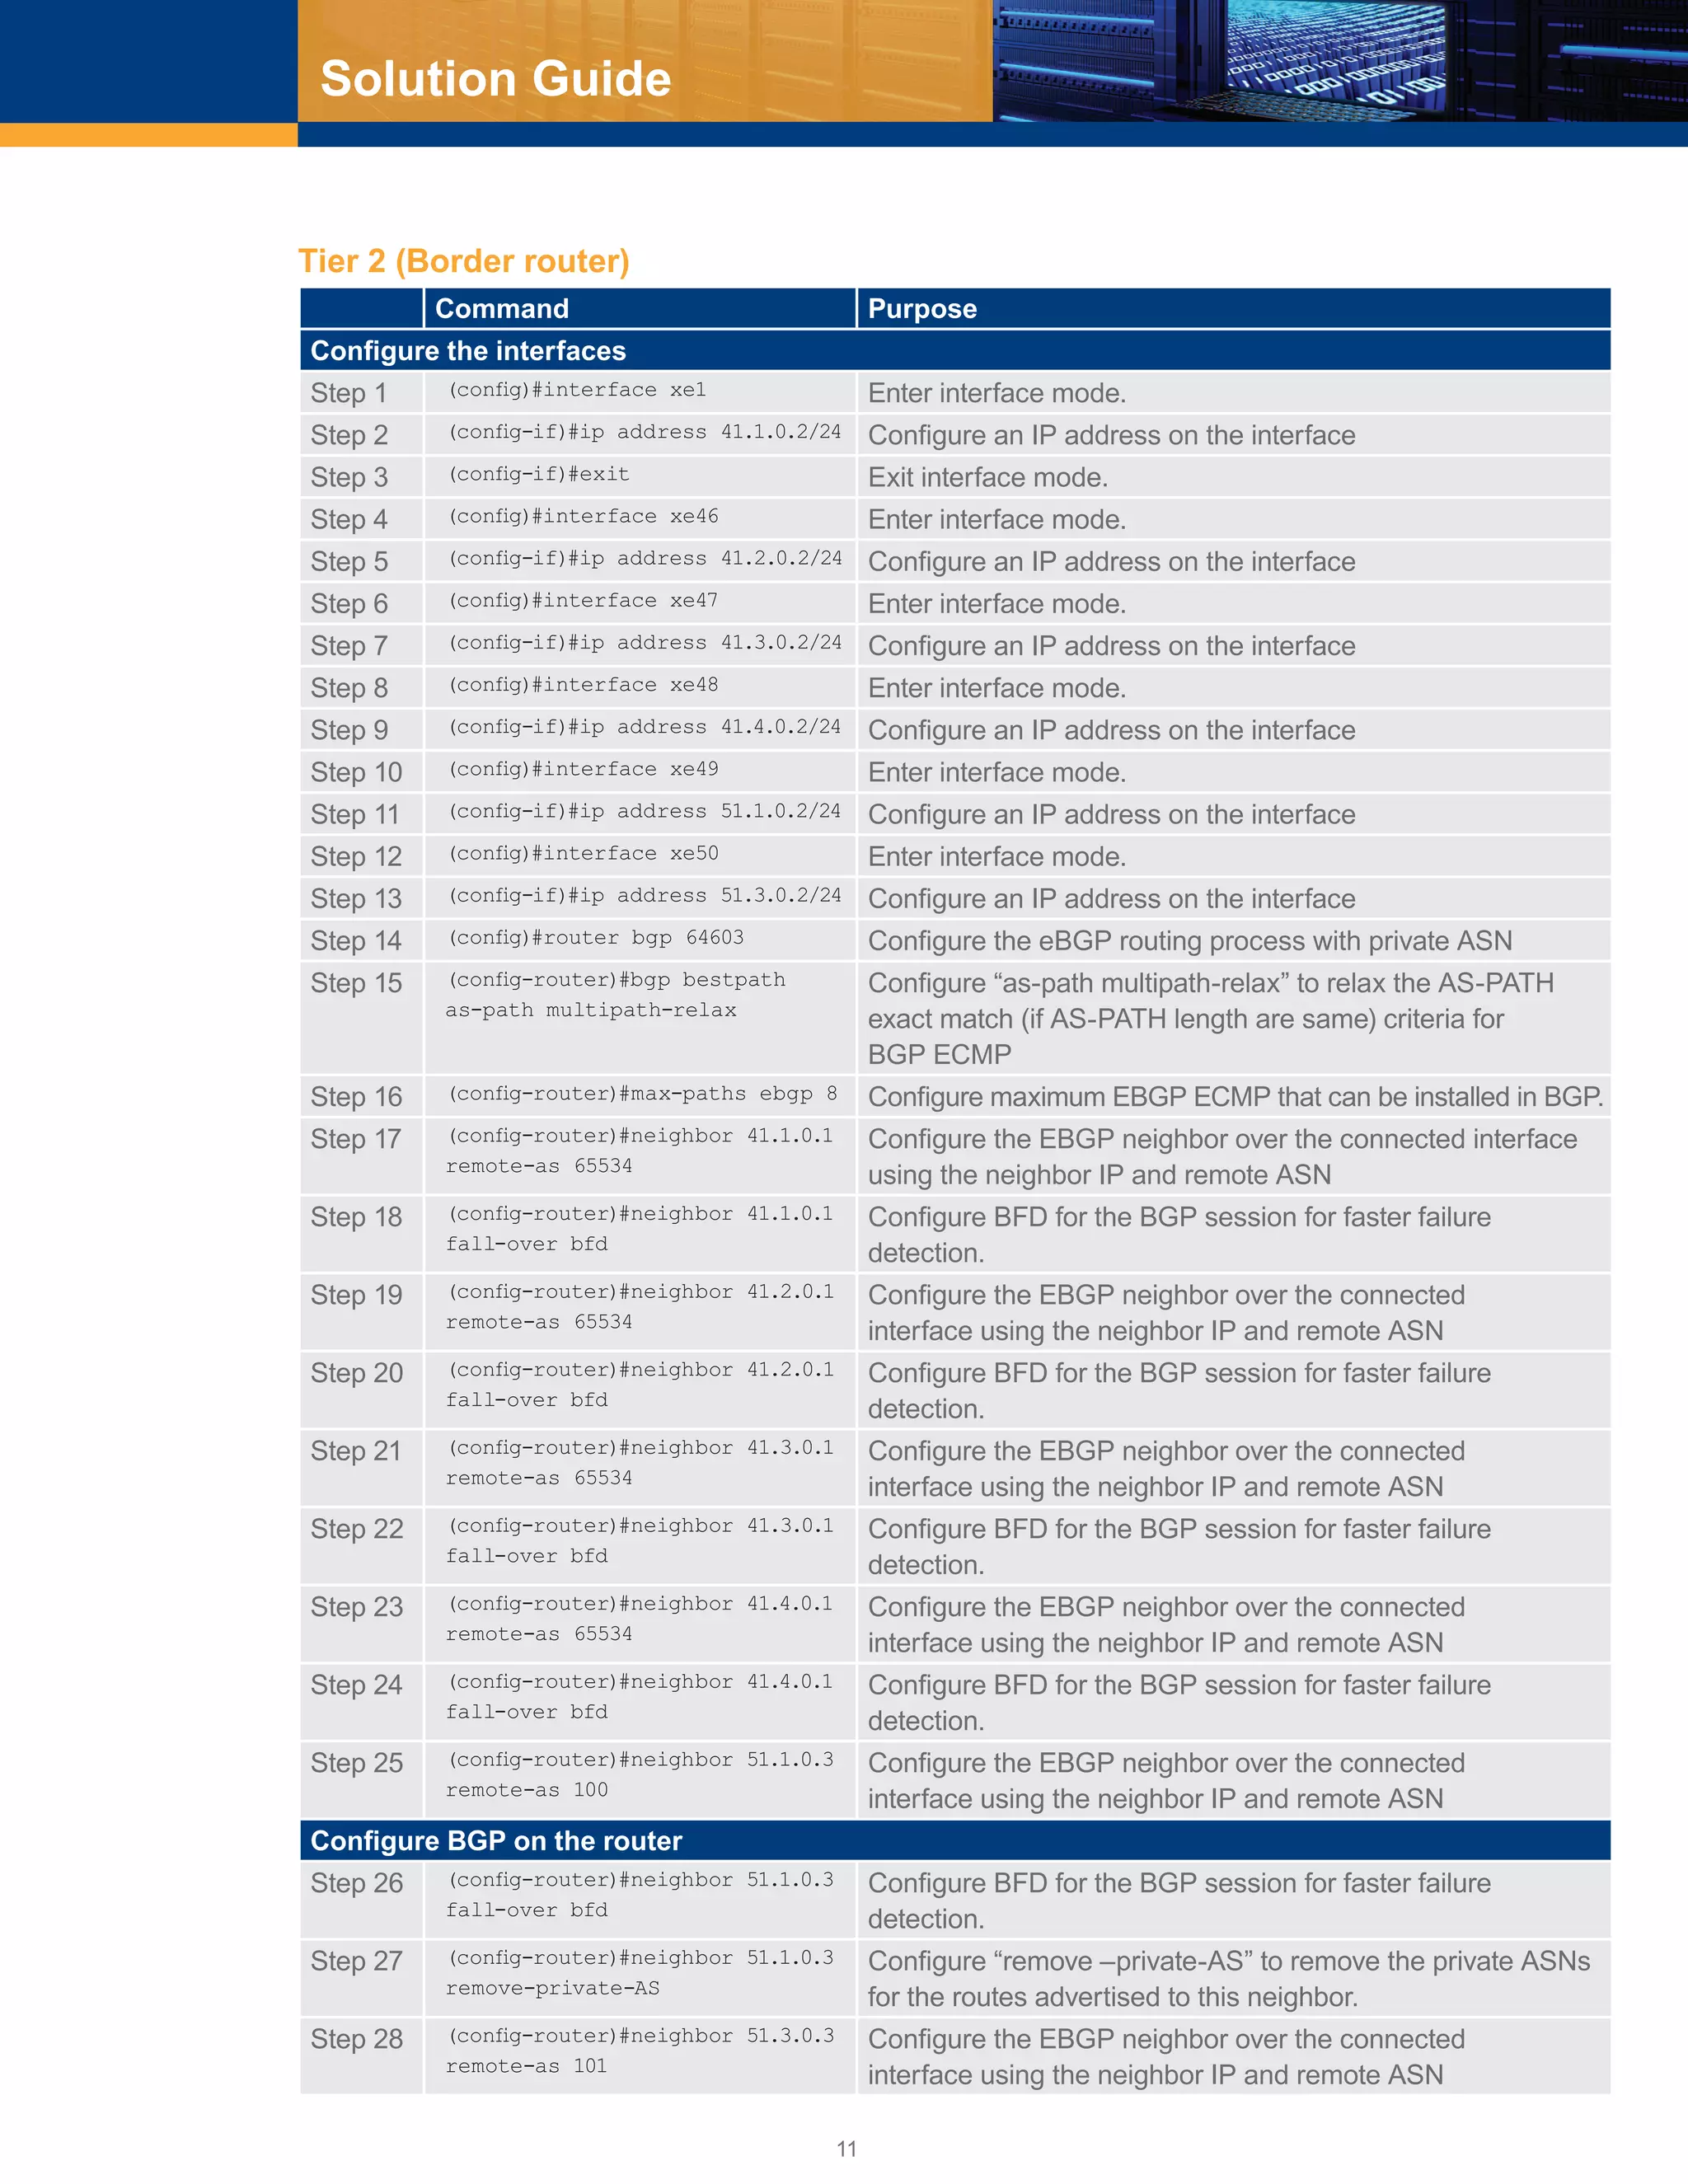
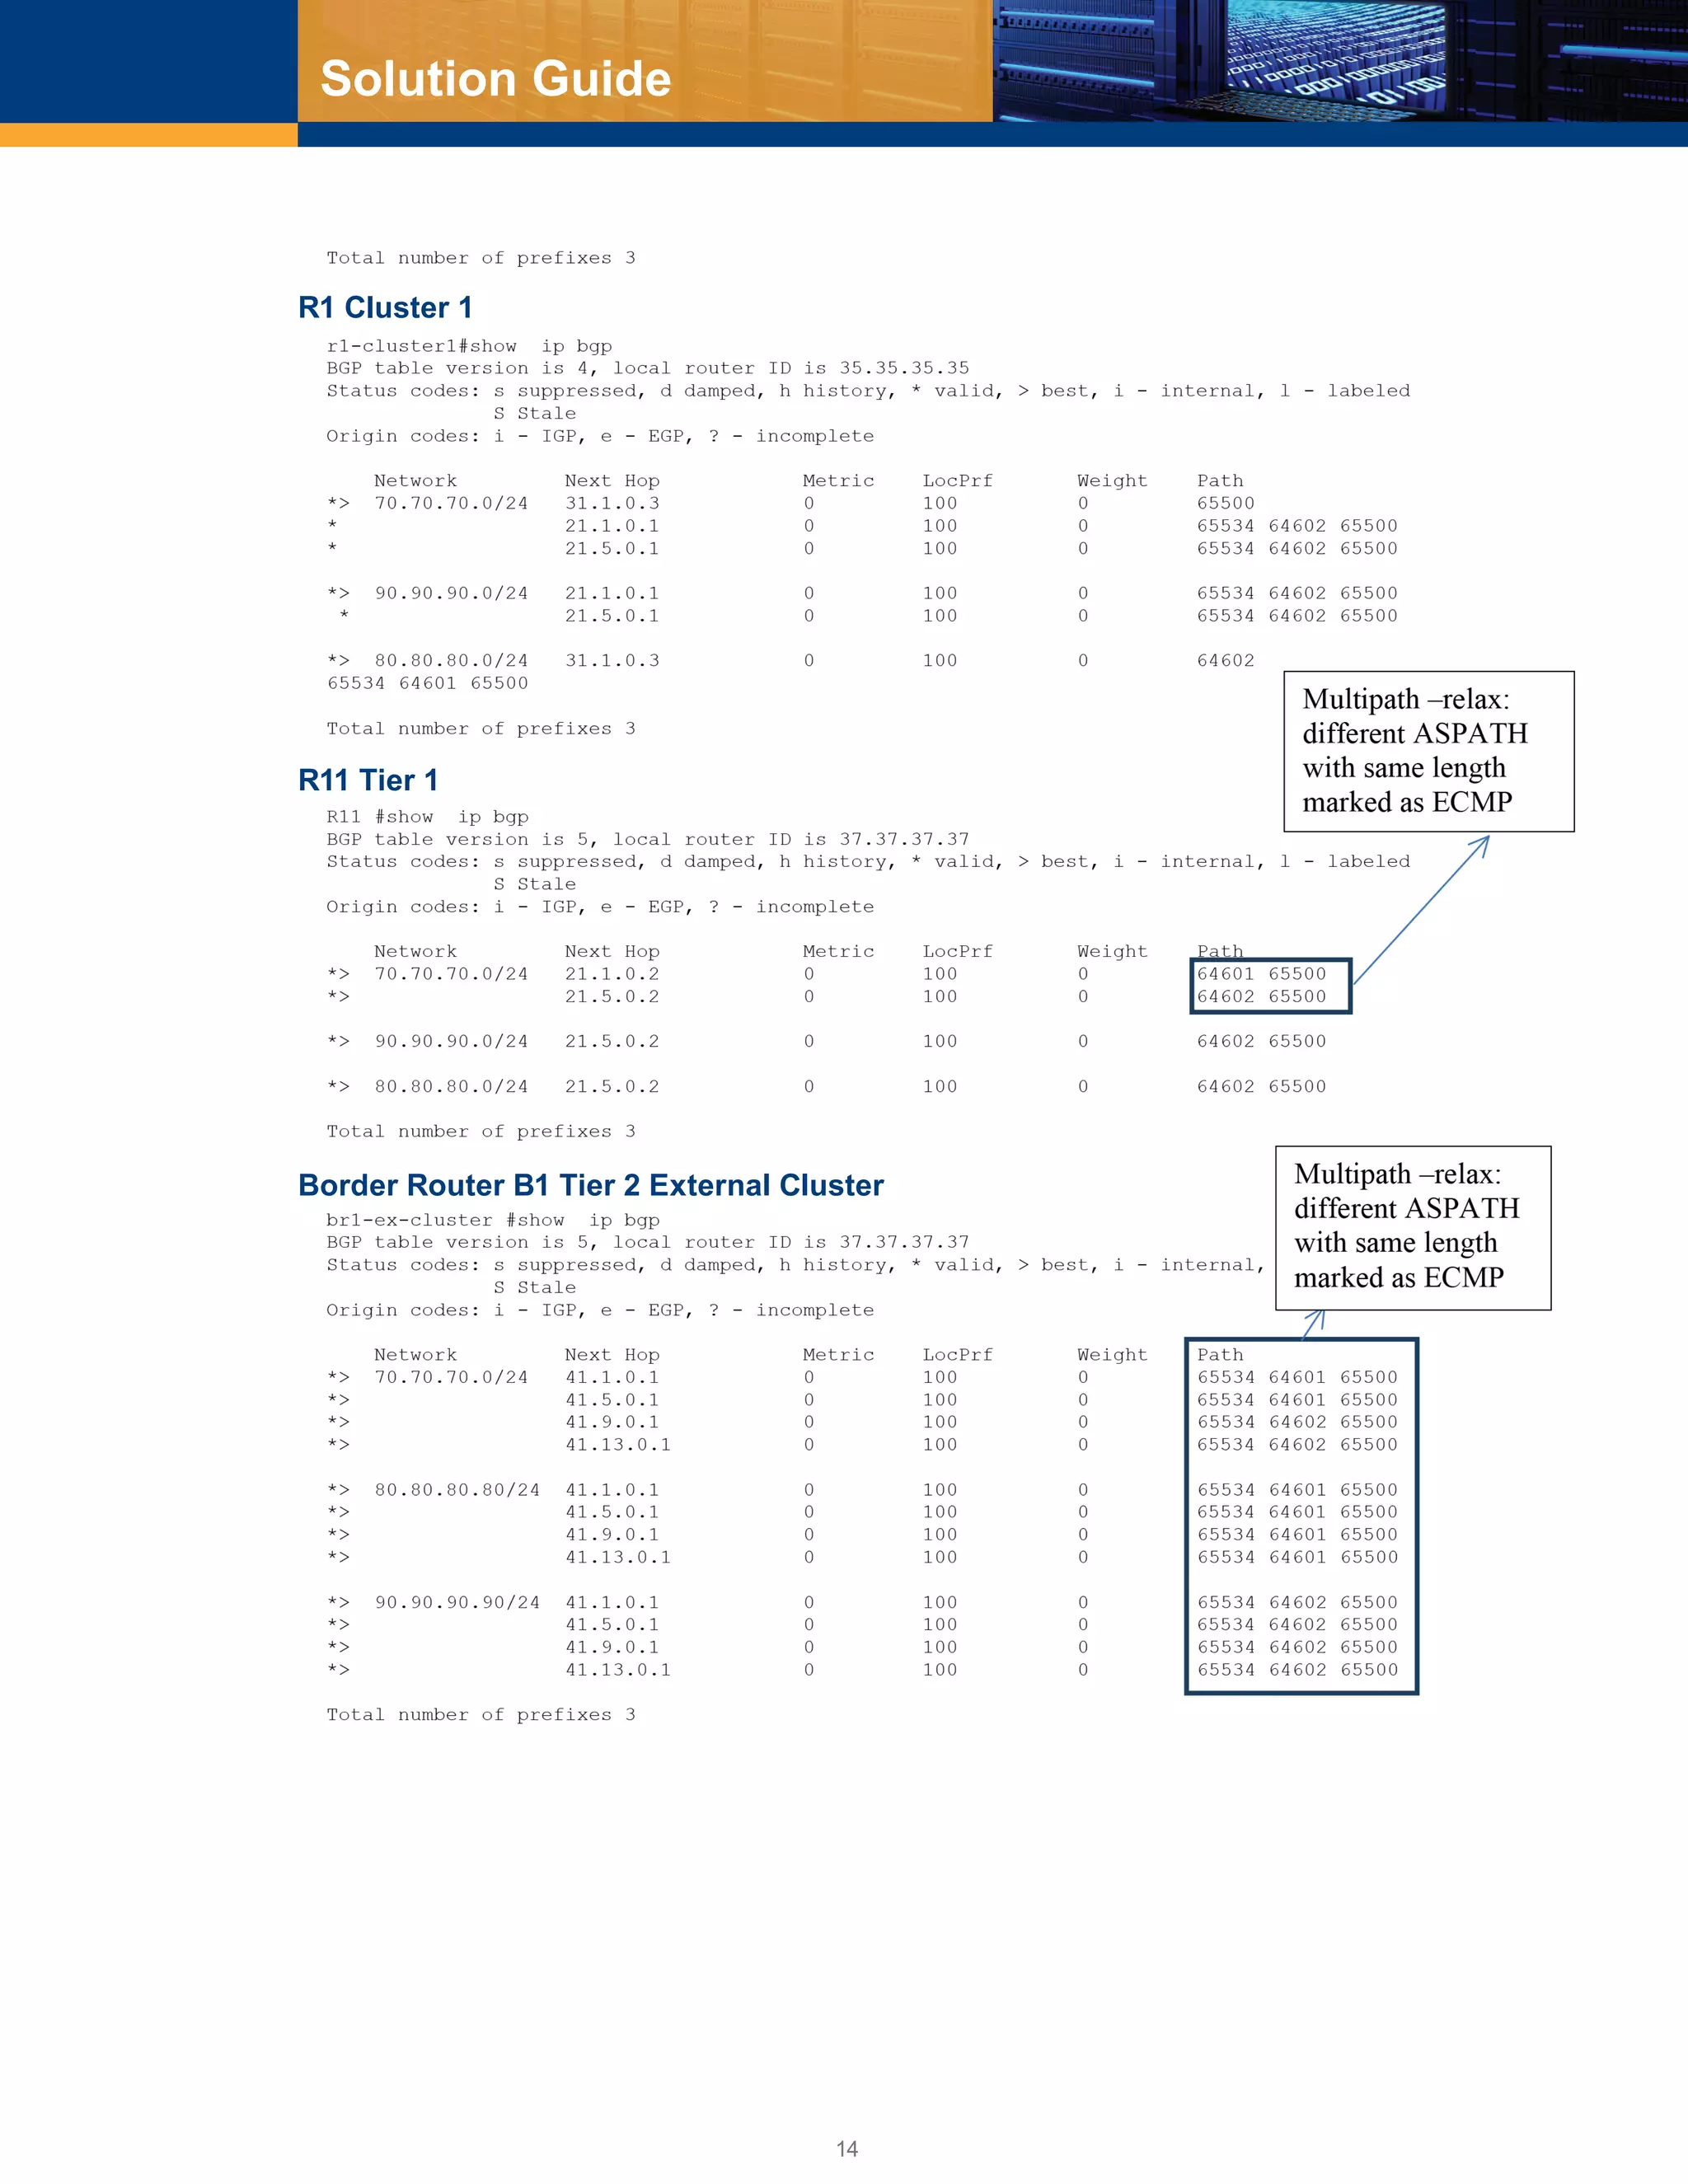
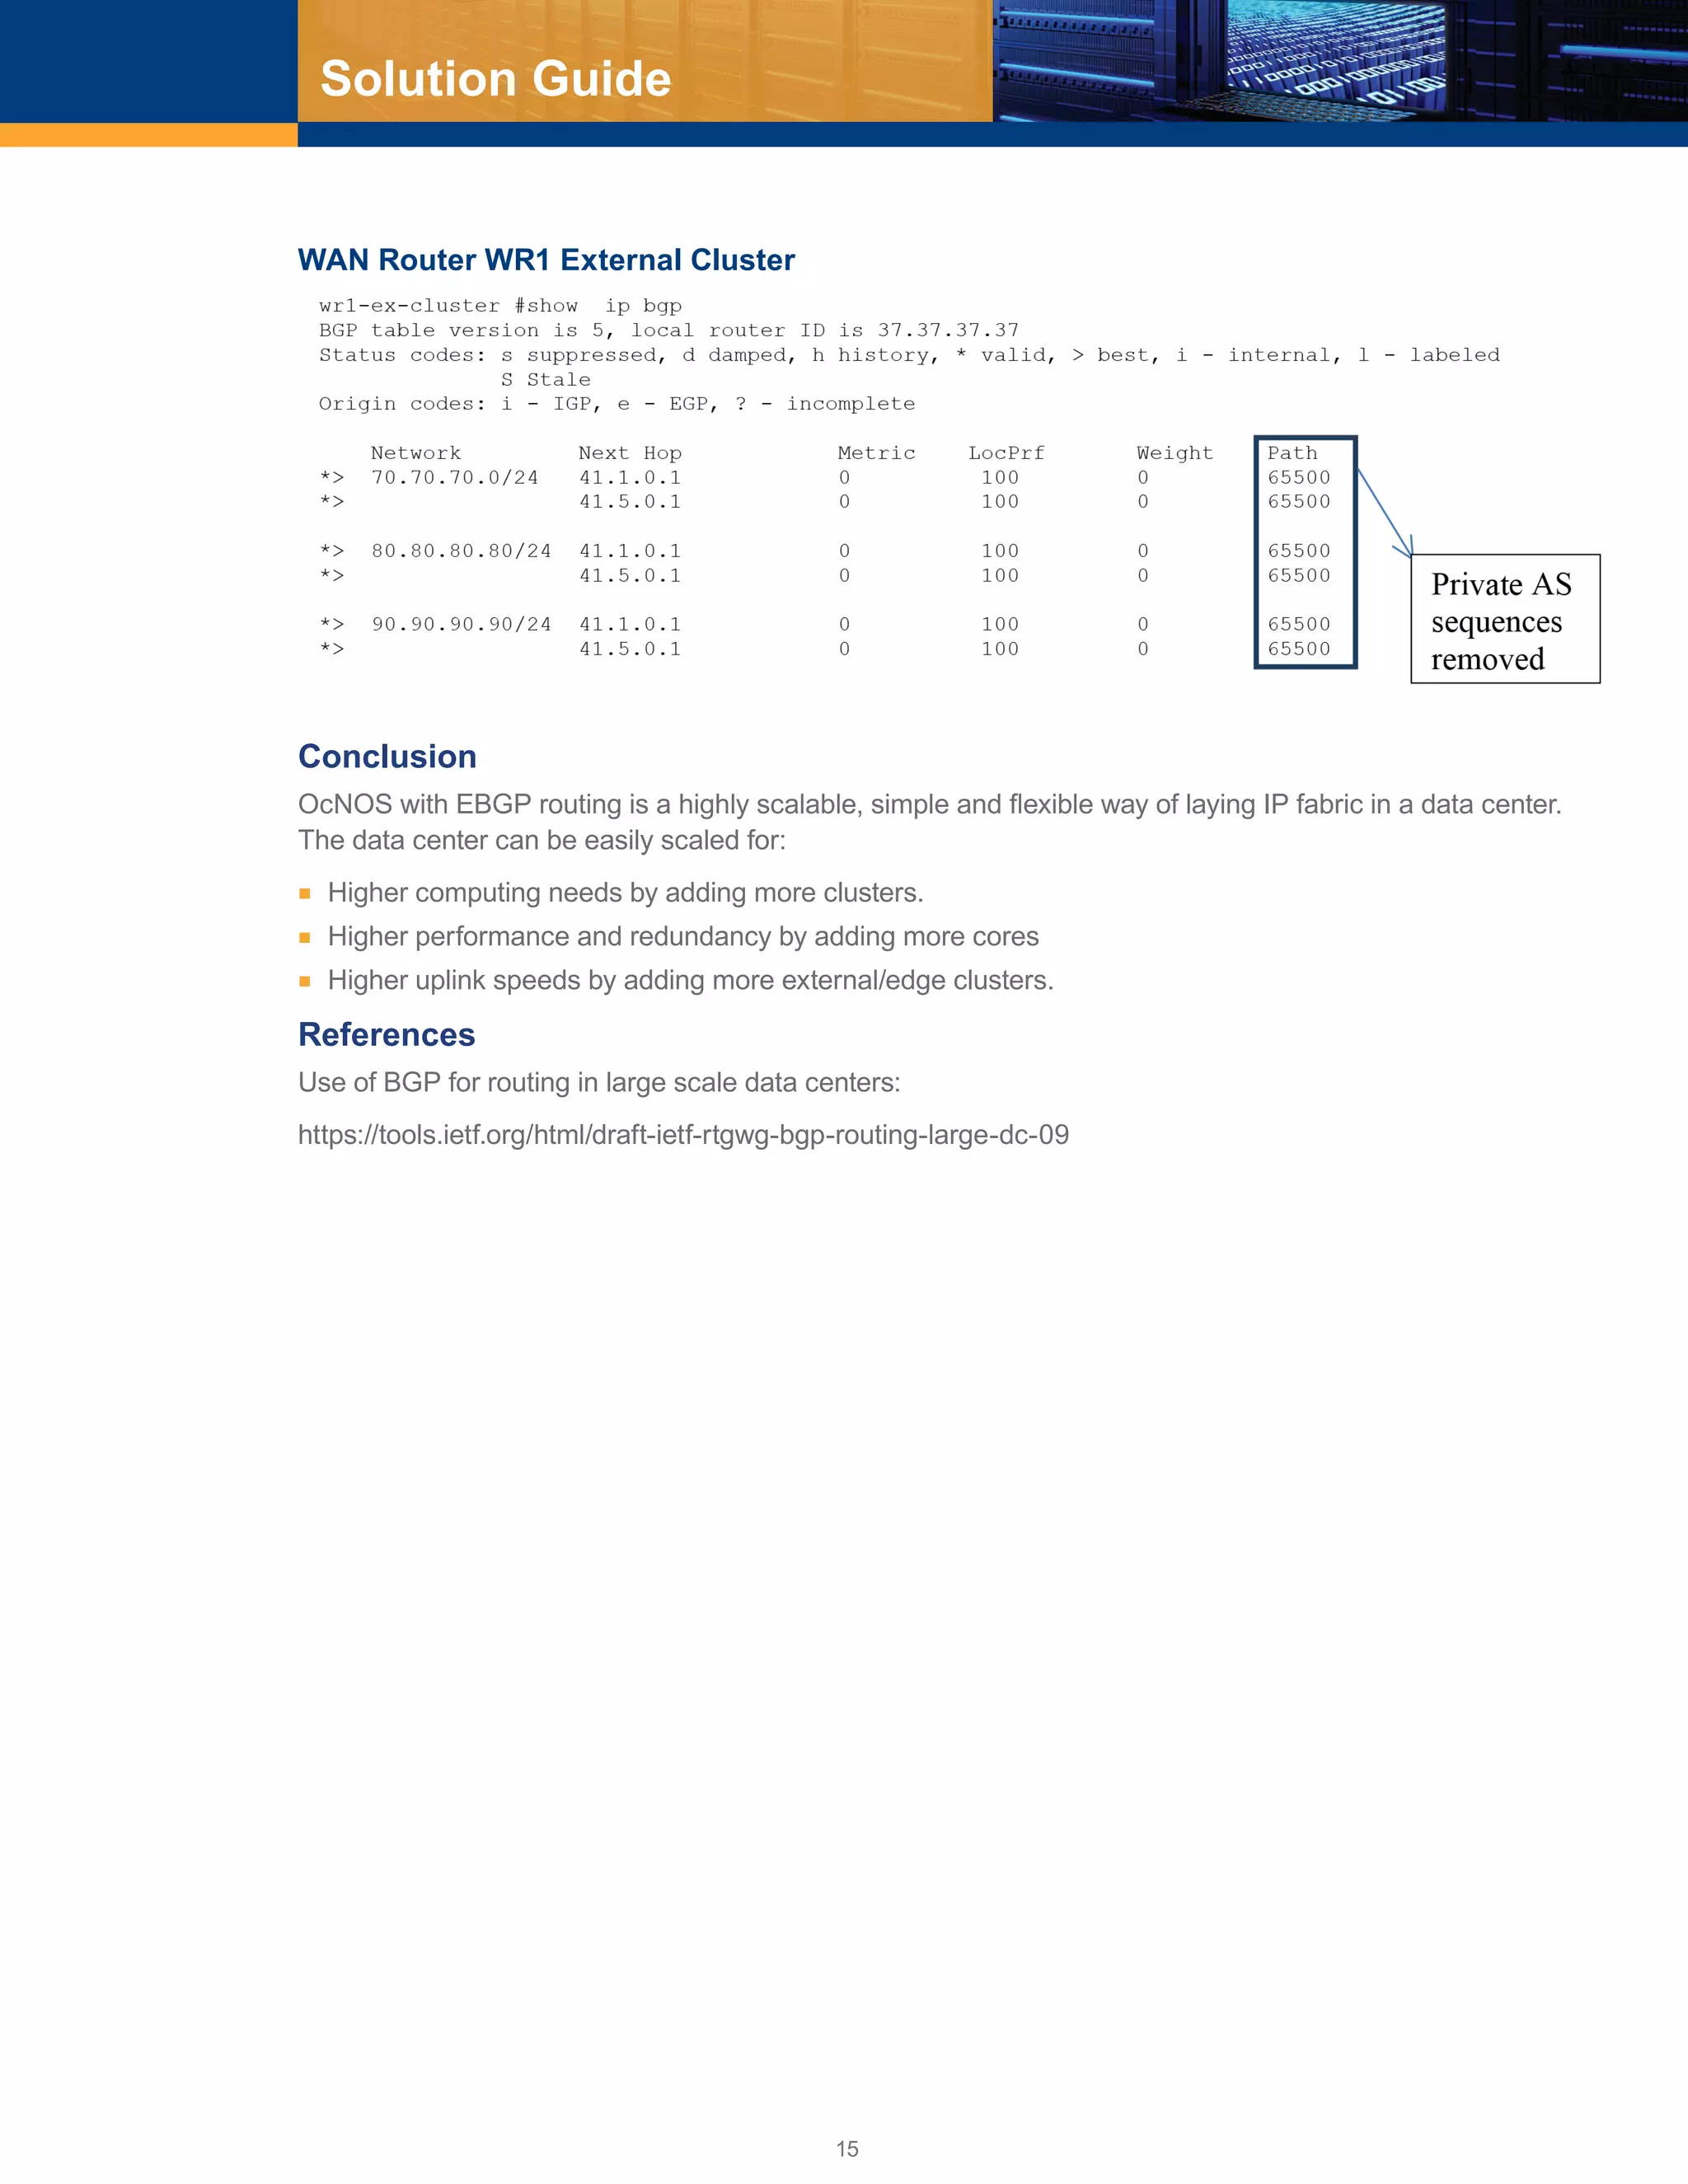
■■ For border routers, remove private ASNs before sending the information to WAN routers by configuring
border routers with the “remove-private-AS” BGP feature.
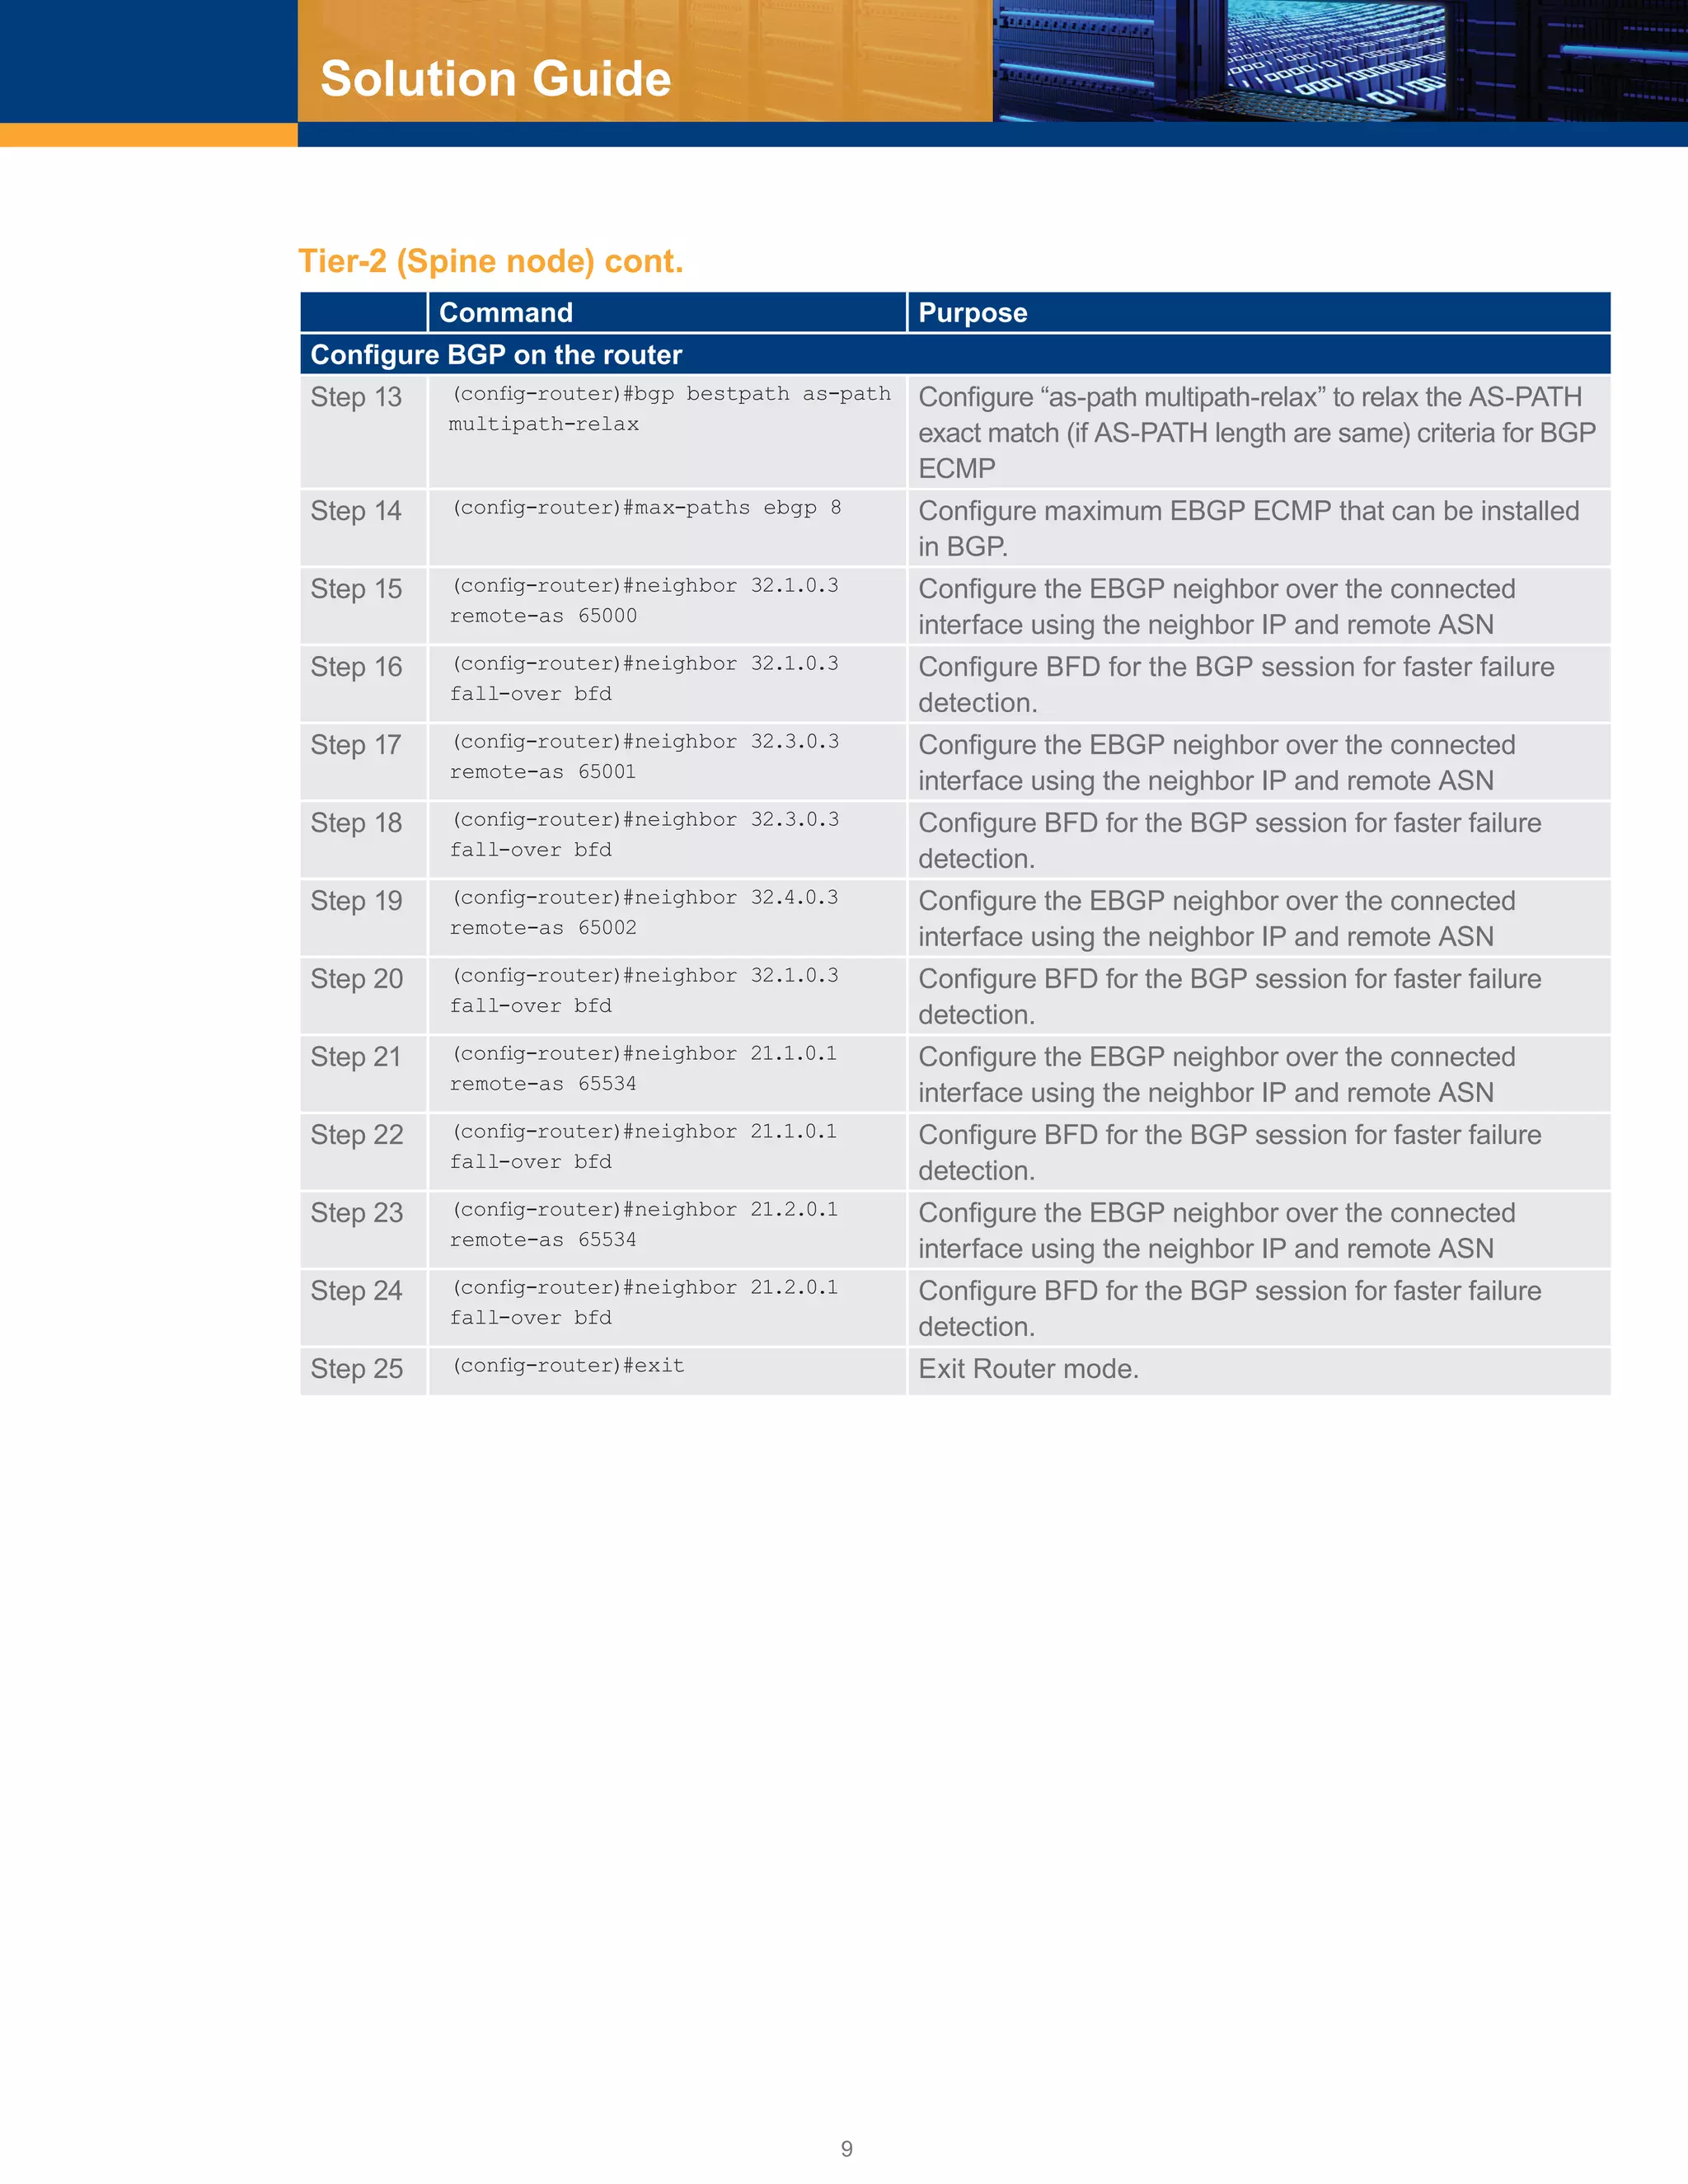
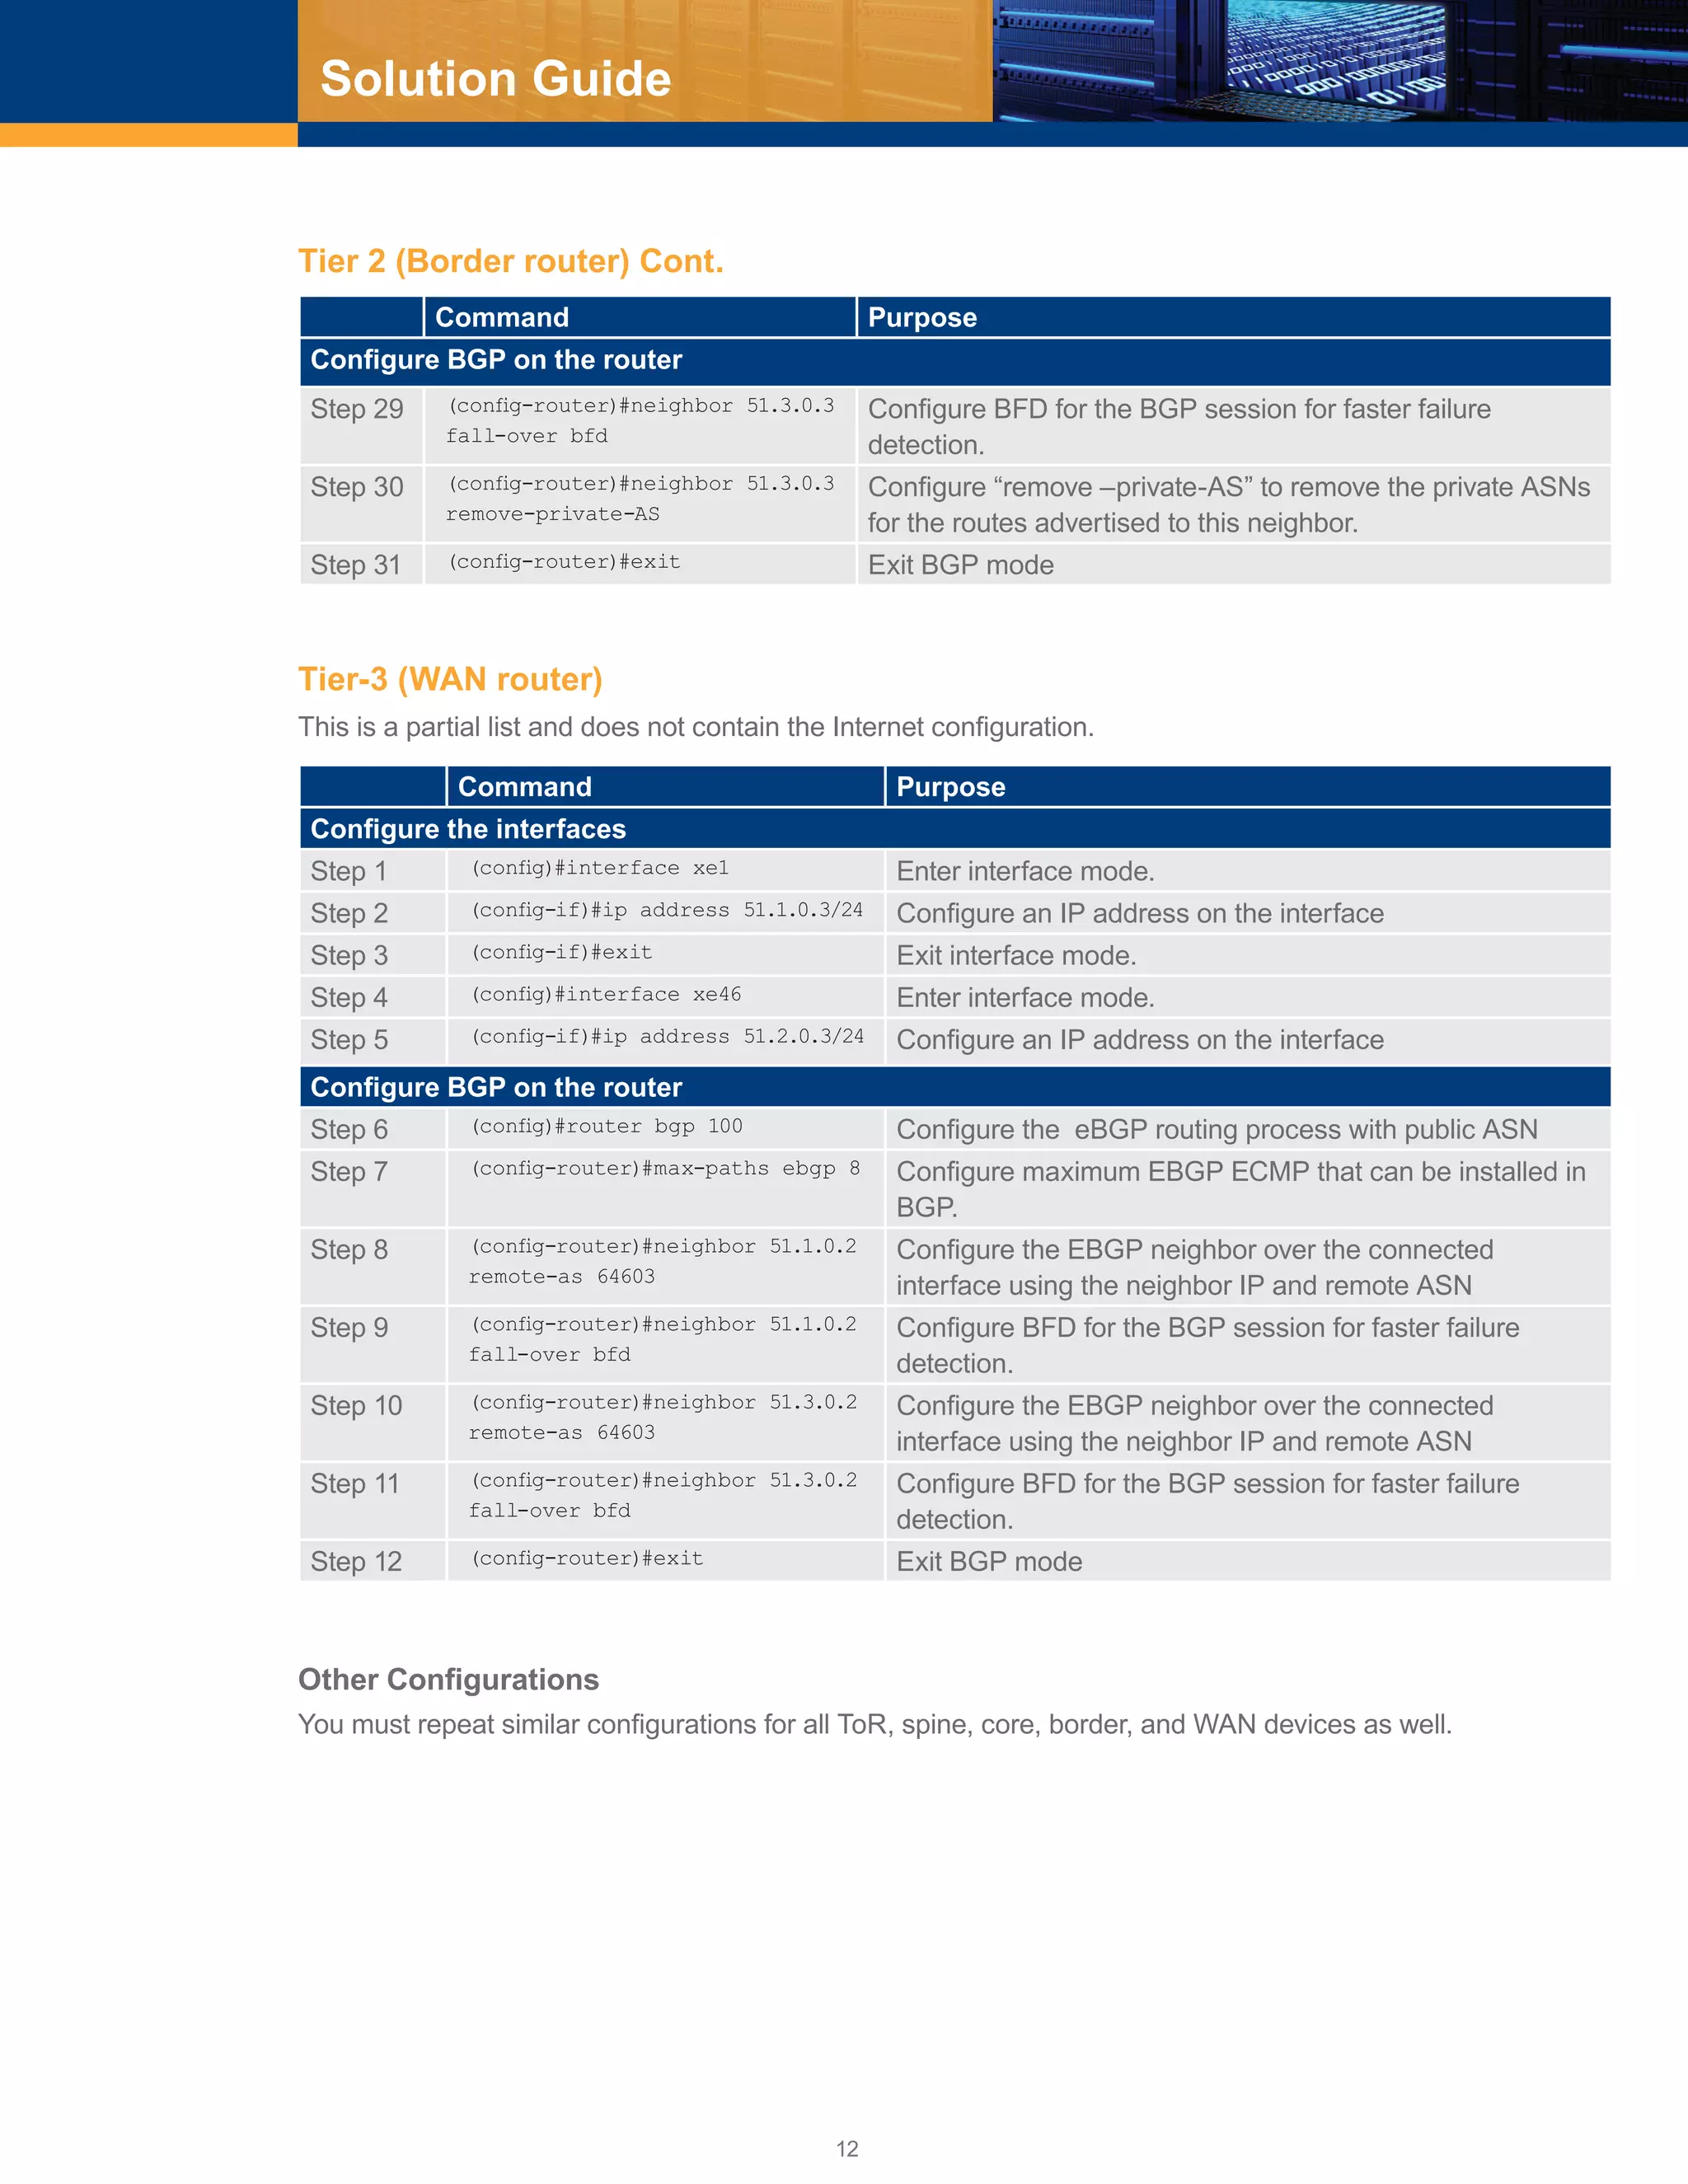
■■ To relax the BGP ECMP criteria for AS paths, configure BGP “as-path multipath-relax” on all routers/
switches. This way, an equal cost path with a different AS PATH, but the same AS PATH length is also
considered an equal cost path (ECMP).](https://image.slidesharecdn.com/ocnos1-181022181219/75/Large-Scale-Data-center-Solution-Guide-eBGP-based-design-5-2048.jpg)

![23
Solution Guide
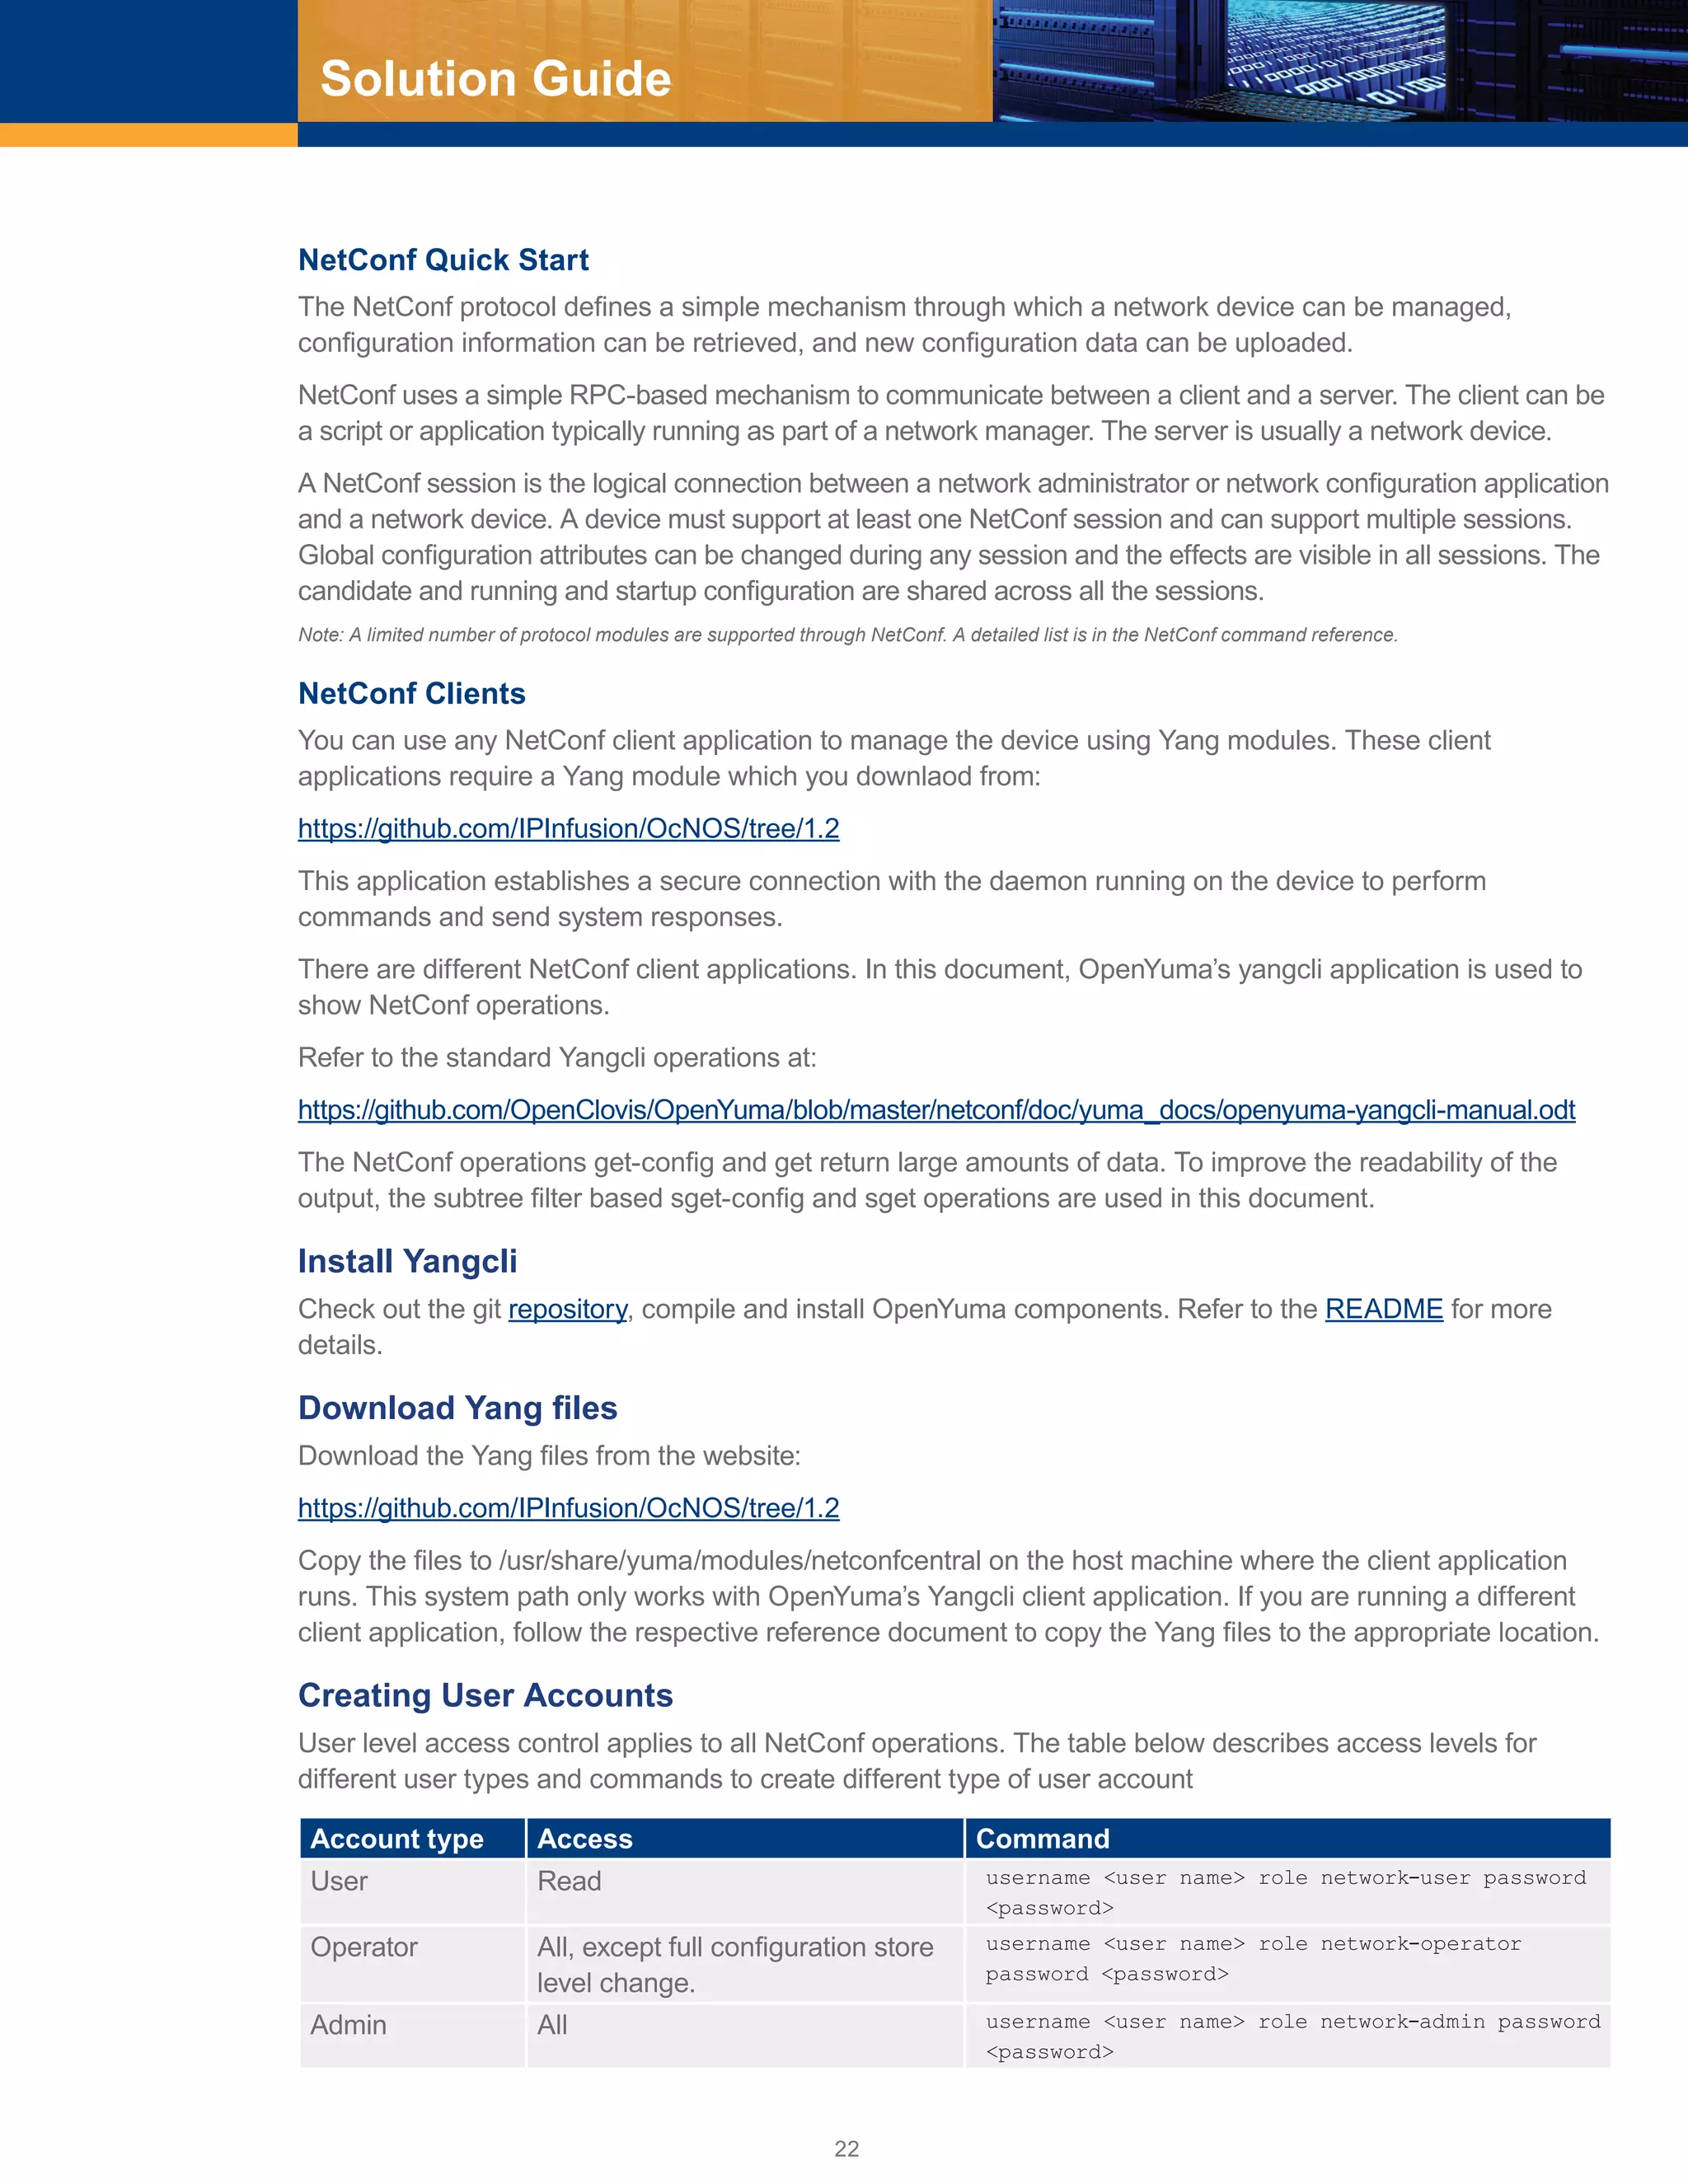
You must login into the device using network administrator account to create new user accounts. These are
the steps:
[root@localhost ~]# ssh ocnos@10.12.45.253
ocnos@10.12.45.253’s password:
Last login: Wed Jun 15 21:27:39 2016
OcNOS version 1.2.0.179-OCNOS-DC-IPBASE-ZEBM IPIRouter 06/14/16 21:30:36
OcNOS>en
OcNOS#configure terminal
Enter configuration commands, one per line. End with CNTL/Z.
OcNOS(config)#username netuser role network-user password Abc@6789
OcNOS(config)#username netoperator role network-operator password Abc@6789
OcNOS(config)#username netadmin role network-admin password Abc@6789
After creating the account, use the write command to write the configured data into persistent storage as
described in Copy Running Configuration to Startup
OcNOS(config)#write
Building configuration...
[OK]
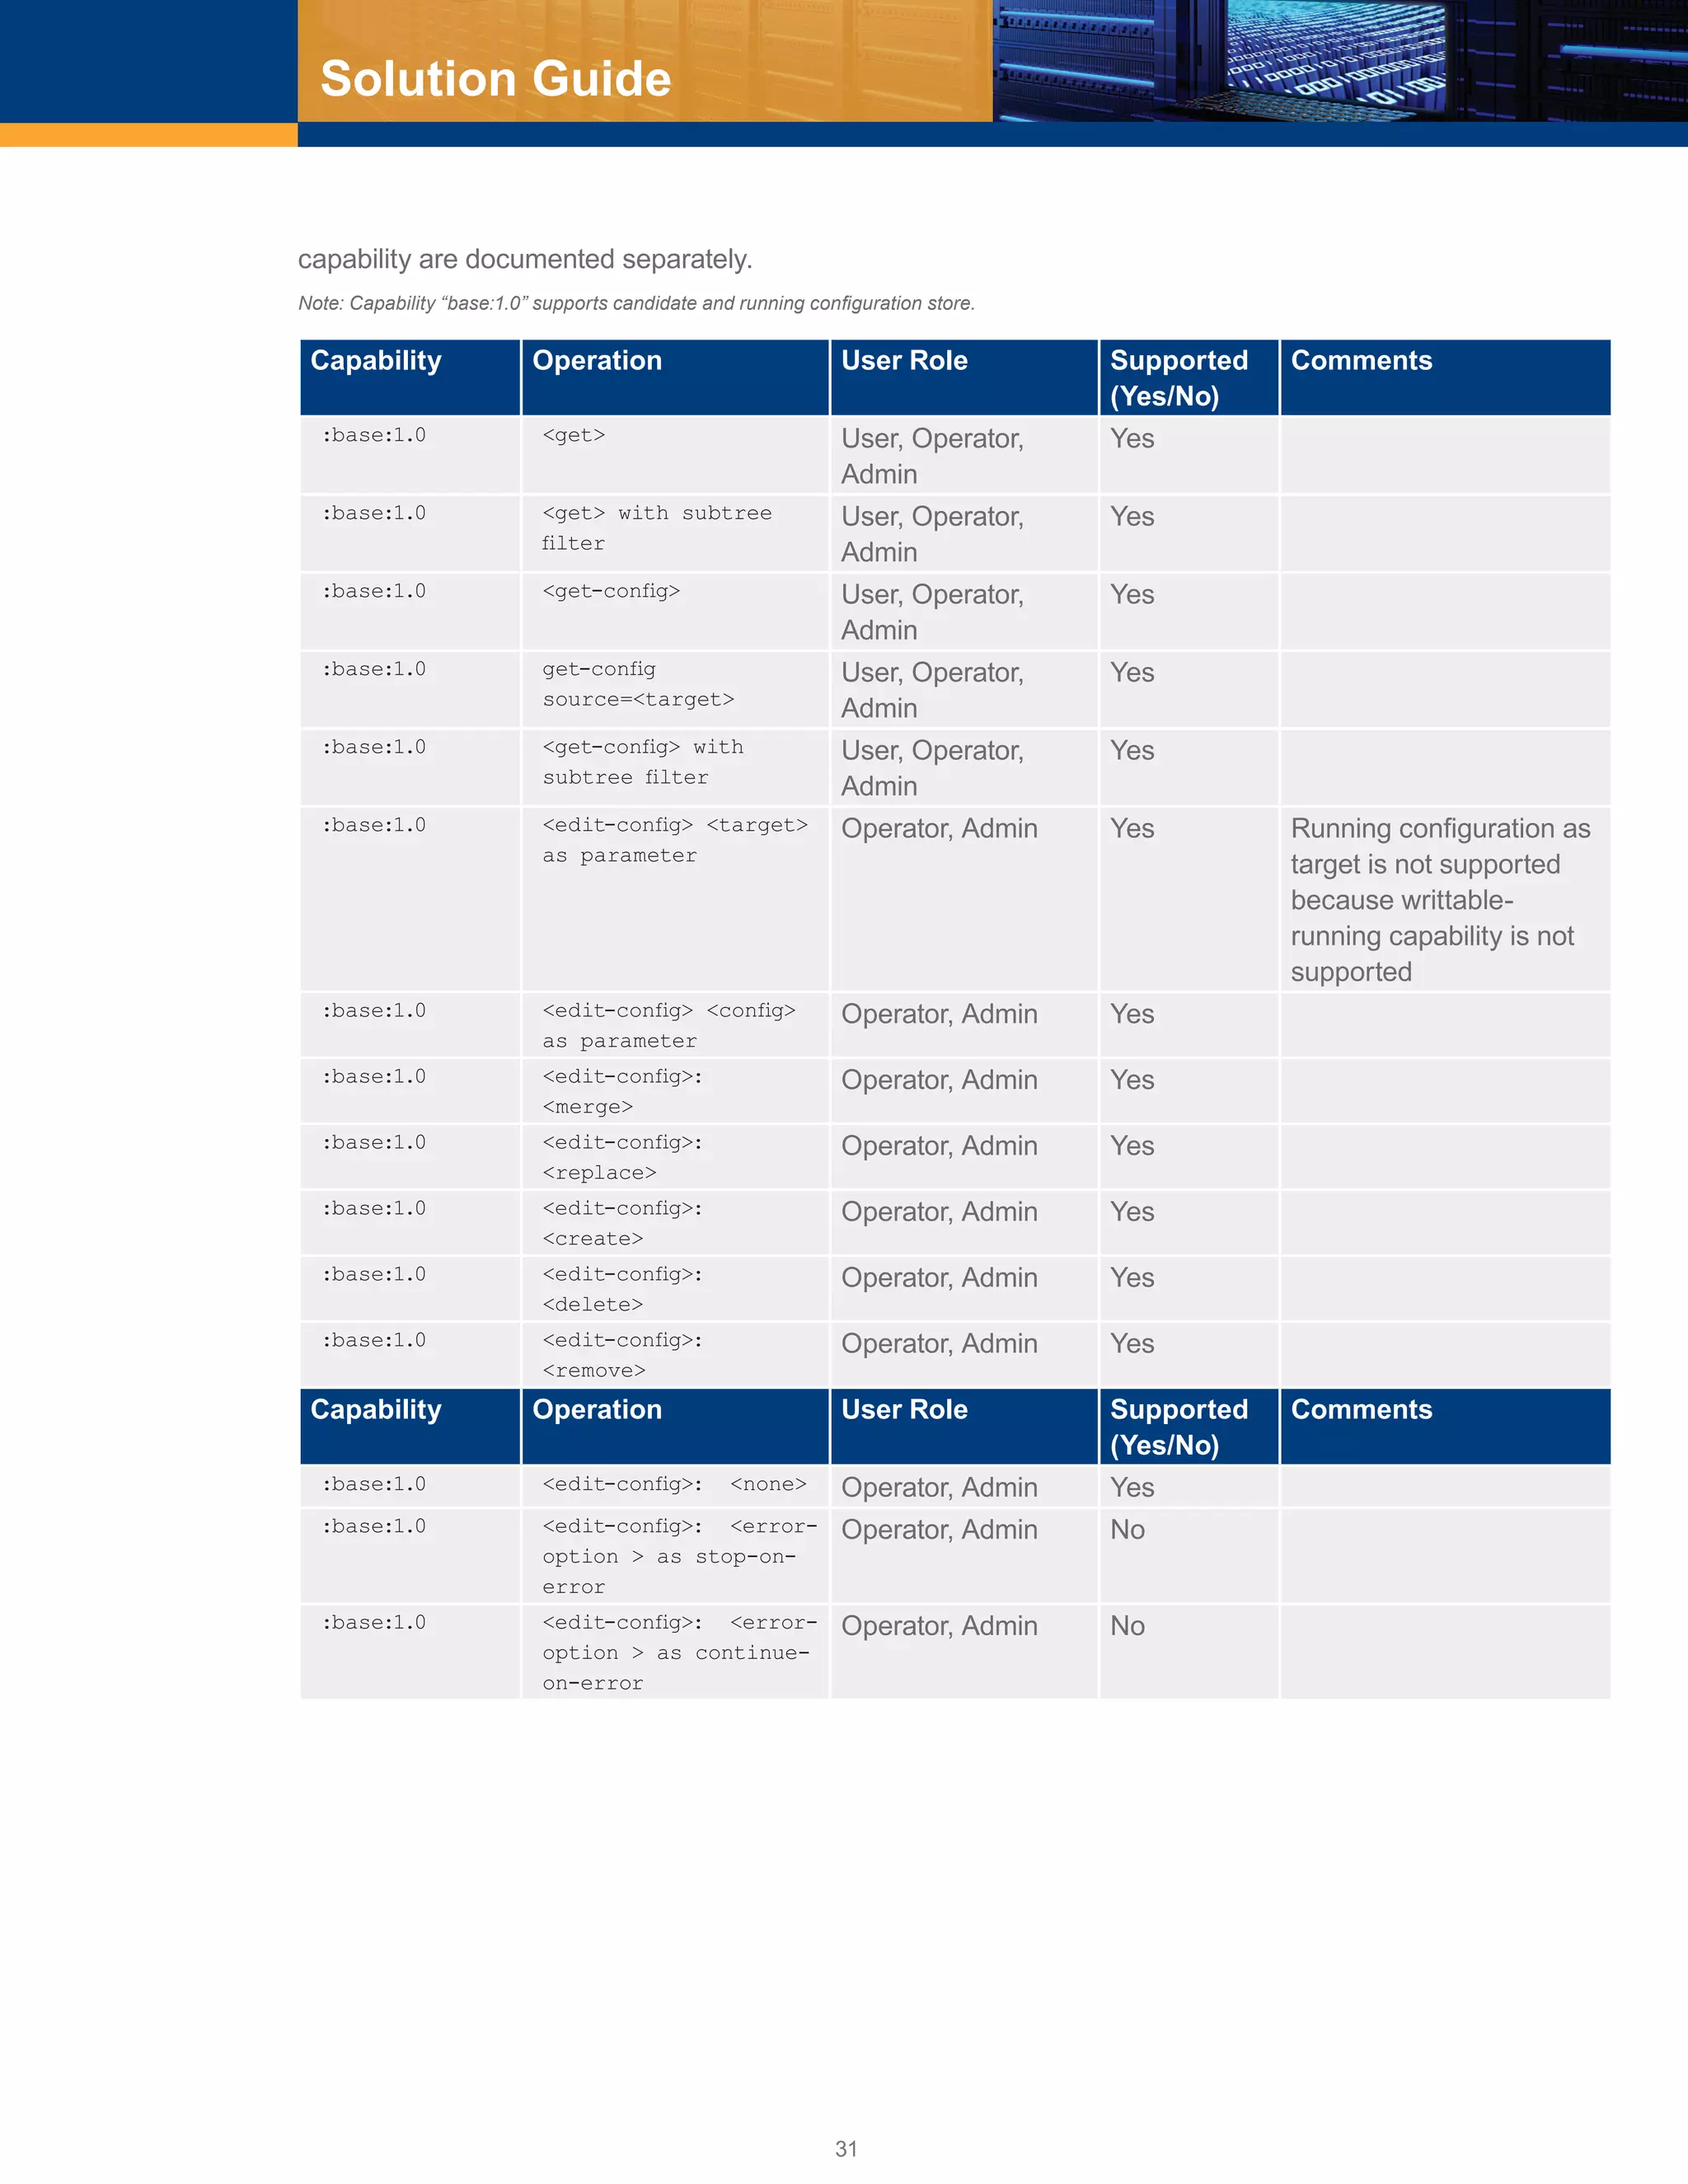
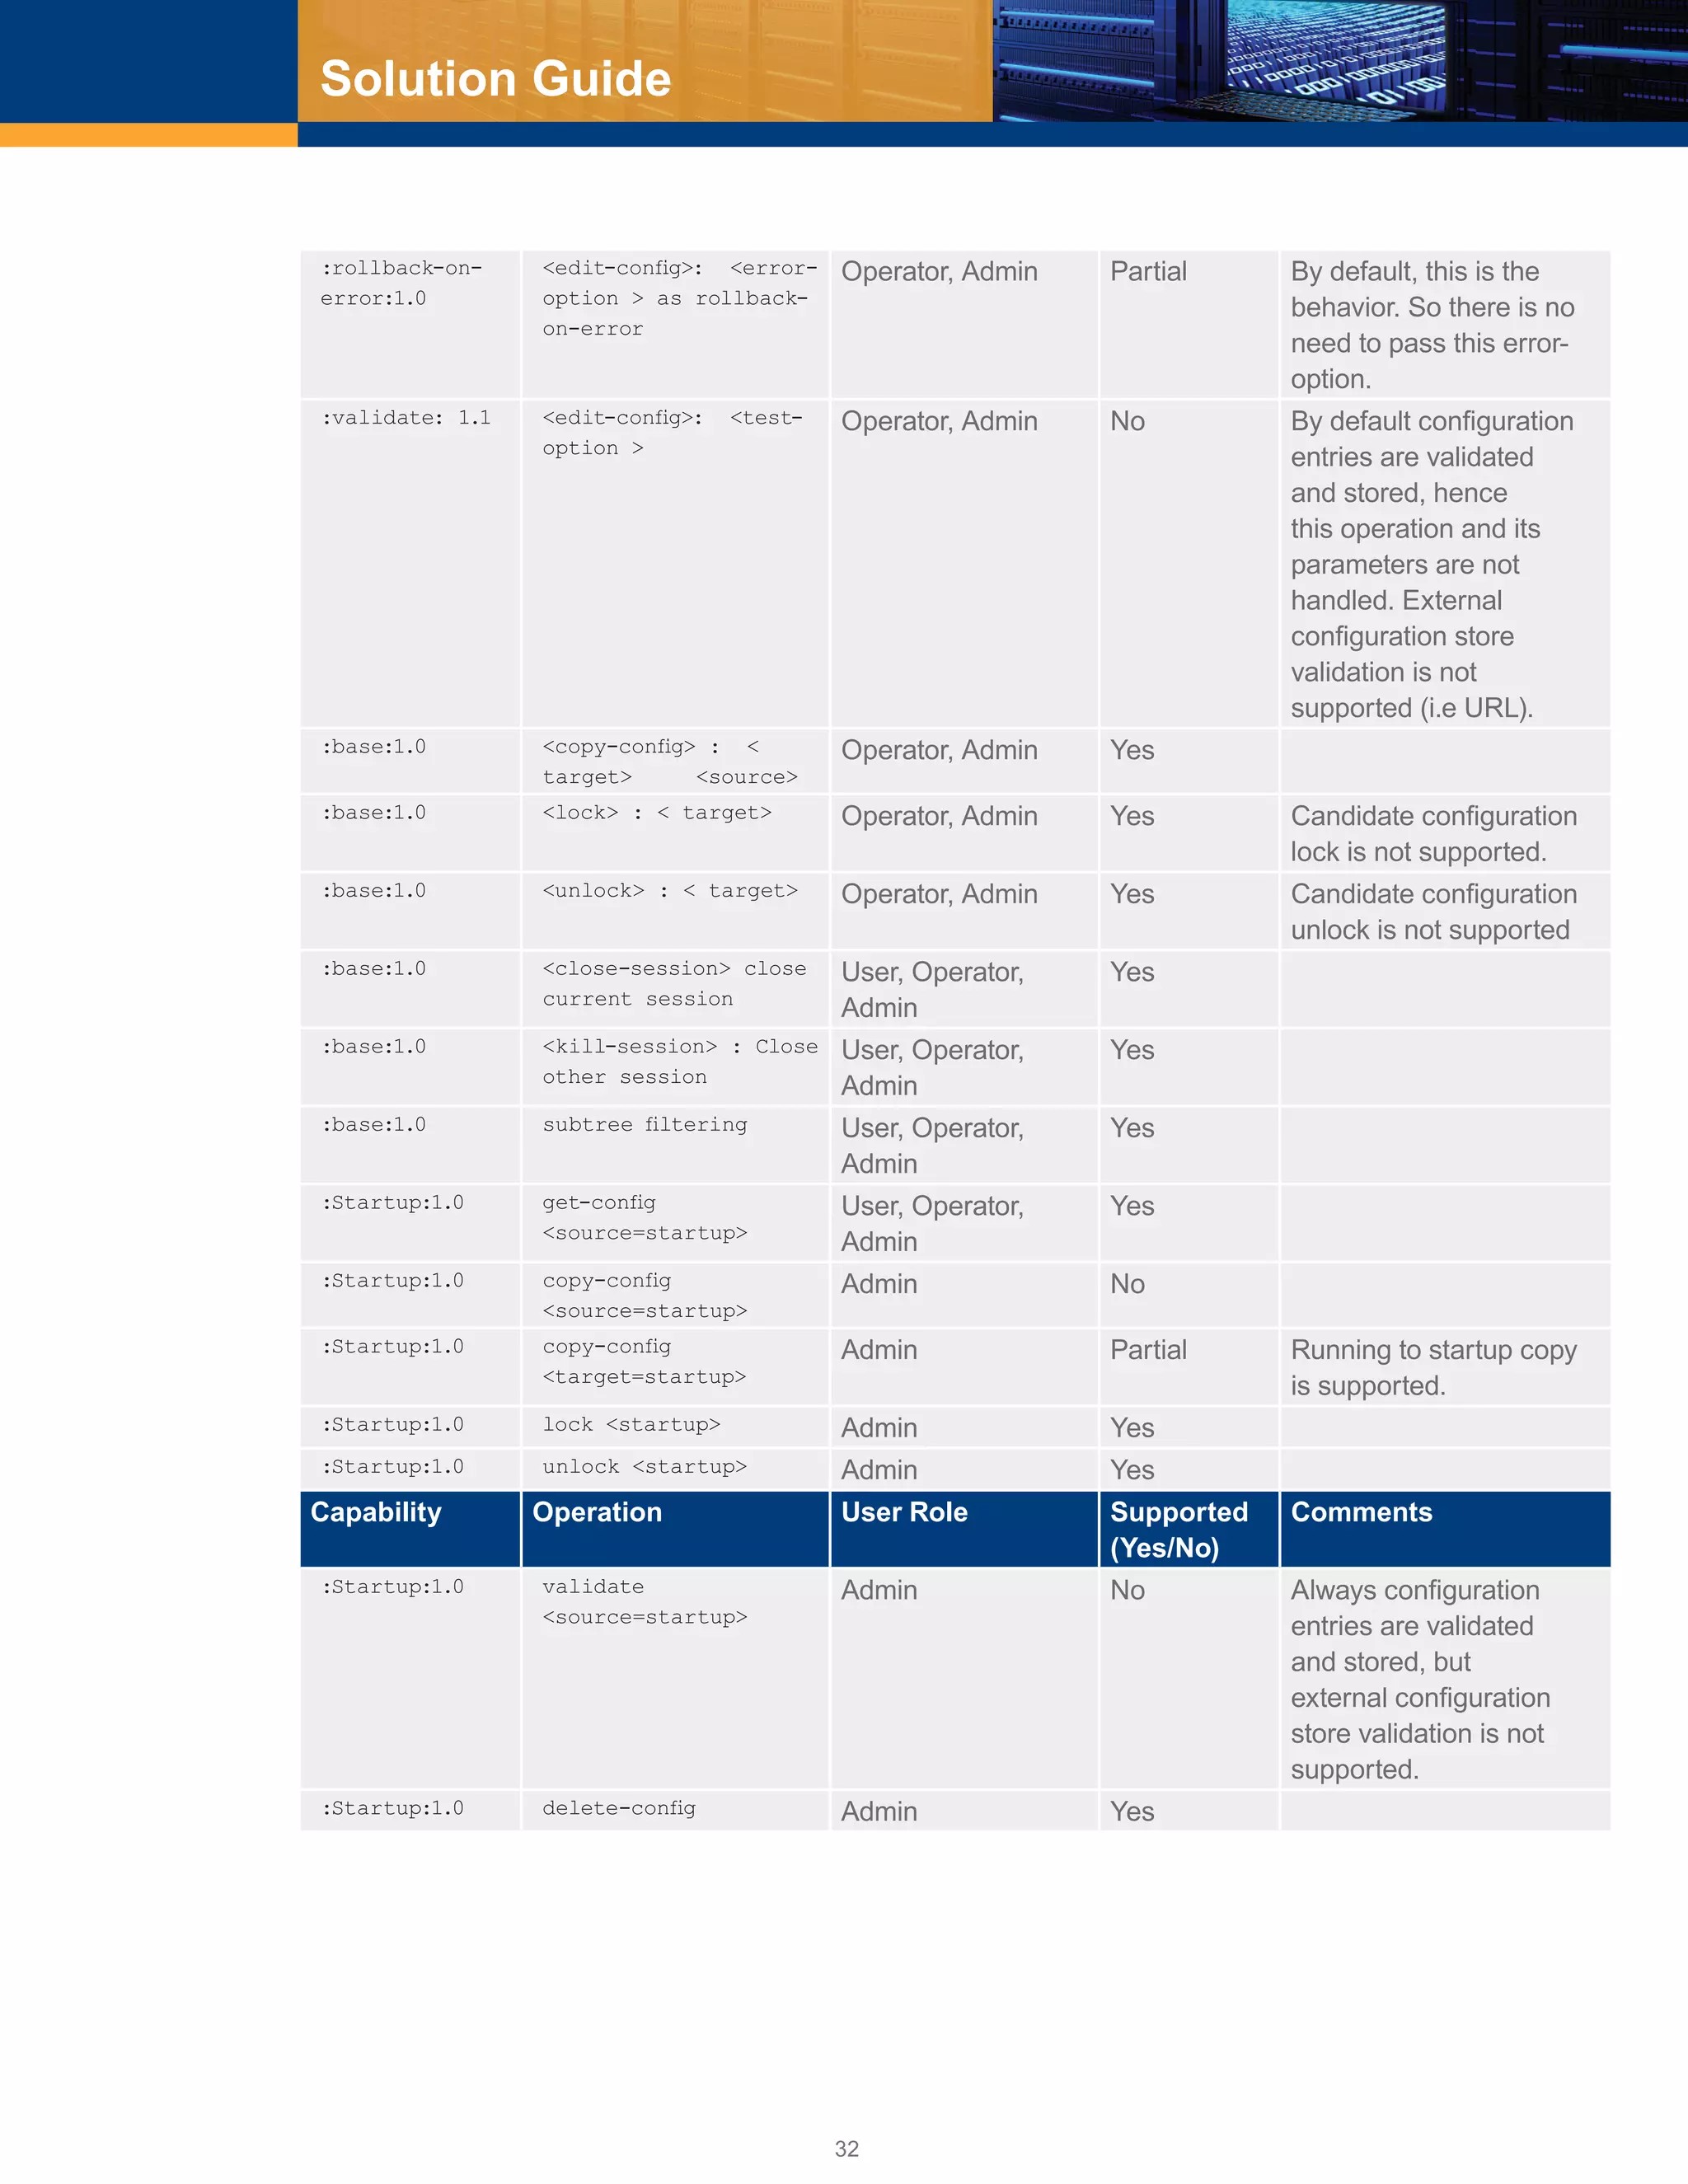
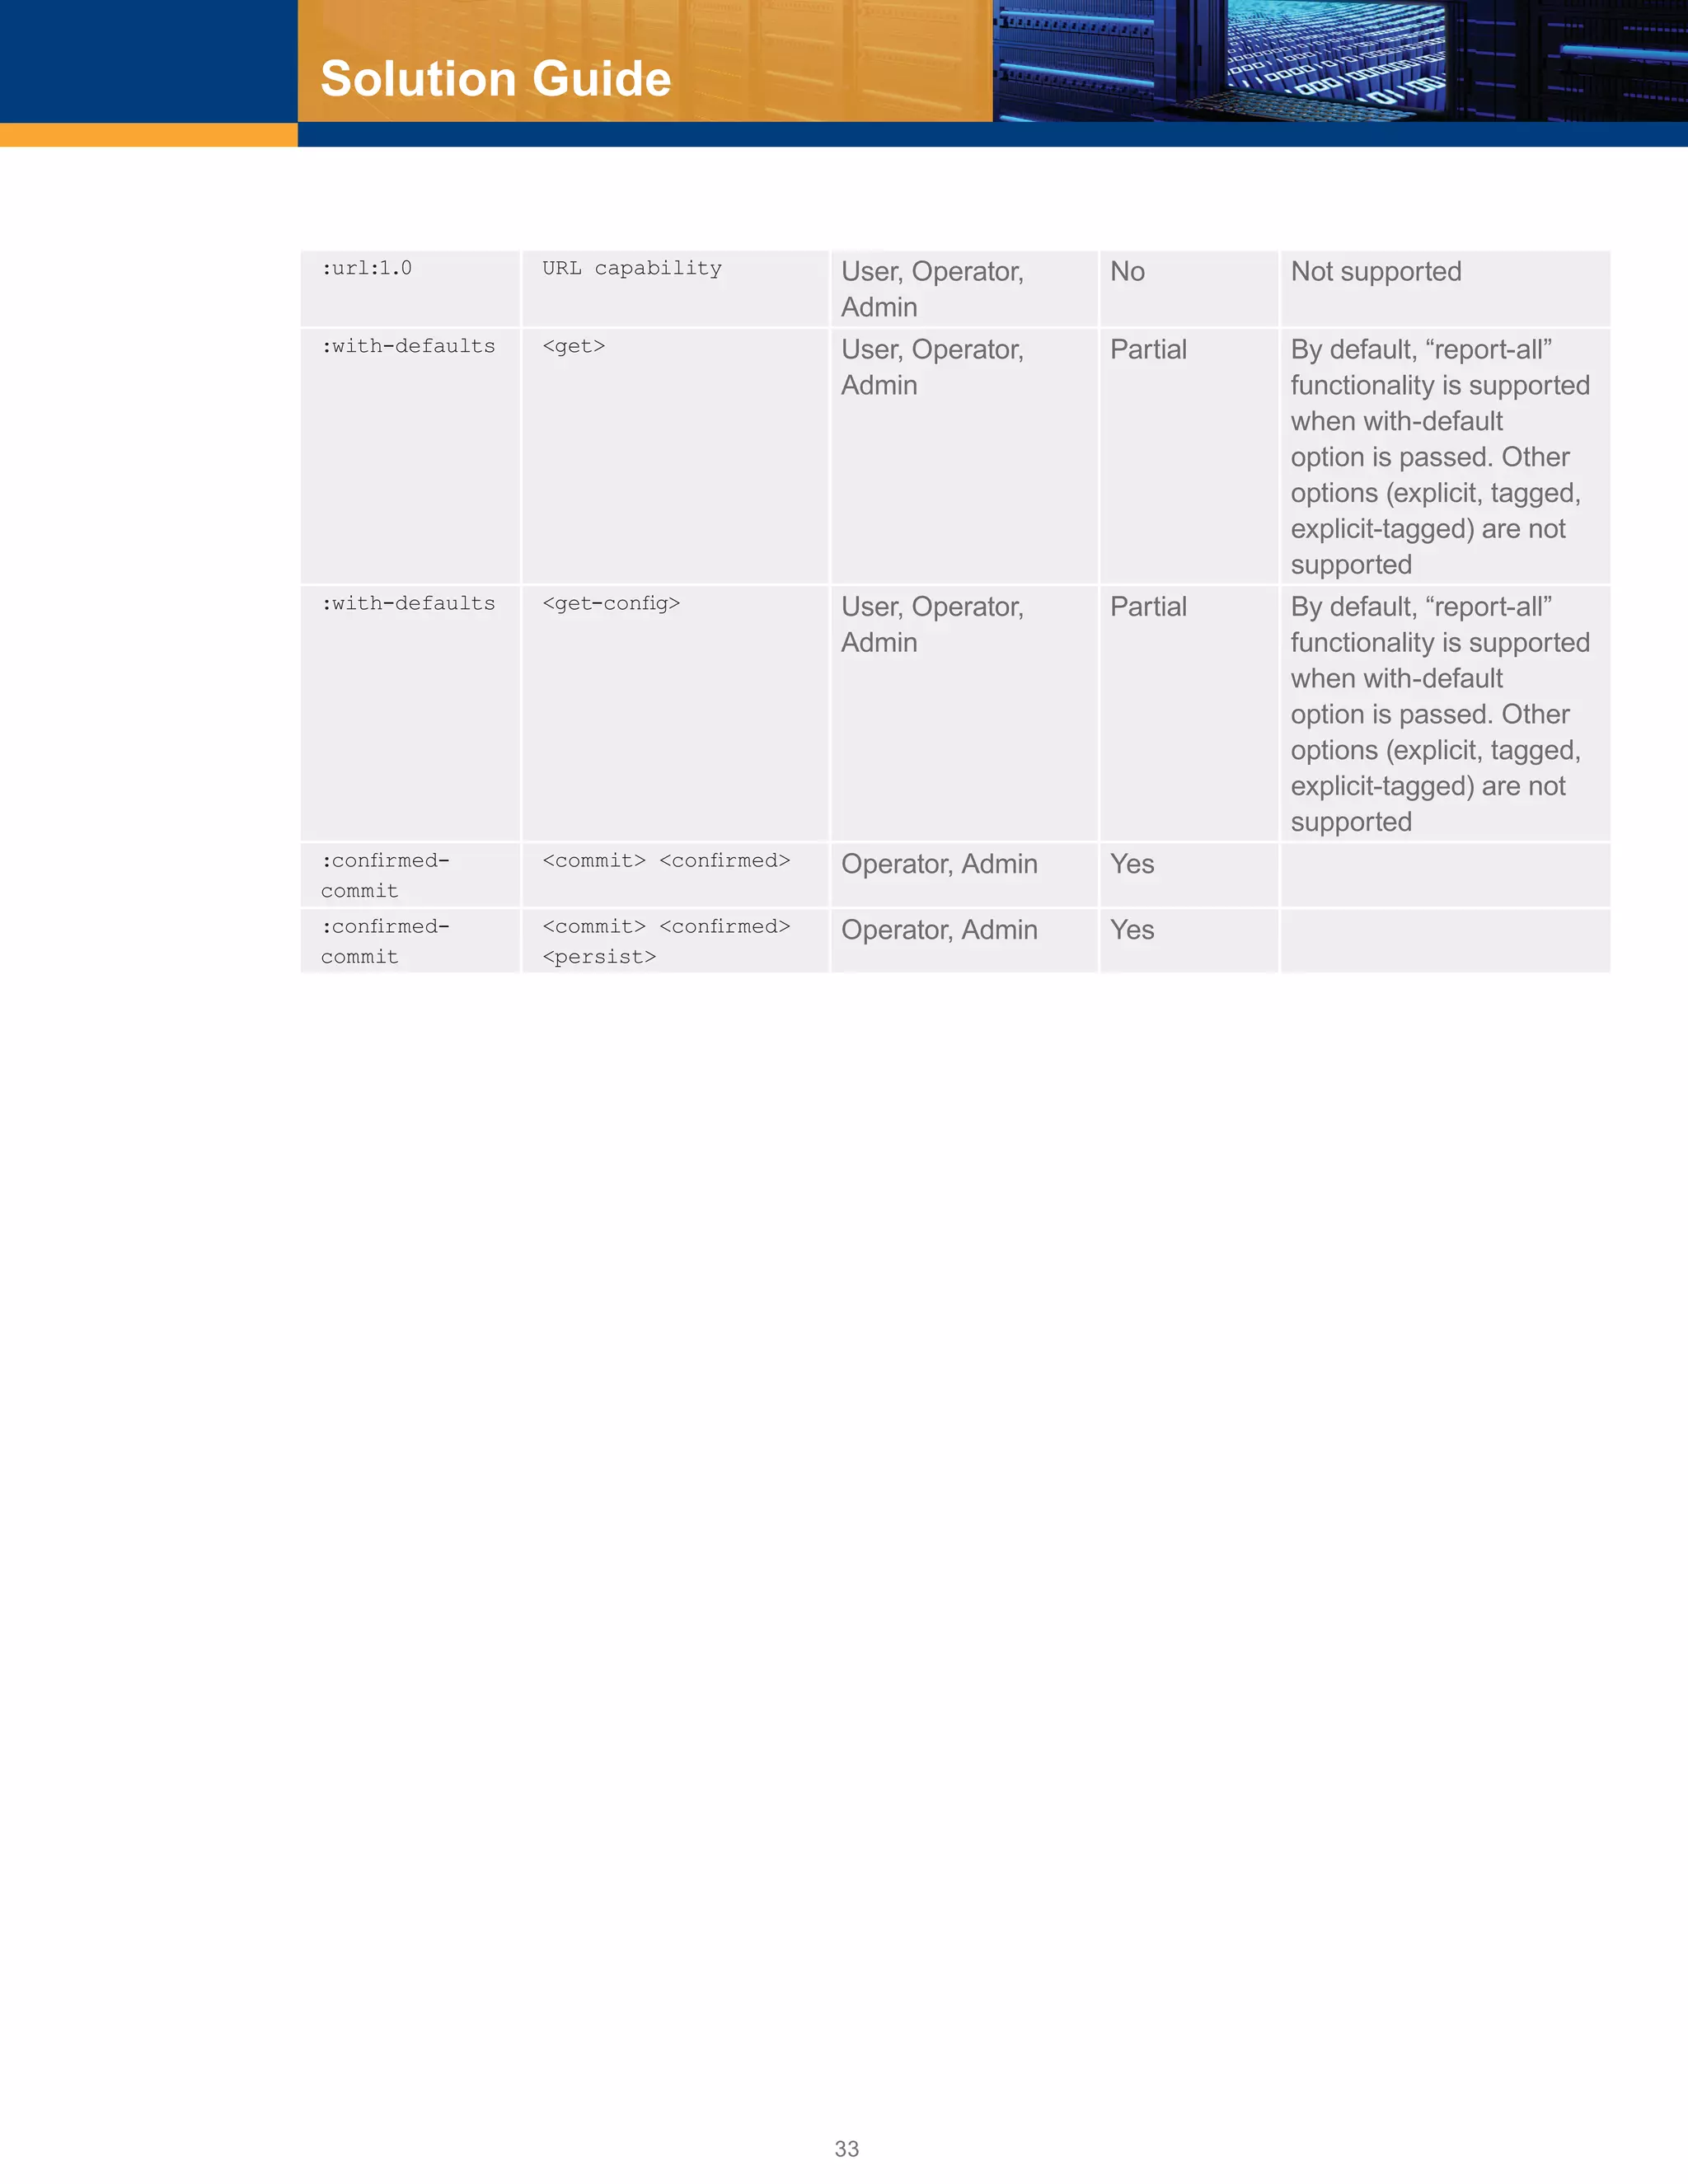
The NetConf operations for different user account types are shown in Supported Operations.
Yangcli Operations
Establish Connection
These are the steps to establish a connection between the NetConf client and the server that is running on
the device.
# yangcli server=<ip _ address> user=<user _ name> password=<password>
ip _ address: Address of the device to be managed
user _ name & password: User account detail for authentication
The interactive version of this command is shown below:
# yangcli
yangcli> connect
Enter string value for leaf <user>
yangcli:connect> <user _ name>
Enter string value for leaf <server>
yangcli:connect> <ip _ address>
Enter string value for leaf <password>
yangcli:connect> <password>
Load Modules
The load command loads a YANG module into the server. This command is not part of the RFC and is only
supported by the Yang client.
The ZebOS module is the parent for all protocol modules supported in OcNOS. This module includes all the
sub modules. Therefore, loading this module is mandatory to start managing the device. Here is the portion of
ZebOS.yang file that includes other sub modules.
module ZebOS {
namespace “http://www.ipinfusion.com/CMLSchema/ZebOS”;
prefix “ZebOS”;
include nsmLACP;
include oamBfd;](https://image.slidesharecdn.com/ocnos1-181022181219/75/Large-Scale-Data-center-Solution-Guide-eBGP-based-design-23-2048.jpg)


The document provides a solution guide for implementing an eBGP-based data center using the OcNOS framework, focusing on design philosophies, network topologies, and configuration guidelines. It outlines the requirements for large-scale data centers, highlighting the advantages of a Clos topology and Layer 3 routing for operational simplicity and network stability. Configuration details, including best practices for BGP setup and ASN allocation, are also included to aid in the efficient deployment of the data center architecture.


![Vibe Coding vs. Spec-Driven Development [Free Meetup]](https://cdn.slidesharecdn.com/ss_thumbnails/vibecodingvsspecdrivendevelopment-251209105622-43f455e7-thumbnail.jpg?width=640&height=640&fit=bounds)


