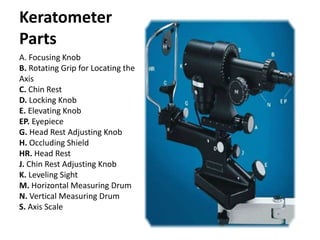
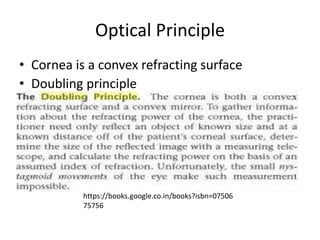
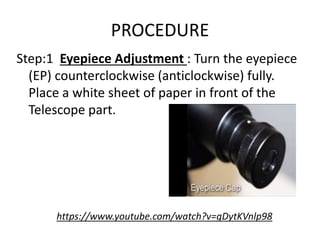
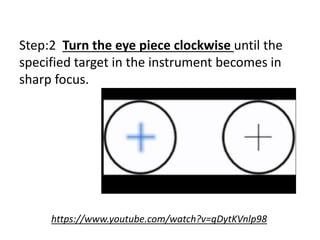
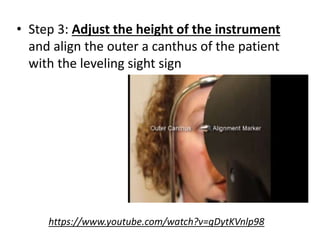
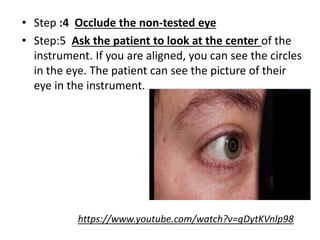
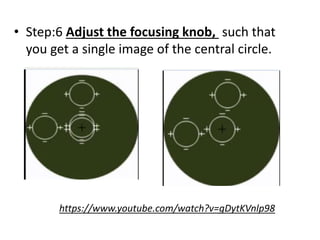
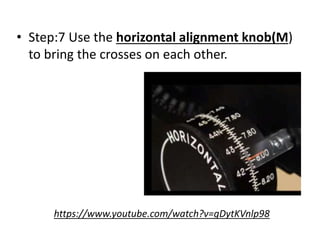
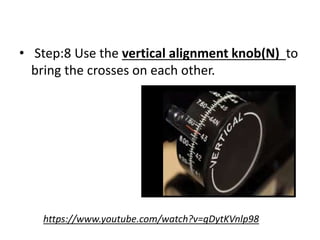
Keratometer
Presented by
Dhaneshwar pal
2017 Batch
B.Optometry 5th sem
Topics which include
Introduction
Instrument parts
Optics of the keratometer
Types of keratometer
Keratometry
Recordings
Introduction
• The radii of curvature of the cornea.
• The directions of the principal meridians of
the eye, determining whether the astigmatism
is with-the-rule or against-the-rule -- a key
factor in contact lens fitting.
• The degree of corneal astigmatism.
• The presence of any corneal distortion.
• Keratometry is essential in the fitting of
contact lenses.
• Evaluating the patients with keratoconus.
• The determination of appropriate intraocular
lens implant power for patients undergoing
cataract surgery.
Keratometer
Parts
A. Focusing Knob
B. Rotating Grip for Locating the
Axis
C. Chin Rest
D. Locking Knob
E. Elevating Knob
EP. Eyepiece
G. Head Rest Adjusting Knob
H. Occluding Shield
HR. Head Rest
J. Chin Rest Adjusting Knob
K. Leveling Sight
M. Horizontal Measuring Drum
N. Vertical Measuring Drum
S. Axis Scale
Optical Principle
• Cornea is a convex refracting surface
• Doubling principle
https://books.google.co.in/books?isbn=07506
75756
Optics
Primary Care Optometry-Grosvenor
page 224
Bausch & Lomb Keratometer
• One position keratometer: it measures two
meridians at the same time.
• It contains two prisms.
PROCEDURE
Step:1 Eyepiece Adjustment : Turn the eyepiece
(EP) counterclockwise (anticlockwise) fully.
Place a white sheet of paper in front of the
Telescope part.
https://www.youtube.com/watch?v=gDytKVnlp98
Step:2 Turn the eye piece clockwise until the
specified target in the instrument becomes in
sharp focus.
https://www.youtube.com/watch?v=gDytKVnlp98
• Step 3: Adjust the height of the instrument
and align the outer a canthus of the patient
with the leveling sight sign
https://www.youtube.com/watch?v=gDytKVnlp98
• Step :4 Occlude the non-tested eye
• Step:5 Ask the patient to look at the center of the
instrument. If you are aligned, you can see the circles
in the eye. The patient can see the picture of their
eye in the instrument.
https://www.youtube.com/watch?v=gDytKVnlp98
• Step:6 Adjust the focusing knob, such that
you get a single image of the central circle.
https://www.youtube.com/watch?v=gDytKVnlp98
• Step:7 Use the horizontal alignment knob(M)
to bring the crosses on each other.
https://www.youtube.com/watch?v=gDytKVnlp98
• Step:8 Use the vertical alignment knob(N) to
bring the crosses on each other.
https://www.youtube.com/watch?v=gDytKVnlp98
• step:9 Read the values from the scales.
https://www.youtube.com/watch?v=gDytKVnlp98
REFERENCES
• Theodore Grosvenor, Primary Care Optometry;
Fourth edition pg:315-317, DOI:
• Optivision 2020; Retrieved from
http://www.optivision2020.com/keratometer.html;
retrieved on 28th July’15
• Retrieved from
https://www.youtube.com/watch?v=gDytKVnlp98;
retrieved on 28th july’15
Keratometer

Keratometer

  • 1.
  • 2.
    Topics which include Introduction Instrumentparts Optics of the keratometer Types of keratometer Keratometry Recordings
  • 3.
    Introduction • The radiiof curvature of the cornea. • The directions of the principal meridians of the eye, determining whether the astigmatism is with-the-rule or against-the-rule -- a key factor in contact lens fitting. • The degree of corneal astigmatism. • The presence of any corneal distortion.
  • 4.
    • Keratometry isessential in the fitting of contact lenses. • Evaluating the patients with keratoconus. • The determination of appropriate intraocular lens implant power for patients undergoing cataract surgery.
  • 5.
    Keratometer Parts A. Focusing Knob B.Rotating Grip for Locating the Axis C. Chin Rest D. Locking Knob E. Elevating Knob EP. Eyepiece G. Head Rest Adjusting Knob H. Occluding Shield HR. Head Rest J. Chin Rest Adjusting Knob K. Leveling Sight M. Horizontal Measuring Drum N. Vertical Measuring Drum S. Axis Scale
  • 6.
    Optical Principle • Corneais a convex refracting surface • Doubling principle https://books.google.co.in/books?isbn=07506 75756
  • 7.
  • 8.
    Bausch & LombKeratometer • One position keratometer: it measures two meridians at the same time. • It contains two prisms.
  • 9.
    PROCEDURE Step:1 Eyepiece Adjustment: Turn the eyepiece (EP) counterclockwise (anticlockwise) fully. Place a white sheet of paper in front of the Telescope part. https://www.youtube.com/watch?v=gDytKVnlp98
  • 10.
    Step:2 Turn theeye piece clockwise until the specified target in the instrument becomes in sharp focus. https://www.youtube.com/watch?v=gDytKVnlp98
  • 11.
    • Step 3:Adjust the height of the instrument and align the outer a canthus of the patient with the leveling sight sign https://www.youtube.com/watch?v=gDytKVnlp98
  • 12.
    • Step :4Occlude the non-tested eye • Step:5 Ask the patient to look at the center of the instrument. If you are aligned, you can see the circles in the eye. The patient can see the picture of their eye in the instrument. https://www.youtube.com/watch?v=gDytKVnlp98
  • 13.
    • Step:6 Adjustthe focusing knob, such that you get a single image of the central circle. https://www.youtube.com/watch?v=gDytKVnlp98
  • 14.
    • Step:7 Usethe horizontal alignment knob(M) to bring the crosses on each other. https://www.youtube.com/watch?v=gDytKVnlp98
  • 15.
    • Step:8 Usethe vertical alignment knob(N) to bring the crosses on each other. https://www.youtube.com/watch?v=gDytKVnlp98
  • 16.
    • step:9 Readthe values from the scales. https://www.youtube.com/watch?v=gDytKVnlp98
  • 17.
    REFERENCES • Theodore Grosvenor,Primary Care Optometry; Fourth edition pg:315-317, DOI: • Optivision 2020; Retrieved from http://www.optivision2020.com/keratometer.html; retrieved on 28th July’15 • Retrieved from https://www.youtube.com/watch?v=gDytKVnlp98; retrieved on 28th july’15