The document discusses setting up and using Keras and TensorFlow libraries for machine learning. It provides instructions on installing the libraries, preparing data, defining a model with sequential layers, compiling the model to configure the learning process, training the model on data, and evaluating the trained model on test data. A sample program is included that uses a fashion MNIST dataset to classify images into 10 categories using a simple sequential model.


![1) # Import libraries
from tensorflow.keras.models import Sequential
from tensorflow.keras.layers import Dense
import tensorflow as tf
import numpy as np
2) # Prepare dataset
X_train, Y_train = (data,lables) # Training Data
X_val, Y_val = (data,lables) # Validation Data
X_test, Y_test = (data,lables) # Testing Data
3) # Create model
model = Sequential()
model.add(Dense(12, input_shape=(8,),
init='uniform', activation='relu'))
model.add(Dense(8, init='uniform',
activation='relu'))
model.add(Dense(1, init='uniform',
activation='sigmoid'))
Stages in writing program in Keras
4) # Compile model
model.compile( loss='categorical_crossentropy',
optimizer='adam',
metrics=['accuracy']
loss_weight=0.1
)
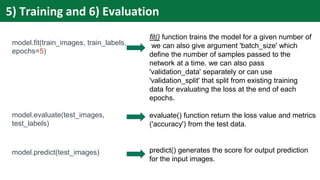
5) # Training on the given dataset
model.fit(X_train, Y_train,
batch_size = batch_size,
epochs = nb_epoch,
verbose = 1,
validation_data = (X_val, Y_val))
6) # Evaluate model
score = model.evaluate(X_test, Y_test,verbose=0)](https://image.slidesharecdn.com/py05-220506073414-59aa39a6/85/Keras-and-TensorFlow-4-320.jpg)
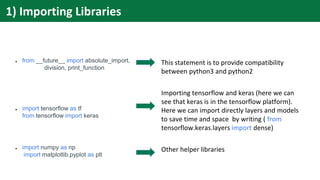
![from __future__ import absolute_import, division, print_function
import tensorflow as tf
from tensorflow import keras
import numpy as np
import matplotlib.pyplot as plt
fashion_mnist = keras.datasets.fashion_mnist
(train_images, train_labels), (test_images, test_labels) = fashion_mnist.load_data()
class_names = ['T-shirt/top', 'Trouser', 'Pullover', 'Dress', 'Coat', 'Sandal', 'Shirt', 'Sneaker', 'Bag', 'Ankle boot']
train_images = train_images / 255.0
test_images = test_images / 255.0
model = keras.Sequential([
keras.layers.Flatten(input_shape=(28, 28)),
keras.layers.Dense(128, activation=tf.nn.relu),
keras.layers.Dense(10, activation=tf.nn.softmax)
])
model.compile(optimizer='adam',
loss='sparse_categorical_crossentropy',
metrics=['accuracy'])
model.fit(train_images, train_labels, epochs=5)
test_loss, test_acc = model.evaluate(test_images, test_labels)
print('Test accuracy:', test_acc)
predictions = model.predict(test_images)
*Taken from tensor flow tutorials
(https://www.tensorflow.org/tutorials/keras/basic_classification)
Sample Program *](https://image.slidesharecdn.com/py05-220506073414-59aa39a6/85/Keras-and-TensorFlow-5-320.jpg)
![● fashion_mnist = keras.datasets.fashion_mnist
● (train_images, train_labels), (test_images, test_labels) =
fashion_mnist.load_data()
train_images = train_images / 255.0
test_images = test_images / 255.0
● class_names = ['T-shirt/top', 'Trouser', 'Pullover', 'Dress', 'Coat',
'Sandal', 'Shirt', 'Sneaker', 'Bag', 'Ankle boot']
Loading the dataset from tensor flow directly. We can
also use our custom made dataset (in any format like
.csv, .json etc.)
loading data into two group train and test sets. We can
also divide the dataset in three part- train, validation and
test. Then validation set will be used to fine-tune the
model. We can also normalize the input data such as
image pixel values that ranges from 0-255 (8bit image)
and convert it to 0-1. This does help in faster training and
also in many cases increase the accuracy but precaution
must be taken about the loss of information.
this step is just giving name to the class labels (0-9). As
MNIST dataset is having these ten classes in its dataset.
So class label '1' will become Trouser and '4' will be coat.
This will help in better representation while plotting the
images.
2) Preparing Dataset](https://image.slidesharecdn.com/py05-220506073414-59aa39a6/85/Keras-and-TensorFlow-8-320.jpg)
![1. model = keras.Sequential([
keras.layers.Flatten(input_shape=(28, 28)),
keras.layers.Dense(128, activation=tf.nn.relu),
keras.layers.Dense(10, activation=tf.nn.softmax)
])
or
2. model = keras.Sequential()
model.add(keras.layers.Flatten(input_shape=(28, 28)))
model.add(keras.layers.Dense(128, activation=tf.nn.relu))
model.add(keras.layers.Dense(10, activation=tf.nn.softmax))
In this segment we are building the network. Here we
are using Sequential class to define our model there
also exist another way called Functional API (it provides
more flexibility unlikely the linear stack of sequential
method as shown in the code 2.)
In given code keras.layers.Flatten layer convert 2-
dimensional array data to 1-dimensional data. the first
argument in other functions, tells us about the output
size. So except first layer no other layer has argument as
input size.
keras.layers.Dense creates the hidden layer.
Choice of Activation function depends upon the
objective and dataset.
3) Creating/ Defining Model](https://image.slidesharecdn.com/py05-220506073414-59aa39a6/85/Keras-and-TensorFlow-9-320.jpg)
![model.compile(optimizer='adam',
loss='sparse_categorical_crossentropy',
metrics=['accuracy'])
Before training we need to configure the learning
process which have mainly three argument as input-
1. An Optimizer: an optimization algorithm that
will help to minimize an objective function/
loss function/ error function to improve the
performance or for better learning.
2. A Loss function: This is the objective that the
model will try to minimize.
3. A list of metrics: A metric is a function that is
used to judge the performance of your
model.
4) Configuring the Learning Process (Compiling the
Model)](https://image.slidesharecdn.com/py05-220506073414-59aa39a6/85/Keras-and-TensorFlow-10-320.jpg)