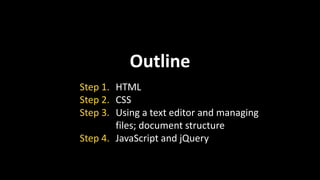
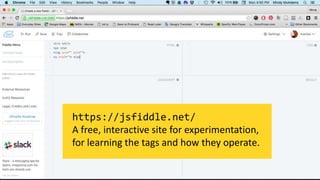
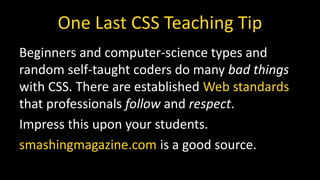
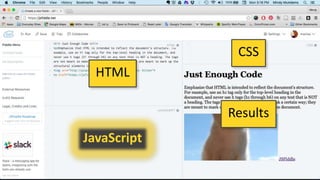
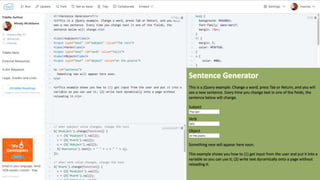
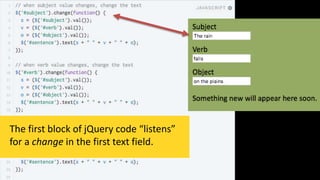
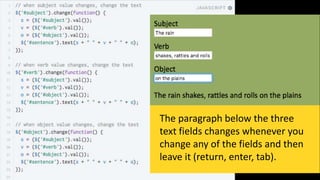
Web Design in 2016:
Just Enough Code
Mindy McAdams
University of Florida
http://bit.ly/mm-just
These are files for you to use. I will refer
to them throughout this presentation.
Using software tools is like this.
Using code is like this.
Warning
HTML, CSS and JavaScript have all evolved over the years.
Check carefully for a date on any tutorials or examples you
use (books too), and teach your students to do the same.
Outline
Step 1.
Step 2.
Step 3.
Step 4.
HTML
CSS
Using a text editor and managing
files; document structure
JavaScript and jQuery
HTML
Step 1.
https://jsfiddle.net/
A free, interactive site for experimentation,
for learning the tags and how they operate.
1) Start with 4 essential HTML tags for (in order from top):
a main heading, a paragraph, an image, and a link.
2) Fill each of the essential HTML tags with (respectively) a
main heading, a paragraph, an image URL, and a link URL.
3) Click the “Run” command in JSFiddle.
4) View the
outcome in the
JSFiddle
“Result” pane.
https://jsfiddle.net/
Free, and you can save your
work indefinitely.
5) Encourage students to add more HTML elements, then
“Run” again to update the results.
HTML
JavaScript
CSS
Results
HTML
JavaScript
CSS
Results
CSS
Step 2.
Memorize and Teach This
HTML marks up the structure of the document.
Headings, paragraphs, images, links …
CSS is used to control design: all the visual
effects and layout of elements.
Color, margins, rules and borders, fonts ...
Tip: Start CSS with colors,
and apply them to HTML
elements already used.
We’re still using
JSFiddle and
clicking “Run”
after changes to
see results.
body
refers to most of the visible page
h1
a pair of h1 tags wraps the main heading at the top of the page
Beginner CSS
background
sets the background
color (this property can
also be used for more)
color
sets the foreground color
only (text color)
color.adobe.com
Students get pretty excited
about this free site.
While the students are
playing with CSS colors,
it’s a good time to
introduce link styles.
a
affects all links on the page
a:hover
affects each link when moused over
After colors:
border
margin
padding
CSS Teaching Tips 1–4
1. Do not get into DIVs, HTML5 elements, or
positioning until students have experimented
thoroughly with padding, margins, and
borders.
2. Using borders is a great way to learn the
different effects of margins and padding.
CSS Teaching Tips 1–4
3. Require students to look up the “CSS box
model” and create a fiddle that uses borders
and explains difference between margin and
padding, with visual examples.
4. Do not teach fonts until later, when the
students are working with real files and not
JSFiddle.
div
Like duct tape, this element has
thousands of uses. After a thorough
workout with border, margin, and
padding, have the students
experiment with div tags.
HTML
CSS
One Last CSS Teaching Tip
Beginners and computer-science types and
random self-taught coders do many bad things
with CSS. There are established Web standards
that professionals follow and respect.
Impress this upon your students.
smashingmagazine.com is a good source.
Using a text editor, managing files,
document structure
Step 3.
Text editor:
Atom is free, and excellent.
https://atom.io
Text editor:
You must not use Notepad (Windows)
or TextEdit (Mac), because they don't
do the right things in the right way.
Good Work Habits
1. Always create a new folder for a new code
project.
2. Inside that folder, create three separate folders
for css, images, and scripts.
3. Save all files into their proper folders.
4. Do not save any project files outside that
project’s folder.
A well-ordered project
Document Structure
<!DOCTYPE html>
<html>
<head>
<!-- meta tags, title, link tags -->
</head>
<body>
<!-- all content visible to users -->
</body>
</html>
The HTML head element
<!DOCTYPE html>
<html>
<head>
<meta charset="utf-8">
<meta name="viewport"
content="width=device-width, initial-
scale=1">
<title> Title for search engines </title>
</head>
Now your students can create complete standalone
documents outside a content management system.
They can create a site consisting of many pages, or a
single-page application for web, mobile or both.
Next Steps
• Page layouts and responsive design/design for
mobile devices
• Responsive images
• Optimizing image file size for best
performance
• Accessibility for people with disabilities
JavaScript and jQuery
Step 4.
Why teach JavaScript and jQuery to
beginners?
Tip: Never say "Java" when you mean JavaScript. They are not even
related! Java is a completely different programming language.
HTML
JavaScript
CSS
Results
The aim is to start students with
JS code they can manipulate,
change, and run, to inspire them.
The three blocks of jQuery code
here each do the same thing, but
each block is “listening” for a
different action by the user.
The first block of jQuery code “listens”
for a change in the first text field.
The second block of jQuery code
“listens” for a change in the second
text field.
The third block of jQuery code “listens”
for a change in the third text field.
The paragraph below the three
text fields changes whenever you
change any of the fields and then
leave it (return, enter, tab).
There is no change until you leave
the field (return, enter, tab).
This jQuery example is explained
in the “handout”
http://bit.ly/mm-just
and there’s a link to the fiddle,
which you can play with.
http://bit.ly/mm-just
Most people learn code by looking at fairly simple scripts,
playing with them, and modifying them.
You don’t need to know everything
to be able to do something.
Web Design in 2016: Just Enough Code
Mindy McAdams
University of Florida
mmcadams@jou.ufl.edu
Twitter: @macloo

Just Enough Code

  • 1.
    Web Design in2016: Just Enough Code Mindy McAdams University of Florida
  • 2.
    http://bit.ly/mm-just These are filesfor you to use. I will refer to them throughout this presentation.
  • 3.
    Using software toolsis like this.
  • 4.
    Using code islike this.
  • 5.
    Warning HTML, CSS andJavaScript have all evolved over the years. Check carefully for a date on any tutorials or examples you use (books too), and teach your students to do the same.
  • 6.
    Outline Step 1. Step 2. Step3. Step 4. HTML CSS Using a text editor and managing files; document structure JavaScript and jQuery
  • 7.
  • 8.
    https://jsfiddle.net/ A free, interactivesite for experimentation, for learning the tags and how they operate.
  • 9.
    1) Start with4 essential HTML tags for (in order from top): a main heading, a paragraph, an image, and a link.
  • 10.
    2) Fill eachof the essential HTML tags with (respectively) a main heading, a paragraph, an image URL, and a link URL.
  • 11.
    3) Click the“Run” command in JSFiddle.
  • 12.
    4) View the outcomein the JSFiddle “Result” pane.
  • 13.
    https://jsfiddle.net/ Free, and youcan save your work indefinitely.
  • 14.
    5) Encourage studentsto add more HTML elements, then “Run” again to update the results.
  • 16.
  • 17.
  • 18.
  • 19.
    Memorize and TeachThis HTML marks up the structure of the document. Headings, paragraphs, images, links … CSS is used to control design: all the visual effects and layout of elements. Color, margins, rules and borders, fonts ...
  • 20.
    Tip: Start CSSwith colors, and apply them to HTML elements already used. We’re still using JSFiddle and clicking “Run” after changes to see results.
  • 21.
    body refers to mostof the visible page h1 a pair of h1 tags wraps the main heading at the top of the page Beginner CSS background sets the background color (this property can also be used for more) color sets the foreground color only (text color)
  • 22.
    color.adobe.com Students get prettyexcited about this free site.
  • 23.
    While the studentsare playing with CSS colors, it’s a good time to introduce link styles. a affects all links on the page a:hover affects each link when moused over
  • 24.
  • 25.
    CSS Teaching Tips1–4 1. Do not get into DIVs, HTML5 elements, or positioning until students have experimented thoroughly with padding, margins, and borders. 2. Using borders is a great way to learn the different effects of margins and padding.
  • 26.
    CSS Teaching Tips1–4 3. Require students to look up the “CSS box model” and create a fiddle that uses borders and explains difference between margin and padding, with visual examples. 4. Do not teach fonts until later, when the students are working with real files and not JSFiddle.
  • 27.
    div Like duct tape,this element has thousands of uses. After a thorough workout with border, margin, and padding, have the students experiment with div tags.
  • 28.
  • 29.
  • 30.
    One Last CSSTeaching Tip Beginners and computer-science types and random self-taught coders do many bad things with CSS. There are established Web standards that professionals follow and respect. Impress this upon your students. smashingmagazine.com is a good source.
  • 31.
    Using a texteditor, managing files, document structure Step 3.
  • 33.
    Text editor: Atom isfree, and excellent. https://atom.io
  • 34.
    Text editor: You mustnot use Notepad (Windows) or TextEdit (Mac), because they don't do the right things in the right way.
  • 35.
    Good Work Habits 1.Always create a new folder for a new code project. 2. Inside that folder, create three separate folders for css, images, and scripts. 3. Save all files into their proper folders. 4. Do not save any project files outside that project’s folder.
  • 36.
  • 37.
    Document Structure <!DOCTYPE html> <html> <head> <!--meta tags, title, link tags --> </head> <body> <!-- all content visible to users --> </body> </html>
  • 38.
    The HTML headelement <!DOCTYPE html> <html> <head> <meta charset="utf-8"> <meta name="viewport" content="width=device-width, initial- scale=1"> <title> Title for search engines </title> </head>
  • 39.
    Now your studentscan create complete standalone documents outside a content management system. They can create a site consisting of many pages, or a single-page application for web, mobile or both.
  • 40.
    Next Steps • Pagelayouts and responsive design/design for mobile devices • Responsive images • Optimizing image file size for best performance • Accessibility for people with disabilities
  • 41.
  • 42.
    Why teach JavaScriptand jQuery to beginners? Tip: Never say "Java" when you mean JavaScript. They are not even related! Java is a completely different programming language.
  • 43.
  • 45.
    The aim isto start students with JS code they can manipulate, change, and run, to inspire them.
  • 46.
    The three blocksof jQuery code here each do the same thing, but each block is “listening” for a different action by the user.
  • 47.
    The first blockof jQuery code “listens” for a change in the first text field.
  • 48.
    The second blockof jQuery code “listens” for a change in the second text field.
  • 49.
    The third blockof jQuery code “listens” for a change in the third text field.
  • 50.
    The paragraph belowthe three text fields changes whenever you change any of the fields and then leave it (return, enter, tab).
  • 51.
    There is nochange until you leave the field (return, enter, tab).
  • 52.
    This jQuery exampleis explained in the “handout” http://bit.ly/mm-just and there’s a link to the fiddle, which you can play with.
  • 53.
  • 54.
  • 55.
    Most people learncode by looking at fairly simple scripts, playing with them, and modifying them. You don’t need to know everything to be able to do something.
  • 56.
    Web Design in2016: Just Enough Code Mindy McAdams University of Florida mmcadams@jou.ufl.edu Twitter: @macloo

Editor's Notes

  • #2 Good afternoon! I'd like to introduce the idea of "Just Enough Code" - to add a 2- or 3-week module on Web coding into courses like editing, or design. There are 2 reasons to do this. One is to demystify how Web and mobile sites are made. The other is to open a door - for (at least) some students - to something they might really have an aptitude for, something they might really enjoy, if you just have a chance to explore it.
  • #3 Write down this URL, or open it now if you can. These are files you can use in your courses. Just download them. And there's a document that expands on this presentation. https://github.com/macloo/just_enough_code
  • #4 When we show students how to use tools THAT PLUG IN content and put it online, we're teaching something like this.
  • #5 When we show students how to use code, we're OPENING A DOOR to a much bigger workbench. With code, you can build anything you can imagine.
  • #6 Before we start, I want to mention that GOOGLE is your BEST FRIEND for both teaching and learning code ... BUT you have to make sure your resources are UP TO DATE. Techniques from just a few years ago are now considered bad practice by Web professionals.
  • #7 This presentation has FOUR PARTS. This is also the order for teaching.
  • #8 Start with HTML alone.
  • #9 I recommend starting with J-S-Fiddle. The "JS" is for JavaScript, but you can use it for writing just HTML. "Fiddle" means it's meant for playing around. JSFiddle is really friendly for playing with code, because you don't have to mess around with files and opening them in the browser, switching windows, reloading the page, etc. It's all here in ONE WINDOW.
  • #10 Start with these 4 essential HTML tags for -- a main heading, a paragraph, an image, and a link. HERE, these tags are EMPTY. We’re looking at part of the JSFiddle window.
  • #11 Fill in the HTML tags. You should notice that the heading, the paragraph, and the link each have a PAIR of tags. Text goes in between. The image tag is a standalone, a "solo" or "empty" tag. For the image and the link, we fill in a URL.
  • #12 In JSFiddle, when you're ready to view any changes, click "Run.”
  • #13 You get instant gratification without leaving the JSFiddle window. This is really effective with students!
  • #14 This is the full-screen of JSFiddle. You never leave this window. Just click "Run" after you've changed the HTML.
  • #15 Here, I added a new P element, and I also added P tags around the link that we already had.
  • #16 This is the result, after I clicked “Run.”
  • #17 NOTE that JSFiddle provides 4 panes: HTML, CSS, Results, and JavaScript.
  • #18 You can change the SIZES of the 4 panes by dragging the dividers. But you always have all 4 panes VISIBLE.
  • #19 Let's move on to CSS. You don't have to cover any more HTML than that to start with! CSS stands for Cascading Style Sheets – NOT A HELPFUL NAME.
  • #20 HTML for STRUCTURE. CSS for DESIGN. Students and most beginners want to ignore this and subvert it -- but IT IS LAW.
  • #21 When you introduce CSS, I suggest you start with color. Apply the colors using proper CSS styles on the HTML elements the students already know.
  • #22 BODY and H1 are called CSS selectors. BACKGROUND and COLOR are called properties. Most SELECTORS are HTML elements, like H1, which we’ve already seen.
  • #23 Students really like using this site to create palettes. Using the HEX CODES is way cooler and more fun than using color names like "red" and "blue," and it gives you access to millions of hues and shades. color.adobe.com - https://color.adobe.com/explore/newest/
  • #24 At the same time I'm introducing color, I like to introduce the way CSS handles LINK STYLES. If you change the background color of a page, you'll probably need to change the link color too.
  • #25 After students have some experience with colors and CSS, you can introduce borders, margins, and padding -- which are also CSS properties. Give them some exercises for using these in JSFiddle so they can experience how they affect all the elements on the page.
  • #26 1) I'm recommending an order for teaching that works well for most people, including my students over the years. 2) This tip about BORDERS is used by a lot of trainers. Students have trouble understanding the INTERACTION of margins and padding in the browser. By EXPERIMENTING with these in conjunction with borders, they learn better.
  • #27 3) The "CSS box model" is all over the Web. Use Google. It addresses the margins-and-padding problems that frustrate beginners when they try to create or repair layouts. 4) This advice about fonts is also based on my experience in teaching. Fonts are easy after the students have the CSS foundation I've already outlined.
  • #28 When you wrap some HTML in a pair of div tags, you can then use CSS (and JavaScript) to do all kinds of things to that wrapped block. To target a specific div with CSS, we must give it a unique id in the HTML. You can see that here where I named one div "kitty" and the other div "square.”
  • #29 In JSFiddle, here's that HTML. I'll show you the CSS on the next slide. For now, notice how the image and the paragraph in the "kitty" div are inside a box. And notice how the "square" div -- which contains nothing at all -- appears on the page. This example: https://jsfiddle.net/macloo/hxjn97u5/
  • #30 In the CSS, here’s how we can style the properties of different DIVs. We've already see padding, background, and border. Now we also see that we can control width and height -- two more CSS properties.
  • #31 Before we move on to the next section, I'd like to emphasize that students should understand that Web design and development is not a free-for-all. Professionals follow standard best practices. Failure to do so results in bad experiences for the audience, and the audience is unforgiving. Smashing Magazine is one of the sources I rely on to check what the current best practices are.
  • #32 Now we move on from JSFiddle and learn about real files that can be opened in a Web browser and that can be uploaded to a Web server.
  • #33 First, a word about tools. Some newsrooms and agencies may be using Dreamweaver, but professional Web designers and developers DO NOT. http://www.killersites.com/blog/2014/is-dreamweaver-still-relevant-in-web-design/
  • #34 The main tool you need for writing code is a text editor. I recommend Atom for everyone. It is awesome. https://atom.io/
  • #35 Here’s what Atom looks like. It has a lot of features that make writing code EASIER. Most important, it will not mess up your code, as inferior text editors WILL.
  • #36 With the text editor, students will be creating numerous separate files. These must be ORGANIZED. Most important, they must learn to keep all files for ONE project together in ONE folder, and all files for another project in a different folder.
  • #37 This is what a typical Web project looks like, on your Desktop.
  • #38 Now ... this is the correct structure for an HTML document. Every HTML document created in recent years has this basic structure. The parts are NOT OPTIONAL. The way the tags are NESTED is very important. The order of the tags as seen here is ESSENTIAL. This is something we have to teach carefully.
  • #39 Something else we have to teach carefully is the correct structure of the HEAD element. Any other order within the head is WRONG. The correct use of the title element is important. You'll see that The New York Times, for example, uses the TITLE element very strategically.
  • #40 At this point, students can create entire websites or apps. All they need to add is how to upload the files to a Web server.
  • #41 The foundation is set at this point, and students can go on in many different directions from here.
  • #42 Now, my final section is intimidating to many people, and I appreciate that.
  • #43 "Why teach JavaScript and jQuery to beginners?" Because JavaScript is what makes digital content INTERACTIVE. If you want it to move, spin, fold, animate, calculate, or just plain respond, then it needs JavaScript!
  • #44 Thanks to JSFiddle, students can experiment quickly -- and painlessly -- with JavaScript and jQuery.
  • #45 I like to start students with something they can alter, and play with. Again, JSFiddle is perfect for this. Here is an example. If you copied down that URL at the beginning, you have a link to this fiddle in the README document. https://jsfiddle.net/macloo/xegj2oe7/
  • #47 So, just briefly -- and remember, this is a LIVE fiddle you can play with yourself, and I'll share that URL again at the end if you didn't get it -- this is an introductory script that basically does THE SAME THING in response to 3 DIFFERENT actions the USER can take on the page.
  • #48 The first block runs if the user types in the first text field.
  • #49 The second block runs if the user types in the second text field.
  • #50 The third block runs if the user types in the third text field.
  • #51 What happens on-screen? When the user changes the contents of one text field, it changes the text on the Web page instantly. The page does not reload. There's no waiting.
  • #52 If you stay inside the changed text field, the page does not change.
  • #53 This is that URL I gave you at the beginning. Bit dot L Y slash M M hyphen just.
  • #54 Since we are in PART 4 of this, the link is down in the bottom quarter of the document.
  • #55 These links are at the very the bottom of the document. Here’s the same link again. It’s all in one place.
  • #56 I think it's important to think about the opportunity we can give to students to break outside their limitations -- maybe limitations that don't even exist. By exposing them to "Just Enough Code," we can open doors to new careers in communication that some of them have never imagined -- but that they would excel in!
  • #57 CONTACT INFO