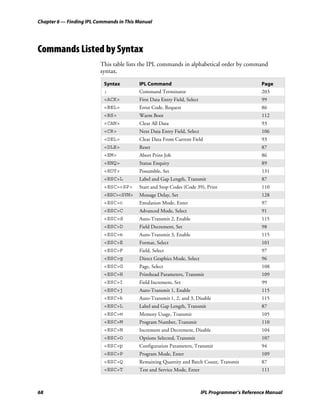
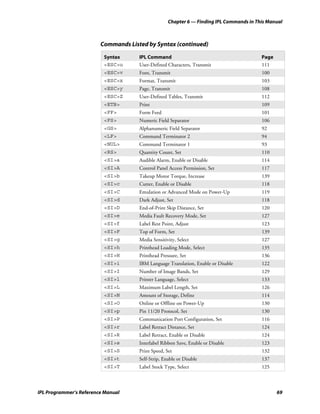
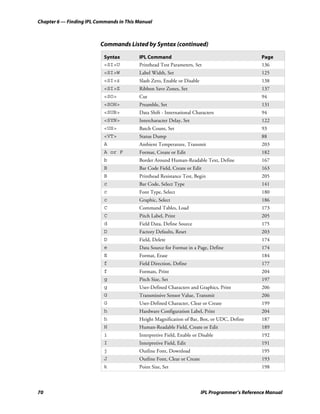
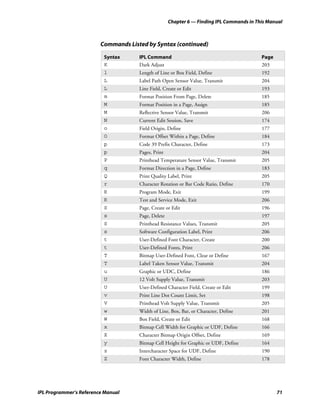
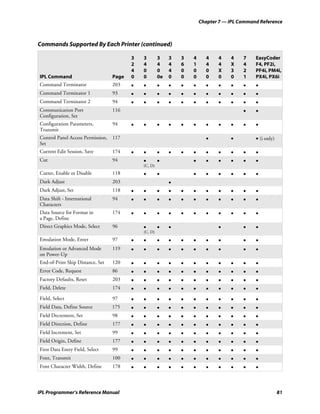
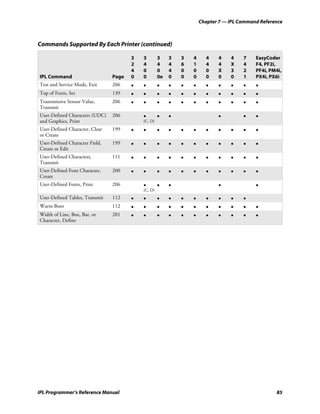
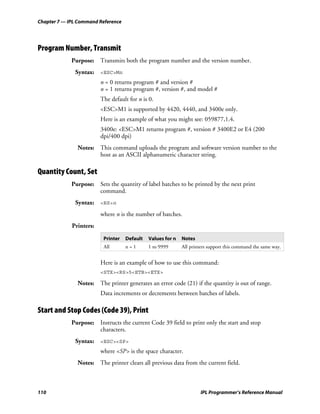
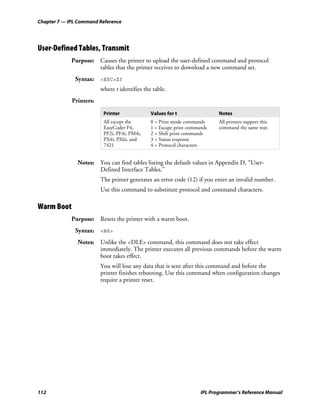
This document is a programmer's reference manual for Intermec Printer Language (IPL) commands. It contains information about downloading fonts, designing bar code labels, troubleshooting printer issues, optimizing printer performance, and the full list of supported IPL commands with their syntax and usage. The manual is intended for programmers and engineers who need to control Intermec printers programmatically.


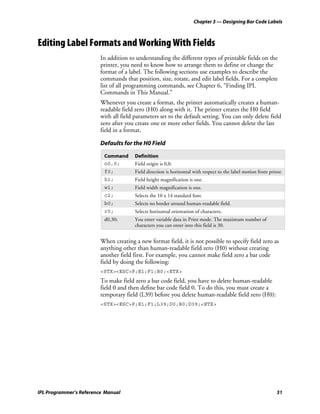


![7 IPL Command Reference
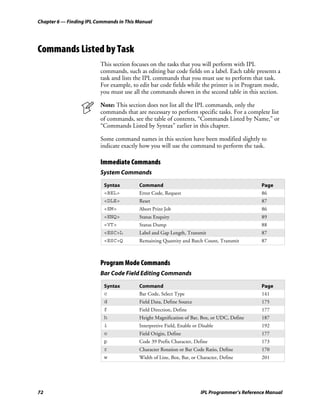
This chapter describes all of the IPL commands. The commands are
grouped by type (Immediate, Print, Configuration, Program, and Test and
Service) and alphabetized within each type.
The commands listed in this chapter are used for all Intermec printers.
Defaults, ranges of values for the variables, and special notes for specific
printers are presented in a chart under the Printers heading.
Convention Description
<> Angle brackets < > enclose mnemonic representations of ASCII control
characters. For example, <ETX> represents the ASCII “End of Text”
control character.
data Italic text represents variable data, which you must replace with a real
value. For example, n signifies a variable for which you must designate a
constant value.
[data] Italic text within brackets represents optional data.
Ctrl Bold text represents a key on your keypad. For example, Ctrl represents
the Ctrl key.
Ctrl-Z When two keys are joined with a dash, press them simultaneously. For
example, if you see the command Ctrl-Z, press the two keys at the same
time.
E3;F3 Type all characters that appear in the Courier font by pressing an
individual key on the keypad.
IPL Programmer’s Reference Manual 79](https://image.slidesharecdn.com/ipl-100603063325-phpapp01/85/Ipl-95-320.jpg)
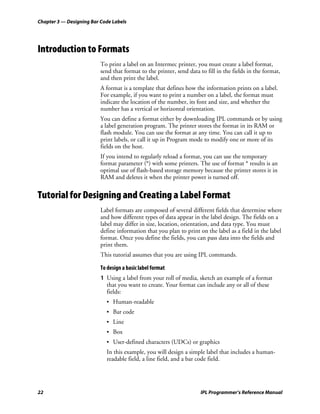
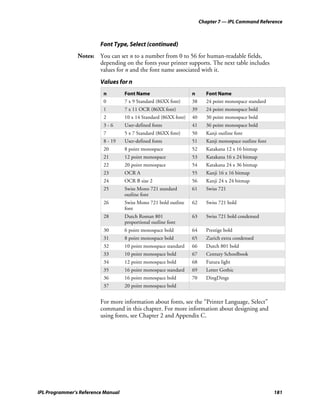
![Chapter 7 — IPL Command Reference
Font, Transmit (continued)
If you send <ESC>v to the printer without specifying a value for the n
parameter, the printer (except for the 3400A, 3400B, 3600, and 4400)
uploads the entire user-defined fonts directory. The directory appears in
this format:
IDnumber, name, type, storage size<CR><LF>
where:
IDnumber is the font number that was specified by n in the
command that created the user-defined font.
name is the optional font name that may have been specified by
,name in the command that created the user-defined font.
type is 200 for Bitmap fonts, 300 for Speedo outline fonts, or
301 for TrueType fonts.
storage size is 0 for resident fonts.
Always transmit fonts in Advanced mode.
The target printer remains in Advanced mode. The printer generates an
error code (27) if you enter an invalid number.
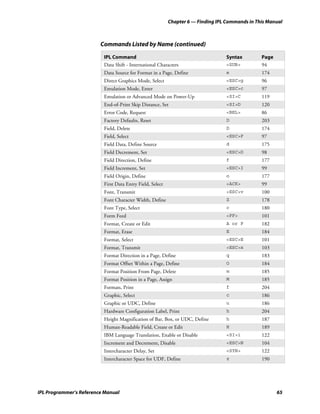
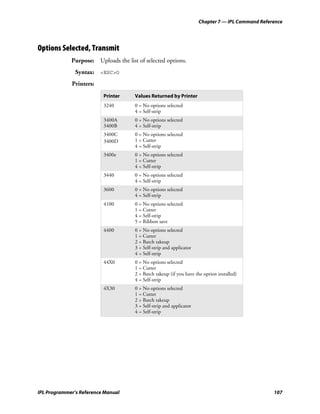
Form Feed
Purpose: Feeds a label out to the next print point.
Syntax: <FF>
Notes: If you use self-strip, the printer feeds out one blank label to the strip pin,
skipping an entire label. If you use batch operation with die-cut label
stock, the label moves to the tear bar.
If you use continuous label stock, the label stock moves the same amount
as the end-of-print skip distance.
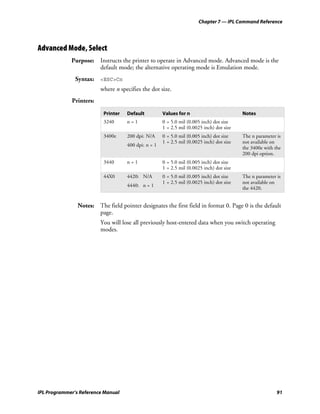
Format, Select
Purpose: Selects a format for data entry or printing.
Syntax: <ESC>En[,m]
where n is the numeric format ID and ,m specifies to reimage only
changed fields.
IPL Programmer’s Reference Manual 101](https://image.slidesharecdn.com/ipl-100603063325-phpapp01/85/Ipl-117-320.jpg)
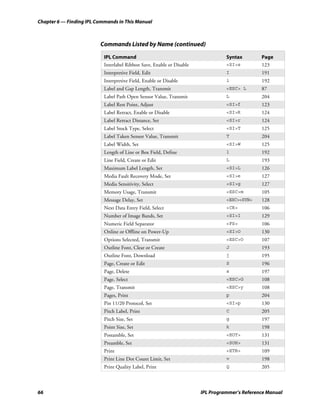
![Chapter 7 — IPL Command Reference
Format, Transmit (continued)
Notes: If you send <ESC>x to the printer without specifying a value for the n
parameter, the printer (except for the 3400A, 3400B, 3600, and 4400)
uploads the entire format directory. The directory appears in this format:
[IDnumber] [name] [type] [storage size]<CR><LF>
where:
IDnumber is the format number that was specified by n in the
command that created the format.
name is the optional format name that may have been specified by
,name in the command that created the format.
type is 0 for formats.
storage size is the number of bytes needed to store the format.
The target printer remains in Advanced mode.
The printer generates an error code (25) if you enter an invalid number.
Increment and Decrement, Disable
Purpose: Resets any increment or decrement flags for the current field.
Syntax: <ESC>N
104 IPL Programmer’s Reference Manual](https://image.slidesharecdn.com/ipl-100603063325-phpapp01/85/Ipl-120-320.jpg)
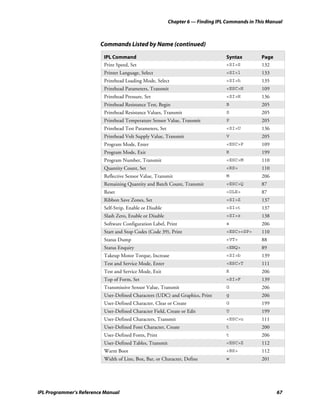
![Chapter 7 — IPL Command Reference
Page, Transmit (continued)
Notes: If you send <ESC>y to the printer without specifying a value for the n
parameter, the printer uploads the entire page directory. The directory
appears in this format:
[IDnumber] [name] [type] [storage size]<CR><LF>
where:
IDnumber is the page number that was specified by n in the command
that created the page.
name is the optional page name that may have been specified by
,name in the command that created the page.
type is 1 for pages.
storage size is always 0 for a page.
The target printer remains in Advanced mode. The printer generates an
error code (26) if you enter an invalid number.
Print
Purpose: Prints the current page or format with previously entered data.
Syntax: <ETB>
Printhead Parameters, Transmit
Purpose: Transmits the number and size of dots in the printhead back to the host.
Syntax: <ESC>H
Notes: Here is an example of what you can expect to see: 896,5.0.
Program Mode, Enter
Purpose: Causes the printer to enter Program mode for the purpose of creating or
editing pages, formats, fonts, or graphics.
Syntax: <ESC>P
Notes: When this command is executed, you lose all previously entered data.
IPL Programmer’s Reference Manual 109](https://image.slidesharecdn.com/ipl-100603063325-phpapp01/85/Ipl-125-320.jpg)
![Chapter 7 — IPL Command Reference
Storage Area Usage, Transmit
See the “Memory Usage, Transmit” command.
Test and Service Mode, Enter
Purpose: Enters Test and Service mode.
Syntax: <ESC>T
Notes: The printer completes all print jobs before executing this command. When
the printer enters Test and Service mode, it erases any host-entered data
that was sent prior to the command.
User-Defined Characters, Transmit
Purpose: Uploads a graphic (user-defined character) from the printer in the form of
commands and data the printer receives to create the graphic.
Syntax: <ESC>un
where n is the graphic ID number.
Printers:
Printer Default Values for n Notes
All None 0 to 99 All printers support this command the same
way.
Notes: If you send <ESC>u to the printer without specifying a value for the n
parameter, the printer (except for the 3400A, 3400B, 3600, and 4400)
uploads the entire graphics directory. The directory appears in this format:
[IDnumber] [name] [type] [storage size]<CR><LF>
where:
IDnumber is the graphic number that was specified by n in the
command that created the graphic.
name is the optional graphic name that may have been specified
by ,name in the command that created the graphic.
type is 100 for a graphic.
storage size is the number of bytes to store the graphic.
If the printer is in Advanced mode, each data byte represents six bits of the
graphic bitmap. If the printer is in Emulation mode, each data byte
represents one bit of the graphic image.
The printer generates an error code (28) if you enter an invalid number.
IPL Programmer’s Reference Manual 111](https://image.slidesharecdn.com/ipl-100603063325-phpapp01/85/Ipl-127-320.jpg)
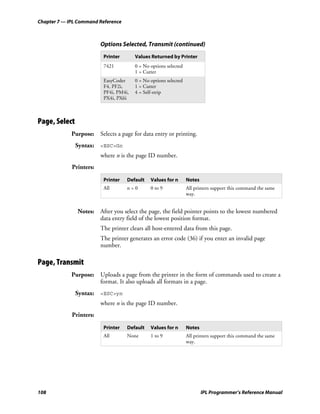
![Chapter 7 — IPL Command Reference
Communication Port Configuration, Set
Purpose: Sets the serial and parallel port configuration.
Syntax: <SI>P[n1][,n2][,n3][,n4][,n5][,n6]
where:
n1 sets the baud rate, n2 sets the parity, n3 sets the data bits, n4 sets the
protocol, and n5 sets the Multi-Drop address (if you are using Multi-
Drop).
n6 sets the parallel port mode.
Printers:
n2 n3
Printer Defaults n1 Values Values Values n4 Values n5 Values n6 Values
7421 n1 = 3 0 = 1,200 0 = None 0 = 7 bits 0= A - Z, 0 - 5 0 = Centronic
n2 = 0 1 = 2,400 1 = even 1 = 8 bits XON/XOFF Mode
n3 = 1 2 = 4,800 2 = odd 1 = Intermec
1 = 1284 Nibble
n4 = 0 3 = 9,600 XON/XOFF Mode
n5 = A 4 = 19,200 2 = Intermec
n6 = 0 Standard
3 = Polling
Mode D
EasyCoder n1 = 3 0 = 1,200 0 = None 0 = 7 bits 0 = XON/XOFF N/A N/A
F4, PF2i, n2 = 0 1 = 2,400 1 = even 1 = 8 bits 2 = Intermec
PF4i, PM4i, n3 = 1 2 = 4,800 2 = odd Standard
PX4i, PX6i n4 = 0 3 = 9,600
4 = 19,200
5 = 38,400
6 = 57,600
7 = 115,200
116 IPL Programmer’s Reference Manual](https://image.slidesharecdn.com/ipl-100603063325-phpapp01/85/Ipl-132-320.jpg)

![Chapter 7 — IPL Command Reference
Emulation or Advanced Mode on Power-Up (continued)
Printer Default Values for n Notes
44X0 4420: 4420: 0 = Emulation mode (10 mil) You can use
n=1 1 = Advanced mode (5 mil) Advanced mode
2 = Emulation mode (15 mil) 2.5 mil option
4440:
only on the
n=3 4440: 0 = Emulation mode (10 mil)
4440.
1 = Advanced mode (5 mil)
2 = Emulation mode (15 mil)
3 = Advanced mode (2.5 mil)
7421 n=1 0 = Emulation mode (10 mil)
1 = Advanced mode (5 mil)
2 = Emulation mode (15 mil)
EasyCoder n=1 0 = Emulation mode (10 mil)
F4, PF2i, 1 = Advanced mode (5 mil)
PF4i, PM4i, 2 = Emulation mode (15 mil)
PX4i, PX6i
Notes: Emulation mode lets you print labels that were designed on an 86XX
printer in multiples of 10 or 15 mil. Advanced mode lets you print bar
code labels in multiples of 2.5 or 5 mil.
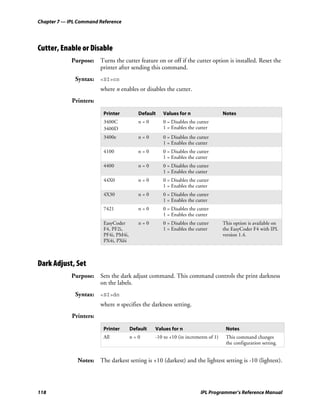
End-of-Print Skip Distance, Set
Purpose: Sets the end-of-print skip distance. This distance is a value in 5 mil
increments that the label advances after printing or when you pause
printing.
Syntax: <SI>D[n]
where n is the distance in 5 mil increments (3.3 mil increments on 4X30
printers).
120 IPL Programmer’s Reference Manual](https://image.slidesharecdn.com/ipl-100603063325-phpapp01/85/Ipl-136-320.jpg)

![Chapter 7 — IPL Command Reference
Media Fault Recovery Mode, Set
Purpose: Sets the media fault recovery mode.
Syntax: <SI>en
Printers:
Printer Default Values for n
3400e n=0 0 = reprints interrupted label
1 = do not reprint interrupted label
4420 n=0 0 = reprints interrupted label
1 = do not reprint interrupted label
4440 n=0 0 = reprints interrupted label
1 = do not reprint interrupted label
7421 n=0 0 = reprints interrupted label
1 = do not reprint interrupted label
EasyCoder n=0 0 = reprints interrupted label
F4, PF2i, 1 = do not reprint interrupted label
PF4i, PM4i,
PX4i, PX6i
Media Sensitivity, Select
Purpose: Selects the media sensitivity of the printer.
Syntax: <SI>gn[,m]
where n specifies direct thermal (DT) stock or thermal transfer (TTR)
stock, and ,m specifies the sensitivity.
Printers:
Printer Default Values for n Values for ,m Notes
3240 n=0 0 = Direct thermal 420 = Direct thermal You can only set n by
1 = Thermal transfer 567 = Thermal transfer using the DIP switches.
3400A n=0 0 = Direct thermal 420 = Direct thermal You can only set n by
3400B 1 = Thermal transfer 567 = Thermal transfer using the DIP switches.
3400C n=0 0 = Direct thermal 470 = Direct thermal You can only set n by
3400D 1 = Thermal transfer 567 = Thermal transfer using the DIP switches.
3400e n=0 0 = Direct thermal 470 = Direct thermal (2-5 ips) You can only set n by
1 = Thermal transfer 720 = Direct thermal (6-8 ips) using the DIP switches.
567 = Thermal transfer
3440 n=0 0 = Direct thermal 470 = Direct thermal You can only set n by
1 = Thermal transfer 567 = Thermal transfer using the DIP switches.
3600 n=0 0 = Direct thermal 420 = Direct thermal You can only set n by
1 = Thermal transfer 567 = Thermal transfer using the DIP switches.
IPL Programmer’s Reference Manual 127](https://image.slidesharecdn.com/ipl-100603063325-phpapp01/85/Ipl-143-320.jpg)
![Chapter 7 — IPL Command Reference
Online or Offline on Power-Up
Purpose: Selects the printer to be online or offline when it is turned on.
Syntax: <SI>On
where n specifies online or offline.
Printers:
Printer Default Values for n
4400 n=0 0 = Printer is online on power up
1 = Printer is offline on power up
4X30 n=0 0 = Printer is online on power up
1 = Printer is offline on power up
Pin 11/20 Protocol, Set
Purpose: Sets the protocol for pin 11/20.
Syntax: <SI>pn[,m]
where n sets the protocol for pin 20 (DTR) and ,m sets the protocol for
pin 11 (PS).
Printers:
Printer Default Values for n and ,m Notes
3400e n=0 0 = The pin follows the software protocol
44X0 m=0 1 = Always ready (high)
2 = Flow control
3 = Ready/Busy
7421 n=0 0 = The pin follows the software protocol The 7421 uses
m=0 1 = Always ready (high) pins 6 and 9
2 = Flow control instead of pins
3 = Ready/Busy 20 and 11.
Notes: When a pin is set to the default, it uses flow control if the serial port is set
for XON/XOFF protocol. The pin uses ready/busy if the serial port is set
to Intermec Standard protocol.
When you set a pin to always ready (high), the pin is held high as long as
the printer receives power.
130 IPL Programmer’s Reference Manual](https://image.slidesharecdn.com/ipl-100603063325-phpapp01/85/Ipl-146-320.jpg)

![Chapter 7 — IPL Command Reference
Printhead Loading Mode, Select
Purpose: Selects the printhead loading mode that affects how the whole image prints
on the label. Mirror Printing mode reverses the order in which data loads
into the printhead. Inverse Printing mode causes all pixels that are white to
invert to black and vice versa.
Syntax: <SI>hn[,m]
Printers:
Printer Defaults Values for n Values for ,m
3400C n=0 0 = Selects normal 0 = Selects normal printing
3400D ,m = 0 printing 1 = Selects Inverse Printing
3400e 1 = Selects Mirror Printing mode
mode
3440 n=0 0 = Selects normal 0 = Selects normal printing
,m = 0 printing 1 = Selects Inverse Printing
1 = Selects Mirror Printing mode
mode
44X0 n=0 0 = Selects normal 0 = Selects normal printing
,m = 0 printing 1 = Selects Inverse Printing
1 = Selects Mirror Printing mode
mode
7421 n=0 0 = Selects normal 0 = Selects normal printing
,m = 0 printing 1 = Selects Inverse Printing
1 = Selects Mirror Printing mode
mode
EasyCoder n=0 0 = Selects normal 0 = Selects normal printing
F4, PF2i, ,m = 0 printing 1 = Selects Inverse Printing
PF4i, PM4i, 1 = Selects Mirror Printing mode
PX4i, PX6i mode
Note: The printhead is not under warranty if you use Inverse Printing mode for
batch printing. Intermec does not recommend using Inverse Printing
mode for batch printing. For best results with Inverse Printing mode, use a
maximum print density of 35 percent.
IPL Programmer’s Reference Manual 135](https://image.slidesharecdn.com/ipl-100603063325-phpapp01/85/Ipl-151-320.jpg)
![Chapter 7 — IPL Command Reference
Printhead Pressure, Set
Purpose: Compensates for variations in the thickness of label stock.
Syntax: <SI>Hn
Printers:
Printer Default Values for n Notes
4400 n=0 0 = Low printhead pressure If your labels are slipping, or
1 = High printhead pressure you notice that the pressure is
too light, try changing the
pressure to the other setting.
Printhead Test Parameters, Set
Purpose: Sets the printhead test parameters.
Syntax: <SI>Un[,m][,p][,q]
where:
n determines whether printing continues if the printhead test sends a
warning.
,m is the positive threshold of the percentage of the allowable deviation
in resistance.
,p is the negative threshold of the percentage of the allowable deviation
in resistance.
,q specifies how often (in terms of the number of labels printed) to
automatically run the printhead resistance test.
Printers:
Printer Defaults Values for n ,m ,p and ,q Notes
4400 n=0 n = 0 Printing continues This command is
m = 45 when warning occurs effective upon
p = 45 n = 1 Printing stops execution.
q=0 when warning occurs
,m A number from 45 to 10
,p A number from 45 to 10
,q A number from 0 to 9999.
Setting q = 0 disables the test.
136 IPL Programmer’s Reference Manual](https://image.slidesharecdn.com/ipl-100603063325-phpapp01/85/Ipl-152-320.jpg)
![Chapter 7 — IPL Command Reference
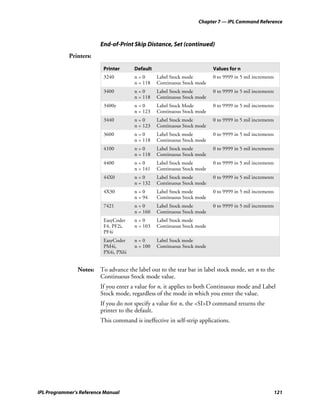
Ribbon Save Zones, Set
Purpose: Defines the start and stop points of a ribbon save zone within the label.
This command does not enable interlabel ribbon save.
Syntax: <SI>Zn[,m]
n and ,m are the zone start and zone stop distances, in dot increments,
from the detected front of the label.
The difference between m and n depends on the speed (number of ips) at
which you are printing. Also, m must be bigger than n by at least 100, or
the command will be ignored.
Printers:
Printer Notes
4100 The ribbon save option must be installed or the printer will ignore this
command. Setting a ribbon save zone enables ribbon save. Entering no
ribbon save zones clears all ribbon save zones within this label. If only one
parameter is entered, the command is ignored. The maximum number of
zones possible on one label is 10. This command is buffered up and
becomes effective upon execution.
Self-Strip, Enable or Disable
Purpose: Turns the self-strip (label taken sensor) option on or off.
Syntax: <SI>tn
Printers:
Printer Default Values for n Notes
3240 n=0 0 = disabled
1 = enabled
3400 n=0 0 = disabled
1 = enabled
3440 n=0 0 = disabled
1 = enabled
3600 n=0 0 = disabled
1 = enabled
4100 N/A N/A The 4100 printer ignores this command;
however, you can enable self-strip by using
the DIP switches.
4400 n=0 0 = disabled You must install the self-strip option from the
1 = enabled control panel before you can enable or disable
the label taken sensor.
44X0 n=0 0 = disabled
1 = enabled
IPL Programmer’s Reference Manual 137](https://image.slidesharecdn.com/ipl-100603063325-phpapp01/85/Ipl-153-320.jpg)
![Chapter 7 — IPL Command Reference
Program Mode Commands
You can use Program mode commands to design label formats and to
download user-defined fonts and graphics.
When creating or editing formats, the printer uses a field pointer to
designate the field you are going to modify when the printer is in Program
mode. To download commands in Program mode, you must specify the
field you want to change. If you do not select a field, the pointer continues
to point to the last selected field until you select a different format or field.
New formats contain a default human-readable field numbered H0. New
pages do not contain a default format.
Program mode commands are effective when the printer is in Program
mode. You can switch the printer to Program mode with this command:
<STX><ESC>P<ETX>
For help downloading Program mode commands to the printer, see
“Sending IPL Commands to the Printer” in Chapter 1.
Note: You must precede each string of commands with the start of
message character <STX> and follow it with the end of message character
<ETX>. The semicolon (;) is the command terminator. All commands in
Program mode must end with this terminator except the last command in
a message. The printer ignores parentheses [( )] and <LF> characters.
140 IPL Programmer’s Reference Manual](https://image.slidesharecdn.com/ipl-100603063325-phpapp01/85/Ipl-156-320.jpg)
![Chapter 7 — IPL Command Reference
Bar Code, Select Type
Purpose: Selects a symbology for a bar code field.
Syntax: cn[,m1][,m2][,m3]
n is the symbology and m1, m2, and m3 are modifiers for that symbology.
For more information on valid m values, see the information for that
symbology in the following pages.
Values for n
n Symbology n Symbology n Symbology
0 Code 39 7 UPC/EAN Codes 15 JIS-ITF
1 Code 93 8 HIBC Code 39 16 HIBC Code 128
2 Interleaved 2 of 5 9 Code 16K 17 Data Matrix
3 Code 2 of 5 10 Code 49 18 QR Code
4 Codabar 11 POSTNET 19 MicroPDF417
5 Code 11 12 PDF417 20 RSS
6 Code 128 14 MaxiCode 21 EAN.UCC Composite
Printers:
Printer Default Values for n
3240 n=0 0 - 12, 14 - 19
3400A n=0 0 - 11
3400B n=0 0 - 12, 14 - 17
3400C n=0 0 - 12, 14 - 19
3400D
3400e
3440 n=0 0 - 12, 14 - 19
3600 n=0 0 - 12, 14 - 17
4100 n=0 0 - 11 Standard memory
0 - 12, 14 Expanded memory
4400 n=0 0 - 11
44X0 n=0 0 - 12, 14 - 19
4X30 n=0 0 - 12, 14, 16, 17
7421 n=0 0 - 12, 14 - 19
EasyCoder F4 n=0 0 - 12, 14 - 19
EasyCoder PF2i, PF4i, n=0 0 - 12, 14 - 21
PM4i, PX4i, PX6i
IPL Programmer’s Reference Manual 141](https://image.slidesharecdn.com/ipl-100603063325-phpapp01/85/Ipl-157-320.jpg)
![Chapter 7 — IPL Command Reference
Bar Code, Select Type (continued)
Code 39
c0[,m]
The default for m is 0.
Values for m
m Description
0 Selects 8646 compatible Code 39. No check digit.
1 Selects 8646 compatible Code 39. Printer enters check digit.
2 Selects 8646 compatible Code 39. Host enters check digit and printer verifies.
3 Selects full ASCII Code 39. No check digit.
4 Selects full ASCII Code 39. Printer enters check digit.
5 Selects full ASCII Code 39. Host enters check digit and printer verifies.
6 Selects 43 character Code 39. No check digit.
7 Selects 43 character Code 39. Printer enters check digit.
8 Selects 43 character Code 39. Host enters check digit and printer verifies.
Intermec printers support three different types of Code 39:
• 43 character Code 39
• Full ASCII Code 39
• 8646 compatible Code 39 (except the EasyCoder F4, PF2i, PF4i and
PM4i)
The 8646 compatible version only differs from the full ASCII version by
four characters. The “$”, “%”, “/”, and “+” are encoded as single characters
instead of as “/D”, “/E”, “/O”, and “/K.” The 8646 compatible version
allows the printer to be backward compatible with 86XX printers.
When you enter <ESC><SPACE> as data, the printer prints the start and
stop characters.
Code 93
c1
142 IPL Programmer’s Reference Manual](https://image.slidesharecdn.com/ipl-100603063325-phpapp01/85/Ipl-158-320.jpg)
![Chapter 7 — IPL Command Reference
Bar Code, Select Type (continued)
Interleaved 2 of 5
c2[,m]
The default for m is 0.
Values for m
m Description
0 Selects Interleaved 2 of 5. No check digit.
1 Selects Interleaved 2 of 5. Printer enters check digit.
2 Selects Interleaved 2 of 5. Host enters check digit.
Note: The printer adds a zero to character strings that are odd in length.
Code 2 of 5
c3[,m]
The default for m is 0.
Values for m
m Description
0 Selects Code 2 of 5. 3-bar start/stop code.
1 Selects Code 2 of 5. 2-bar start/stop code.
Codabar
c4[,m]
The default for m is 0.
Values for m
m Description
0 Selects Codabar. Host enters start/stop codes and printer
verifies.
1,x,y Selects Codabar. Printer enters start code x and stop code y.
The values for x and y can range from A to D and from a to d.
Valid start/stop characters range from A to D and from a to d. You can
define them as part of the bar code field, or you can download them as
part of the print data. Start/stop characters sent down with printer data
override the characters defined by the bar code field.
IPL Programmer’s Reference Manual 143](https://image.slidesharecdn.com/ipl-100603063325-phpapp01/85/Ipl-159-320.jpg)
![Chapter 7 — IPL Command Reference
Bar Code, Select Type (continued)
Code 11
c5[,m]
The default for m is 0.
Values for m
m Description
0 Selects Code 11. Printer enters 2 check digits.
1 Selects Code 11. Printer enters 1 check digit.
2 Selects Code 11. Host enters 2 check digits and printer verifies.
3 Selects Code 11. Host enters 1 check digit and printer verifies.
Code 128
c6[,m1][,m2][,m3]
The default for m1, m2, and m3 = 0.
Values for m1 and m2
m1,m2 Description
0,0 Selects Code 128, keep parentheses and spaces.
0,1 Selects Code 128, ignore parentheses and spaces in the bar code but keep
them in the interpretive field.
1,0 Selects UCC-128 Serial Shipping Container Code.
1,1 Selects UCC-128 Serial Shipping Container Code and keep parentheses and
spaces in interpretive field.
In Emulation mode, you can print the Function 1 character by entering
<SUB> 1. In Advanced mode, you can print the Function 1 character by
entering <SUB><SUB> 1. You can print the characters for Function 2, 3,
and 4 in the same way.
UCC-128 serial shipping container code automatically starts in subset C
with a <FNC1>. It is a fixed length version of Code 128 requiring you to
enter 19 numeric characters. The printer forces the first two characters to
zero.
144 IPL Programmer’s Reference Manual](https://image.slidesharecdn.com/ipl-100603063325-phpapp01/85/Ipl-160-320.jpg)
![Chapter 7 — IPL Command Reference
Bar Code, Select Type (continued)
UPC/EAN
c7[,m1][,m2]
The default for m1 and m2 is 0.
Values for m1
m1 Description
0 Selects UPC/EAN Codes. Printer enters check digit. Flag 1 enabled.
1 Selects UPC/EAN Codes. Printer enters check digit. Flag 1 disabled.
2 Selects UPC/EAN Codes. Host enters check digit and printer verifies Flag 1
enabled.
3 Selects UPC/EAN Codes. Host enters check digit and printer verifies. Flag 1
disabled.
Values for m2
m2 Description m2 Description
0 variable length 5 UPC Version D1
1 EAN 8 6 UPC Version D2
2 EAN 13 7 UPC Version D3
3 UPC Version A 8 UPC Version D4
4 UPC Version E 9 UPC Version D5
The variable length option selects the UPC/EAN version by the number of
characters in the data field. The number of data characters and check
characters allowed for each version are:
EAN 8 7 data + 1 check character
EAN 13 12 data + 1 check character
UPC version A 11 data + 1 check character
UPC version E 6 data + 1 check character
UPC version D1 13 data + 1 check character
UPC version D2 18 data + 2 check characters
UPC version D3 22 data + 2 check characters
UPC version D4 25 data + 3 check characters
UPC version D5 29 data + 3 check characters
Use a “.” to delimit the bar code data from the supplemental data. Data to
the right of the “.” is supplemental data; data to the left is bar code data.
You can add the two- or five-digit supplemental to any version of the
UPC/EAN code.
146 IPL Programmer’s Reference Manual](https://image.slidesharecdn.com/ipl-100603063325-phpapp01/85/Ipl-162-320.jpg)
![Chapter 7 — IPL Command Reference
Bar Code, Select Type (continued)
The flag 1 option only applies to EAN 8, EAN 13, and UPC version A.
For EAN 13, enabling the flag 1 option prints the first character of the bar
code interpretive. For EAN 8 and UPC version A, enabling the flag 1
option moves the first and last character of the bar code interpretive
outside of the guard bars.
UPC Versions D1 - D5 are not supported in the 3400 C/D, 3400e, 4420,
4440, EasyCoder F4, PF2i, PF4i and PM4i printers.
HIBC Code 39
c8[,m1][,m2]
The default for m1 is 0.
Values for m1 Conforming to the Supplier Standard
m1 Description
0 Selects HIBC Code 39. Primary format.
1 Selects HIBC Code 39. Alternate primary format.
2[,m2] Selects HIBC Code 39. Secondary format. The linkage character comes
from ,m2, which is the field identifier.
Values for m1 Conforming to the Provider Standard
m1 Description
3 Single format.
4 First data format.
5[,m2] Selects HIBC Code 39. Second data format. The linkage character comes
from ,m2, which is the field identifier.
6 Selects HIBC Code 39. Multiple data format.
Code 16K
c9
In Emulation mode, use a <SUB> 1 to represent the function 1 character.
To represent the function 1 character in Advanced mode, enter
<SUB><SUB> 1. Represent the characters for functions 2, 3, and 4 in the
same way.
To produce a square symbol, specify a height magnification of 1 in
Advanced mode. To specify a square symbol, use a height magnification of
250 in Emulation mode.
IPL Programmer’s Reference Manual 147](https://image.slidesharecdn.com/ipl-100603063325-phpapp01/85/Ipl-163-320.jpg)
![Chapter 7 — IPL Command Reference
Bar Code, Select Type (continued)
Code 49
c10
Use a <SUB> 1 to represent the function 1 character in Emulation mode.
In Advanced mode, you can represent the function 1 character by entering
<SUB><SUB> 1. You can represent the characters for functions 2, 3, and
4 in the same way.
To produce a square symbol, specify a height magnification of 1 in
Advanced mode. To specify a square symbol, use a height magnification of
250 in Emulation mode.
The printer supports only the alphanumeric (0) and numeric (2) modes.
POSTNET
c11
POSTNET uses the height (“h”) and width (“w”) commands in the same
way as a font. Other symbologies use “h” to specify the bar height and “w”
to specify the narrow bar width. POSTNET uses “h” and “w” to magnify
the base character cell. Each character cell is 13 dots high by 22 dots wide.
The default width and height magnification for POSTNET is 2 x 2,
resulting in a symbology sized according to the POSTNET specification.
PDF417
c12[[,m1][,m2][,m3]];
PDF417 is a stacked 2D symbology that provides the ability to scan across
rows of code. Each row consists of start/stop characters, row identifiers,
and symbol characters, which consist of four bars and four spaces each and
contain the actual data. This symbology uses error correction symbol
characters appended at the end to recover loss of data.
Default Parameters for PDF417
Parameter Default Description
,m1 0 The printer selects the number of columns needed to
create a symbol that is as close to square as possible.
,m2 9 The printer automatically selects the error correction level
based on the amount of data.
,m3 0 Truncating disabled.
148 IPL Programmer’s Reference Manual](https://image.slidesharecdn.com/ipl-100603063325-phpapp01/85/Ipl-164-320.jpg)
![Chapter 7 — IPL Command Reference
Bar Code, Select Type (continued)
MaxiCode
c14[,m1]
MaxiCode is a fixed-size 2D symbology where the printer ignores height
and width magnification. This symbology is made up of offset rows of
hexagonal elements, each of which is 35 mils wide by 40 mils high,
arranged around a bull’s-eye finder pattern. Each hexagon represents one
bit of information and is either black or white depending on the state of
the encoded data bit. United Parcel Service (UPS) developed MaxiCode
for the specific purpose of encoding information about a parcel.
This table lists the possible values for ,m1. The default value
autodiscriminates between Modes 2, 3, and 4.
Note: If you have developed previous applications using Mode 0, your
printer will still support your application; however, we recommend using
Mode 2 or 3 for new applications.
Values for m1
m1 Description
2 Structured Carrier Message for numeric postal codes up to 9 digits
3 Structured Carrier Message for alphanumeric postal codes up to 6 characters
4 Standard Symbol
5 Full Enhanced Error Correction (EEC)
6 Reader Programming
When you select MaxiCode, you must format your data to conform to the
five fields described in the next table.
Note: The header only applies to Structured Carrier Message (Modes 2 and
3). The Structured Carrier Message header is optional.
MaxiCode Fields
Field Description of Field Number of Characters Default
1 Header (optional) Nine None
2 Postal code Six or nine None
3 Country code Three 840 (U.S.)
4 Service class Three 999
5 Secondary Message 84 None
1 2 3 4 5
p
IPL.018
IPL Programmer’s Reference Manual 151](https://image.slidesharecdn.com/ipl-100603063325-phpapp01/85/Ipl-167-320.jpg)
![Chapter 7 — IPL Command Reference
Bar Code, Select Type (continued)
Notes: The NULL character is not supported. If the NULL character appears in
the user data, you will lose it along with any following data.
All control characters (<RS>, <GS>, <EOT>, etc.) must be preceded by a
<SUB> character, as illustrated in the following examples.
This example illustrates the command for MaxiCode Mode 2:
<STX><ESC>C<ETX>
<STX><ESC>P<ETX>
<STX>E1;F1<ETX>
<STX>H0;o10,10<ETX>
<STX>B1;o100,300;f1;c14,2;h6;w6;d0,100<ETX>
<STX>R<ETX>
<STX><ESC>E1<CAN><ETX>
<STX>MaxiCode Sample Mode 2<CR><ETX>
<STX>[)><SUB><RS>01<SUB><GS>01982039280<SUB><GS>840<SUB>
<GS>001<SUB><GS>1Z94924221455215<SUB><RS>Intermec 6001
36th Ave West Everett, WA 98203<SUB><EOT><ETX>
<STX><ETB><ETX>
This example illustrates the command for MaxiCode Mode 3:
<STX><ESC>P<ETX>
<STX>E1;F1<ETX>
<STX>H0;o10,10<ETX>
<STX>B1;o100,300;f1;c14,3;h6;w6;d0,100<ETX>
<STX>R<ETX>
<STX><ESC>E1<CAN><ETX>
<STX>MaxiCode Sample Mode 3<CR><ETX>
<STX>[)><SUB><RS>01<SUB><GS>96T51654<SUB><GS>484<SUB>
<GS>066<SUB><GS>1Z00000256<SUB><RS><SUB><EOT><ETX>
<STX><ETB><ETX>
JIS-ITF
c15[,m]
The default for m is 0.
Values for m
m Description
0 Selects 5 dot narrow bar width magnification.
1 Selects 8 dot narrow bar width magnification.
2 Selects 10 dot narrow bar width magnification.
The next command defines a data source for the current field and how
many characters are in the field.
d[n][,m]
The default for n,m is 0,14.
152 IPL Programmer’s Reference Manual](https://image.slidesharecdn.com/ipl-100603063325-phpapp01/85/Ipl-168-320.jpg)
![Chapter 7 — IPL Command Reference
Bar Code, Select Type (continued)
Values for n
n Description
d0[,m] This field receives data from a host. The ,m is the data length, which can be
set to 6 (condensed), 14 (standard), and 16 (extended).
d2[,m] This field acts as a slave field and receives its data from another field (master
slave). The ,m is the master slave field ID.
d3[,m] The printer defines the data during Program mode (fixed). The ,m
determines the JIS-ITF type. If the data length is not exactly 6, 14, or 16, the
printer uses the next highest JIS-ITF type with zero padding in front.
The JIS-ITF bar code is the Japanese Industry Standard for Interleaved
2 of 5. JIS-ITF bar codes are in a box of solid black that measures 4.75
mm (0.19 in) and always include an interpretive field [21 x 14O CR-B
(JIS x 9001)] centered beneath the bar code field.
Valid narrow bar width magnifications are 5, 8, and 10 dots. Due to
printhead dot size limitations, the printer cannot achieve a true 2.5 to 1
ratio when using a narrow bar width of 5 dots. The printer uses a wide bar
width of 12 dots for a true 2.4 to 1 ratio instead.
JIS-ITF bar code fields consist of these three categories: standard,
condensed, and enlarged. If you are not using the command to define the
source of the field data, the printer automatically chooses a category. If
your bar code field contains 14 characters, the printer uses standard JIS-
ITF. If your field contains 6, the printer uses the condensed version, and if
your field contains 16, the printer uses the enlarged version.
HIBC Code 128
c16[,m1][,m2]
The default for m1 is 0.
Values for m1 Conforming to the Supplier Standard
m1 Description
0 Selects HIBC Code 128. Primary format.
1 Selects HIBC Code 128. Alternate primary format.
2,m2 Selects HIBC Code 128. Secondary format. The linkage
character comes from ,m2, which is the field identifier.
IPL Programmer’s Reference Manual 153](https://image.slidesharecdn.com/ipl-100603063325-phpapp01/85/Ipl-169-320.jpg)
![Chapter 7 — IPL Command Reference
Bar Code, Select Type (continued)
Values for m1 Conforming to the Provider Standard
m1 Description
3 Single format.
4 First data format.
5,m2 Selects HIBC Code 128. Second data format. The linkage
character comes from ,m2, which is the field identifier.
6 Selects HIBC Code 128. Multiple data format.
Data Matrix Symbology Versions ECC-100 and ECC-200
c17[,m1][,m2][,m3,m4[,m5,m6]]
Data Matrix is a 2D matrix symbology made up of square modules
arranged within a perimeter finder pattern. The finder pattern is a
perimeter to the data region and is one module wide. Two adjacent sides
are solid dark lines. These lines are used to define physical size, orientation,
and symbol distortion. Intermec supports these two versions of Data
Matrix: ECC-100 and ECC-200. Use ECC-200 for new applications.
Data Matrix Default Parameters
Parameter Default Description
,m1 200 ECC-200
,m2 0 Square
,m3 0 Position of current symbol in group
,m4 ,m3 Total number of symbols in group
,m5 1 File identifier
,m6 1 File identifier
,m1 is a three-digit number that selects the Data Matrix version. Possible
values are:
• 100 (ECC-100)
• 200 (ECC-200)
Note: The EasyCoder F4, Pf2i, PF4i, and PM4i printers only support
,m1 = 200.
,m2 is a one-digit value that indicates whether your symbol will be square
or rectangular. The amount of data you enter determines the size of the
symbol. Possible values are:
• 0 = square
• 1 = rectangular
154 IPL Programmer’s Reference Manual](https://image.slidesharecdn.com/ipl-100603063325-phpapp01/85/Ipl-170-320.jpg)
![Chapter 7 — IPL Command Reference
Bar Code, Select Type (continued)
Use ,m3, ,m4, ,m5, and ,m6 when you define Structured Append symbols
within ECC-200.
Structured Append Parameter Values for Data Matrix
Possible
Parameter Description Values
,m3 The position of the current symbol in the group 0 - 16
,m4 The total number of symbols in the group 0 - 16
,m5 File identifier 1 - 254
,m6 File identifier 1 - 254
For example, setting ,m3,m4,m5,m6 to 2,5,1,43 indicates that the current
symbol definition is the second in a group of 5 with the file identifier of
1,43.
If you do not set ,m3 or you set it to 0, you disable Structured Append
mode. If you do not set ,m5 or ,m6, the settings default to 1,1.
Notes: This table lists how many numeric, alpha, or 8-bit characters you can place
in a Data Matrix bar code for each version.
Character Capacity for Data Matrix Versions
Type of Character ECC-100 ECC-200
All numeric 88 3116
All alpha 59 2335
All 8-bit 38 1556
QR Code
c18[,m1][,m2][,m3]
QR Code is a matrix 2D symbology that encodes data into patterns
consisting of black and white dots or modules. A three position detection
pattern enables omni-directional reading and ultra high-speed reading. QR
Code can handle a wide range of data, including numerical, alphabetical,
Kanji, Hiragana, Katakana, graphics, and control codes. A built-in error
correction function enables the QR Code to repair errors in the code.
IPL Programmer’s Reference Manual 155](https://image.slidesharecdn.com/ipl-100603063325-phpapp01/85/Ipl-171-320.jpg)
![Chapter 7 — IPL Command Reference
Bar Code, Select Type (continued)
Values for m1, m2, m3
Parameter Default Description Possible Values
,m1 2 QR model 1 = Model 1
2 = Model 2
,m2 M Error correction L = 7% correction
level M = 15% correction
Q = 25% correction
H = 30% correction
,m3 8 Mask number 0-7 = Mask type
8 = Auto-selection of mask by printer
Notes: You can only create QR symbols up to 3550 characters.
MicroPDF417
c19[,m1][,m2]
MicroPDF417 is a 2D symbology, derived from PDF417. You use
MicroPDF417 for applications needing improved area efficiency but
without the requirement for PDF417’s maximum data capacity.
MicroPDF417 replaces PDF417’s 17-module-wide start/stop patterns and
left/right row indicators with a unique set of 10-module-wide Row
Address Patterns, which were designed both to reduce overall symbol
width and to enable linear scanning at row heights as low as 2X.
MicroPDF417, unlike PDF417, may only be printed in certain defined
combinations of number of data columns (m1) and number of data rows
(m2), up to a maximum of 4 data columns by 44 data rows.
Values for m1 and m2
Parameter Default Description
m1 0 Sets the number of data columns in the printed symbol.
The default setting (0) allows the printer to determine
the most efficient size for given data. Possible values are 0
through 4.
m2 0 Sets the number of data rows in the printed symbol. The
default setting (0) allows the printer to determine the
most efficient size for given data. Possible values depend
on the setting for m1.
156 IPL Programmer’s Reference Manual](https://image.slidesharecdn.com/ipl-100603063325-phpapp01/85/Ipl-172-320.jpg)
![Chapter 7 — IPL Command Reference
Bar Code, Select Type (continued)
MicroPDF417 uses the following symbol sizes (data columns x data rows),
each with a distinct error correction capacity:
1x11 2x8 3x6 4x4
1x14 2x11 3x8 4x6
1x17 2x14 3x10 4x8
1x20 2x17 3x12 4x10
1x24 2x20 3x15 4x12
1x28 2x23 3x20 4x15
2x26 3x26 4x20
3x32 4x26
3x38 4x32
3x44 4x38
4x44
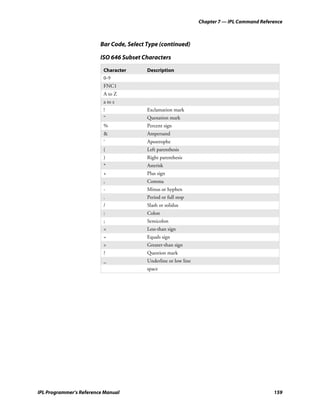
RSS
c20[,m1][,m2][,m3]
The Reduced Space Symbology (RSS) family contains seven different
linear bar codes that can be used individually (c20) or as Composite
Components for the EAN.UCC Composite symbology (c21).
RSS Bar Code Descriptions
RSS Bar Code Description
RSS-14 Numeric only linear symbology used to encode the Global Trade Item Numbers
(GTINs) for scanning in the supply chain.
RSS-14 is smaller than EAN-13 or UPC-A and may include up to 13 digits. The check
digit is not included in the data.
RSS-14 Truncated Reduced height symbology designed to fit on small, narrow items. This bar code may
include up to 13 digits. The check digit is not included in the data.
RSS-14 Stacked A variation that is stacked in two rows, and is suitable for applications with limited
width available. This bar code may include up to 13 digits. The check digit is not
included in the data.
RSS-14 Stacked Full height version symbology with omni directional scanning capability so it can be
Omnidirectional scanned at retail point-of-sale. This bar code may include up to 13 digits. The check
digit is not included in the data.
RSS-14 Limited Numeric only linear symbology used to encode the Global Trade Item Numbers
(GTINs) for scanning in the supply chain. This bar code may include up to 13 digits.
The check digit is not included in the data.
RSS-14 Expanded Encodes a maximum of 74 numeric or 41 alphanumeric characters from a subset of ISO
646 consisting of the upper and lowercase letters, digits, 20 selected punctuation
characters and the FNC1 character. See the “ISO 646 Subset Characters” table on page
159.
RSS-14 Expanded Stacked RSS-14 Expanded symbology that is stacked in 2 to 11 rows.
IPL Programmer’s Reference Manual 157](https://image.slidesharecdn.com/ipl-100603063325-phpapp01/85/Ipl-173-320.jpg)
![Chapter 7 — IPL Command Reference
Bar Code, Select Type (continued)
Values for m1, m2, m3
Parameter Default Description Possible Values
,m1 2 Select RSS 0 = RSS-14
version 1 = RSS-14 Truncated
2 = RSS-14 Stacked
3 = RSS-14 Stacked Omnidirectional
4 = RSS Limited
5 = RSS Expanded
6 = RSS Expanded Stacked
,m2 1 Height of the ,m1 = 2, 3, and 6 only
separator pattern Minimum is 1X the defined bar
row magnification of the barcode (w[n]
command). If too low of a value for m2
is entered, the height will be changed to
the smallest legal value for the selected
magnification.
,m3 2 Number of ,m1 = 6 only
segments per Even numbers in the range of 2 to 22
row
The height of the bar codes or the height of each row in the stacked bar
codes is determined by the bar height magnification command (h[n]). For
RSS-14 Stacked, the lower row is set using the value specified in the bar
height magnification command and the upper row height is calculated
from this value. If the bar height magnification command is not sent, the
bar code will default to the proper height specified for the selected width:
• For m1 = 0 h[n] = 33*w[n]
• For m1 = 1 h[n] = 13*w[n]
• For m1 = 2 h[n] = 7*w[n]
• For m1 = 3 h[n] = 33*w[n]
• For m1 = 4 h[n] = 10*w[n]
• For m1 = 5 h[n] = 33*w[n]
• For m1 = 6 h[n] = 34*w[n]
If the amount of data sent to the bar code exceeds the defined limit, an
Error Code 11 is generated and the bar code does not print.
158 IPL Programmer’s Reference Manual](https://image.slidesharecdn.com/ipl-100603063325-phpapp01/85/Ipl-174-320.jpg)
![Chapter 7 — IPL Command Reference
Bar Code, Select Type (continued)
EAN.UCC Composite
c21[,m1][,m2][,m3][,m4][,m5][,m6]
The EAN.UCC Composite symbology consists of an EAN.UCC linear
component associated with an adjacent 2D Composite Component.
The linear component encodes the primary identification so that it is
readable by all scanning technologies and so that 2D imagers can use the
linear component as a finder pattern for the adjacent 2D Composite
Component. The linear components include these bar codes:
• UCC/EAN-128
• UPC-A
• EAN-8
• EAN-13
• RSS family of bar codes
The 2D Composite Component encodes supplementary data, such as
batch number or expiration date. There are three types of 2D Composite
Components that are all based on the PDF417 symbology:
• CC-A is a structural variant of MicroPDF417.
• CC-B is a MicroPDF417 symbol.
• CC-C is a PDF417 symbol.
The data for the linear and 2D components is separated by the <HT>
command with the data for the linear component sent first. For example,
to print a Composite bar code with the linear component encoding
112233445566 and the 2D component encoding aabbccddeeff, the data is
sent to the printer as 112233445566<HT>aabbccddeeff.
For all possible combinations of linear and 2D Composite components,
see the next table, “Combinations of Linear and 2D Composite
Components and Capacity.”
160 IPL Programmer’s Reference Manual](https://image.slidesharecdn.com/ipl-100603063325-phpapp01/85/Ipl-176-320.jpg)
![Chapter 7 — IPL Command Reference
Bar Code, Select Type (continued)
Values for m1, m2, m3, m4, m5, m6
Parameter Default Description Possible Values
,m1 0 Select version 0 = UCC/EAN-128 with CC-C
1= UCC/EAN-128 with CC-A or CC-B
2= EAN-13 with CC-A or CC-B
3= EAN-8 with CC-A or CC-B
4= UPC-A with CC-A or CC-B
5= UPC-E with CC-A or CC-B
6= RSS-14 with CC-A or CC-B
7= RSS-14 Truncated with CC-A or CC-B
8= RSS-14 Stacked with CC-A or CC-B
9= RSS-14 Stacked Omnidirectional with CC-A or CC-B
10 = RSS Limited with CC-A or CC-B
11 = RSS Expanded with CC-A or CC-B
12 = RSS Expanded Stacked with CC-A or CC-B
Note: The printer determines whether CC-A or CC-B wil be
used based on the amount of data sent to the 2D Composite
Component.
,m2 1 Height of the ,m1 = 0, and 6-12 only:
separator pattern Range is between 1X and 2X the defined bar magnification of
row the bar code (w[n] command). If too low of a value for ,m2 is
entered, the height is changed to the smallest legal value for the
selected magnification. If too high a value is entered, an Error
Code 11”Invalid bar code data” is generated.
Example: If w[n] is set to 3 the separator height can be 3 to 6.
,m3 0 (m1 = 0) Number of ,m1 = 0: ,m3 = 0 selects the largest number of columns for the
4 (m1 = 12) segments or 2D bar code to fit within the 1D bar code including its quiet
columns per row zones. Values for ,m3 are from 1 to 30.
,m1 = 12: the number of segments per row.
,m4 1 Display space, “(“ ,m4 = 0: the bar code does not include any of the “space”, “(“
and “)” characters and “)” characters in the data, but these characters are displayed
in the human readable interpretive field.
,m4 = 1: the bar code and the human readable interpretive field
includes exactly the same data.
,m5 0 Height of each row ,m5 = 0: the height is 3X the magnification (default)
in the 2D bar code
,m6 0 Print the linear ,m6 = 0: do not print the human readable interpretive field for
barcode interpretive the linear bar code
field ,m6 = 1: print the human readable interpretive field for the
linear bar code
Note: The human readable interpretive field for the 2D
Composite Component is displayed if the i[n] is set to 1.
162 IPL Programmer’s Reference Manual](https://image.slidesharecdn.com/ipl-100603063325-phpapp01/85/Ipl-178-320.jpg)
![Chapter 7 — IPL Command Reference
Bar Code Field, Create or Edit
Purpose: Edits or creates a bar code field.
Syntax: Bn[,name]
Printers:
Printer Default Values for n Notes
All n=0 0 - 199 The ,name parameter is optional. The field
can be up to eight ASCII characters, but
cannot start with a numeric character.
Notes: When you create a bar code field, you automatically create an interpretive
field if you have enabled the Interpretive parameter.
Bar Code Field Default Parameters
Parameter Syntax Default
Field origin o 0,0
Field direction f 0 degrees
Bar code type c Code 39
Check digits Disabled
Prefix None
Data length 20
Ratio r 3 to 1
Interpretive i Disabled
Height magnification h 50
Width magnification w 1
The printer generates an error code (38) if the field number is out of
range.
IPL Programmer’s Reference Manual 163](https://image.slidesharecdn.com/ipl-100603063325-phpapp01/85/Ipl-179-320.jpg)
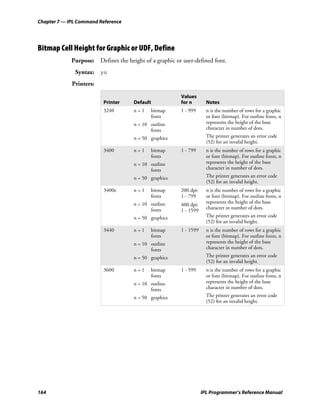
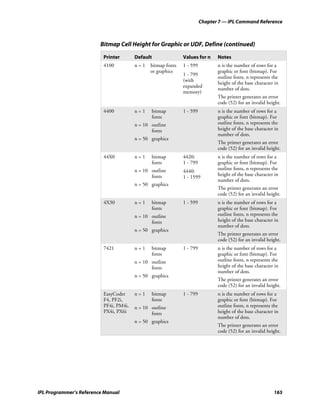
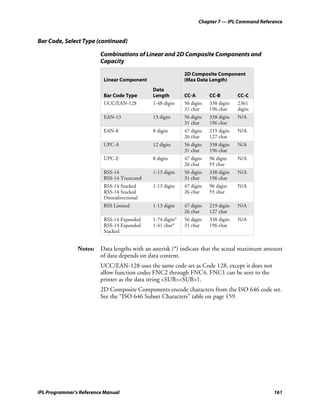
![Chapter 7 — IPL Command Reference
Bitmap Cell Width for Graphic or UDF, Define (continued)
Printer Default Values for n Notes
7421 n=1 bitmap fonts 1 - 799 The printer generates an
or graphics error code (52) for an
invalid width.
n = 10 outline fonts
EasyCoder n=1 bitmap fonts 1 - 799 The printer generates an
F4, PF2i, or graphics error code (52) for an
PF4i, invalid width.
n = 10 outline fonts
PM4i,
PX4i, PX6i
Bitmap User-Defined Font, Clear or Define
Purpose: Clears or creates a user-defined bitmap font set. The font ID number is n.
Syntax: Tn[,name]
Printers:
Printer Default Values for n Notes
All N/A 3 to 6 and 8 to 19 The ,name parameter is an optional field.
The field can be up to eight ASCII
characters.
Notes: If you have already defined font set n, the printer erases all previous
characters in the font. You can recreate an existing font, but you cannot
edit it. To change any characters, you must transmit the entire font set.
Border Around Human-Readable Text, Define
Purpose: Defines a border around a human-readable field.
Syntax: bn
Printers:
Printer Default Values for n Notes
3240 n=0 0 - 199 When n is greater than 0, field
no borders (black letters) prints white letters with n dot
size border around the field.
3400A n=0 no borders 0 - 199 When n is greater than 0, field
3400B (black letters) prints white letters with n dot
size border around the field.
3400C n=0 no borders 0 - 999 When n is greater than 0, field
3400D (black letters) prints white letters with n dot
size border around the field.
IPL Programmer’s Reference Manual 167](https://image.slidesharecdn.com/ipl-100603063325-phpapp01/85/Ipl-183-320.jpg)
![Chapter 7 — IPL Command Reference
Border Around Human-Readable Text, Define (continued)
Printer Default Values for n Notes
3400e n=0 no borders 0 - 999 When n is greater than 0, field
(black prints white letters with n dot
letters) size border around the field.
3440 n=0 no borders 0 - 999 When n is greater than 0, field
(black prints white letters with n dot
letters) size border around the field.
3600 n=0 no borders 0 - 199 When n is greater than 0, field
(black prints white letters with n dot
letters) size border around the field.
4100 n=0 no borders 0 - 199 When n is greater than 0, field
(black prints white letters with n dot
letters) size border around the field.
4400 n=0 no borders 0 - 199 When n is greater than 0, field
(black prints white letters with n dot
letters) size border around the field.
44X0 n=0 no borders 0 - 999 When n is greater than 0, field
(black prints white letters with n dot
letters) size border around the field.
4X30 n=0 no borders 0 - 199 When n is greater than 0, field
(black prints white letters with n dot
letters) size border around the field.
7421 n=0 no borders 0 -999 When n is greater than 0, field
(black prints white letters with n dot
letters) size border around the field.
EasyCoder n=0 no borders 0 - 999 When n is greater than 0, field
F4, PF2i, (black prints white letters with n dot
PF4i, PM4i, letters) size border around the field.
PX4i, PX6i
Box Field, Create or Edit
Purpose: Accesses or creates a box field.
Syntax: Wn[,name]
Printers:
Printer Default Values for n Notes
All n=0 0 - 199 The ,name parameter is optional. The field can
be up to eight ASCII characters, but cannot
start with a numeric character.
168 IPL Programmer’s Reference Manual](https://image.slidesharecdn.com/ipl-100603063325-phpapp01/85/Ipl-184-320.jpg)
![Chapter 7 — IPL Command Reference
Code 39 Prefix Character, Define
Purpose: Defines the prefix for a Code 39 field. The prefix is only valid for Code 39
fields.
Syntax: p[n1][n2][n3][n4];
Printers:
Printer Default Values for n Notes
All No prefix A to Z Enter the prefix after you select Code 39. For
(uppercase example, enter c0,3;pABC4; rather than
only) and pABC4;c0,3;.
0 to 9 When you enter the @ character as n1, it
clears all prefixes. Prefix characters do not
appear in the interpretive field.
Command Tables, Load
Purpose: Downloads a command table, with t as the command table identifier. This
command table identifier is followed by the nibblized command entries
(c1-cn) to be loaded into the table. The printer expects two hex digits for
every entry in the table.
Syntax: C[t], [command 1], [command 2], ..., [command n]
t is the command table identifier.
Printers:
Printer Default Values for t Notes
All except the N/A 0 = Print mode commands Data must be nibblized
EasyCoder 1 = Escape print commands ASCII characters ranging
F4, PF2i, 2 = Shift print commands from 0 to 9 and A to F.
PF4i, PM4i, 3 = Status response
PX4i, PX6i, 4 = Protocol characters
and 7421
Notes: New commands become effective after you reset the printer or turn the
power off and back on. For help, see Appendix D, “User-Defined Interface
Tables.”
To change an entry in the table, you must send the entire table to the
printer as a string of ASCII characters in hexadecimal form. Any entry that
you do not redefine retains its old value. To modify only a few commands,
send the <ESC>Z command, capture the output, modify it, and send it
back to the printer.
IPL Programmer’s Reference Manual 173](https://image.slidesharecdn.com/ipl-100603063325-phpapp01/85/Ipl-189-320.jpg)
![Chapter 7 — IPL Command Reference
Current Edit Session, Save
Purpose: Saves the current page, format, UDC, or UDF being edited. The printer
remains in Program mode.
Syntax: N
Notes: The printer automatically saves the current page, format, or UDC when
you call a new one or when you exit Program mode.
Data Source for Format in a Page, Define
Purpose: Defines a data source for a format assigned to a page position.
Syntax: en[,m1][,m2]
Printers:
Printer Default Values for n Notes
All n=0 0 - format receives its data The format ID must be the
except m1 = a during Print mode same for both the master and
4X30 m2 = 0 slave formats.
1 - format is a slave of
another format within For the 4X30, this command
this page. was called Format Page
Position, Define Data Source.
All values are the same.
m1 is the position of the master format within the page.
m2 is the data offset to apply to the slave format. You can only offset data
that is delimited by numeric field separator <FS> or alphanumeric field
separator <GS>.
Field, Delete
Purpose: Deletes field n from the format.
Syntax: Dn
Printers:
Printer Default Values for n Notes
All n=0 0 -199. You cannot delete the last field in a format. If
you delete the current field, the field pointer
points to the next field. If you delete a master
field, you also delete all slave fields of that
master field.
174 IPL Programmer’s Reference Manual](https://image.slidesharecdn.com/ipl-100603063325-phpapp01/85/Ipl-190-320.jpg)
![Chapter 7 — IPL Command Reference
Field Data, Define Source
Purpose: Defines a data source for the current field and how many characters are in
the field.
Syntax: dn[,m1][,m2]
Printers:
Values for m1
Printer Default Values for n (d0 or d1)
3240 0,20,0 Bar code fields 0 = Data entered in Print mode 0 - 3550
0,30,0 Human- 1 = Data entered in Print mode
readable fields 2 = Data comes from field ,m1
3 = Fixed data
3400 0,20,0 Bar code fields 0 = Data entered in Print mode 0 - 3550
0,30,0 Human- 1 = Data entered in Print mode
readable fields 2 = Data comes from field ,m1
3 = Fixed data
3440 0,20,0 Bar code fields 0 = Data entered in Print mode 0 - 3550 (incl.
0,30,0 Human- 1 = Data entered in Print mode 2D fields)
readable fields 2 = Data comes from field ,m1
3 = Fixed data
3600 0,20,0 Bar code fields 0 = Data entered in Print mode 0 - 3550
0,30,0 Human- 1 = Data entered in Print mode
readable fields 2 = Data comes from field ,m1
3 = Fixed data
4100 0,20,0 Bar code fields 0 = Data entered in Print mode 0 - 250
0,30,0 Human- 1 = Data entered in Print mode
readable fields 2 = Data comes from field ,m1
3 = Fixed data
4400 0,20,0 Bar code fields 0 = Data entered in Print mode 0 - 250
0,30,0 Human- 1 = Data entered in Print mode
readable fields 2 = Data comes from field ,m1
3 = Fixed data
IPL Programmer’s Reference Manual 175](https://image.slidesharecdn.com/ipl-100603063325-phpapp01/85/Ipl-191-320.jpg)
![Chapter 7 — IPL Command Reference
Field Data, Define Source (continued)
Values for m1
Printer Default Values for n (d0 or d1)
44X0 0,20,0 Bar code 0 = Data entered in Print mode 0 - 3550
fields 1 = Data entered in Print mode
0,30,0 Human- 2 = Data comes from field ,m1
readable 3 = Fixed data
fields
4X30 0,20,0 Bar code 0 = Data entered in Print mode 0 - 3550
fields 1 = Data entered in Print mode
0,30,0 Human- 2 = Data comes from field ,m1
readable 3 = Fixed data
fields
7421 0,20,0 Bar code 0 = Data entered in Print mode 0 - 3550
fields 1 = Data entered in Print mode
0,30,0 Human- 2 = Data comes from field ,m1
readable 3 = Fixed data
fields
EasyCoder 0,20,0 Bar code 0 = Data entered in Print mode 0 - 3550
F4, PF2i, fields 1 = Data entered in Print mode
PF4i, PM4i, 0,30,0 Human- 2 = Data comes from field ,m1
PX4i, PX6i
readable 3 = Fixed data
fields
The syntax for this command is illustrated in these examples.
d0[,m1]
d1[,m1];
Enter optional data in Print mode. ,m1 is the maximum amount of data
that you can enter into this field. The default for ,m1 is 20 characters for
bar code fields, and 30 characters for human-readable fields.
d2,m1[,m2];
Copy data into this field from field ,m1. You must define the field before
you can use it. ,m2 is an optional positive integer numeric field offset that
can range from 0 to 9999, with 0 as the default. You can only offset data
delimited by numeric field separator (FS) or alphanumeric field separator
(GS). A bar code field cannot copy data from a human-readable field, but
a human-readable field can copy data from a bar code field.
d3,m1;
Fixed data m1 is stored as part of the format, and you use it every time you
print the current field. You cannot change entered data with print
commands.
176 IPL Programmer’s Reference Manual](https://image.slidesharecdn.com/ipl-100603063325-phpapp01/85/Ipl-192-320.jpg)
![Chapter 7 — IPL Command Reference
Font Type, Select
Purpose: Selects a font type for human-readable fields.
Syntax: cn[,m]
where:
n is the font ID number.
,m is the intercharacter gap (the space between characters). If you do not
specify ,m, the printer uses the default value of the selected font.
Printers:
Printer Default Values for n Values for m
3240 n=0 0 to 26, 28, 30 to 41 -199 to 199
50 to 56 with the Kanji option
3400A n=0 0 to 24 -199 to 199
3400B n=0 0 to 25, 30 to 41, -199 to 199
3400C 50 to 56 with the Kanji option
3400D
3400e n=0 0 to 26, 28, 30 to 41 -199 to 199
50 to 56 with the Kanji option
3440 n=0 0 to 26, 28, 30 to 41 -199 to 199
50 to 56 with the Kanji option
3600 n=0 0 to 25, 30 to 41 -199 to 199
50 to 56 with the Kanji option
4100 n=0 0 to 24 -199 to 199
4400 n=0 0 to 25 -199 to 199
44X0 n=0 0 to 26, 28, 30 to 41 -199 to 199
50 to 56 with the Kanji option
4X30 n=0 0 to 26, 28, 30 to 41 -199 to 199
7421 n=0 0 to 26, 28, 30 to 41 -199 to 199
EasyCoder n=0 0 to 26, 28, 30 to 41 -199 to 199
F4
EasyCoder n=0 0 to 26, 28, 30 to 41, 61 to 70 -199 to 199
PF2i, PF4i,
PM4i,
PX4i, PX6i
180 IPL Programmer’s Reference Manual](https://image.slidesharecdn.com/ipl-100603063325-phpapp01/85/Ipl-196-320.jpg)
![Chapter 7 — IPL Command Reference
Format, Create or Edit
Purpose: Edits or creates a format.
Syntax: An[,name] or Fn[,name]
Printers:
Printer Default Values for n Notes
3240 N/A 1 - 99 n is the format ID number.
The ,name parameter is an optional field. The
field can be up to eight ASCII characters, but
cannot start with a numeric character.
3400A N/A 1 - 19 n is the format ID number.
3400B The ,name parameter is an optional field. The
field can be up to eight ASCII characters, but
cannot start with a numeric character.
3400C N/A *, 1 - 19 If you use an asterisk (*) for the label format,
3400D the printer does not store the label format in
permanent memory. When you turn the
printer off, the printer loses the label format.
3400e N/A *, 1 - 99 If you use an asterisk (*) for the label format,
the printer does not store the label format in
permanent memory. When you turn the
printer off, the printer loses the label format.
3440 N/A *, 1 - 99 If you use an asterisk (*) for the label format,
the printer does not store the label format in
permanent memory. When you turn the
printer off, the printer loses the label format.
3600 N/A 1 - 19 n is the format ID number.
The ,name parameter is an optional field. The
field can be up to eight ASCII characters, but
cannot start with a numeric character.
4100 N/A 1 - 19 n is the format ID number.
The ,name parameter is an optional field. The
field can be up to eight ASCII characters, but
cannot start with a numeric character.
4400 N/A 1 - 19 n is the format ID number.
The ,name parameter is an optional field. The
field can be up to eight ASCII characters, but
cannot start with a numeric character.
44X0 N/A *, 1 - 99 If you use an asterisk (*) for the label format,
the printer does not store the label format in
permanent memory. When you turn the
printer off, the printer loses the label format.
182 IPL Programmer’s Reference Manual](https://image.slidesharecdn.com/ipl-100603063325-phpapp01/85/Ipl-198-320.jpg)

![Chapter 7 — IPL Command Reference
Height Magnification of Bar, Box, or UDC, Define (continued)
Notes: For human-readable fields, graphics, and the POSTNET symbology, n
represents the vertical magnification of the character bitmap.
If you set n to a number that is too large, the printer uses the highest value
it can support.
In Advanced Mode, a dot is 5 mil for a 200 dpi printer and 2.5 mil for a
400 dpi printer. For the 4X30 printers, a dot is 3.3 mil.
Human-Readable Field, Create or Edit
Purpose: Edits or creates a human-readable field.
Syntax: Hn[,name]
Printers:
Printer Default Values for n Notes
All n=0 0 - 199 The ,name parameter is an optional field.
You can use eight ASCII characters (not
counting the semicolon) and cannot start
with a number.
Notes: The parameters for the default field are listed in the next table.
Parameters for the Default Field
Parameter Syntax Default
Field origin o 0,0
Field direction f 0 degrees
Character rotation r 0 degrees
Font c 7 x 9 standard
Height magnification h 2
Width magnification w 2
Pitch g Disabled
Point k Disabled
Border b Disabled
Data origin d Print mode
Data length 30
IPL Programmer’s Reference Manual 189](https://image.slidesharecdn.com/ipl-100603063325-phpapp01/85/Ipl-205-320.jpg)
![Chapter 7 — IPL Command Reference
Line Field, Create or Edit
Purpose: Accesses or creates a line field.
Syntax: Ln[,name]
Printers:
Printer Default Values for n Notes
All n=0 0 to 199 The ,name parameter is an optional field. The
field can be up to eight ASCII characters.
Notes: The parameters for the default field are listed in the next table.
Parameters for the Default Field
Parameter Syntax Default
Field origin o 0,0
Field direction f 0 degrees
Line length l 100
Line width w 1
Outline Font, Clear or Create
Purpose: Clears or creates an outline font or graphic.
Syntax: Jn[,name][,type][,size]
where:
n is the font or graphic ID.
,name is a string of up to eight ASCII characters (not counting the
semicolon) that provides a name for the font or graphic.
,type is the type of the font.
,size defines the size of a TrueType font and is only needed for
double-byte fonts that exceed 512K bytes.
IPL Programmer’s Reference Manual 193](https://image.slidesharecdn.com/ipl-100603063325-phpapp01/85/Ipl-209-320.jpg)

![Chapter 7 — IPL Command Reference
Program Mode, Exit
Purpose: Instructs the printer to exit Program mode and enter Print mode. It saves
any format or page currently being edited.
Syntax: R
User-Defined Character, Clear or Create
Purpose: Clears or creates a graphic bitmap.
Syntax: Gn[,name]
Printers:
Printer Default Values for n Notes
All N/A 0 to 99 The ,name parameter is an optional field of up
to eight ASCII characters (not counting the
semicolon) and cannot start with a number.
Notes: If you have already defined graphic n, the printer erases it and redefines it.
User-Defined Character Field, Create or Edit
Purpose: Edits or creates a graphic field.
Syntax: Un[,name]
Printers:
Printer Default Values for n Notes
All n=0 0 to 199 The ,name parameter is an optional field of up
to eight ASCII characters (not counting the
semicolon) and cannot start with a number.
Notes: The parameters for the default field are listed in the next table.
Parameters for the Default Field
Parameter Syntax Default
Field origin o 0,0
Field direction f 0 degrees
Character rotation r 0 degrees
Height magnification h 1
Width magnification w 1
IPL Programmer’s Reference Manual 199](https://image.slidesharecdn.com/ipl-100603063325-phpapp01/85/Ipl-215-320.jpg)

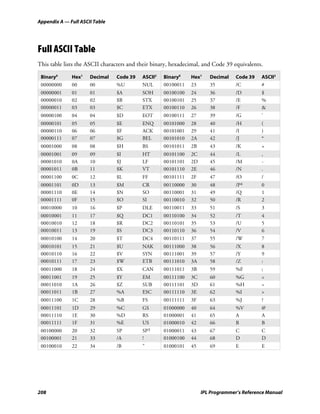
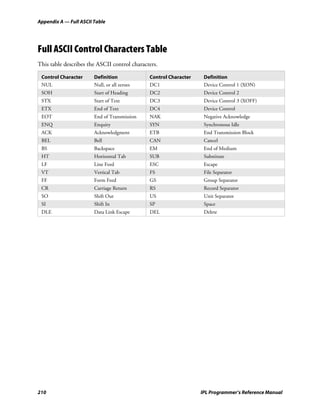
![Appendix A — Full ASCII Table
Full ASCII Table (continued)
Binary0 Hex1 Decimal Code 39 ASCII2 Binary0 Hex1 Decimal Code 39 ASCII2
01000110 46 70 F F 01100011 63 99 +C c
01000111 47 71 G G 01100100 64 100 +D d
01001000 48 72 H H 01100101 65 101 +E e
01001001 49 73 I I 01100110 66 102 +F f
01001010 4A 74 J J 01100111 67 103 +G g
01001011 4B 75 K K 01101000 68 104 +H h
01001100 4C 76 L L 01101001 69 105 +I i
01001101 4D 77 M M 01101010 6A 106 +J j
01001110 4E 78 N N 01101011 6B 107 +K k
01001111 4F 79 O O 01101100 6C 108 +L l
01010000 50 80 P P 01101101 6D 109 +M m
01010001 51 81 Q Q 01101110 6E 110 +N n
01010010 52 82 R R 01101111 6F 111 +O o
01010011 53 83 S S 01110000 70 112 +P p
01010100 54 84 T T 01110001 71 113 +Q q
01010101 55 85 U U 01110010 72 114 +R r
01010110 56 86 V V 01110011 73 115 +S s
01010111 57 87 W W 01110100 74 116 +T t
01011000 58 88 X X 01110101 75 117 +U u
01011001 59 89 Y Y 01110110 76 118 +V v
01011010 5A 90 Z Z 01110111 77 119 +W w
01011011 5B 91 %K [ 01111000 78 120 +X x
01011100 5C 92 %L 01111001 79 121 +Y y
01011101 5D 93 %M ] 01111010 7A 122 +Z z
01011110 5E 94 %N ^ 01111011 7B 123 %P {
01011111 5F 95 %O _ 01111100 7C 124 %Q |
01100000 60 96 %W ` 01111101 7D 125 %R }
01100001 61 97 +A a 01111110 7E 126 %S ~
01100010 62 98 +B b 01111111 7F 127 %T5 n6
Notes:
0 Bit positions are 76543210.
1 Hexadecimal value
2 ASCII character
3 SP is the SPACE character.
4 The Code 39 characters /P through /Y may be interchanged with the numbers 0 through 9.
5 May be interchanged with %X or %Y or %Z.
6 n is the DELETE character.
IPL Programmer’s Reference Manual 209](https://image.slidesharecdn.com/ipl-100603063325-phpapp01/85/Ipl-225-320.jpg)

![Appendix B — Character Sets
International Character Sets
The following tables show which hex codes to download for international
characters not available in the U.S. character set. To use the tables, find the
hex code for the U.S. character that corresponds with the character in your
language.
Advanced Character Table
If you are running your printer in Advanced mode, use this table to find
the right hex codes for the international character sets.
23 24 40 5B 5C 5D 5E 60 7B 7C 7D 7E
U.S. ASCII # $ @ [ ] ^ ` { ¦ } ~
U.K. ASCII £ $ @ [ ] ^ ` { ¦ } −
Germany # $ § Ä Ö Ü ^ ` ä ö ü ß
France £ $ à ° ç § ^ ` é ù è ¨
Norway/Denmark # $ @ Æ Ø Å ^ ` æ ø å −
Sweden/Finland # ¤ É Ä Ö Å Ü é ä ö å ü
Spain £ $ § ¡ Ñ ¿ ^ ` ° ñ ç ~
Switzerland # $ à ° ç é ^ ù ä ö ü è
Italy £ $ § ° ç é ^ ù à ò è ì
8636/46 Character Table
This table shows the hex codes for the character sets that print if your
printer is running under 86XX emulation mode.
23 24 40 5B 5C 5D 5E 60 7B 7C 7D 7E
U.S. ASCII # $ @ [ ] ^ ` { ¦ } ~
U.K. ASCII £ $ @ [ ] ^ ` { ¦ } ~
Germany # $ § Ä Ö Ü ^ ` ä ö ü ß
France £ $ à ° ç § ^ ` é ù è ¨
Norway/Denmark # $ @ Æ Ø Å ^ ` æ ø å ~
Sweden/Finland # ¤ É Ä Ö Å Ü é ä ö å ü
Spain Pt $ @ ¡ Ñ ¿ ^ ` ¨ ñ ç ~
Switzerland # $ à ° ç é ^ ù ä ö ü è
Italy # $ § ° ç é ^ ù à ò è ì
212 IPL Programmer’s Reference Manual](https://image.slidesharecdn.com/ipl-100603063325-phpapp01/85/Ipl-228-320.jpg)
![Appendix B — Character Sets
IBM Translation Character Table
This table shows the hex codes for the international character sets that
print if your printer is running with Translation enabled.
21 23 24 40 5B 5C 5D 5E 60 7B 7C 7D 7E
U.S. ASCII ¦ # $ @ ¢ ! ¬ ` { ¦ } ~
U.K. ASCII ¦ # £ @ $ ! ¬ ` { ¦ } −
Germany ! # $ § Ä Ö Ü ^ ` ä ö ü ß
France ! £ $ à ° ç § ^ ` é ù è ¨
Norway/Denmark ! Æ Å Ø # ¤ ^ ` æ ø å ü
Sweden/Finland ! Ä Å Ö § É ¤ ^ é ä ö å ü
Spain ¦ Ñ Pt @ [ ] ¬ ` { ñ } ¨
Switzerland ! # $ à ° ç é ^ ù ä ö ü è
Italy ! £ $ § ° ç é ^ ù à ò è ì
IPL Programmer’s Reference Manual 213](https://image.slidesharecdn.com/ipl-100603063325-phpapp01/85/Ipl-229-320.jpg)
![Appendix B — Character Sets
Code Page 850 Character Table
This table shows the character set that prints if your printer has Code Page
850 selected as the printer language.
Note: Some Intermec printers do not support Code Page 850. For more
information, see the “Printer Language, Select” command in Chapter 7.
♥ ♣
♥
♦
00 01 02 03 04 05 06 07 08 09 0A 0B 0C 0D 0E 0F
➝
➝
➝
▲
➝
▲
¶ § ➝ ➝
➝
➝ ➝ ▲ ▼
➝
10 11 12 13 14 15 16 17 18 19 1A 1B 1C 1D 1E 1F
∗
! # $ & ' ( ) + , - .
20 21
"
22 23 24
%
25 26 27 28 29 2A 2B 2C 2D 2E 2F
0 1 2 3 4 5 6 7 8 9 : ; < = > ?
30 31 32 33 34 35 36 37 38 39 3A 3B 3C 3D 3E 3F
@ A B C D E F G H I J K L M N O
40 41 42 43 44 45 46 47 48 49 4A 4B 4C 4D 4E 4F
P Q R S T U V W X Y Z [ ] -
50 51 52 53 54 55 56 57 58 59 5A 5B 5C 5D 5E 5F
` a b
62
c
63
d e f66 g
6465 67
h
68
i
69
j
6A
k
6B
l m n o
6C6D 6E 6F
60 61
p q r s t u v w x y z { } ˜
70 71 72 73 74 75 D6 77 78 79 7A 7B 7C 7D 7E 7F
Ç ü é â ä à å ç ê ë è Å
Ä 8F
80 81 82 83 84 85 E6 87 88 89 8A 8B 8C 8D 8E
É æ Æ ô ö ò û ù ÿ Ö Ü ø £ Ø X ƒ
90 91 92 93 94 95 F6 97 98 99 9A 9B 9C 9D 9E 9F
á í ó ú ñ Ñ a o ¿ ® ¬ 1/2 1/4 i
A0 A1 A2 A3 A4 A5 A6 A7 A8 A9 AA AB AC AD AE AF
©
Á Â Á ¢ ¥ ¬
B0 B1 B2 B3 B4 B5 B6 B7 B8 B9 BA BB BC BD BE BF
ã Ã
C0 C1 C2 C3 C4 C5 C6 C7 C8 C9 CA CB CC CD CE CF
D Ê Ë È
D2 D3 D4 D5
Í
D6
Î
D7
Ï
D8 D9 DA DB DC DD
Ì DE DF
D0 D1
Ó ß Ô Ò õ Õ µ ρ ρ Ú Û Ù y
´ Y -
´ ´
E0 E1 E2 E3 E4 E5 E6 E7 E8 E9 EA EB EC ED EE EF
3 ¶ § ÷
-
F0 F1 F2
4
F3 F4 F5 F6 F7 F8 F9 FA
1
FB
3
FC
2
FD FE FF
IPL019.eps
214 IPL Programmer’s Reference Manual](https://image.slidesharecdn.com/ipl-100603063325-phpapp01/85/Ipl-230-320.jpg)
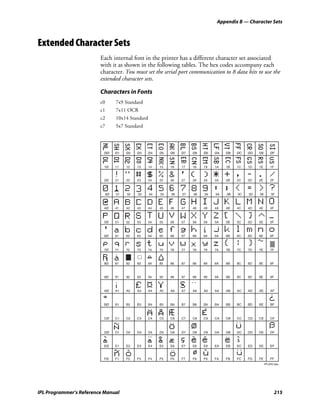
![Appendix B — Character Sets
Characters in Fonts
c20 8 point
c21 12 point
c22 20 point
ØØ Ø1 Ø2 Ø3 Ø4 Ø5 Ø6 Ø7 Ø8 Ø9 ØA ØB ØC ØD ØE ØE
1Ø 11 12 13 14 15 16 17 18 19 1A 1B 1C 1D 1E 1F
! " # $ % & ’ ( ) * + , - . /
2Ø 21 22 23 24 25 26 27 28 29 2A 2B 2C 2D 2E 2F
0 1 2 3 4 5 6 7 8 9 : ; < = > ?
3Ø 31 32 33 34 35 36 37 38 39 3A 3B 3C 3D 3E 3F
@ A B C D E F G H I J K L M N O
4Ø 41 42 43 44 45 46 47 48 49 4A 4B 4C 4D 4E 4F
P Q R S T U V W X Y Z [ ] _
5Ø 51 52 53 54 55 56 57 58 59 5A 5B 5C 5D 5E 5F
` a b c d e f g h i j k l m n o
6Ø 61 62 63 64 65 66 67 68 69 6A 6B 6C 6D 6E 6F
p q r s t u v w x y z { } ∼
7Ø 71 72 73 74 75 76 77 78 79 7A 7B 7C 7D 7E 7F
8Ø 81 82 83 84 85 86 87 88 89 8A 8B 8C 8D 8E 8F
9Ø 91 92 93 94 95 96 97 98 99 9A 9B 9C 9D 9E 9F
¡ ¢ | § © a ® -
£ ¤ ¥ | ¨ « ¬ -
AØ A1 A2 A3 A4 A5 A6 A7 A8 A9 AA AB AC AD AE AF
±
2 3
´ µ ¶ . Ç 1 0
» 1
4
1
2
3
4
¿
BØ B1 B2 B3 B4 B5 B6 B7 B8 B9 BA BB BC BD BE BF
À Á Â Ã Ä Å Æ Ç È É Ê Ë Ì Í Î Ï
CØ C1 C2 C3 C4 C5 C6 C7 C8 C9 CA CB CC CD CE CF
D Ñ Ò Ó Ô Õ Ö × Ø Ù Ú Û ´
Ü Y I ß
DØ D1 D2 D3 D4 D5 D6 D7 D8 D8 DA DB DC DD DE DF
à á â ã ä å æ ç è é ê ë ì í î ï
EØ E1 E2 E3 E4 E5 E6 E7 E8 E9 EA EB EC ED EE EF
~ y ÿ
o
FØ
ñ
F1
ò
F2
ó
F3
ô
F4
õ
F5
ö
F6
÷
F7
ø
F8
ù
F9
ú
FA
û
FB
ü
FC
´
FD
Io
FE FF
IPL022.eps
216 IPL Programmer’s Reference Manual](https://image.slidesharecdn.com/ipl-100603063325-phpapp01/85/Ipl-232-320.jpg)
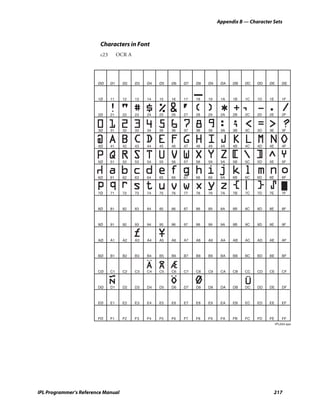
![Appendix C — Creating User-Defined Bitmap Graphics and Fonts
Creating User-Defined Bitmap Graphics
You can create user-defined graphics (user-defined characters, or UDCs) in
two ways: one bit per byte or six bits per byte. To use the UDC in a
format, you must first define a graphic field using the IPL command
Un[,name]. For help using the Un[,name] (User-Defined Character Field,
Create or Edit) command, see Chapter 7, “IPL Command Reference.”
Creating One Bit Per Byte User-Defined Graphics
One bit per byte is the standard graphic format used for downloading to
an Intermec 8636/8646 printer. You can download a one bit per byte
graphic to the printer when it is in 86XX Emulation mode. A one bit per
byte bitmap image is an arrangement of ones and zeros that looks similar
to the following example.
Example of One-Bit Per Byte Bitmap Image
Bitmap Pattern Row
000000010000000 Row 0
000000111000000 Row 1
000001011100000 Row 2
000010011110000 Row 3
000100011111000 Row 4
001000011111100 Row 5
010000011111110 Row 6
100000011111111 Row 7
010000010000010 Row 8
001000010000100 Row 9
000100010001000 Row 10
000010010010000 Row 11
000001010100000 Row 12
000000111000000 Row 13
000000010000000 Row 14
If you look closely at the bitmap pattern above, you can see that it is the
outline of a diamond with a line down the middle and the upper right
corner blacked in.
220 IPL Programmer’s Reference Manual](https://image.slidesharecdn.com/ipl-100603063325-phpapp01/85/Ipl-236-320.jpg)
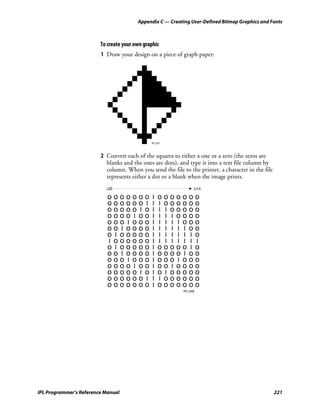

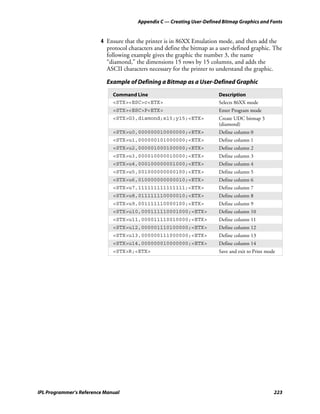
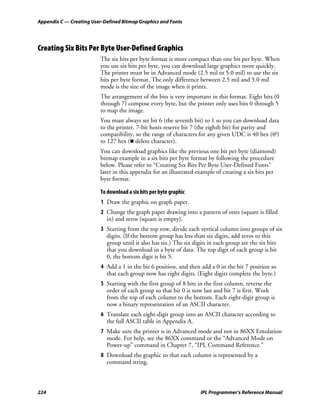
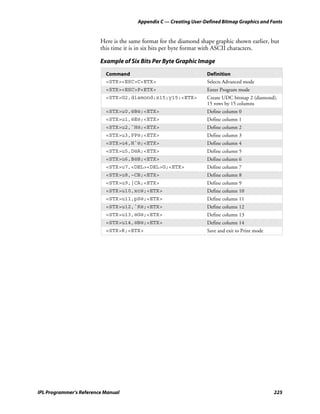
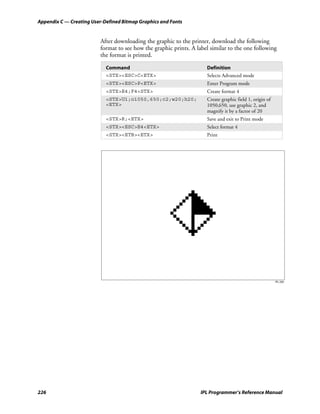
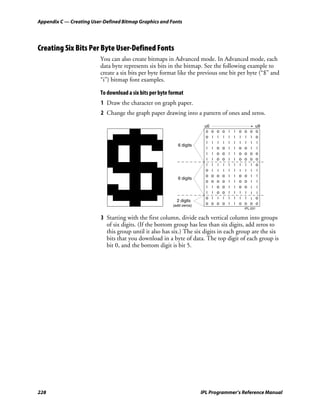
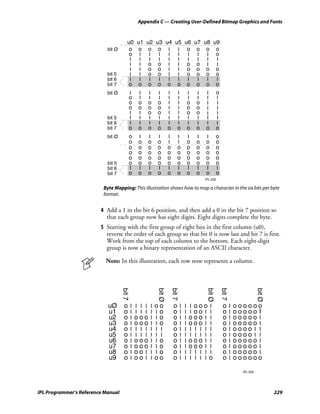
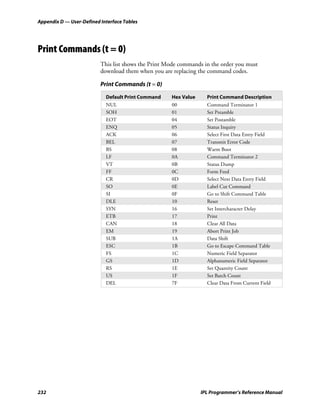
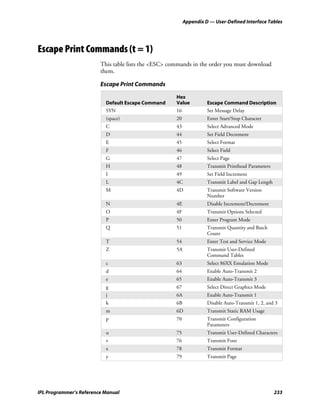
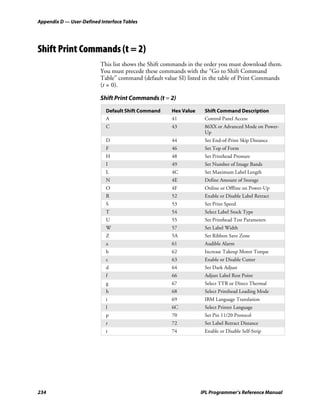
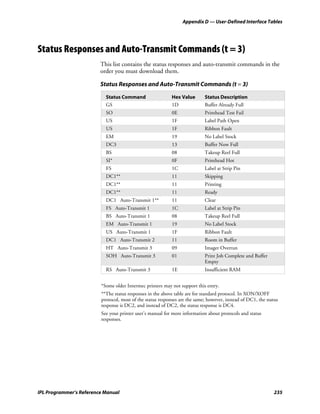
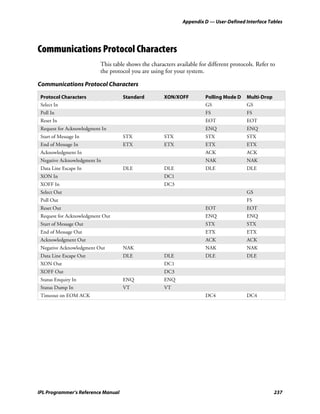

![Appendix E — Using Direct Graphics Mode
Change Origin
Purpose: Tells the printer the X and Y coordinates of the next RLE data column.
Default: 0,0
Syntax: 0x21[x,y]
where x and y are the coordinates of the next data column. Values for x
and y range from 0 to 8191.
The change origin command tells the printer where to place the graphic on
the label. If you do not send the command, the printer uses the default
setting of 0,0.
You can use the command to place different sections of the RLE graphic in
different parts of the label.
Notes: It is not necessary to use this command for every column. Column-to-
column transitions are automatic following the end of line command.
The default origin of any direct graphic (0,0) is in the lower left corner
instead of in the upper left corner. The upper left corner is the label format
origin.
End of Bitmap
Purpose: Marks the end of RLE encoded data.
Syntax: 0x28
Notes: The printer parses subsequent characters as IPL commands.
On the final column of the RLE encoded data, an end of line command
does not need to precede the end of bitmap command.
End of Line
Purpose: Causes the printer to assign subsequent bitmap data to the next column.
Syntax: 0x22
Notes: The printer images the next data stream in the next column position,
incrementing the X position. This command causes an action similar in
function to a carriage return.
IPL Programmer’s Reference Manual 243](https://image.slidesharecdn.com/ipl-100603063325-phpapp01/85/Ipl-259-320.jpg)
![Appendix E — Using Direct Graphics Mode
Raw Bitmap Data Follows
Purpose: Indicates raw bitmap data bytes follow.
Syntax: 0x27[data]
Notes: The printer only uses the first 7 bits of the data byte. If you set a bit to 1,
it prints black. The most significant bit prints farthest to the left. Data
order runs from right to left, so the first dot in a column is the least
significant bit of the first data byte.
Repeat Last Line
Purpose: Causes the printer to copy the previously defined column n number of
times.
Syntax: 0x24n
Values for n range from 0 - 8191.
Notes: The printer automatically increments the X origin of each column. This
command is only valid when preceded by a column of encoded, raw data
or an end of line command.
Transition Black
Purpose: Transition data follows. The first transition is black.
Syntax: 0x25[data,data,...data]
where data specifies the number of black or white dots. Values for data can
range from 0 - 8191.
Notes: Each transition data specifies the number of dots to draw (either black or
white). Each data alternates black and white dot counts.
Transition White
Purpose: Transition data follows. The first transition is white.
Syntax: 0x26[data,data,...data]
Where data specifies the number of black or white dots. Values for data
can range from 0 - 8191.
Notes: Each transition data specifies the number of dots to draw (either black or
white). Each data alternates black and white dot counts.
244 IPL Programmer’s Reference Manual](https://image.slidesharecdn.com/ipl-100603063325-phpapp01/85/Ipl-260-320.jpg)
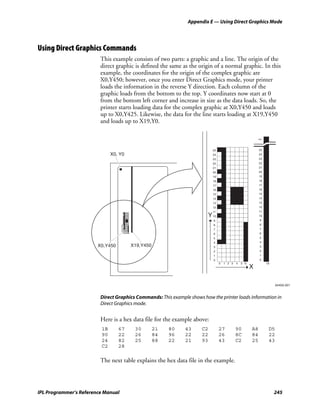
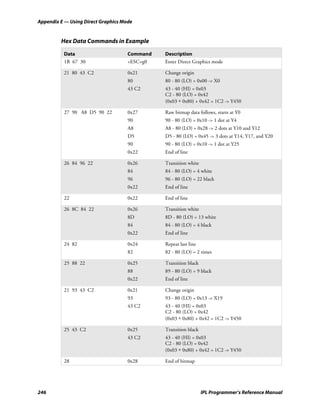


![Erpi admin 11123510[1] by иссам неязын issam hejazin](https://cdn.slidesharecdn.com/ss_thumbnails/erpiadmin111235101-140814022227-phpapp01-thumbnail.jpg?width=640&height=640&fit=bounds)


![2711e um006 -en-p[1]](https://cdn.slidesharecdn.com/ss_thumbnails/2711e-um006-en-p1-120514065850-phpapp02-thumbnail.jpg?width=640&height=640&fit=bounds)


