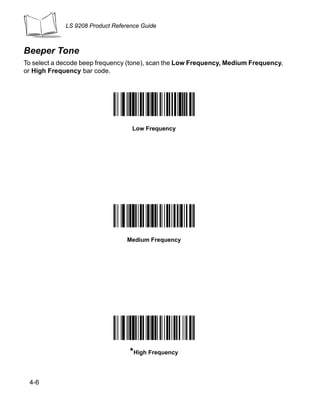
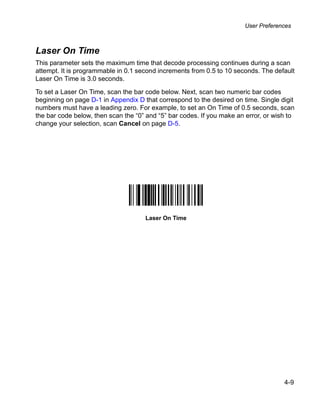
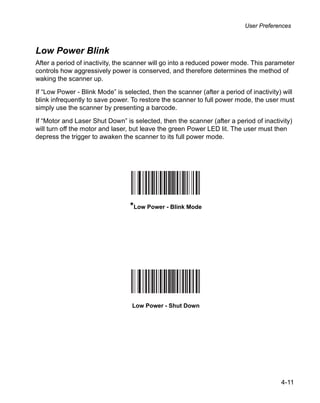
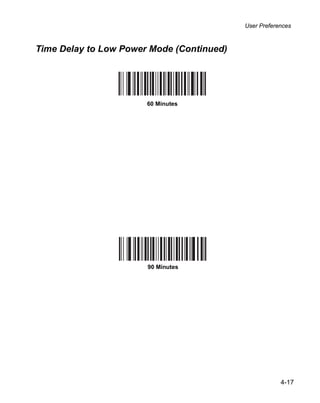
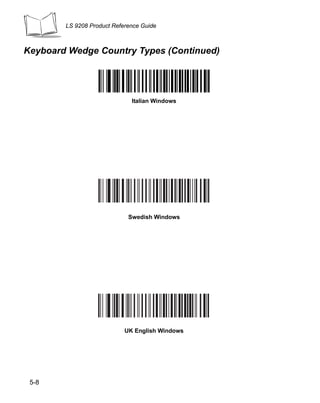
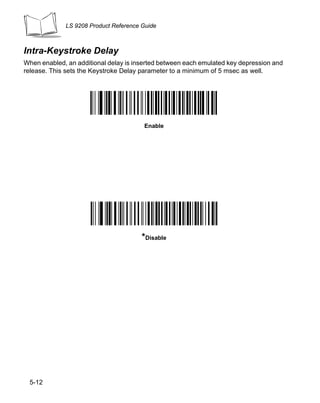
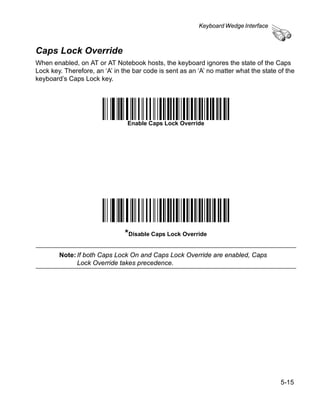
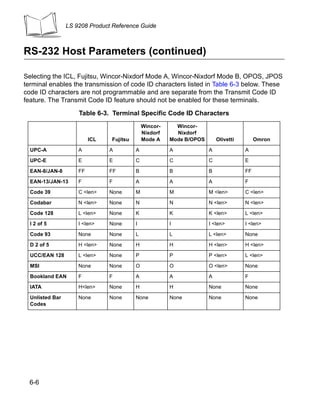
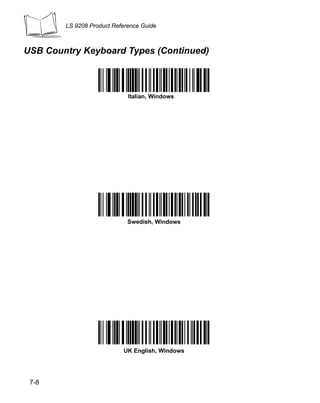
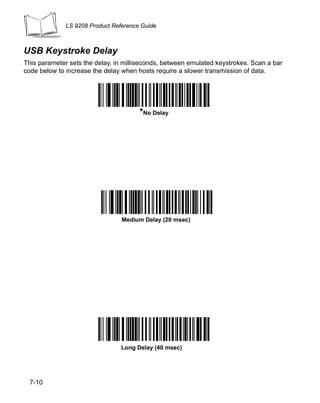
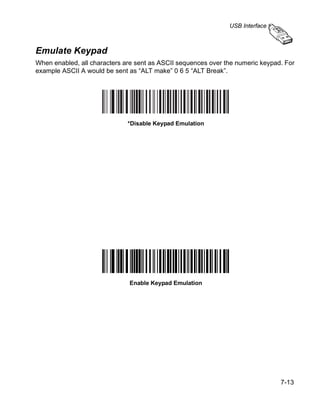
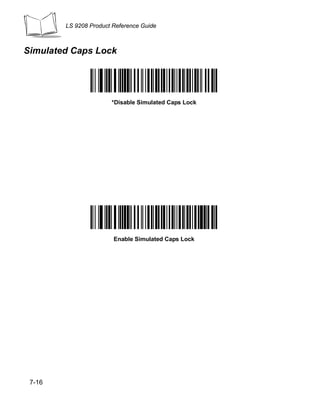
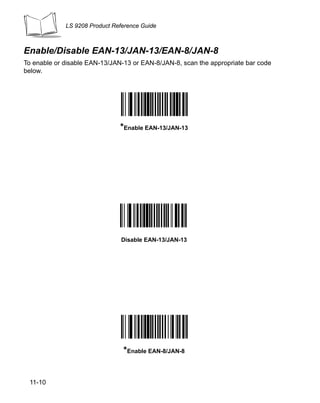
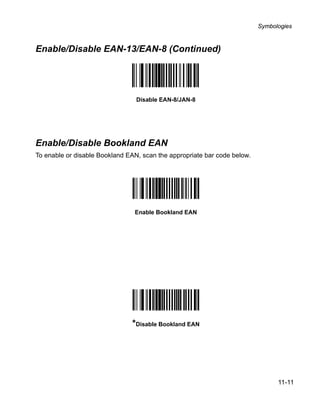
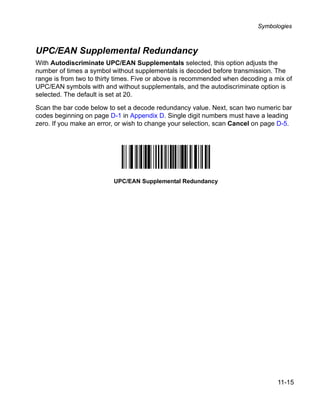
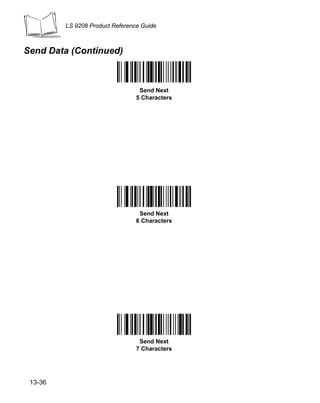
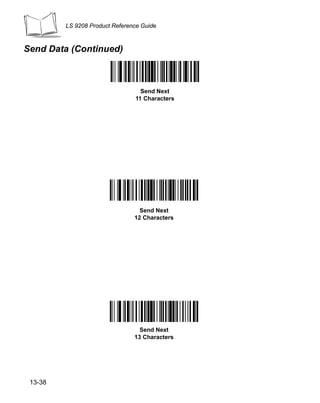
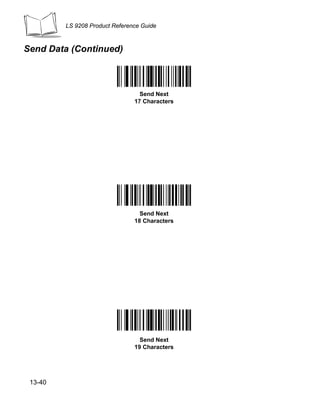
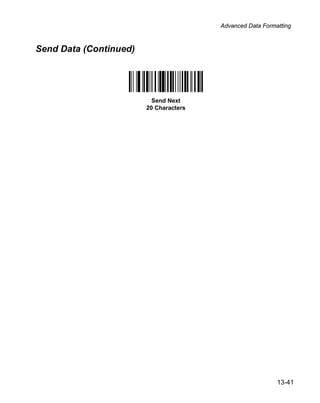
This document is a product reference guide for the LS 9208 scanner. It contains information about setting up, using, maintaining and specifying the technical details of the scanner. The guide includes chapters on getting started with setup and configuration, scanning functionality, maintenance, technical specifications, and customizing user preferences. It provides instructions and definitions for key aspects of using the scanner such as interface connection, scanning modes, beeper tones, LED indicators, aiming and decoding performance.


![LS 9208 Product Reference Guide
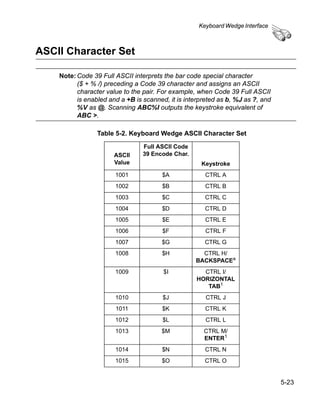
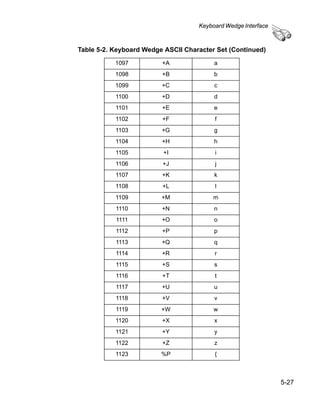
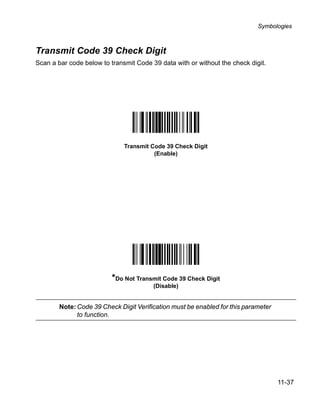
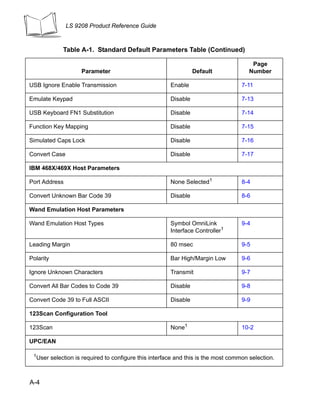
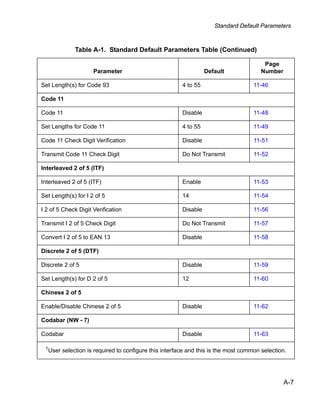
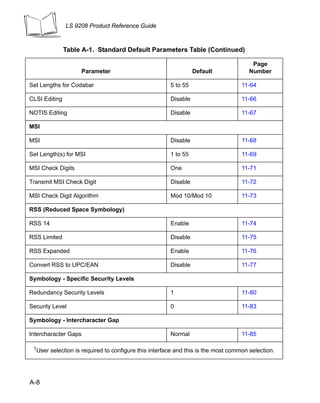
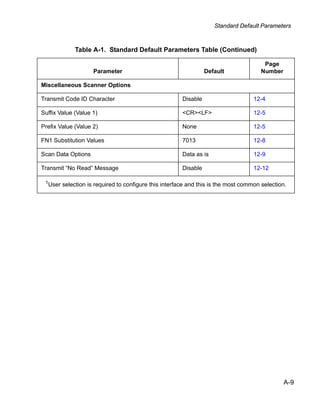
Table 5-2. Keyboard Wedge ASCII Character Set (Continued)
1070 F F
1071 G G
1072 H H
1073 I I
1074 J J
1075 K K
1076 L L
1077 M M
1078 N N
1079 O O
1080 P P
1081 Q Q
1082 R R
1083 S S
1084 T T
1085 U U
1086 V V
1087 W W
1088 X X
1089 Y Y
1090 Z Z
1091 %K [
1092 %L
1093 %M ]
1094 %N ^
1095 %O _
1096 %W ‘
5-26](https://image.slidesharecdn.com/ls9208prg-100603121532-phpapp02/85/Ls9208-prg-98-320.jpg)


![LS 9208 Product Reference Guide
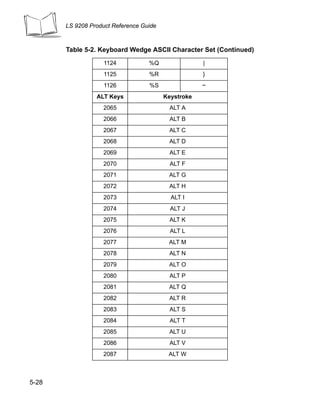
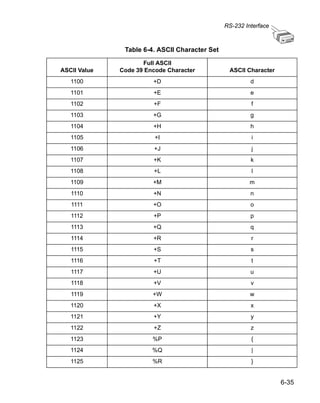
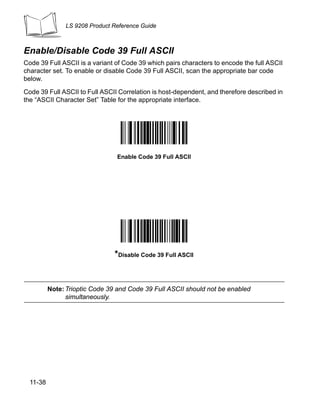
Table 6-4. ASCII Character Set
Full ASCII
ASCII Value Code 39 Encode Character ASCII Character
1074 J J
1075 K K
1076 L L
1077 M M
1078 N N
1079 O O
1080 P P
1081 Q Q
1082 R R
1083 S S
1084 T T
1085 U U
1086 V V
1087 W W
1088 X X
1089 Y Y
1090 Z Z
1091 %K [
1092 %L
1093 %M ]
1094 %N ^
1095 %O _
1096 %W ‘
1097 +A a
1098 +B b
1099 +C c
6-34](https://image.slidesharecdn.com/ls9208prg-100603121532-phpapp02/85/Ls9208-prg-140-320.jpg)


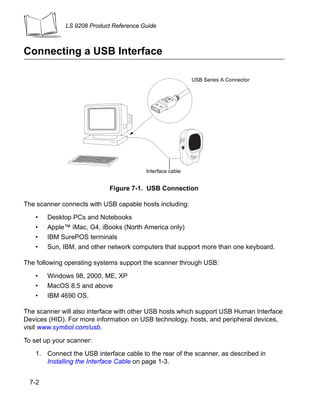


![USB Interface
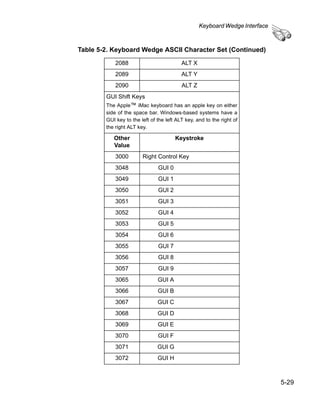
Table 7-2. USB ASCII Character Set (Continued)
1076 L L
1077 M M
1078 N N
1079 O O
1080 P P
1081 Q Q
1082 R R
1083 S S
1084 T T
1085 U U
1086 V V
1087 W W
1088 X X
1089 Y Y
1090 Z Z
1091 %K [
1092 %L
1093 %M ]
1094 %N ^
1095 %O _
1096 %W ‘
1097 +A a
1098 +B b
1099 +C c
1100 +D d
1101 +E e
1102 +F f
7-21](https://image.slidesharecdn.com/ls9208prg-100603121532-phpapp02/85/Ls9208-prg-163-320.jpg)


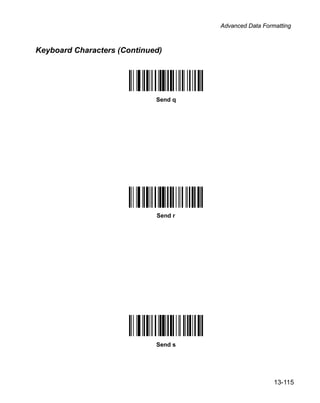
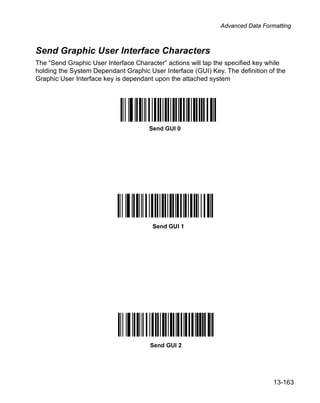
![Advanced Data Formatting
Control Characters (Continued)
Send Control ]
Send Control 6
Send Control -
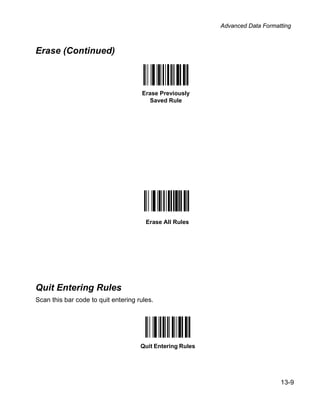
13-87](https://image.slidesharecdn.com/ls9208prg-100603121532-phpapp02/85/Ls9208-prg-373-320.jpg)


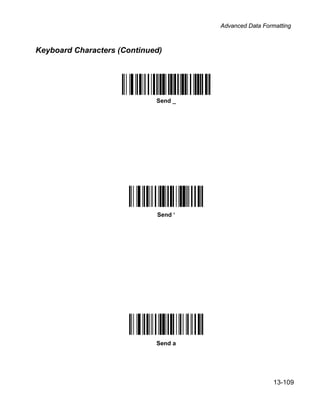
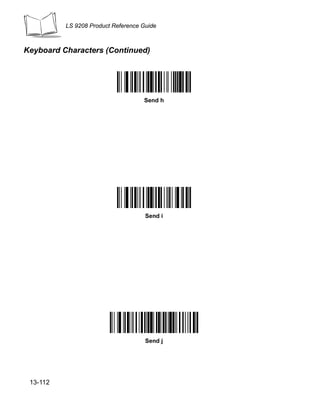
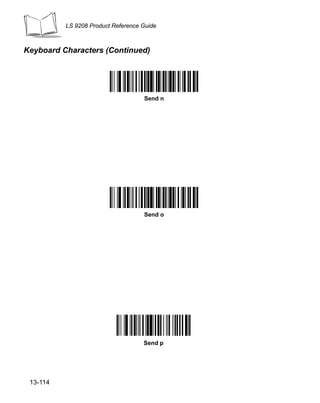
![LS 9208 Product Reference Guide
Keyboard Characters (Continued)
Send
Send ]
Send ^
13-108](https://image.slidesharecdn.com/ls9208prg-100603121532-phpapp02/85/Ls9208-prg-394-320.jpg)


![Advanced Data Formatting
Send ALT Characters (Continued)
Send Alt
Send Alt ]
Send Alt 6
13-129](https://image.slidesharecdn.com/ls9208prg-100603121532-phpapp02/85/Ls9208-prg-415-320.jpg)


![LS 9208 Product Reference Guide
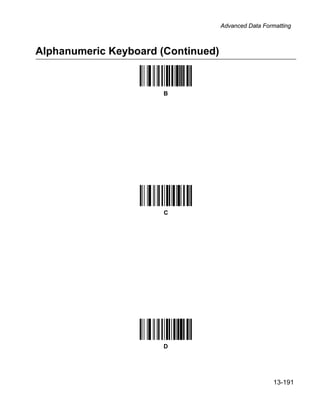
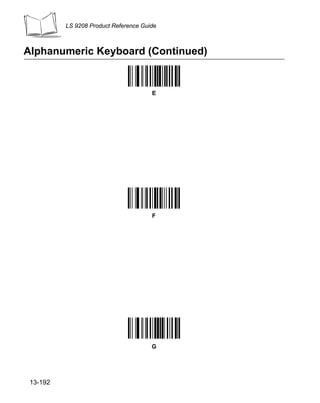
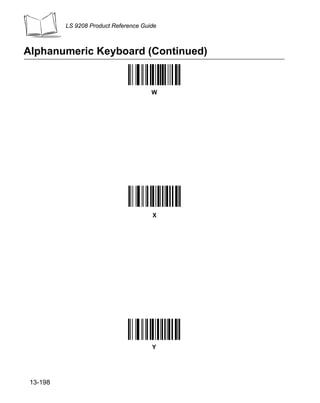
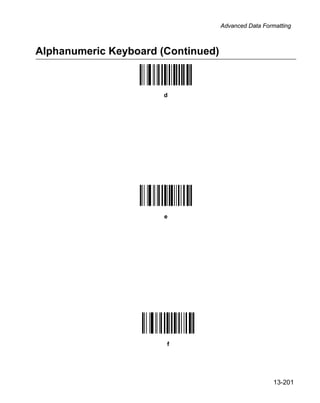
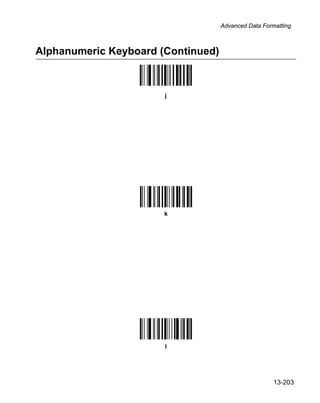
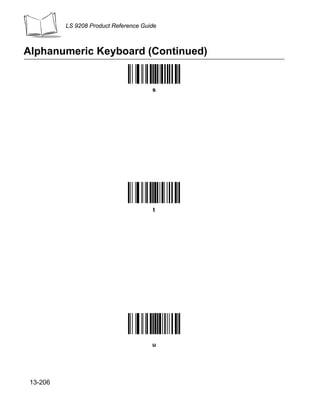
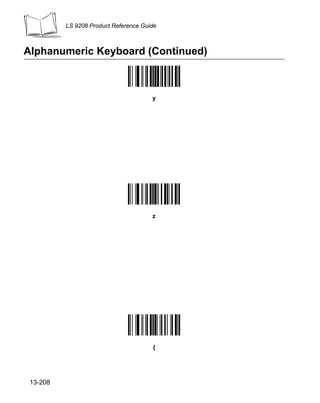
Alphanumeric Keyboard (Continued)
]
^
_
13-186](https://image.slidesharecdn.com/ls9208prg-100603121532-phpapp02/85/Ls9208-prg-472-320.jpg)


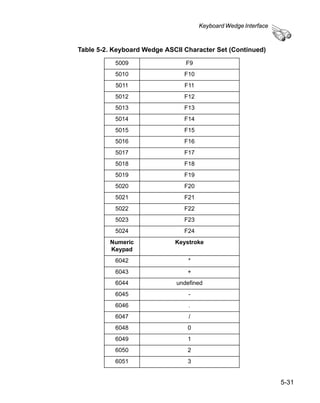
![Programming Reference
AIM Code Identifiers
Each AIM Code Identifier contains the three-character string ]cm where:
]=Flag Character (ASCII 93)
c=Code Character
m=Modifier Character
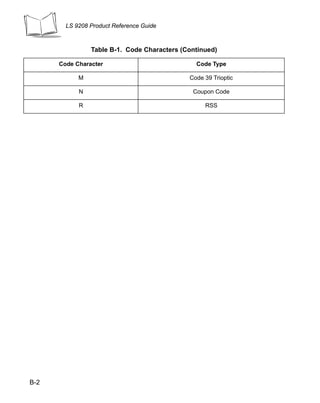
Table B-2. AIM Code Characters
Code Character Code Type
A Code 39, Code 39 Full ASCII, Code 32
C Code 128 (all variants), Coupon (Code 128 portion)
E UPC/EAN, Coupon (UPC/EAN portion)
F Codabar
G Code 93
H Code 11
I Interleaved 2 of 5
M MSI Plessey
S Discrete 2 of 5, IATA
X Bookland EAN, Code 39 Trioptic
e RSS
B-3](https://image.slidesharecdn.com/ls9208prg-100603121532-phpapp02/85/Ls9208-prg-509-320.jpg)
![LS 9208 Product Reference Guide
The modifier character is the sum of the applicable option values based on Table B-3.
Table B-3. Modifier Characters
Code Type Option Value Option
Code 39
0 No Check character.
1 Reader has checked one check character.
3 Reader has checked and stripped check character.
4 Reader has performed Full ASCII character conversion.
5 Reader has performed Full ASCII character conversion and
checked one check character.
7 Reader has performed Full ASCII character conversion and
checked and stripped check character.
Example: A Full ASCII bar code with check character W, A+I+MI+DW, is transmitted
as ]A7AimId where 7 = (3+4).
Trioptic Code 39
0 No option specified at this time. Always transmit 0.
Example: A Trioptic bar code 412356 is transmitted as ]X0412356
Code 128
0 Standard data packet, No Function code 1 in first symbol position.
1 Function code 1 in first symbol character position.
2 Function code 1 in second symbol character position.
Example: A Code (EAN) 128 bar code with Function 1 character in the first position,
FNC1 Aim Id is transmitted as ]C1AimId
B-4](https://image.slidesharecdn.com/ls9208prg-100603121532-phpapp02/85/Ls9208-prg-510-320.jpg)
![Programming Reference
Table B-3. Modifier Characters
Code Type Option Value Option
I 2 of 5
0 No check digit processing.
1 Reader has validated check digit.
3 Reader has validated and stripped check digit.
Example: An I 2 of 5 bar code without check digit, 4123, is transmitted as ]I04123
Codabar
0 Standard Codabar
1 ABC Codabar
Example: A standard Codabar bar code, 4123, is transmitted as ]F04123
Code 93
0 No options specified at this time. Always transmit 0.
Example: A Code 93 bar code 012345678905 is transmitted as ]G0012345678905
MSI Plessey
0 Mod 10 check digit validated and transmitted.
1 Mod 10 check digit validated but not transmitted.
Example: An MSI Plessey bar code 4123, with Mod 10 check digit validated, is
transmitted as ]M04123
D 2 of 5
0 No options specified at this time. Always transmit 0.
Example: A D 2 of 5 bar code 4123, is transmitted as ]S04123
B-5](https://image.slidesharecdn.com/ls9208prg-100603121532-phpapp02/85/Ls9208-prg-511-320.jpg)
![LS 9208 Product Reference Guide
Table B-3. Modifier Characters
Code Type Option Value Option
UPC/EAN
0 Standard packet in full EAN country code format, which is 13 digits
for UPCA and UPCE (not including supplemental data).
1 Two digit supplement data only.
2 Five digit supplement data only.
4 EAN-8 data packet.
Example: A UPCA bar code 012345678905 is transmitted as ]E00012345678905
Bookland EAN
0 No options specified at this time. Always transmit 0.
Example: A Bookland EAN bar code 123456789X is transmitted as ]X0123456789X
B-6](https://image.slidesharecdn.com/ls9208prg-100603121532-phpapp02/85/Ls9208-prg-512-320.jpg)
![Programming Reference
Table B-3. Modifier Characters
Code Type Option Value Option
RSS Family
No option specified at this time. Always transmit 0. RSS-14 and
RSS-Limited transmit with an Application Identifier “01”.
Note: In UCC/EAN-128 emulation mode, RSS is transmitted using
Code 128 rules (i.e., ]C1).
Example: An RSS-14 bar code 100123456788902 is transmitted as
]e001100123456788902.
B-7](https://image.slidesharecdn.com/ls9208prg-100603121532-phpapp02/85/Ls9208-prg-513-320.jpg)