AUTODESK INVENTOR
Trial Projects
Dynamic Simulation
Analyze front loader assembly
page: 2
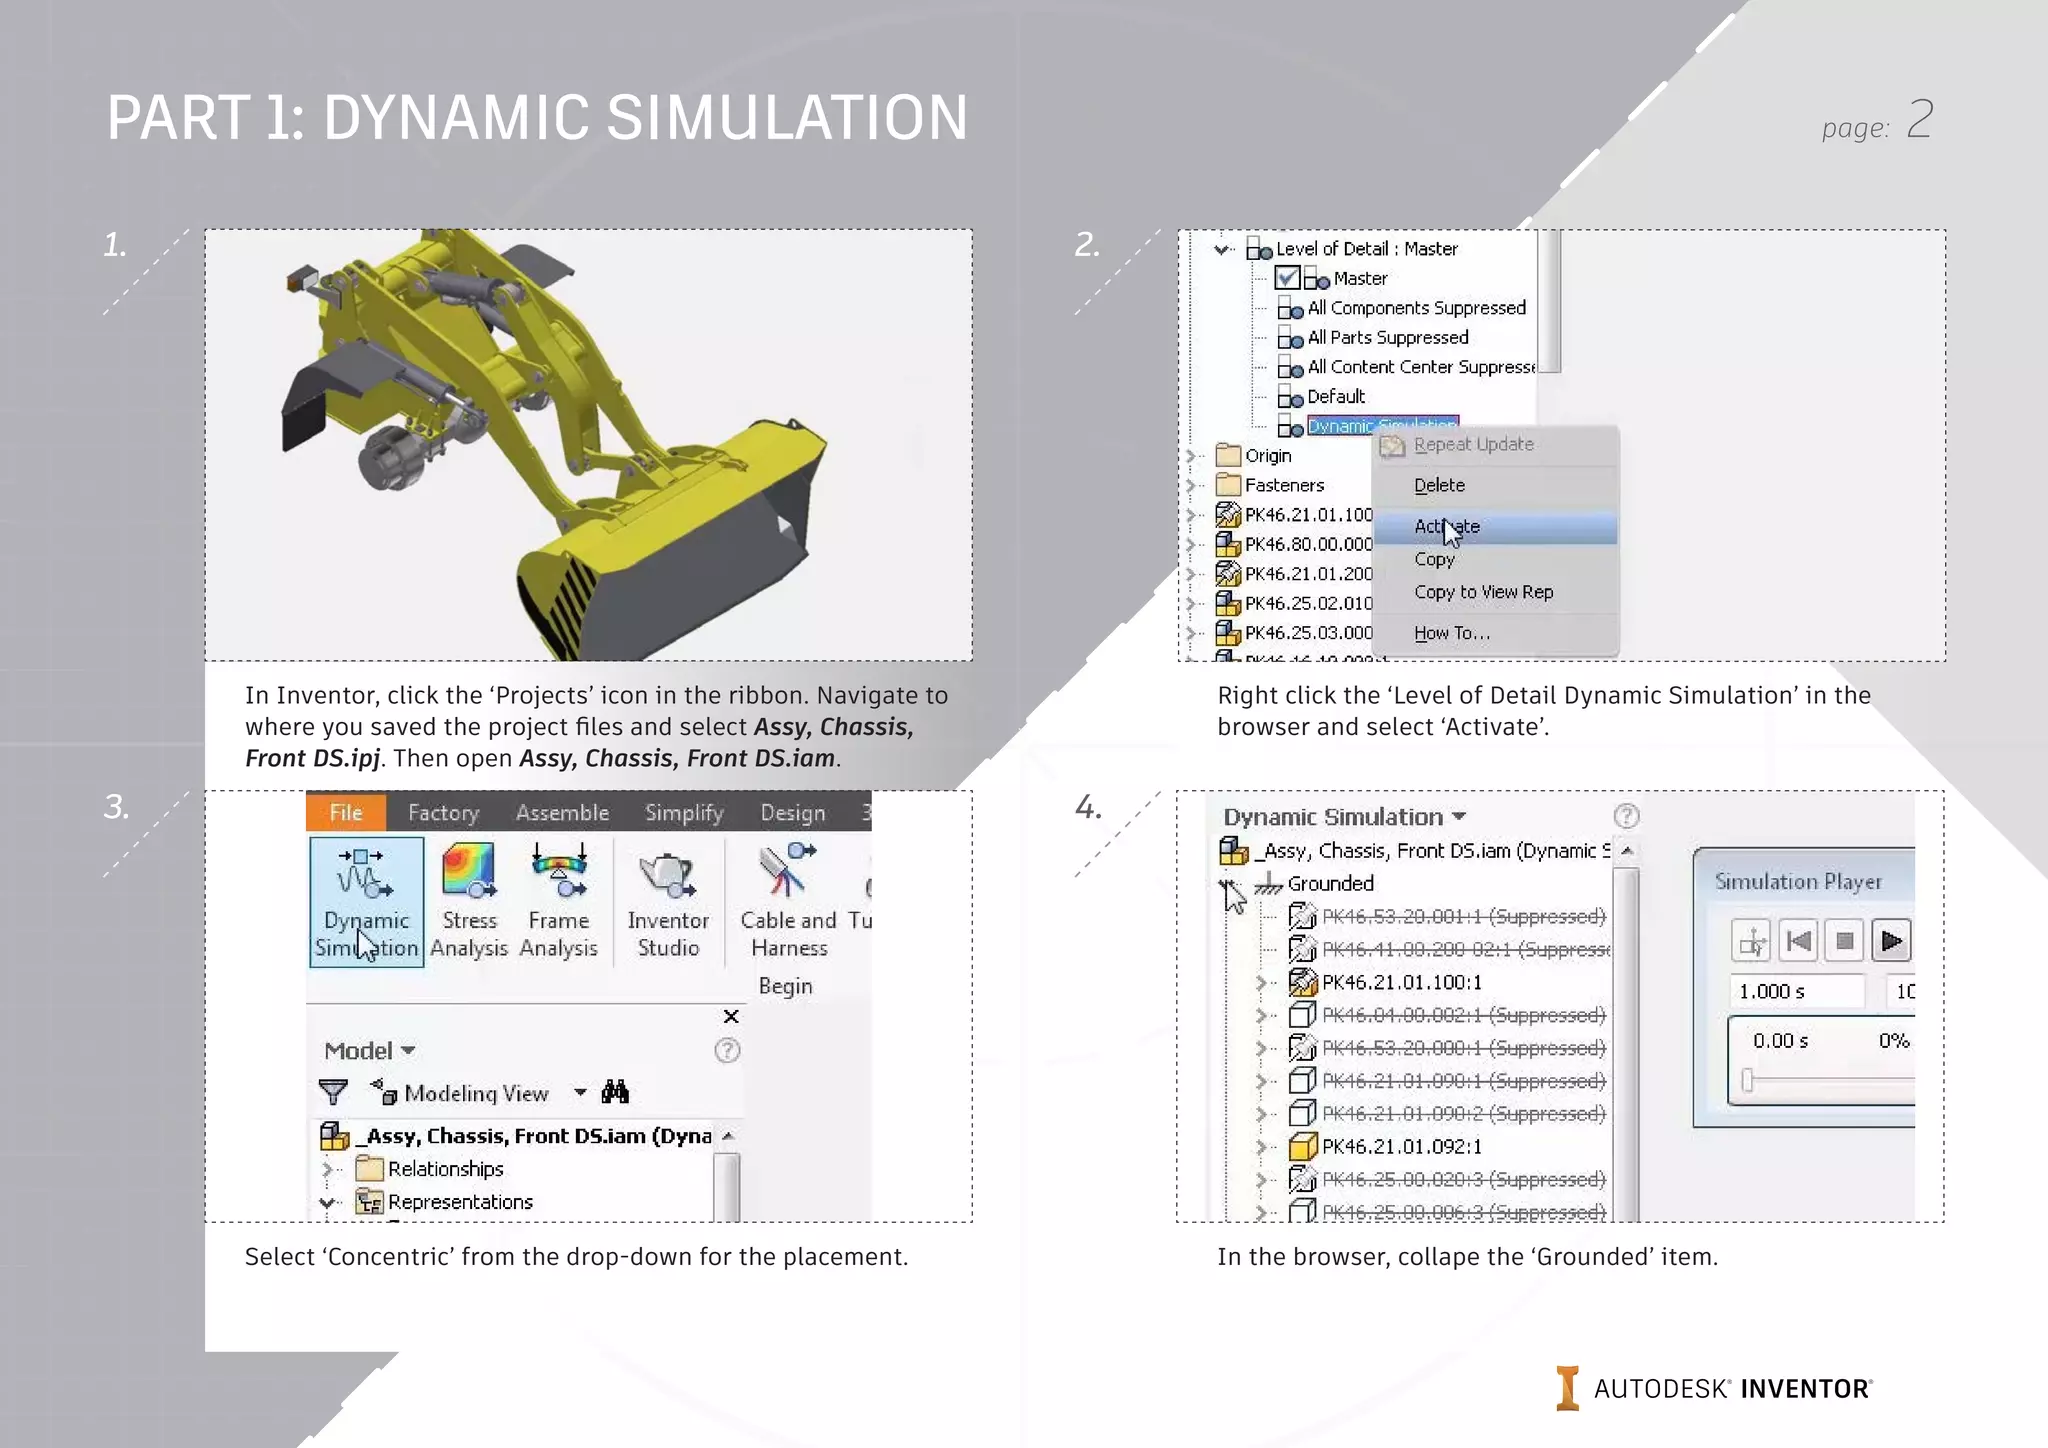
In Inventor, click the ‘Projects’ icon in the ribbon. Navigate to
where you saved the project files and select Assy, Chassis,
Front DS.ipj. Then open Assy, Chassis, Front DS.iam.
Right click the ‘Level of Detail Dynamic Simulation’ in the
browser and select ‘Activate’.
Select ‘Concentric’ from the drop-down for the placement. In the browser, collape the ‘Grounded’ item.
2.
4.
1.
3.
PART 1: DYNAMIC SIMULATION
page: 3
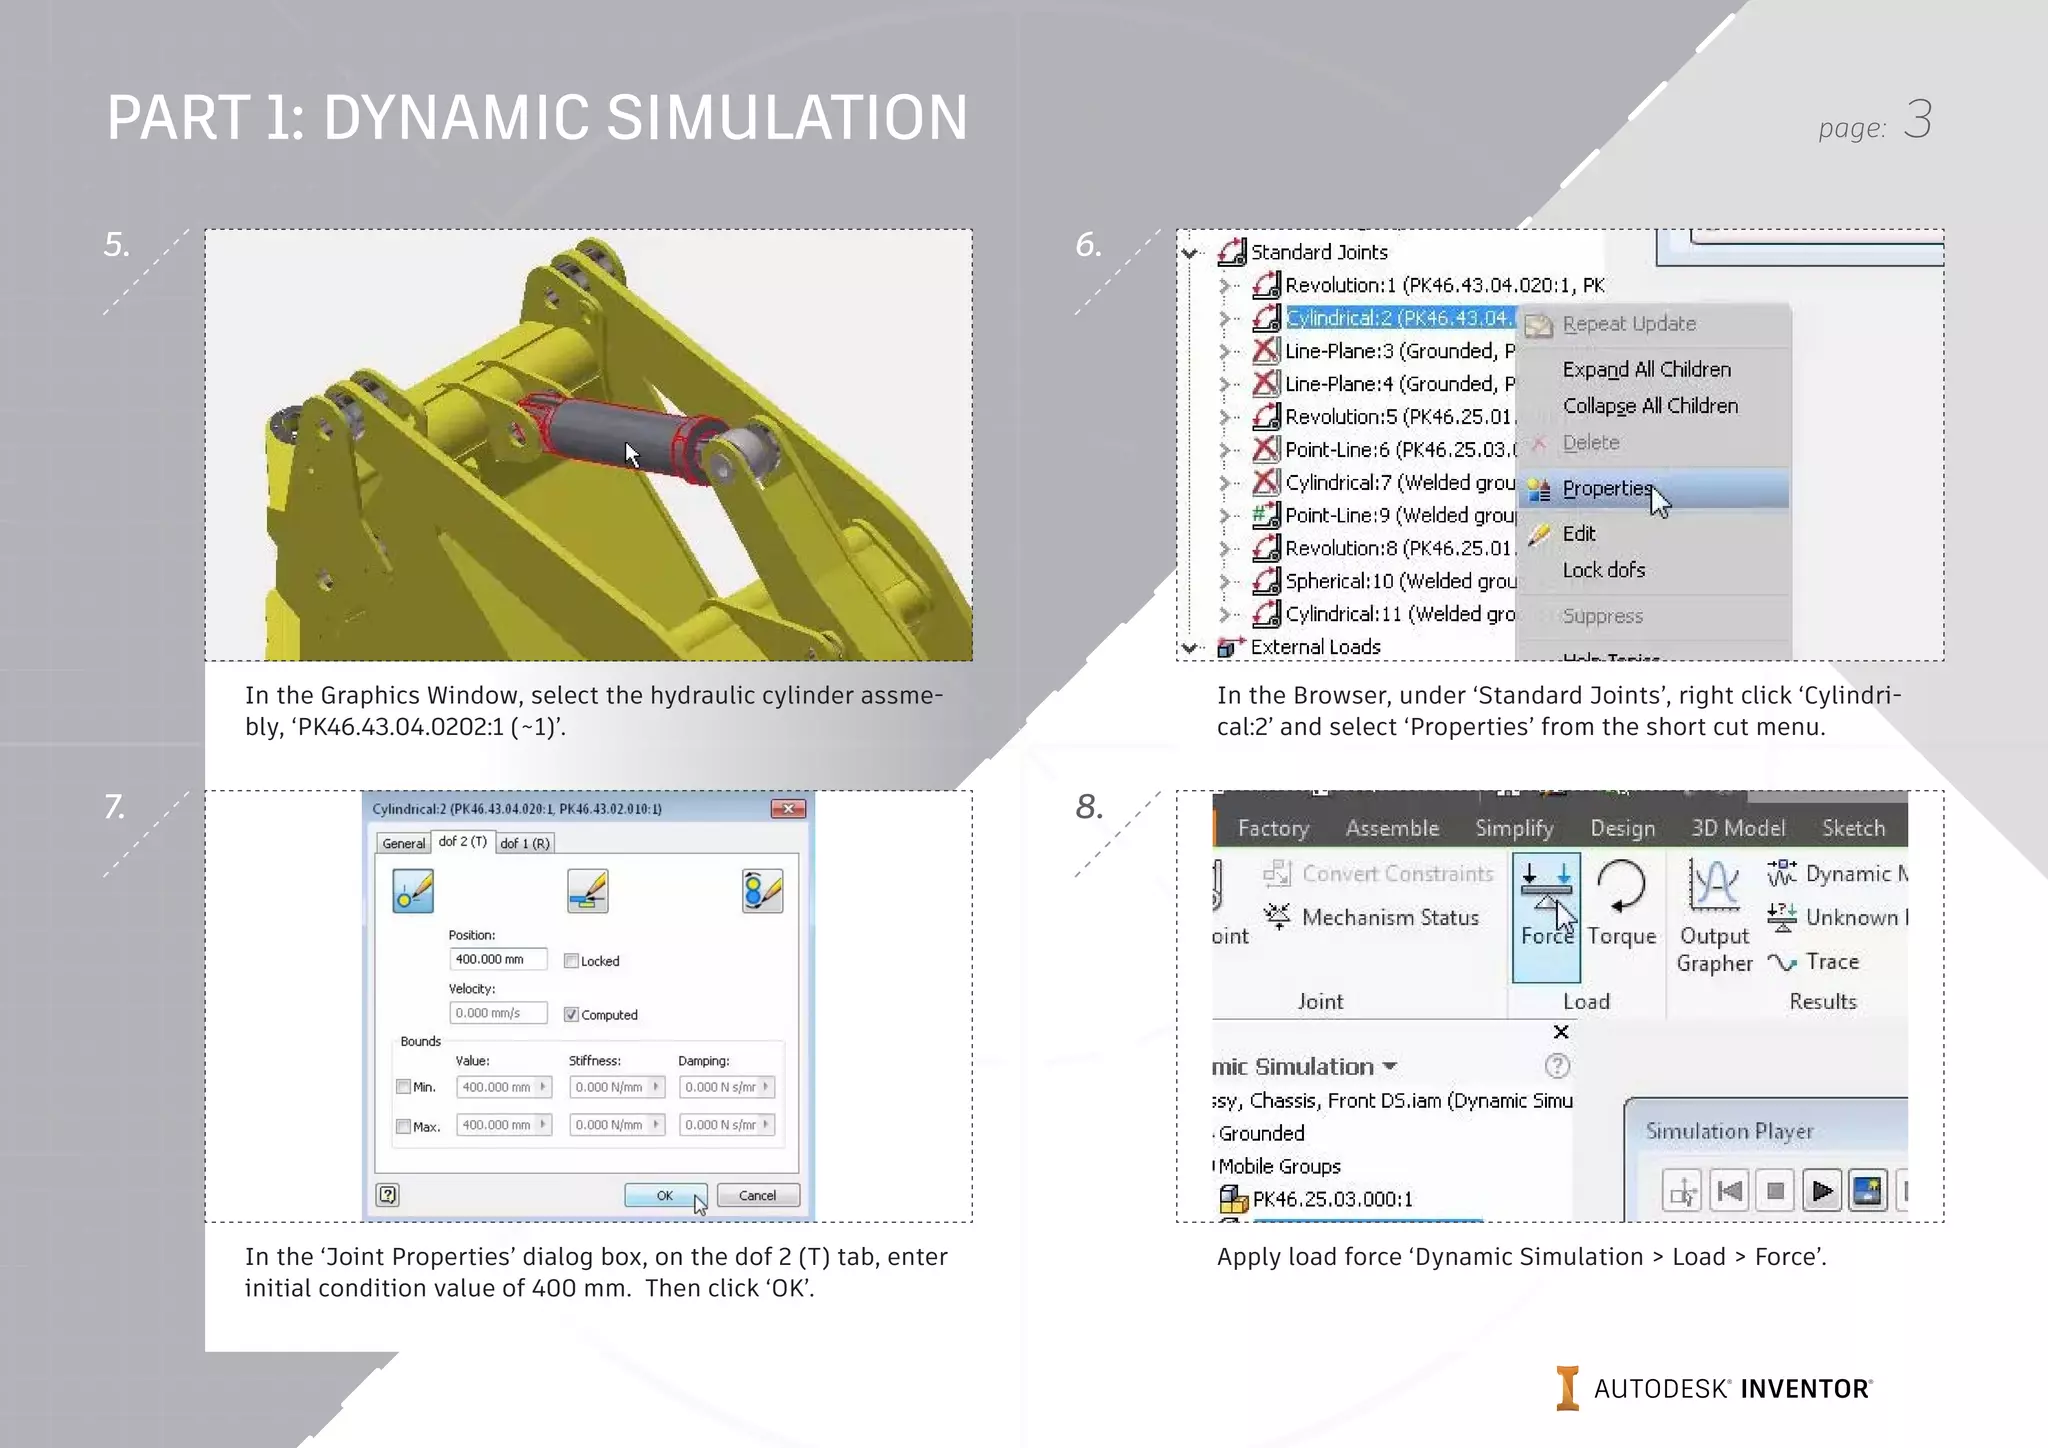
In the Graphics Window, select the hydraulic cylinder assme-
bly, ‘PK46.43.04.0202:1 (~1)’.
In the Browser, under ‘Standard Joints’, right click ‘Cylindri-
cal:2’ and select ‘Properties’ from the short cut menu.
In the ‘Joint Properties’ dialog box, on the dof 2 (T) tab, enter
initial condition value of 400 mm. Then click ‘OK’.
Apply load force ‘Dynamic Simulation > Load > Force’.
6.
8.
5.
7.
PART 1: DYNAMIC SIMULATION
page: 4
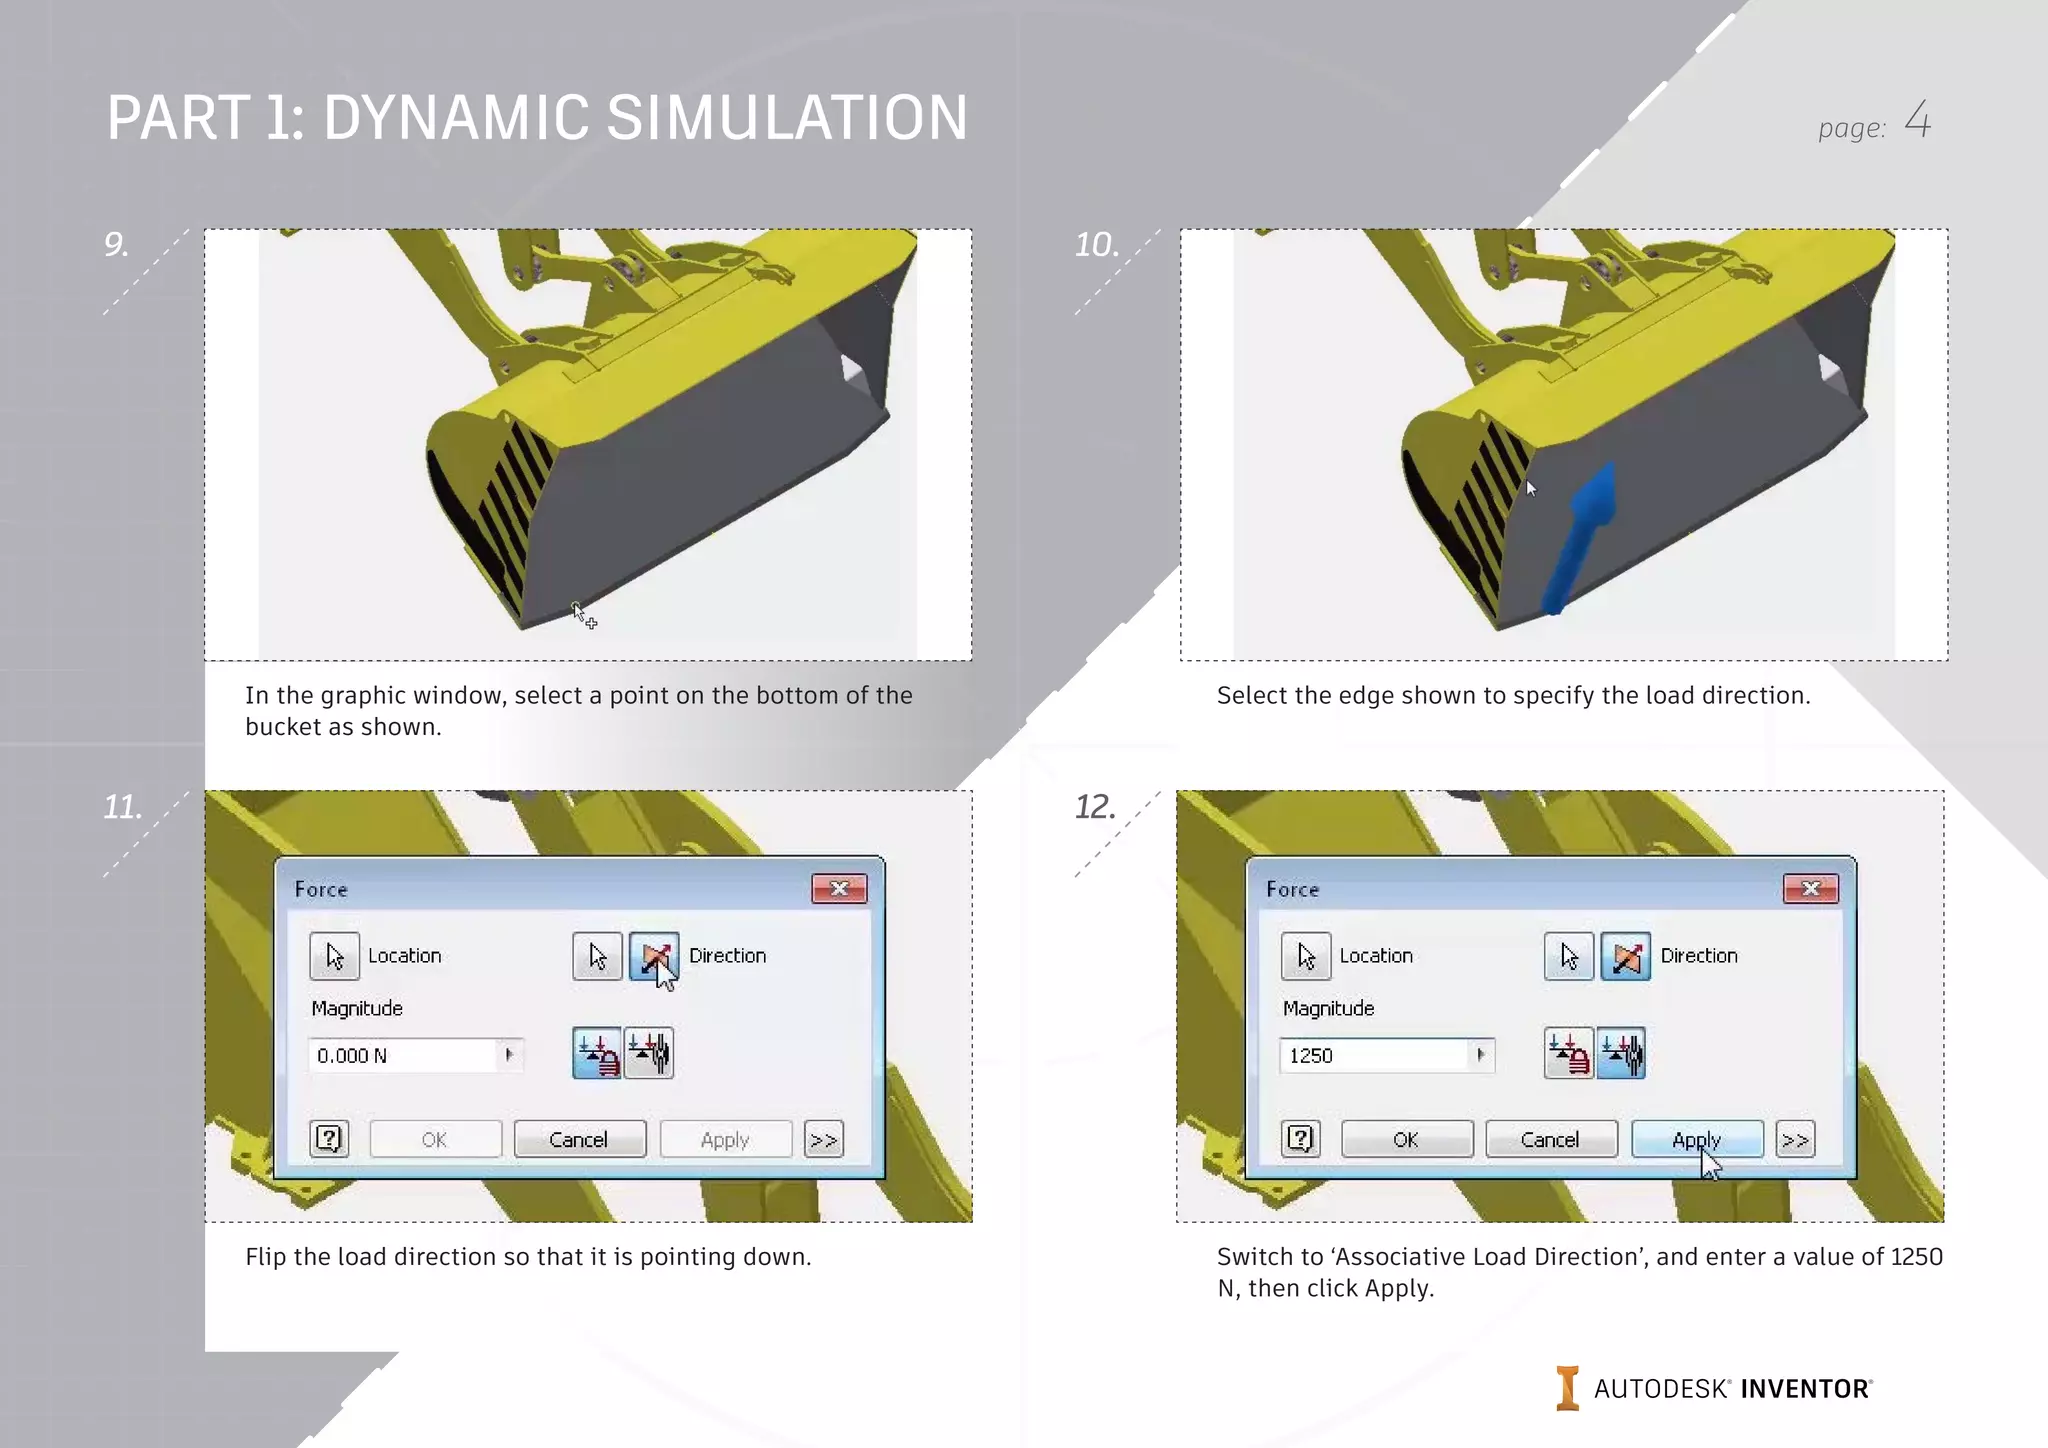
In the graphic window, select a point on the bottom of the
bucket as shown.
Select the edge shown to specify the load direction.
Flip the load direction so that it is pointing down. Switch to ‘Associative Load Direction’, and enter a value of 1250
N, then click Apply.
10.
12.
9.
11.
PART 1: DYNAMIC SIMULATION
page: 5
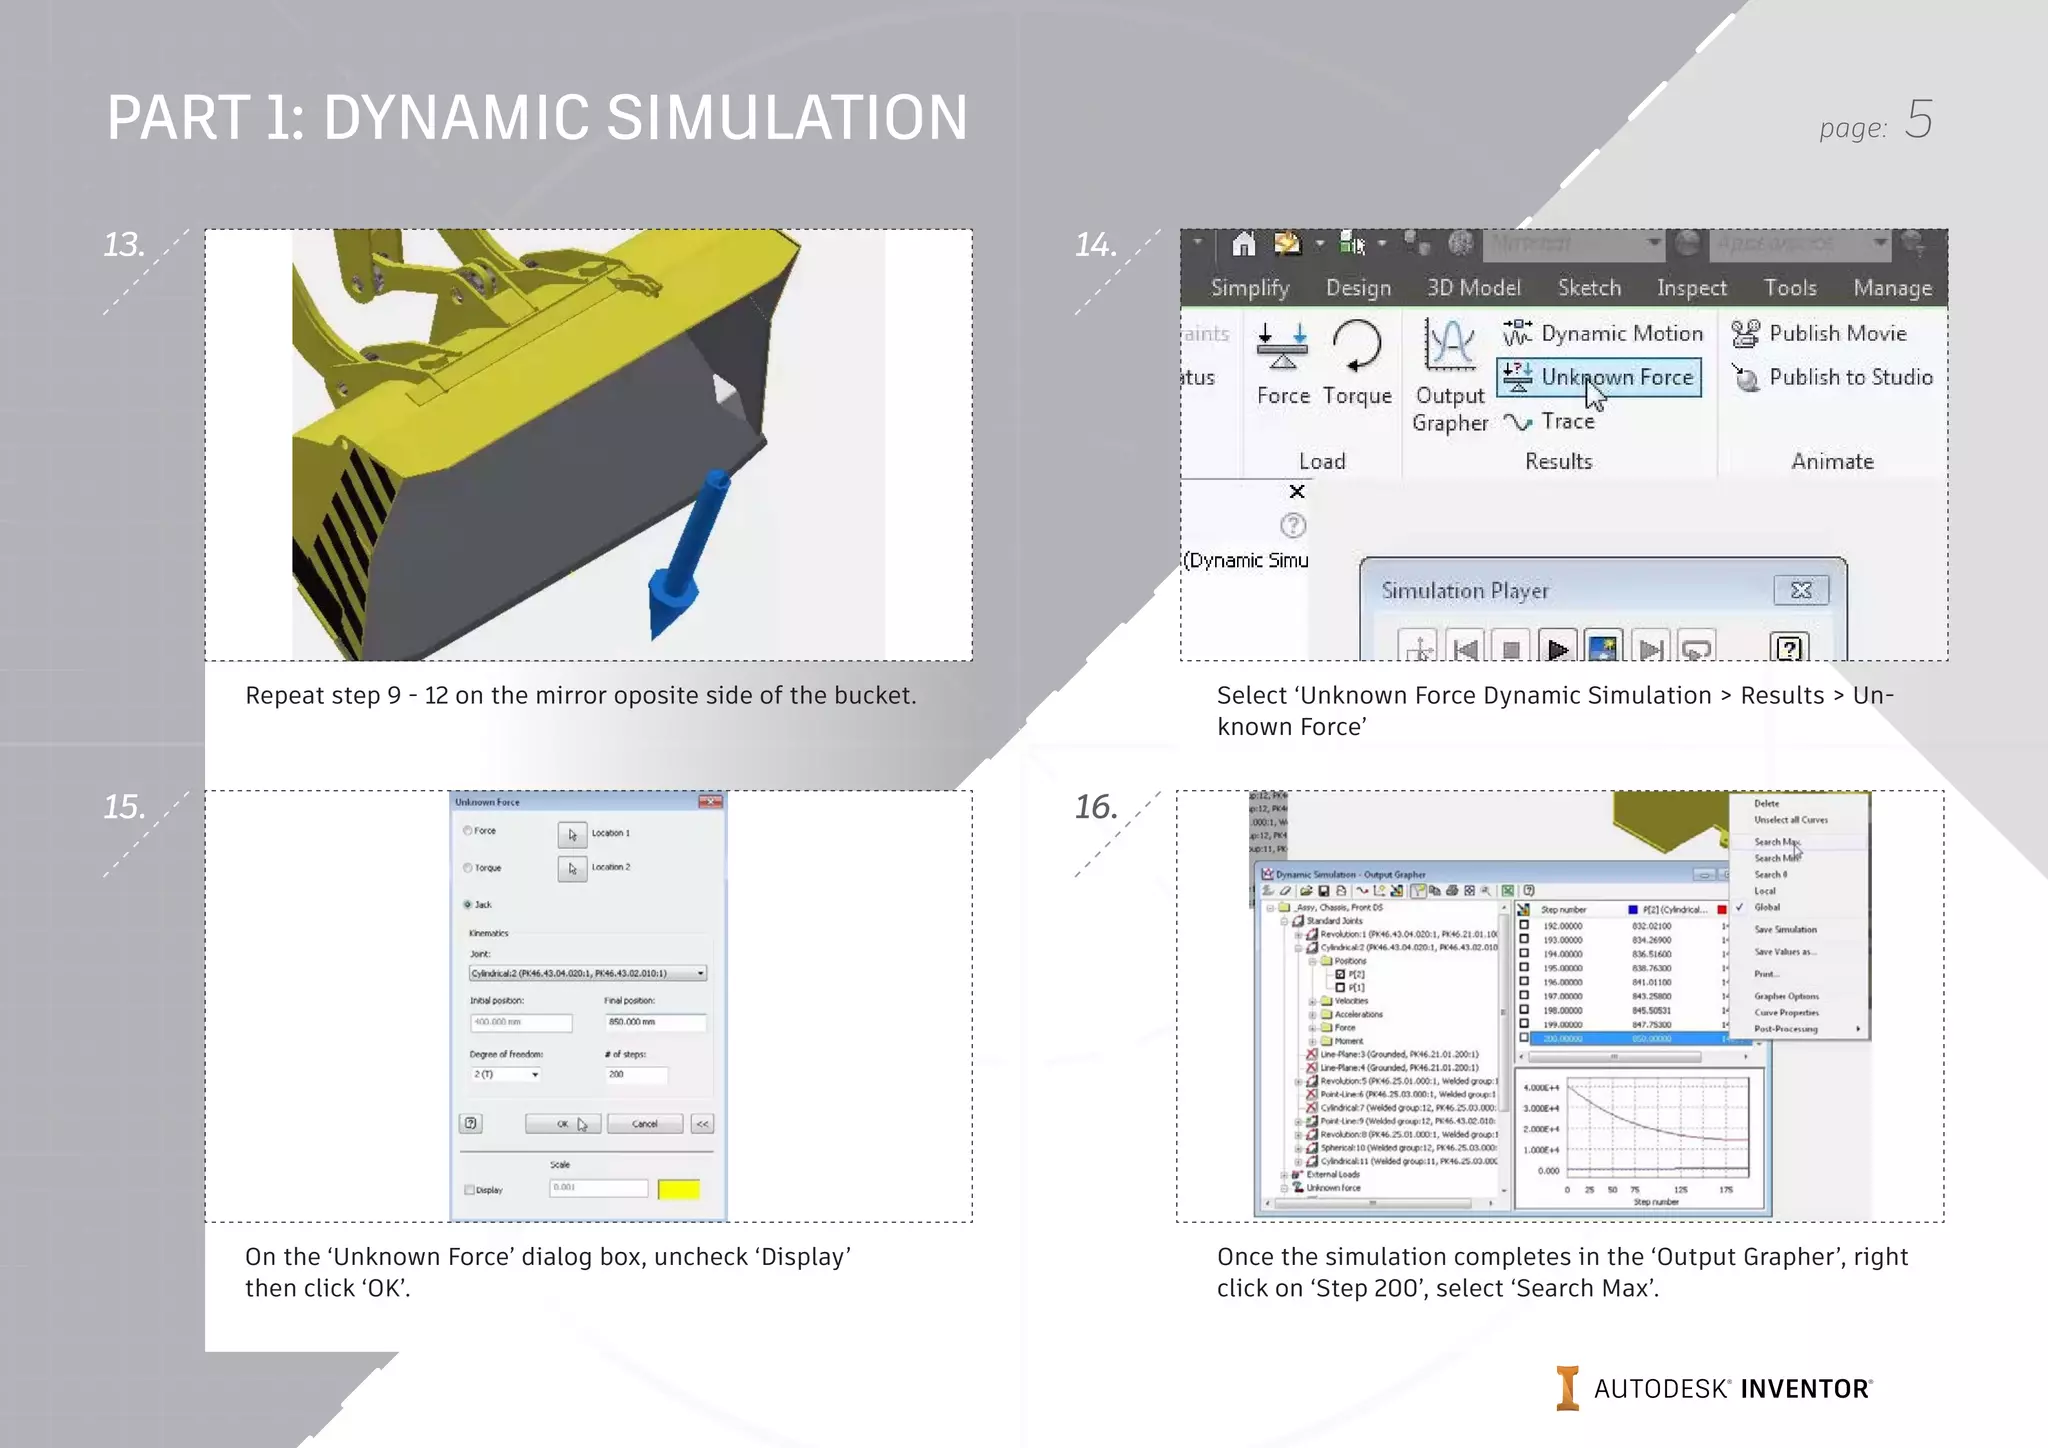
Repeat step 9 - 12 on the mirror oposite side of the bucket. Select ‘Unknown Force Dynamic Simulation > Results > Un-
known Force’
On the ‘Unknown Force’ dialog box, uncheck ‘Display’
then click ‘OK’.
Once the simulation completes in the ‘Output Grapher’, right
click on ‘Step 200’, select ‘Search Max’.
14.
16.
13.
15.
PART 1: DYNAMIC SIMULATION
page: 6
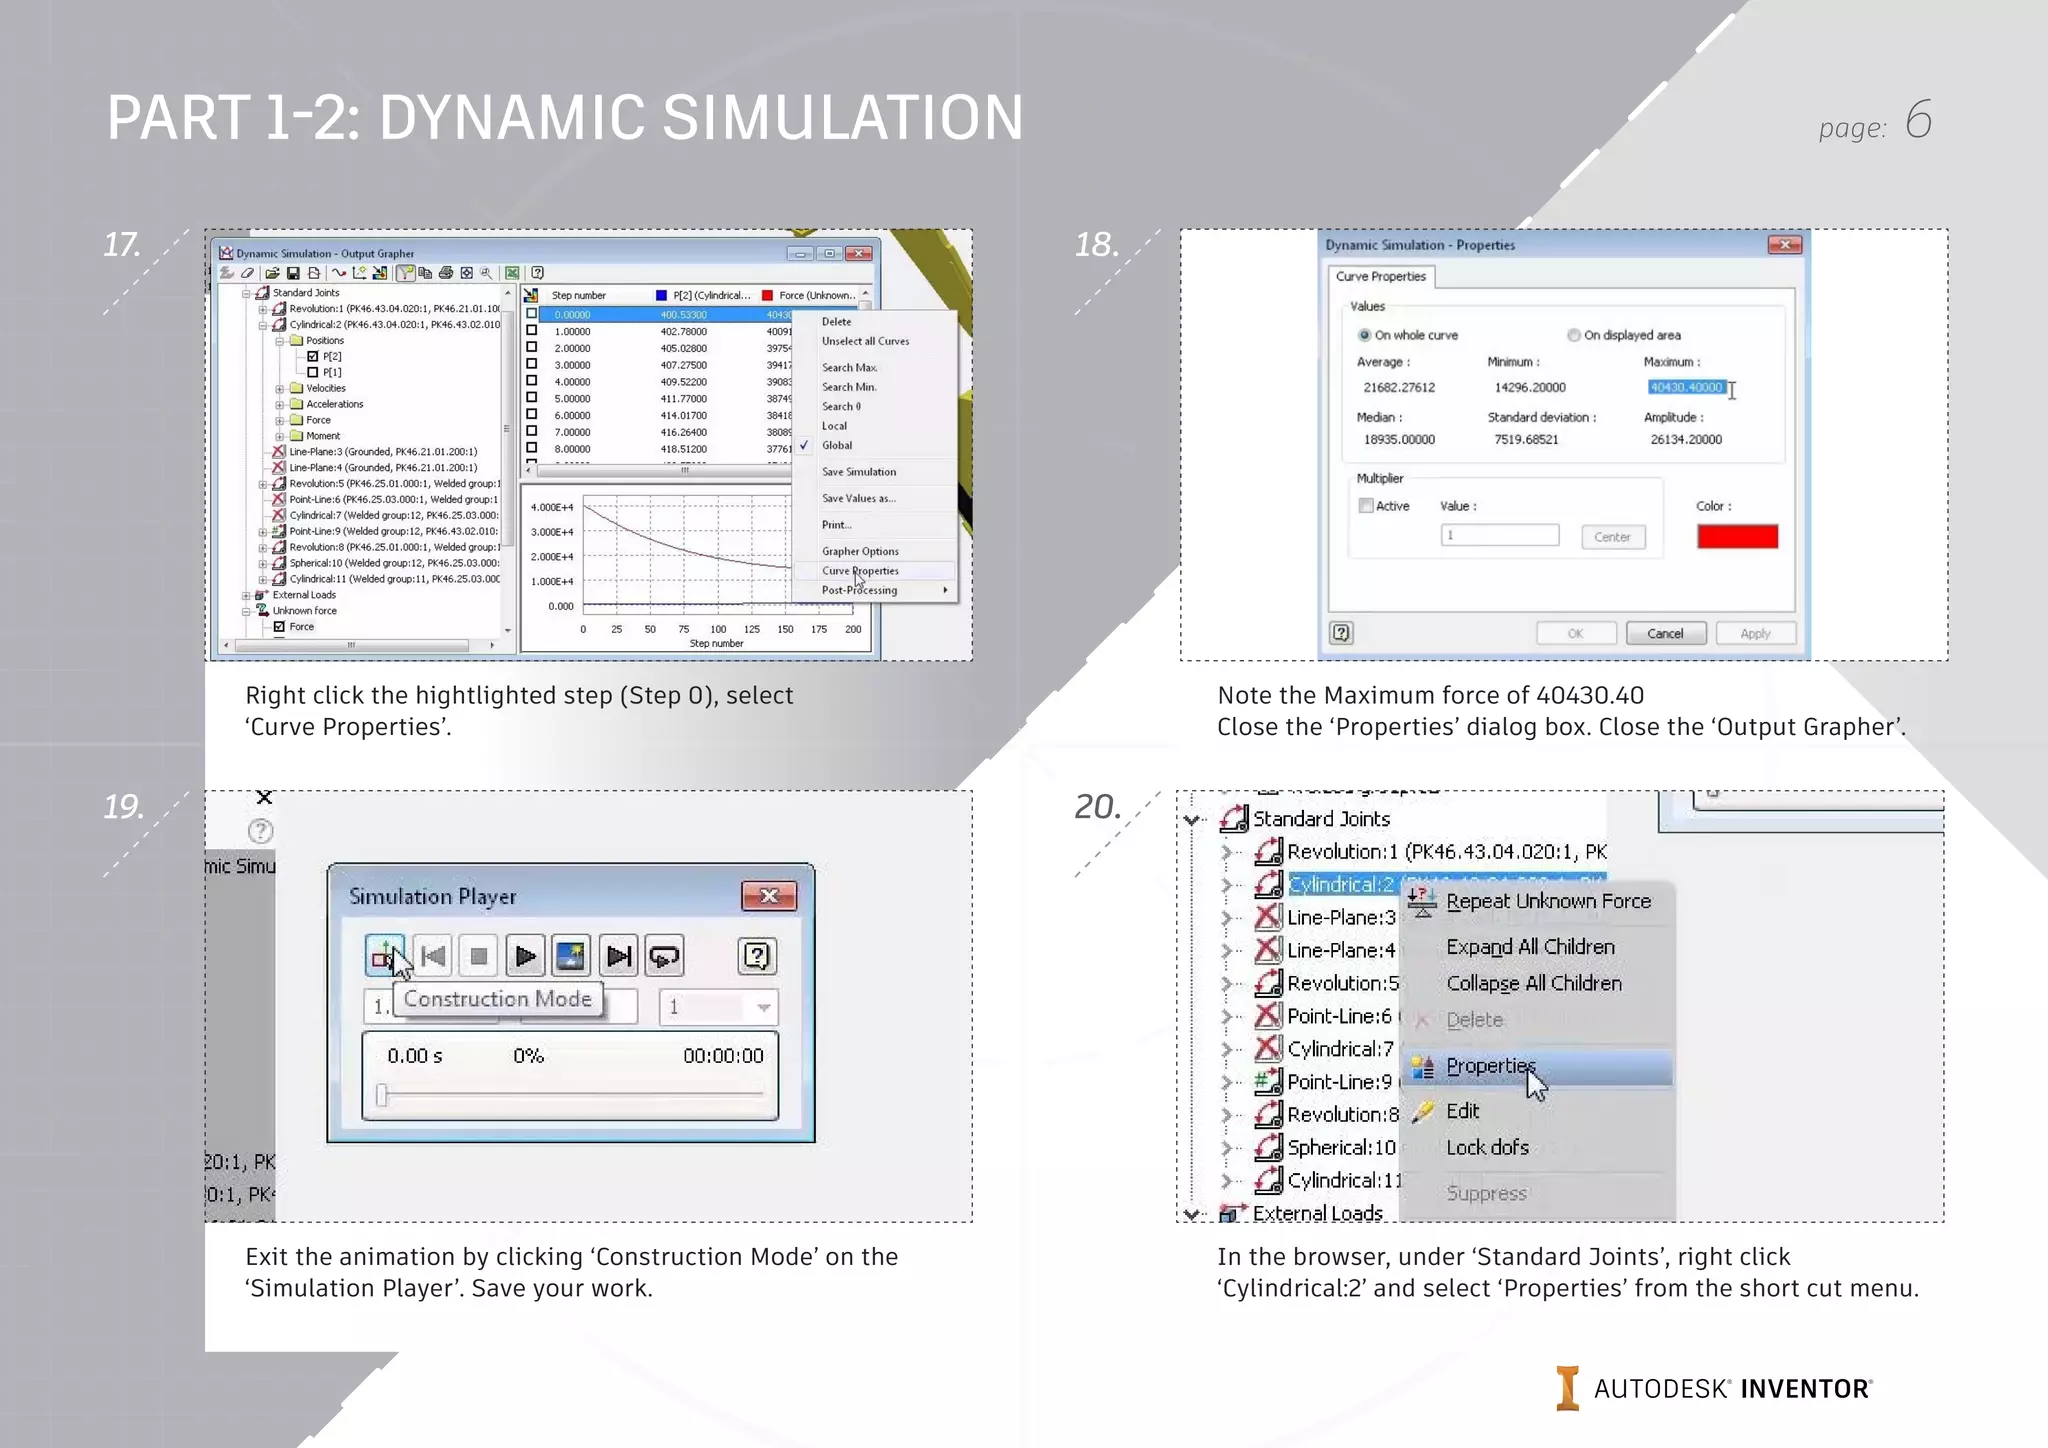
Right click the hightlighted step (Step 0), select
‘Curve Properties’.
Note the Maximum force of 40430.40
Close the ‘Properties’ dialog box. Close the ‘Output Grapher’.
Exit the animation by clicking ‘Construction Mode’ on the
‘Simulation Player’. Save your work.
In the browser, under ‘Standard Joints’, right click
‘Cylindrical:2’ and select ‘Properties’ from the short cut menu.
18.
20.
17.
19.
PART 1-2: DYNAMIC SIMULATION
page: 7
In the ‘Joint Properties’ dialog box, on the ‘dof 2 (T)’ tab, select
‘Edit Joint Force’, check on ‘Enble Joint Force’, select ‘Constant
Value’.
Enter a ‘Constant Value’ of 41500 N, Click ‘OK’.
Select ‘Export to FEA Dynamic Simulation > Stress Analysis >
Export to FEA’.
In the graphics window, select the part shown.
22.
24.
21.
23.
PART 2: DYNAMIC SIMULATION
page: 8
Select ‘OK’ on the warning message dialog box. In the graphics window, select the sub-assembly shown,
right click and select ‘Flexible’ from the short cut menu.
Select ‘Export to FEA Dynamic Simulation > Stress Analysis >
Export to FEA’.
In the graphics gindow, select the part shown. On the ‘Export
to FEA’ dialog box, click ‘OK’
26.
28.
25.
27.
PART 2: DYNAMIC SIMULATION
page: 9
On the ‘FEA Load-Bearing Faces Selection’, under ‘Joints to
complete’: ‘Load Bearing’, select ‘Welding:13’. Select the large
inside circular face shown.
On the ‘FEA Load-Bearing Faces Selection’, under ‘Joints to
complete’: ‘Load Bearing’, select ‘Revolution:14’. Select the
small inside circular face shown. Click ‘OK’.
Run the simualtion, click ‘Run’ on the ‘Simulation Player’. Open the ‘Output Grapher’.
‘Dynamic Simulation > Results > Output Grapher’.
30.
32.
29.
31.
PART 2: DYNAMIC SIMULATION
page: 10
On the ‘Output Grapher’, expand ‘Joint Revolution:14’, then
expand the Force folder, then check ‘On Force’.
On the ‘Output Grapher’, under ‘Joint Cylindrical:2’, uncheck
‘P[2]’.
On the ‘Output Grapher’, check ‘Time Step 1.00000’ to export it. On the ‘Output Grapher’, double click on the graph at the ‘0.5
time mark’.
34.
36.
33.
35.
PART 2: DYNAMIC SIMULATION
page: 11
On the ‘Output Grapher’, check ‘Time Step 0.50000’ to export it. Repeat previous steps for the 0.75 time mark in the graph.
Notice that the time steps have been added to the ‘Export to
FEA’ folder in the ‘Output Grapher’. Close the ‘Output Grapher’.
Exit the animation by clicking ‘Construction Mode’ on the
‘Simulation Player’. Save your work.
38.
40.
37.
39.
PART 2: DYNAMIC SIMULATION
page: 12
Start the ‘Stress Analysis Environment, Environments > Beign >
Stress Analysis’.
Create a ‘New Study Analysis > Manage > Create Study’.
On the ‘Create New Study’ dialog box, check on, ‘Detect and
Elminate Rigid Body Modes’, ‘Separte Stresses Across Contact
Surfaces’, ‘Motion Loads Analysis’.
From the ‘Time Step’ drop down list, select the ‘t:1’ time step
Click ‘OK’.
42.
44.
41.
43.
PART 3: DYNAMIC SIMULATION
page: 13
Turn Off the display of the load glyphs by unchecking ‘Bounda-
ry Conditions Analysis > Display > Boundary Conditions’.
In the browser, right click on ‘Materials’, select ‘Show All Mate-
rials’ from the short cut menu.
Click ‘Mesh Settings Analysis > Mesh > Mesh Settings’. On the Mesh Setting dialog box, enter the values: Average
Element Size: 0.250, Minimum Element Size: 0.375, Check ‘ON’,
‘Create Curved Mesh Elements’. Click ‘OK’.
46.
48.
45.
47.
PART 3: DYNAMIC SIMULATION
page: 14
Click ‘Mesh View Analysis > Mesh > Mesh View’. Turn off Mesh
View by clicking ‘Mesh View’ again.
Run simulation, click ‘Simulate Analysis > Solve > Simulate’.
Click ‘Run’, on the ‘Simulate’ dialog box. Adjust the displacement display, Select ‘Adjusted x0.5
Analysis > Display > Displacement Adjustment’.
50.
52.
49.
51.
PART 3: DYNAMIC SIMULATION
page: 15
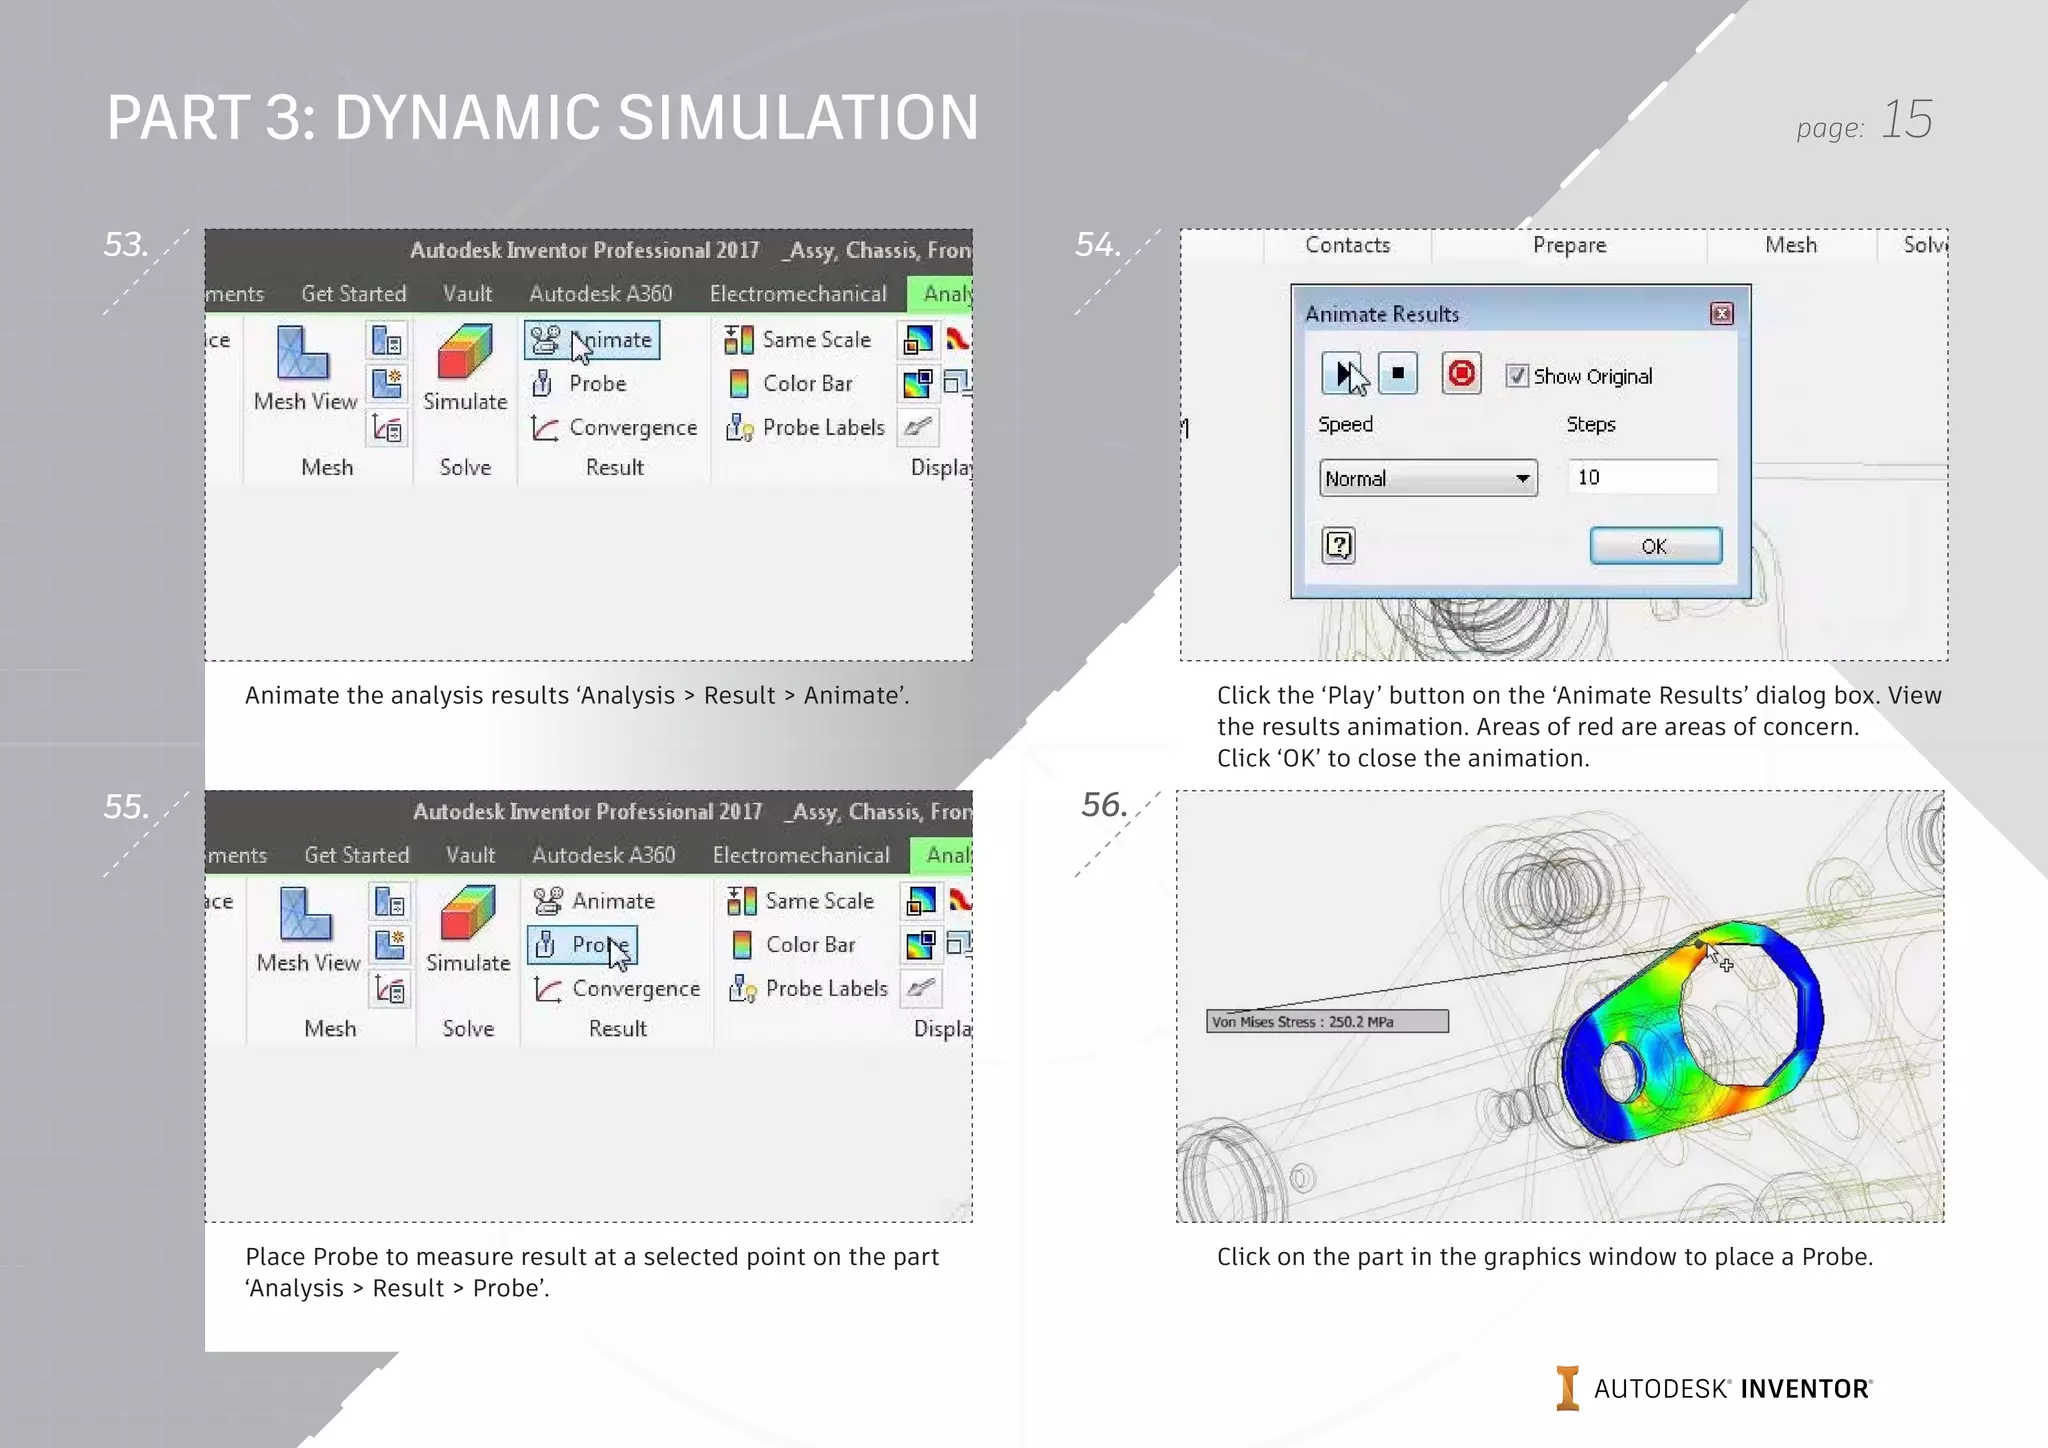
Animate the analysis results ‘Analysis > Result > Animate’. Click the ‘Play’ button on the ‘Animate Results’ dialog box. View
the results animation. Areas of red are areas of concern.
Click ‘OK’ to close the animation.
Place Probe to measure result at a selected point on the part
‘Analysis > Result > Probe’.
Click on the part in the graphics window to place a Probe.
54.
56.
53.
55.
PART 3: DYNAMIC SIMULATION
page: 16
Right click in the graphics gindow, select ‘Finish’ from the short
cut menu.
Hide the Probe display by clicking Off the Probe Lables
‘Analysis > Display > Probe Lables’.
In the browser, double click ‘Displacement’ under the ‘Results’. View the Displacement results in the graphics window. Areas
of red are areas of concern. To finsh the analysis, Click ‘Finish
Analysis’.
58.
60.
57.
59.
PART 3: DYNAMIC SIMULATION
Autodesk, Autodesk Inventor, and the Autodesk logo are registered trademarks or trademarks of Autodesk, Inc., and/or its subsidiaries and/or affiliates in the USA and/or other countries. All other brand
names, product names, or trademarks belong to their respective holders. Autodesk reserves the right to alter product offerings and specifications at any time without notice, and is not responsible for
typographical or graphical errors that may appear in this document.
© 2017 Autodesk, Inc. All rights reserved.

Inventor project-dynamic-simulation-guide-en

  • 1.
    AUTODESK INVENTOR Trial Projects DynamicSimulation Analyze front loader assembly
  • 2.
    page: 2 In Inventor,click the ‘Projects’ icon in the ribbon. Navigate to where you saved the project files and select Assy, Chassis, Front DS.ipj. Then open Assy, Chassis, Front DS.iam. Right click the ‘Level of Detail Dynamic Simulation’ in the browser and select ‘Activate’. Select ‘Concentric’ from the drop-down for the placement. In the browser, collape the ‘Grounded’ item. 2. 4. 1. 3. PART 1: DYNAMIC SIMULATION
  • 3.
    page: 3 In theGraphics Window, select the hydraulic cylinder assme- bly, ‘PK46.43.04.0202:1 (~1)’. In the Browser, under ‘Standard Joints’, right click ‘Cylindri- cal:2’ and select ‘Properties’ from the short cut menu. In the ‘Joint Properties’ dialog box, on the dof 2 (T) tab, enter initial condition value of 400 mm. Then click ‘OK’. Apply load force ‘Dynamic Simulation > Load > Force’. 6. 8. 5. 7. PART 1: DYNAMIC SIMULATION
  • 4.
    page: 4 In thegraphic window, select a point on the bottom of the bucket as shown. Select the edge shown to specify the load direction. Flip the load direction so that it is pointing down. Switch to ‘Associative Load Direction’, and enter a value of 1250 N, then click Apply. 10. 12. 9. 11. PART 1: DYNAMIC SIMULATION
  • 5.
    page: 5 Repeat step9 - 12 on the mirror oposite side of the bucket. Select ‘Unknown Force Dynamic Simulation > Results > Un- known Force’ On the ‘Unknown Force’ dialog box, uncheck ‘Display’ then click ‘OK’. Once the simulation completes in the ‘Output Grapher’, right click on ‘Step 200’, select ‘Search Max’. 14. 16. 13. 15. PART 1: DYNAMIC SIMULATION
  • 6.
    page: 6 Right clickthe hightlighted step (Step 0), select ‘Curve Properties’. Note the Maximum force of 40430.40 Close the ‘Properties’ dialog box. Close the ‘Output Grapher’. Exit the animation by clicking ‘Construction Mode’ on the ‘Simulation Player’. Save your work. In the browser, under ‘Standard Joints’, right click ‘Cylindrical:2’ and select ‘Properties’ from the short cut menu. 18. 20. 17. 19. PART 1-2: DYNAMIC SIMULATION
  • 7.
    page: 7 In the‘Joint Properties’ dialog box, on the ‘dof 2 (T)’ tab, select ‘Edit Joint Force’, check on ‘Enble Joint Force’, select ‘Constant Value’. Enter a ‘Constant Value’ of 41500 N, Click ‘OK’. Select ‘Export to FEA Dynamic Simulation > Stress Analysis > Export to FEA’. In the graphics window, select the part shown. 22. 24. 21. 23. PART 2: DYNAMIC SIMULATION
  • 8.
    page: 8 Select ‘OK’on the warning message dialog box. In the graphics window, select the sub-assembly shown, right click and select ‘Flexible’ from the short cut menu. Select ‘Export to FEA Dynamic Simulation > Stress Analysis > Export to FEA’. In the graphics gindow, select the part shown. On the ‘Export to FEA’ dialog box, click ‘OK’ 26. 28. 25. 27. PART 2: DYNAMIC SIMULATION
  • 9.
    page: 9 On the‘FEA Load-Bearing Faces Selection’, under ‘Joints to complete’: ‘Load Bearing’, select ‘Welding:13’. Select the large inside circular face shown. On the ‘FEA Load-Bearing Faces Selection’, under ‘Joints to complete’: ‘Load Bearing’, select ‘Revolution:14’. Select the small inside circular face shown. Click ‘OK’. Run the simualtion, click ‘Run’ on the ‘Simulation Player’. Open the ‘Output Grapher’. ‘Dynamic Simulation > Results > Output Grapher’. 30. 32. 29. 31. PART 2: DYNAMIC SIMULATION
  • 10.
    page: 10 On the‘Output Grapher’, expand ‘Joint Revolution:14’, then expand the Force folder, then check ‘On Force’. On the ‘Output Grapher’, under ‘Joint Cylindrical:2’, uncheck ‘P[2]’. On the ‘Output Grapher’, check ‘Time Step 1.00000’ to export it. On the ‘Output Grapher’, double click on the graph at the ‘0.5 time mark’. 34. 36. 33. 35. PART 2: DYNAMIC SIMULATION
  • 11.
    page: 11 On the‘Output Grapher’, check ‘Time Step 0.50000’ to export it. Repeat previous steps for the 0.75 time mark in the graph. Notice that the time steps have been added to the ‘Export to FEA’ folder in the ‘Output Grapher’. Close the ‘Output Grapher’. Exit the animation by clicking ‘Construction Mode’ on the ‘Simulation Player’. Save your work. 38. 40. 37. 39. PART 2: DYNAMIC SIMULATION
  • 12.
    page: 12 Start the‘Stress Analysis Environment, Environments > Beign > Stress Analysis’. Create a ‘New Study Analysis > Manage > Create Study’. On the ‘Create New Study’ dialog box, check on, ‘Detect and Elminate Rigid Body Modes’, ‘Separte Stresses Across Contact Surfaces’, ‘Motion Loads Analysis’. From the ‘Time Step’ drop down list, select the ‘t:1’ time step Click ‘OK’. 42. 44. 41. 43. PART 3: DYNAMIC SIMULATION
  • 13.
    page: 13 Turn Offthe display of the load glyphs by unchecking ‘Bounda- ry Conditions Analysis > Display > Boundary Conditions’. In the browser, right click on ‘Materials’, select ‘Show All Mate- rials’ from the short cut menu. Click ‘Mesh Settings Analysis > Mesh > Mesh Settings’. On the Mesh Setting dialog box, enter the values: Average Element Size: 0.250, Minimum Element Size: 0.375, Check ‘ON’, ‘Create Curved Mesh Elements’. Click ‘OK’. 46. 48. 45. 47. PART 3: DYNAMIC SIMULATION
  • 14.
    page: 14 Click ‘MeshView Analysis > Mesh > Mesh View’. Turn off Mesh View by clicking ‘Mesh View’ again. Run simulation, click ‘Simulate Analysis > Solve > Simulate’. Click ‘Run’, on the ‘Simulate’ dialog box. Adjust the displacement display, Select ‘Adjusted x0.5 Analysis > Display > Displacement Adjustment’. 50. 52. 49. 51. PART 3: DYNAMIC SIMULATION
  • 15.
    page: 15 Animate theanalysis results ‘Analysis > Result > Animate’. Click the ‘Play’ button on the ‘Animate Results’ dialog box. View the results animation. Areas of red are areas of concern. Click ‘OK’ to close the animation. Place Probe to measure result at a selected point on the part ‘Analysis > Result > Probe’. Click on the part in the graphics window to place a Probe. 54. 56. 53. 55. PART 3: DYNAMIC SIMULATION
  • 16.
    page: 16 Right clickin the graphics gindow, select ‘Finish’ from the short cut menu. Hide the Probe display by clicking Off the Probe Lables ‘Analysis > Display > Probe Lables’. In the browser, double click ‘Displacement’ under the ‘Results’. View the Displacement results in the graphics window. Areas of red are areas of concern. To finsh the analysis, Click ‘Finish Analysis’. 58. 60. 57. 59. PART 3: DYNAMIC SIMULATION
  • 17.
    Autodesk, Autodesk Inventor,and the Autodesk logo are registered trademarks or trademarks of Autodesk, Inc., and/or its subsidiaries and/or affiliates in the USA and/or other countries. All other brand names, product names, or trademarks belong to their respective holders. Autodesk reserves the right to alter product offerings and specifications at any time without notice, and is not responsible for typographical or graphical errors that may appear in this document. © 2017 Autodesk, Inc. All rights reserved.