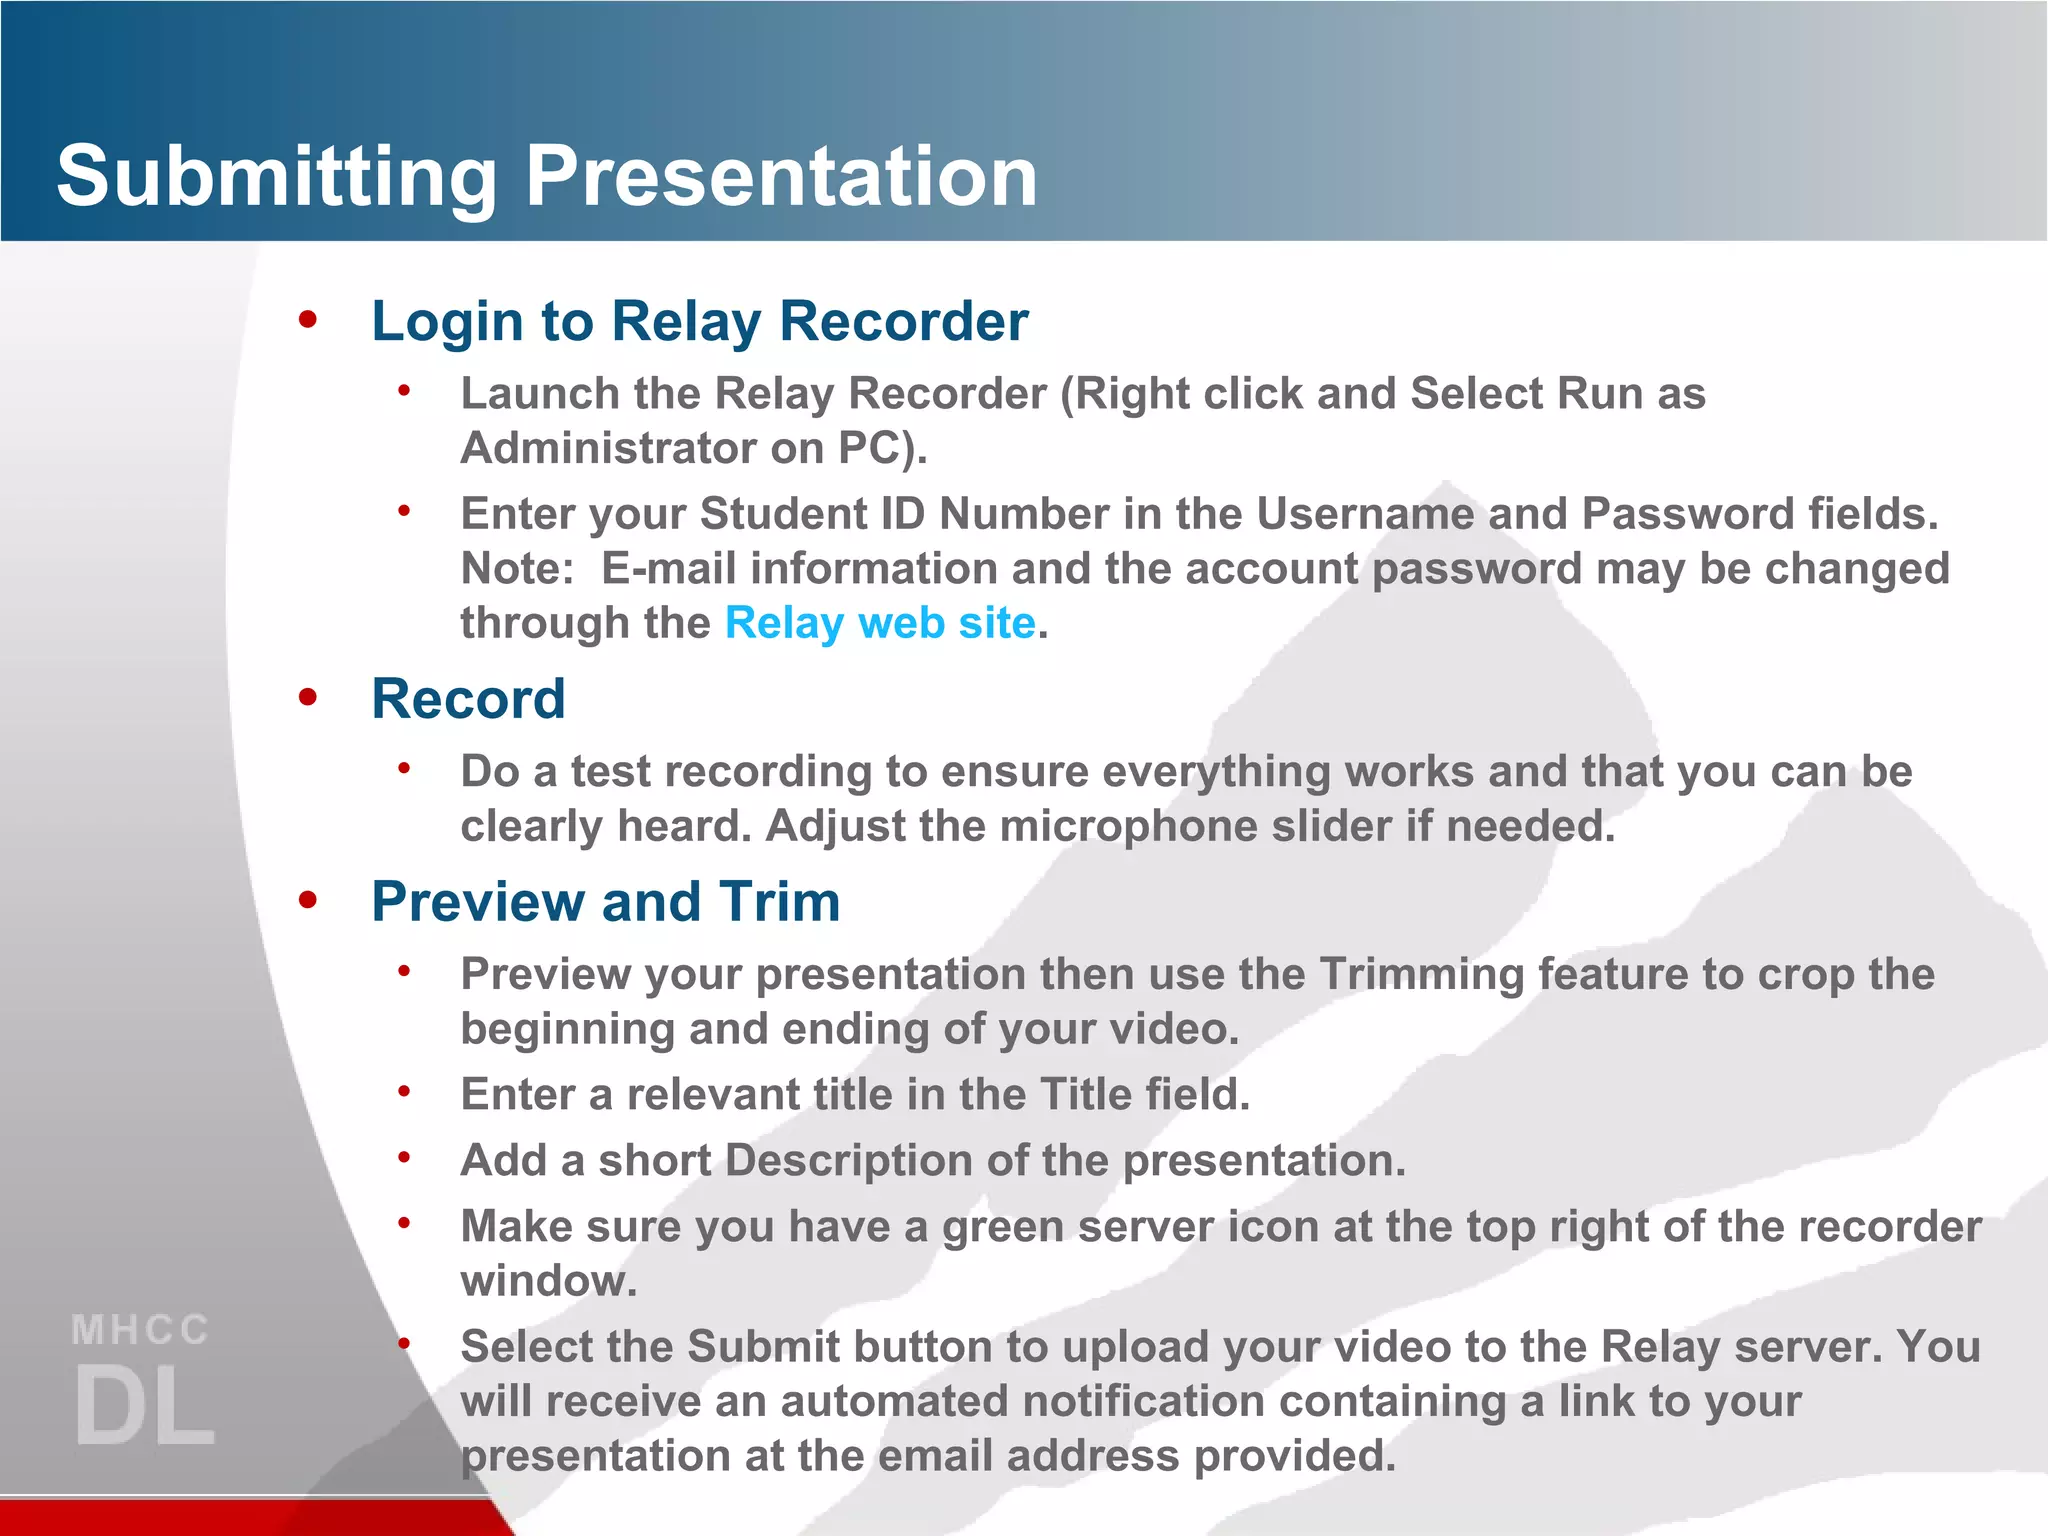
This document provides instructions for using the Slideshare Presentation Template on Relay to record a presentation along with a webcam video. Key steps include creating a Slideshare account, uploading the presentation file to Slideshare, copying the embed code, pasting the code on the webcam page to display the presentation, setting up a Relay account if needed, launching the Relay Recorder to record the webcam and presentation, previewing and trimming the video, and submitting it on Relay.
![Slideshare Presentation Template Overview This template allows you to upload your presentation to Slideshare.net which will allow you to display it on a single webpage along with your web camera. Both the camera and presentation can be recorded using Relay without the hassle of managing multiple windows. Review the remaining slides for further details on how to get started. Requirements PC or Mac running MS Office, OpenOffice, or iWork. USB capable webcam. There is no guarantee that your webcam is supported, so you may have to rely on other recording options. Access to the webcam and presentation webpage. MHCC Relay account and Recorder. Free Slideshare.net account. Mt. Hood Community College – [Course Title]](https://image.slidesharecdn.com/powerpointslidesharepresentation-1-110414041750-phpapp01/75/introduction_Smith_Kevin-1-2048.jpg)
![Template Editing Instructions Feel free to use this template ‘as is’, create your own, or edit to your liking, including: Titles Backgrounds Bullets, Images, Charts, Layouts, Fonts, etc. Avoid Embedding audio or videos. Adding transitions or animations. Mt. Hood Community College – [Course Title]](https://image.slidesharecdn.com/powerpointslidesharepresentation-1-110414041750-phpapp01/75/introduction_Smith_Kevin-2-2048.jpg)
![Upload Presentation Create A Slideshare Account Visit Slideshare.net and sign up for a new account. Slideshare Upload Login into your Slideshare account. Select the Upload your first document button. Select the Browser and select files… button and locate your presentation file on your computer. Provide a Title and short Description and keep Privacy setting to Public then select Save Changes. Copy Embed Code Select the Embed field next to your presentation. It should automatically highlight all the code. Right click (or Command key + button Mac) and select Copy from mouse menu or Ctrl + c (or Command + c Mac). Mt. Hood Community College – [Course Title]](https://image.slidesharecdn.com/powerpointslidesharepresentation-1-110414041750-phpapp01/75/introduction_Smith_Kevin-3-2048.jpg)
![Camera and Slideshare Setup Open Camera Webpage Open the webcam and presentation web. Select the “Allow” button on the camera object to display your camera. Paste your Slideshare embed code that you previously copied into the text box and it will automatically load. Right click (or Command key + button Mac) and select Paste from mouse menu or Ctrl + v (or Command + v Mac) Type in your name above your video or click to leave blank. You are ready to record your presentation when your camera and presentations appear. Mt. Hood Community College – [Course Title]](https://image.slidesharecdn.com/powerpointslidesharepresentation-1-110414041750-phpapp01/75/introduction_Smith_Kevin-4-2048.jpg)
![Setup Relay Account New Configure Relay Account Relay accounts only have to be set up once. If you have done this earlier then skip this slide. Visit the Relay Website. Sign in with your Student ID in the Username and Password fields. Select the Home tab then Account Settings and edit the following fields: Update Your Name. Replace your Student ID with your name. You will still login with your Student ID. Add your active email address. This is critical. All videos notifications use this address. Change your password. Secure your account with your own password. Mt. Hood Community College – [Course Title]](https://image.slidesharecdn.com/powerpointslidesharepresentation-1-110414041750-phpapp01/75/introduction_Smith_Kevin-5-2048.jpg)
![Powerpoint slideshare presentation[1]](https://cdn.slidesharecdn.com/ss_thumbnails/powerpointslidesharepresentation1-101015151744-phpapp01-thumbnail.jpg?width=640&height=640&fit=bounds)


![Tossinfezionialimentari 110221144814-phpapp02[1]](https://cdn.slidesharecdn.com/ss_thumbnails/tossinfezionialimentari-110221144814-phpapp021-110517045739-phpapp01-thumbnail.jpg?width=640&height=640&fit=bounds)


