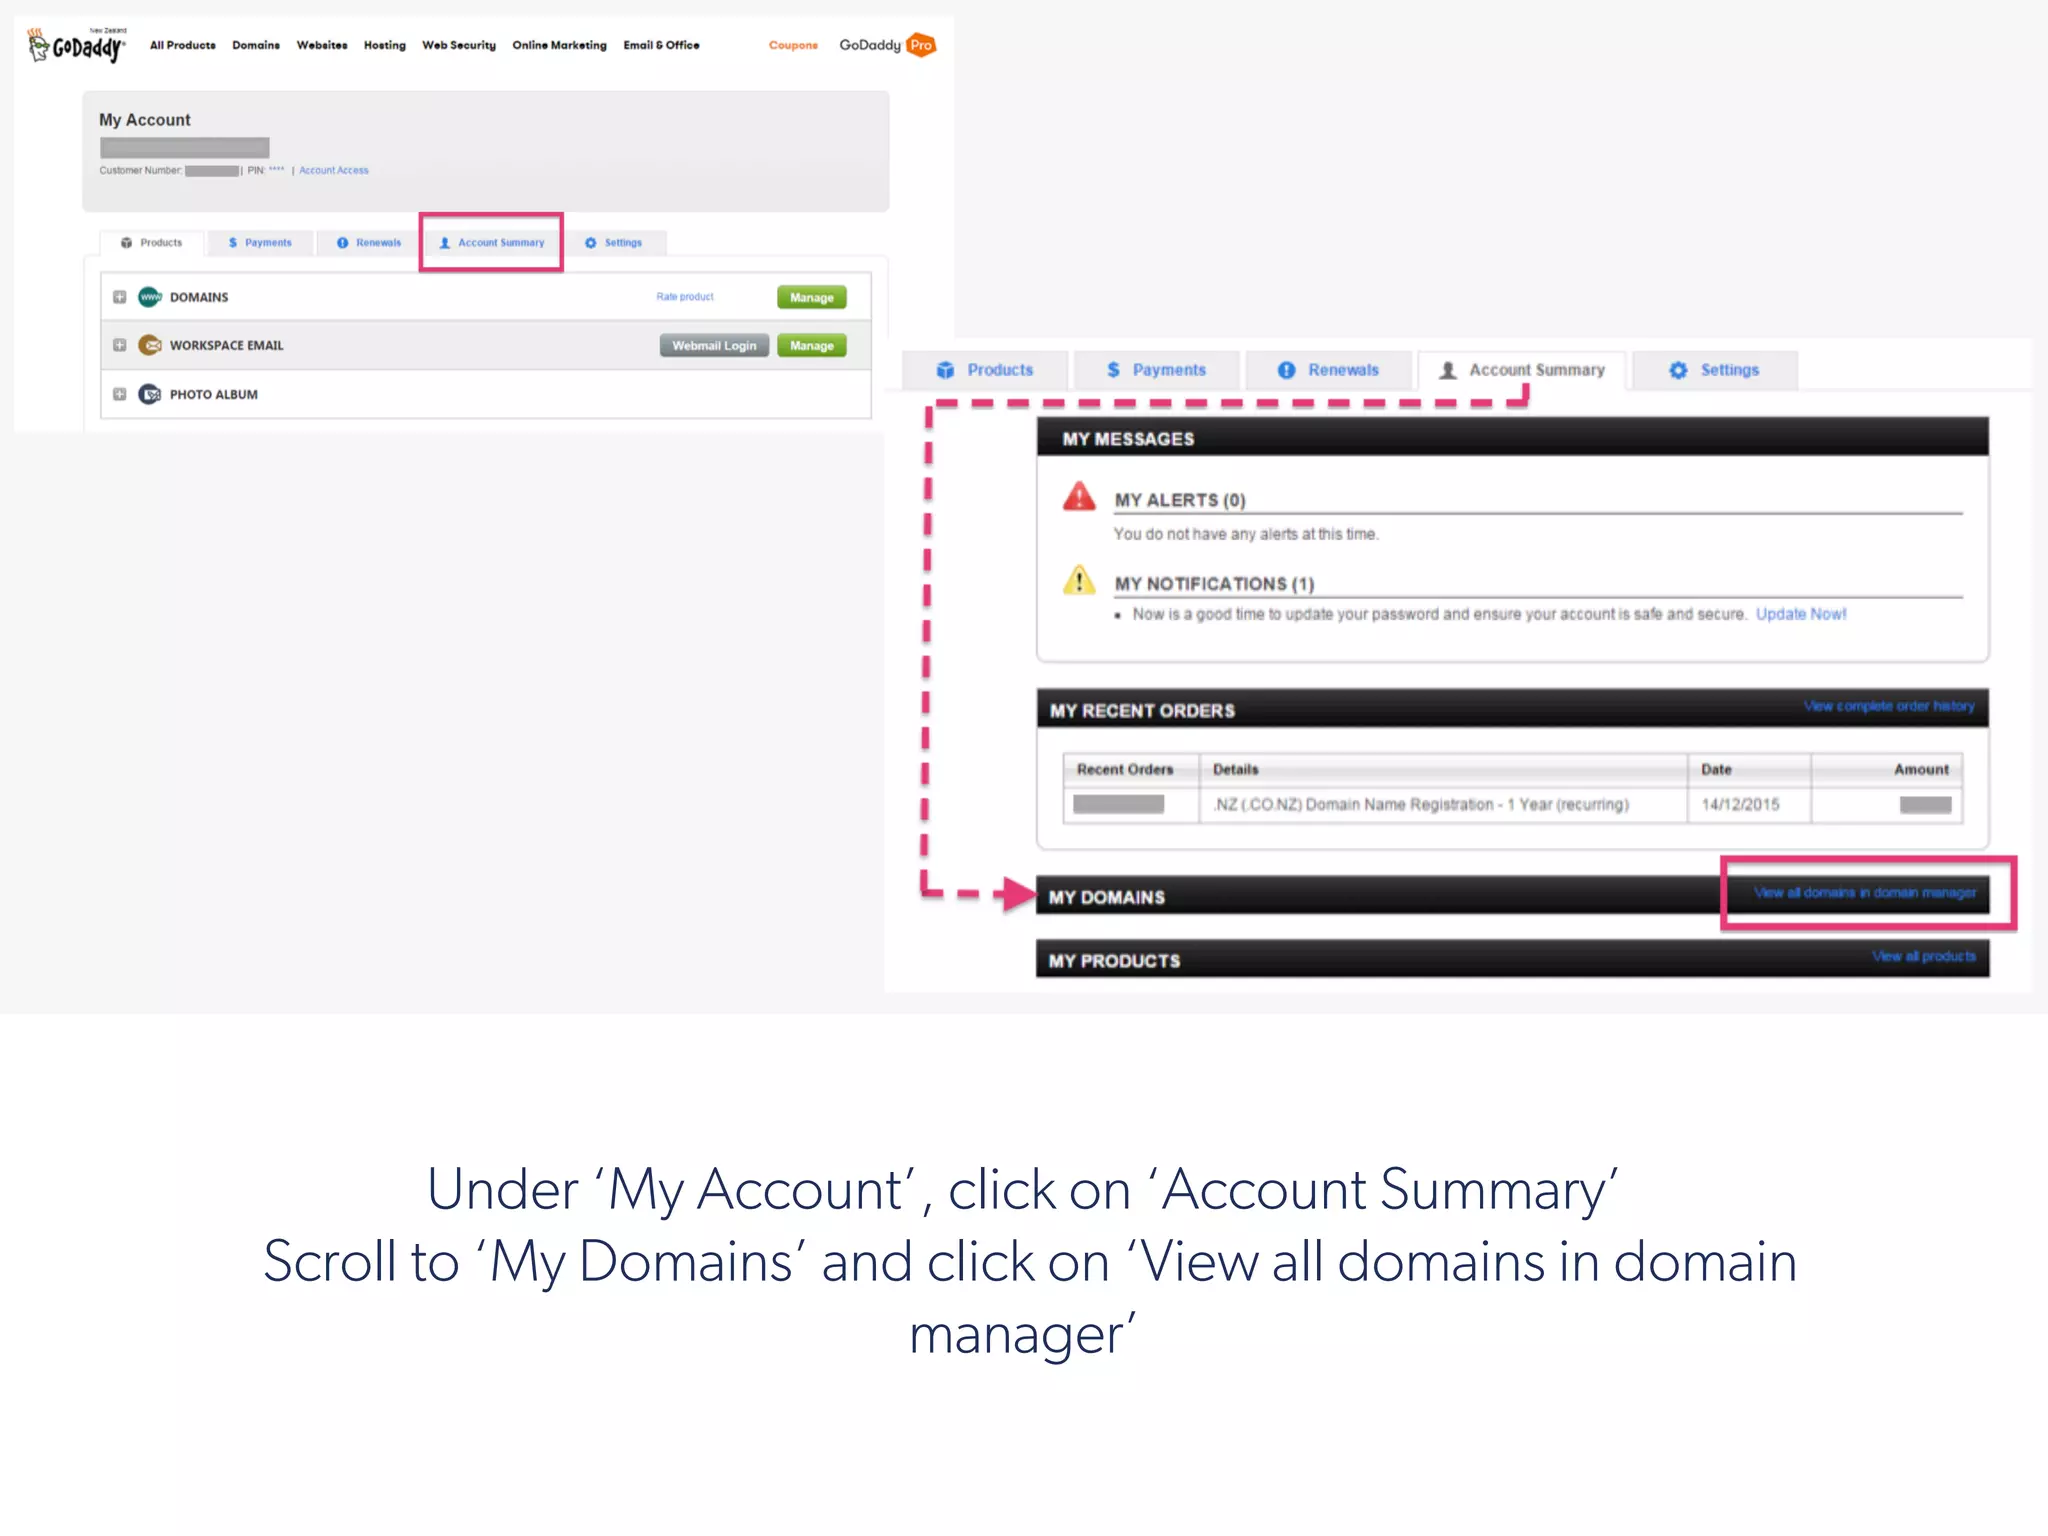
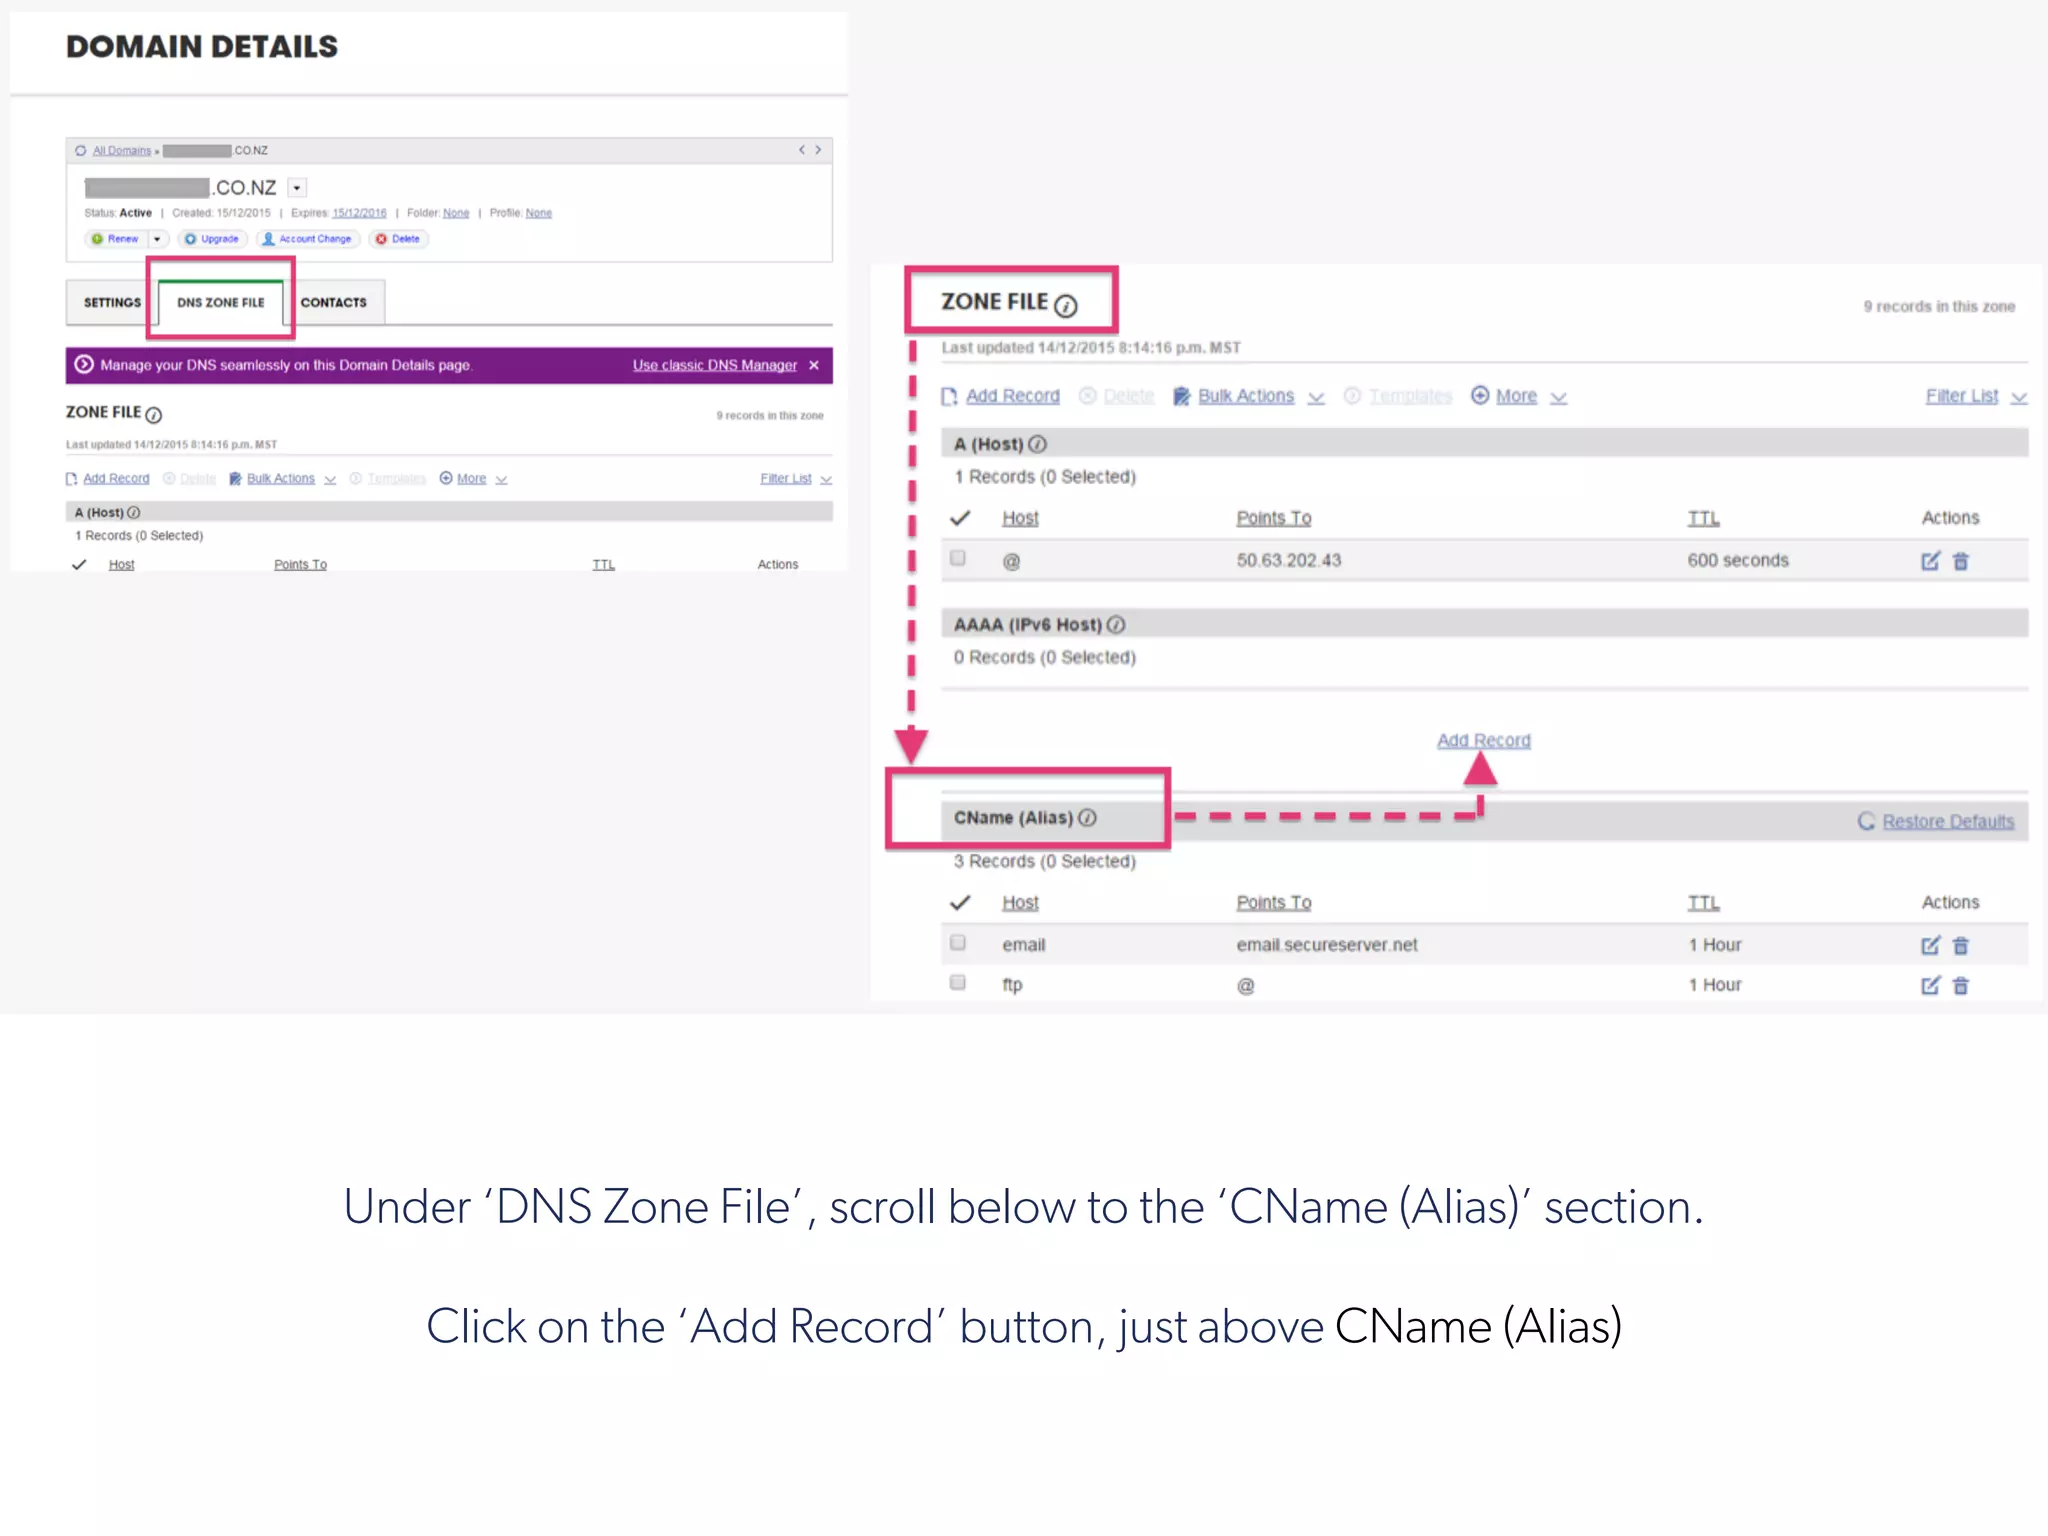
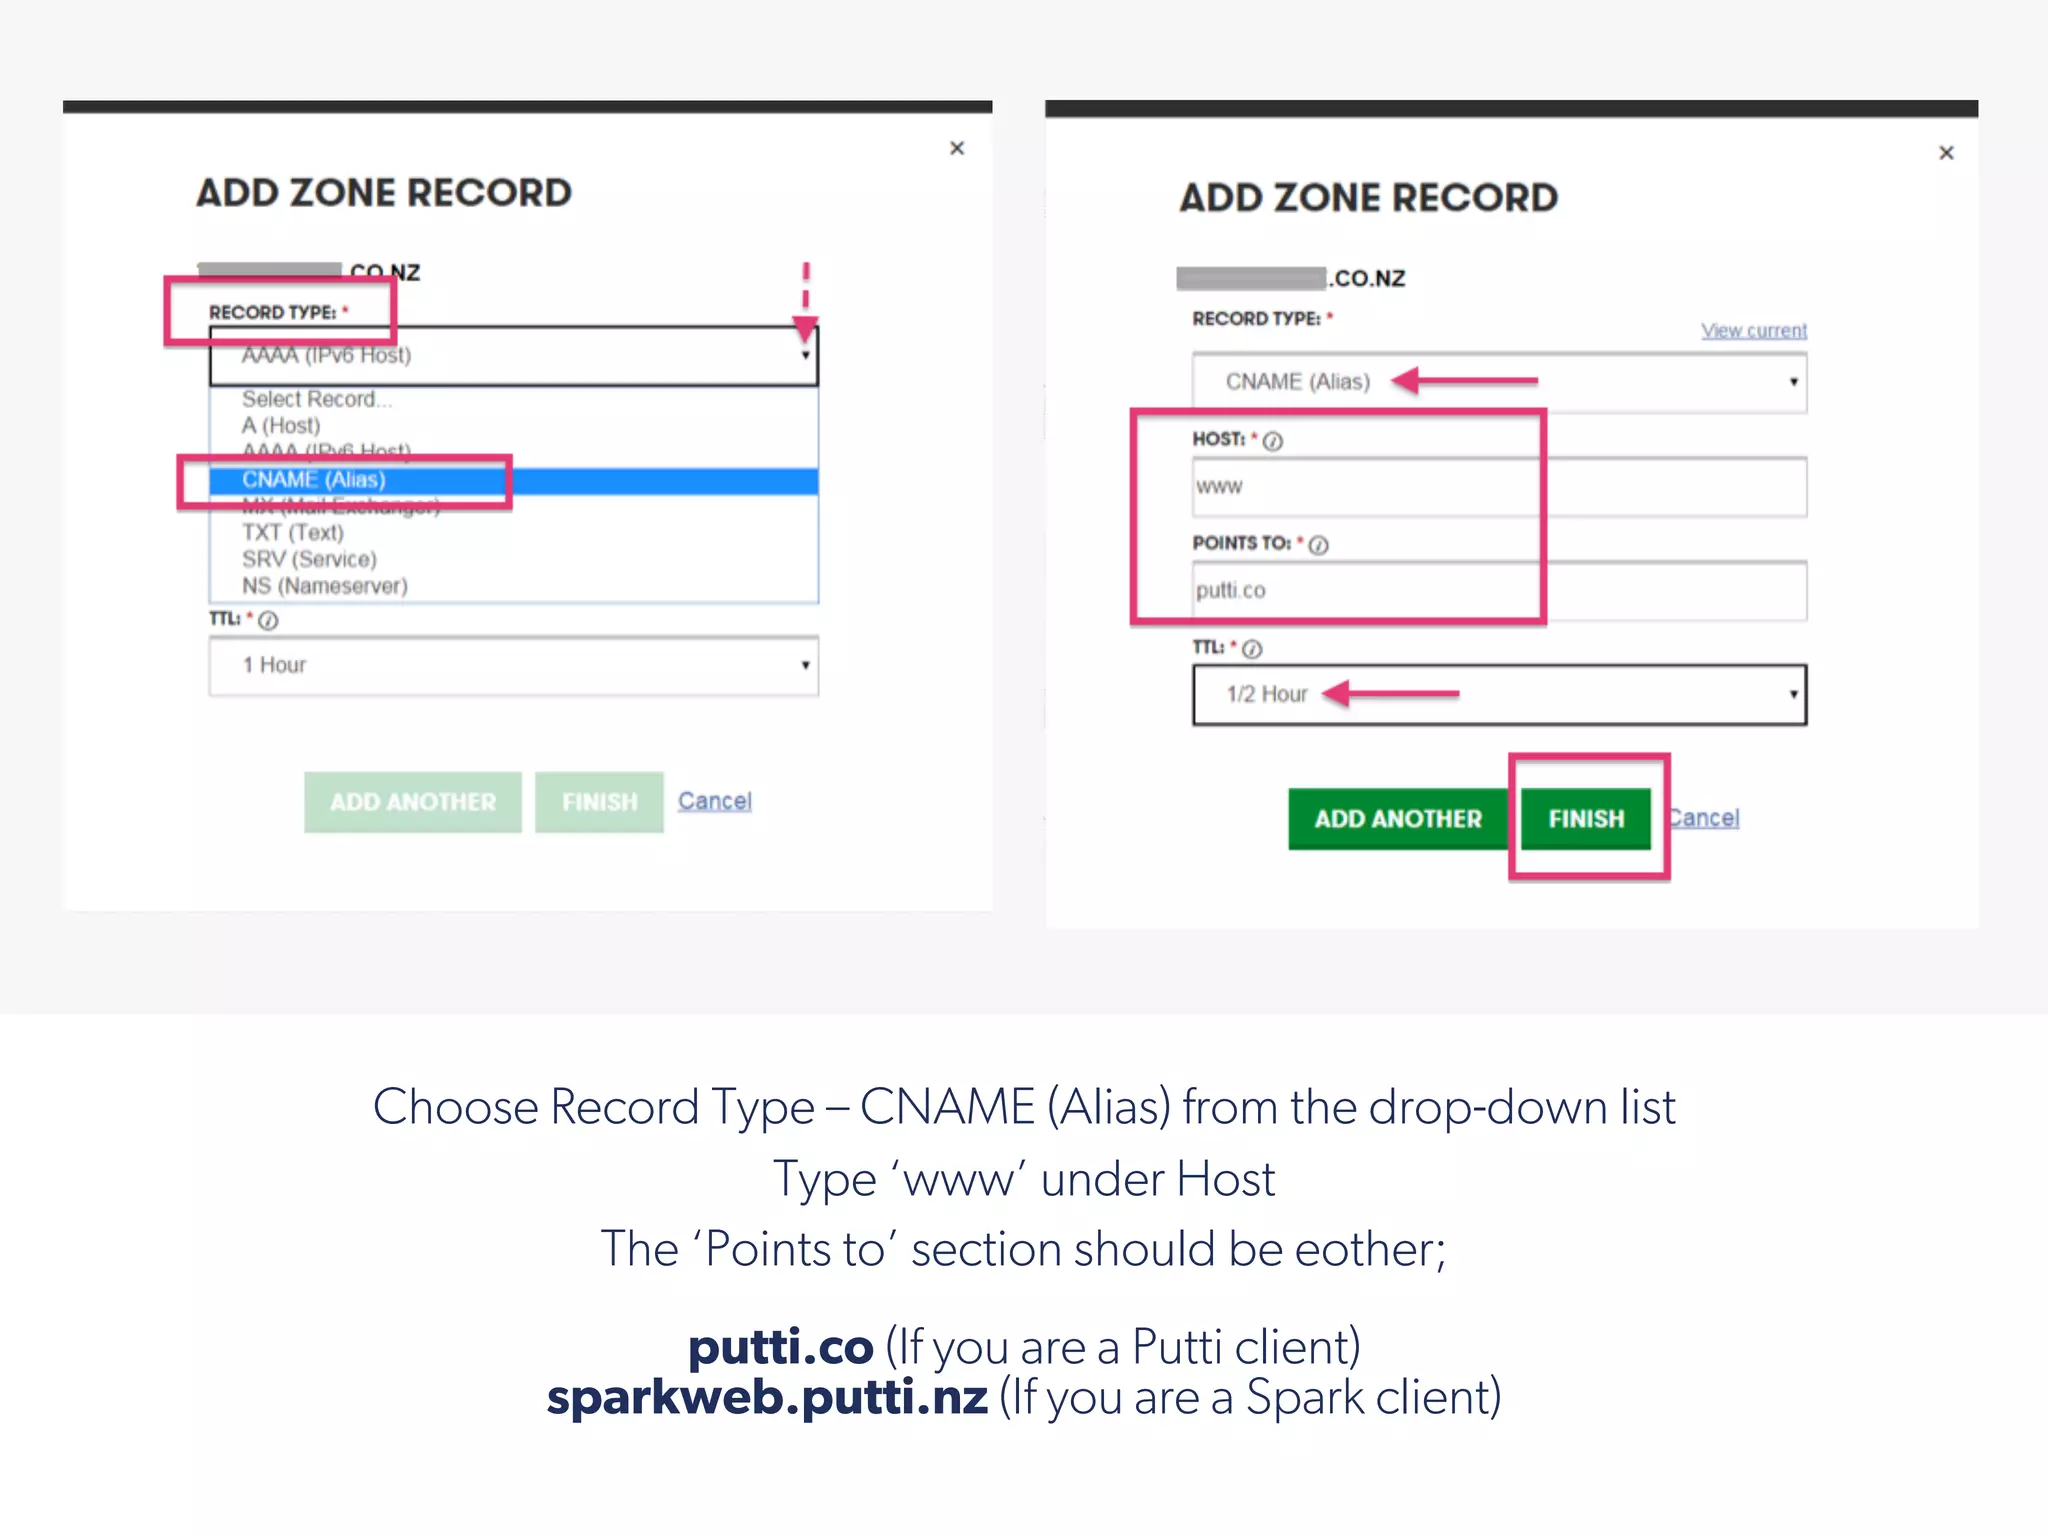
This tutorial is going to show you how to add a CNAME record for
your website if you have previously bought a domain name.
!
!
If you’ve bought and registered a domain name with ‘Go Daddy’,
please log in to your Go Daddy account.
!
Under ‘My Account’, click on ‘Account Summary’
 Scroll to ‘My Domains’ and click on ‘View all domains in domain
manager’
!
On the ‘My Domains’ page, you’ll see a dotted section with your domain name in
the center, in bold.
Click on the ‘cog’ at the top right of that dotted section.
Now click on ‘Manage DNS’ in the drop-down list.
!
Under ‘DNS Zone File’, scroll below to the ‘CName (Alias)’ section.
Click on the ‘Add Record’ button, just above CName (Alias)
 
Choose Record Type – CNAME (Alias) from the drop-down list
Type ‘www’ under Host
The ‘Points to’ section should be eother;
putti.co (If you are a Putti client)
sparkweb.putti.nz (If you are a Spark client)
!
Choose TTL as ½ Hour
Then click ‘Finish’
!
The newly added record will now show up in the CNAME (Alias) section.
!
Click on the ‘Edit’ button if you want to make changes to the CNAME Record.
Make your changes in the ‘Edit Zone Record’ window and hit ‘Finish’.
!
If you’re looking to use your domain name without the ‘www.’, follow these two steps:
Step 1 - Create a CNAME record that points www.yourdomainname.com to putti.co (or
sparkweb.putti.nz if you registered with Spark Business). TTL needs to be set to 30 minutes
or 1 hour.
 
!
 
Step 2 - You'll need to do a 301 redirect from http://yourdomainname.com to
http://www.yourdomainname.com.
Note: If your registrar account does not list anything for a 301 redirect, please look up their
Support pages for URL redirection or simply Contact their Support Team.
!
 
Step 3 – On your domain management screen, click ‘settings’
!
 
Step 4 – Under the forwarding section press ‘Manage’ Located under
Domain:Off
!
 
Step 5 – Press the edit icon
!
 
Step 6 – Under “Forward To’ Type the full name of your url e.g
www.example.com, once edited press save, your redirect should only take a few
moments to start working
!
Add the Domain Name to your CMS 
!
Log in to the platform and navigate over to the ‘Web Layout’ tab, making
sure you are on the ‘web’ view of the platform. This is located in the
middle of your header bar.
!
On the top section below the header bar, you’ll now see a section
with a url, with an ‘Edit’ icon next to it.
!
Press the ‘edit’ pen icon
After you’ve clicked this, you’ll see the ‘Use Built-in domain’ section
highlighted by default.
!
Click on ‘Use Custom Domain(s)’
Enter your complete domain name.
E.g.www.yourdomainname.com.
Click on ‘Add Domain’.
Note: Be sure to enter the entire name. Eg: www.example.com. If there is no
www listed before the URL, it will not work.
!
If the domain name is added on correctly, you’ll see a blue tick on the right side of it.
Then press ‘save’ on the top right of the page.
NOTE: If not added correctly, it’ll show an exclamation mark.
Be sure to check that you haven’t added any spaces to the domain name by mistake.
If you’ve corrected it and still see this exclamation mark, please contact the Support Team.
!
Setting up CNAME on Go daddy

Setting up CNAME on Go daddy

  • 1.
    This tutorial isgoing to show you how to add a CNAME record for your website if you have previously bought a domain name. !
  • 2.
    ! If you’ve boughtand registered a domain name with ‘Go Daddy’, please log in to your Go Daddy account.
  • 3.
    ! Under ‘My Account’,click on ‘Account Summary’  Scroll to ‘My Domains’ and click on ‘View all domains in domain manager’
  • 4.
    ! On the ‘MyDomains’ page, you’ll see a dotted section with your domain name in the center, in bold. Click on the ‘cog’ at the top right of that dotted section. Now click on ‘Manage DNS’ in the drop-down list.
  • 5.
    ! Under ‘DNS ZoneFile’, scroll below to the ‘CName (Alias)’ section. Click on the ‘Add Record’ button, just above CName (Alias)
  • 6.
      Choose Record Type– CNAME (Alias) from the drop-down list Type ‘www’ under Host The ‘Points to’ section should be eother; putti.co (If you are a Putti client) sparkweb.putti.nz (If you are a Spark client) !
  • 7.
    Choose TTL as½ Hour Then click ‘Finish’ !
  • 8.
    The newly addedrecord will now show up in the CNAME (Alias) section. !
  • 9.
    Click on the‘Edit’ button if you want to make changes to the CNAME Record. Make your changes in the ‘Edit Zone Record’ window and hit ‘Finish’. !
  • 10.
    If you’re lookingto use your domain name without the ‘www.’, follow these two steps: Step 1 - Create a CNAME record that points www.yourdomainname.com to putti.co (or sparkweb.putti.nz if you registered with Spark Business). TTL needs to be set to 30 minutes or 1 hour.   !
  • 11.
      Step 2 -You'll need to do a 301 redirect from http://yourdomainname.com to http://www.yourdomainname.com. Note: If your registrar account does not list anything for a 301 redirect, please look up their Support pages for URL redirection or simply Contact their Support Team. !
  • 12.
      Step 3 –On your domain management screen, click ‘settings’ !
  • 13.
      Step 4 –Under the forwarding section press ‘Manage’ Located under Domain:Off !
  • 14.
      Step 5 –Press the edit icon !
  • 15.
      Step 6 –Under “Forward To’ Type the full name of your url e.g www.example.com, once edited press save, your redirect should only take a few moments to start working !
  • 16.
    Add the DomainName to your CMS  !
  • 17.
    Log in tothe platform and navigate over to the ‘Web Layout’ tab, making sure you are on the ‘web’ view of the platform. This is located in the middle of your header bar. !
  • 18.
    On the topsection below the header bar, you’ll now see a section with a url, with an ‘Edit’ icon next to it. !
  • 19.
    Press the ‘edit’pen icon After you’ve clicked this, you’ll see the ‘Use Built-in domain’ section highlighted by default. !
  • 20.
    Click on ‘UseCustom Domain(s)’ Enter your complete domain name. E.g.www.yourdomainname.com. Click on ‘Add Domain’. Note: Be sure to enter the entire name. Eg: www.example.com. If there is no www listed before the URL, it will not work. !
  • 21.
    If the domainname is added on correctly, you’ll see a blue tick on the right side of it. Then press ‘save’ on the top right of the page. NOTE: If not added correctly, it’ll show an exclamation mark. Be sure to check that you haven’t added any spaces to the domain name by mistake. If you’ve corrected it and still see this exclamation mark, please contact the Support Team. !