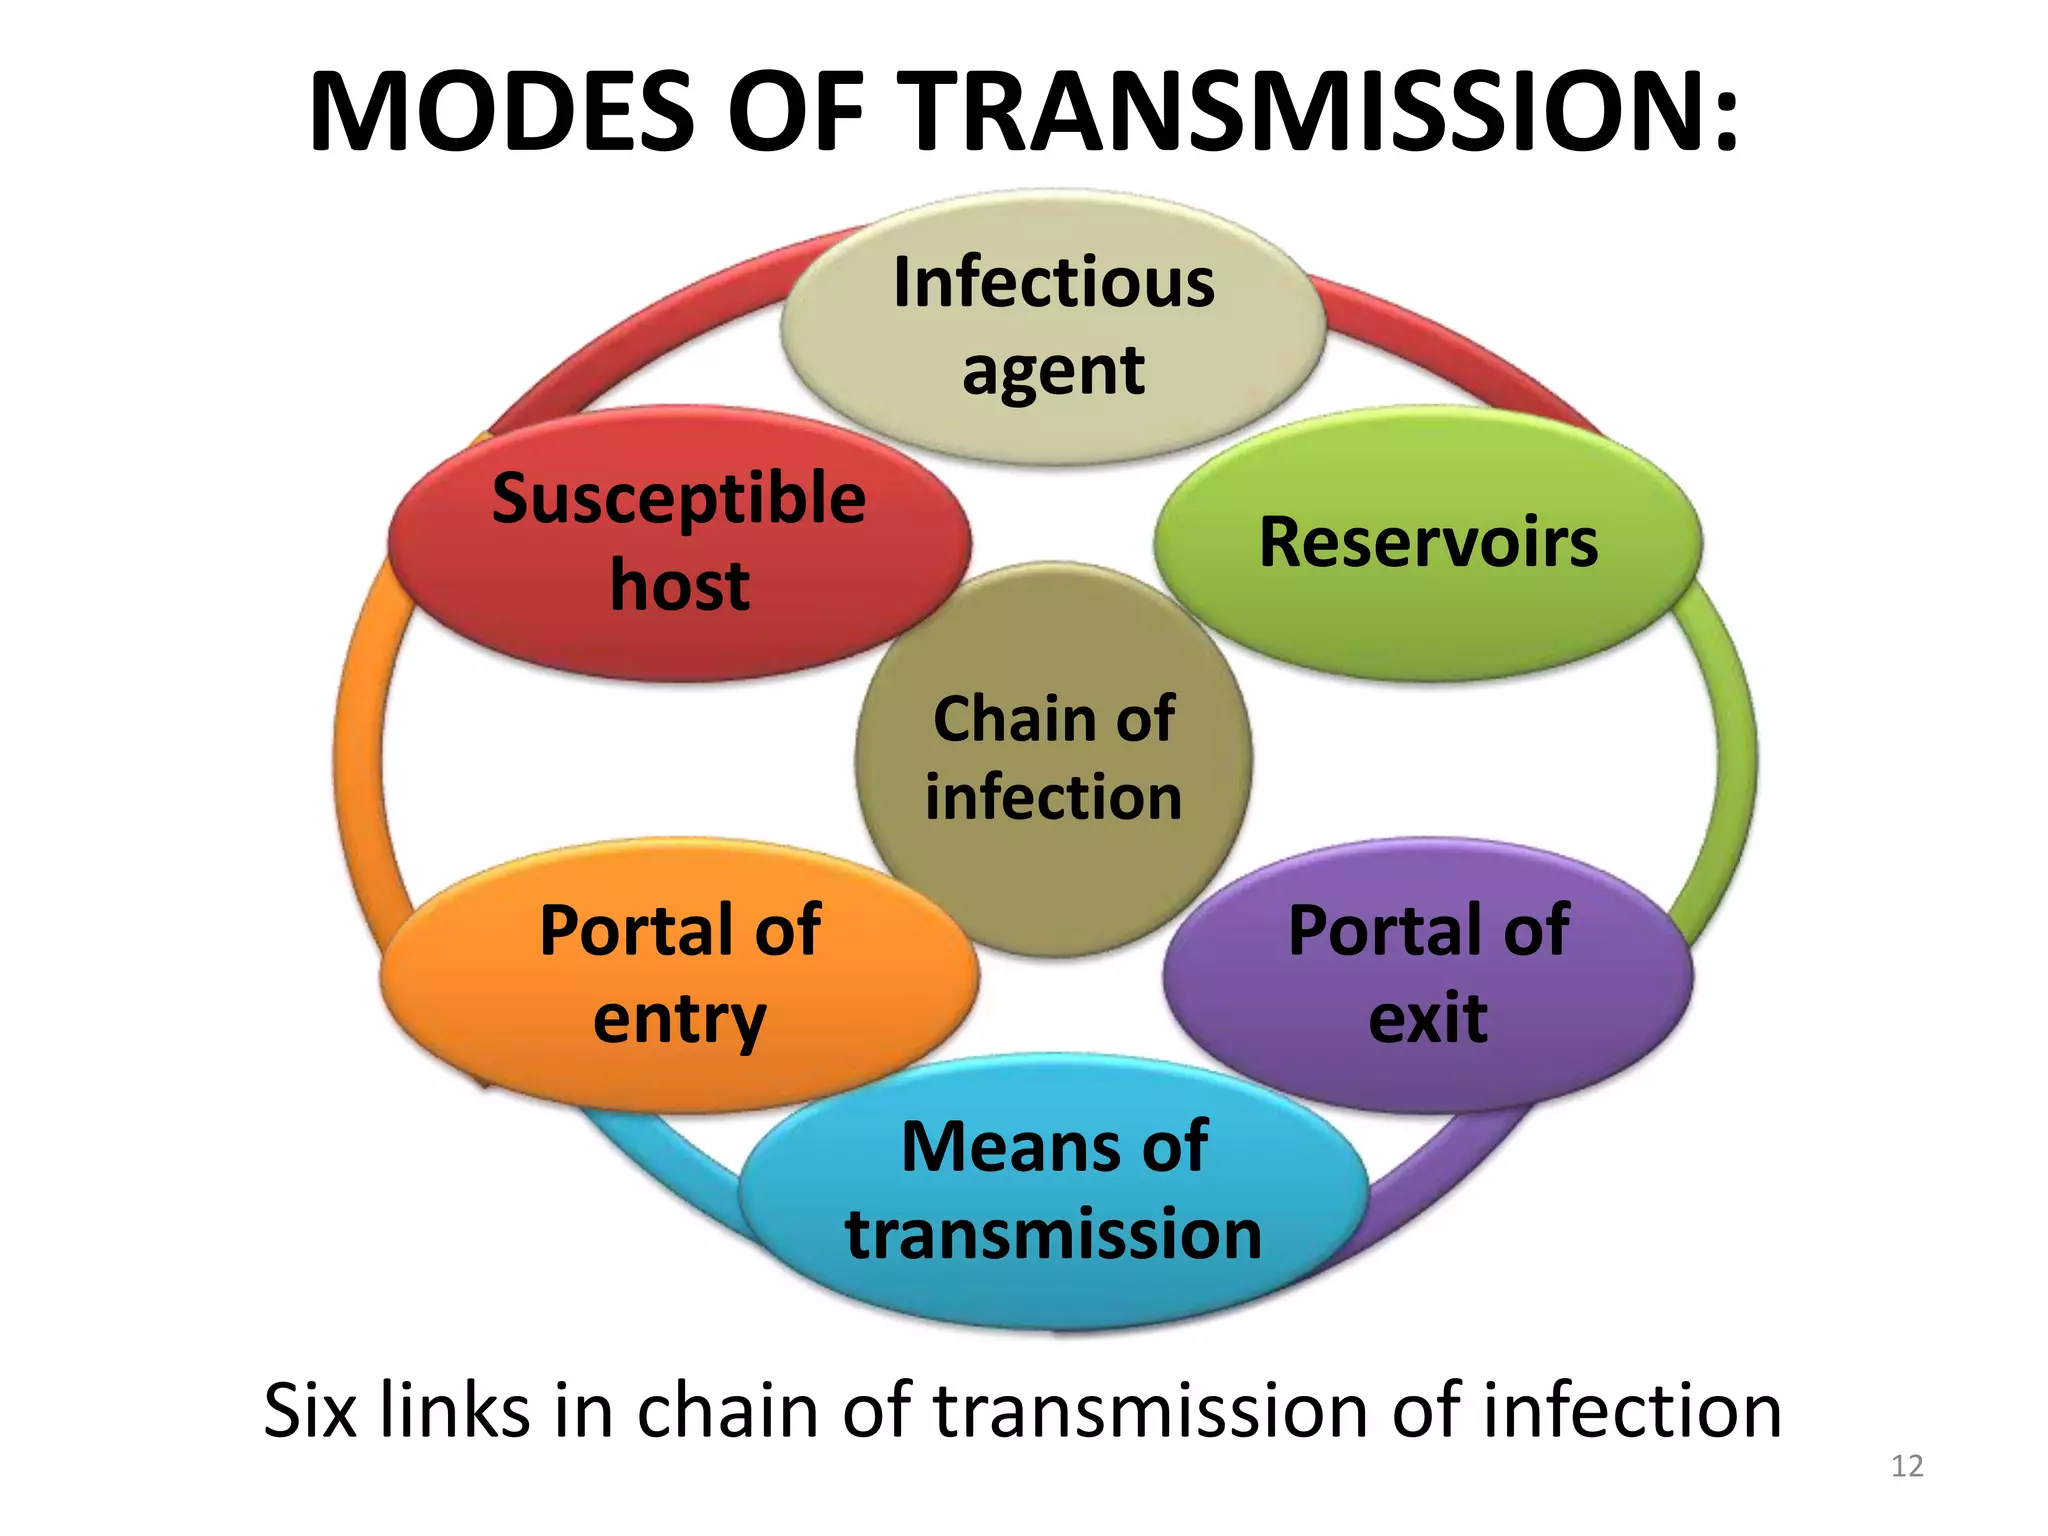
2. CONTENTS
Introduction
Mode of Transmission
Mode of Infection control
Objective of Infection control
Operatory Asepsis
Personal Protection Barrier
Sterilization
Disinfection
Laboratory Infection Control
Clinical Waste Disposal.
2
3. Definitions
• INFECTION CONTROL – Also called
“exposure control plan” by OSHA is a
required office program that is
designed to protect personnel
against risks of exposure to infection.
3
4. STERILIZATION:
•Use of a physical or chemical
procedure to destroy all
microorganisms including substantial
numbers of resistant bacterial spores.
4
5. • Sterilization means the destruction of all life
forms. (Ronald B Luftig).
• Sterilization is the process of killing or
removing all viable organisms. (MIMS –
PLAYFAIR)
5
6. • STERILE:
–Free from all living microorganisms;
usually described as a probability (e.g.,
the probability of a surviving
microorganism being 1 in 1 million).
6
8. • Disinfection is less lethal than sterilization,
because it destroys the majority of recognized
pathogenic microorganisms, but not
necessarily all microbial forms (e.g., bacterial
spores).
• Disinfection is a process of removing or killing
most, but not all, viable organisms.
8
9. • DISINFECTANT: A chemical agent used on
inanimate objects to destroy virtually all
recognized pathogenic microorganisms,
but not necessarily all microbial forms
(e.g., bacterial endospores).
9
10. • ASEPSIS: prevention of microbial
contamination of living tissues or sterile
materials by excluding, removing or killing
microorganisms.
10
11. Direct contact with blood or body fluids
Indirect contact with a contaminated
instrument or surface
Contact of mucosa of the eyes, nose, or
mouth with droplets or spatter
Inhalation of airborne microorganisms
Modes of Diseases Transmission
11
12. MODES OF TRANSMISSION:
Six links in chain of transmission of infection
Chain of
infection
Infectious
agent
Reservoirs
Portal of
exit
Means of
transmission
Portal of
entry
Susceptible
host
12
14. Why , Who and what
Why is infection control necessary in dentistry ?
•Dental staff and patients may be exposed to a wide
variety of pathogenic microorganisms .
14
15. • Who is responsible for infection control
in the dental office ?
– Each member of the dental team must follow the
recommended guidelines .
15
16. • What should be done to prevent the
transmission of disease in the dental office ?
16
17. The most effective ways to prevent the
transmission of diseases includes :
1) Hand washing
2) Gloves
3) Face masks
4) Protective eye wear
5) Protective clothing
6) Instrument sterilization and disinfection
17
18. Diseases Transmission in Dental Office
The dental office should have an infection control
program to prevent the transmission of disease from
the following :
Patient to dental team
Dental team to patient
Patient to patient
Dental office to community ( include dental team’s
family )
Community to dental office to patient
Diseases Transmission in Dental Office
18
19. •To prevent such infections, following is a list
of all those procedures and precautions that
together constitute infection control.
19
20. 20
•These guidelines should be followed each
time treatment is performed because we
are never certain of the patient's status,
either because they themselves do not
know or because they have chosen not to
inform their healthcare providers of their
condition.
•Following these guidelines for every
patient is called "Standard Precautions".
22. Personal protective equipment ( PPE )
•OSHA requires the employer to provide employees
with appropriate personal protective equipment .
•Examples of PPE:
1- Protective clothing
2- Surgical masks
3- Face shields
4- Protective eyewear
5- Disposable patient treatment gloves
6- Heavy-duty utility gloves
22
23. These PPE must be used whenever you :
Performing tasks that could produce
splash or spatter .
Any contact with body fluids
Perform other clinical activities that
require handling contaminated items e.g.
radiographs , impressions , dentures or
contaminated equipment and surfaces .
23
24. HAND HYGIENE
Hand washing is the single most important
procedure for preventing the spread of
infection. So , you must wash your hands each
time before you put on gloves and immediately
after you remove gloves .
24
25. • Hand washing is also required if you touch
contaminated instruments or surfaces during
working
• We should always use liquid soap during hand
washing . Bar soap should never be used
because it may transmit contamination.
25
26. • Visibly dirty
• After touching
contaminated objects with
bare hands
• Before and after patient
treatment (before glove
placement and after glove
removal)
HANDS NEED TO BE CLEANED WHEN
27. OPERATORY ASEPSIS
• In the dental operatory, environmental
surfaces (i.e., a surface or equipment that
does not contact patients directly) can
become contaminated during patient care.
27
28. • Certain surfaces, especially ones touched
frequently (e.g., light handles, unit switches,
and drawer knobs) can serve as reservoirs of
microbial contamination, although they have
not been associated directly with transmission
of infection to either personnel or patients.
28
29. • Transfer of microorganisms from
contaminated environmental surfaces to
patients occurs primarily through personnel
hand contact
29
30. A. Infection Control During the
Pretreatment Period
• The process of infection control begins during
the period of preparation for clinical treatment.
• Paying attention to infection control at this time
has several payoffs.
30
31. • In addition to reducing the risk of
transmission of infectious agents during
patient care, thinking ahead will make the
treatment session more efficient and will also
make the post treatment infection control
process easier and more effective.
31
32. 1. Remove unnecessary items from
the dental procedure area : The
dental procedure area should be
arranged to facilitate a thorough
cleaning following each patient.
32
33. 2. Preplan the materials needed during
treatment.
- Set out all instruments, medications,
impression materials, and other items that
are needed for a procedure.
- Thinking ahead minimizes the need to
search for additional items or to enter
cabinets and drawers once gloves have
become contaminated.
33
34. 3. Utilize disposable items whenever possible:
The use of disposable items saves time during
cleanup and decontamination and solves the
problem of proper reprocessing.
34
35. • 4. Use prearranged tray set-ups for routine or
frequently performed procedures.
–Helps to eliminate the need to go into
cabinets once you have started a procedure.
35
36. 5.Use individualized, sterilized bur blocks for
each procedure
• Using individualized bur blocks containing only
the burs required for that procedure helps to
eliminate the contamination of other, unneeded
burs and to make clean-up easier.
36
37. 6. If indicated, have the rubber dam setup on
the tray.
When a rubber dam will be used during a clinical
procedure, it also should be included on the tray
setup. In addition, include those items needed
for high-velocity evacuation.
37
38. 7. Identify those items that will become contaminated
during treatment.
• While preparing the dental procedure area prior to
beginning a clinical procedure, consider which items will
become contaminated during treatment.
• Examples of such surfaces include countertops, light
handles, X-ray unit heads, tray tables etc.
• Decide whether to use a barrier, e.g., plastic wrap to
prevent contamination of these surfaces and items or to
disinfect them when the procedure is complete.
38
39. Surface barriers :
• Surface barriers are used to
prevent contamination on the
surface underneath.
• All the surface barriers
should be resistant to fluids in
order to prevent
microorganisms in saliva,
blood, and other liquids from
soaking through the barrier
and reach the surface
underneath.
Chair Drapes
39
43. 8. Review patient records before initiating
treatment and place radiographs on the
view box.
• Do not leave the record on the countertop
or handle it after beginning treatment.
• Place the record in a drawer or out of the
dental procedure area, so that it doesn’t
become contaminated.
• Entries into the record should be done
before and after the procedure.
43
45. 9. Prepare personnel involved in patient
care.
• An essential pretreatment procedure is the
preparation of all personnel involved in
patient care.
• This includes the utilization of personal
protective equipment (gown, eyewear, mask
and gloves) and hand hygiene.
45
47. B. Infection Control during the treatment
Period (Chairside Infection Control ) :
The infection control procedures described in
the previous period will help you to reduce
the risk of transmission of infectious agents.
During treatment there are additional
precautions that can be taken to further
reduce infection risks.
47
48. 1. Use care when receiving, handling, or
passing sharp instruments
2. Take special precautions with syringes and
needles.
3. Use a rubber dam whenever possible
4. Avoid touching unprotected switches,
handles and other equipment once gloves
have been contaminated.
5. Avoid entering cabinets once gloves have
been contaminated.
48
51. Continue to wear personal protective equipment
during clean-up: After patient care is completed,
begin the cleaning and disinfection process by
removing contaminated gloves used during
treatment, wash your hands and use the utility
gloves before beginning the clean up. Continue
to wear protective eyewear, mask, and gown.
C. Infection Control During the Post-
Treatment Period
51
52. Remove all disposable barriers : All of the
barriers placed before treatment, including
light handle covers and countertop barriers,
should be removed.
Clean and disinfect all items not protected
by barriers.
52
53. Cleaning and disinfection of the dental
treatment room surfaces are important
components in an effective infection
control program
The laboratory studies have proved that
microorganisms may survive on
environmental surfaces for long time . For
example, Mycobacterium tuberculosis
may survive for weeks
53
57. CRITICAL INSTRUMENTS
• Penetrate MUCOUS MEMBRANES or CONTACT
BONE, BLOODSTREAM, or other normally sterile
tissues
• HEAT STERILIZE between uses or use sterile single-
use, DISPOSABLE devices
• Examples include SURGICAL INSTRUMENTS,
SCALPEL BLADES, PERIODONTAL SCALERS, AND
SURGICAL DENTAL BURS
57
58. SEMI-CRITICAL INSTRUMENTS
• Contact MUCOUS MEMBRANES but do NOT
PENETRATE SOFT TISSUE
• HEAT STERILIZE or HIGH-LEVEL DISINFECT
• Examples: DENTAL MOUTH MIRRORS,
AMALGAM CONDENSERS, AND DENTAL
HANDPIECES
58
59. NONCRITICAL INSTRUMENTS
AND DEVICES
• Contact intact SKIN
• Clean and disinfect using a LOW TO
INTERMEDIATE LEVEL DISINFECTANT
• Examples: X-RAY HEADS, FACEBOWS, PULSE
OXIMETER, BLOOD PRESSURE CUFF
59
60. STERILIZATION
• Stages for instrument sterilization:
1. Presoaking
2. Cleaning
3. Corrosion control and lubrication
4. Packaging
5. Sterilization
6. Handling sterile instruments
7. Storage
8. Distribution
60
61. Agents used in sterilization
• Physical agents:
1. Sunlight
2. Drying
3. Dryheat: flaming, incineration, hot air
4. Moist heat: pasteurization, boiling, steam under
pressure, steam under normal pressure.
5. Filtration: candles asbestos pads, membranes
6. Radiation
7. Ultrasonic and sonic vibrations
61
63. The 4 accepted METHODS OF
STERILIZATION are:
• Steam pressure sterilization (autoclave)
• Chemical vapor pressure sterilization-
(chemiclave)
• Dry heat sterilization (dryclave)
• Ethylene oxide sterilization
63
64. AUTOCLAVE
• Sterilization with STEAM UNDER PRESSURE
• Time required at 1210 C is 15 mins at 15 lbs of
pressure.
Advantages
• Rapid and effective
• Effective for sterilizing cloth surgical
packs and towel packs
Disadvantages
• Items sensitive to heat cannot be sterilized
• It tends to corrode carbon steel burs
and instruments
64
66. • Advantages
• Carbon steel and other carbon sensitive burs,
instruments and pliers are sterilized without rust
or corrosion
• Disadvantages
• Items sensitive to elevated temperature will be
damaged
• Instruments must be very lightly packed.
• Towel and heavy clothing cannot be sterilized.
66
68. Dry Heat Sterilization
Conventional dry heat ovens:
• Achieved at temperature above 1600 C.
• Have heated chambers that allow air to circulate by gravity
flow.
• 6-12mins is required for sterilization
68
69. • Disadvantages
• Without careful calibration, more chances
sterilization failures
–The most accurate way to calibrate a
sterilization cycle is by using external
temperature gauge (pyrometer) attached to
a thermocouple wire.
69
72. • Advantages:
1. Operates effectively
at low temperatures
2. Gas is extremely
penetrative
3. Can be used for
sensitive equipment
like handpieces.
4. Sterilization is
verifiable
• Disadvantages:
1. Potentially
mutagenic and
carcinogenic.
2. Requires aeration
chamber ,cycle time
lasts hours
3. Usually only hospital
based.
72
73. Sterilization Monitoring
Types of Indicators
• Mechanical
–Measure time, temperature, pressure
• Chemical
–Change in color when physical
parameter is reached
• Biological (spore tests)
–Use biological spores to assess the
sterilization process directly
74. STERILIZATION METHOD SPORE TYPE INCUBATION TEMPERATURE
AUTOCLAVE Bacillus stearothemophilus 56°C
CHEMICAL VAPOR
DRY HEAT Bacillus subtilis 37°C
ETHYLENE OXIDE
Gamma radiation B. Pumilus E601 370C
Sterilization monitoring has four components:
1. a sterilization indicator on the instrument bag,
stamped with the date it is sterilized,
2. daily color-change process-indicator strips,
3. weekly biologic spore test, and
4. documentation notebook.
74
75. STORAGE AND CARE OF STERILE
INSTRUMENTS
• Storage areas should be dust proof, dry,
well ventilated and easily accessible for
routine dental use.
• Sterile materials should be stored atleast
8-10 inches from the floor, atleast 18
inches from the ceiling, and atleast 2
inches from the outside walls.
75
76. • Items are not stored in any location where
they can become wet.
• Items should be positioned so that
packaged items are not crushed, bent,
crushed, compressed or punctured.
• Outside shipping containers and
corrugated cartons should not be used as
containers in sterile storage areas.
• Ultra violet chambers and formalin
chambers are now commonly used for
storage of instruments.
76
78. DISINFECTION
• Disinfection is always at least a two-step
procedure:
• The initial step involves vigorous scrubbing of
the surfaces to be disinfected and wiping
them clean.
• The second step involves wetting the surface
with a disinfectant and leaving it wet for the
time prescribed by the manufacturer.
78
79. • The ideal disinfectant has the following
properties:
1. Broad spectrum of activity
2. Acts rapidly
3. Non corrosive
4. Environment friendly
5. Is free of volatile organic compounds
6. Nontoxic & nonstaining
79
80. • High-level disinfection: Disinfection
process that inactivates vegetative
bacteria, mycobacteria, fungi, and
viruses but not necessarily high
numbers of bacterial spores.
80
81. Intermediate-level disinfection:
Disinfection process that inactivates
vegetative bacteria, the majority of
fungi, mycobacteria, and the majority of
viruses (particularly enveloped viruses)
but not bacterial spores.
81
82. • Low-level disinfectant: Liquid chemical
germicide. OSHA requires low-level
hospital disinfectants also to have a label
claim for potency against HIV and HBV.
• Gigasept which contains
succindialdehyde and
dimethoxytetrahydrofuran are used for
disinfection of plastic and rubber
materials eg: dental chair
82
83. BASICS OF LABORATORY IC
• Need COORDINATION between DENTAL OFFICE
AND LAB
• Use of proper methods/materials for handling
and decontaminating soiled incoming items
• All contaminated INCOMING ITEMS should be
cleaned and DISINFECTED before being
HANDLED BY LAB PERSONNEL, and before
being returned to the patient
83
85. INCOMING ITEMS
• Rinse under running tap
water to remove
blood/saliva
• Disinfect as appropriate
• Rinse thoroughly with tap
water to remove residual
disinfectant
• No single disinfectant is
ideal or compatible with
all items 85
86. OUTGOING ITEMS
• Clean and disinfect before
delivery to patient
• After disinfection: rinse and
place in plastic bag with
diluted mouthwash until
insertion
• Do not store in disinfectant
before insertion
• Label the plastic bag: “This
case shipment has been
disinfected with ______ for
_____ minutes”
86
87. REFERENCES:
• Operative dentistry, infection control, 4th
edition, sturdevent.
• Sterilization and disinfection of dental
instruments by ADA
• Disinfection & sterilization of dental
instruments TB MED 266, 1995
• CDC, guidelines for disinfection &
sterilization in health care facilities 2008.
• CDC guidelines for infection control in dental
health care settings, Dec19, 2003/vol.52.
87