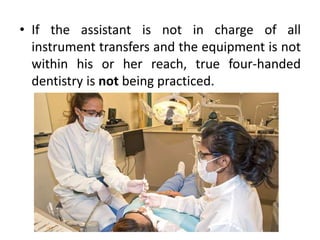
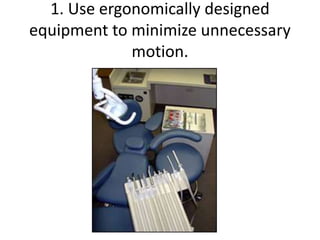
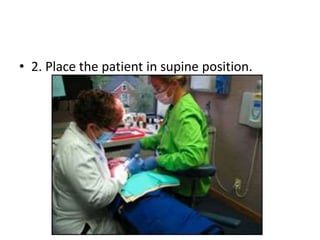
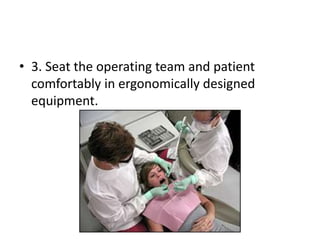
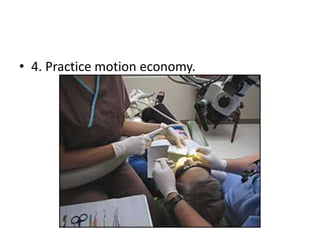
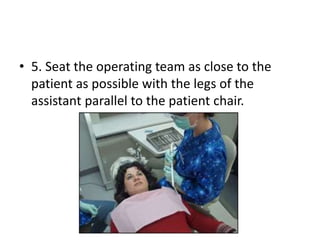
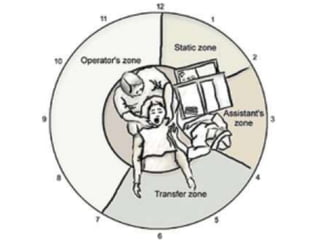
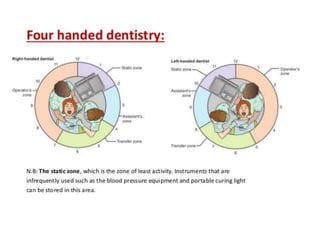
FOUR HANDED DENTISTRY
• Four-handed dentistry may sound like
something a space alien should be doing, but
really it is simple to understand.
• It simply means that the dental assistant's two
hands are assisting the dentist's two hands,
helping to reduce the amount of time a dental
exam or procedure may take.
• Any dental professional will tell you that sitting
at chairside all day is very uncomfortable and
may result in lower back pain, tendonitis,
and/or neuromuscular or musculoskeletal
complications.
• Dentists can still be observed changing their
own burs, twisting and turning to reach
equipment on their sides of the chair.
• If the assistant is not in charge of all
instrument transfers and the equipment is not
within his or her reach, true four-handed
dentistry is not being practiced.
• Four-handed dentistry is not “hurry-up
dentistry.”
• It is based on a set of principles that define
the conditions under which efficiency can be
attained.
• Basic Tenets of Four-Handed Dentistry
1. Use ergonomically designed
equipment to minimize unnecessary
motion.
• 2. Place the patient in supine position.
• 3. Seat the operating team and patient
comfortably in ergonomically designed
equipment.
• 4. Practice motion economy.
• 5. Seat the operating team as close to the
patient as possible with the legs of the
assistant parallel to the patient chair.
• 6. Utilize preset trays.
– Minimize the number of instruments to be used.
– Place instruments in sequence of use.
– Place in order from left to right or top to bottom
as preferred
• 7. Position equipment, instruments, and
materials in advance.
• 8. The dentist assigns all legally delegable
duties to qualified clinical assistants based on
the state’s guidelines.
• 9. Patient treatment is discussed with the
patient and planned in advance in a logical
sequence.
Principles of Motion Economy
• Motion economy refers to the manner in which
human energy is conserved while performing a
task.
• The objective in all areas of the dental office,
clinical, business or laboratory setting should be
to minimize the number and magnitude of
motions and conserve energy while working.
• Ask yourself the following questions:
Simplification and reduction of body motions to
simplify and reduce work content.
• 1. How many times do you turn your body or
reach for an instrument?
• 2. Does the assistant eliminate operator stress
by transferring the instruments and materials
to the operator?
• 3. Does the assistant have primary
responsibility for transfer of materials and
instruments or is the assistant often
unoccupied while the dentist reaches for an
instrument or changes a bur?
• 4. Are the handpieces and instruments within
a 21-inch radius of the assistant?
5. Are these
same
ergonomic
concepts
applied to
the dental
business
office to
minimize
unnecessary
motion and
reduce
stress?
Classification of Motion
• Motions can be classified into five categories
according to the length of the motion as
shown below:
• Class I. Movement of the fingers only as when
picking up a cotton roll.
• Class II. Fingers and wrist motion as used
when transferring an instrument to the
operator.
• Class III. Fingers, wrist, and elbow as when
reaching for a handpiece.
• Class IV. The entire arm and shoulder as when
reaching to change the light position.
• Class V. The entire torso as when turning
around to reach for equipment from the fixed
cabinetry.
• Strategies for Conserving Motion
– Emphasis on modifying motion economy should be
given to eliminating Class IV or V motions.
– Motion economy should be the primary consideration
when purchasing and positioning dental equipment
since this concept reduces or eliminates the number
and length of motions used during basic treatment
procedures. To improve motion economy at chair side,
consider the following suggestions:
• 1. Decrease the number of instruments used
for a procedure by maximizing the use of each
one for multiple functions.
• 2. Position the instruments on a preset
tray/cassette in the sequence that they will be
used.
• 3. Position instruments, materials, and
equipment in advance, whenever possible.
• 4. Have back up supplies and larger
armamentarium located in easy reach to avoid
Class V motion or the need to leave the
operative site.
• 5. Place the armamentarium on a mobile cart
as close to the patient as possible.
• 6. Place the patient in a supine position.
• 7. Seat the operating team as close to the
patient as possible.
• 8. Place the assistant’s legs parallel to the
patient chair to ensure the assistant is close to
the patient and will not need to reach.
• 9. Use operating stools that promote good
posture and provide back and abdominal
support that adjusts vertically and
horizontally.
• 10. When using a microscope maintain good
posture and allow the assistant access to the
transfer zone.
• 11. Provide work areas that are 1 to 2 inches
below the elbow. Notice, too, the business
assistant’s thighs are parallel to the floor
regardless of the height of the stool.
• 12. Minimize the number of eye movements
between the close and brightly lit operating field
and more distant objects in the treatment room
with lower illumination.
• 13. Reduce the length and number of motions
made by the operator and the dental assistant to
accomplish routine and repetitive tasks.
• 14. Use smooth continuous motions and avoid
distracting zigzag movement.
Zones of activity
• All treatment activity evolves around the patient.
Before equipment selection can be considered,
the dental team must be aware of special
functional spatial relationships around the
patient at chair side.
• The work area around the patient is divided into
four “zones of activity.”
• Zones of activity are identified using the patient’s
face as the face of a clock.
• The four zones are: the operator’s zone,
assistant’s zone, transfer zone, and static zone.
Figure 1. Zones of Activity for a right-
handed dentist.
Figure 2. Zones of Activity for a left-
handed dentist.
Strategies to Ensure Effective Four-
Handed Dentistry
Teamwork
• To effectively implement the concepts of true
four-handed dentistry each member of the dental
team must assume individual as well as team
responsibilities.
• The team must be aware of each other’s needs,
recognize the need to reposition the patient and
operating team, as necessary, to reduce strain, improve
access and visibility, and reduce unnecessary
movement by transferring instruments only within the
transfer zone.
• Strategies for the Operator
• The dentist/operator must develop a
standardized routine for basic dental procedures.
• Develop a non-verbal signal denoting a need to
exchange an instrument.
• When necessary, give advance distinct verbal
direction to communicate a need for a different
instrument or material.
• The dentist/operator must be willing to accept
input from the assistant when it is noted that
chair positions need to be adjusted.
• The operator must maintain a working
position within the operator’s zone.
• Avoid legs interfering with the static or
assistant’s zone.
• Confine eye focus to the field of operation.
• Confine hand and arm movement to the
transfer zone.
• Avoid twisting and turning to reach
instruments by relying on the assistant to
change burs and to transfer needed
instruments.
• Exchange instruments only in the transfer
zone.
• Avoid removing instruments from the preset
tray by returning instruments to the assistant.
Strategies for the Dental Assistant
• Develop a thorough understanding of the
procedure.
• Recognize the patient’s needs.
• Anticipate the operator’s need, and recognize any
change in the procedure.
• Be seated as close to the patient as possible with
legs parallel to the long axis of the patient’s body.
• Be alert to changes in position of the dentist and
determine a non-verbal signal to indicate to him or her
that chair positioning needs to be improved.
• Maintain the order of both the instruments and dental
materials according to their sequence of use.
• When transferring a dental instrument to the operator,
orient the working end of the instrument so it is
pointing up for maxillary functions and down for
mandibular functions.
• Work with the operator to establish and follow a safe,
standardized, and predictable instrument transfer
protocol.
• When practical the dental assistant should
change burs in the handpiece and maintain a
“ready position” for delivery of the handpiece.
• Remove debris from instruments before
returning them to the preset tray.
• Maintain a clean work area at all times.
• Communication between the operator and
the assistant is vital to successfully implement
the concepts of true four-handed dentistry.
Fifteen Excuses for a Closed Mind Toward the
Practice of Ergonomic Concepts in Four-Handed
Dentistry
• I am too connected to the old way.
• We are not competent in those techniques.
• It seems like a nuance that will not last for long.
• It would be a major change in our routine.
• We are already exhausted and our time is
saturated with so much technology now.
• How do I know we won’t be worse off than we
are now?
• I know this equipment and I will lose control if we
have to change.
• It costs too much.
• That is how the equipment is designed, so I just
work around it.
• It’s too radical a change.
• It just seems like more work.
• My staff may want more money if we increase
production.
• I don’t think my patients will like it.
• It’s not required by OSHA.
• It just won’t work in our office.
Conclusion
• In this brief overview the reader has been exposed to
the basic principles of four-handed dentistry.
• These principles allow the practitioner to work smarter,
not harder.
• When the concepts discussed in this article are applied
to the dental team’s daily practice, it is likely that the
team will identify areas that relate to increased stress
and reduced productivity.
• If so, keep an open mind and begin today to determine
how changes can be made to modify your mode of
practice to make it more productive and less stressful.
• https://www.youtube.com/watch?v=mRfKQhS
749k
References
• http://www.dentistryiq.com/articles/dem/pri
nt/volume-9/issue-5/equipment/are-you-
ready-to-switch-to-four-handed-dentistry.html
• https://www.dentalcare.com/en-
us/professional-education/ce-
courses/ce428/basic-tenets-of-four-handed-
dentistry

Four handed dentistry

  • 1.
  • 2.
    • Four-handed dentistrymay sound like something a space alien should be doing, but really it is simple to understand. • It simply means that the dental assistant's two hands are assisting the dentist's two hands, helping to reduce the amount of time a dental exam or procedure may take.
  • 3.
    • Any dentalprofessional will tell you that sitting at chairside all day is very uncomfortable and may result in lower back pain, tendonitis, and/or neuromuscular or musculoskeletal complications.
  • 4.
    • Dentists canstill be observed changing their own burs, twisting and turning to reach equipment on their sides of the chair.
  • 5.
    • If theassistant is not in charge of all instrument transfers and the equipment is not within his or her reach, true four-handed dentistry is not being practiced.
  • 6.
    • Four-handed dentistryis not “hurry-up dentistry.” • It is based on a set of principles that define the conditions under which efficiency can be attained.
  • 7.
    • Basic Tenetsof Four-Handed Dentistry
  • 8.
    1. Use ergonomicallydesigned equipment to minimize unnecessary motion.
  • 9.
    • 2. Placethe patient in supine position.
  • 10.
    • 3. Seatthe operating team and patient comfortably in ergonomically designed equipment.
  • 11.
    • 4. Practicemotion economy.
  • 12.
    • 5. Seatthe operating team as close to the patient as possible with the legs of the assistant parallel to the patient chair.
  • 13.
    • 6. Utilizepreset trays. – Minimize the number of instruments to be used. – Place instruments in sequence of use. – Place in order from left to right or top to bottom as preferred
  • 14.
    • 7. Positionequipment, instruments, and materials in advance.
  • 15.
    • 8. Thedentist assigns all legally delegable duties to qualified clinical assistants based on the state’s guidelines.
  • 16.
    • 9. Patienttreatment is discussed with the patient and planned in advance in a logical sequence.
  • 17.
    Principles of MotionEconomy • Motion economy refers to the manner in which human energy is conserved while performing a task. • The objective in all areas of the dental office, clinical, business or laboratory setting should be to minimize the number and magnitude of motions and conserve energy while working. • Ask yourself the following questions: Simplification and reduction of body motions to simplify and reduce work content.
  • 18.
    • 1. Howmany times do you turn your body or reach for an instrument?
  • 19.
    • 2. Doesthe assistant eliminate operator stress by transferring the instruments and materials to the operator?
  • 20.
    • 3. Doesthe assistant have primary responsibility for transfer of materials and instruments or is the assistant often unoccupied while the dentist reaches for an instrument or changes a bur?
  • 21.
    • 4. Arethe handpieces and instruments within a 21-inch radius of the assistant?
  • 22.
    5. Are these same ergonomic concepts appliedto the dental business office to minimize unnecessary motion and reduce stress?
  • 23.
    Classification of Motion •Motions can be classified into five categories according to the length of the motion as shown below:
  • 24.
    • Class I.Movement of the fingers only as when picking up a cotton roll.
  • 25.
    • Class II.Fingers and wrist motion as used when transferring an instrument to the operator.
  • 26.
    • Class III.Fingers, wrist, and elbow as when reaching for a handpiece.
  • 27.
    • Class IV.The entire arm and shoulder as when reaching to change the light position.
  • 28.
    • Class V.The entire torso as when turning around to reach for equipment from the fixed cabinetry.
  • 29.
    • Strategies forConserving Motion – Emphasis on modifying motion economy should be given to eliminating Class IV or V motions. – Motion economy should be the primary consideration when purchasing and positioning dental equipment since this concept reduces or eliminates the number and length of motions used during basic treatment procedures. To improve motion economy at chair side, consider the following suggestions:
  • 30.
    • 1. Decreasethe number of instruments used for a procedure by maximizing the use of each one for multiple functions.
  • 31.
    • 2. Positionthe instruments on a preset tray/cassette in the sequence that they will be used.
  • 32.
    • 3. Positioninstruments, materials, and equipment in advance, whenever possible.
  • 33.
    • 4. Haveback up supplies and larger armamentarium located in easy reach to avoid Class V motion or the need to leave the operative site.
  • 34.
    • 5. Placethe armamentarium on a mobile cart as close to the patient as possible.
  • 35.
    • 6. Placethe patient in a supine position.
  • 36.
    • 7. Seatthe operating team as close to the patient as possible.
  • 37.
    • 8. Placethe assistant’s legs parallel to the patient chair to ensure the assistant is close to the patient and will not need to reach.
  • 38.
    • 9. Useoperating stools that promote good posture and provide back and abdominal support that adjusts vertically and horizontally.
  • 39.
    • 10. Whenusing a microscope maintain good posture and allow the assistant access to the transfer zone.
  • 40.
    • 11. Providework areas that are 1 to 2 inches below the elbow. Notice, too, the business assistant’s thighs are parallel to the floor regardless of the height of the stool.
  • 41.
    • 12. Minimizethe number of eye movements between the close and brightly lit operating field and more distant objects in the treatment room with lower illumination. • 13. Reduce the length and number of motions made by the operator and the dental assistant to accomplish routine and repetitive tasks. • 14. Use smooth continuous motions and avoid distracting zigzag movement.
  • 42.
    Zones of activity •All treatment activity evolves around the patient. Before equipment selection can be considered, the dental team must be aware of special functional spatial relationships around the patient at chair side. • The work area around the patient is divided into four “zones of activity.” • Zones of activity are identified using the patient’s face as the face of a clock. • The four zones are: the operator’s zone, assistant’s zone, transfer zone, and static zone.
  • 43.
    Figure 1. Zonesof Activity for a right- handed dentist.
  • 44.
    Figure 2. Zonesof Activity for a left- handed dentist.
  • 45.
    Strategies to EnsureEffective Four- Handed Dentistry Teamwork • To effectively implement the concepts of true four-handed dentistry each member of the dental team must assume individual as well as team responsibilities. • The team must be aware of each other’s needs, recognize the need to reposition the patient and operating team, as necessary, to reduce strain, improve access and visibility, and reduce unnecessary movement by transferring instruments only within the transfer zone.
  • 46.
    • Strategies forthe Operator • The dentist/operator must develop a standardized routine for basic dental procedures. • Develop a non-verbal signal denoting a need to exchange an instrument. • When necessary, give advance distinct verbal direction to communicate a need for a different instrument or material. • The dentist/operator must be willing to accept input from the assistant when it is noted that chair positions need to be adjusted.
  • 47.
    • The operatormust maintain a working position within the operator’s zone. • Avoid legs interfering with the static or assistant’s zone. • Confine eye focus to the field of operation. • Confine hand and arm movement to the transfer zone.
  • 48.
    • Avoid twistingand turning to reach instruments by relying on the assistant to change burs and to transfer needed instruments. • Exchange instruments only in the transfer zone. • Avoid removing instruments from the preset tray by returning instruments to the assistant.
  • 49.
    Strategies for theDental Assistant • Develop a thorough understanding of the procedure. • Recognize the patient’s needs. • Anticipate the operator’s need, and recognize any change in the procedure. • Be seated as close to the patient as possible with legs parallel to the long axis of the patient’s body.
  • 50.
    • Be alertto changes in position of the dentist and determine a non-verbal signal to indicate to him or her that chair positioning needs to be improved. • Maintain the order of both the instruments and dental materials according to their sequence of use. • When transferring a dental instrument to the operator, orient the working end of the instrument so it is pointing up for maxillary functions and down for mandibular functions. • Work with the operator to establish and follow a safe, standardized, and predictable instrument transfer protocol.
  • 51.
    • When practicalthe dental assistant should change burs in the handpiece and maintain a “ready position” for delivery of the handpiece. • Remove debris from instruments before returning them to the preset tray. • Maintain a clean work area at all times. • Communication between the operator and the assistant is vital to successfully implement the concepts of true four-handed dentistry.
  • 55.
    Fifteen Excuses fora Closed Mind Toward the Practice of Ergonomic Concepts in Four-Handed Dentistry • I am too connected to the old way. • We are not competent in those techniques. • It seems like a nuance that will not last for long. • It would be a major change in our routine. • We are already exhausted and our time is saturated with so much technology now. • How do I know we won’t be worse off than we are now? • I know this equipment and I will lose control if we have to change.
  • 56.
    • It coststoo much. • That is how the equipment is designed, so I just work around it. • It’s too radical a change. • It just seems like more work. • My staff may want more money if we increase production. • I don’t think my patients will like it. • It’s not required by OSHA. • It just won’t work in our office.
  • 57.
    Conclusion • In thisbrief overview the reader has been exposed to the basic principles of four-handed dentistry. • These principles allow the practitioner to work smarter, not harder. • When the concepts discussed in this article are applied to the dental team’s daily practice, it is likely that the team will identify areas that relate to increased stress and reduced productivity. • If so, keep an open mind and begin today to determine how changes can be made to modify your mode of practice to make it more productive and less stressful.
  • 58.
  • 59.