Downloaded 102 times


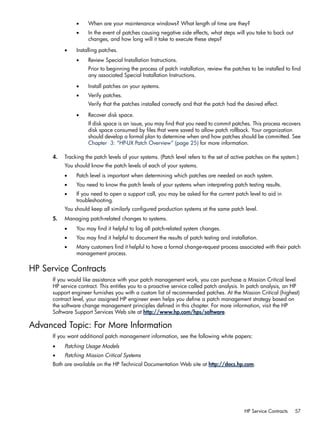
![Which Patches Are on My System?
SD-UX is included with the HP-UX operating system and provides a powerful set of tools for centralized HP-UX
software management. Many SD-UX commands start with sw; for example: swlist, swinstall, swreg,
swremove, swcopy, and swverify. For more information about SD-UX, see the Software Distributor
Administration Guide on the HP Technical Documentation Web site at http://docs.hp.com.
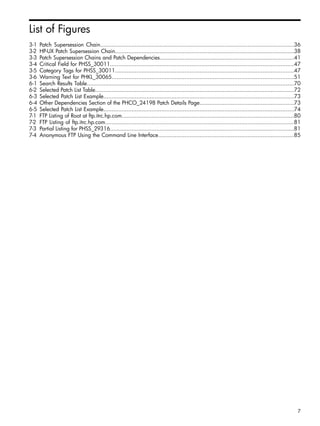
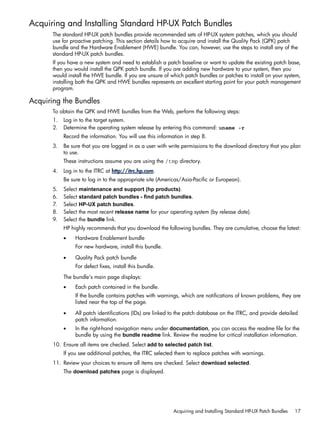
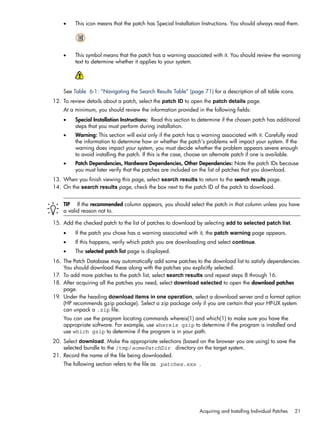
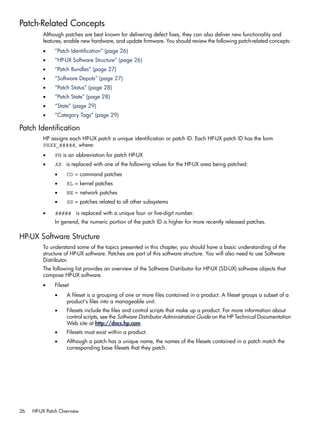
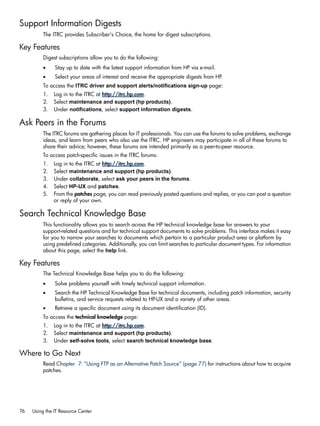
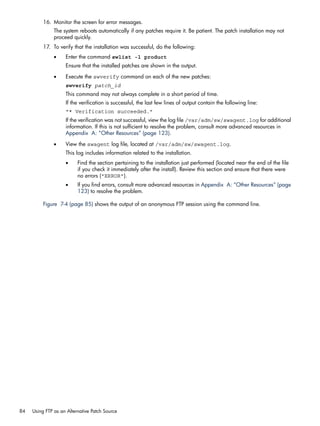
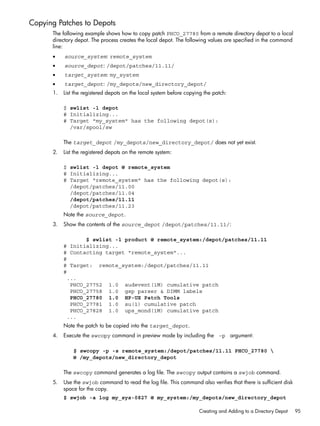
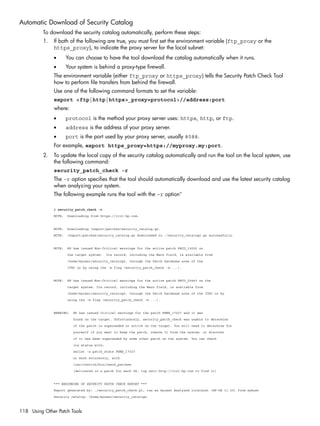
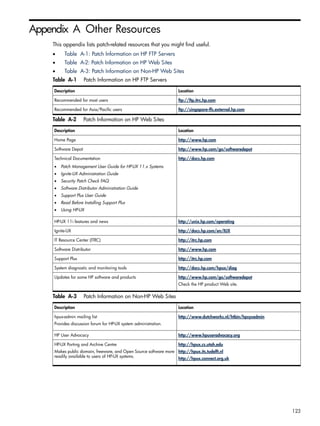
The swlist command can be invaluable in determining which patches and patch bundles are on your
HP-UX system. You can use the swlist command to display information about software products that are
installed on a local or remote host, or that are stored in a local or remote depot. You can use the various
command arguments and options to customize the information returned. See the swlist(1M) manpage.
This section presents some examples of swlist to display information about patches, bundles, and depots.
NOTE For brevity and improved readability, some lines of SD-UX command output have been shortened
or removed.
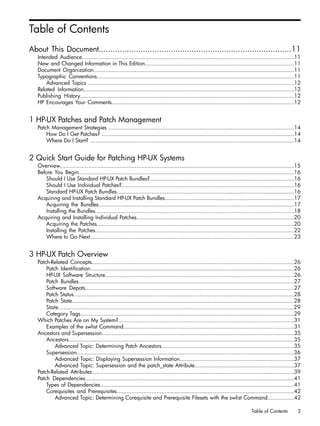
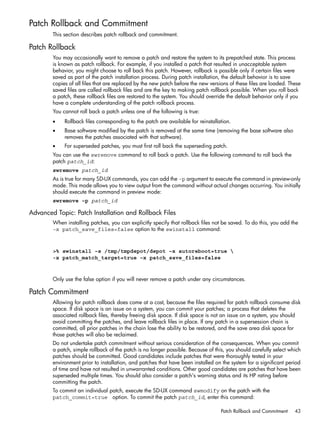
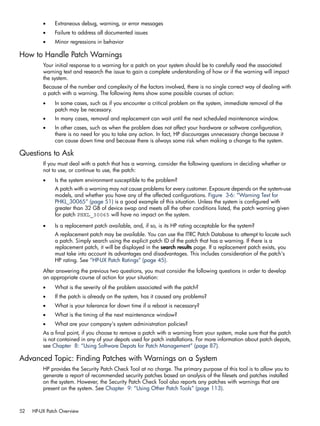
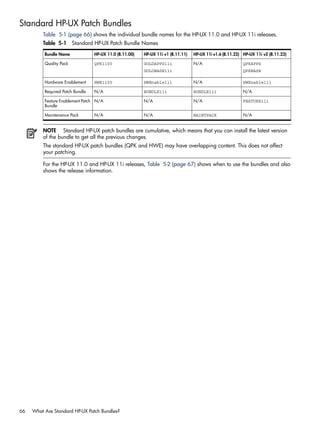
Examples of the swlist Command
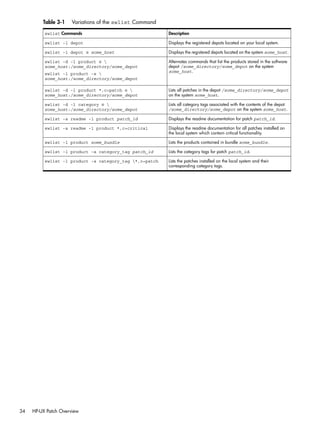
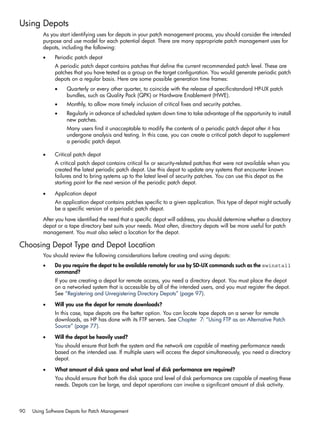
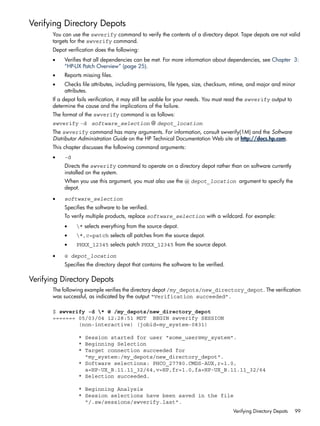
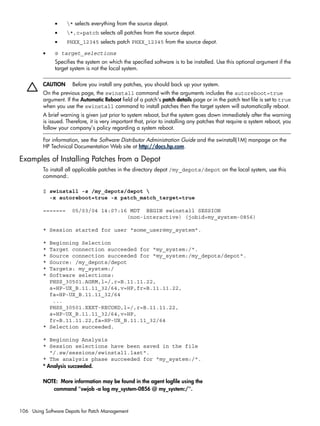
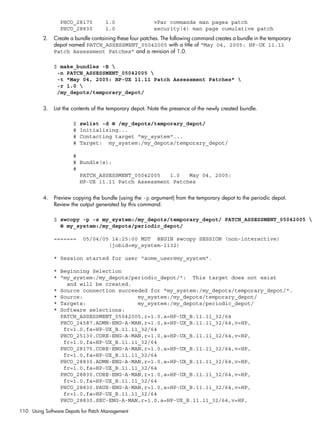
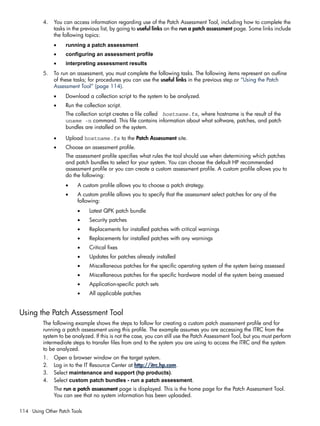
If you use swlist with no arguments, you get a default listing of all top-level software installed on your
local host. You will see output similar to the following:
$ swlist
# Initializing...
# Contacting target "some_system"...
#
# Target: some_system:/
# Bundle(s):
BUNDLE11i B.11.11.0102.2 Required Patch Bundle for HP-UX 11i, February 2001
GOLDAPPS11i B.11.11.0312.4 Gold Applications Patches for HP-UX 11i v1, Dec 2003
GOLDBASE11i B.11.11.0312.4 Gold Base Patches for HP-UX 11i v1, December 2003
HWEnable11i B.11.11.0309.4 Hardware Enablement Patches for HP-UX 11i, Sep 2003
MOZILLA 1.4.0.00.00 Mozilla 1.4 for HP-UX
T1471AA A.03.50.000 HP-UX Secure Shell
# Product(s) not contained in a Bundle:
PHCO_28848 1.0 Software Distributor Cumulative Patch
PHCO_29010 1.0 shar(1) patch
PHCO_29495 1.0 libc cumulative patch
PHSS_28677 1.0 CDE Applications Periodic Patch
vim 5.8 Vi IMproved
The swlist command has many arguments. This chapter considers only the following arguments and
operands:
swlist [ -d ] [ -l level ] [ -a attribute ] [ -s source ] [ software_selections ] [ -x
option=value ] [ @ target_selections ]
• -d
Directs the swlist command to operate on a software depot rather than on software currently installed
on the system. When you use this argument, you must also use the @ target_selections argument
to specify the depot.
• -l level
• Lists all software objects down to the specified level. The following is a partial list of supported
level values:
• depot: Lists products available from a depot.
• bundle: Shows only bundles.
• product: Shows only products.
Which Patches Are on My System? 31](https://image.slidesharecdn.com/hp-ux-patchinstallation-140318232423-phpapp02/85/HP-UX-Patch-Installation-31-320.jpg)
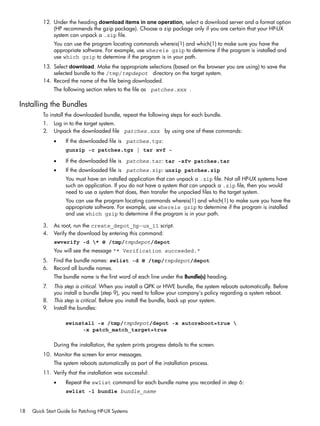
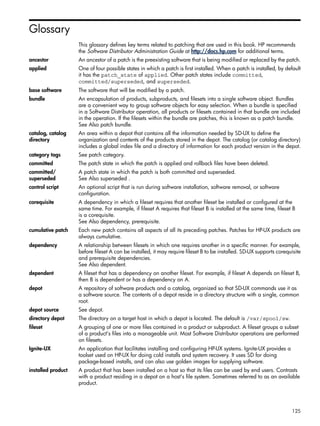
![• patch: Shows all applied patches.
• fileset: Shows products and filesets.
• file: Shows products, filesets, files, and numbers (used in software licensing).
• category: Shows all categories of available patches for patches that have included category
objects in their definition.
• Specifies multiple values for level :
-l bundle -l product: Shows bundles and the products they contain.
• -a attribute
Specifies one or more attributes to display. For more information about attributes, see “Patch-Related
Attributes” (page 39).
• -s source
Specifies the software source to list. Use this argument as an alternative way to list a depot.
• software_selections
• Specifies software objects to be listed.
• Applies only if the level is bundle, product, fileset, file, or patch.
• Use wildcards [ ], *, ? in the specification of the software_selections if you want
to make multiple selections. For example:
• A specification of bun[12] selects software bun1 and bun2.
• A specification of * selects all software.
• Views the manpages for sd(5) using the command: man 5 sd
• -x option=value
• Sets the option to specified value.
• The default behavior of the swlist command is to show only the latest patches installed on a
system. It does not show patches that have been superseded. To list superseded patches, set the
show_superseded_patches option to true:
swlist -x show_superseded_patches=true
• Specifies multiple -x options if needed.
• @ target_selections
• Specifies the target of the command. You can tell the swlist command to operate on a system
other than the local host or on a depot. For example, to specify the swlist command operate
on the system host1:
swlist @ host1
• Operates on the software depot depot1 located in directory some_directory on the local
host:
swlist @ /some_directory/depot1
• Operates on the depot depot2 located in directory some_directory on the system host1:
swlist @ host1:/some_directory/depot2
For a complete list of swlist arguments, consult the swlist(1M) manpage or the Software Distributor
Administration Guide on the HP Technical Documentation Web site at http://docs.hp.com.
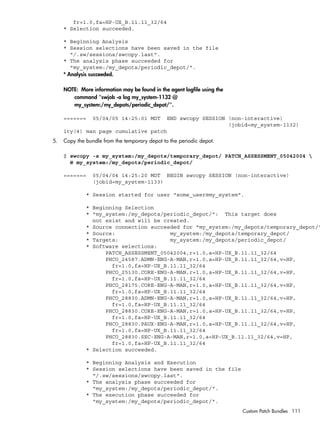
To filter the output to display only patches, you can use the -l argument in combination with a software
selection using the category tag patch:
32 HP-UX Patch Overview](https://image.slidesharecdn.com/hp-ux-patchinstallation-140318232423-phpapp02/85/HP-UX-Patch-Installation-32-320.jpg)


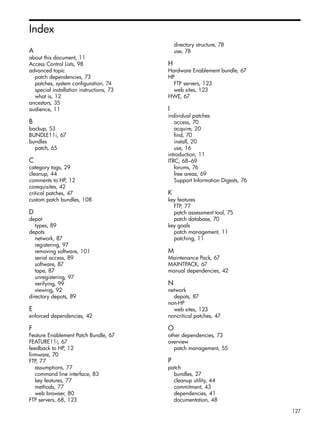
![swmodify -x patch_commit=true patch_id
You can add the -p argument to this command so it will be executed in preview-only mode.
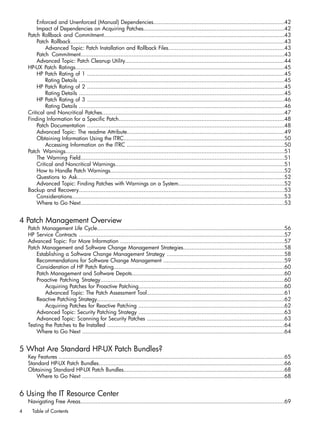
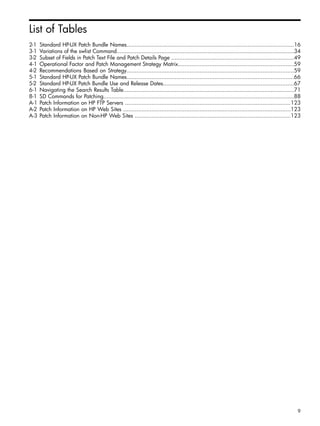
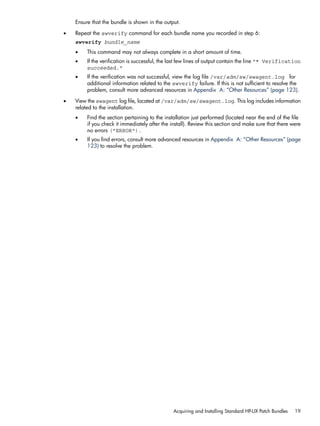
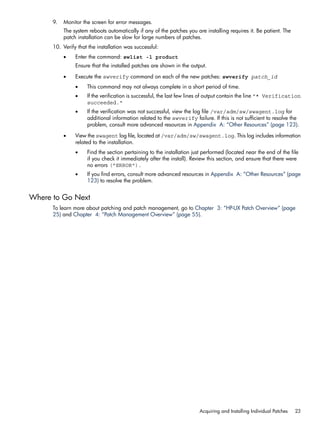
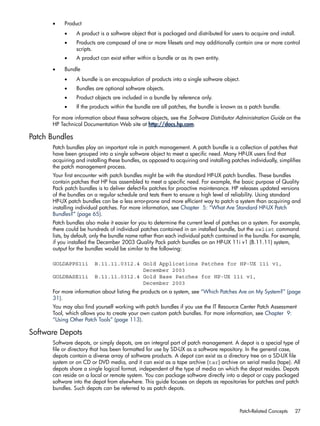
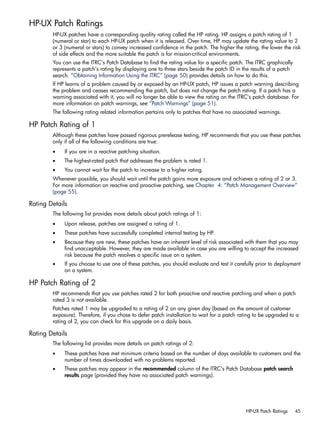
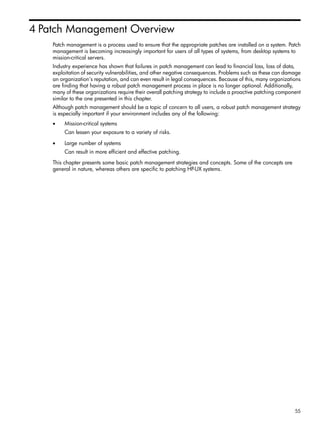
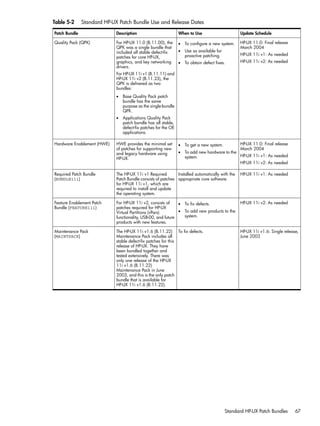
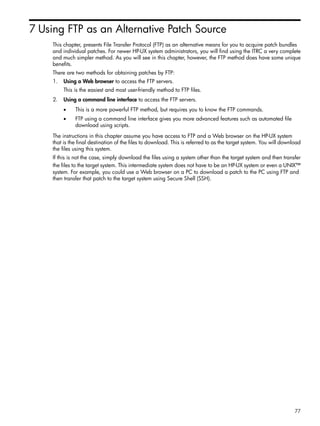
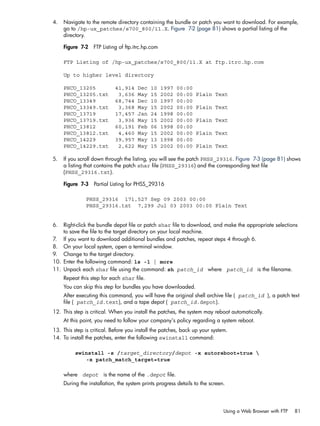
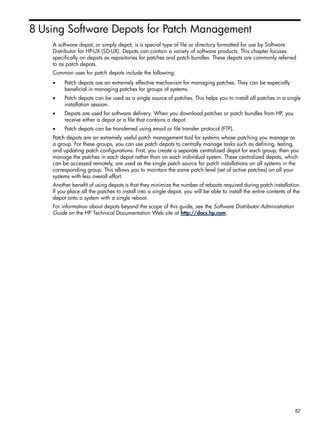
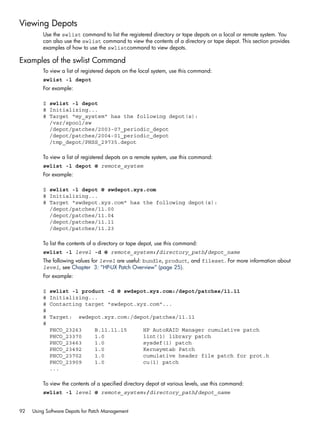
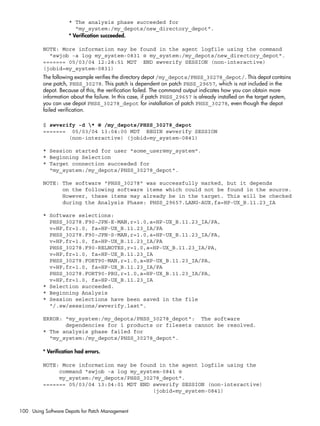
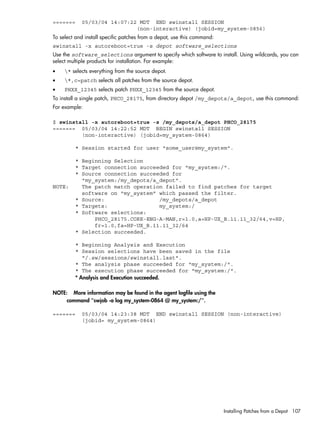
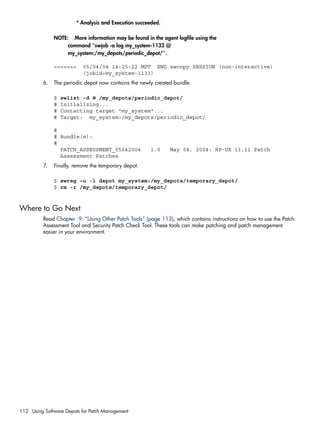
Advanced Topic: Patch Cleanup Utility
The patch utility called cleanup allows you to commit all patches that have been superseded a specified
number of times. You can execute this command in preview mode in order to see what effect the command
will have without actually making any changes. You should always use the preview mode first. This is
accomplished by including the -p argument. The command has the following format:
cleanup [-p] -c number
The cleanup utility is delivered by the following patches (and their superseding patches):·
• PHCO_27779 (HP-UX 11.0, B.11.00)
• PHCO_27780 (HP-UX 11i v1, B.11.11)
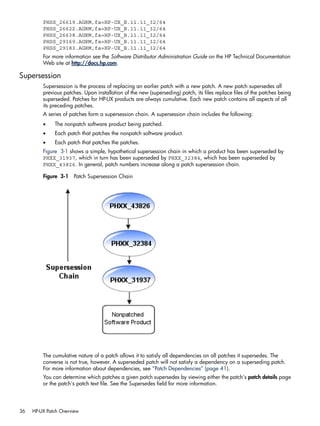
For example, the following command will execute in preview mode. When executed without the -p option,
the command causes all patches superseded three or more times to be committed. The patches to be committed
are shown in the output of the command.
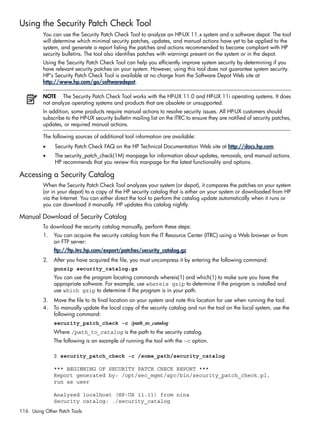
$ cleanup -p -c3
### Cleanup program started at 04/13/04 07:17:40
Preview mode enabled. No modifications will be made.
Commit patches superseded at least 3 time(s) on 'some_system'.
Obtaining superseded patch information...done.
The following patches superseded at least 3 time(s) can be committed:
Superseded # Times Superseded Disk Space in /var/adm/sw/save Superseded By
========== ================== ============================== =============
PHKL_23313 3 66560 bytes PHKL_26519
PHKL_26233 3 180224 bytes PHKL_28267
PHNE_23288 3 59392 bytes PHNE_23645
PHNE_26388 4 6581248 bytes PHNE_28103
PHNE_28103 3 6694912 bytes PHNE_28983
PHSS_21817 5 12379136 bytes PHSS_26619
PHSS_26492 3 8761344 bytes PHSS_27872
PHSS_26619 4 14969856 bytes PHSS_26622
PHSS_26622 3 27064320 bytes PHSS_26638
All information has been logged to /var/adm/cleanup.log.
### Cleanup program completed at 04/13/04 07:17:40
44 HP-UX Patch Overview](https://image.slidesharecdn.com/hp-ux-patchinstallation-140318232423-phpapp02/85/HP-UX-Patch-Installation-44-320.jpg)
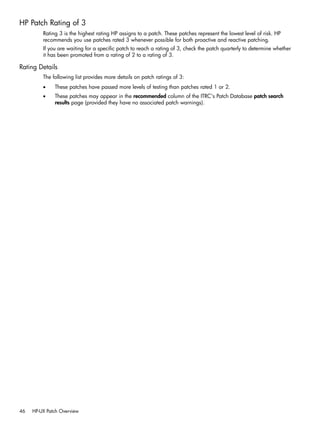

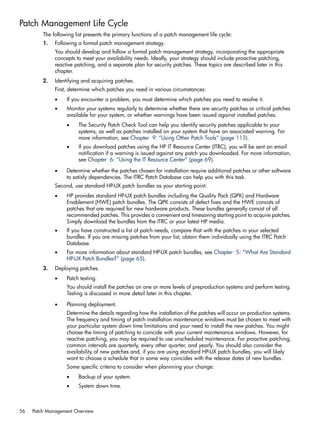
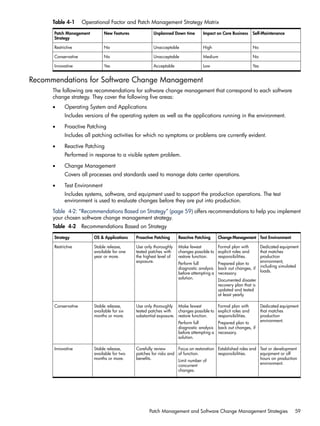

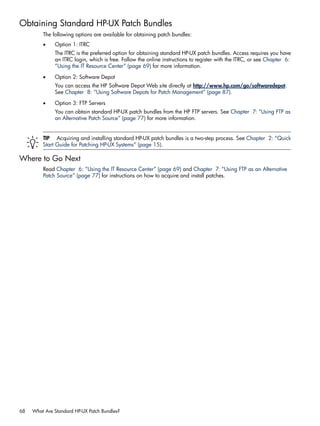


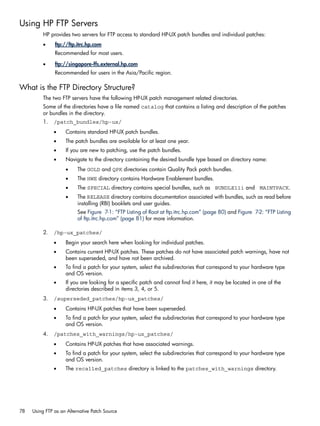
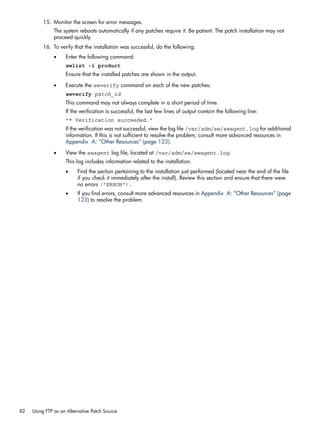
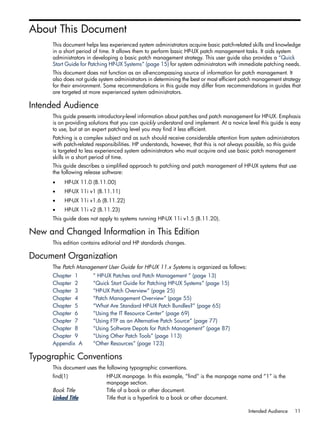
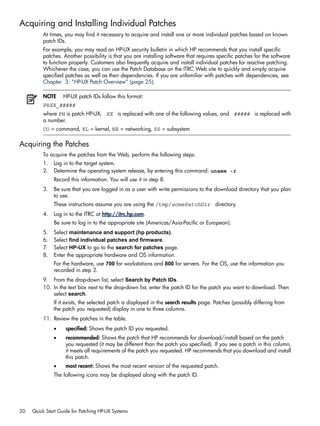
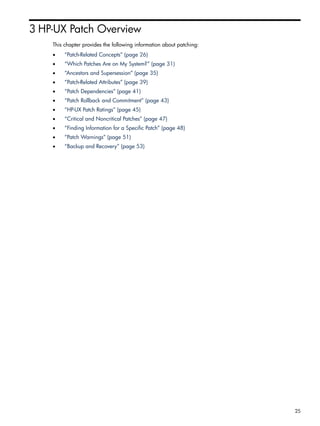
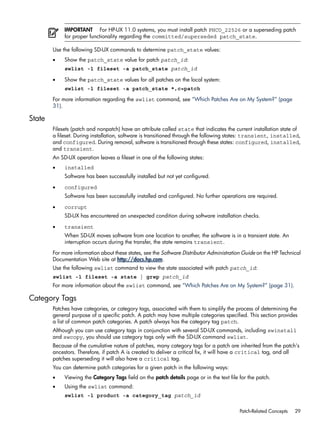
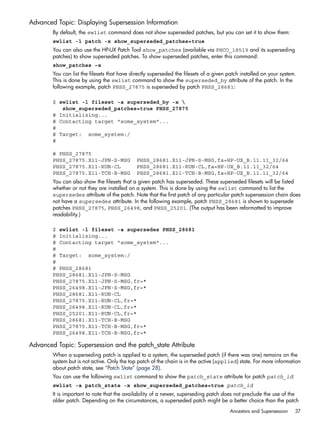
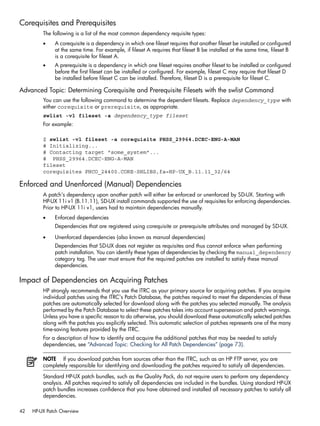
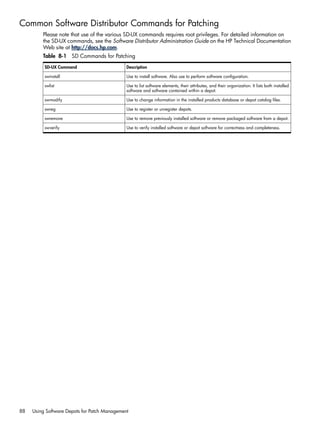
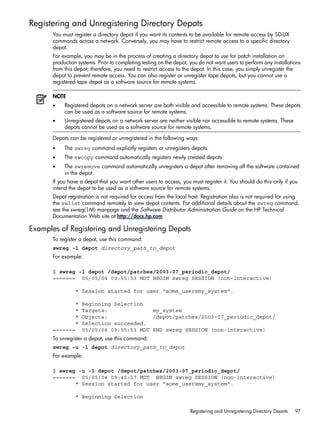
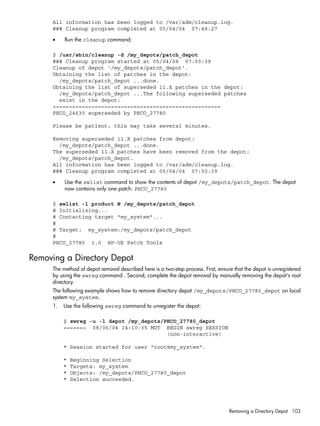
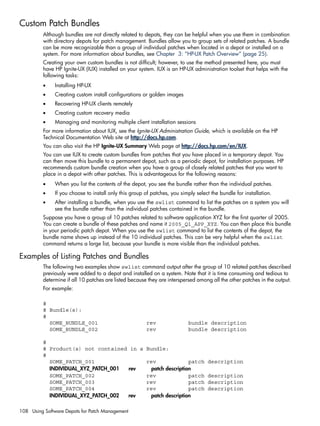
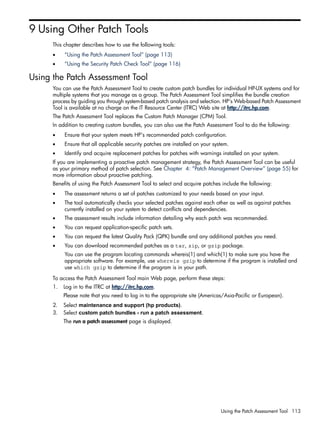
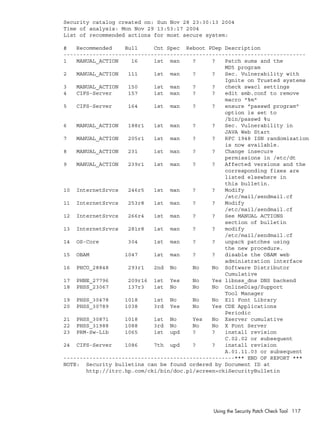
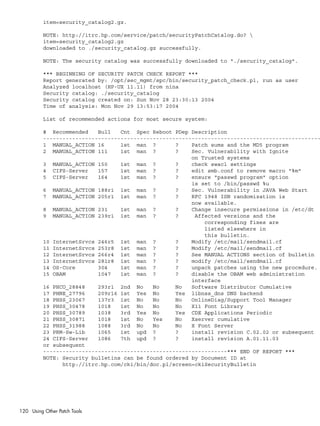
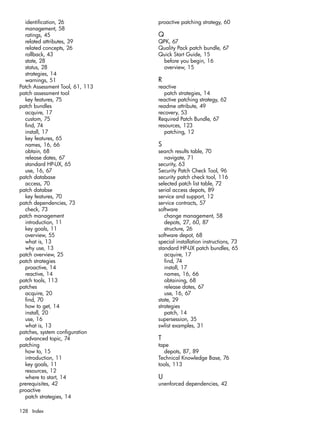
![Figure 7-4 Anonymous FTP Using the Command Line Interface
autgr_57> cd target_dir
autgr_57> ftp ftp.itrc.hp.com
Connected to ftp.itrc.hp.com (192.151.52.14).
220-
220-Welcome to the IT Resource Center ftp server
220-------------------------------------------------------
220-
220-You are user 13, and there is a limit of 400 simultaneous accesses.
220-
220-Log in as user "anonymous" (using your e-mail address as your password)
220-to retrieve available patches for HP-UX, MPE/iX, and other platforms.
220-
220-If you are a user of other HP ITRC services, log in with your
220-HP ITRC User ID and password to deposit or retrieve your files.
220-
220-If you have questions, send email to:
220-
220-support_feedback@europe-ffs.external.hp.com
220-
220 i3107ffs FTP server (HP ASL ftpd, version(322)) ready.
Name (ftp.itrc.hp.com:richardm): anonymous
331 Guest login ok, send your complete e-mail address as password.
Password:
230 Guest login ok, access restrictions apply.
Remote system type is UNIX.
Using binary mode to transfer files.
ftp> bin
200 Type set to I.
ftp> cd hp-ux_patches/s700_800/11.X
250 CWD command successful.
ftp> get PHSS_29316
local: PHSS_29316 remote: PHSS_29316
227 Entering Passive Mode (192,151,52,14,14,70)
150 Opening BINARY mode data connection for PHSS_29316 (171527 bytes).
226 Transfer complete.
171527 bytes received in 0.635 secs (2.6e+02 Kbytes/sec)
ftp> quit
221 Goodbye.
autgr_57> ls -l
total 336
-rw-r--r-- 1 rar users 171527 Sep 9 2003 PHSS_29316
autgr_57> sh PHSS_29316
x - PHSS_29316.text
x - PHSS_29316.depot [non-ascii]
autgr_57> ls
PHSS_29316 PHSS_29316.depot PHSS_29316.text
Where to Go Next
Read Chapter 8: “Using Software Depots for Patch Management” (page 87) for more instructions about
how to use software depots.
Using the Command Line Interface with FTP 85](https://image.slidesharecdn.com/hp-ux-patchinstallation-140318232423-phpapp02/85/HP-UX-Patch-Installation-85-320.jpg)

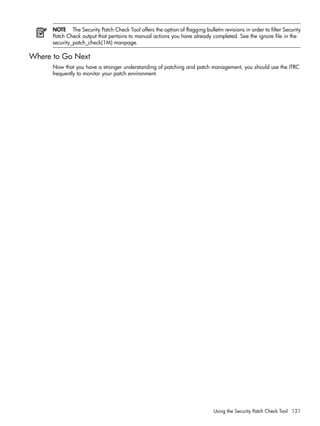
![Creating and Adding to a Directory Depot
You can use the swcopy command to create a directory depot from an existing tape or directory depot.
Software objects from the source depot are copied into the target directory. By default, the swcopy command
automatically registers newly created directory depots for use by Software Distributor.
The swcopy command has many possible arguments. For information, consult the swinstall(1M) manpage
or the Software Distributor Administration Guide on the HP Technical Documentation Web site at
http://docs.hp.com.
In this chapter, consider only the following command arguments:
swcopy [ -p ] -s [ source_system:] /directory_path/source_depot software_selections
@ [ target_system:] /directory_path/target_depot
The swcopy arguments are as follows:
• -p
• Executes in preview mode when given the optional -p command line argument.
• Does not perform the software copy. It shows what the output from executing the command will
be.
• Results in the creation of the root directory for the depot as well as a catalog directory and a
swagent.log file. The log file contains useful information, including disk space analysis. The
command output includes instructions for viewing the information in the log file. These instructions
are similar to the following:
NOTE: More information may be found in the agent logfile
using the command "swjob -a log target_system-1234
@ target_system:/some_directory/target_depot".
• -s [source_system:]/directory_path/source_depot
• Specifies the tape or directory depot from which patches will be copied.
• Include the name of the source_system to specify a system other than the local one.
• Use the appropriate path and depot name of the depot on the media to copy from a depot located
on media, such as CD or DVD.
• software_selections
• Specifies the software to be copied.
• Replace software_selections with a wildcard to copy multiple products to the target depot
with one command. For example:
• * selects everything from the source depot.
• *,c=patch selects all patches from the source depot.
• PHXX_12345 selects patch PHXX_12345 from the source depot.
• @ [target_system:]/directory_path/target_depot
• Specifies the depot directory into which the selected patches will be copied.
• Include the name of the target_system to specify a system other than the local one.
• If this target does not exist and you execute the swcopy command as a user with appropriate
permissions, the target is created. If you do not have the required permissions, the command
generates an error message that provides information about actions you can take to resolve the
problem.
94 Using Software Depots for Patch Management](https://image.slidesharecdn.com/hp-ux-patchinstallation-140318232423-phpapp02/85/HP-UX-Patch-Installation-94-320.jpg)
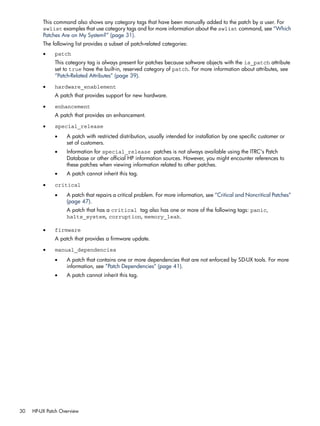
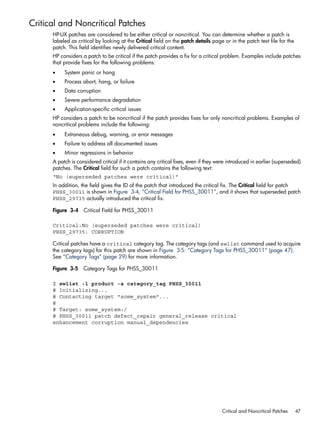
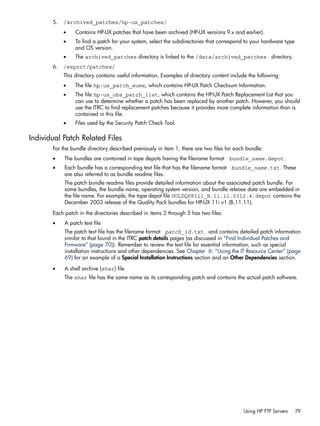
![Removing Software from a Directory Depot
If you need to remove patches from a directory depot, you can do so by using the swremove command.
swremove [ -p ] -d patch_to_remove @ [ target_system:] /some_directory/target_depot
A basic description of these swremove arguments follows:
• -p
Executes the command in preview mode.
• -d
Operates on a depot rather than on installed software.
• patch_to_remove
• Specifies the patches to be removed.
• Replace with a wildcard to remove multiple patches with one command. For example:
• • * selects everything from the source depot.
• *,c=patch selects all patches from the source depot.
• PHXX_12345 selects patch PHXX_12345 from the source depot.
• @ [target_system:]/some_directory/target_depot
• Include target_system if you want to specify a system other than the local one.
• Use to specify the directory depot from which the selected patches will be removed.
The success or failure of the command is indicated in the output, which also details how to get more
information.
It is good practice to unregister a depot that has been made available for remote use prior to modifying the
depot. When you have completed depot modifications, reregister the depot to make it available again.
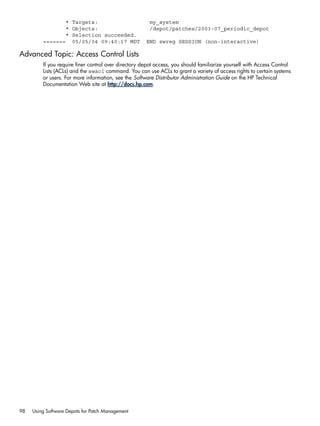
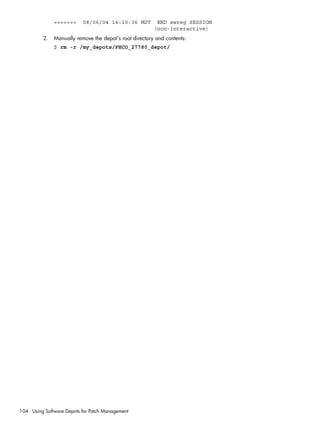
The following example shows how to remove patch PHCO_27780 from directory depot
/my_depots/new_directory_depot on system named my_system:
$ swremove -d PHCO_27780 @ my_system:/my_depots/new_directory_depot
======= 05/03/04 13:25:01 MDT BEGIN swremove SESSION
(non-interactive) (jobid=my_system-0843)
* Session started for user "some_user@my_system".
* Beginning Selection
* Target connection succeeded for
"my_system:/my_depots/new_directory_depot".
* Software selections:
PHCO_27780.CMDS-AUX,r=1.0,a=HP-UX_B.11.11_32/64,
v=HP,fr=1.0, fa=HP-UX_B.11.11_32/64
* Selection succeeded.
* Beginning Analysis
* Session selections have been saved in the file
"/.sw/sessions/swremove.last".
* The analysis phase succeeded for
"my_system:/my_depots/new_directory_depot".
* Analysis succeeded.
* Beginning Execution
* The execution phase succeeded for
"my_system:/my_depots/new_directory_depot".
* Execution succeeded.
Removing Software from a Directory Depot 101](https://image.slidesharecdn.com/hp-ux-patchinstallation-140318232423-phpapp02/85/HP-UX-Patch-Installation-101-320.jpg)
![NOTE: More information may be found in the agent logfile using the
command "swjob -a log my_system-0843 @
my_system:/my_depots/new_directory_depot".
======= 05/03/04 13:25:02 MDT END swremove SESSION (non-interactive)
(jobid=my_system-0843)
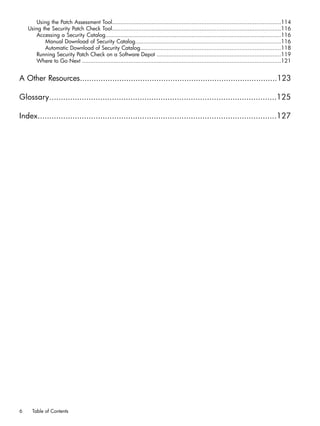
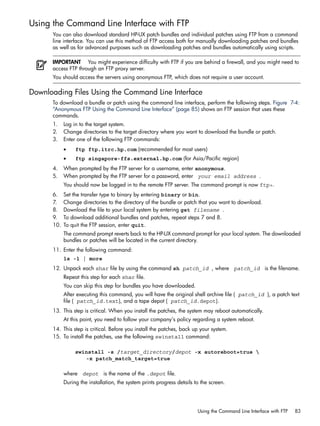
Advanced Topic: Removing Superseded Patches from a Depot
If you have a depot that you are using for patch installation that contains both superseded patches and
corresponding superseding patches, the superseded patches will never be installed and are a waste of disk
space. There is a patch utility called cleanup that you can use to remove all patches from a software depot
if they have been superseded by patches that are also available in the depot. This command works only for
directory depots, not tape depots.
The cleanup utility is delivered by the following patches (and their superseding patches):
• PHCO_27779 (HP-UX 11.0, B.11.00)
• PHCO_27780 (HP-UX 11i v1, B.11.11)
To execute cleanup on the depot some_depot, you can use the following command:
cleanup [-p] -d /some_directory/some_depot
If you use the -p option, the command executes in preview mode. You will be able to see what changes
will be made without any changes actually occurring. HP recommends that you always execute the command
in preview mode first.
For additional information and command options, see the cleanup(1M) manpage.
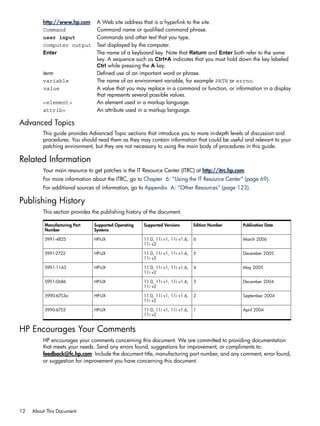
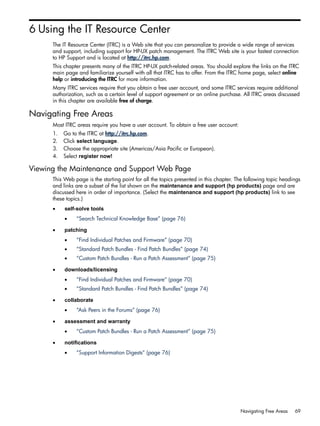
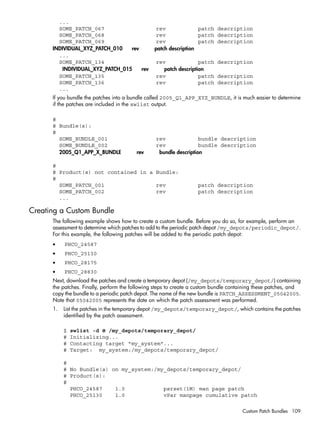
The following example shows how to use the cleanup command to remove superseded patches from the
depot /my_depots/patch_depot.
• Use the swlist command to show the contents of depot /my_depots/patch_depot. The depot
contains two patches: PHCO_24630 and PHCO_27780. The patch PHCO_27780 supersedes
PHCO_24630.
$ swlist -l product @ /my_depots/patch_depot
# Initializing...
# Contacting target "my_system"...
#
# Target: my_system:/my_depots/patch_depot
#
PHCO_24630 1.0 HP-UX Patch Tools
PHCO_27780 1.0 HP-UX Patch Tools
• Use the cleanup command in preview mode to see what changes will occur without actually making
any changes. The command output shows that patch PHCO_24630 will be removed because the
cleanup command removes superseded patches; the output states “PHCO_24630 superseded by
PHCO_27780”.
$ /usr/sbin/cleanup -p -d /my_depots/patch_depot
### Cleanup program started at 05/04/04 07:48:27
Preview mode enabled. No modifications will be made.
Cleanup of depot '/my_depots/patch_depot'.
Obtaining the list of patches in the depot:
/my_depots/patch_depot ...done.
Obtaining the list of superseded 11.X patches in the depot:
/my_depots/patch_depot ...The following superseded patches
exist in the depot:
====================================================
PHCO_24630 superseded by PHCO_27780
102 Using Software Depots for Patch Management](https://image.slidesharecdn.com/hp-ux-patchinstallation-140318232423-phpapp02/85/HP-UX-Patch-Installation-102-320.jpg)
![Installing Patches from a Depot
To install patches from a directory or tape depot, use the swinstall command .
• For additional information about the swinstall command, see the swinstall(1M) manpage and the
Software Distributor Administration Guide on the HP Technical Documentation Web site at
http://docs.hp.com.
• For more information about installing patches, see Chapter 2: “Quick Start Guide for Patching HP-UX
Systems” (page 15).
When you run the swinstall command, the output tells you the success or failure of the command and
how to get additional information. Prior to actually installing patches, you should run the swinstall
command in preview mode by including the -p argument.
Although the swinstall command takes many arguments, the following are pertinent to this discussion:
swinstall [ -p ] -s source_system:/some_directory/source_depot -x autoreboot=true -x
patch_match_target=true software_selections [@ target_selections ]
A basic description of these swinstall arguments follows:
• -p
Executes the command in preview mode. When executed in preview mode, the swinstall command
does not perform the software installation. Rather, this argument shows what the output from executing
the command would be if the patch were installed.
Creates a log file that contains information such as disk space requirements and use. The command
output includes instructions for viewing the log file. The instructions are similar to the following:
NOTE: More information may be found in the agent
logfile using the command
"swjob -a log some_system-1251 @ some_system:/".
• -s source_system:/some_directory/source_depot
Specifies the tape or directory depot from which patches will be installed. For a tape depot, this must
refer to a local depot.
To install from a depot located on media, such as CD or DVD, use the appropriate path and depot
name of the depot on the media.
• -x autoreboot=true
Instructs the swinstall command to reboot the system when required.
• -x patch_match_target=true
Selects for installation only those patches that correspond to products installed on the target system.
• software_selections
Specifies the software to be installed. If you use the -x patch_match_target=true option, you
do not need to specify a software selection.
To install multiple products to the target depot with one command, replace software_selections
with a wildcard. For example:
Installing Patches from a Depot 105](https://image.slidesharecdn.com/hp-ux-patchinstallation-140318232423-phpapp02/85/HP-UX-Patch-Installation-105-320.jpg)


This chapter introduces patches and patch management for HP-UX systems. It discusses two main patch management strategies: proactive patching, which involves regularly applying patches to prevent security issues or bugs, and reactive patching, which involves applying patches only in response to known issues. It also briefly discusses where system administrators can obtain patches and provides a starting point for developing a patch management strategy.