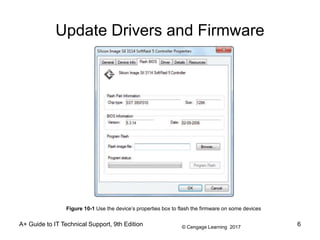
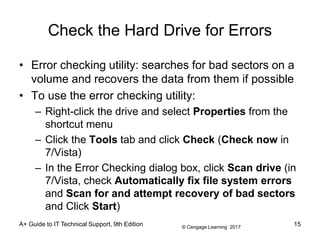
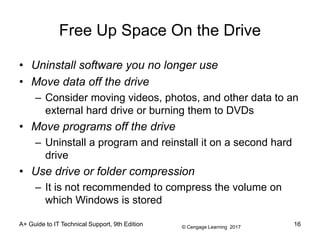
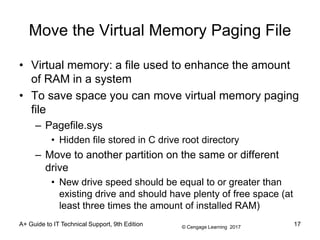
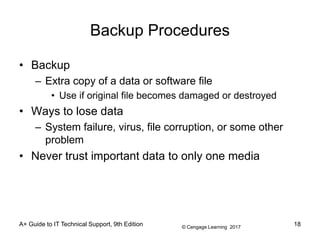
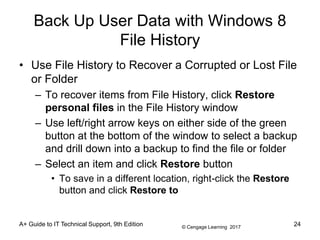
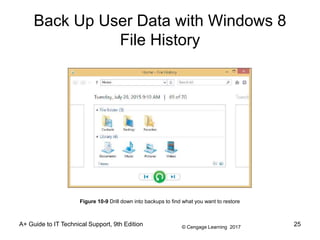
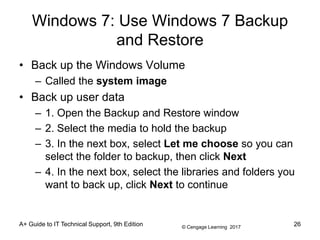
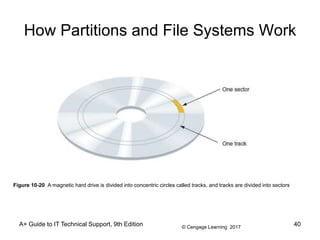
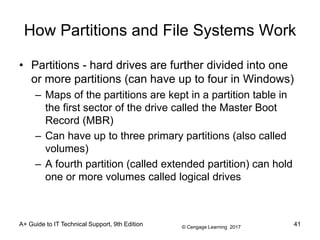
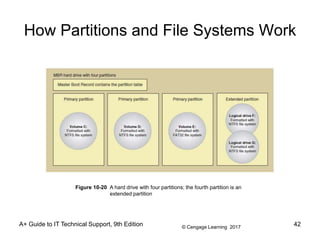
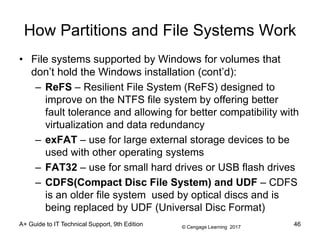
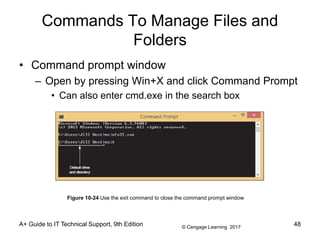
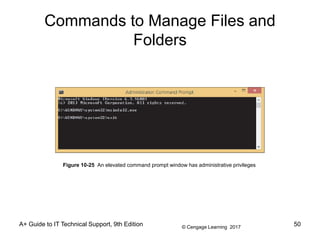
SlideShare a Scribd company logo
1 of 76
A+ Guide to IT Technical Support, 9th
Edition
Chapter 10
Maintaining Windows
© Cengage Learning 2017
A+ Guide to IT Technical Support, 9th Edition
Objectives
• Set up and perform scheduled preventive
maintenance tasks to keep Windows healthy
• Prepare for disaster by keeping good backups of
user data and Windows system files
• Use commands to manage files and folders and how
to use Disk Management to manage hard drives
2
© Cengage Learning 2017
A+ Guide to IT Technical Support, 9th Edition
Scheduled Preventive Maintenance
• Preventive maintenance
– Alleviates slow computer performance
• Some regular tasks to perform
– Verifying critical Windows settings
– Update drivers and firmware
– Patch management
– Clean up the hard drive
– Checking drive for errors
– Move the virtual memory paging file
3
© Cengage Learning 2017
A+ Guide to IT Technical Support, 9th Edition
Verify Critical Windows Settings
• Three Windows settings are critical for keeping a
system protected
– Explain importance to users so they do not change
the settings
– Windows Updates - verify updates and service packs
are installed
• Windows Updates should be configured to
automatically allow updating
– Antivirus/anti-malware software - should be set to
scan regularly and up to date
– Network security setting – ensure the security type is
set for optimum firewall settings
4
© Cengage Learning 2017
Update Drivers and Firmware
• A few devices have firmware on the device that can
be updated
– Called flash firmware
• To flash the firmware on a controller card:
– Download the flash image file from the device
manufacturer’s website
– Click Browse and locate the file
– Click Program Flash to begin the firmware update
A+ Guide to IT Technical Support, 9th Edition 5
© Cengage Learning 2017
Update Drivers and Firmware
A+ Guide to IT Technical Support, 9th Edition 6
Figure 10-1 Use the device’s properties box to flash the firmware on some devices
© Cengage Learning 2017
Patch Management
• Guidelines for reading error messages or
documentation:
– The term x86 refers to 32-bit CPUs and OSs
– All CPUs installed in personal computers today are
hybrid processors that can process either 32 bits or
64 bits
– The term IA64 refers specifically to 64-bit Intel
processors
– The term x64 refers to 64-bit OSs
A+ Guide to IT Technical Support, 9th Edition 7
© Cengage Learning 2017
Clean Up the Hard Drive
• Delete unneeded files occasionally
– Windows requires about 15% hard drive free space
• Uses it for defragmenting drives, burning CDs and
DVDs, and other tasks
• Ways to improve drive performance and free up
space:
– Defragmenting the drive
– Checking for errors
– Compressing folders
– Moving files and folders to other drives
A+ Guide to IT Technical Support, 9th Edition 8
© Cengage Learning 2017
Directory Structures
• User Profile Namespace – when a user logs onto
Windows a user profile is created
– A collection of user data and settings
– Consists of two general items
• A user folder – created under the C:Users folder and
contains a group of subfolders collectively called the
user profile namespace
• Ntuser.dat – file stored in the C:Usersusername
folder
A+ Guide to IT Technical Support, 9th Edition 9
© Cengage Learning 2017
Directory Structures
• Program Files
• C:Program Files – where Windows stores program
files unless you select a different location
• In 64-bit versions of Windows:
– 64-bit program files are stored in C:Program Files
and 32-bit program files are stored in C:Program
Files (x86) folder
A+ Guide to IT Technical Support, 9th Edition 10
© Cengage Learning 2017
Directory Structures
• Folders for Windows Data
– Registry location: C:WindowsSystem32config
– Backup of the registry:
C:WindowsSystem32configRegBack
– Fonts: C:WindowsFonts
– Temporary files: C:WindowsTemp
– Offline files: stored in the client-side caching (CSC)
folder which is C:WindowsCSC
• Allows users to work with files in the folder when the
computer is not connected to a corporate network
A+ Guide to IT Technical Support, 9th Edition 11
© Cengage Learning 2017
Use the Disk Cleanup Utility
• Use the Windows Disk Cleanup utility to delete
temporary files
• To use:
– Open Windows Explorer, right-click the volume that
Windows is installed on, and select Properties
– On the General tab, click Disk Cleanup
– To see temporary system files that can also be
deleted, click Clean up system files
– If even more space is needed click the More Options
to see what else could be deleted
A+ Guide to IT Technical Support, 9th Edition 12
© Cengage Learning 2017
Defrag the Hard Drive
• Defragment: to rearrange fragments or parts of files
so each file is stored in contiguous clusters
• Two types of hard drives:
– Magnetic hard disk drives (HDDs) – contain spinning
platters
• Windows automatically defrags once a week
– Solid-state drives (SSDs) – contain flash memory
• Has no moving parts so defrag does not improve
read/write time
• Defragmenting this type of drive is not recommended
A+ Guide to IT Technical Support, 9th Edition 13
© Cengage Learning 2017
Defrag the Hard Drive
• Cluster (also called file allocation unit): group of
whole sectors in a file system
– Number of sectors in a cluster is fixed
• A file is stored in whole clusters
– Unused space at end of last cluster is called slack
and is wasted free space
• As files are written and deleted from a drive, clusters
are used, released, and used again
– Moving arm of drive may have to move all over a
drive to collect all fragments of a file
• Slows down performance
• Solution is to defragment the drive
A+ Guide to IT Technical Support, 9th Edition 14
© Cengage Learning 2017
A+ Guide to IT Technical Support, 9th Edition
Check the Hard Drive for Errors
• Error checking utility: searches for bad sectors on a
volume and recovers the data from them if possible
• To use the error checking utility:
– Right-click the drive and select Properties from the
shortcut menu
– Click the Tools tab and click Check (Check now in
7/Vista)
– In the Error Checking dialog box, click Scan drive (in
7/Vista, check Automatically fix file system errors
and Scan for and attempt recovery of bad sectors
and Click Start)
15
© Cengage Learning 2017
Free Up Space On the Drive
• Uninstall software you no longer use
• Move data off the drive
– Consider moving videos, photos, and other data to an
external hard drive or burning them to DVDs
• Move programs off the drive
– Uninstall a program and reinstall it on a second hard
drive
• Use drive or folder compression
– It is not recommended to compress the volume on
which Windows is stored
A+ Guide to IT Technical Support, 9th Edition 16
© Cengage Learning 2017
A+ Guide to IT Technical Support, 9th Edition
Move the Virtual Memory Paging File
• Virtual memory: a file used to enhance the amount
of RAM in a system
• To save space you can move virtual memory paging
file
– Pagefile.sys
• Hidden file stored in C drive root directory
– Move to another partition on the same or different
drive
• New drive speed should be equal to or greater than
existing drive and should have plenty of free space (at
least three times the amount of installed RAM)
17
© Cengage Learning 2017
A+ Guide to IT Technical Support, 9th Edition
Backup Procedures
• Backup
– Extra copy of a data or software file
• Use if original file becomes damaged or destroyed
• Ways to lose data
– System failure, virus, file corruption, or some other
problem
• Never trust important data to only one media
18
© Cengage Learning 2017
A+ Guide to IT Technical Support, 9th Edition
Planning For Disaster Recovery
• Decisions to make for a backup and recovery plan
– Decide on backup destination
– Decide on the backup software
• Consider purchasing third-party backup software
– Offers more features than Microsoft utility
– Decide how simple or complex your backup strategy
should be
• Large organizations might require backups be
documented daily, scheduled at certain times of the
day or night, and recovery plans tested regularly
19
© Cengage Learning 2017
Planning For Disaster Recovery
• After backup plan is in place, test the recovery plan
– Test the recovery process
• Erase a file and use the recovery procedures to verify
that you can restore the file from backup
– Keep backups in a safe place and routinely test them
• Should be kept under lock and key
• In case of fire, keep backups off-site
• Routinely verify backups are good by performing a test
recovery of a backed-up file or folder
A+ Guide to IT Technical Support, 9th Edition 20
© Cengage Learning 2017
Back Up User Data with Windows 8
File History
• Windows 8 File History backs up user data stored in
several locations, including:
– Libraries, user desktop, Internet Explorer favorites,
contact folders and offline OneDrive files (for
Microsoft accounts)
• File History utility is available as a window on the
Windows desktop or an app in the Windows 8
interface
– For most control, use the window on the desktop
A+ Guide to IT Technical Support, 9th Edition 21
© Cengage Learning 2017
Back Up User Data with Windows 8
File History
• To use:
– Connect your backup device and open Control Panel
in classic view, then click File History
– To turn on File History, click Turn on
– To manage backups, click Advanced settings
– On the Advanced Settings window, set how often
backups are made and how long old backups should
be kept
• You can also view a history of events and clean up old
backups to free up space
A+ Guide to IT Technical Support, 9th Edition 22
© Cengage Learning 2017
Back Up User Data with Windows 8
File History
A+ Guide to IT Technical Support, 9th Edition 23
Figure 10-8 Turn on and off File History and control its settings
© Cengage Learning 2017
Back Up User Data with Windows 8
File History
• Use File History to Recover a Corrupted or Lost File
or Folder
– To recover items from File History, click Restore
personal files in the File History window
– Use left/right arrow keys on either side of the green
button at the bottom of the window to select a backup
and drill down into a backup to find the file or folder
– Select an item and click Restore button
• To save in a different location, right-click the Restore
button and click Restore to
A+ Guide to IT Technical Support, 9th Edition 24
© Cengage Learning 2017
Back Up User Data with Windows 8
File History
A+ Guide to IT Technical Support, 9th Edition 25
Figure 10-9 Drill down into backups to find what you want to restore
© Cengage Learning 2017
Windows 7: Use Windows 7 Backup
and Restore
• Back up the Windows Volume
– Called the system image
• Back up user data
– 1. Open the Backup and Restore window
– 2. Select the media to hold the backup
– 3. In the next box, select Let me choose so you can
select the folder to backup, then click Next
– 4. In the next box, select the libraries and folders you
want to back up, click Next to continue
A+ Guide to IT Technical Support, 9th Edition 26
© Cengage Learning 2017
Windows 7: Use Windows 7 Backup
and Restore
• Back up user data (cont’d)
– 1. 5. Verify the correct folders and libraries are
selected
• You can also change the frequency in this step
– 6. Review your backup settings and click Save
settings and run backup
A+ Guide to IT Technical Support, 9th Edition 27
© Cengage Learning 2017
Windows 7: Use Windows 7 Backup
and Restore
• Recover Backed Up Items
– 1. Make the backup media available to computer
– 2. Open Backup and Restore and click Restore my
files
– 3. Use one of three buttons to locate the file or folder
• Follow directions on-screen to restore
• To restore a previous version of a file or folder:
– 1. Copy the corrupted file or folder to a new location
– 2. Right click the file or folder and select Restore
previous version
– 3. Select the version you want and click Restore
A+ Guide to IT Technical Support, 9th Edition 28
© Cengage Learning 2017
Back Up Windows System Files
• Windows System Protection – automatically backs
up system files and stores them at regular intervals
• Restore point
– Condition at time a snapshot taken
– Includes Windows system files
• Restore points are taken at least every 24 hours
• Can use up to 15 percent of disk space
– If disk space gets too low, restore points are no
longer made
• Can manually create restore point at any time using
the System Protection tab of System Properties
A+ Guide to IT Technical Support, 9th Edition 29
© Cengage Learning 2017
Back Up Windows System Files
A+ Guide to IT Technical Support, 9th Edition 30
Figure 10-14 Make sure System Protection is turned on for the volume on which Windows is installed
© Cengage Learning 2017
A+ Guide to IT Technical Support, 9th Edition
Back Up Windows System Files
• Apply a restore point
– System Restore restores the system to its condition at
the time a restore point is made
– User data not altered
– Can affect installed software, hardware, user settings,
and OS configuration settings
– Changes made to settings are lost after restore point
is created
– Always use most recent restore point capable of fixing
the problem
31
© Cengage Learning 2017
A+ Guide to IT Technical Support, 9th Edition
Back Up Windows System Files
• To return the system to a previous restore point:
– Click Start, type rstrui.exe in the Search box and
press Enter
• System Restore box opens, click Next
– Select a restore point and click Next
– Windows asks you to confirm, click Finish and
respond to warning box
32
© Cengage Learning 2017
Back Up Windows System Files
• Points to remember about system restore
– Limitations
• System Protection must be turned on
• Recovers from errors only if registry somewhat intact
• Process cannot remove virus or worm infection
• Process might create a new problem
• Process might make many changes to a system
• Restore points kept in a hidden folder on the hard drive
• Viruses and malware sometimes hide in restore points
• Can launch System Restore using startup recovery tools
A+ Guide to IT Technical Support, 9th Edition 33
© Cengage Learning 2017
Windows 8 Custom Refresh Image
• Custom refresh image – an image of the entire
Windows volume including the Windows installation
– Windows 8 apps, desktop applications, and user
settings and data
• Best time to create a refresh image:
– Right after you’ve installed Windows, hardware,
applications, and user accounts
• Image is stored in a file named CustomRefresh.wim
in the folder you specify
– WIM file uses the Windows Imaging File format
A+ Guide to IT Technical Support, 9th Edition 34
© Cengage Learning 2017
Windows 8 Custom Refresh Image
• Steps to create a Windows 8 custom refresh image:
– Open an elevated command prompt window
• Press Win+X and click Command Prompt (Admin)
– Enter this command, substituting drive and folder:
• recimg /createimage D:MyImage
• The image and its location are registered as the
active recovery image
• The recimg command can also be used to manage
refresh images
A+ Guide to IT Technical Support, 9th Edition 35
© Cengage Learning 2017
Windows 7: Windows 7 System Image
• To create a Windows 7 system image, click Create
a system image in the Backup and Restore window
and follow directions on screen
• Points to keep in mind:
– A system image includes the entire drive C: or other
drive on which Windows is installed
– A system image must always be created on an
internal or external hard drive
– Don’t depend just on the system image as your
backup
A+ Guide to IT Technical Support, 9th Edition 36
© Cengage Learning 2017
Windows 7: Windows 7 System Image
• Points to keep in mind (cont’d):
– You can create a system image any time after
Windows is installed, and then you can use this
image to recover from a failed hard drive
A+ Guide to IT Technical Support, 9th Edition 37
© Cengage Learning 2017
Managing Files, Folders, and Storage
Devices
• This section of the chapter covers:
– Managing files and folders using commands in a
command prompt window
– Managing hard drive partitions and volumes using the
Disk Management utility
A+ Guide to IT Technical Support, 9th Edition 38
© Cengage Learning 2017
How Partitions and File Systems Work
• All data is stored on a hard drive in sectors (records)
• Each sector on drive is the same size (usually 512
bytes)
• Low-level formatting: A process (usually performed
at the factory) that electronically creates the hard
drive tracks and sectors and tests for bad spots
– Size of the sector and total number of sectors
determine capacity
– Today’s drive capacities are measured in GB
(gigabytes) or TB (terabytes)
A+ Guide to IT Technical Support, 9th Edition 39
© Cengage Learning 2017
How Partitions and File Systems Work
A+ Guide to IT Technical Support, 9th Edition 40
Figure 10-20 A magnetic hard drive is divided into concentric circles called tracks, and tracks are divided into sectors
© Cengage Learning 2017
A+ Guide to IT Technical Support, 9th Edition
How Partitions and File Systems Work
• Partitions - hard drives are further divided into one
or more partitions (can have up to four in Windows)
– Maps of the partitions are kept in a partition table in
the first sector of the drive called the Master Boot
Record (MBR)
– Can have up to three primary partitions (also called
volumes)
– A fourth partition (called extended partition) can hold
one or more volumes called logical drives
41
© Cengage Learning 2017
A+ Guide to IT Technical Support, 9th Edition
How Partitions and File Systems Work
42
Figure 10-20 A hard drive with four partitions; the fourth partition is an
extended partition
© Cengage Learning 2017
A+ Guide to IT Technical Support, 9th Edition
How Partitions and File Systems Work
• Partitions (cont’d)
– GPT partitions – the Globally Unique Identifier
Partition Table (GUID or GPT) system can support up
to 128 partitions
• Required for drives larger than 2 TB
• Does not use extended partitions or logical volumes
• The bootable partition is not called an active partition
• First sector in a GPT system contains the protective
MBR, which provides information to legacy software
that does not support GPT
• All partitions are tracked in a single partition table,
stored in the GPT header
43
© Cengage Learning 2017
A+ Guide to IT Technical Support, 9th Edition
How Partitions and File Systems Work
44
Figure 10-21 A hard drive using GPT
© Cengage Learning 2017
A+ Guide to IT Technical Support, 9th Edition
How Partitions and File Systems Work
• File System - before a drive can be used it must be:
– Assigned a drive letter (C: or D:)
– Formatted using a file system
• File system is overall structure an OS uses to name,
store, and organize files on a drive
• Windows 8/7 supports three types of file systems:
NTFS, FAT32, and exFAT
• File systems supported by Windows for volumes
that don’t hold the Windows installation:
– NTFS – uses smaller allocation unit or cluster sizes
than FAT32 (more efficient)
45
© Cengage Learning 2017
How Partitions and File Systems Work
• File systems supported by Windows for volumes that
don’t hold the Windows installation (cont’d):
– ReFS – Resilient File System (ReFS) designed to
improve on the NTFS file system by offering better
fault tolerance and allowing for better compatibility with
virtualization and data redundancy
– exFAT – use for large external storage devices to be
used with other operating systems
– FAT32 – use for small hard drives or USB flash drives
– CDFS(Compact Disc File System) and UDF – CDFS
is an older file system used by optical discs and is
being replaced by UDF (Universal Disc Format)
A+ Guide to IT Technical Support, 9th Edition 46
© Cengage Learning 2017
A+ Guide to IT Technical Support, 9th Edition
How Partitions and File Systems Work
• Windows assigns two functions to partitions:
– Active partition – the bootable partition that startup
UEFI/BIOS turns to when searching for an OS
• In GPT system, it is called the EFI System Partition
(ESP)
• In Windows, the MBR active partition or the ESP
System Partition is called the system partition
– Boot partition – partition where Windows OS is stored
47
© Cengage Learning 2017
Commands To Manage Files and
Folders
• Command prompt window
– Open by pressing Win+X and click Command Prompt
• Can also enter cmd.exe in the search box
A+ Guide to IT Technical Support, 9th Edition
Figure 10-24 Use the exit command to close the command prompt window
48
© Cengage Learning 2017
Commands to Manage Files and
Folders
• Windows has two levels of command prompt
windows
– Standard window – default directory is the currently
logged on user’s folder
• Commands requiring administrative privileges will not
work
– Elevated window – requires the user to logon as an
administrator
• The word “administrator” will appear in the title bar
• Default directory will be C:Windowssystem32
A+ Guide to IT Technical Support, 9th Edition 49
© Cengage Learning 2017
Commands to Manage Files and
Folders
A+ Guide to IT Technical Support, 9th Edition 50
Figure 10-25 An elevated command prompt window has administrative privileges
© Cengage Learning 2017
Commands to Manage Files and
Folders
• Tips for working in a command prompt window:
– Type cls and press Enter to clear the window
– Press the up arrow to retrieve the last command
– Press the right arrow to retrieve the last command
line one character at a time
– Press Ctrl+C, Ctrl+Break or Ctrl+Pause to terminate
a command before it is finished
– Type exit and press Enter to close the window
A+ Guide to IT Technical Support, 9th Edition 51
© Cengage Learning 2017
A+ Guide to IT Technical Support, 9th Edition
Commands To Manage Files and
Folders
• File naming conventions
– Filename and file extension characters
• Letters a through z and numbers 0 through 9
• Characters: _ ^ $~ ! # % & – { } ( ) @ ' `
– Filename with spaces:
• Enclose filename in double quotation marks
• Wildcard characters in command lines
– Question mark (?): wildcard for one character
– Asterisk (*): wildcard for one or more characters
52
© Cengage Learning 2017
A+ Guide to IT Technical Support, 9th Edition
Commands To Manage Files and
Folders
• help or <command name> /?
Table 10-2 Sample help commands
53
© Cengage Learning 2017
Commands to Manage Files and
Folders
• dir [<filename>] [/p] [/s] [/w]
– List files and directories
A+ Guide to IT Technical Support, 9th Edition 54
Table 10-3 Sample dir commands
© Cengage Learning 2017
A+ Guide to IT Technical Support, 9th Edition
Commands To Manage Files and
Folders
• md [drive:]path
– Creates a subdirectory under a directory
• cd [drive:]path or cd..
– Changes current default directory
– Use .. after CD to move from child directory to its
parent directory
• rd [drive:]path
– Removes a subdirectory
• Directory must contain no files
• Directory must contain no subdirectories
• Directory must not be current directory
55
© Cengage Learning 2017
Commands To Manage Files and
Folders
• del or erase <filename>
– Erases files or groups of files
• ren <filename1> <filename2>
– Renames a file
• copy <source> [<destination>] [/v] [/y]
– Useful switches or parameters
• /v: size of each new file compared to the size of original
file
• /y: confirmation message does not appear asking to
confirm before overwriting a file
A+ Guide to IT Technical Support, 9th Edition 56
© Cengage Learning 2017
A+ Guide to IT Technical Support, 9th Edition
Commands To Manage Files and
Folders
• recover <filename>
– Attempts to recover a file when parts corrupted
• expand [/d] <source> [<destination>]
– Extracts files from compressed distribution files,
which are often used to distribute files for software
installations
57
Table 10-4 Sample expand commands
© Cengage Learning 2017
A+ Guide to IT Technical Support, 9th Edition
Commands To Manage Files and
Folders
• xcopy <source> [<destination>] [/s] [/c] [/y] [/d:date]
58
Table 10-5 Sample Xcopy commands
© Cengage Learning 2017
A+ Guide to IT Technical Support, 9th Edition
Commands To Manage Files and
Folders
• robocopy <source> [<destination>] [/s] [/e]
[/log:filename] [/log+:filename] [/move] [/purge]
– Robust File Copy command
Table 10-6 Sample robocopy commands
59
© Cengage Learning 2017
A+ Guide to IT Technical Support, 9th Edition
Commands To Manage Files and
Folders
• chkdsk [drive:] [/f] [/r]
– Fixes file system errors
– Recovers data from bad sectors
Figure 10-27 Lost and cross-linked clusters
60
© Cengage Learning 2017
A+ Guide to IT Technical Support, 9th Edition
Commands To Manage Files and
Folders
• defrag [drive:] [/C]
– Examines a drive for fragmented files
• Rewrites fragmented files in contiguous clusters
Table 10-7 Sample defrag commands
61
© Cengage Learning 2017
A+ Guide to IT Technical Support, 9th Edition
Commands To Manage Files and
Folders
• format <drive:> [/v:label] [/q] [fs:<filesystem>]
– Used to format a hard drive or other storage device
Table 10-8 Sample format commands
62
© Cengage Learning 2017
Commands To Manage Files and
Folders
• shutdown [/m computername] [/i] [/r] [/s] [/f] [/t xx]
– Shut down the local computer or a remote computer
A+ Guide to IT Technical Support, 9th Edition 63
Figure 10-9 Sample shutdown commands
© Cengage Learning 2017
Commands To Manage Files and
Folders
• Windows PowerShell – designed to replace the
command prompt utility
– Users enter commands to be executed
– Processes objects called cmdlets
– Contains thousands of cmdlets and technicians can
program their own cmdlets
– To open Windows 8 PowerShell, press Win+X, click
Run, type powershell in the Run box, press Enter
A+ Guide to IT Technical Support, 9th Edition 64
© Cengage Learning 2017
Use Disk Management To Manage
Hard Drives
• Disk Management is the primary tool for managing
hard drives
– Manage partitions, prepare a new drive for first use,
mount a drive, use Windows dynamic disks, or
troubleshoot problems with the hard drive
• Resize, Create, and Delete Partitions
– To open Disk Management, use one of these
methods:
• Press Win+X and click Disk Management
• Press Win+S, type diskmgmt.msc, and press Enter
A+ Guide to IT Technical Support, 9th Edition 65
© Cengage Learning 2017
Use Disk Management To Manage
Hard Drives
A+ Guide to IT Technical Support, 9th Edition 66
Figure 10-28 Shrink a volume to make room for a new partition
© Cengage Learning 2017
Use Disk Management To Manage
Hard Drives
• Prepare a drive for first use
– Step 1: Initialize the Disk
• When initialized, Windows identifies the disk as a basic
disk, which is a single hard drive that works
independently of other hard drives
– Step 2: Create a Volume and Format It with a File
System
• Right-click in the unallocated space, select New
Simple Volume from the shortcut menu, and follow
directions on-screen
A+ Guide to IT Technical Support, 9th Edition 67
© Cengage Learning 2017
A+ Guide to IT Technical Support, 9th Edition
Use Disk Management To Manage
Hard Drives
• How to Mount a Drive
– Mounted drive is a volume accessible by a folder on
another volume
• Folder has more available space
– Mount point: C:Projects folder
Figure 10-31 The C:Projects folder is
the mount point for the mounted drive
68
© Cengage Learning 2017
Use Disk Management To Manage
Hard Drives
• Windows Dynamic Disks
– Several dynamic disks can work together to
collectively present a single dynamic volume
– Data to configure each hard drive is stored in a disk
management database (resides in last 1 MB of space
on each hard drive)
– Better reliability, spanning, stripping (RAID 0) to
improve performance, mirror two hard drives for fault
tolerance (RAID 1) for XP
A+ Guide to IT Technical Support, 9th Edition 69
© Cengage Learning 2017
Use Disk Management To Manage
Hard Drives
• Windows dynamic disks (cont’d.)
– Disk Management converts two or more basic disks
to dynamic disks
A+ Guide to IT Technical Support, 9th Edition 70
Figure 10-35 Convert a basic disk to a dynamic disk
© Cengage Learning 2017
A+ Guide to IT Technical Support, 9th Edition
Use Disk Management To Manage
Hard Drives
• Use Disk Management to Troubleshoot Hard Drive
Problems
– Drive and volume statuses:
• Healthy
• Failed
• Online
• Active
• EFI System Partition
• Unallocated
• Formatting
• Basic
• Dynamic
71
© Cengage Learning 2017
A+ Guide to IT Technical Support, 9th Edition
Windows Storage Spaces
• With Storage Spaces, you can create a storage pool
using any number of internal and external backup
drives
– Create one or more virtual drives, called spaces, from
this pool
– Appear as normal drives in File Explorer
• Storage spaces is designed for resiliency
– Resistance of a configuration against data loss in the
event of drive failure
72
© Cengage Learning 2017
A+ Guide to IT Technical Support, 9th Edition
Windows Storage Spaces
• Storage options:
– Simple
– Two-way mirroring
– Three-way mirroring
– Parity
• Thin provisioning – a feature that can configure a
space to have more virtual storage than the physical
drives actually offer
73
© Cengage Learning 2017
A+ Guide to IT Technical Support, 9th Edition
Summary
• Regular preventive maintenance improves
performance and troubleshooting
– Verify Windows settings, defragment hard drives,
check drive for errors, reduce startup process to
essentials, and free up hard drive space
• Windows offers may preventative maintenance tools
• Plan for disaster recovery in the event a hard drive
fails by performing routine backups of data and
system files
• Windows 8 File History and Windows 7 Backup and
Restore can be used to schedule routine backups of
user data files
74
© Cengage Learning 2017
A+ Guide to IT Technical Support, 9th Edition
Summary
• System Protection creates restore points
• A Windows 8 custom refresh image backs up the
entire Windows volume
• A hard drive is divided into sectors, blocks, and
partitions
• The MBR partitioning system requires legacy BIOS
and a 32-bit OS
• The GPT partitioning system requires UEFI and a
64-bit OS
75
© Cengage Learning 2017
Summary
• Commands useful to manage files, folders and
storage media include help, dir, del, ren, copy,
recover, expand, xcopy, robocopy, MD, CD, RD,
chkdsk, defrag, and format
• Use Disk Management to manage hard drives and
partitions
• Windows 8 Storage Spaces is expected to replace
the Windows solution for software RAID and can
support thin provisioning
A+ Guide to IT Technical Support, 9th Edition 76

More Related Content

What's hot

System Administration DCU
System Administration DCUSystem Administration DCU
System Administration DCU
Khalid Rehan
 
Database administration and security
Database administration and securityDatabase administration and security
Database administration and security
Mohd Arif
 
It essentials pc hardware and software overview
It essentials pc hardware and software overviewIt essentials pc hardware and software overview
It essentials pc hardware and software overview
Ahmed Sultan
 
Owny IT Desktop Monitoring Featurelist
Owny IT Desktop Monitoring FeaturelistOwny IT Desktop Monitoring Featurelist
Owny IT Desktop Monitoring Featurelist
NCS Computech Ltd.
 
Sample_Blueprint-Fault_Tolerant_NAS
Sample_Blueprint-Fault_Tolerant_NASSample_Blueprint-Fault_Tolerant_NAS
Sample_Blueprint-Fault_Tolerant_NAS
Mike Alvarado
 

What's hot (16)

ITE v5.0 - Chapter 5
ITE v5.0 - Chapter 5ITE v5.0 - Chapter 5
ITE v5.0 - Chapter 5
 
System Administration DCU
System Administration DCUSystem Administration DCU
System Administration DCU
 
ITE v5.0 - Chapter 3
ITE v5.0 - Chapter 3ITE v5.0 - Chapter 3
ITE v5.0 - Chapter 3
 
ITE v5.0 - Chapter 4
ITE v5.0 - Chapter 4ITE v5.0 - Chapter 4
ITE v5.0 - Chapter 4
 
Database administration and security
Database administration and securityDatabase administration and security
Database administration and security
 
Resume
ResumeResume
Resume
 
introduction to system administration
introduction to system administrationintroduction to system administration
introduction to system administration
 
Backup Exec 15: Designing Protection for the Future, Today
Backup Exec 15: Designing Protection for the Future, TodayBackup Exec 15: Designing Protection for the Future, Today
Backup Exec 15: Designing Protection for the Future, Today
 
It essentials pc hardware and software overview
It essentials pc hardware and software overviewIt essentials pc hardware and software overview
It essentials pc hardware and software overview
 
IT system and network administrator
IT system and network administratorIT system and network administrator
IT system and network administrator
 
The Cost of Managing IBM i Without Automation
The Cost of Managing IBM i Without AutomationThe Cost of Managing IBM i Without Automation
The Cost of Managing IBM i Without Automation
 
Owny IT Desktop Monitoring Featurelist
Owny IT Desktop Monitoring FeaturelistOwny IT Desktop Monitoring Featurelist
Owny IT Desktop Monitoring Featurelist
 
Sample_Blueprint-Fault_Tolerant_NAS
Sample_Blueprint-Fault_Tolerant_NASSample_Blueprint-Fault_Tolerant_NAS
Sample_Blueprint-Fault_Tolerant_NAS
 
ITE v5.0 - Chapter 9
ITE v5.0 - Chapter 9ITE v5.0 - Chapter 9
ITE v5.0 - Chapter 9
 
W982 05092004
W982 05092004W982 05092004
W982 05092004
 
ITE v5.0 - Chapter 1
ITE v5.0 - Chapter 1ITE v5.0 - Chapter 1
ITE v5.0 - Chapter 1
 

Similar to ppt ch10

Utility-Softwares.pptxgdgfgdgdfgdfggfgfd
Utility-Softwares.pptxgdgfgdgdfgdfggfgfdUtility-Softwares.pptxgdgfgdgdfgdfggfgfd
Utility-Softwares.pptxgdgfgdgdfgdfggfgfd
ghioredondo0
 
Windows 8 dddd (beekelaar)
Windows 8 dddd (beekelaar)Windows 8 dddd (beekelaar)
Windows 8 dddd (beekelaar)
hypervnu
 

Similar to ppt ch10 (20)

Ch 13
Ch 13Ch 13
Ch 13
 
Host961 PC Backup
Host961 PC BackupHost961 PC Backup
Host961 PC Backup
 
Backing up your data
Backing up your dataBacking up your data
Backing up your data
 
Never Clueless PC and server backups
Never Clueless PC and server backupsNever Clueless PC and server backups
Never Clueless PC and server backups
 
Preventive Maintenance
Preventive MaintenancePreventive Maintenance
Preventive Maintenance
 
ppt ch07
ppt ch07ppt ch07
ppt ch07
 
ppt ch13
ppt ch13ppt ch13
ppt ch13
 
ITE7_Chp10.pptx
ITE7_Chp10.pptxITE7_Chp10.pptx
ITE7_Chp10.pptx
 
ppt ch08
ppt ch08ppt ch08
ppt ch08
 
Utility-Softwares.pptxgdgfgdgdfgdfggfgfd
Utility-Softwares.pptxgdgfgdgdfgdfggfgfdUtility-Softwares.pptxgdgfgdgdfgdfggfgfd
Utility-Softwares.pptxgdgfgdgdfgdfggfgfd
 
Windows 8 dddd (beekelaar)
Windows 8 dddd (beekelaar)Windows 8 dddd (beekelaar)
Windows 8 dddd (beekelaar)
 
Comp 107 unit 4(operating systems)
Comp 107 unit 4(operating systems)Comp 107 unit 4(operating systems)
Comp 107 unit 4(operating systems)
 
MCSA 70-412 Chapter 12
MCSA 70-412 Chapter 12MCSA 70-412 Chapter 12
MCSA 70-412 Chapter 12
 
Module 5a - Storage -Storage System Features.pptx
Module 5a - Storage -Storage System Features.pptxModule 5a - Storage -Storage System Features.pptx
Module 5a - Storage -Storage System Features.pptx
 
Module 5a - Storage -Storage System Features.pptx
Module 5a - Storage -Storage System Features.pptxModule 5a - Storage -Storage System Features.pptx
Module 5a - Storage -Storage System Features.pptx
 
Backup Options for IBM PureData for Analytics powered by Netezza
Backup Options for IBM PureData for Analytics powered by NetezzaBackup Options for IBM PureData for Analytics powered by Netezza
Backup Options for IBM PureData for Analytics powered by Netezza
 
Asset Management and Workflow
Asset Management and WorkflowAsset Management and Workflow
Asset Management and Workflow
 
Ch07
Ch07Ch07
Ch07
 
PACE-IT: Operation System Features
PACE-IT: Operation System FeaturesPACE-IT: Operation System Features
PACE-IT: Operation System Features
 
Windows 11 Desktop 01. Administration System Maintenance and Troubleshooting...
Windows 11 Desktop 01. Administration  System Maintenance and Troubleshooting...Windows 11 Desktop 01. Administration  System Maintenance and Troubleshooting...
Windows 11 Desktop 01. Administration System Maintenance and Troubleshooting...
 

More from sadejoseph (9)

ppt ch16
ppt ch16ppt ch16
ppt ch16
 
ch14
ch14ch14
ch14
 
ppt ch11
ppt ch11ppt ch11
ppt ch11
 
Ex13 lesson04
Ex13 lesson04Ex13 lesson04
Ex13 lesson04
 
Ex13 lesson03
Ex13 lesson03Ex13 lesson03
Ex13 lesson03
 
Ex13 lesson02
Ex13 lesson02Ex13 lesson02
Ex13 lesson02
 
Ex13 lesson01
Ex13 lesson01Ex13 lesson01
Ex13 lesson01
 
OCP Booklet June 2015
OCP Booklet June 2015OCP Booklet June 2015
OCP Booklet June 2015
 
Ocp Booklet June 2015
Ocp Booklet June 2015Ocp Booklet June 2015
Ocp Booklet June 2015
 

Recently uploaded

Finding Java's Hidden Performance Traps @ DevoxxUK 2024
Finding Java's Hidden Performance Traps @ DevoxxUK 2024Finding Java's Hidden Performance Traps @ DevoxxUK 2024
Finding Java's Hidden Performance Traps @ DevoxxUK 2024
Victor Rentea
 

Recently uploaded (20)

Navigating the Deluge_ Dubai Floods and the Resilience of Dubai International...
Navigating the Deluge_ Dubai Floods and the Resilience of Dubai International...Navigating the Deluge_ Dubai Floods and the Resilience of Dubai International...
Navigating the Deluge_ Dubai Floods and the Resilience of Dubai International...
 
AWS Community Day CPH - Three problems of Terraform
AWS Community Day CPH - Three problems of TerraformAWS Community Day CPH - Three problems of Terraform
AWS Community Day CPH - Three problems of Terraform
 
[BuildWithAI] Introduction to Gemini.pdf
[BuildWithAI] Introduction to Gemini.pdf[BuildWithAI] Introduction to Gemini.pdf
[BuildWithAI] Introduction to Gemini.pdf
 
Web Form Automation for Bonterra Impact Management (fka Social Solutions Apri...
Web Form Automation for Bonterra Impact Management (fka Social Solutions Apri...Web Form Automation for Bonterra Impact Management (fka Social Solutions Apri...
Web Form Automation for Bonterra Impact Management (fka Social Solutions Apri...
 
How to Check CNIC Information Online with Pakdata cf
How to Check CNIC Information Online with Pakdata cfHow to Check CNIC Information Online with Pakdata cf
How to Check CNIC Information Online with Pakdata cf
 
Simplifying Mobile A11y Presentation.pptx
Simplifying Mobile A11y Presentation.pptxSimplifying Mobile A11y Presentation.pptx
Simplifying Mobile A11y Presentation.pptx
 
Finding Java's Hidden Performance Traps @ DevoxxUK 2024
Finding Java's Hidden Performance Traps @ DevoxxUK 2024Finding Java's Hidden Performance Traps @ DevoxxUK 2024
Finding Java's Hidden Performance Traps @ DevoxxUK 2024
 
Polkadot JAM Slides - Token2049 - By Dr. Gavin Wood
Polkadot JAM Slides - Token2049 - By Dr. Gavin WoodPolkadot JAM Slides - Token2049 - By Dr. Gavin Wood
Polkadot JAM Slides - Token2049 - By Dr. Gavin Wood
 
WSO2's API Vision: Unifying Control, Empowering Developers
WSO2's API Vision: Unifying Control, Empowering DevelopersWSO2's API Vision: Unifying Control, Empowering Developers
WSO2's API Vision: Unifying Control, Empowering Developers
 
Less Is More: Utilizing Ballerina to Architect a Cloud Data Platform
Less Is More: Utilizing Ballerina to Architect a Cloud Data PlatformLess Is More: Utilizing Ballerina to Architect a Cloud Data Platform
Less Is More: Utilizing Ballerina to Architect a Cloud Data Platform
 
ChatGPT and Beyond - Elevating DevOps Productivity
ChatGPT and Beyond - Elevating DevOps ProductivityChatGPT and Beyond - Elevating DevOps Productivity
ChatGPT and Beyond - Elevating DevOps Productivity
 
DEV meet-up UiPath Document Understanding May 7 2024 Amsterdam
DEV meet-up UiPath Document Understanding May 7 2024 AmsterdamDEV meet-up UiPath Document Understanding May 7 2024 Amsterdam
DEV meet-up UiPath Document Understanding May 7 2024 Amsterdam
 
Choreo: Empowering the Future of Enterprise Software Engineering
Choreo: Empowering the Future of Enterprise Software EngineeringChoreo: Empowering the Future of Enterprise Software Engineering
Choreo: Empowering the Future of Enterprise Software Engineering
 
Navigating Identity and Access Management in the Modern Enterprise
Navigating Identity and Access Management in the Modern EnterpriseNavigating Identity and Access Management in the Modern Enterprise
Navigating Identity and Access Management in the Modern Enterprise
 
Design and Development of a Provenance Capture Platform for Data Science
Design and Development of a Provenance Capture Platform for Data ScienceDesign and Development of a Provenance Capture Platform for Data Science
Design and Development of a Provenance Capture Platform for Data Science
 
Introduction to Multilingual Retrieval Augmented Generation (RAG)
Introduction to Multilingual Retrieval Augmented Generation (RAG)Introduction to Multilingual Retrieval Augmented Generation (RAG)
Introduction to Multilingual Retrieval Augmented Generation (RAG)
 
CNIC Information System with Pakdata Cf In Pakistan
CNIC Information System with Pakdata Cf In PakistanCNIC Information System with Pakdata Cf In Pakistan
CNIC Information System with Pakdata Cf In Pakistan
 
Corporate and higher education May webinar.pptx
Corporate and higher education May webinar.pptxCorporate and higher education May webinar.pptx
Corporate and higher education May webinar.pptx
 
Six Myths about Ontologies: The Basics of Formal Ontology
Six Myths about Ontologies: The Basics of Formal OntologySix Myths about Ontologies: The Basics of Formal Ontology
Six Myths about Ontologies: The Basics of Formal Ontology
 
Exploring Multimodal Embeddings with Milvus
Exploring Multimodal Embeddings with MilvusExploring Multimodal Embeddings with Milvus
Exploring Multimodal Embeddings with Milvus
 

ppt ch10

  • 1. A+ Guide to IT Technical Support, 9th Edition Chapter 10 Maintaining Windows
  • 2. © Cengage Learning 2017 A+ Guide to IT Technical Support, 9th Edition Objectives • Set up and perform scheduled preventive maintenance tasks to keep Windows healthy • Prepare for disaster by keeping good backups of user data and Windows system files • Use commands to manage files and folders and how to use Disk Management to manage hard drives 2
  • 3. © Cengage Learning 2017 A+ Guide to IT Technical Support, 9th Edition Scheduled Preventive Maintenance • Preventive maintenance – Alleviates slow computer performance • Some regular tasks to perform – Verifying critical Windows settings – Update drivers and firmware – Patch management – Clean up the hard drive – Checking drive for errors – Move the virtual memory paging file 3
  • 4. © Cengage Learning 2017 A+ Guide to IT Technical Support, 9th Edition Verify Critical Windows Settings • Three Windows settings are critical for keeping a system protected – Explain importance to users so they do not change the settings – Windows Updates - verify updates and service packs are installed • Windows Updates should be configured to automatically allow updating – Antivirus/anti-malware software - should be set to scan regularly and up to date – Network security setting – ensure the security type is set for optimum firewall settings 4
  • 5. © Cengage Learning 2017 Update Drivers and Firmware • A few devices have firmware on the device that can be updated – Called flash firmware • To flash the firmware on a controller card: – Download the flash image file from the device manufacturer’s website – Click Browse and locate the file – Click Program Flash to begin the firmware update A+ Guide to IT Technical Support, 9th Edition 5
  • 6. © Cengage Learning 2017 Update Drivers and Firmware A+ Guide to IT Technical Support, 9th Edition 6 Figure 10-1 Use the device’s properties box to flash the firmware on some devices
  • 7. © Cengage Learning 2017 Patch Management • Guidelines for reading error messages or documentation: – The term x86 refers to 32-bit CPUs and OSs – All CPUs installed in personal computers today are hybrid processors that can process either 32 bits or 64 bits – The term IA64 refers specifically to 64-bit Intel processors – The term x64 refers to 64-bit OSs A+ Guide to IT Technical Support, 9th Edition 7
  • 8. © Cengage Learning 2017 Clean Up the Hard Drive • Delete unneeded files occasionally – Windows requires about 15% hard drive free space • Uses it for defragmenting drives, burning CDs and DVDs, and other tasks • Ways to improve drive performance and free up space: – Defragmenting the drive – Checking for errors – Compressing folders – Moving files and folders to other drives A+ Guide to IT Technical Support, 9th Edition 8
  • 9. © Cengage Learning 2017 Directory Structures • User Profile Namespace – when a user logs onto Windows a user profile is created – A collection of user data and settings – Consists of two general items • A user folder – created under the C:Users folder and contains a group of subfolders collectively called the user profile namespace • Ntuser.dat – file stored in the C:Usersusername folder A+ Guide to IT Technical Support, 9th Edition 9
  • 10. © Cengage Learning 2017 Directory Structures • Program Files • C:Program Files – where Windows stores program files unless you select a different location • In 64-bit versions of Windows: – 64-bit program files are stored in C:Program Files and 32-bit program files are stored in C:Program Files (x86) folder A+ Guide to IT Technical Support, 9th Edition 10
  • 11. © Cengage Learning 2017 Directory Structures • Folders for Windows Data – Registry location: C:WindowsSystem32config – Backup of the registry: C:WindowsSystem32configRegBack – Fonts: C:WindowsFonts – Temporary files: C:WindowsTemp – Offline files: stored in the client-side caching (CSC) folder which is C:WindowsCSC • Allows users to work with files in the folder when the computer is not connected to a corporate network A+ Guide to IT Technical Support, 9th Edition 11
  • 12. © Cengage Learning 2017 Use the Disk Cleanup Utility • Use the Windows Disk Cleanup utility to delete temporary files • To use: – Open Windows Explorer, right-click the volume that Windows is installed on, and select Properties – On the General tab, click Disk Cleanup – To see temporary system files that can also be deleted, click Clean up system files – If even more space is needed click the More Options to see what else could be deleted A+ Guide to IT Technical Support, 9th Edition 12
  • 13. © Cengage Learning 2017 Defrag the Hard Drive • Defragment: to rearrange fragments or parts of files so each file is stored in contiguous clusters • Two types of hard drives: – Magnetic hard disk drives (HDDs) – contain spinning platters • Windows automatically defrags once a week – Solid-state drives (SSDs) – contain flash memory • Has no moving parts so defrag does not improve read/write time • Defragmenting this type of drive is not recommended A+ Guide to IT Technical Support, 9th Edition 13
  • 14. © Cengage Learning 2017 Defrag the Hard Drive • Cluster (also called file allocation unit): group of whole sectors in a file system – Number of sectors in a cluster is fixed • A file is stored in whole clusters – Unused space at end of last cluster is called slack and is wasted free space • As files are written and deleted from a drive, clusters are used, released, and used again – Moving arm of drive may have to move all over a drive to collect all fragments of a file • Slows down performance • Solution is to defragment the drive A+ Guide to IT Technical Support, 9th Edition 14
  • 15. © Cengage Learning 2017 A+ Guide to IT Technical Support, 9th Edition Check the Hard Drive for Errors • Error checking utility: searches for bad sectors on a volume and recovers the data from them if possible • To use the error checking utility: – Right-click the drive and select Properties from the shortcut menu – Click the Tools tab and click Check (Check now in 7/Vista) – In the Error Checking dialog box, click Scan drive (in 7/Vista, check Automatically fix file system errors and Scan for and attempt recovery of bad sectors and Click Start) 15
  • 16. © Cengage Learning 2017 Free Up Space On the Drive • Uninstall software you no longer use • Move data off the drive – Consider moving videos, photos, and other data to an external hard drive or burning them to DVDs • Move programs off the drive – Uninstall a program and reinstall it on a second hard drive • Use drive or folder compression – It is not recommended to compress the volume on which Windows is stored A+ Guide to IT Technical Support, 9th Edition 16
  • 17. © Cengage Learning 2017 A+ Guide to IT Technical Support, 9th Edition Move the Virtual Memory Paging File • Virtual memory: a file used to enhance the amount of RAM in a system • To save space you can move virtual memory paging file – Pagefile.sys • Hidden file stored in C drive root directory – Move to another partition on the same or different drive • New drive speed should be equal to or greater than existing drive and should have plenty of free space (at least three times the amount of installed RAM) 17
  • 18. © Cengage Learning 2017 A+ Guide to IT Technical Support, 9th Edition Backup Procedures • Backup – Extra copy of a data or software file • Use if original file becomes damaged or destroyed • Ways to lose data – System failure, virus, file corruption, or some other problem • Never trust important data to only one media 18
  • 19. © Cengage Learning 2017 A+ Guide to IT Technical Support, 9th Edition Planning For Disaster Recovery • Decisions to make for a backup and recovery plan – Decide on backup destination – Decide on the backup software • Consider purchasing third-party backup software – Offers more features than Microsoft utility – Decide how simple or complex your backup strategy should be • Large organizations might require backups be documented daily, scheduled at certain times of the day or night, and recovery plans tested regularly 19
  • 20. © Cengage Learning 2017 Planning For Disaster Recovery • After backup plan is in place, test the recovery plan – Test the recovery process • Erase a file and use the recovery procedures to verify that you can restore the file from backup – Keep backups in a safe place and routinely test them • Should be kept under lock and key • In case of fire, keep backups off-site • Routinely verify backups are good by performing a test recovery of a backed-up file or folder A+ Guide to IT Technical Support, 9th Edition 20
  • 21. © Cengage Learning 2017 Back Up User Data with Windows 8 File History • Windows 8 File History backs up user data stored in several locations, including: – Libraries, user desktop, Internet Explorer favorites, contact folders and offline OneDrive files (for Microsoft accounts) • File History utility is available as a window on the Windows desktop or an app in the Windows 8 interface – For most control, use the window on the desktop A+ Guide to IT Technical Support, 9th Edition 21
  • 22. © Cengage Learning 2017 Back Up User Data with Windows 8 File History • To use: – Connect your backup device and open Control Panel in classic view, then click File History – To turn on File History, click Turn on – To manage backups, click Advanced settings – On the Advanced Settings window, set how often backups are made and how long old backups should be kept • You can also view a history of events and clean up old backups to free up space A+ Guide to IT Technical Support, 9th Edition 22
  • 23. © Cengage Learning 2017 Back Up User Data with Windows 8 File History A+ Guide to IT Technical Support, 9th Edition 23 Figure 10-8 Turn on and off File History and control its settings
  • 24. © Cengage Learning 2017 Back Up User Data with Windows 8 File History • Use File History to Recover a Corrupted or Lost File or Folder – To recover items from File History, click Restore personal files in the File History window – Use left/right arrow keys on either side of the green button at the bottom of the window to select a backup and drill down into a backup to find the file or folder – Select an item and click Restore button • To save in a different location, right-click the Restore button and click Restore to A+ Guide to IT Technical Support, 9th Edition 24
  • 25. © Cengage Learning 2017 Back Up User Data with Windows 8 File History A+ Guide to IT Technical Support, 9th Edition 25 Figure 10-9 Drill down into backups to find what you want to restore
  • 26. © Cengage Learning 2017 Windows 7: Use Windows 7 Backup and Restore • Back up the Windows Volume – Called the system image • Back up user data – 1. Open the Backup and Restore window – 2. Select the media to hold the backup – 3. In the next box, select Let me choose so you can select the folder to backup, then click Next – 4. In the next box, select the libraries and folders you want to back up, click Next to continue A+ Guide to IT Technical Support, 9th Edition 26
  • 27. © Cengage Learning 2017 Windows 7: Use Windows 7 Backup and Restore • Back up user data (cont’d) – 1. 5. Verify the correct folders and libraries are selected • You can also change the frequency in this step – 6. Review your backup settings and click Save settings and run backup A+ Guide to IT Technical Support, 9th Edition 27
  • 28. © Cengage Learning 2017 Windows 7: Use Windows 7 Backup and Restore • Recover Backed Up Items – 1. Make the backup media available to computer – 2. Open Backup and Restore and click Restore my files – 3. Use one of three buttons to locate the file or folder • Follow directions on-screen to restore • To restore a previous version of a file or folder: – 1. Copy the corrupted file or folder to a new location – 2. Right click the file or folder and select Restore previous version – 3. Select the version you want and click Restore A+ Guide to IT Technical Support, 9th Edition 28
  • 29. © Cengage Learning 2017 Back Up Windows System Files • Windows System Protection – automatically backs up system files and stores them at regular intervals • Restore point – Condition at time a snapshot taken – Includes Windows system files • Restore points are taken at least every 24 hours • Can use up to 15 percent of disk space – If disk space gets too low, restore points are no longer made • Can manually create restore point at any time using the System Protection tab of System Properties A+ Guide to IT Technical Support, 9th Edition 29
  • 30. © Cengage Learning 2017 Back Up Windows System Files A+ Guide to IT Technical Support, 9th Edition 30 Figure 10-14 Make sure System Protection is turned on for the volume on which Windows is installed
  • 31. © Cengage Learning 2017 A+ Guide to IT Technical Support, 9th Edition Back Up Windows System Files • Apply a restore point – System Restore restores the system to its condition at the time a restore point is made – User data not altered – Can affect installed software, hardware, user settings, and OS configuration settings – Changes made to settings are lost after restore point is created – Always use most recent restore point capable of fixing the problem 31
  • 32. © Cengage Learning 2017 A+ Guide to IT Technical Support, 9th Edition Back Up Windows System Files • To return the system to a previous restore point: – Click Start, type rstrui.exe in the Search box and press Enter • System Restore box opens, click Next – Select a restore point and click Next – Windows asks you to confirm, click Finish and respond to warning box 32
  • 33. © Cengage Learning 2017 Back Up Windows System Files • Points to remember about system restore – Limitations • System Protection must be turned on • Recovers from errors only if registry somewhat intact • Process cannot remove virus or worm infection • Process might create a new problem • Process might make many changes to a system • Restore points kept in a hidden folder on the hard drive • Viruses and malware sometimes hide in restore points • Can launch System Restore using startup recovery tools A+ Guide to IT Technical Support, 9th Edition 33
  • 34. © Cengage Learning 2017 Windows 8 Custom Refresh Image • Custom refresh image – an image of the entire Windows volume including the Windows installation – Windows 8 apps, desktop applications, and user settings and data • Best time to create a refresh image: – Right after you’ve installed Windows, hardware, applications, and user accounts • Image is stored in a file named CustomRefresh.wim in the folder you specify – WIM file uses the Windows Imaging File format A+ Guide to IT Technical Support, 9th Edition 34
  • 35. © Cengage Learning 2017 Windows 8 Custom Refresh Image • Steps to create a Windows 8 custom refresh image: – Open an elevated command prompt window • Press Win+X and click Command Prompt (Admin) – Enter this command, substituting drive and folder: • recimg /createimage D:MyImage • The image and its location are registered as the active recovery image • The recimg command can also be used to manage refresh images A+ Guide to IT Technical Support, 9th Edition 35
  • 36. © Cengage Learning 2017 Windows 7: Windows 7 System Image • To create a Windows 7 system image, click Create a system image in the Backup and Restore window and follow directions on screen • Points to keep in mind: – A system image includes the entire drive C: or other drive on which Windows is installed – A system image must always be created on an internal or external hard drive – Don’t depend just on the system image as your backup A+ Guide to IT Technical Support, 9th Edition 36
  • 37. © Cengage Learning 2017 Windows 7: Windows 7 System Image • Points to keep in mind (cont’d): – You can create a system image any time after Windows is installed, and then you can use this image to recover from a failed hard drive A+ Guide to IT Technical Support, 9th Edition 37
  • 38. © Cengage Learning 2017 Managing Files, Folders, and Storage Devices • This section of the chapter covers: – Managing files and folders using commands in a command prompt window – Managing hard drive partitions and volumes using the Disk Management utility A+ Guide to IT Technical Support, 9th Edition 38
  • 39. © Cengage Learning 2017 How Partitions and File Systems Work • All data is stored on a hard drive in sectors (records) • Each sector on drive is the same size (usually 512 bytes) • Low-level formatting: A process (usually performed at the factory) that electronically creates the hard drive tracks and sectors and tests for bad spots – Size of the sector and total number of sectors determine capacity – Today’s drive capacities are measured in GB (gigabytes) or TB (terabytes) A+ Guide to IT Technical Support, 9th Edition 39
  • 40. © Cengage Learning 2017 How Partitions and File Systems Work A+ Guide to IT Technical Support, 9th Edition 40 Figure 10-20 A magnetic hard drive is divided into concentric circles called tracks, and tracks are divided into sectors
  • 41. © Cengage Learning 2017 A+ Guide to IT Technical Support, 9th Edition How Partitions and File Systems Work • Partitions - hard drives are further divided into one or more partitions (can have up to four in Windows) – Maps of the partitions are kept in a partition table in the first sector of the drive called the Master Boot Record (MBR) – Can have up to three primary partitions (also called volumes) – A fourth partition (called extended partition) can hold one or more volumes called logical drives 41
  • 42. © Cengage Learning 2017 A+ Guide to IT Technical Support, 9th Edition How Partitions and File Systems Work 42 Figure 10-20 A hard drive with four partitions; the fourth partition is an extended partition
  • 43. © Cengage Learning 2017 A+ Guide to IT Technical Support, 9th Edition How Partitions and File Systems Work • Partitions (cont’d) – GPT partitions – the Globally Unique Identifier Partition Table (GUID or GPT) system can support up to 128 partitions • Required for drives larger than 2 TB • Does not use extended partitions or logical volumes • The bootable partition is not called an active partition • First sector in a GPT system contains the protective MBR, which provides information to legacy software that does not support GPT • All partitions are tracked in a single partition table, stored in the GPT header 43
  • 44. © Cengage Learning 2017 A+ Guide to IT Technical Support, 9th Edition How Partitions and File Systems Work 44 Figure 10-21 A hard drive using GPT
  • 45. © Cengage Learning 2017 A+ Guide to IT Technical Support, 9th Edition How Partitions and File Systems Work • File System - before a drive can be used it must be: – Assigned a drive letter (C: or D:) – Formatted using a file system • File system is overall structure an OS uses to name, store, and organize files on a drive • Windows 8/7 supports three types of file systems: NTFS, FAT32, and exFAT • File systems supported by Windows for volumes that don’t hold the Windows installation: – NTFS – uses smaller allocation unit or cluster sizes than FAT32 (more efficient) 45
  • 46. © Cengage Learning 2017 How Partitions and File Systems Work • File systems supported by Windows for volumes that don’t hold the Windows installation (cont’d): – ReFS – Resilient File System (ReFS) designed to improve on the NTFS file system by offering better fault tolerance and allowing for better compatibility with virtualization and data redundancy – exFAT – use for large external storage devices to be used with other operating systems – FAT32 – use for small hard drives or USB flash drives – CDFS(Compact Disc File System) and UDF – CDFS is an older file system used by optical discs and is being replaced by UDF (Universal Disc Format) A+ Guide to IT Technical Support, 9th Edition 46
  • 47. © Cengage Learning 2017 A+ Guide to IT Technical Support, 9th Edition How Partitions and File Systems Work • Windows assigns two functions to partitions: – Active partition – the bootable partition that startup UEFI/BIOS turns to when searching for an OS • In GPT system, it is called the EFI System Partition (ESP) • In Windows, the MBR active partition or the ESP System Partition is called the system partition – Boot partition – partition where Windows OS is stored 47
  • 48. © Cengage Learning 2017 Commands To Manage Files and Folders • Command prompt window – Open by pressing Win+X and click Command Prompt • Can also enter cmd.exe in the search box A+ Guide to IT Technical Support, 9th Edition Figure 10-24 Use the exit command to close the command prompt window 48
  • 49. © Cengage Learning 2017 Commands to Manage Files and Folders • Windows has two levels of command prompt windows – Standard window – default directory is the currently logged on user’s folder • Commands requiring administrative privileges will not work – Elevated window – requires the user to logon as an administrator • The word “administrator” will appear in the title bar • Default directory will be C:Windowssystem32 A+ Guide to IT Technical Support, 9th Edition 49
  • 50. © Cengage Learning 2017 Commands to Manage Files and Folders A+ Guide to IT Technical Support, 9th Edition 50 Figure 10-25 An elevated command prompt window has administrative privileges
  • 51. © Cengage Learning 2017 Commands to Manage Files and Folders • Tips for working in a command prompt window: – Type cls and press Enter to clear the window – Press the up arrow to retrieve the last command – Press the right arrow to retrieve the last command line one character at a time – Press Ctrl+C, Ctrl+Break or Ctrl+Pause to terminate a command before it is finished – Type exit and press Enter to close the window A+ Guide to IT Technical Support, 9th Edition 51
  • 52. © Cengage Learning 2017 A+ Guide to IT Technical Support, 9th Edition Commands To Manage Files and Folders • File naming conventions – Filename and file extension characters • Letters a through z and numbers 0 through 9 • Characters: _ ^ $~ ! # % & – { } ( ) @ ' ` – Filename with spaces: • Enclose filename in double quotation marks • Wildcard characters in command lines – Question mark (?): wildcard for one character – Asterisk (*): wildcard for one or more characters 52
  • 53. © Cengage Learning 2017 A+ Guide to IT Technical Support, 9th Edition Commands To Manage Files and Folders • help or <command name> /? Table 10-2 Sample help commands 53
  • 54. © Cengage Learning 2017 Commands to Manage Files and Folders • dir [<filename>] [/p] [/s] [/w] – List files and directories A+ Guide to IT Technical Support, 9th Edition 54 Table 10-3 Sample dir commands
  • 55. © Cengage Learning 2017 A+ Guide to IT Technical Support, 9th Edition Commands To Manage Files and Folders • md [drive:]path – Creates a subdirectory under a directory • cd [drive:]path or cd.. – Changes current default directory – Use .. after CD to move from child directory to its parent directory • rd [drive:]path – Removes a subdirectory • Directory must contain no files • Directory must contain no subdirectories • Directory must not be current directory 55
  • 56. © Cengage Learning 2017 Commands To Manage Files and Folders • del or erase <filename> – Erases files or groups of files • ren <filename1> <filename2> – Renames a file • copy <source> [<destination>] [/v] [/y] – Useful switches or parameters • /v: size of each new file compared to the size of original file • /y: confirmation message does not appear asking to confirm before overwriting a file A+ Guide to IT Technical Support, 9th Edition 56
  • 57. © Cengage Learning 2017 A+ Guide to IT Technical Support, 9th Edition Commands To Manage Files and Folders • recover <filename> – Attempts to recover a file when parts corrupted • expand [/d] <source> [<destination>] – Extracts files from compressed distribution files, which are often used to distribute files for software installations 57 Table 10-4 Sample expand commands
  • 58. © Cengage Learning 2017 A+ Guide to IT Technical Support, 9th Edition Commands To Manage Files and Folders • xcopy <source> [<destination>] [/s] [/c] [/y] [/d:date] 58 Table 10-5 Sample Xcopy commands
  • 59. © Cengage Learning 2017 A+ Guide to IT Technical Support, 9th Edition Commands To Manage Files and Folders • robocopy <source> [<destination>] [/s] [/e] [/log:filename] [/log+:filename] [/move] [/purge] – Robust File Copy command Table 10-6 Sample robocopy commands 59
  • 60. © Cengage Learning 2017 A+ Guide to IT Technical Support, 9th Edition Commands To Manage Files and Folders • chkdsk [drive:] [/f] [/r] – Fixes file system errors – Recovers data from bad sectors Figure 10-27 Lost and cross-linked clusters 60
  • 61. © Cengage Learning 2017 A+ Guide to IT Technical Support, 9th Edition Commands To Manage Files and Folders • defrag [drive:] [/C] – Examines a drive for fragmented files • Rewrites fragmented files in contiguous clusters Table 10-7 Sample defrag commands 61
  • 62. © Cengage Learning 2017 A+ Guide to IT Technical Support, 9th Edition Commands To Manage Files and Folders • format <drive:> [/v:label] [/q] [fs:<filesystem>] – Used to format a hard drive or other storage device Table 10-8 Sample format commands 62
  • 63. © Cengage Learning 2017 Commands To Manage Files and Folders • shutdown [/m computername] [/i] [/r] [/s] [/f] [/t xx] – Shut down the local computer or a remote computer A+ Guide to IT Technical Support, 9th Edition 63 Figure 10-9 Sample shutdown commands
  • 64. © Cengage Learning 2017 Commands To Manage Files and Folders • Windows PowerShell – designed to replace the command prompt utility – Users enter commands to be executed – Processes objects called cmdlets – Contains thousands of cmdlets and technicians can program their own cmdlets – To open Windows 8 PowerShell, press Win+X, click Run, type powershell in the Run box, press Enter A+ Guide to IT Technical Support, 9th Edition 64
  • 65. © Cengage Learning 2017 Use Disk Management To Manage Hard Drives • Disk Management is the primary tool for managing hard drives – Manage partitions, prepare a new drive for first use, mount a drive, use Windows dynamic disks, or troubleshoot problems with the hard drive • Resize, Create, and Delete Partitions – To open Disk Management, use one of these methods: • Press Win+X and click Disk Management • Press Win+S, type diskmgmt.msc, and press Enter A+ Guide to IT Technical Support, 9th Edition 65
  • 66. © Cengage Learning 2017 Use Disk Management To Manage Hard Drives A+ Guide to IT Technical Support, 9th Edition 66 Figure 10-28 Shrink a volume to make room for a new partition
  • 67. © Cengage Learning 2017 Use Disk Management To Manage Hard Drives • Prepare a drive for first use – Step 1: Initialize the Disk • When initialized, Windows identifies the disk as a basic disk, which is a single hard drive that works independently of other hard drives – Step 2: Create a Volume and Format It with a File System • Right-click in the unallocated space, select New Simple Volume from the shortcut menu, and follow directions on-screen A+ Guide to IT Technical Support, 9th Edition 67
  • 68. © Cengage Learning 2017 A+ Guide to IT Technical Support, 9th Edition Use Disk Management To Manage Hard Drives • How to Mount a Drive – Mounted drive is a volume accessible by a folder on another volume • Folder has more available space – Mount point: C:Projects folder Figure 10-31 The C:Projects folder is the mount point for the mounted drive 68
  • 69. © Cengage Learning 2017 Use Disk Management To Manage Hard Drives • Windows Dynamic Disks – Several dynamic disks can work together to collectively present a single dynamic volume – Data to configure each hard drive is stored in a disk management database (resides in last 1 MB of space on each hard drive) – Better reliability, spanning, stripping (RAID 0) to improve performance, mirror two hard drives for fault tolerance (RAID 1) for XP A+ Guide to IT Technical Support, 9th Edition 69
  • 70. © Cengage Learning 2017 Use Disk Management To Manage Hard Drives • Windows dynamic disks (cont’d.) – Disk Management converts two or more basic disks to dynamic disks A+ Guide to IT Technical Support, 9th Edition 70 Figure 10-35 Convert a basic disk to a dynamic disk
  • 71. © Cengage Learning 2017 A+ Guide to IT Technical Support, 9th Edition Use Disk Management To Manage Hard Drives • Use Disk Management to Troubleshoot Hard Drive Problems – Drive and volume statuses: • Healthy • Failed • Online • Active • EFI System Partition • Unallocated • Formatting • Basic • Dynamic 71
  • 72. © Cengage Learning 2017 A+ Guide to IT Technical Support, 9th Edition Windows Storage Spaces • With Storage Spaces, you can create a storage pool using any number of internal and external backup drives – Create one or more virtual drives, called spaces, from this pool – Appear as normal drives in File Explorer • Storage spaces is designed for resiliency – Resistance of a configuration against data loss in the event of drive failure 72
  • 73. © Cengage Learning 2017 A+ Guide to IT Technical Support, 9th Edition Windows Storage Spaces • Storage options: – Simple – Two-way mirroring – Three-way mirroring – Parity • Thin provisioning – a feature that can configure a space to have more virtual storage than the physical drives actually offer 73
  • 74. © Cengage Learning 2017 A+ Guide to IT Technical Support, 9th Edition Summary • Regular preventive maintenance improves performance and troubleshooting – Verify Windows settings, defragment hard drives, check drive for errors, reduce startup process to essentials, and free up hard drive space • Windows offers may preventative maintenance tools • Plan for disaster recovery in the event a hard drive fails by performing routine backups of data and system files • Windows 8 File History and Windows 7 Backup and Restore can be used to schedule routine backups of user data files 74
  • 75. © Cengage Learning 2017 A+ Guide to IT Technical Support, 9th Edition Summary • System Protection creates restore points • A Windows 8 custom refresh image backs up the entire Windows volume • A hard drive is divided into sectors, blocks, and partitions • The MBR partitioning system requires legacy BIOS and a 32-bit OS • The GPT partitioning system requires UEFI and a 64-bit OS 75
  • 76. © Cengage Learning 2017 Summary • Commands useful to manage files, folders and storage media include help, dir, del, ren, copy, recover, expand, xcopy, robocopy, MD, CD, RD, chkdsk, defrag, and format • Use Disk Management to manage hard drives and partitions • Windows 8 Storage Spaces is expected to replace the Windows solution for software RAID and can support thin provisioning A+ Guide to IT Technical Support, 9th Edition 76