SlideShare a Scribd company logo
1 of 9
Tiling a floor can seem a daunting step for the amateurDIY-er, but it
isn’t as tough as it might seem…
Hard tiling is an attractive and functionalflooring choice for bathroomsand kitchens, and even
hallwaysand conservatories. They’re great for high-traffic areas, as they’re hard-wearing, as
well as being easy-clean. If you’re already a bit of a tiling pro, learn some more tiling tips from
our “Tips to take your tiling skillsto the next level” blog piece.
How to tile a floor, safety first:
For safety, make sure you wear strong, heavy-dutygloves to protect yourhands – removing old
tiling can be a nasty business, especially any broken shards. Also make sure to wear protective
goggles to guard against flying tile shards, and a dust mask.
How to tile a floor step ONE – preparation & purchase
When measuring the area, make sure to include any awkward, jutting areas such as alcoves
and round up to the nearest whole number. Tiles come in packs, and you’ll need to find out
how much surface area each pack covers.
Your hard tiling can be laidonto any dry and level concrete floor. If it isn’t level, you’llneed to
even it out. You can lay tiles over existing vinyl or quarry tiles, though you need to make sure
they are firmly and properly laid. If you’re laying over vinyl tiling, though, you should coat the
surface with primer. Ideallyyou should use an adhesive specificallyfor the purpose, especially
if you’re laying tiles onto wood or concrete.
If you’re working on a timber floor, you will first have to strengthen it – use 13mm-thick
exterior grade plywood,and fix in place with 4mm gauge 25mm screws or ring-shanked nailsat
30cm intervals.
How to tile a floor step TWO: layout
The “key tile” (the first tile that you’ll lay) will determine the whole layoutof your tiling, so it’s
important to get its positioningright. You have to start pretty centrally in yourroom and work
out in each direction, as most rooms aren’t perfect squares – if you started at the edge you’d
end up with a real mess.
From the centre of your room (the centre of the key tile), dry-lay a row of tiles from one of
the centre lines to the wall. Do you end up with a tiny slither of tile? If you do, you need to
reassess – this won’t look good. If you’re in this position, move your whole line the width of
one tile away from this wall. Even if you end up with 1/3 tiles at each end, this will look better
than an untidyslither of tile at the skirting boards.
When you’ve got this line right, carry on dry-laying – from this centre line, now go in the
opposite direction, and then at right angles to it (ultimately,bisecting yourcentral tile in a
cross shape). When you’ve laidall this out, move your key tile around slightly until there’s a
gap of around the size of half a tile around the edge of the whole room. Once your key tile is
set, mark its positionwith chalk or another faint but visiblemarking.
You’llneed to make sure all edge tiles are cut to shape at this stage, so now is the time to
mark these up and cut them down.
How to tile a floor step THREE: beginning to tile
BEST BUY: tile spacers. If you buy tile spacers to help you here, your finished product is going
to look so much more professional.
Start with the key tile and work out from here towards one of the walls. Bear in mind, when
choosing your direction, that you shouldn’t walk on your newly laidtiles for 24 hours. Make
sure you’ve left yourself a way to escape! Alternatively,you could just tile half a room per day,
so the room isn’t fully out-of-action.
Spread out around a metres-worth of adhesivein the centre of your room. Using a spreader,
or notched trowel, spread it evenly across the square metre of surface. The spreader will leave
just the right amount of adhesive to make the tiles stick, but make sure you can just about see
your markings representing the locationof the key tile. Lay your first tile into position,twisting
it slightly as you go. Thisgets rid of any air bubbles that may be stuck as you lower it, and
ensures the tile beds properly into the adhesive.
Using plastic spacers, work out from the key tile in one direction towards the wall. Every
metre or two, check that yourfloor is level using a spirit measure. Once this row is complete,
do the same at right angles, so your tilingcriss-crosses the room from the key tile. Work in
rows in one corner of the room, completinga quarter.
Carry on laying untilyou’ve covered the floor, excepting the cut tiles needed for the edges.
At this stage wipe down all your tiles to make sure no adhesive sticks permanently, ruining
your lovely new tiling.
Make sure to scrape up any adhesive where the cut edge tiles will go – you need your
surface to remain flat. You now need to wait 24 hours before the final steps.
How to tile a floor step FOUR: 24 hours later
Having cut your tiles (using a lever-action flat-bed cutter or heavy-duty tile cutter), you can
now fill the edging. Squeeze a layer of adhesive onto the back of each tile then press it into
position,again leaving it 24 hours to set.
How to tile a floor step FIVE: grouting
Making sure the adhesive is solidly set before you move onto grouting. Now make sure to
make up your grout well (most require mixing with water) – any lumpswill show an unequal
and unprofessionalsurface in your end result. Leave your grout to sit for 2-3 minutesonce
made up, unless otherwise recommended, as this can help break down lumps and release air
bubbles. N.B: for the edges of the room you are better to use a flexible sealant rather than the
grout, to allowfor movement and flexibilityas the tile meets the wall.
If you’re using glazed tiles, you can simply pourthe grout over and use a grout spreader with
a rubber edge to squeegee the grout into place. If you have non-glazed tiles you’llneed to be
more careful – mix a very dry grout up and gently put it into each crack, trying to avoid getting
any grout onto the tile surface to avoidstains.
As the grout begins to set, go over it with a wooden dowel or striking tool, pressing the grout
firmly to fill any gaps or air pockets. Carry a damp sponge and wipe up any mess as you go. All
of the grout has to be compacted, without gaps, to ensure water resistance.
Once the grout is hard (approximately an hour), wipe all over again with a damp cloth,
focussing on each tile one-by-one to make sure no grouting stains have escaped your
attention.
Try to avoid using the floor for 48 hours if at allpossible; otherwise be gentle and delicatefor
this period.
Seal around the corners of the room with a flexible sealant of the same colouras your grout,
and there you have it – one floor tiled!
For more please see http://www.hss.com

More Related Content

What's hot

Paint application
Paint applicationPaint application
Paint applicationmichael mcewan
 
Foundation and plain paper power point
Foundation and plain paper power pointFoundation and plain paper power point
Foundation and plain paper power pointDjCurrie
 
How to Install Allure GripStrip Flooring - Official Installation Instructions...
How to Install Allure GripStrip Flooring - Official Installation Instructions...How to Install Allure GripStrip Flooring - Official Installation Instructions...
How to Install Allure GripStrip Flooring - Official Installation Instructions...AllureFlooring
 
Assignment for niro visit mar 2018
Assignment for niro visit mar 2018Assignment for niro visit mar 2018
Assignment for niro visit mar 2018Sze Ting Kuek
 
Wall and Floor Tiling - Perimeter and Area
Wall and Floor Tiling - Perimeter and AreaWall and Floor Tiling - Perimeter and Area
Wall and Floor Tiling - Perimeter and AreaDjCurrie
 
tray definition and classification
tray definition and classification tray definition and classification
tray definition and classification Shanai Attie
 
Special tray prosthodontics
Special tray prosthodonticsSpecial tray prosthodontics
Special tray prosthodonticsShazlana Raheem
 
Catalogue
CatalogueCatalogue
CatalogueBunthin
 
9. How to install asphalt roofing on a shed
9. How to install asphalt roofing on a shed9. How to install asphalt roofing on a shed
9. How to install asphalt roofing on a shedicreatablesseo
 
4. hand out
4. hand out4. hand out
4. hand outshammasm
 
Product tips & tricks 1
Product tips & tricks 1Product tips & tricks 1
Product tips & tricks 1Margie Lewis
 
How to build a retaining wall
How to build a retaining wallHow to build a retaining wall
How to build a retaining wallPraveen Sudarsan
 

What's hot (20)

Paint application
Paint applicationPaint application
Paint application
 
Surface defects
Surface defectsSurface defects
Surface defects
 
Foundation and plain paper power point
Foundation and plain paper power pointFoundation and plain paper power point
Foundation and plain paper power point
 
8.boxing impressions and making casts
8.boxing impressions and making casts8.boxing impressions and making casts
8.boxing impressions and making casts
 
How to Install Allure GripStrip Flooring - Official Installation Instructions...
How to Install Allure GripStrip Flooring - Official Installation Instructions...How to Install Allure GripStrip Flooring - Official Installation Instructions...
How to Install Allure GripStrip Flooring - Official Installation Instructions...
 
Stock trays
Stock traysStock trays
Stock trays
 
Wall tiling
Wall tilingWall tiling
Wall tiling
 
Assignment for niro visit mar 2018
Assignment for niro visit mar 2018Assignment for niro visit mar 2018
Assignment for niro visit mar 2018
 
Wall and Floor Tiling - Perimeter and Area
Wall and Floor Tiling - Perimeter and AreaWall and Floor Tiling - Perimeter and Area
Wall and Floor Tiling - Perimeter and Area
 
tray definition and classification
tray definition and classification tray definition and classification
tray definition and classification
 
Special tray prosthodontics
Special tray prosthodonticsSpecial tray prosthodontics
Special tray prosthodontics
 
Coat and finishes c3
Coat and finishes c3Coat and finishes c3
Coat and finishes c3
 
Catalogue
CatalogueCatalogue
Catalogue
 
9. How to install asphalt roofing on a shed
9. How to install asphalt roofing on a shed9. How to install asphalt roofing on a shed
9. How to install asphalt roofing on a shed
 
4. hand out
4. hand out4. hand out
4. hand out
 
Floor Tape & Paints
Floor Tape & PaintsFloor Tape & Paints
Floor Tape & Paints
 
8.boxing impressions and making casts
8.boxing impressions and making casts8.boxing impressions and making casts
8.boxing impressions and making casts
 
Product tips & tricks 1
Product tips & tricks 1Product tips & tricks 1
Product tips & tricks 1
 
How to build a retaining wall
How to build a retaining wallHow to build a retaining wall
How to build a retaining wall
 
Deck marking
Deck markingDeck marking
Deck marking
 

Viewers also liked

Topic 9 finishes
Topic 9   finishesTopic 9   finishes
Topic 9 finishesChiety Lasim
 
flooring and its types
flooring and its typesflooring and its types
flooring and its typesLakshay Sharma
 
Finishing works (Building Construction)
Finishing works (Building Construction)Finishing works (Building Construction)
Finishing works (Building Construction)Zairul Zaiky
 
Blame 009
Blame 009Blame 009
Blame 009comicgo
 
CURRICULUM VITAE OMAN (1)
CURRICULUM VITAE OMAN (1)CURRICULUM VITAE OMAN (1)
CURRICULUM VITAE OMAN (1)oman ana
 
Handmade Ceramic Wall and Backsplash Tile
Handmade Ceramic Wall and Backsplash TileHandmade Ceramic Wall and Backsplash Tile
Handmade Ceramic Wall and Backsplash Tilehifire
 
6710 128 power_point 1_
6710 128 power_point 1_6710 128 power_point 1_
6710 128 power_point 1_Gordon Turner
 
The art of tile
The art of tileThe art of tile
The art of tileSalman Asif
 
Kohler Water Tile Cleaning Instructions
Kohler Water Tile Cleaning Instructions Kohler Water Tile Cleaning Instructions
Kohler Water Tile Cleaning Instructions Living180University
 
Suretile Product Presentation
Suretile Product PresentationSuretile Product Presentation
Suretile Product PresentationMark Sykes
 
Historic West End: "Winston-Salem's Front Porch"
Historic West End: "Winston-Salem's Front Porch"Historic West End: "Winston-Salem's Front Porch"
Historic West End: "Winston-Salem's Front Porch"echidesi
 

Viewers also liked (12)

Topic 9 finishes
Topic 9   finishesTopic 9   finishes
Topic 9 finishes
 
flooring and its types
flooring and its typesflooring and its types
flooring and its types
 
Finishing works (Building Construction)
Finishing works (Building Construction)Finishing works (Building Construction)
Finishing works (Building Construction)
 
Blame 009
Blame 009Blame 009
Blame 009
 
Book Hotel
Book HotelBook Hotel
Book Hotel
 
CURRICULUM VITAE OMAN (1)
CURRICULUM VITAE OMAN (1)CURRICULUM VITAE OMAN (1)
CURRICULUM VITAE OMAN (1)
 
Handmade Ceramic Wall and Backsplash Tile
Handmade Ceramic Wall and Backsplash TileHandmade Ceramic Wall and Backsplash Tile
Handmade Ceramic Wall and Backsplash Tile
 
6710 128 power_point 1_
6710 128 power_point 1_6710 128 power_point 1_
6710 128 power_point 1_
 
The art of tile
The art of tileThe art of tile
The art of tile
 
Kohler Water Tile Cleaning Instructions
Kohler Water Tile Cleaning Instructions Kohler Water Tile Cleaning Instructions
Kohler Water Tile Cleaning Instructions
 
Suretile Product Presentation
Suretile Product PresentationSuretile Product Presentation
Suretile Product Presentation
 
Historic West End: "Winston-Salem's Front Porch"
Historic West End: "Winston-Salem's Front Porch"Historic West End: "Winston-Salem's Front Porch"
Historic West End: "Winston-Salem's Front Porch"
 

Similar to How to tile a floor

How to tile a floor and wall
How to tile a floor and wallHow to tile a floor and wall
How to tile a floor and wallHSS Hire
 
How to sand a floor
How to sand a floorHow to sand a floor
How to sand a floorHSS Hire
 
Ceramic tiles for worktops
Ceramic tiles for worktopsCeramic tiles for worktops
Ceramic tiles for worktopsPraveen Sudarsan
 
Tips for replacing bathroom tiles
Tips for replacing bathroom tilesTips for replacing bathroom tiles
Tips for replacing bathroom tilesashleygibson234
 
Replace broken tiles
Replace broken tilesReplace broken tiles
Replace broken tilesZulaiha Amaria
 
Lay carpet tiles
Lay carpet tilesLay carpet tiles
Lay carpet tilesZulaiha Amaria
 
Laying Terracotta Floor Tiles
Laying Terracotta Floor TilesLaying Terracotta Floor Tiles
Laying Terracotta Floor Tileslarrycotcher
 
How To Repair And Replace Broken Bathroom Ceramic Tiles
How To Repair And Replace Broken Bathroom Ceramic TilesHow To Repair And Replace Broken Bathroom Ceramic Tiles
How To Repair And Replace Broken Bathroom Ceramic TilesOttawa Tile
 
Artex and plaster
Artex and plasterArtex and plaster
Artex and plasterZulaiha Amaria
 
Painting a ceiling
Painting a ceilingPainting a ceiling
Painting a ceilingZulaiha Amaria
 
Copy of Plastering.pptx
Copy of Plastering.pptxCopy of Plastering.pptx
Copy of Plastering.pptxSantoshreddy B
 
Interior painting
Interior paintingInterior painting
Interior paintingZulaiha Amaria
 
Wallpapering techniques
Wallpapering techniquesWallpapering techniques
Wallpapering techniquesZulaiha Amaria
 
How to remove a wallpaper
How to remove a wallpaperHow to remove a wallpaper
How to remove a wallpaperGilbert Kiprotich
 

Similar to How to tile a floor (20)

Wall tiling
Wall tilingWall tiling
Wall tiling
 
How to tile a floor and wall
How to tile a floor and wallHow to tile a floor and wall
How to tile a floor and wall
 
Laying Floor Tiles: A DIY How-to Guide
Laying Floor Tiles: A DIY How-to GuideLaying Floor Tiles: A DIY How-to Guide
Laying Floor Tiles: A DIY How-to Guide
 
How to sand a floor
How to sand a floorHow to sand a floor
How to sand a floor
 
Ceramic tiles for worktops
Ceramic tiles for worktopsCeramic tiles for worktops
Ceramic tiles for worktops
 
Tips for replacing bathroom tiles
Tips for replacing bathroom tilesTips for replacing bathroom tiles
Tips for replacing bathroom tiles
 
Replace broken tiles
Replace broken tilesReplace broken tiles
Replace broken tiles
 
Lay carpet tiles
Lay carpet tilesLay carpet tiles
Lay carpet tiles
 
Laying Terracotta Floor Tiles
Laying Terracotta Floor TilesLaying Terracotta Floor Tiles
Laying Terracotta Floor Tiles
 
How To Repair And Replace Broken Bathroom Ceramic Tiles
How To Repair And Replace Broken Bathroom Ceramic TilesHow To Repair And Replace Broken Bathroom Ceramic Tiles
How To Repair And Replace Broken Bathroom Ceramic Tiles
 
Artex and plaster
Artex and plasterArtex and plaster
Artex and plaster
 
How to Grout Floor Tiles Easily
How to Grout Floor Tiles EasilyHow to Grout Floor Tiles Easily
How to Grout Floor Tiles Easily
 
Painting a ceiling
Painting a ceilingPainting a ceiling
Painting a ceiling
 
Artex and plaster
Artex and plasterArtex and plaster
Artex and plaster
 
Copy of Plastering.pptx
Copy of Plastering.pptxCopy of Plastering.pptx
Copy of Plastering.pptx
 
Interior painting
Interior paintingInterior painting
Interior painting
 
cereamic
cereamiccereamic
cereamic
 
Wallpapering techniques
Wallpapering techniquesWallpapering techniques
Wallpapering techniques
 
Installing wallpaper
Installing wallpaperInstalling wallpaper
Installing wallpaper
 
How to remove a wallpaper
How to remove a wallpaperHow to remove a wallpaper
How to remove a wallpaper
 

More from HSS Hire

Colour wheel
Colour wheelColour wheel
Colour wheelHSS Hire
 
How to install guttering
How to install gutteringHow to install guttering
How to install gutteringHSS Hire
 
Unblocking your drains
Unblocking your drainsUnblocking your drains
Unblocking your drainsHSS Hire
 
More creative ideas for your home
More creative ideas for your homeMore creative ideas for your home
More creative ideas for your homeHSS Hire
 
Creative ideas for your picture frames
Creative ideas for your picture framesCreative ideas for your picture frames
Creative ideas for your picture framesHSS Hire
 
7 tips for mini gardening
7 tips for mini gardening7 tips for mini gardening
7 tips for mini gardeningHSS Hire
 
Hss 9 tips home maintenance
Hss 9 tips home maintenanceHss 9 tips home maintenance
Hss 9 tips home maintenanceHSS Hire
 
How to Safely Cut Down a Tree and Remove it from Your Garden
How to Safely Cut Down a Tree and Remove it from Your GardenHow to Safely Cut Down a Tree and Remove it from Your Garden
How to Safely Cut Down a Tree and Remove it from Your GardenHSS Hire
 
DIY Tasks for the Winter
DIY Tasks for the Winter DIY Tasks for the Winter
DIY Tasks for the Winter HSS Hire
 
How to Paint a Wall Like a Pro
How to Paint a Wall Like a ProHow to Paint a Wall Like a Pro
How to Paint a Wall Like a ProHSS Hire
 
DIY Guide: How to Lay Patio Decking
DIY Guide: How to Lay Patio DeckingDIY Guide: How to Lay Patio Decking
DIY Guide: How to Lay Patio DeckingHSS Hire
 

More from HSS Hire (11)

Colour wheel
Colour wheelColour wheel
Colour wheel
 
How to install guttering
How to install gutteringHow to install guttering
How to install guttering
 
Unblocking your drains
Unblocking your drainsUnblocking your drains
Unblocking your drains
 
More creative ideas for your home
More creative ideas for your homeMore creative ideas for your home
More creative ideas for your home
 
Creative ideas for your picture frames
Creative ideas for your picture framesCreative ideas for your picture frames
Creative ideas for your picture frames
 
7 tips for mini gardening
7 tips for mini gardening7 tips for mini gardening
7 tips for mini gardening
 
Hss 9 tips home maintenance
Hss 9 tips home maintenanceHss 9 tips home maintenance
Hss 9 tips home maintenance
 
How to Safely Cut Down a Tree and Remove it from Your Garden
How to Safely Cut Down a Tree and Remove it from Your GardenHow to Safely Cut Down a Tree and Remove it from Your Garden
How to Safely Cut Down a Tree and Remove it from Your Garden
 
DIY Tasks for the Winter
DIY Tasks for the Winter DIY Tasks for the Winter
DIY Tasks for the Winter
 
How to Paint a Wall Like a Pro
How to Paint a Wall Like a ProHow to Paint a Wall Like a Pro
How to Paint a Wall Like a Pro
 
DIY Guide: How to Lay Patio Decking
DIY Guide: How to Lay Patio DeckingDIY Guide: How to Lay Patio Decking
DIY Guide: How to Lay Patio Decking
 

Recently uploaded

EPANDING THE CONTENT OF AN OUTLINE using notes.pptx
EPANDING THE CONTENT OF AN OUTLINE using notes.pptxEPANDING THE CONTENT OF AN OUTLINE using notes.pptx
EPANDING THE CONTENT OF AN OUTLINE using notes.pptxRaymartEstabillo3
 
DATA STRUCTURE AND ALGORITHM for beginners
DATA STRUCTURE AND ALGORITHM for beginnersDATA STRUCTURE AND ALGORITHM for beginners
DATA STRUCTURE AND ALGORITHM for beginnersSabitha Banu
 
ROOT CAUSE ANALYSIS PowerPoint Presentation
ROOT CAUSE ANALYSIS PowerPoint PresentationROOT CAUSE ANALYSIS PowerPoint Presentation
ROOT CAUSE ANALYSIS PowerPoint PresentationAadityaSharma884161
 
ECONOMIC CONTEXT - PAPER 1 Q3: NEWSPAPERS.pptx
ECONOMIC CONTEXT - PAPER 1 Q3: NEWSPAPERS.pptxECONOMIC CONTEXT - PAPER 1 Q3: NEWSPAPERS.pptx
ECONOMIC CONTEXT - PAPER 1 Q3: NEWSPAPERS.pptxiammrhaywood
 
AMERICAN LANGUAGE HUB_Level2_Student'sBook_Answerkey.pdf
AMERICAN LANGUAGE HUB_Level2_Student'sBook_Answerkey.pdfAMERICAN LANGUAGE HUB_Level2_Student'sBook_Answerkey.pdf
AMERICAN LANGUAGE HUB_Level2_Student'sBook_Answerkey.pdfphamnguyenenglishnb
 
Judging the Relevance and worth of ideas part 2.pptx
Judging the Relevance  and worth of ideas part 2.pptxJudging the Relevance  and worth of ideas part 2.pptx
Judging the Relevance and worth of ideas part 2.pptxSherlyMaeNeri
 
Roles & Responsibilities in Pharmacovigilance
Roles & Responsibilities in PharmacovigilanceRoles & Responsibilities in Pharmacovigilance
Roles & Responsibilities in PharmacovigilanceSamikshaHamane
 
Full Stack Web Development Course for Beginners
Full Stack Web Development Course  for BeginnersFull Stack Web Development Course  for Beginners
Full Stack Web Development Course for BeginnersSabitha Banu
 
Like-prefer-love -hate+verb+ing & silent letters & citizenship text.pdf
Like-prefer-love -hate+verb+ing & silent letters & citizenship text.pdfLike-prefer-love -hate+verb+ing & silent letters & citizenship text.pdf
Like-prefer-love -hate+verb+ing & silent letters & citizenship text.pdfMr Bounab Samir
 
Crayon Activity Handout For the Crayon A
Crayon Activity Handout For the Crayon ACrayon Activity Handout For the Crayon A
Crayon Activity Handout For the Crayon AUnboundStockton
 
What is Model Inheritance in Odoo 17 ERP
What is Model Inheritance in Odoo 17 ERPWhat is Model Inheritance in Odoo 17 ERP
What is Model Inheritance in Odoo 17 ERPCeline George
 
Difference Between Search & Browse Methods in Odoo 17
Difference Between Search & Browse Methods in Odoo 17Difference Between Search & Browse Methods in Odoo 17
Difference Between Search & Browse Methods in Odoo 17Celine George
 
Quarter 4 Peace-education.pptx Catch Up Friday
Quarter 4 Peace-education.pptx Catch Up FridayQuarter 4 Peace-education.pptx Catch Up Friday
Quarter 4 Peace-education.pptx Catch Up FridayMakMakNepo
 
Grade 9 Q4-MELC1-Active and Passive Voice.pptx
Grade 9 Q4-MELC1-Active and Passive Voice.pptxGrade 9 Q4-MELC1-Active and Passive Voice.pptx
Grade 9 Q4-MELC1-Active and Passive Voice.pptxChelloAnnAsuncion2
 
ENGLISH 7_Q4_LESSON 2_ Employing a Variety of Strategies for Effective Interp...
ENGLISH 7_Q4_LESSON 2_ Employing a Variety of Strategies for Effective Interp...ENGLISH 7_Q4_LESSON 2_ Employing a Variety of Strategies for Effective Interp...
ENGLISH 7_Q4_LESSON 2_ Employing a Variety of Strategies for Effective Interp...JhezDiaz1
 
Gas measurement O2,Co2,& ph) 04/2024.pptx
Gas measurement O2,Co2,& ph) 04/2024.pptxGas measurement O2,Co2,& ph) 04/2024.pptx
Gas measurement O2,Co2,& ph) 04/2024.pptxDr.Ibrahim Hassaan
 
MULTIDISCIPLINRY NATURE OF THE ENVIRONMENTAL STUDIES.pptx
MULTIDISCIPLINRY NATURE OF THE ENVIRONMENTAL STUDIES.pptxMULTIDISCIPLINRY NATURE OF THE ENVIRONMENTAL STUDIES.pptx
MULTIDISCIPLINRY NATURE OF THE ENVIRONMENTAL STUDIES.pptxAnupkumar Sharma
 

Recently uploaded (20)

EPANDING THE CONTENT OF AN OUTLINE using notes.pptx
EPANDING THE CONTENT OF AN OUTLINE using notes.pptxEPANDING THE CONTENT OF AN OUTLINE using notes.pptx
EPANDING THE CONTENT OF AN OUTLINE using notes.pptx
 
9953330565 Low Rate Call Girls In Rohini Delhi NCR
9953330565 Low Rate Call Girls In Rohini  Delhi NCR9953330565 Low Rate Call Girls In Rohini  Delhi NCR
9953330565 Low Rate Call Girls In Rohini Delhi NCR
 
DATA STRUCTURE AND ALGORITHM for beginners
DATA STRUCTURE AND ALGORITHM for beginnersDATA STRUCTURE AND ALGORITHM for beginners
DATA STRUCTURE AND ALGORITHM for beginners
 
ROOT CAUSE ANALYSIS PowerPoint Presentation
ROOT CAUSE ANALYSIS PowerPoint PresentationROOT CAUSE ANALYSIS PowerPoint Presentation
ROOT CAUSE ANALYSIS PowerPoint Presentation
 
ECONOMIC CONTEXT - PAPER 1 Q3: NEWSPAPERS.pptx
ECONOMIC CONTEXT - PAPER 1 Q3: NEWSPAPERS.pptxECONOMIC CONTEXT - PAPER 1 Q3: NEWSPAPERS.pptx
ECONOMIC CONTEXT - PAPER 1 Q3: NEWSPAPERS.pptx
 
AMERICAN LANGUAGE HUB_Level2_Student'sBook_Answerkey.pdf
AMERICAN LANGUAGE HUB_Level2_Student'sBook_Answerkey.pdfAMERICAN LANGUAGE HUB_Level2_Student'sBook_Answerkey.pdf
AMERICAN LANGUAGE HUB_Level2_Student'sBook_Answerkey.pdf
 
Judging the Relevance and worth of ideas part 2.pptx
Judging the Relevance  and worth of ideas part 2.pptxJudging the Relevance  and worth of ideas part 2.pptx
Judging the Relevance and worth of ideas part 2.pptx
 
Roles & Responsibilities in Pharmacovigilance
Roles & Responsibilities in PharmacovigilanceRoles & Responsibilities in Pharmacovigilance
Roles & Responsibilities in Pharmacovigilance
 
Full Stack Web Development Course for Beginners
Full Stack Web Development Course  for BeginnersFull Stack Web Development Course  for Beginners
Full Stack Web Development Course for Beginners
 
Like-prefer-love -hate+verb+ing & silent letters & citizenship text.pdf
Like-prefer-love -hate+verb+ing & silent letters & citizenship text.pdfLike-prefer-love -hate+verb+ing & silent letters & citizenship text.pdf
Like-prefer-love -hate+verb+ing & silent letters & citizenship text.pdf
 
Crayon Activity Handout For the Crayon A
Crayon Activity Handout For the Crayon ACrayon Activity Handout For the Crayon A
Crayon Activity Handout For the Crayon A
 
What is Model Inheritance in Odoo 17 ERP
What is Model Inheritance in Odoo 17 ERPWhat is Model Inheritance in Odoo 17 ERP
What is Model Inheritance in Odoo 17 ERP
 
Model Call Girl in Bikash Puri Delhi reach out to us at 🔝9953056974🔝
Model Call Girl in Bikash Puri  Delhi reach out to us at 🔝9953056974🔝Model Call Girl in Bikash Puri  Delhi reach out to us at 🔝9953056974🔝
Model Call Girl in Bikash Puri Delhi reach out to us at 🔝9953056974🔝
 
Raw materials used in Herbal Cosmetics.pptx
Raw materials used in Herbal Cosmetics.pptxRaw materials used in Herbal Cosmetics.pptx
Raw materials used in Herbal Cosmetics.pptx
 
Difference Between Search & Browse Methods in Odoo 17
Difference Between Search & Browse Methods in Odoo 17Difference Between Search & Browse Methods in Odoo 17
Difference Between Search & Browse Methods in Odoo 17
 
Quarter 4 Peace-education.pptx Catch Up Friday
Quarter 4 Peace-education.pptx Catch Up FridayQuarter 4 Peace-education.pptx Catch Up Friday
Quarter 4 Peace-education.pptx Catch Up Friday
 
Grade 9 Q4-MELC1-Active and Passive Voice.pptx
Grade 9 Q4-MELC1-Active and Passive Voice.pptxGrade 9 Q4-MELC1-Active and Passive Voice.pptx
Grade 9 Q4-MELC1-Active and Passive Voice.pptx
 
ENGLISH 7_Q4_LESSON 2_ Employing a Variety of Strategies for Effective Interp...
ENGLISH 7_Q4_LESSON 2_ Employing a Variety of Strategies for Effective Interp...ENGLISH 7_Q4_LESSON 2_ Employing a Variety of Strategies for Effective Interp...
ENGLISH 7_Q4_LESSON 2_ Employing a Variety of Strategies for Effective Interp...
 
Gas measurement O2,Co2,& ph) 04/2024.pptx
Gas measurement O2,Co2,& ph) 04/2024.pptxGas measurement O2,Co2,& ph) 04/2024.pptx
Gas measurement O2,Co2,& ph) 04/2024.pptx
 
MULTIDISCIPLINRY NATURE OF THE ENVIRONMENTAL STUDIES.pptx
MULTIDISCIPLINRY NATURE OF THE ENVIRONMENTAL STUDIES.pptxMULTIDISCIPLINRY NATURE OF THE ENVIRONMENTAL STUDIES.pptx
MULTIDISCIPLINRY NATURE OF THE ENVIRONMENTAL STUDIES.pptx
 

How to tile a floor

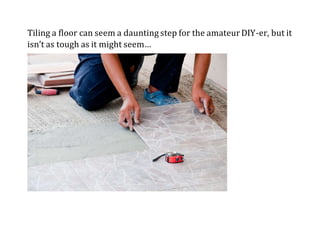
  • 1. Tiling a floor can seem a daunting step for the amateurDIY-er, but it isn’t as tough as it might seem…
  • 2. Hard tiling is an attractive and functionalflooring choice for bathroomsand kitchens, and even hallwaysand conservatories. They’re great for high-traffic areas, as they’re hard-wearing, as well as being easy-clean. If you’re already a bit of a tiling pro, learn some more tiling tips from our “Tips to take your tiling skillsto the next level” blog piece. How to tile a floor, safety first: For safety, make sure you wear strong, heavy-dutygloves to protect yourhands – removing old tiling can be a nasty business, especially any broken shards. Also make sure to wear protective goggles to guard against flying tile shards, and a dust mask.
  • 3. How to tile a floor step ONE – preparation & purchase When measuring the area, make sure to include any awkward, jutting areas such as alcoves and round up to the nearest whole number. Tiles come in packs, and you’ll need to find out how much surface area each pack covers. Your hard tiling can be laidonto any dry and level concrete floor. If it isn’t level, you’llneed to even it out. You can lay tiles over existing vinyl or quarry tiles, though you need to make sure they are firmly and properly laid. If you’re laying over vinyl tiling, though, you should coat the surface with primer. Ideallyyou should use an adhesive specificallyfor the purpose, especially if you’re laying tiles onto wood or concrete. If you’re working on a timber floor, you will first have to strengthen it – use 13mm-thick exterior grade plywood,and fix in place with 4mm gauge 25mm screws or ring-shanked nailsat 30cm intervals.
  • 4. How to tile a floor step TWO: layout The “key tile” (the first tile that you’ll lay) will determine the whole layoutof your tiling, so it’s important to get its positioningright. You have to start pretty centrally in yourroom and work out in each direction, as most rooms aren’t perfect squares – if you started at the edge you’d end up with a real mess. From the centre of your room (the centre of the key tile), dry-lay a row of tiles from one of the centre lines to the wall. Do you end up with a tiny slither of tile? If you do, you need to reassess – this won’t look good. If you’re in this position, move your whole line the width of one tile away from this wall. Even if you end up with 1/3 tiles at each end, this will look better than an untidyslither of tile at the skirting boards. When you’ve got this line right, carry on dry-laying – from this centre line, now go in the opposite direction, and then at right angles to it (ultimately,bisecting yourcentral tile in a cross shape). When you’ve laidall this out, move your key tile around slightly until there’s a gap of around the size of half a tile around the edge of the whole room. Once your key tile is set, mark its positionwith chalk or another faint but visiblemarking. You’llneed to make sure all edge tiles are cut to shape at this stage, so now is the time to mark these up and cut them down.
  • 5. How to tile a floor step THREE: beginning to tile BEST BUY: tile spacers. If you buy tile spacers to help you here, your finished product is going to look so much more professional. Start with the key tile and work out from here towards one of the walls. Bear in mind, when choosing your direction, that you shouldn’t walk on your newly laidtiles for 24 hours. Make sure you’ve left yourself a way to escape! Alternatively,you could just tile half a room per day, so the room isn’t fully out-of-action. Spread out around a metres-worth of adhesivein the centre of your room. Using a spreader, or notched trowel, spread it evenly across the square metre of surface. The spreader will leave just the right amount of adhesive to make the tiles stick, but make sure you can just about see your markings representing the locationof the key tile. Lay your first tile into position,twisting it slightly as you go. Thisgets rid of any air bubbles that may be stuck as you lower it, and ensures the tile beds properly into the adhesive. Using plastic spacers, work out from the key tile in one direction towards the wall. Every metre or two, check that yourfloor is level using a spirit measure. Once this row is complete,
  • 6. do the same at right angles, so your tilingcriss-crosses the room from the key tile. Work in rows in one corner of the room, completinga quarter. Carry on laying untilyou’ve covered the floor, excepting the cut tiles needed for the edges. At this stage wipe down all your tiles to make sure no adhesive sticks permanently, ruining your lovely new tiling. Make sure to scrape up any adhesive where the cut edge tiles will go – you need your surface to remain flat. You now need to wait 24 hours before the final steps.
  • 7. How to tile a floor step FOUR: 24 hours later Having cut your tiles (using a lever-action flat-bed cutter or heavy-duty tile cutter), you can now fill the edging. Squeeze a layer of adhesive onto the back of each tile then press it into position,again leaving it 24 hours to set.
  • 8. How to tile a floor step FIVE: grouting Making sure the adhesive is solidly set before you move onto grouting. Now make sure to make up your grout well (most require mixing with water) – any lumpswill show an unequal and unprofessionalsurface in your end result. Leave your grout to sit for 2-3 minutesonce made up, unless otherwise recommended, as this can help break down lumps and release air bubbles. N.B: for the edges of the room you are better to use a flexible sealant rather than the grout, to allowfor movement and flexibilityas the tile meets the wall. If you’re using glazed tiles, you can simply pourthe grout over and use a grout spreader with a rubber edge to squeegee the grout into place. If you have non-glazed tiles you’llneed to be more careful – mix a very dry grout up and gently put it into each crack, trying to avoid getting any grout onto the tile surface to avoidstains. As the grout begins to set, go over it with a wooden dowel or striking tool, pressing the grout firmly to fill any gaps or air pockets. Carry a damp sponge and wipe up any mess as you go. All of the grout has to be compacted, without gaps, to ensure water resistance.
  • 9. Once the grout is hard (approximately an hour), wipe all over again with a damp cloth, focussing on each tile one-by-one to make sure no grouting stains have escaped your attention. Try to avoid using the floor for 48 hours if at allpossible; otherwise be gentle and delicatefor this period. Seal around the corners of the room with a flexible sealant of the same colouras your grout, and there you have it – one floor tiled! For more please see http://www.hss.com