1. WALLPAPERING
TECHNIQUES
Wallpapering is a skill that develops with practice. If you are
a beginner, leave papering stairwells and ceilings until you
are reasonably competent.
Take care when working on ladders, and do not overreach.
Wallpapering is one of the most popular ways of changing
the appearance of a room.
Modern materials make decorating much easier for
beginners. The extensive range of wallcoverings available
means that you can change the colour, pattern and texture
of your walls with ease. With practice you will be able to
paper even the most difficult areas of your home with
confidence. Wallpapering is usually the final stage of
decorating a room after painting. From solid colours to
sophisticated prints to patterned papers for children's rooms,
wallpapering is a simple, versatile and effective way of
refreshing any space in the house.
• When planning your decor, don't forget we stock a
wide range of coordinating borders, trims, blinds,
lighting and tiles as well.
• B&Q wallpapers also come in easy-clean waterproof
vinyl for high-splash areas like kitchens and
bathrooms.
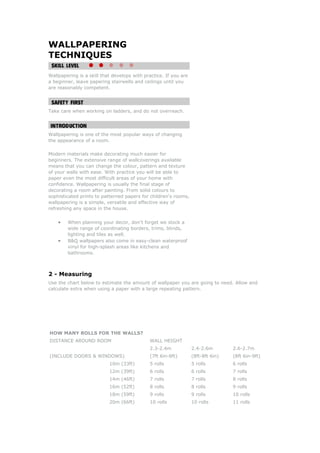
2 - Measuring
Use the chart below to estimate the amount of wallpaper you are going to need. Allow and
calculate extra when using a paper with a large repeating pattern.
HOW MANY ROLLS FOR THE WALLS?
WALL HEIGHTDISTANCE AROUND ROOM
2.3-2.4m 2.4-2.6m 2.6-2.7m
(INCLUDE DOORS & WINDOWS) (7ft 6in-8ft) (8ft-8ft 6in) (8ft 6in-9ft)
10m (33ft) 5 rolls 5 rolls 6 rolls
12m (39ft) 6 rolls 6 rolls 7 rolls
14m (46ft) 7 rolls 7 rolls 8 rolls
16m (52ft) 8 rolls 8 rolls 9 rolls
18m (59ft) 9 rolls 9 rolls 10 rolls
20m (66ft) 10 rolls 10 rolls 11 rolls
2. For a more accurate estimate, calculate the area of your walls, using the method outlined
below.
Step 1: A standard roll of wallpaper is approximately 10.5m (33ft) long and 530mm (1ft 9in)
wide. If you measure the height of the walls from skirting to ceiling, you can work out how
many strips of paper you can cut from a standard roll - four strips is about average.
Step 2: Measure around the room (ignoring doors and windows) to work out how many roll
widths you need to cover the walls. Divide this figure by the number of strips you can cut from
one roll to calculate how many rolls you need to buy. Make a small allowance for wastage.
When buying wallpaper, ensure that all of the rolls have the same batch number to be certain
that the colours match. Keep your receipts so that you can return unused rolls.
3 - Preparing the surfaces
Walls should be clean, dry and sound. You can paper directly
over painted surfaces, as long as you have washed them
thoroughly with sugar soap.
Remove peeling or damaged wallpaper
Stripping wallpaper is a messy job, so take up carpets or
cover them with dust sheets. Take all the furniture out of the
room or group it together in the middle of the floor and
protect it with more dust sheets.
Use warm soapy water (or
water with paper stripper) to
soften old absorbent
wallcoverings, then use a
wide stripping knife to s
the paper off the wall. A
steam-generating wa
stripper makes the job even
easier. When removing
painted wallpapers or
washable wallcoverings,
scratch the surface with a
wallpaper scorer to enable
the moisture to penetrate.
crape
llpaper
You can peel vinyl wallcoverings off the wall, leaving the
backing paper behind. If it is sound, just paper over the
backing, or strip it like ordinary wallpaper.
Repair damaged plaster
Repair damaged plaster with a fine surface filler. Rake loose
material from deep cracks and holes, then pack filler into all
the crevices, using a flexible filler knife.
3. When the filler is dry, sand it smooth with medium-grade
abrasive paper.
Size newly plastered walls with a 'proprietary size' or diluted
wallpaper paste to make sure paper will adhere.
4 - Cutting and pasting wallpaper
Step 1:
Mix wallpaper paste in a bucket. Instructions on the
packaging will give you a guide to the strength and amount
of paste you need for the type of paper you are hanging.
Use fungicidal paste to prevent mould from growing behind
vinyl or blown vinyl.
Step 2:
Measure the height of the wall to ascertain the length of the
first strip, adding about 100mm (4in) for trimming top and
bottom. Cut similar lengths from the roll. If your paper is
patterned, you may have to allow extra for matching the
pattern on adjacent strips - check before cutting.
When cutting wallpaper strips from a roll, first mark or nick
the edge of the paper at the required length. Then fold the
paper over at this point, aligning the side edges carefully,
and slit along the crease with a metal ruler or wallpaper
scissors.
Step 3:
Lay the cut strips face down on your pasting table. To
prevent the strips curling while you apply the paste, tuck the
free ends of the paper behind a piece of string tied between
the legs of the table.
Step 4:
Align the top strip with the front edge of the table and, using
a wide pasting brush, apply the paste evenly, first down the
centre of the strip, then brush it out towards the front edge.
Slide the strip across to align with the back edge of the table
and brush on more paste towards that edge. Make sure both
edges are well covered.
Try not to get paste on the front side because it can leave
marks.
Fold the pasted section over, pasted side to pasted side, and
4. slide the paper along the table to paste and fold the other
end in a similar way. Use this method to paste subsequent
strips of paper and keep your pasting table clean.
Keep your pasting brush clean by resting the bristles on
string tied across the top of the paste bucket.
You may have to leave some heavyweight papers to soak for
a short while before hanging them. Check the
manufacturer's instructions.
5 - Hanging wallpaper - Basics
Step 1:
If possible, start by papering a wall that contains neither
door nor window. Begin at one corner, working away from
the window. When hanging paper with a large regular
pattern, start at a central feature such as a chimneybreast.
Walls and corners are rarely
true or square, so they
cannot be relied upon as a
guide. The trick is to mark a
vertical guideline on the wall,
using a plumb line.
Mark the line on the wall,
slightly less than one roll
width away from the corner.
Step 2:
Unfold the top half of the paper and lightly press it to the
wall using a paperhanger's brush.
Step 3:
Slide the strip to align its
edge with the plumbed line
on the wall. Allow the paper
to overlap the ceiling by
about 50mm (2in). Brush o
from the centre to exclu
trapped under the paper.
Unfold the bottom half and
brush it into place in a similar way.
ut
de air
5. Step 4:
Using the back of your
wallpaper scissors or sharp
knife, score a line along the
corner between the wall and
ceiling. Peel back the paper
and cut along the crease to
remove the waste, then
smooth the paper back into
place. Use the same method
to trim the strip to length at skirting level.
To avoid tearing wet wallpaper, put a new blade in your craft
knife or scalpel.
Step 5:
Hang the next strip beside the first, making a neat butt
between them. At the same time, slide the strip up or down
to align any pattern motif. Keep checking that the match is
accurate as you brush the strip into place.
As you proceed, wipe excess paste from the ceiling and
skirting, using a damp sponge. Similarly, wipe smears of
paste off the surface of the paper. Run a seam roller along
the butt joints to make sure they are stuck down, and that
your wallpaper is flat.
Disguise a less-than-perfect line at the ceiling by pasting a
narrow, patterned border along the top of the wall
6 - Hanging wallpaper - Around switches
When you get to a light
switch, make two diagonal
cuts across the centre of the
faceplate, running from
corner to corner. Tap the
paper in around the fa
and trim off most of the
waste with scissors.
ceplate
the pasting brush to stipple the paper down firmly
Turn off the electricity at the consumer unit and loosen the
faceplate so that you can tuck the paper behind it. Turn the
power on again when the paste is dry.
Paper around flush wall sockets in a similar way: cut the
wallpaper to butt against the mounting box of a surface-
mounted socket or switch. Cut the diagonals with scissors
and use a sharp knife to trim off the waste.
Use
6. around the edge of the mounting box.
7 - Hanging wallpaper - Papering around
he strip of paper next to the door, butt it
ake a diagonal cut in the waste towards the corner of the
rush the paper down against the side of the frame, make a
mooth down what's left of the strip above the door, then
o
ontinue with short strips over the door, hanging the next
- Hanging wallpaper - Papering around
s are more or less flush with the internal face
hen a window is set back into the wall, it leaves a narrow
tep 1:
full strip of wallpaper adjacent to the window and
nto
tep 2:
paper into place below the window, trimming to fit
doorways
hen hanging tW
against its neighbour in the usual way, allowing the other
edge to overlap the doorframe.
M
doorframe.
B
crease with your scissors and cut off the waste.
S
trim off the waste, leaving a 12mm (1/2in) overlap pasted t
the top of the frame.
C
full strip down the other side of the doorframe. Crease and
trim off the waste as before
8
windows
f your windowI
of the wall, paper up to the window frames as if you were
papering around a door.
W
strip of wall all around, known as the 'reveal'. There is a
specific technique for papering a reveal:
S
Hang the
make two horizontal cuts in the paper overlapping the
reveal, one just above the top and another along the
underside of the sill. Fold and brush the flap of paper o
the side of the reveal. Crease and trim off the waste at the
window frame.
S
Brush the
as required.
7. Step 3:
At the top, cut a small piece
of wallpaper to match the
width of the overlap above
the reveal. Paste this to the
underside of the reveal and
wrap it around the front
corner, tucking it under the
paper pasted above. Trim off
the waste next to the window frame.
Where one piece of thick paper overlaps another, cut
through both layers with a sharp knife to make a matching
butt joint. Remove the waste and press down the joint with
a seam roller.
9 - Hanging wallpaper - Papering corners
Papering internal corners
Trying to wrap a wide strip of wallpaper around a corner
invariably results in unsightly creases. The answer is to cut
the strip of paper lengthwise, allowing 12mm (1/2in) only to
turn the corner.
If the offcut is wide enough, paste it onto the adjacent wall,
covering the overlap in the corner. Mark a plumbed guideline
on the wall to make sure the offcut is vertical.
Papering external corners
When taking wallpaper around an external corner, cut the
strip to width, leaving a 25mm (1in) overlap to wrap around
the corner. Hang the offcut on the adjacent wall so that it
overlaps the turned edge by about 12mm (1/2in).
10 - Hanging wallpaper - Papering behind
adiatorsr
Ideally, you should drain a radiator and take it off the wall
so that you can paper behind it. If that is not possible, first
turn off the heat and wait for the radiator to cool. Paste the
strip of paper to the wall above the radiator. Then slit it from
the bottom edge so that you can smooth it down on either
side of the radiator's fixing brackets. Press the paper into
place behind the radiator, using a narrow radiator paint
roller.