SlideShare a Scribd company logo
1 of 7
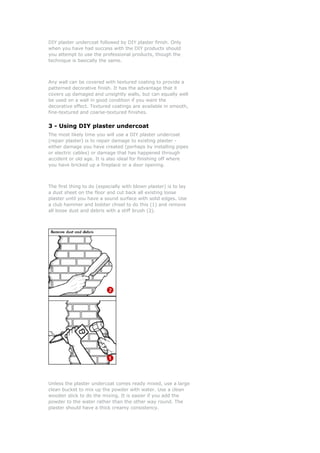
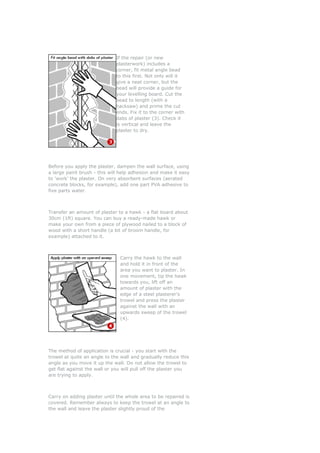
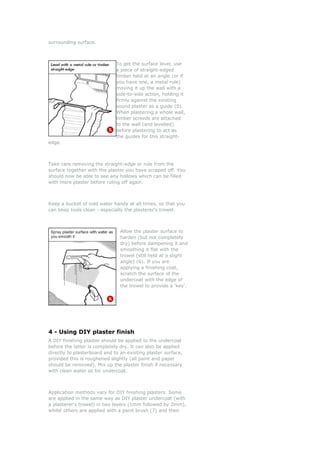
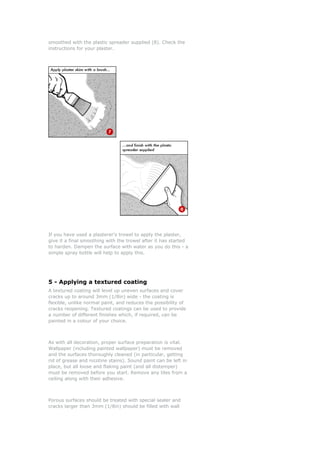
Download to read offline
ARTEX AND PLASTER

Proper plastering is not easy. But DIY plasters are designed
with ease of use in mind, and ArtexTM is no more difficult to
apply than thick paint.


It is best to wear gloves when mixing up dry plaster-based
products - disposable plastic gloves are fine. Wear a face
mask when mixing up fine powder.


Being able to use Artex and plaster can help keep the walls
and ceilings in your home looking good.

A professional plasterer will normally use gypsum-based
Carlite plaster applied in two layers, undercoat and finish.
The skill to do this properly takes years to acquire and the
amateur should start with DIY plasters.

"ArtexTM" is the best known make of textured coating, used
on internal walls and ceilings to cover up cracks and uneven
surfaces or fashioned into patterns. Some people may want
to remove the patterned effect.


2 - Choosing the right product
Consider what you want the plaster and/or textured coating
to do. If a wall or ceiling is basically in good condition, but
has a few holes or hairline cracks, there are many different
wall fillers that you can use to make the surface smooth for
decorating.


Where an area of plaster is seriously damaged or has come
away from the wall ('blown'), you can use a 'repair' plaster
(a DIY plaster undercoat) once all the old loose plaster has
been removed. This has a good enough finish for papering or
tiling, but if you want to paint it, apply a DIY plaster finish
(also known as plaster skim) first.


DIY plasters are ideal for repairing the damage to walls
created by holes made for electric wiring and plumbing
waste pipes.


If you have rough or uneven walls, and using a wall filler will
not be good enough, the whole wall can be given a coat of
DIY plaster finish (it can be applied up to 3mm or 1/8in
thick). Alternatively, you could apply a textured coating,
with or without a patterned finish.


A new masonry wall can either be covered with plasterboard
(often the best choice for a DIYer) or can be plastered using
DIY plaster undercoat followed by DIY plaster finish. Only
when you have had success with the DIY products should
you attempt to use the professional products, though the
technique is basically the same.


Any wall can be covered with textured coating to provide a
patterned decorative finish. It has the advantage that it
covers up damaged and unsightly walls, but can equally well
be used on a wall in good condition if you want the
decorative effect. Textured coatings are available in smooth,
fine-textured and coarse-textured finishes.


3 - Using DIY plaster undercoat
The most likely time you will use a DIY plaster undercoat
(repair plaster) is to repair damage to existing plaster -
either damage you have created (perhaps by installing pipes
or electric cables) or damage that has happened through
accident or old age. It is also ideal for finishing off where
you have bricked up a fireplace or a door opening.


The first thing to do (especially with blown plaster) is to lay
a dust sheet on the floor and cut back all existing loose
plaster until you have a sound surface with solid edges. Use
a club hammer and bolster chisel to do this (1) and remove
all loose dust and debris with a stiff brush (2).


Unless the plaster undercoat comes ready mixed, use a large
clean bucket to mix up the powder with water. Use a clean
wooden stick to do the mixing. It is easier if you add the
powder to the water rather than the other way round. The
plaster should have a thick creamy consistency.
If the repair (or new
                             plasterwork) includes a
                             corner, fit metal angle bead
                             to this first. Not only will it
                             give a neat corner, but the
                             bead will provide a guide for
                             your levelling board. Cut the
                             bead to length (with a
                             hacksaw) and prime the cut
                             ends. Fix it to the corner with
                             dabs of plaster (3). Check it
                             is vertical and leave the
                             plaster to dry.


Before you apply the plaster, dampen the wall surface, using
a large paint brush - this will help adhesion and make it easy
to 'work' the plaster. On very absorbent surfaces (aerated
concrete blocks, for example), add one part PVA adhesive to
five parts water.


Transfer an amount of plaster to a hawk - a flat board about
30cm (1ft) square. You can buy a ready-made hawk or
make your own from a piece of plywood nailed to a block of
wood with a short handle (a bit of broom handle, for
example) attached to it.


                               Carry the hawk to the wall
                               and hold it in front of the
                               area you want to plaster. In
                               one movement, tip the hawk
                               towards you, lift off an
                               amount of plaster with the
                               edge of a steel plasterer's
                               trowel and press the plaster
                               against the wall with an
                               upwards sweep of the trowel
                               (4).


The method of application is crucial - you start with the
trowel at quite an angle to the wall and gradually reduce this
angle as you move it up the wall. Do not allow the trowel to
get flat against the wall or you will pull off the plaster you
are trying to apply.


Carry on adding plaster until the whole area to be repaired is
covered. Remember always to keep the trowel at an angle to
the wall and leave the plaster slightly proud of the
surrounding surface.


                              To get the surface level, use
                              a piece of straight-edged
                              timber held at an angle (or if
                              you have one, a metal rule)
                              moving it up the wall with a
                              side-to-side action, holding it
                              firmly against the existing
                              sound plaster as a guide (5).
                              When plastering a whole wall,
                              timber screeds are attached
                              to the wall (and levelled)
                              before plastering to act as
                              the guides for this straight-
edge.


Take care removing the straight-edge or rule from the
surface together with the plaster you have scraped off. You
should now be able to see any hollows which can be filled
with more plaster before ruling off again.


Keep a bucket of cold water handy at all times, so that you
can keep tools clean - especially the plasterer's trowel.


                                Allow the plaster surface to
                                harden (but not completely
                                dry) before dampening it and
                                smoothing it flat with the
                                trowel (still held at a slight
                                angle) (6). If you are
                                applying a finishing coat,
                                scratch the surface of the
                                undercoat with the edge of
                                the trowel to provide a 'key'.


4 - Using DIY plaster finish
A DIY finishing plaster should be applied to the undercoat
before the latter is completely dry. It can also be applied
directly to plasterboard and to an existing plaster surface,
provided this is roughened slightly (all paint and paper
should be removed). Mix up the plaster finish if necessary
with clean water as for undercoat.


Application methods vary for DIY finishing plasters. Some
are applied in the same way as DIY plaster undercoat (with
a plasterer's trowel) in two layers (1mm followed by 2mm),
whilst others are applied with a paint brush (7) and then
smoothed with the plastic spreader supplied (8). Check the
instructions for your plaster.


If you have used a plasterer's trowel to apply the plaster,
give it a final smoothing with the trowel after it has started
to harden. Dampen the surface with water as you do this - a
simple spray bottle will help to apply this.


5 - Applying a textured coating
A textured coating will level up uneven surfaces and cover
cracks up to around 3mm (1/8in) wide - the coating is
flexible, unlike normal paint, and reduces the possibility of
cracks reopening. Textured coatings can be used to provide
a number of different finishes which, if required, can be
painted in a colour of your choice.


As with all decoration, proper surface preparation is vital.
Wallpaper (including painted wallpaper) must be removed
and the surfaces thoroughly cleaned (in particular, getting
rid of grease and nicotine stains). Sound paint can be left in
place, but all loose and flaking paint (and all distemper)
must be removed before you start. Remove any tiles from a
ceiling along with their adhesive.


Porous surfaces should be treated with special sealer and
cracks larger than 3mm (1/8in) should be filled with wall
filler: a special caulking tool is available to make this job
easier. Filled cracks and joints between new plasterboard
should be taped over with joint tape (tape should also be
used on the edges of filled areas). If any parts of the wall
are powdery or 'chalky', use a stabilising solution before
applying the coating.


Mix up powder, following the manufacturer's instructions. To
speed up this process, whisk attachments are available for
both hand and powered drills. Ready-mixed products can be
applied straight from the tub. Use masking tape to protect
electrical fittings, timber paintwork and exposed plumbing
pipes. Lay a dustsheet on the floor.


Textured coatings can be applied with a large paint brush
(wall brush) or roller. The application method is different to
paint as the coating is applied more or less in one go rather
then being 'worked' once it is on the surface. Apply the
coating to the wall or ceiling in bands around 60cm (2ft)
wide; if you are applying a pattern, do this before applying
the next band of coating.


A brush or roller will leave a relatively flat surface (its
texture depending on the type of coating being used), but if
you want to provide a decorative pattern, this is done once
the coating is on the wall. There are several different
texturing tools you can use to provide the pattern:


    •   patterned rollers for producing diamond, diagonal,
        bark and stipple patterns.
    •   brushes and stipplers for creating a wide range of
        textured effects.
    •   combs for creating artistic combed textures
        (including flower and rose designs as well as
        standard linear ones).
    •   lacers (triangular plastic hand-held blades) for
        smoothing tips of heavier random textures (broken
        leather, bark and swirls, for example) to reduce the
        sharpness of the peaks; a standard set includes
        medium and small sizes. The tool is kept damp with
        water and is used before the texture has gone firm.
    •   margin brush for creating borders around textured
        patterns and also for painting around fittings.
    •   You could also use a damp sponge to create a
        stipple effect or your own swirl design.


6 - Unwanted textured coating?
If you have moved into a different house and want to
remove at least some of the patterned textured coating from
the walls and ceilings, there are two choices: cover or strip.
Covering is the easiest choice. You can get specific products
designed for doing this and all you do is to apply them on
top of the existing patterned coating (with a plasterer's
float) so that the surface is restored to a smooth flat surface
which you can then paper or paint. Remember, though, that
you will now have quite a thick coating. Stripping is the
alternative. There are specific products made for stripping
textured coatings, though they may not work on all types. If
the chemical stripper does not work, you can try a steam
wallpaper stripper to soften the coating so that you can strip
it off by hand. A large hired type will work better than a DIY
wallpaper stripper, but the job is messy and jolly hard work!
Some old textured finishes may contain a small proportion of
asbestos. For further details, consult the appropriate
supplier or manufacturer.

More Related Content

What's hot

Chapter 10 wall finishes ( plastering,pointing & painting)
Chapter 10 wall finishes ( plastering,pointing & painting)Chapter 10 wall finishes ( plastering,pointing & painting)
Chapter 10 wall finishes ( plastering,pointing & painting)KHUSHBU SHAH
 
Jointing & Pointing Brick & Blockwork
Jointing & Pointing Brick & BlockworkJointing & Pointing Brick & Blockwork
Jointing & Pointing Brick & BlockworkSteve Jarvis
 
Pointing and finishing
Pointing and finishingPointing and finishing
Pointing and finishingkajal018
 
Plastering and pointing
Plastering and pointingPlastering and pointing
Plastering and pointingRehmat Kaur
 
Jointing & Pointing
Jointing & PointingJointing & Pointing
Jointing & PointingSteve Jarvis
 
Technical advice note for bag rub finish
Technical advice note for bag rub finishTechnical advice note for bag rub finish
Technical advice note for bag rub finishlimetecuk
 
Nishant Parekh MRS repair of stone masonry PPT
Nishant Parekh MRS repair of stone masonry PPTNishant Parekh MRS repair of stone masonry PPT
Nishant Parekh MRS repair of stone masonry PPTNishant Parekh
 
Module 4 finishing works
Module 4 finishing worksModule 4 finishing works
Module 4 finishing worksRemya V.R
 
Terrazzo flooring and PCC flooring
Terrazzo flooring and PCC flooringTerrazzo flooring and PCC flooring
Terrazzo flooring and PCC flooringShubhamRai1305
 
Cement Plastering procedure
Cement Plastering procedureCement Plastering procedure
Cement Plastering procedureSyed Javed
 

What's hot (12)

Chapter 10 wall finishes ( plastering,pointing & painting)
Chapter 10 wall finishes ( plastering,pointing & painting)Chapter 10 wall finishes ( plastering,pointing & painting)
Chapter 10 wall finishes ( plastering,pointing & painting)
 
Plastering and pointing
Plastering and pointingPlastering and pointing
Plastering and pointing
 
Jointing & Pointing Brick & Blockwork
Jointing & Pointing Brick & BlockworkJointing & Pointing Brick & Blockwork
Jointing & Pointing Brick & Blockwork
 
Pointing and finishing
Pointing and finishingPointing and finishing
Pointing and finishing
 
Plastering and pointing
Plastering and pointingPlastering and pointing
Plastering and pointing
 
Jointing & Pointing
Jointing & PointingJointing & Pointing
Jointing & Pointing
 
Technical advice note for bag rub finish
Technical advice note for bag rub finishTechnical advice note for bag rub finish
Technical advice note for bag rub finish
 
Nishant Parekh MRS repair of stone masonry PPT
Nishant Parekh MRS repair of stone masonry PPTNishant Parekh MRS repair of stone masonry PPT
Nishant Parekh MRS repair of stone masonry PPT
 
Module 4 finishing works
Module 4 finishing worksModule 4 finishing works
Module 4 finishing works
 
04 masonry
04 masonry04 masonry
04 masonry
 
Terrazzo flooring and PCC flooring
Terrazzo flooring and PCC flooringTerrazzo flooring and PCC flooring
Terrazzo flooring and PCC flooring
 
Cement Plastering procedure
Cement Plastering procedureCement Plastering procedure
Cement Plastering procedure
 

Viewers also liked

Viewers also liked (8)

Corrugated sheet roofing
Corrugated sheet roofingCorrugated sheet roofing
Corrugated sheet roofing
 
Build a brick barbecue
Build a brick barbecueBuild a brick barbecue
Build a brick barbecue
 
Colour schemes
Colour schemesColour schemes
Colour schemes
 
All about decking
All about deckingAll about decking
All about decking
 
Fixing to plasterboard and plasterboard fixings
Fixing to plasterboard and plasterboard fixingsFixing to plasterboard and plasterboard fixings
Fixing to plasterboard and plasterboard fixings
 
Wallpapering techniques
Wallpapering techniquesWallpapering techniques
Wallpapering techniques
 
The Ultimate Property Investment Guide2
The Ultimate Property Investment Guide2The Ultimate Property Investment Guide2
The Ultimate Property Investment Guide2
 
About kitchens
About kitchensAbout kitchens
About kitchens
 

Similar to Artex and plaster

Ceramic tiles for worktops
Ceramic tiles for worktopsCeramic tiles for worktops
Ceramic tiles for worktopsPraveen Sudarsan
 
How to tile a floor
How to tile a floorHow to tile a floor
How to tile a floorHSS Hire
 
Wallpaper Artwork Tutorial
Wallpaper Artwork TutorialWallpaper Artwork Tutorial
Wallpaper Artwork Tutorialvsheaffer
 
Wallpapering techniques
Wallpapering techniquesWallpapering techniques
Wallpapering techniquesZulaiha Amaria
 
educational sheet clay plaster
educational sheet clay plastereducational sheet clay plaster
educational sheet clay plasterlibnam
 
11. How to paint a shed
11. How to paint a shed11. How to paint a shed
11. How to paint a shedicreatablesseo
 
Plastering Process (Cement/Masonry/Finishing Layer)
Plastering Process (Cement/Masonry/Finishing Layer)Plastering Process (Cement/Masonry/Finishing Layer)
Plastering Process (Cement/Masonry/Finishing Layer)Zelkhan
 
Timber Panels Installation
Timber Panels InstallationTimber Panels Installation
Timber Panels InstallationDeziner Panels
 

Similar to Artex and plaster (20)

Artex and plaster
Artex and plasterArtex and plaster
Artex and plaster
 
Wall tiling
Wall tilingWall tiling
Wall tiling
 
Ceramic tiles for worktops
Ceramic tiles for worktopsCeramic tiles for worktops
Ceramic tiles for worktops
 
How to tile a floor
How to tile a floorHow to tile a floor
How to tile a floor
 
Wallpaper stripping
Wallpaper strippingWallpaper stripping
Wallpaper stripping
 
Wallpaper stripping
Wallpaper strippingWallpaper stripping
Wallpaper stripping
 
Interior painting
Interior paintingInterior painting
Interior painting
 
Lay carpet tiles
Lay carpet tilesLay carpet tiles
Lay carpet tiles
 
Wallpaper Artwork Tutorial
Wallpaper Artwork TutorialWallpaper Artwork Tutorial
Wallpaper Artwork Tutorial
 
Replace broken tiles
Replace broken tilesReplace broken tiles
Replace broken tiles
 
Cornices and coving
Cornices and covingCornices and coving
Cornices and coving
 
Hanging wallpaper
Hanging wallpaperHanging wallpaper
Hanging wallpaper
 
Wallpapering techniques
Wallpapering techniquesWallpapering techniques
Wallpapering techniques
 
educational sheet clay plaster
educational sheet clay plastereducational sheet clay plaster
educational sheet clay plaster
 
11. How to paint a shed
11. How to paint a shed11. How to paint a shed
11. How to paint a shed
 
Wallpaper a ceiling
Wallpaper a ceilingWallpaper a ceiling
Wallpaper a ceiling
 
Glass blocks
Glass blocksGlass blocks
Glass blocks
 
Plastering Process (Cement/Masonry/Finishing Layer)
Plastering Process (Cement/Masonry/Finishing Layer)Plastering Process (Cement/Masonry/Finishing Layer)
Plastering Process (Cement/Masonry/Finishing Layer)
 
Timber Panels Installation
Timber Panels InstallationTimber Panels Installation
Timber Panels Installation
 
Lay a laminate floor
Lay a laminate floorLay a laminate floor
Lay a laminate floor
 

More from Praveen Sudarsan

More from Praveen Sudarsan (20)

How to install pvc downpipes
How to install pvc downpipesHow to install pvc downpipes
How to install pvc downpipes
 
How to hang wallpaper
How to hang wallpaperHow to hang wallpaper
How to hang wallpaper
 
How to construct a suimple garden pond
How to construct a suimple garden pondHow to construct a suimple garden pond
How to construct a suimple garden pond
 
How to build a retaining wall
How to build a retaining wallHow to build a retaining wall
How to build a retaining wall
 
How to build a raised formal pool
How to build a raised formal poolHow to build a raised formal pool
How to build a raised formal pool
 
How to build a deck
How to build a deckHow to build a deck
How to build a deck
 
How a lighting circuit works
How a lighting circuit worksHow a lighting circuit works
How a lighting circuit works
 
Home security
Home securityHome security
Home security
 
Heat guns
Heat gunsHeat guns
Heat guns
 
Hanging a door
Hanging a doorHanging a door
Hanging a door
 
Handrail anatomy
Handrail anatomyHandrail anatomy
Handrail anatomy
 
Upvc fascia
Upvc fasciaUpvc fascia
Upvc fascia
 
Timber care
Timber careTimber care
Timber care
 
How to avoid the cowboy builder
How to avoid the cowboy builderHow to avoid the cowboy builder
How to avoid the cowboy builder
 
General do it yourself safety comments
General do it yourself safety commentsGeneral do it yourself safety comments
General do it yourself safety comments
 
Garage floor insulation
Garage floor insulationGarage floor insulation
Garage floor insulation
 
Foundations for light garden walls
Foundations for light garden wallsFoundations for light garden walls
Foundations for light garden walls
 
Fixing to lathe & plaster
Fixing to lathe & plasterFixing to lathe & plaster
Fixing to lathe & plaster
 
Fitting a mortice latch
Fitting a mortice latchFitting a mortice latch
Fitting a mortice latch
 
Fit extra electrical sockets
Fit extra electrical socketsFit extra electrical sockets
Fit extra electrical sockets
 

Recently uploaded

Flow Your Strategy at Flight Levels Day 2024
Flow Your Strategy at Flight Levels Day 2024Flow Your Strategy at Flight Levels Day 2024
Flow Your Strategy at Flight Levels Day 2024Kirill Klimov
 
Organizational Structure Running A Successful Business
Organizational Structure Running A Successful BusinessOrganizational Structure Running A Successful Business
Organizational Structure Running A Successful BusinessSeta Wicaksana
 
Youth Involvement in an Innovative Coconut Value Chain by Mwalimu Menza
Youth Involvement in an Innovative Coconut Value Chain by Mwalimu MenzaYouth Involvement in an Innovative Coconut Value Chain by Mwalimu Menza
Youth Involvement in an Innovative Coconut Value Chain by Mwalimu Menzaictsugar
 
8447779800, Low rate Call girls in Saket Delhi NCR
8447779800, Low rate Call girls in Saket Delhi NCR8447779800, Low rate Call girls in Saket Delhi NCR
8447779800, Low rate Call girls in Saket Delhi NCRashishs7044
 
The CMO Survey - Highlights and Insights Report - Spring 2024
The CMO Survey - Highlights and Insights Report - Spring 2024The CMO Survey - Highlights and Insights Report - Spring 2024
The CMO Survey - Highlights and Insights Report - Spring 2024christinemoorman
 
Marketing Management Business Plan_My Sweet Creations
Marketing Management Business Plan_My Sweet CreationsMarketing Management Business Plan_My Sweet Creations
Marketing Management Business Plan_My Sweet Creationsnakalysalcedo61
 
Ten Organizational Design Models to align structure and operations to busines...
Ten Organizational Design Models to align structure and operations to busines...Ten Organizational Design Models to align structure and operations to busines...
Ten Organizational Design Models to align structure and operations to busines...Seta Wicaksana
 
FULL ENJOY Call girls in Paharganj Delhi | 8377087607
FULL ENJOY Call girls in Paharganj Delhi | 8377087607FULL ENJOY Call girls in Paharganj Delhi | 8377087607
FULL ENJOY Call girls in Paharganj Delhi | 8377087607dollysharma2066
 
India Consumer 2024 Redacted Sample Report
India Consumer 2024 Redacted Sample ReportIndia Consumer 2024 Redacted Sample Report
India Consumer 2024 Redacted Sample ReportMintel Group
 
Buy gmail accounts.pdf Buy Old Gmail Accounts
Buy gmail accounts.pdf Buy Old Gmail AccountsBuy gmail accounts.pdf Buy Old Gmail Accounts
Buy gmail accounts.pdf Buy Old Gmail AccountsBuy Verified Accounts
 
8447779800, Low rate Call girls in Kotla Mubarakpur Delhi NCR
8447779800, Low rate Call girls in Kotla Mubarakpur Delhi NCR8447779800, Low rate Call girls in Kotla Mubarakpur Delhi NCR
8447779800, Low rate Call girls in Kotla Mubarakpur Delhi NCRashishs7044
 
BEST Call Girls In Old Faridabad ✨ 9773824855 ✨ Escorts Service In Delhi Ncr,
BEST Call Girls In Old Faridabad ✨ 9773824855 ✨ Escorts Service In Delhi Ncr,BEST Call Girls In Old Faridabad ✨ 9773824855 ✨ Escorts Service In Delhi Ncr,
BEST Call Girls In Old Faridabad ✨ 9773824855 ✨ Escorts Service In Delhi Ncr,noida100girls
 
Future Of Sample Report 2024 | Redacted Version
Future Of Sample Report 2024 | Redacted VersionFuture Of Sample Report 2024 | Redacted Version
Future Of Sample Report 2024 | Redacted VersionMintel Group
 
Annual General Meeting Presentation Slides
Annual General Meeting Presentation SlidesAnnual General Meeting Presentation Slides
Annual General Meeting Presentation SlidesKeppelCorporation
 
2024 Numerator Consumer Study of Cannabis Usage
2024 Numerator Consumer Study of Cannabis Usage2024 Numerator Consumer Study of Cannabis Usage
2024 Numerator Consumer Study of Cannabis UsageNeil Kimberley
 
Intro to BCG's Carbon Emissions Benchmark_vF.pdf
Intro to BCG's Carbon Emissions Benchmark_vF.pdfIntro to BCG's Carbon Emissions Benchmark_vF.pdf
Intro to BCG's Carbon Emissions Benchmark_vF.pdfpollardmorgan
 
8447779800, Low rate Call girls in Shivaji Enclave Delhi NCR
8447779800, Low rate Call girls in Shivaji Enclave Delhi NCR8447779800, Low rate Call girls in Shivaji Enclave Delhi NCR
8447779800, Low rate Call girls in Shivaji Enclave Delhi NCRashishs7044
 
NewBase 19 April 2024 Energy News issue - 1717 by Khaled Al Awadi.pdf
NewBase  19 April  2024  Energy News issue - 1717 by Khaled Al Awadi.pdfNewBase  19 April  2024  Energy News issue - 1717 by Khaled Al Awadi.pdf
NewBase 19 April 2024 Energy News issue - 1717 by Khaled Al Awadi.pdfKhaled Al Awadi
 
(Best) ENJOY Call Girls in Faridabad Ex | 8377087607
(Best) ENJOY Call Girls in Faridabad Ex | 8377087607(Best) ENJOY Call Girls in Faridabad Ex | 8377087607
(Best) ENJOY Call Girls in Faridabad Ex | 8377087607dollysharma2066
 
/:Call Girls In Indirapuram Ghaziabad ➥9990211544 Independent Best Escorts In...
/:Call Girls In Indirapuram Ghaziabad ➥9990211544 Independent Best Escorts In.../:Call Girls In Indirapuram Ghaziabad ➥9990211544 Independent Best Escorts In...
/:Call Girls In Indirapuram Ghaziabad ➥9990211544 Independent Best Escorts In...lizamodels9
 

Recently uploaded (20)

Flow Your Strategy at Flight Levels Day 2024
Flow Your Strategy at Flight Levels Day 2024Flow Your Strategy at Flight Levels Day 2024
Flow Your Strategy at Flight Levels Day 2024
 
Organizational Structure Running A Successful Business
Organizational Structure Running A Successful BusinessOrganizational Structure Running A Successful Business
Organizational Structure Running A Successful Business
 
Youth Involvement in an Innovative Coconut Value Chain by Mwalimu Menza
Youth Involvement in an Innovative Coconut Value Chain by Mwalimu MenzaYouth Involvement in an Innovative Coconut Value Chain by Mwalimu Menza
Youth Involvement in an Innovative Coconut Value Chain by Mwalimu Menza
 
8447779800, Low rate Call girls in Saket Delhi NCR
8447779800, Low rate Call girls in Saket Delhi NCR8447779800, Low rate Call girls in Saket Delhi NCR
8447779800, Low rate Call girls in Saket Delhi NCR
 
The CMO Survey - Highlights and Insights Report - Spring 2024
The CMO Survey - Highlights and Insights Report - Spring 2024The CMO Survey - Highlights and Insights Report - Spring 2024
The CMO Survey - Highlights and Insights Report - Spring 2024
 
Marketing Management Business Plan_My Sweet Creations
Marketing Management Business Plan_My Sweet CreationsMarketing Management Business Plan_My Sweet Creations
Marketing Management Business Plan_My Sweet Creations
 
Ten Organizational Design Models to align structure and operations to busines...
Ten Organizational Design Models to align structure and operations to busines...Ten Organizational Design Models to align structure and operations to busines...
Ten Organizational Design Models to align structure and operations to busines...
 
FULL ENJOY Call girls in Paharganj Delhi | 8377087607
FULL ENJOY Call girls in Paharganj Delhi | 8377087607FULL ENJOY Call girls in Paharganj Delhi | 8377087607
FULL ENJOY Call girls in Paharganj Delhi | 8377087607
 
India Consumer 2024 Redacted Sample Report
India Consumer 2024 Redacted Sample ReportIndia Consumer 2024 Redacted Sample Report
India Consumer 2024 Redacted Sample Report
 
Buy gmail accounts.pdf Buy Old Gmail Accounts
Buy gmail accounts.pdf Buy Old Gmail AccountsBuy gmail accounts.pdf Buy Old Gmail Accounts
Buy gmail accounts.pdf Buy Old Gmail Accounts
 
8447779800, Low rate Call girls in Kotla Mubarakpur Delhi NCR
8447779800, Low rate Call girls in Kotla Mubarakpur Delhi NCR8447779800, Low rate Call girls in Kotla Mubarakpur Delhi NCR
8447779800, Low rate Call girls in Kotla Mubarakpur Delhi NCR
 
BEST Call Girls In Old Faridabad ✨ 9773824855 ✨ Escorts Service In Delhi Ncr,
BEST Call Girls In Old Faridabad ✨ 9773824855 ✨ Escorts Service In Delhi Ncr,BEST Call Girls In Old Faridabad ✨ 9773824855 ✨ Escorts Service In Delhi Ncr,
BEST Call Girls In Old Faridabad ✨ 9773824855 ✨ Escorts Service In Delhi Ncr,
 
Future Of Sample Report 2024 | Redacted Version
Future Of Sample Report 2024 | Redacted VersionFuture Of Sample Report 2024 | Redacted Version
Future Of Sample Report 2024 | Redacted Version
 
Annual General Meeting Presentation Slides
Annual General Meeting Presentation SlidesAnnual General Meeting Presentation Slides
Annual General Meeting Presentation Slides
 
2024 Numerator Consumer Study of Cannabis Usage
2024 Numerator Consumer Study of Cannabis Usage2024 Numerator Consumer Study of Cannabis Usage
2024 Numerator Consumer Study of Cannabis Usage
 
Intro to BCG's Carbon Emissions Benchmark_vF.pdf
Intro to BCG's Carbon Emissions Benchmark_vF.pdfIntro to BCG's Carbon Emissions Benchmark_vF.pdf
Intro to BCG's Carbon Emissions Benchmark_vF.pdf
 
8447779800, Low rate Call girls in Shivaji Enclave Delhi NCR
8447779800, Low rate Call girls in Shivaji Enclave Delhi NCR8447779800, Low rate Call girls in Shivaji Enclave Delhi NCR
8447779800, Low rate Call girls in Shivaji Enclave Delhi NCR
 
NewBase 19 April 2024 Energy News issue - 1717 by Khaled Al Awadi.pdf
NewBase  19 April  2024  Energy News issue - 1717 by Khaled Al Awadi.pdfNewBase  19 April  2024  Energy News issue - 1717 by Khaled Al Awadi.pdf
NewBase 19 April 2024 Energy News issue - 1717 by Khaled Al Awadi.pdf
 
(Best) ENJOY Call Girls in Faridabad Ex | 8377087607
(Best) ENJOY Call Girls in Faridabad Ex | 8377087607(Best) ENJOY Call Girls in Faridabad Ex | 8377087607
(Best) ENJOY Call Girls in Faridabad Ex | 8377087607
 
/:Call Girls In Indirapuram Ghaziabad ➥9990211544 Independent Best Escorts In...
/:Call Girls In Indirapuram Ghaziabad ➥9990211544 Independent Best Escorts In.../:Call Girls In Indirapuram Ghaziabad ➥9990211544 Independent Best Escorts In...
/:Call Girls In Indirapuram Ghaziabad ➥9990211544 Independent Best Escorts In...
 

Artex and plaster

  • 1. ARTEX AND PLASTER Proper plastering is not easy. But DIY plasters are designed with ease of use in mind, and ArtexTM is no more difficult to apply than thick paint. It is best to wear gloves when mixing up dry plaster-based products - disposable plastic gloves are fine. Wear a face mask when mixing up fine powder. Being able to use Artex and plaster can help keep the walls and ceilings in your home looking good. A professional plasterer will normally use gypsum-based Carlite plaster applied in two layers, undercoat and finish. The skill to do this properly takes years to acquire and the amateur should start with DIY plasters. "ArtexTM" is the best known make of textured coating, used on internal walls and ceilings to cover up cracks and uneven surfaces or fashioned into patterns. Some people may want to remove the patterned effect. 2 - Choosing the right product Consider what you want the plaster and/or textured coating to do. If a wall or ceiling is basically in good condition, but has a few holes or hairline cracks, there are many different wall fillers that you can use to make the surface smooth for decorating. Where an area of plaster is seriously damaged or has come away from the wall ('blown'), you can use a 'repair' plaster (a DIY plaster undercoat) once all the old loose plaster has been removed. This has a good enough finish for papering or tiling, but if you want to paint it, apply a DIY plaster finish (also known as plaster skim) first. DIY plasters are ideal for repairing the damage to walls created by holes made for electric wiring and plumbing waste pipes. If you have rough or uneven walls, and using a wall filler will not be good enough, the whole wall can be given a coat of DIY plaster finish (it can be applied up to 3mm or 1/8in thick). Alternatively, you could apply a textured coating, with or without a patterned finish. A new masonry wall can either be covered with plasterboard (often the best choice for a DIYer) or can be plastered using
  • 2. DIY plaster undercoat followed by DIY plaster finish. Only when you have had success with the DIY products should you attempt to use the professional products, though the technique is basically the same. Any wall can be covered with textured coating to provide a patterned decorative finish. It has the advantage that it covers up damaged and unsightly walls, but can equally well be used on a wall in good condition if you want the decorative effect. Textured coatings are available in smooth, fine-textured and coarse-textured finishes. 3 - Using DIY plaster undercoat The most likely time you will use a DIY plaster undercoat (repair plaster) is to repair damage to existing plaster - either damage you have created (perhaps by installing pipes or electric cables) or damage that has happened through accident or old age. It is also ideal for finishing off where you have bricked up a fireplace or a door opening. The first thing to do (especially with blown plaster) is to lay a dust sheet on the floor and cut back all existing loose plaster until you have a sound surface with solid edges. Use a club hammer and bolster chisel to do this (1) and remove all loose dust and debris with a stiff brush (2). Unless the plaster undercoat comes ready mixed, use a large clean bucket to mix up the powder with water. Use a clean wooden stick to do the mixing. It is easier if you add the powder to the water rather than the other way round. The plaster should have a thick creamy consistency.
  • 3. If the repair (or new plasterwork) includes a corner, fit metal angle bead to this first. Not only will it give a neat corner, but the bead will provide a guide for your levelling board. Cut the bead to length (with a hacksaw) and prime the cut ends. Fix it to the corner with dabs of plaster (3). Check it is vertical and leave the plaster to dry. Before you apply the plaster, dampen the wall surface, using a large paint brush - this will help adhesion and make it easy to 'work' the plaster. On very absorbent surfaces (aerated concrete blocks, for example), add one part PVA adhesive to five parts water. Transfer an amount of plaster to a hawk - a flat board about 30cm (1ft) square. You can buy a ready-made hawk or make your own from a piece of plywood nailed to a block of wood with a short handle (a bit of broom handle, for example) attached to it. Carry the hawk to the wall and hold it in front of the area you want to plaster. In one movement, tip the hawk towards you, lift off an amount of plaster with the edge of a steel plasterer's trowel and press the plaster against the wall with an upwards sweep of the trowel (4). The method of application is crucial - you start with the trowel at quite an angle to the wall and gradually reduce this angle as you move it up the wall. Do not allow the trowel to get flat against the wall or you will pull off the plaster you are trying to apply. Carry on adding plaster until the whole area to be repaired is covered. Remember always to keep the trowel at an angle to the wall and leave the plaster slightly proud of the
  • 4. surrounding surface. To get the surface level, use a piece of straight-edged timber held at an angle (or if you have one, a metal rule) moving it up the wall with a side-to-side action, holding it firmly against the existing sound plaster as a guide (5). When plastering a whole wall, timber screeds are attached to the wall (and levelled) before plastering to act as the guides for this straight- edge. Take care removing the straight-edge or rule from the surface together with the plaster you have scraped off. You should now be able to see any hollows which can be filled with more plaster before ruling off again. Keep a bucket of cold water handy at all times, so that you can keep tools clean - especially the plasterer's trowel. Allow the plaster surface to harden (but not completely dry) before dampening it and smoothing it flat with the trowel (still held at a slight angle) (6). If you are applying a finishing coat, scratch the surface of the undercoat with the edge of the trowel to provide a 'key'. 4 - Using DIY plaster finish A DIY finishing plaster should be applied to the undercoat before the latter is completely dry. It can also be applied directly to plasterboard and to an existing plaster surface, provided this is roughened slightly (all paint and paper should be removed). Mix up the plaster finish if necessary with clean water as for undercoat. Application methods vary for DIY finishing plasters. Some are applied in the same way as DIY plaster undercoat (with a plasterer's trowel) in two layers (1mm followed by 2mm), whilst others are applied with a paint brush (7) and then
  • 5. smoothed with the plastic spreader supplied (8). Check the instructions for your plaster. If you have used a plasterer's trowel to apply the plaster, give it a final smoothing with the trowel after it has started to harden. Dampen the surface with water as you do this - a simple spray bottle will help to apply this. 5 - Applying a textured coating A textured coating will level up uneven surfaces and cover cracks up to around 3mm (1/8in) wide - the coating is flexible, unlike normal paint, and reduces the possibility of cracks reopening. Textured coatings can be used to provide a number of different finishes which, if required, can be painted in a colour of your choice. As with all decoration, proper surface preparation is vital. Wallpaper (including painted wallpaper) must be removed and the surfaces thoroughly cleaned (in particular, getting rid of grease and nicotine stains). Sound paint can be left in place, but all loose and flaking paint (and all distemper) must be removed before you start. Remove any tiles from a ceiling along with their adhesive. Porous surfaces should be treated with special sealer and cracks larger than 3mm (1/8in) should be filled with wall
  • 6. filler: a special caulking tool is available to make this job easier. Filled cracks and joints between new plasterboard should be taped over with joint tape (tape should also be used on the edges of filled areas). If any parts of the wall are powdery or 'chalky', use a stabilising solution before applying the coating. Mix up powder, following the manufacturer's instructions. To speed up this process, whisk attachments are available for both hand and powered drills. Ready-mixed products can be applied straight from the tub. Use masking tape to protect electrical fittings, timber paintwork and exposed plumbing pipes. Lay a dustsheet on the floor. Textured coatings can be applied with a large paint brush (wall brush) or roller. The application method is different to paint as the coating is applied more or less in one go rather then being 'worked' once it is on the surface. Apply the coating to the wall or ceiling in bands around 60cm (2ft) wide; if you are applying a pattern, do this before applying the next band of coating. A brush or roller will leave a relatively flat surface (its texture depending on the type of coating being used), but if you want to provide a decorative pattern, this is done once the coating is on the wall. There are several different texturing tools you can use to provide the pattern: • patterned rollers for producing diamond, diagonal, bark and stipple patterns. • brushes and stipplers for creating a wide range of textured effects. • combs for creating artistic combed textures (including flower and rose designs as well as standard linear ones). • lacers (triangular plastic hand-held blades) for smoothing tips of heavier random textures (broken leather, bark and swirls, for example) to reduce the sharpness of the peaks; a standard set includes medium and small sizes. The tool is kept damp with water and is used before the texture has gone firm. • margin brush for creating borders around textured patterns and also for painting around fittings. • You could also use a damp sponge to create a stipple effect or your own swirl design. 6 - Unwanted textured coating? If you have moved into a different house and want to remove at least some of the patterned textured coating from the walls and ceilings, there are two choices: cover or strip. Covering is the easiest choice. You can get specific products designed for doing this and all you do is to apply them on top of the existing patterned coating (with a plasterer's
  • 7. float) so that the surface is restored to a smooth flat surface which you can then paper or paint. Remember, though, that you will now have quite a thick coating. Stripping is the alternative. There are specific products made for stripping textured coatings, though they may not work on all types. If the chemical stripper does not work, you can try a steam wallpaper stripper to soften the coating so that you can strip it off by hand. A large hired type will work better than a DIY wallpaper stripper, but the job is messy and jolly hard work! Some old textured finishes may contain a small proportion of asbestos. For further details, consult the appropriate supplier or manufacturer.