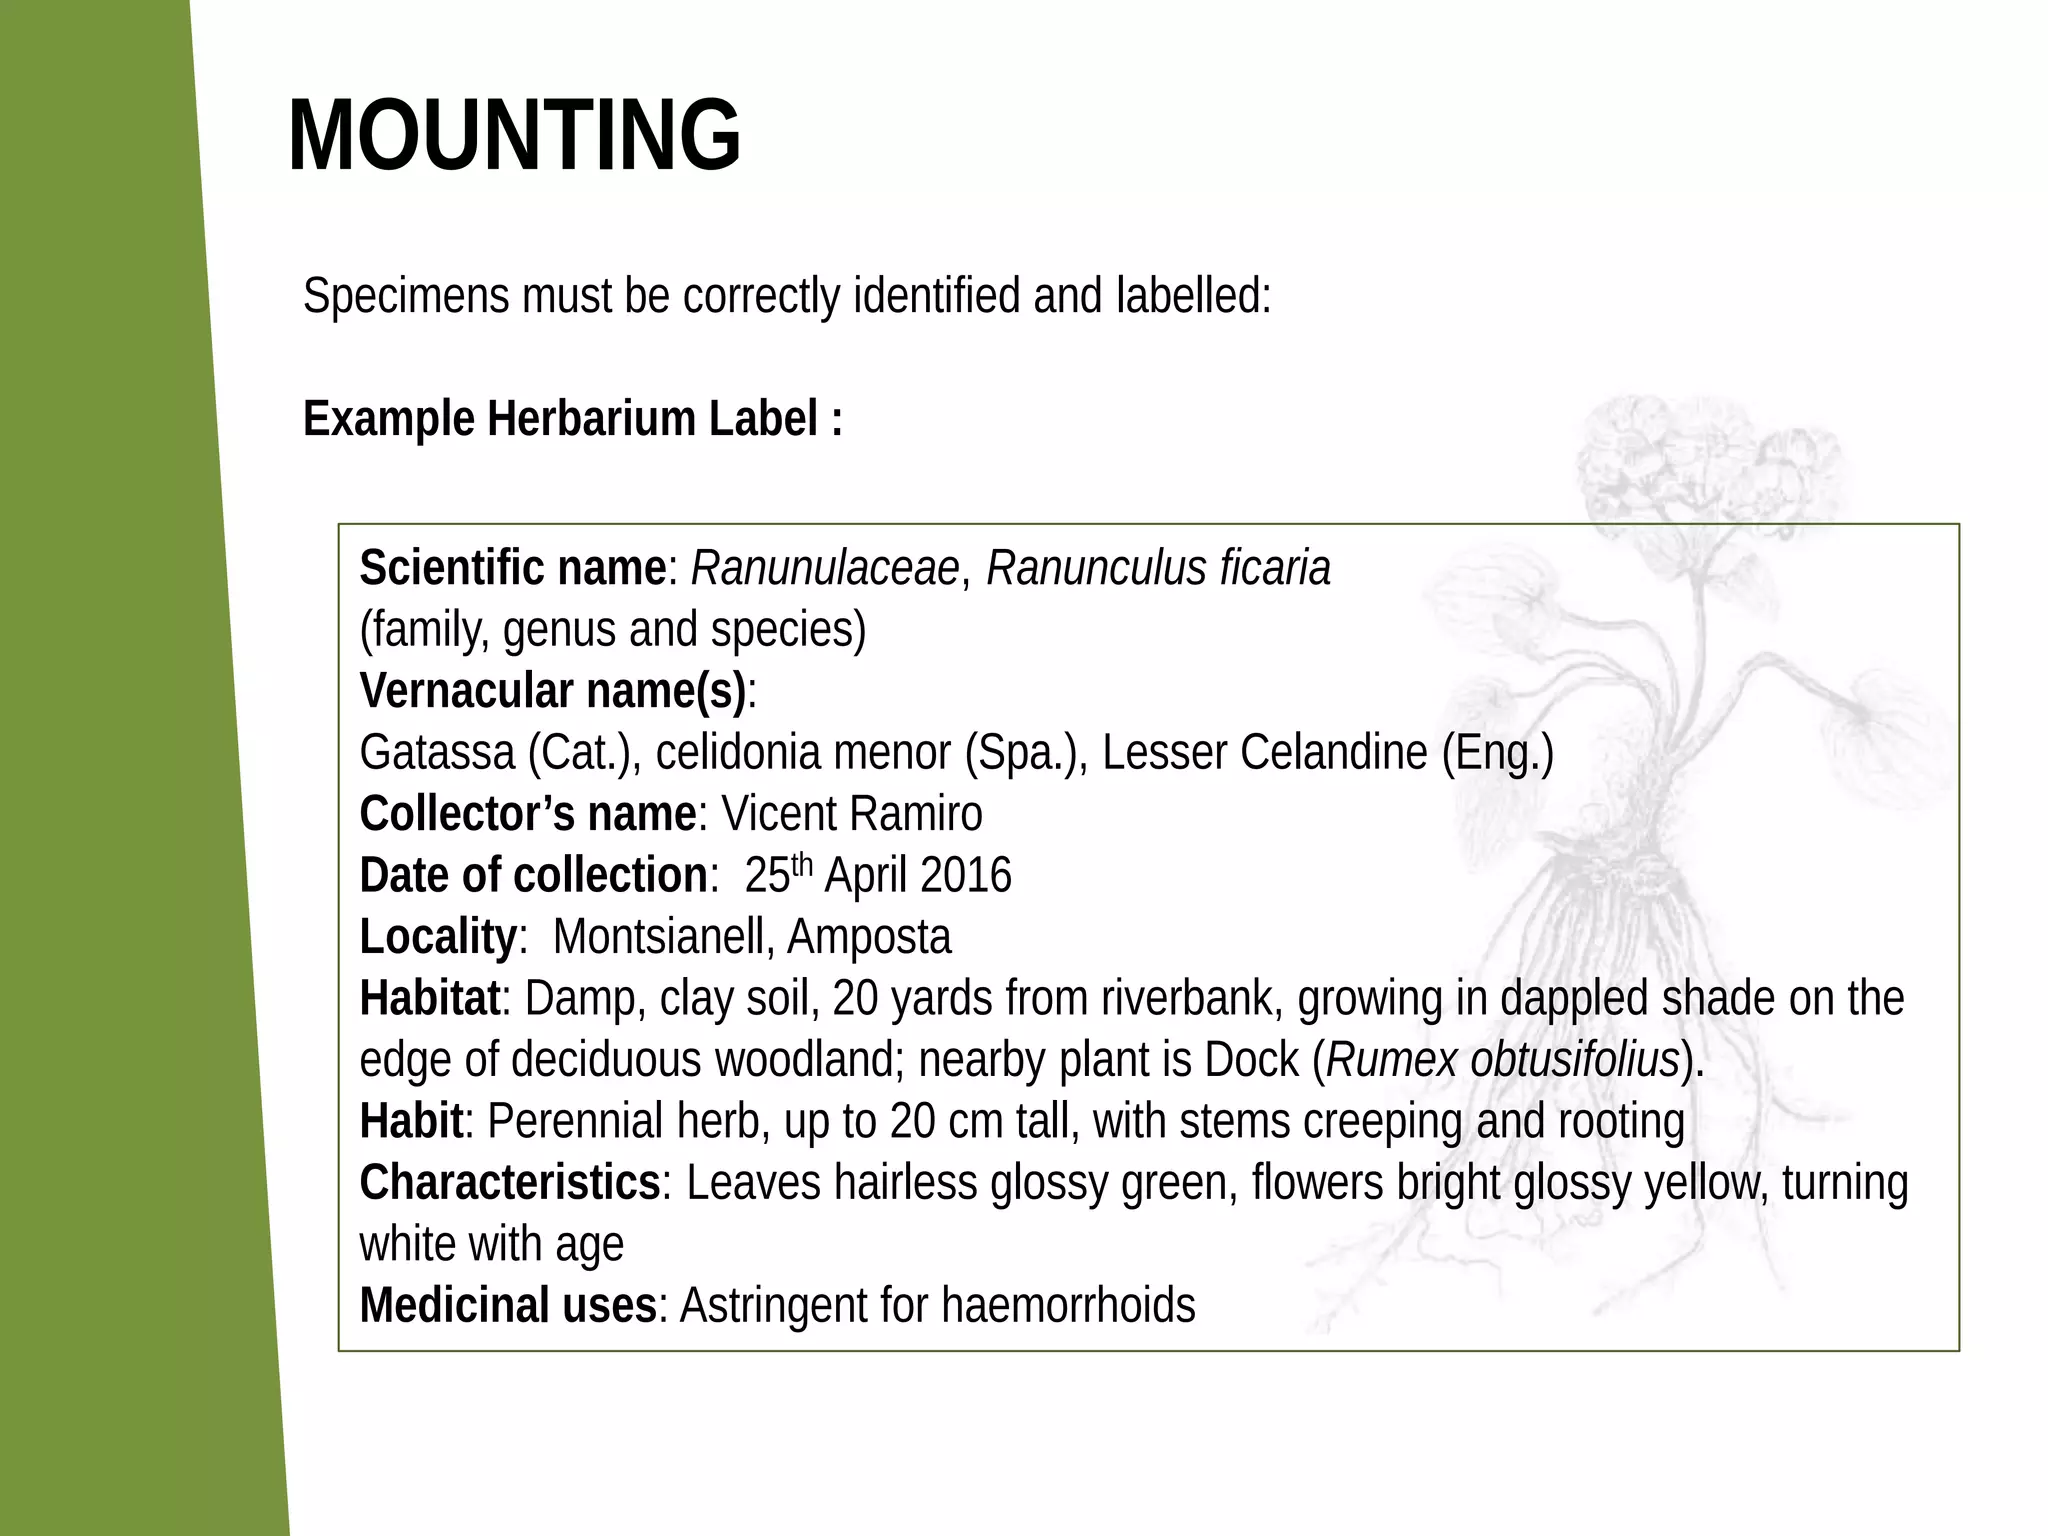
DEPARTAMENT DE CIÈNCIES
Biologia i Geologia
How to make a
Herbarium
Materials list for plant collecting:
Plant press
Plastic bags
Garden secateurs & trowel
Small note book & pencil
Tags (optional)
PLANT COLLECTING
Plants chosen should be good representatives of the species and should contain
all the essential features necessary for identification, i.e. leaves, stems, flowers &
seeds (+ roots if suitably small and the plant is common and abundant).
Collecting too many plant specimens during field trips is wasteful; it is
recommended that you collect only about three samples of your chosen species
to ensure you have adequate space in the plant press and sufficient time and
attention to devote to each specimen.
If very small plants are being collected then gather enough so that several small
specimens can sufficiently fill three A3 mounting sheets – mounting one tiny
specimen on a big sheet looks odd.
PLANT COLLECTING
Preferably collect specimens in dry conditions, a good time being mid-morning,
after the dew has dried but before the heat of the day causes plants to wilt. If
specimens are at all wet or you need to wash soil off the roots then dry them carefully
before pressing.
Field notes must be recorded at the time of collection, noting the following:
Date, collection number, location, habitat, habit, special characteristics.
Use a pencil for these notes rather than a pen because any damp/wetness can cause
ink to smudge and be unreadable.
Attaching a numbered tag to each specimen can be a very useful option as the tag
number will link to the number in your note book, avoiding any later confusion. This is
especially important if you are not certain of identification or are collecting several
plants species.
PLANT COLLECTING
Rare plants – of course permission is needed from the landowner before collecting any
plants, but you also need to check if a plant is rare. Check out these links:
<http://premsa.gencat.cat/pres_fsvp/AppJava/notapremsavw/59894/ca/37-especies-plantes-
perill-critic-dextincio-catalunya.do>
<http://herbarivirtual.uib.es/cat-ub/caracteristica/quadre_47.html>
Transporting your plants home can be difficult and whilst plastic bags are good for collecting
robust plants, delicate structures such as flowers can be damaged. To help prevent this you
can blow air into the bag and seal it – this will help to cushion the plants and also provide
some moisture. If the journey is lengthy you could also add a tiny amount of water to the bag
or wrap the roots in wet tissues or cloths. If the specimens are slightly wilted when you get
home you could place the roots/stems in water to revive them first before pressing.
You can take newspapers, corrugated card and string with you – your plants can be placed
between sheets of newspaper and an outer layer of card, and tied securely for protection on
the journey. Finer plant position adjustments can be done later at home.
IDENTIFICATION
You can use plant guides to help you identifying the
specimens. Here you can find some useful links:
<http://argus.biblioteques.gencat.cat/iii/encore/search/C__Sguia%20de%20plantes__O
rightresult__U1?lang=cat&suite=pearl>
<http://www.rjb.csic.es/jardinbotanico/jardin/index.php?Pag=594&len= >
<http://www.keytonature.eu/wiki/Pautas_para_la_identificaci%C3%B3n>
PRESSING & DRYING
Materials list for initial pressing:
Plant press
Newspaper
A home made press is easy to construct from two sturdy pieces of A3 sized plywood
and either two lengths of strap with buckles that can be cinched tight, or else four wing
nuts & bolts at each corner that can be screwed tight.
PRESSING & DRYING
Arrange the plant carefully, trying to avoid overlapping. If too crowded, either fold or trim
some shoots or leaves. If trimmed, it is important that you leave a stub to show what has
been removed. Large plants can have their stems folded to accommodate them within
the confines of the page or you can have several sheets for one plant showing the top,
middle and bottom of a plant.
Specimens can be adjusted once they are partially pressed as this makes fine
adjustments easier. This first adjustment could be after just half an hour of pressing with
delicate plants, or perhaps the next morning with more robust plants.
At least one leaf and one flower should be turn to expose the back surface.
Important note: If the specimen has thick or lumpy parts, use folds of newspaper to add
padding over less bulky structures to help distribute the pressure evenly. If this is not
done, delicate leaves and flowers may receive insufficient pressure and end up wrinkled
and discolored.
PRESSING & DRYING
Succulent or fleshy plants may be cut longitudinally and/or transversely and it may be
necessary to scoop out the inner tissue. Succulent plants can be killed by placing in
boiling water for a few minutes or they may continue to grow and have even been
known to send out a flower suddenly after years sitting in a herbarium!
Bulbs and thick roots may be cut in half lengthwise (off-centre to prevent the plant
from falling apart).
For the first two to four days you will need to check daily and change the blotting paper
and/or other surrounding papers, and retighten the press, but as the plants dry these
checks can become less frequent.
PRESSING & DRYING
If drying thick or fleshy material, change the sheets of drying paper more often but
if you are not experienced then it is best to avoid very succulent material. They are
very difficult to dry completely and if mounted moist are liable to become
discoloured and smelly.
Note: if your specimens are not completely dry, mould may develop on them
and this can be very dangerous if you breathe in the spoors.
Warmth may be used to improve the drying rate, for example over a radiator or in
an airing cupboard (in a humid climate, heat is essential).
The rate of drying is dependant on the plant material being pressed and the
temperature, pressure and the paper used. Drying may occur within two to four
days but often takes somewhat longer. Quick drying is preferred as it helps
retain the natural colours and prevents decay and mould formation
MOUNTING
Materials list for mounting plants:
Cartridge Paper
Waters-soluble glue or glue tape
Computer-generated labels
Cartridge paper for mounting your specimens should preferably be A3 size (the size
required by official herbariums). Jagged edges look very messy and unprofessional –
careful use a ruler and a hobby knife with a fresh blade, as this will produce clean,
straight edges.
Using only one side of your thick A3 cartridge paper, arrange your specimens
carefully, making sure that they represent the way the plant grows naturally. Don’t try
to arrange flowering stems artistically in a separate fashion. Remember you are
aiming to show the viewer what the plant looked like in nature.
MOUNTING
Loose specimens such as seed pods, pieces of bark, flowers and leaves should
be placed in a small paper packet that is then fixed to the mounting sheet. These
paper packets should only be folded and not glued or stapled together as one
has to be able to open them out flat in order to access delicate specimens easily
without damaging them.
The specimens may be mounted directly on the
paper with water-soluble glue. Apply as a
series of small dots to the back of the plant
parts. Water-soluble glue allows for later
removal of samples if required. Alternatively,
specimens may be secured with thin strips of
paper or sown on with linen or cotton thread but
these methods are not as popular because
specimens can more easily detach and become
damaged.
MOUNTING
Specimens must be correctly identified and labelled:
Example Herbarium Label :
Scientific name: Ranunulaceae, Ranunculus ficaria
(family, genus and species)
Vernacular name(s):
Gatassa (Cat.), celidonia menor (Spa.), Lesser Celandine (Eng.)
Collector’s name: Vicent Ramiro
Date of collection: 25th April 2016
Locality: Montsianell, Amposta
Habitat: Damp, clay soil, 20 yards from riverbank, growing in dappled shade on the
edge of deciduous woodland; nearby plant is Dock (Rumex obtusifolius).
Habit: Perennial herb, up to 20 cm tall, with stems creeping and rooting
Characteristics: Leaves hairless glossy green, flowers bright glossy yellow, turning
white with age
Medicinal uses: Astringent for haemorrhoids
MOUNTING
It is recommended that you design a label using your computer. This may then be
used a template for all other herbarium specimens. Giving clear borders around
your label allows for much neater cutting and presentation.
Don’t forget that characteristics are very important as they relate to all the extra
signs that may be missing when a plant has been dried. Examples are:
Colour & aroma
Surface hairs
Stem structure
Exudate
…
Storage of collection: Storage is in a large A3 paper or card folder, with members
of each genus being kept together. These folders are stored flat.
I hope this information is
helpful – good luck and
get collecting!
<https://theherbarium.wordpress.com/2010/09/10/how-to-make-a-herbarium/>
DEPARTAMENT DE CIÈNCIES
Biologia i Geologia

How to make a herbarium

  • 1.
    DEPARTAMENT DE CIÈNCIES Biologiai Geologia How to make a Herbarium
  • 2.
    Materials list forplant collecting: Plant press Plastic bags Garden secateurs & trowel Small note book & pencil Tags (optional) PLANT COLLECTING Plants chosen should be good representatives of the species and should contain all the essential features necessary for identification, i.e. leaves, stems, flowers & seeds (+ roots if suitably small and the plant is common and abundant). Collecting too many plant specimens during field trips is wasteful; it is recommended that you collect only about three samples of your chosen species to ensure you have adequate space in the plant press and sufficient time and attention to devote to each specimen. If very small plants are being collected then gather enough so that several small specimens can sufficiently fill three A3 mounting sheets – mounting one tiny specimen on a big sheet looks odd.
  • 3.
    PLANT COLLECTING Preferably collectspecimens in dry conditions, a good time being mid-morning, after the dew has dried but before the heat of the day causes plants to wilt. If specimens are at all wet or you need to wash soil off the roots then dry them carefully before pressing. Field notes must be recorded at the time of collection, noting the following: Date, collection number, location, habitat, habit, special characteristics. Use a pencil for these notes rather than a pen because any damp/wetness can cause ink to smudge and be unreadable. Attaching a numbered tag to each specimen can be a very useful option as the tag number will link to the number in your note book, avoiding any later confusion. This is especially important if you are not certain of identification or are collecting several plants species.
  • 4.
    PLANT COLLECTING Rare plants– of course permission is needed from the landowner before collecting any plants, but you also need to check if a plant is rare. Check out these links: <http://premsa.gencat.cat/pres_fsvp/AppJava/notapremsavw/59894/ca/37-especies-plantes- perill-critic-dextincio-catalunya.do> <http://herbarivirtual.uib.es/cat-ub/caracteristica/quadre_47.html> Transporting your plants home can be difficult and whilst plastic bags are good for collecting robust plants, delicate structures such as flowers can be damaged. To help prevent this you can blow air into the bag and seal it – this will help to cushion the plants and also provide some moisture. If the journey is lengthy you could also add a tiny amount of water to the bag or wrap the roots in wet tissues or cloths. If the specimens are slightly wilted when you get home you could place the roots/stems in water to revive them first before pressing. You can take newspapers, corrugated card and string with you – your plants can be placed between sheets of newspaper and an outer layer of card, and tied securely for protection on the journey. Finer plant position adjustments can be done later at home.
  • 5.
    IDENTIFICATION You can useplant guides to help you identifying the specimens. Here you can find some useful links: <http://argus.biblioteques.gencat.cat/iii/encore/search/C__Sguia%20de%20plantes__O rightresult__U1?lang=cat&suite=pearl> <http://www.rjb.csic.es/jardinbotanico/jardin/index.php?Pag=594&len= > <http://www.keytonature.eu/wiki/Pautas_para_la_identificaci%C3%B3n>
  • 6.
    PRESSING & DRYING Materialslist for initial pressing: Plant press Newspaper A home made press is easy to construct from two sturdy pieces of A3 sized plywood and either two lengths of strap with buckles that can be cinched tight, or else four wing nuts & bolts at each corner that can be screwed tight.
  • 7.
    PRESSING & DRYING Materialslist for initial pressing: Plant press Newspaper A home made press is easy to construct from two sturdy pieces of A3 sized plywood and either two lengths of strap with buckles that can be cinched tight, or else four wing nuts & bolts at each corner that can be screwed tight.
  • 8.
    PRESSING & DRYING Arrangethe plant carefully, trying to avoid overlapping. If too crowded, either fold or trim some shoots or leaves. If trimmed, it is important that you leave a stub to show what has been removed. Large plants can have their stems folded to accommodate them within the confines of the page or you can have several sheets for one plant showing the top, middle and bottom of a plant. Specimens can be adjusted once they are partially pressed as this makes fine adjustments easier. This first adjustment could be after just half an hour of pressing with delicate plants, or perhaps the next morning with more robust plants. At least one leaf and one flower should be turn to expose the back surface. Important note: If the specimen has thick or lumpy parts, use folds of newspaper to add padding over less bulky structures to help distribute the pressure evenly. If this is not done, delicate leaves and flowers may receive insufficient pressure and end up wrinkled and discolored.
  • 9.
    PRESSING & DRYING Succulentor fleshy plants may be cut longitudinally and/or transversely and it may be necessary to scoop out the inner tissue. Succulent plants can be killed by placing in boiling water for a few minutes or they may continue to grow and have even been known to send out a flower suddenly after years sitting in a herbarium! Bulbs and thick roots may be cut in half lengthwise (off-centre to prevent the plant from falling apart). For the first two to four days you will need to check daily and change the blotting paper and/or other surrounding papers, and retighten the press, but as the plants dry these checks can become less frequent.
  • 10.
    PRESSING & DRYING Ifdrying thick or fleshy material, change the sheets of drying paper more often but if you are not experienced then it is best to avoid very succulent material. They are very difficult to dry completely and if mounted moist are liable to become discoloured and smelly. Note: if your specimens are not completely dry, mould may develop on them and this can be very dangerous if you breathe in the spoors. Warmth may be used to improve the drying rate, for example over a radiator or in an airing cupboard (in a humid climate, heat is essential). The rate of drying is dependant on the plant material being pressed and the temperature, pressure and the paper used. Drying may occur within two to four days but often takes somewhat longer. Quick drying is preferred as it helps retain the natural colours and prevents decay and mould formation
  • 11.
    MOUNTING Materials list formounting plants: Cartridge Paper Waters-soluble glue or glue tape Computer-generated labels Cartridge paper for mounting your specimens should preferably be A3 size (the size required by official herbariums). Jagged edges look very messy and unprofessional – careful use a ruler and a hobby knife with a fresh blade, as this will produce clean, straight edges. Using only one side of your thick A3 cartridge paper, arrange your specimens carefully, making sure that they represent the way the plant grows naturally. Don’t try to arrange flowering stems artistically in a separate fashion. Remember you are aiming to show the viewer what the plant looked like in nature.
  • 12.
    MOUNTING Loose specimens suchas seed pods, pieces of bark, flowers and leaves should be placed in a small paper packet that is then fixed to the mounting sheet. These paper packets should only be folded and not glued or stapled together as one has to be able to open them out flat in order to access delicate specimens easily without damaging them. The specimens may be mounted directly on the paper with water-soluble glue. Apply as a series of small dots to the back of the plant parts. Water-soluble glue allows for later removal of samples if required. Alternatively, specimens may be secured with thin strips of paper or sown on with linen or cotton thread but these methods are not as popular because specimens can more easily detach and become damaged.
  • 13.
    MOUNTING Specimens must becorrectly identified and labelled: Example Herbarium Label : Scientific name: Ranunulaceae, Ranunculus ficaria (family, genus and species) Vernacular name(s): Gatassa (Cat.), celidonia menor (Spa.), Lesser Celandine (Eng.) Collector’s name: Vicent Ramiro Date of collection: 25th April 2016 Locality: Montsianell, Amposta Habitat: Damp, clay soil, 20 yards from riverbank, growing in dappled shade on the edge of deciduous woodland; nearby plant is Dock (Rumex obtusifolius). Habit: Perennial herb, up to 20 cm tall, with stems creeping and rooting Characteristics: Leaves hairless glossy green, flowers bright glossy yellow, turning white with age Medicinal uses: Astringent for haemorrhoids
  • 14.
    MOUNTING It is recommendedthat you design a label using your computer. This may then be used a template for all other herbarium specimens. Giving clear borders around your label allows for much neater cutting and presentation. Don’t forget that characteristics are very important as they relate to all the extra signs that may be missing when a plant has been dried. Examples are: Colour & aroma Surface hairs Stem structure Exudate … Storage of collection: Storage is in a large A3 paper or card folder, with members of each genus being kept together. These folders are stored flat.
  • 15.
    I hope thisinformation is helpful – good luck and get collecting! <https://theherbarium.wordpress.com/2010/09/10/how-to-make-a-herbarium/> DEPARTAMENT DE CIÈNCIES Biologia i Geologia