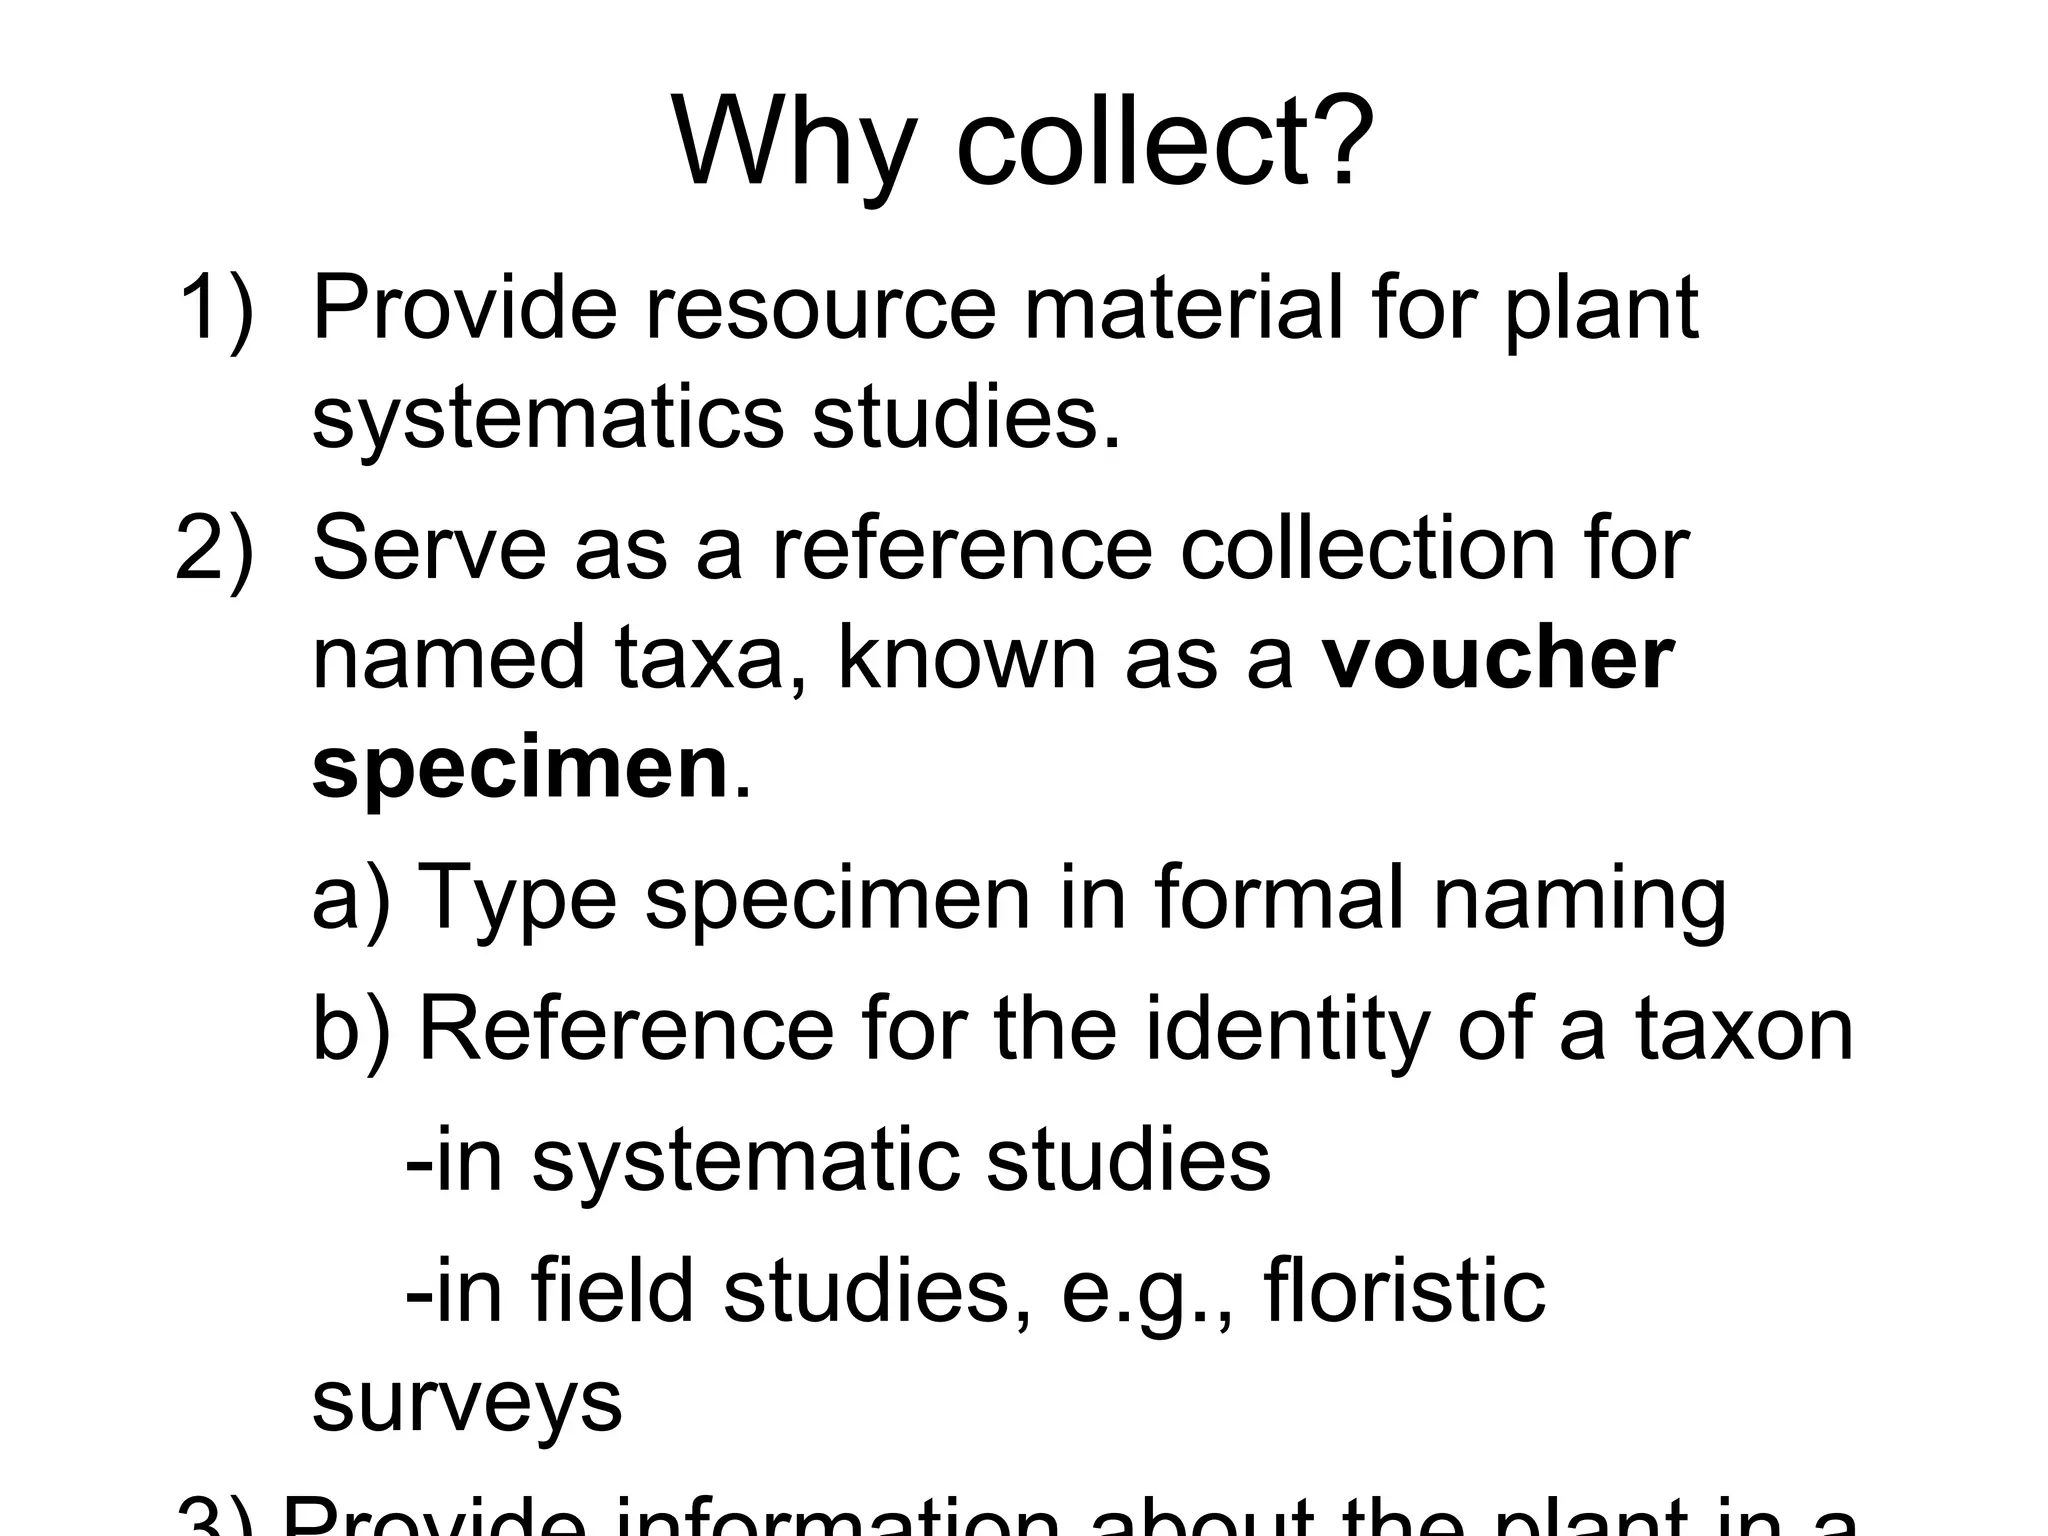
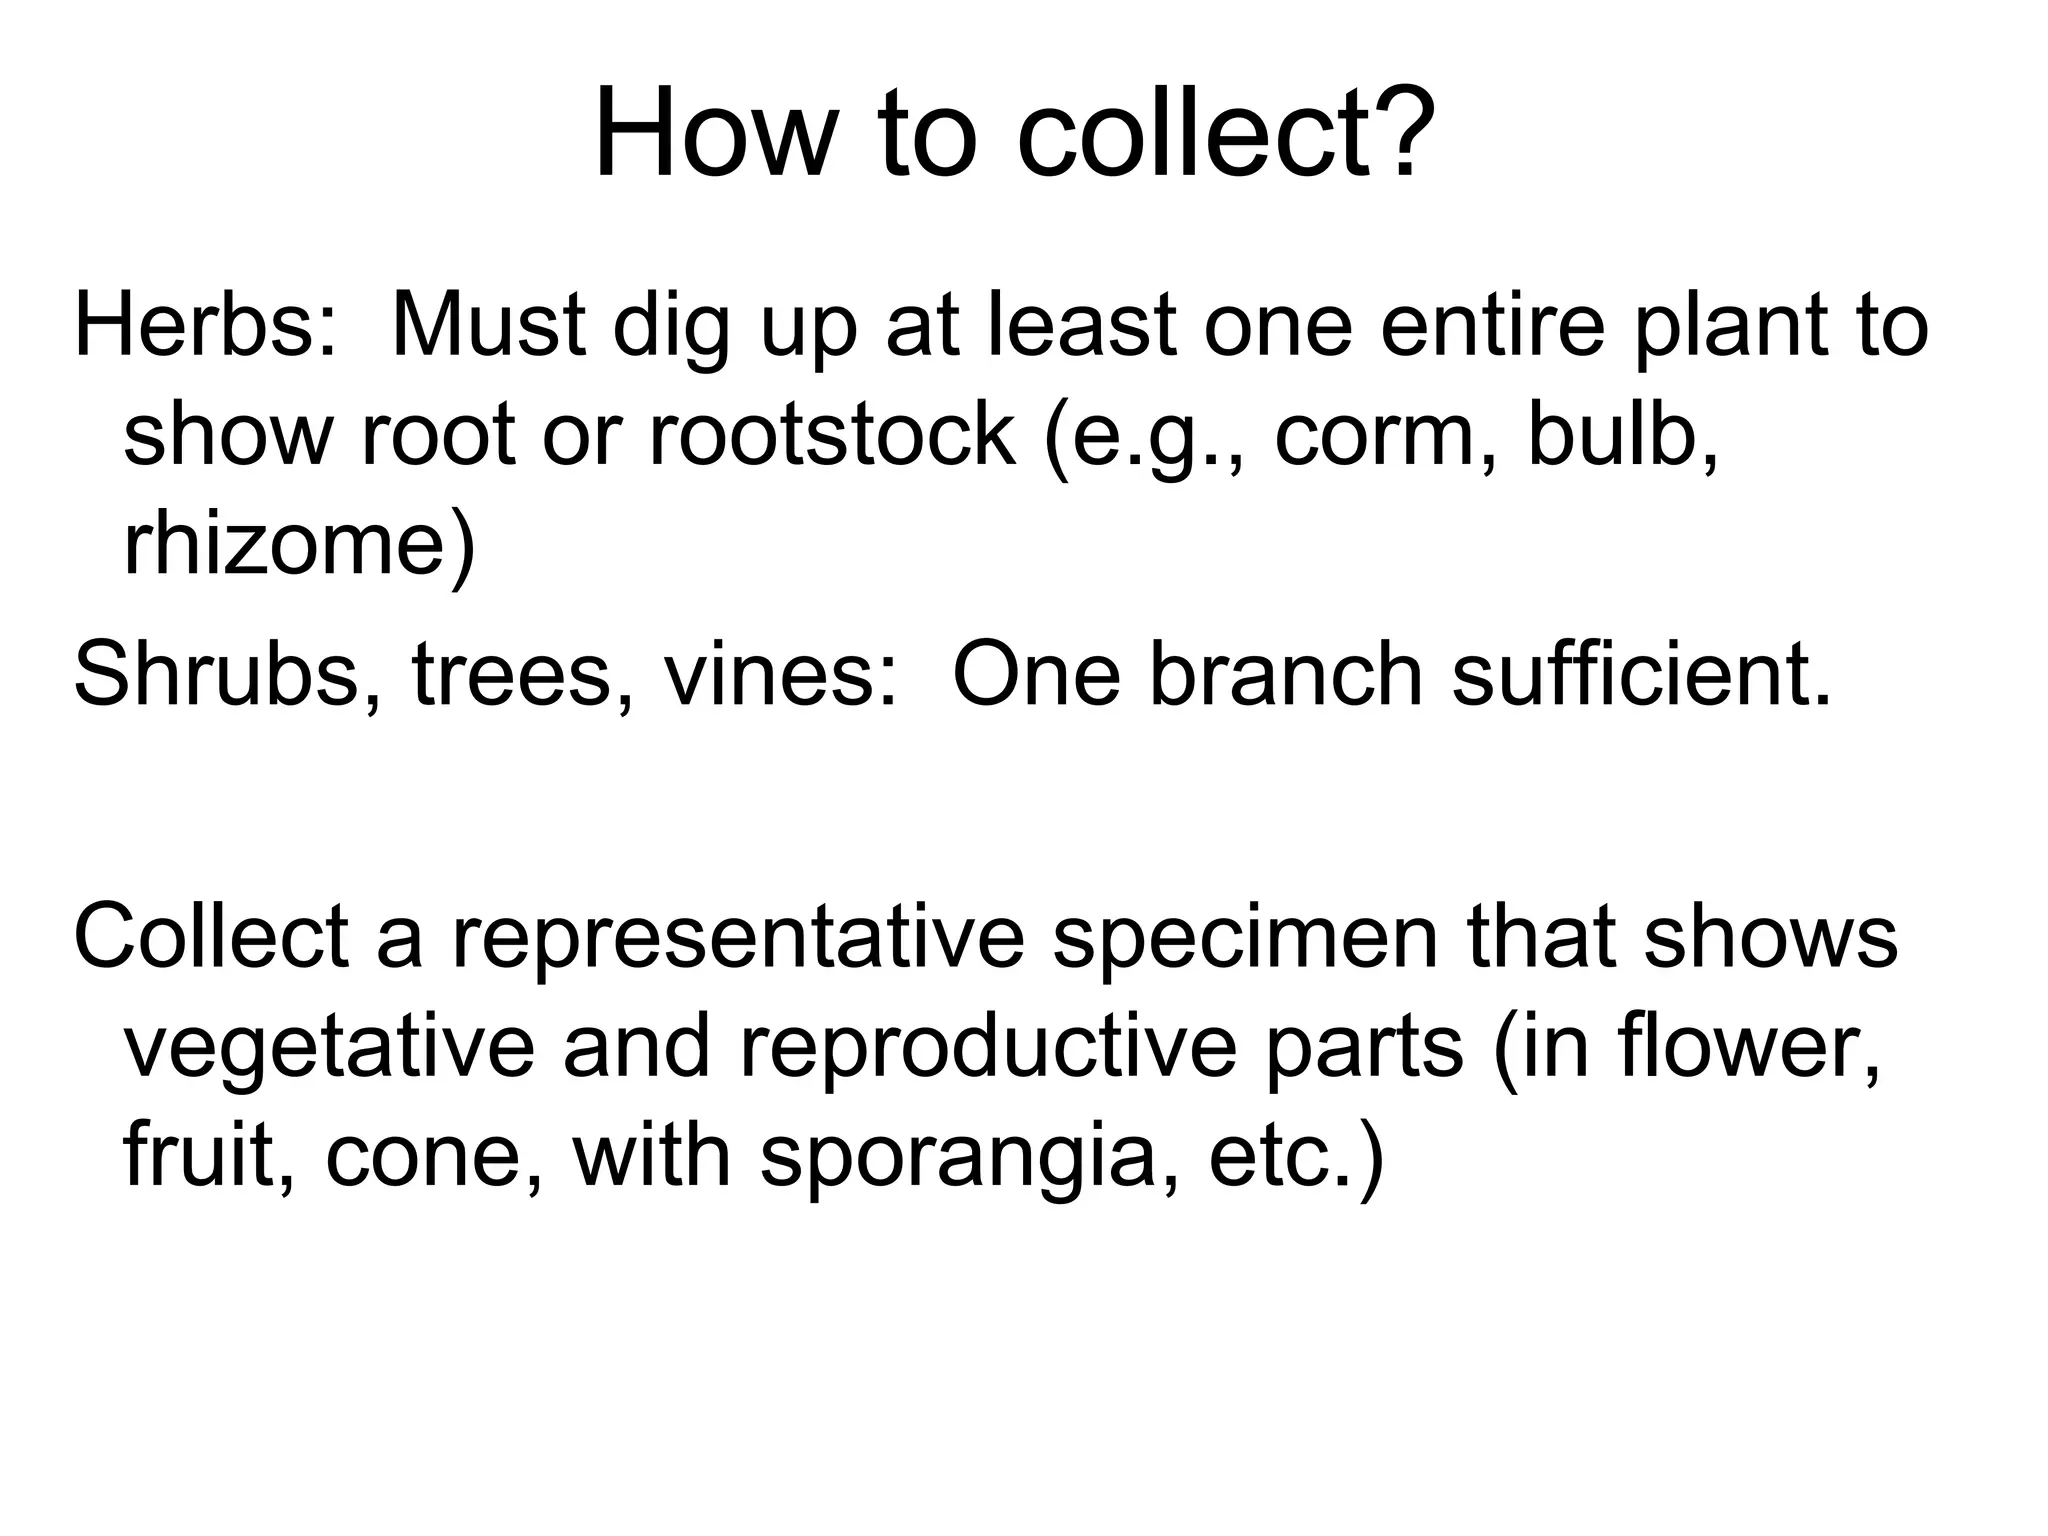
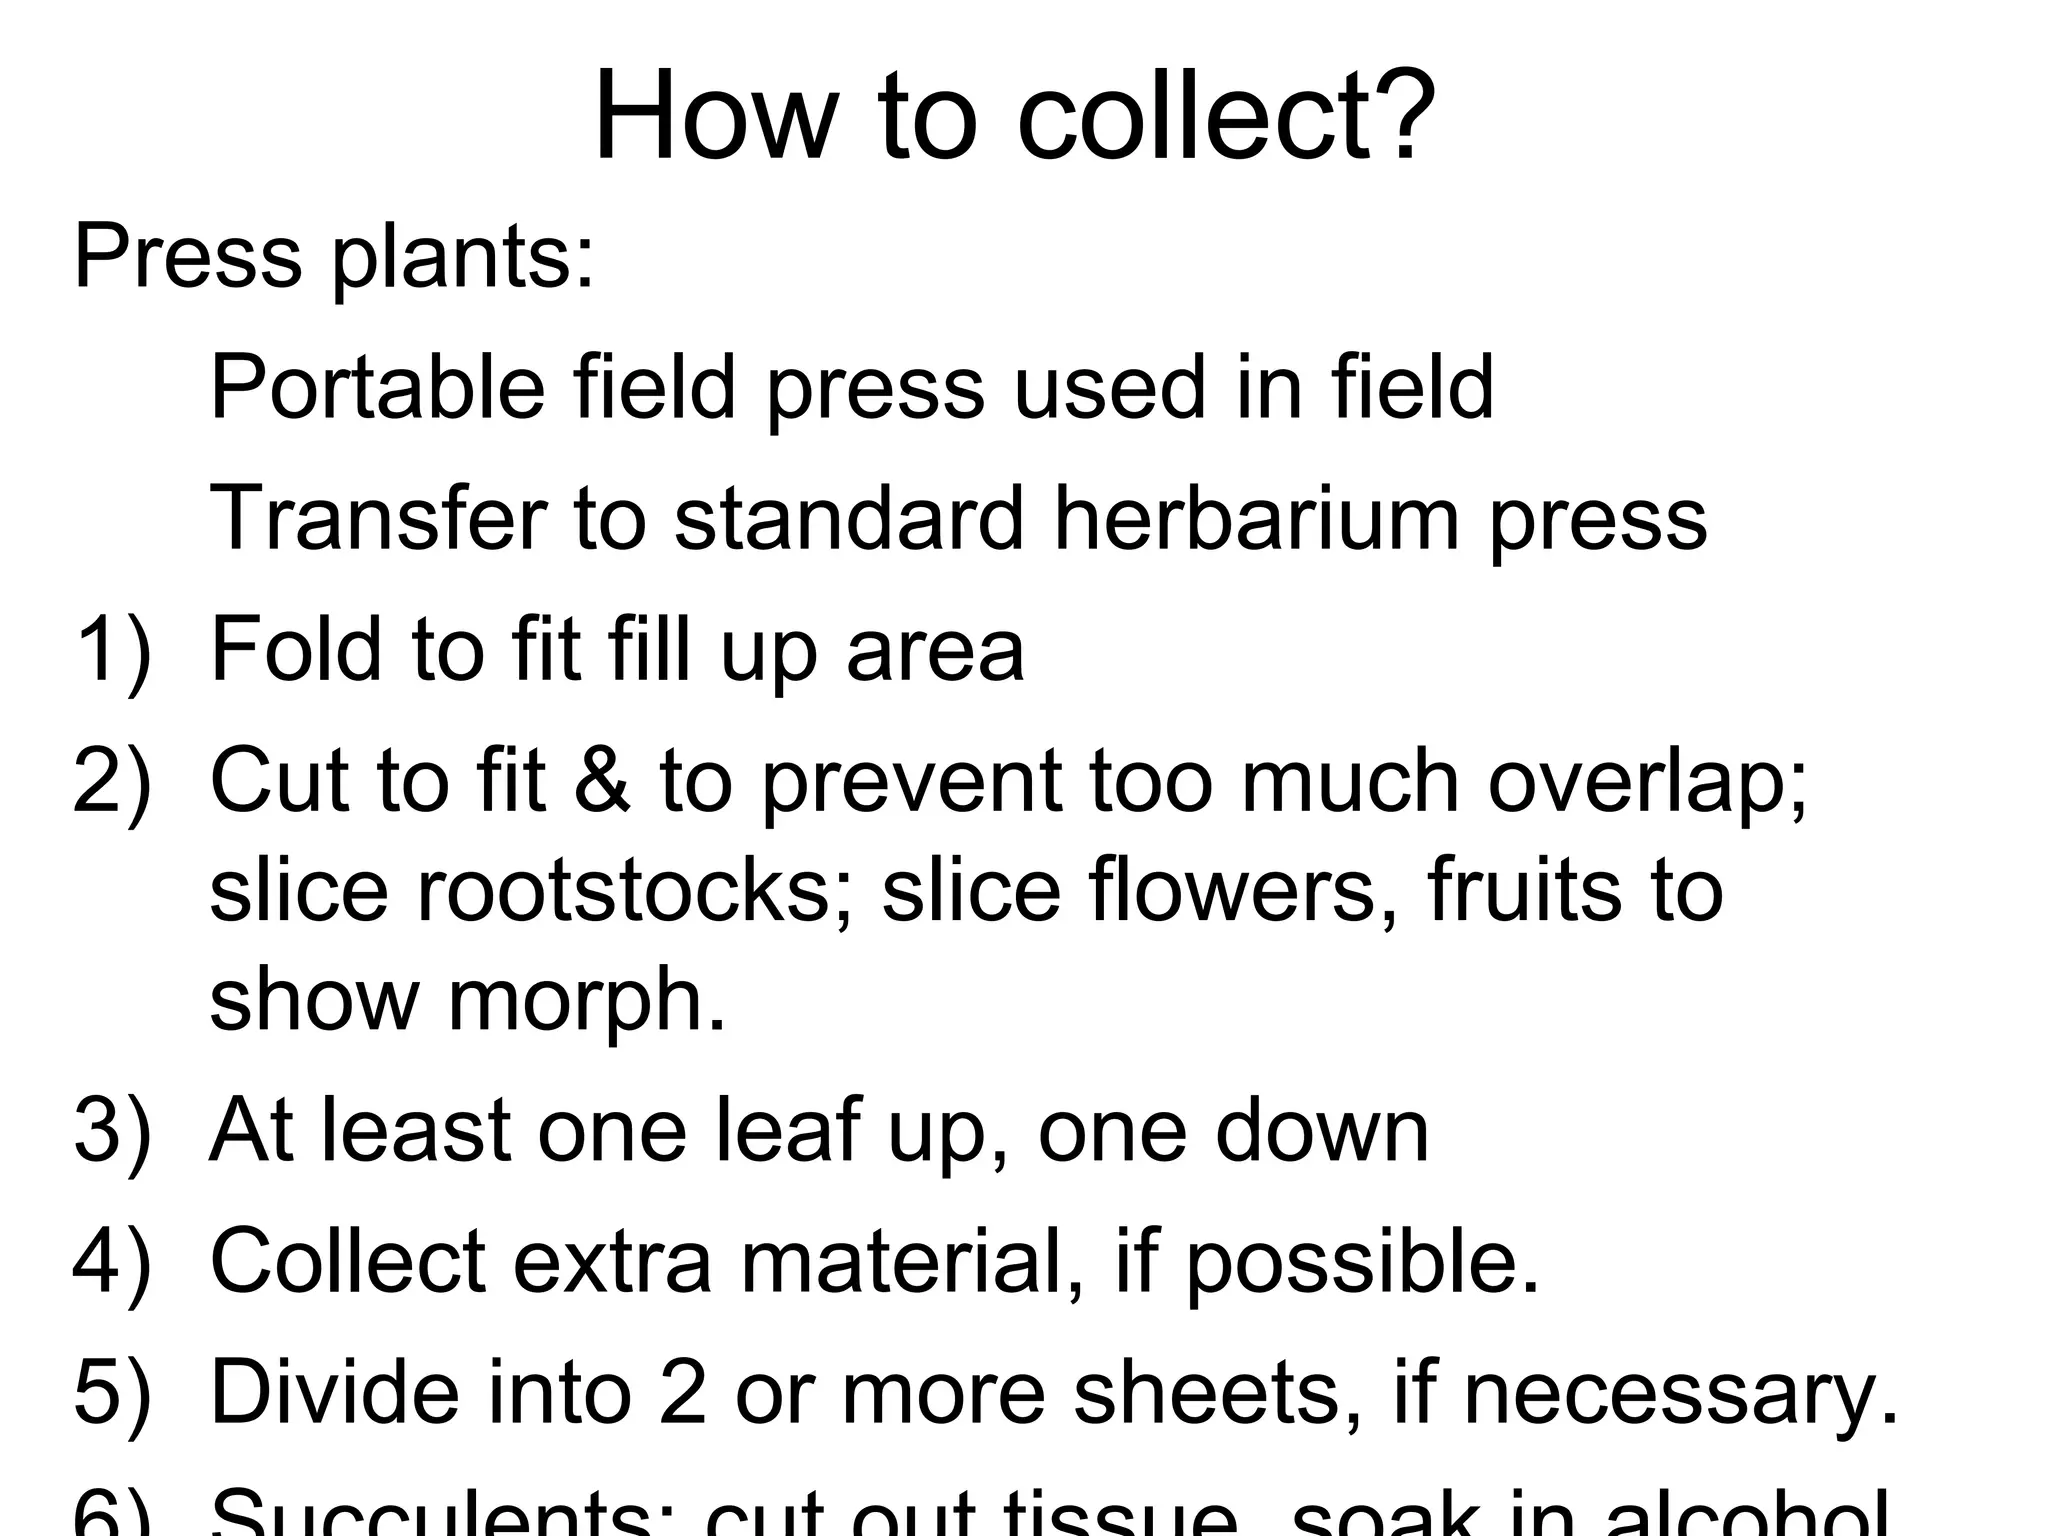
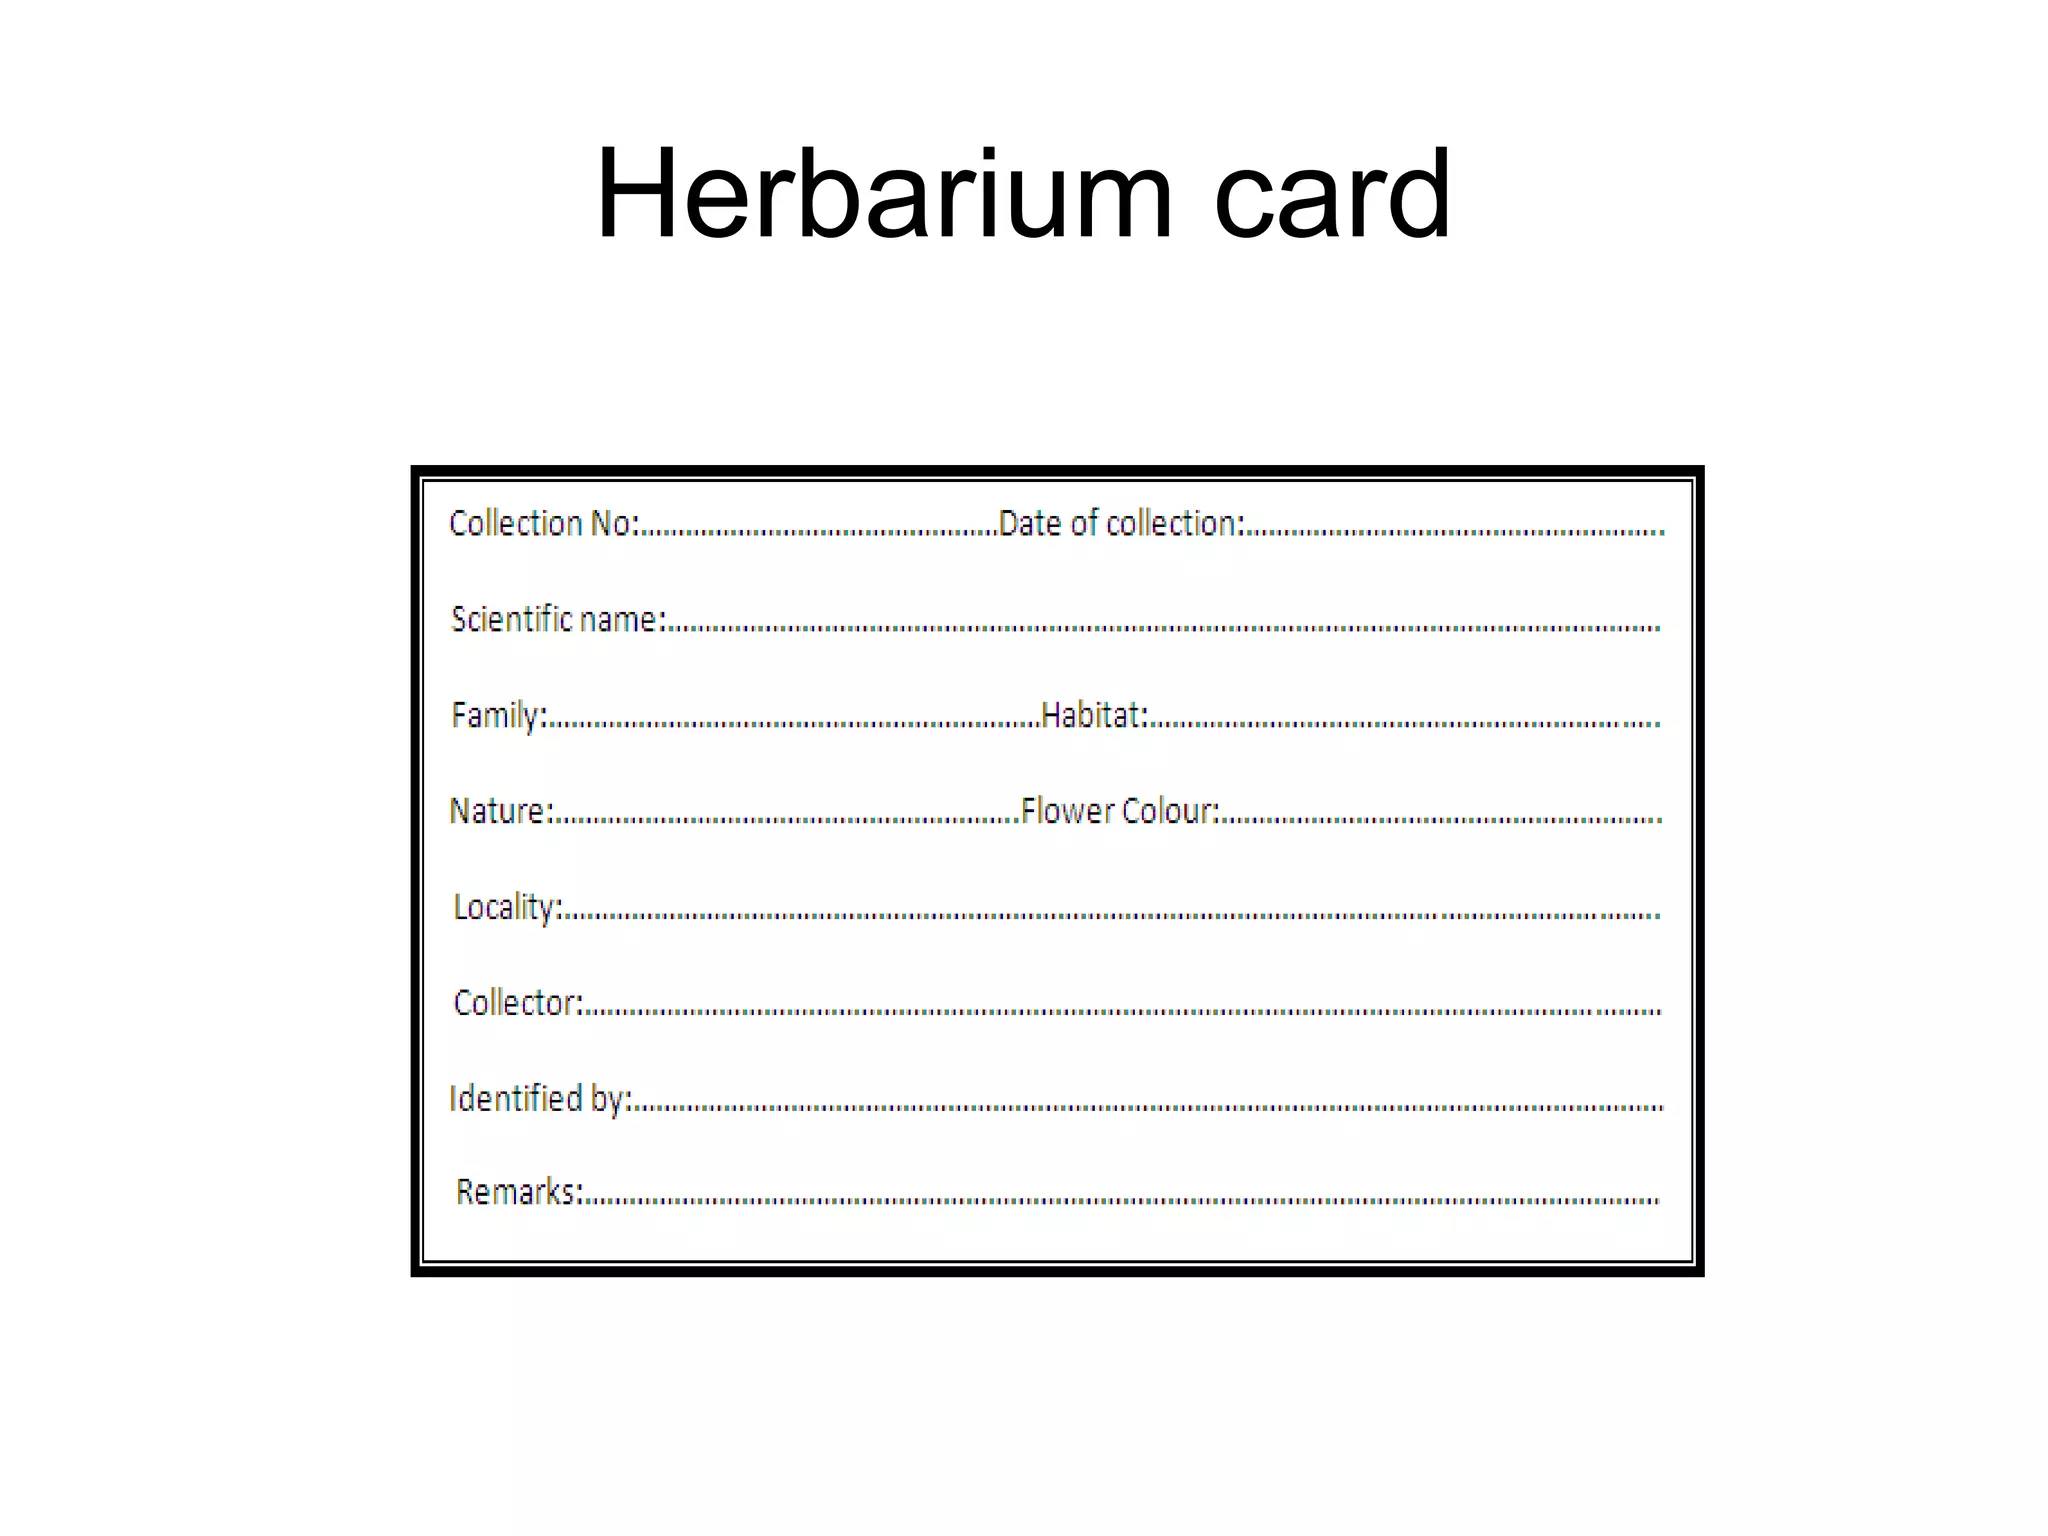
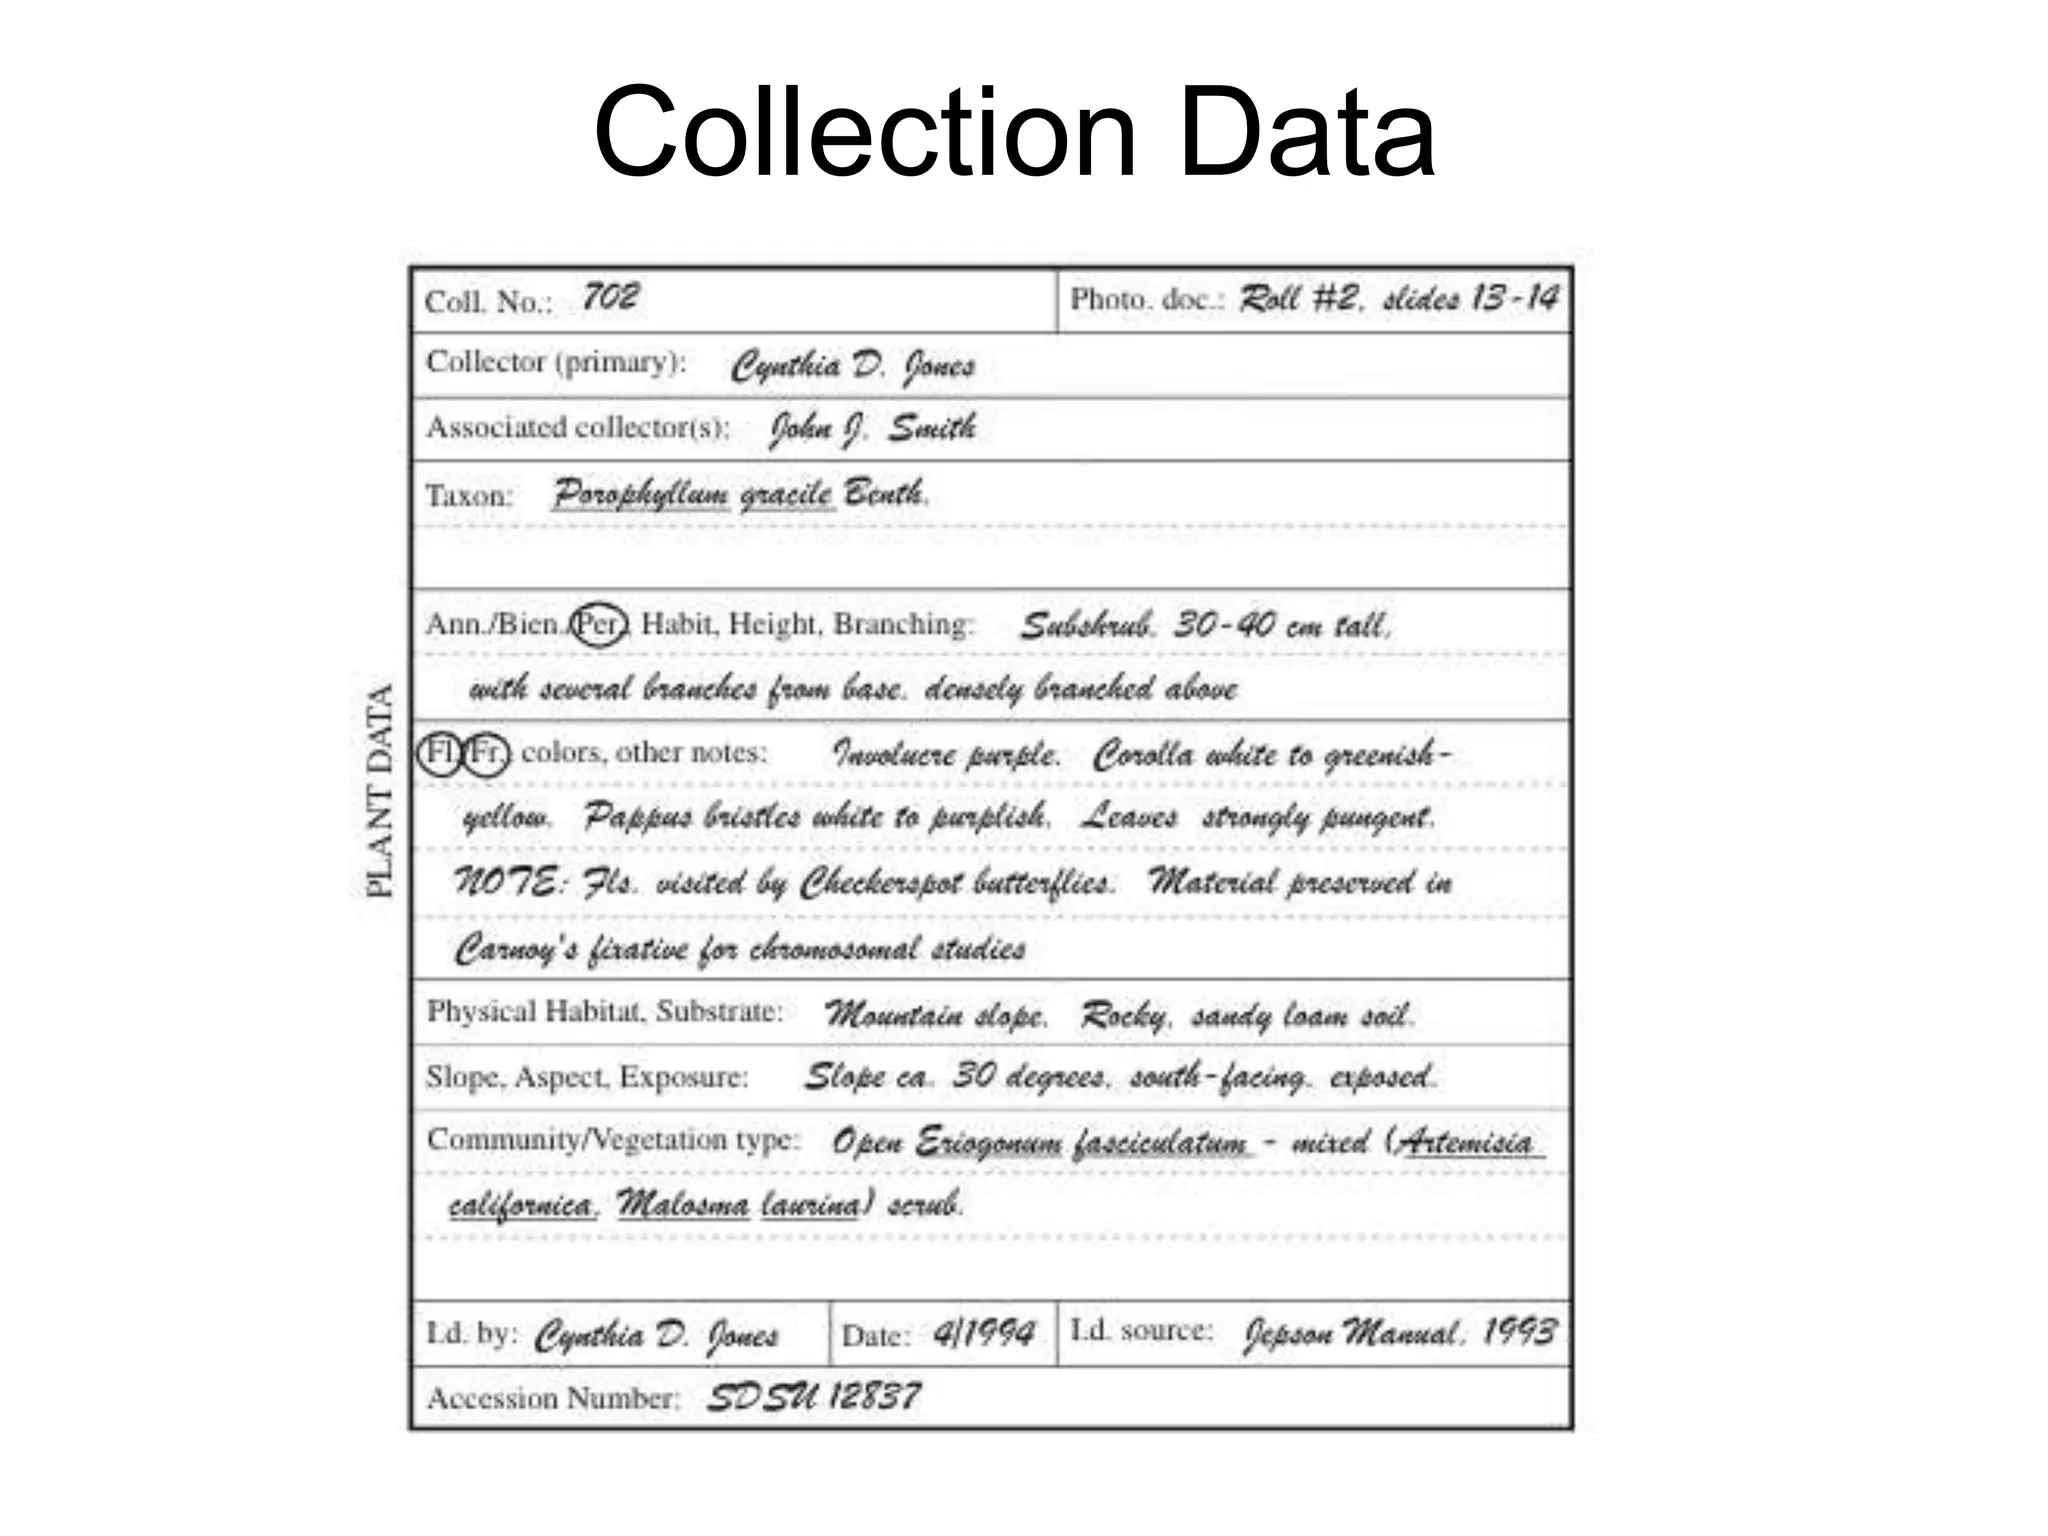
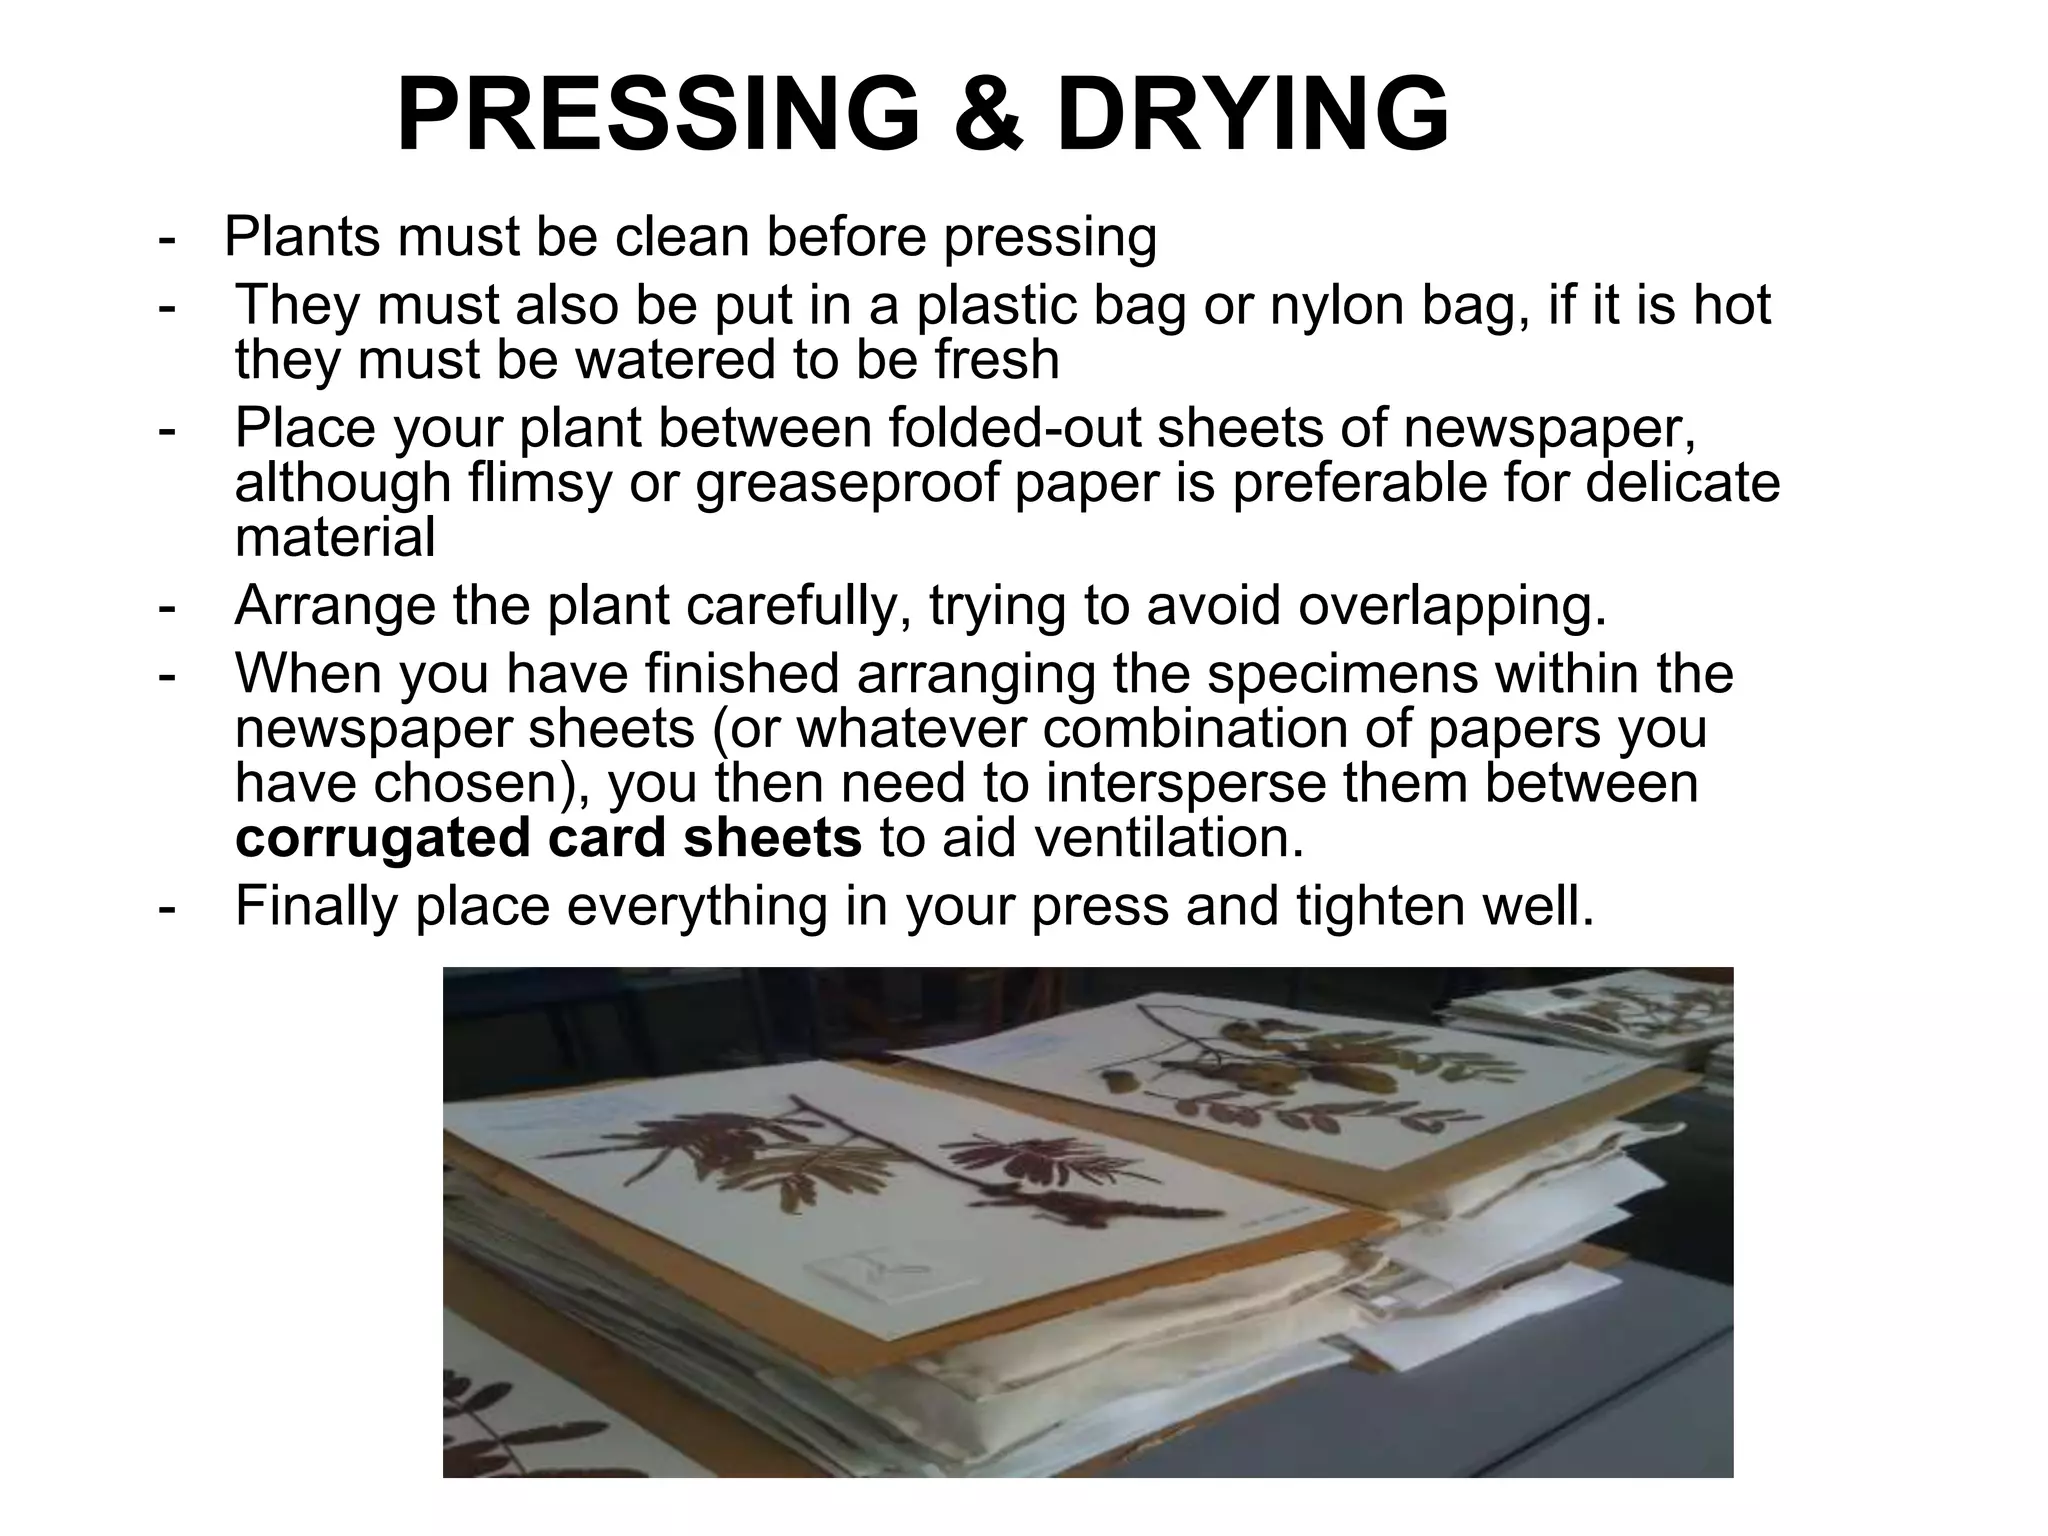
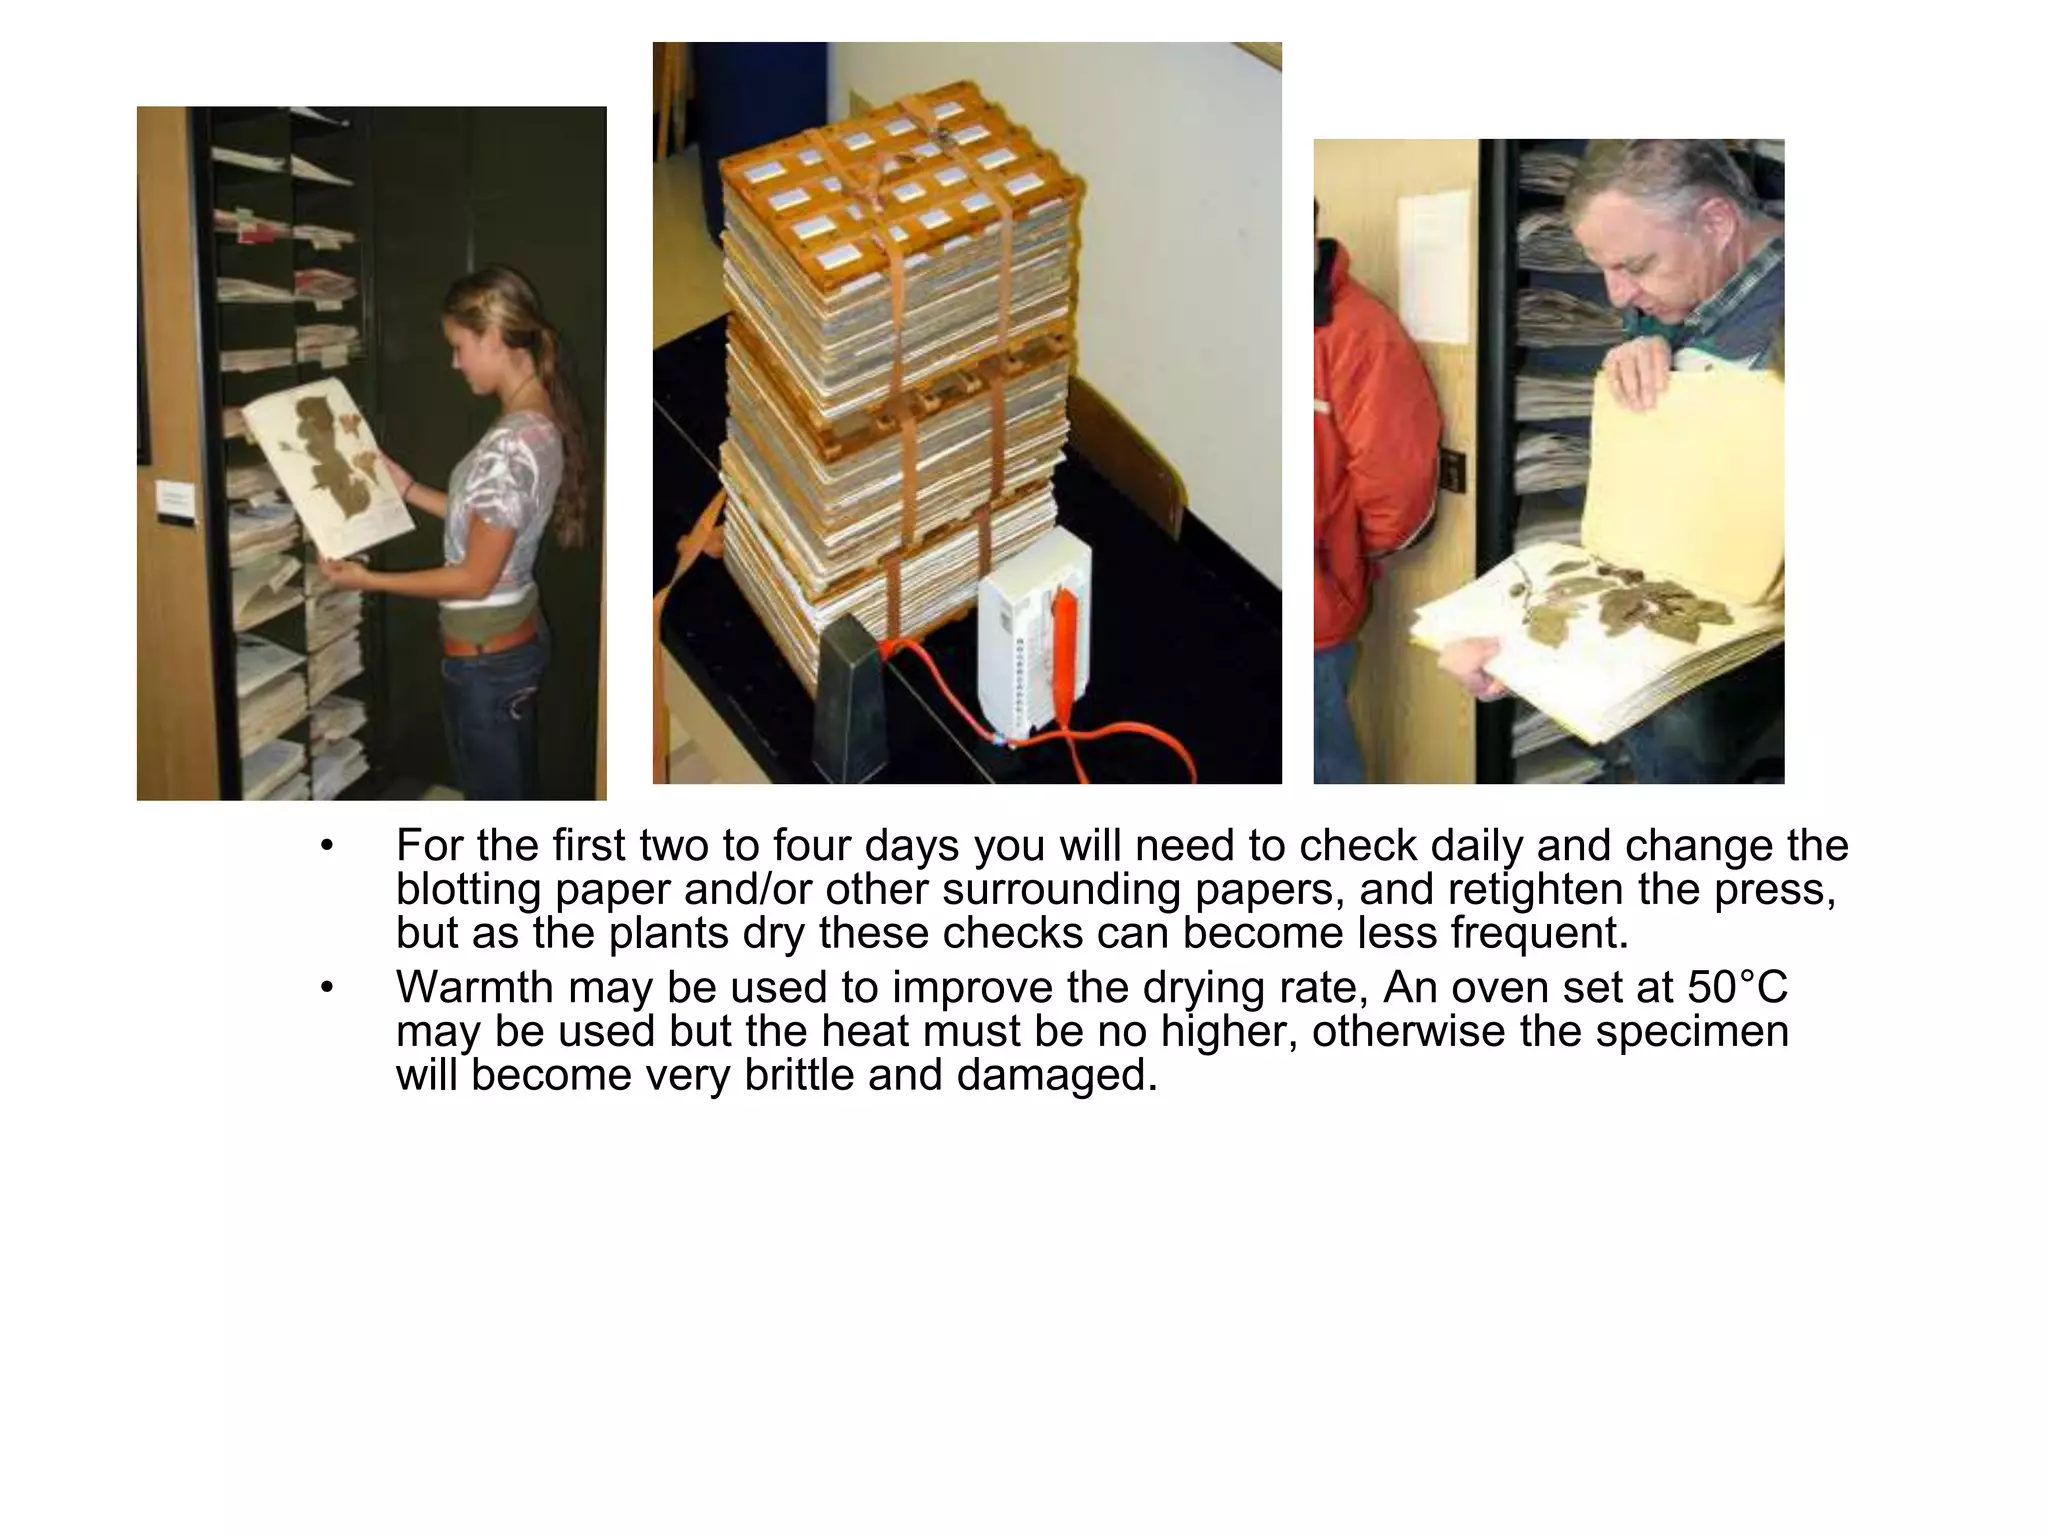
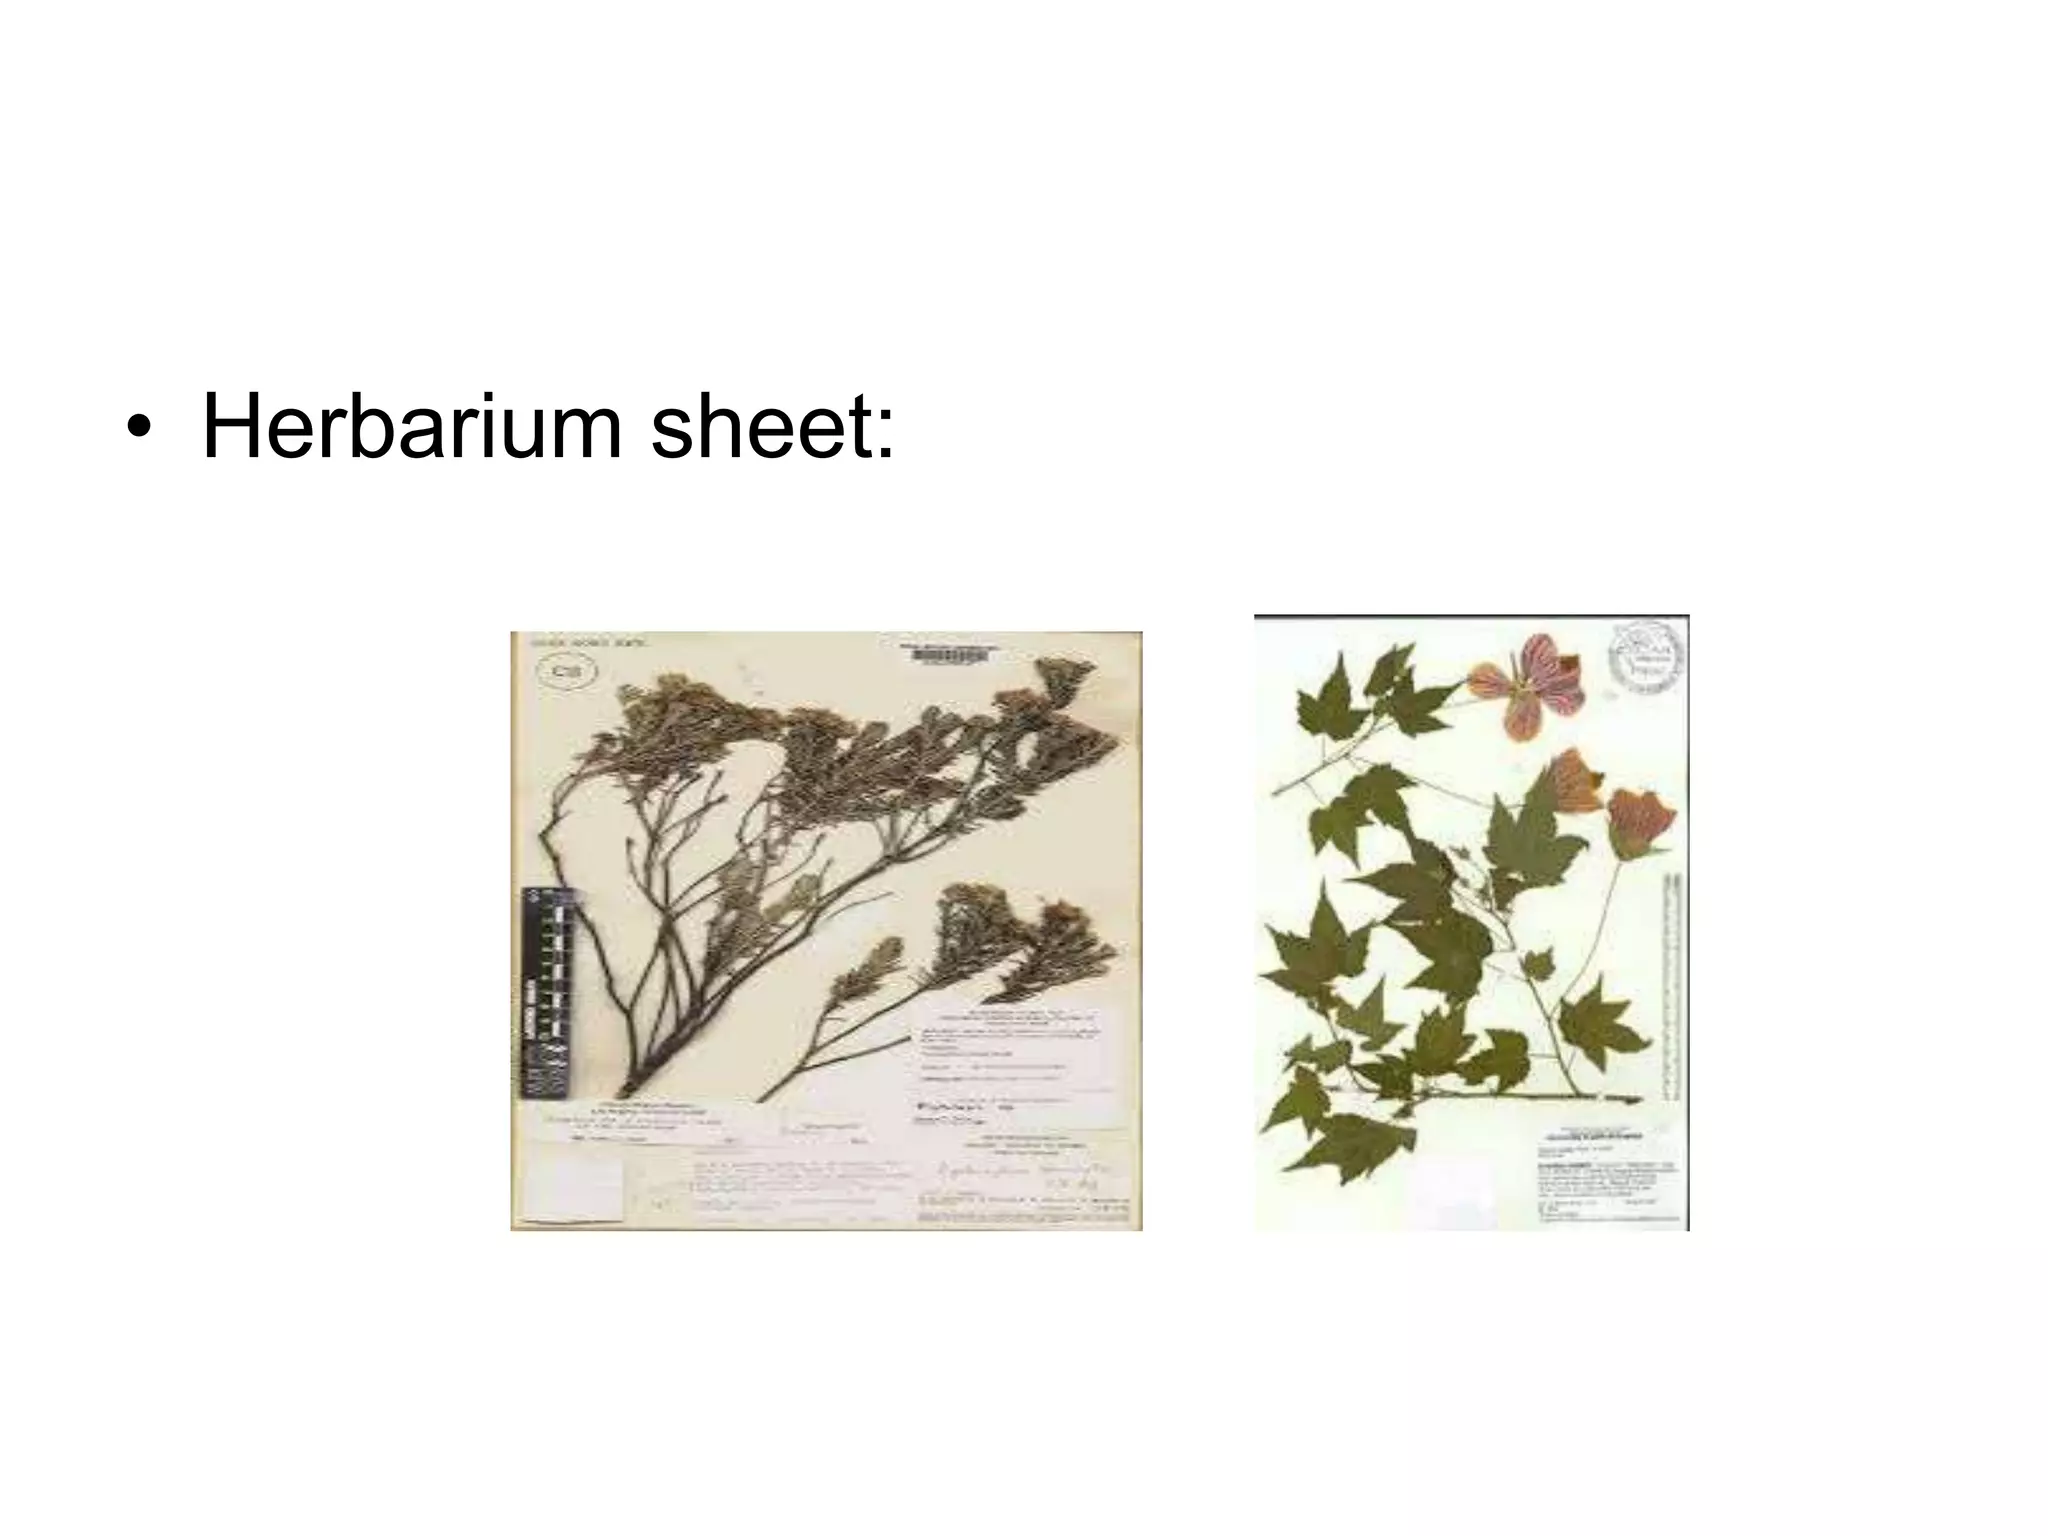
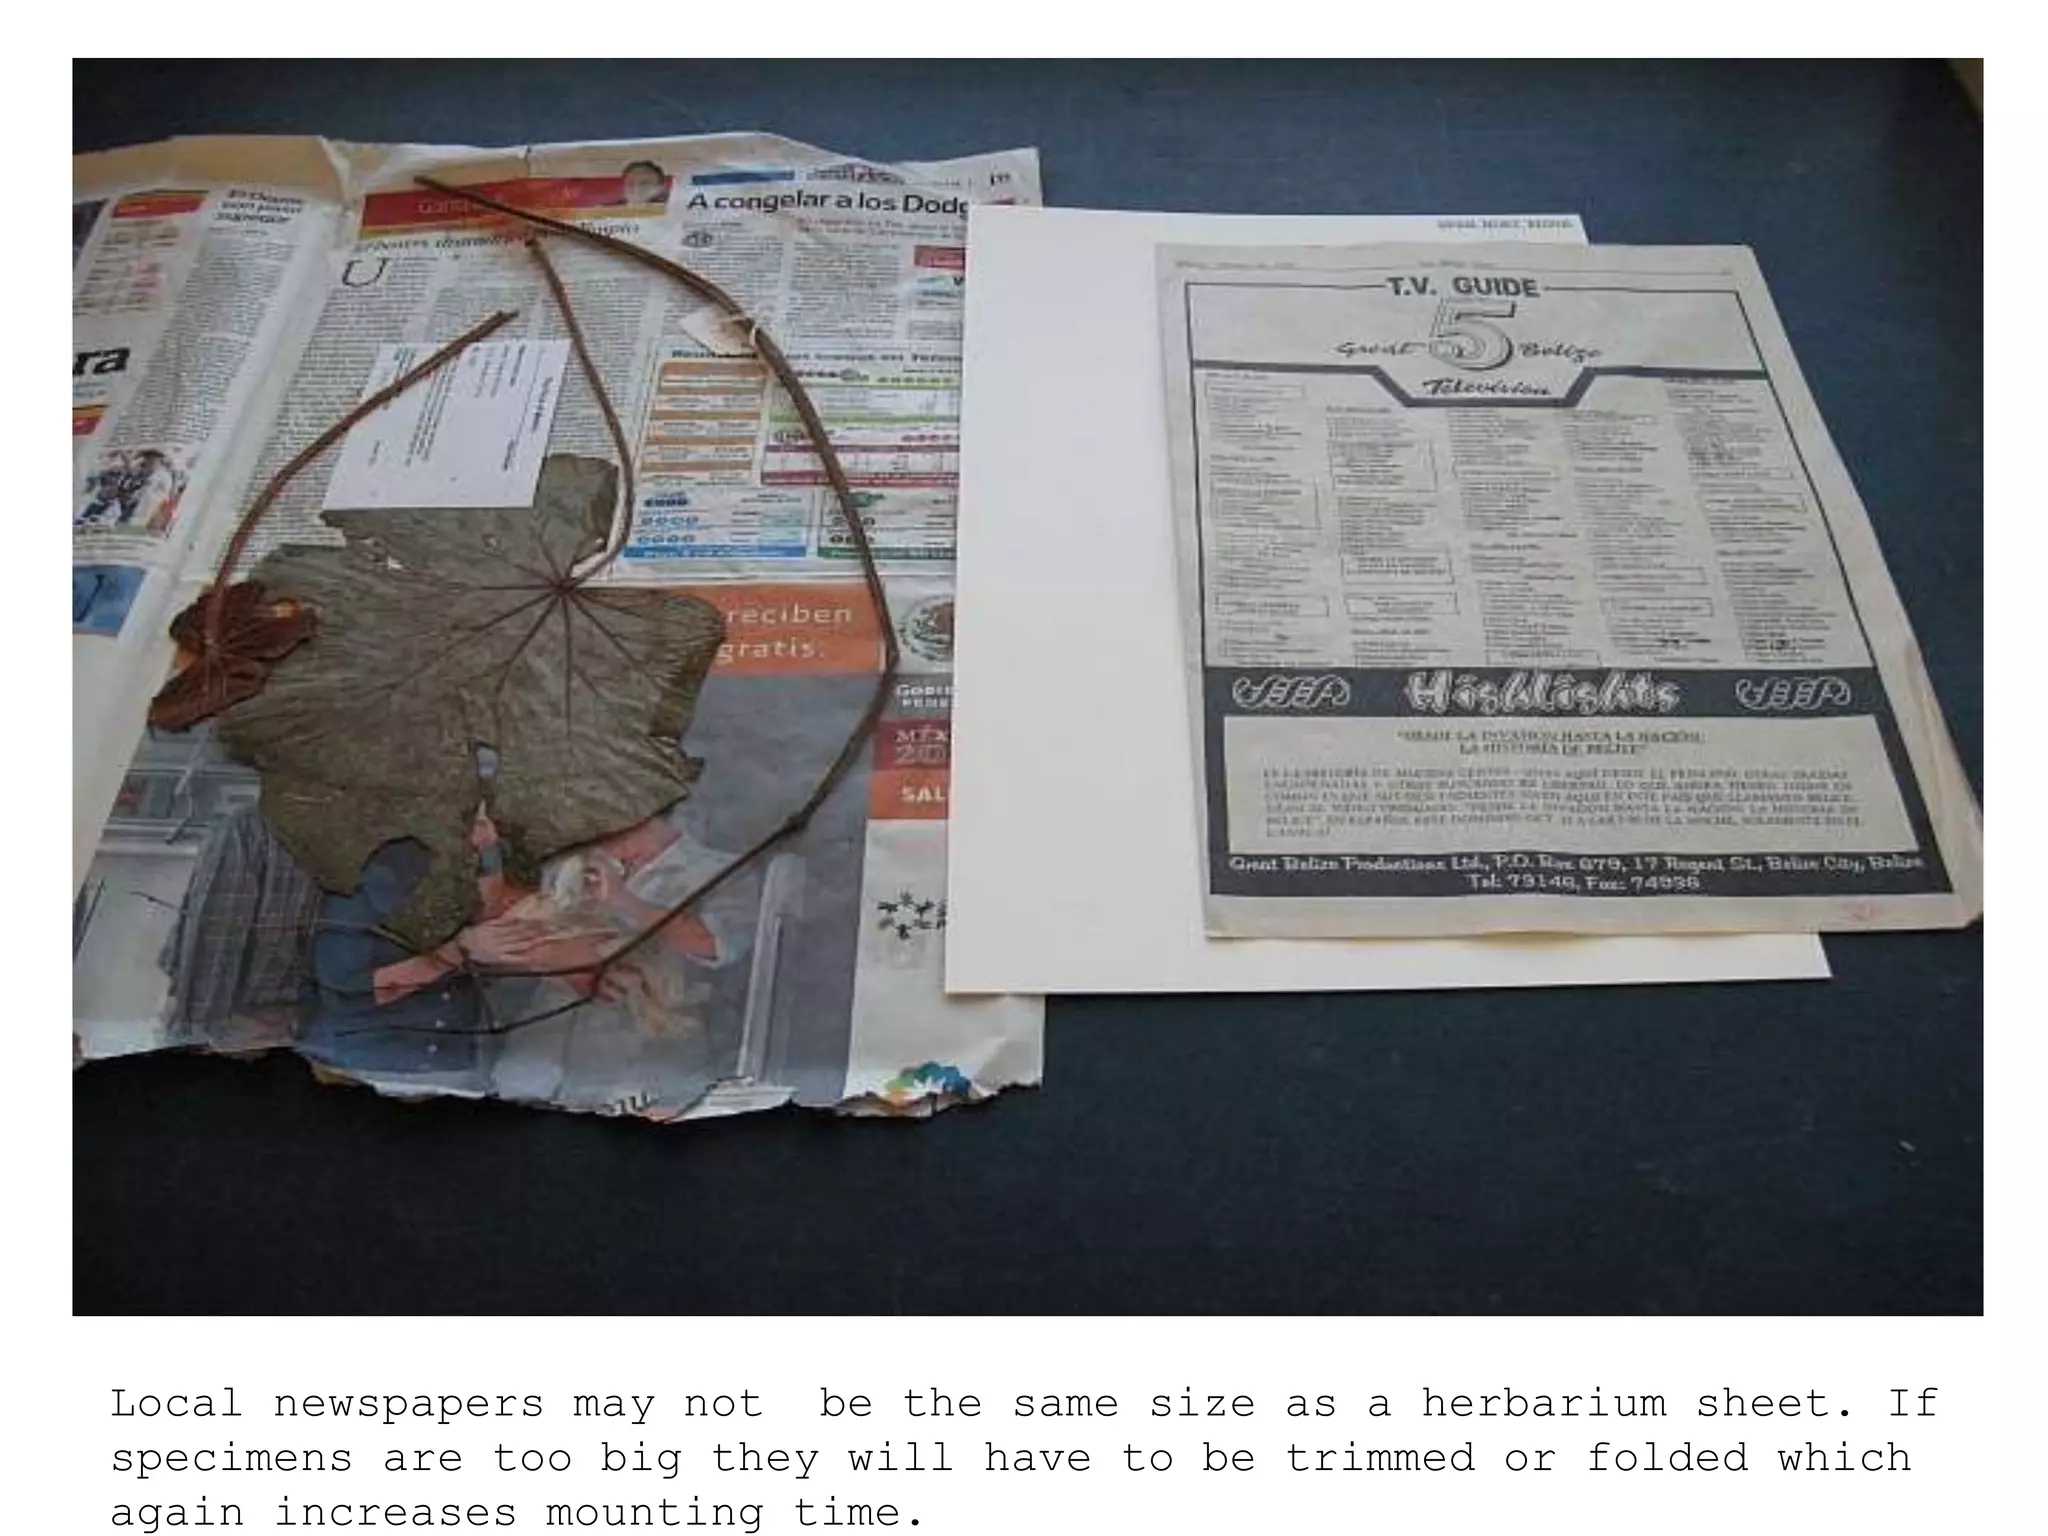
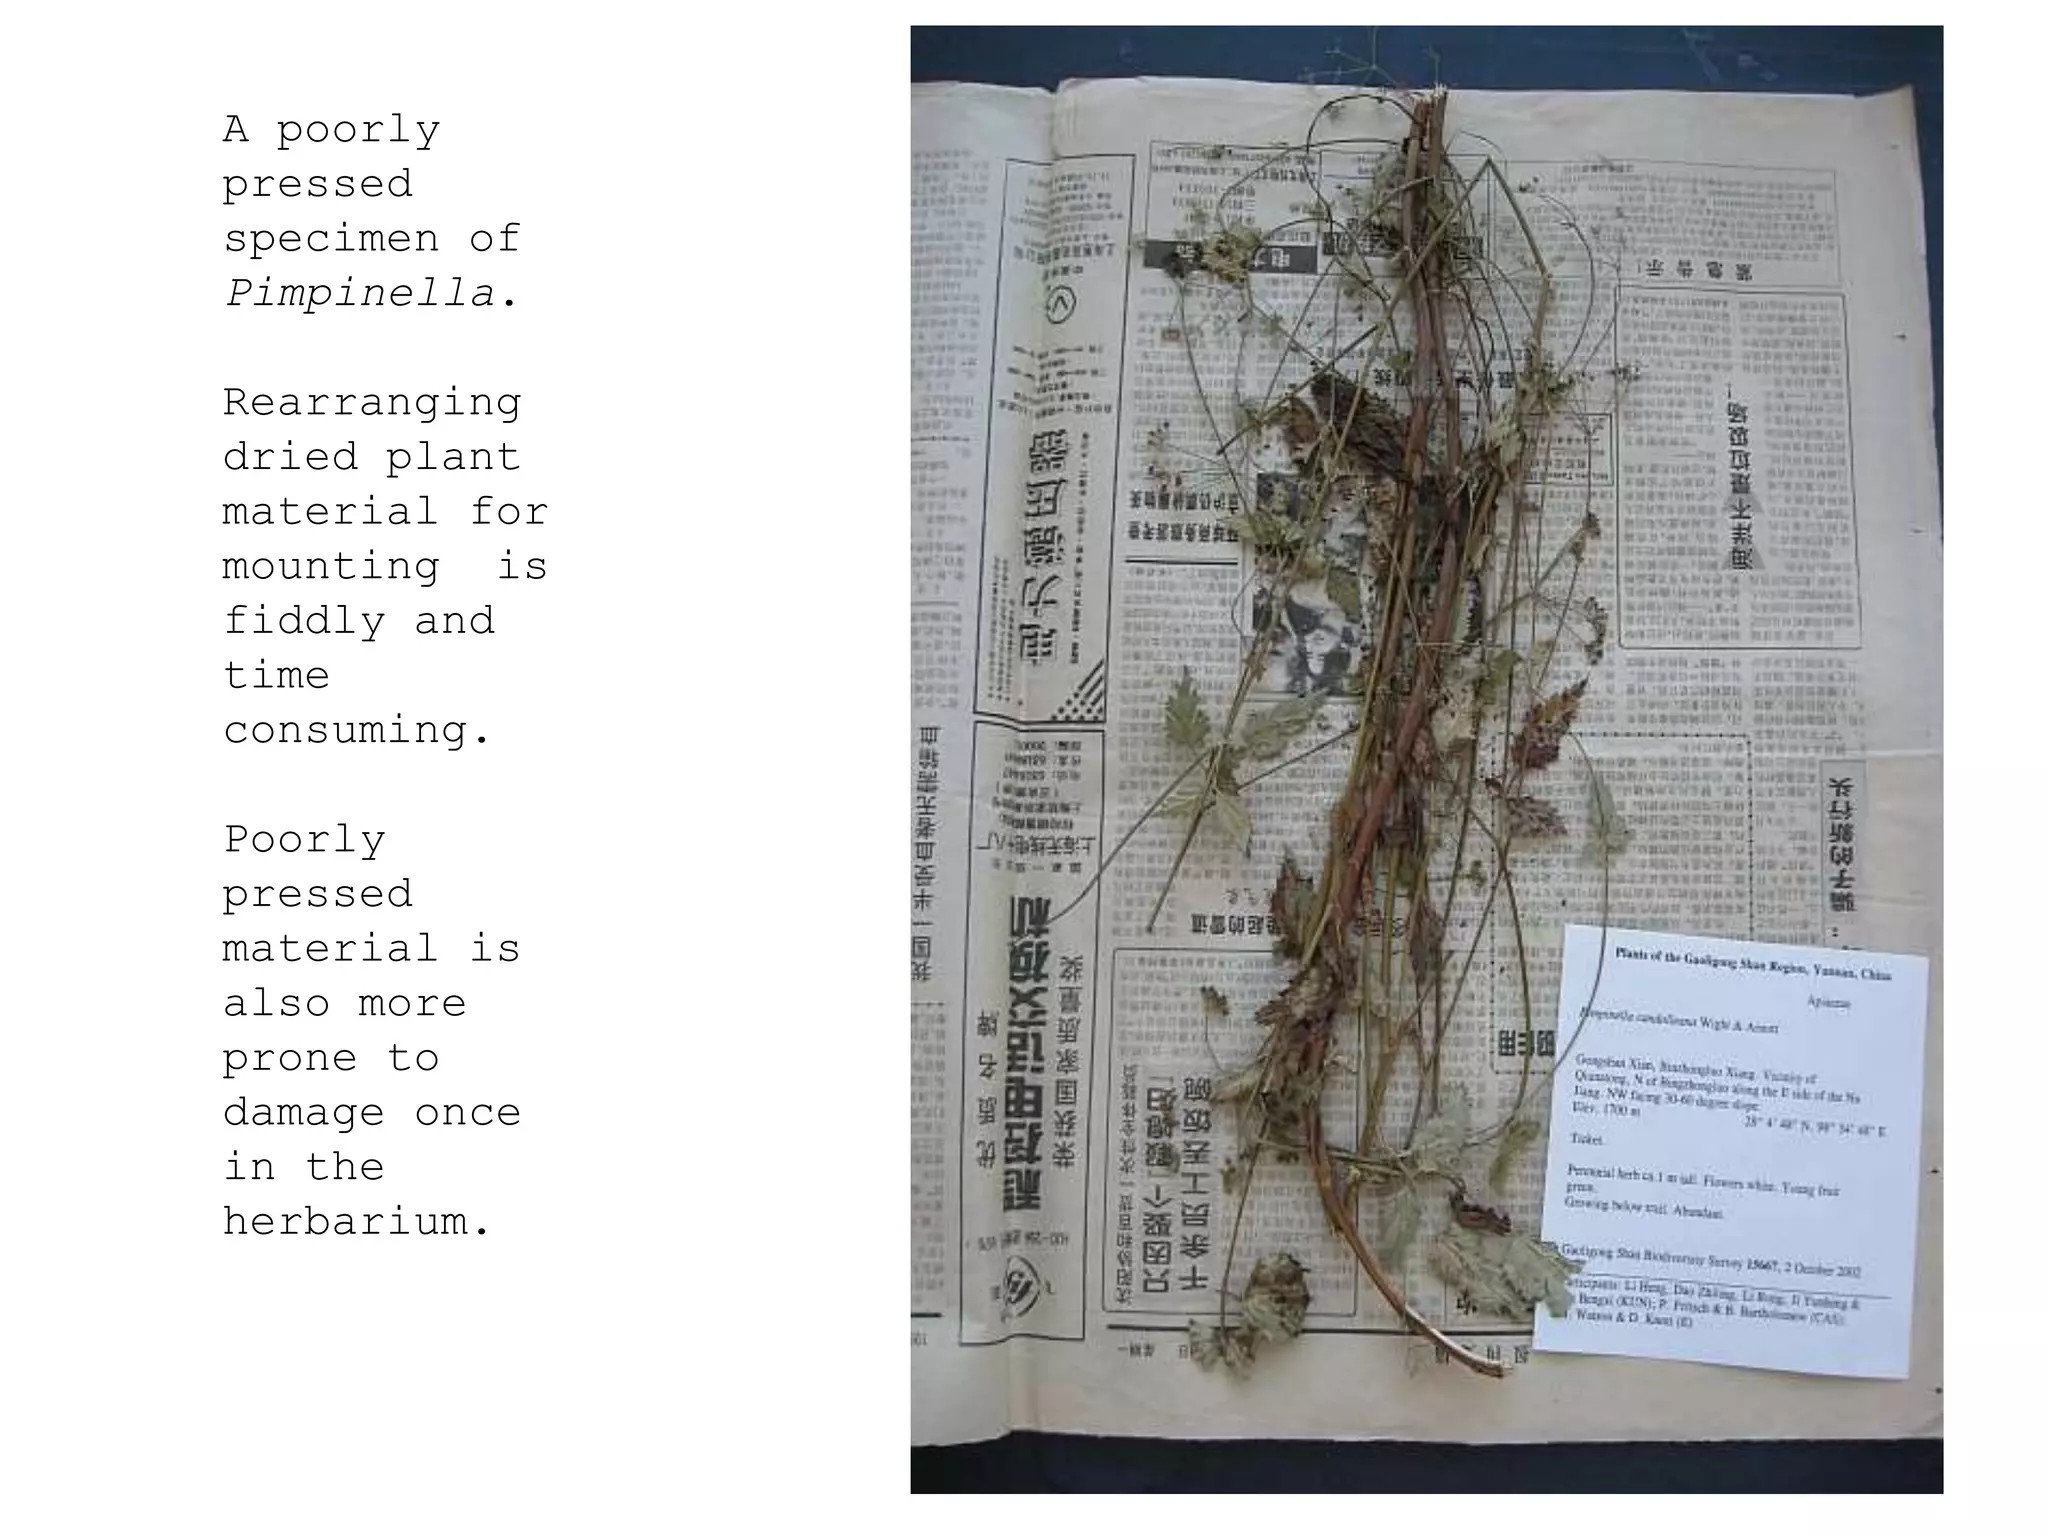
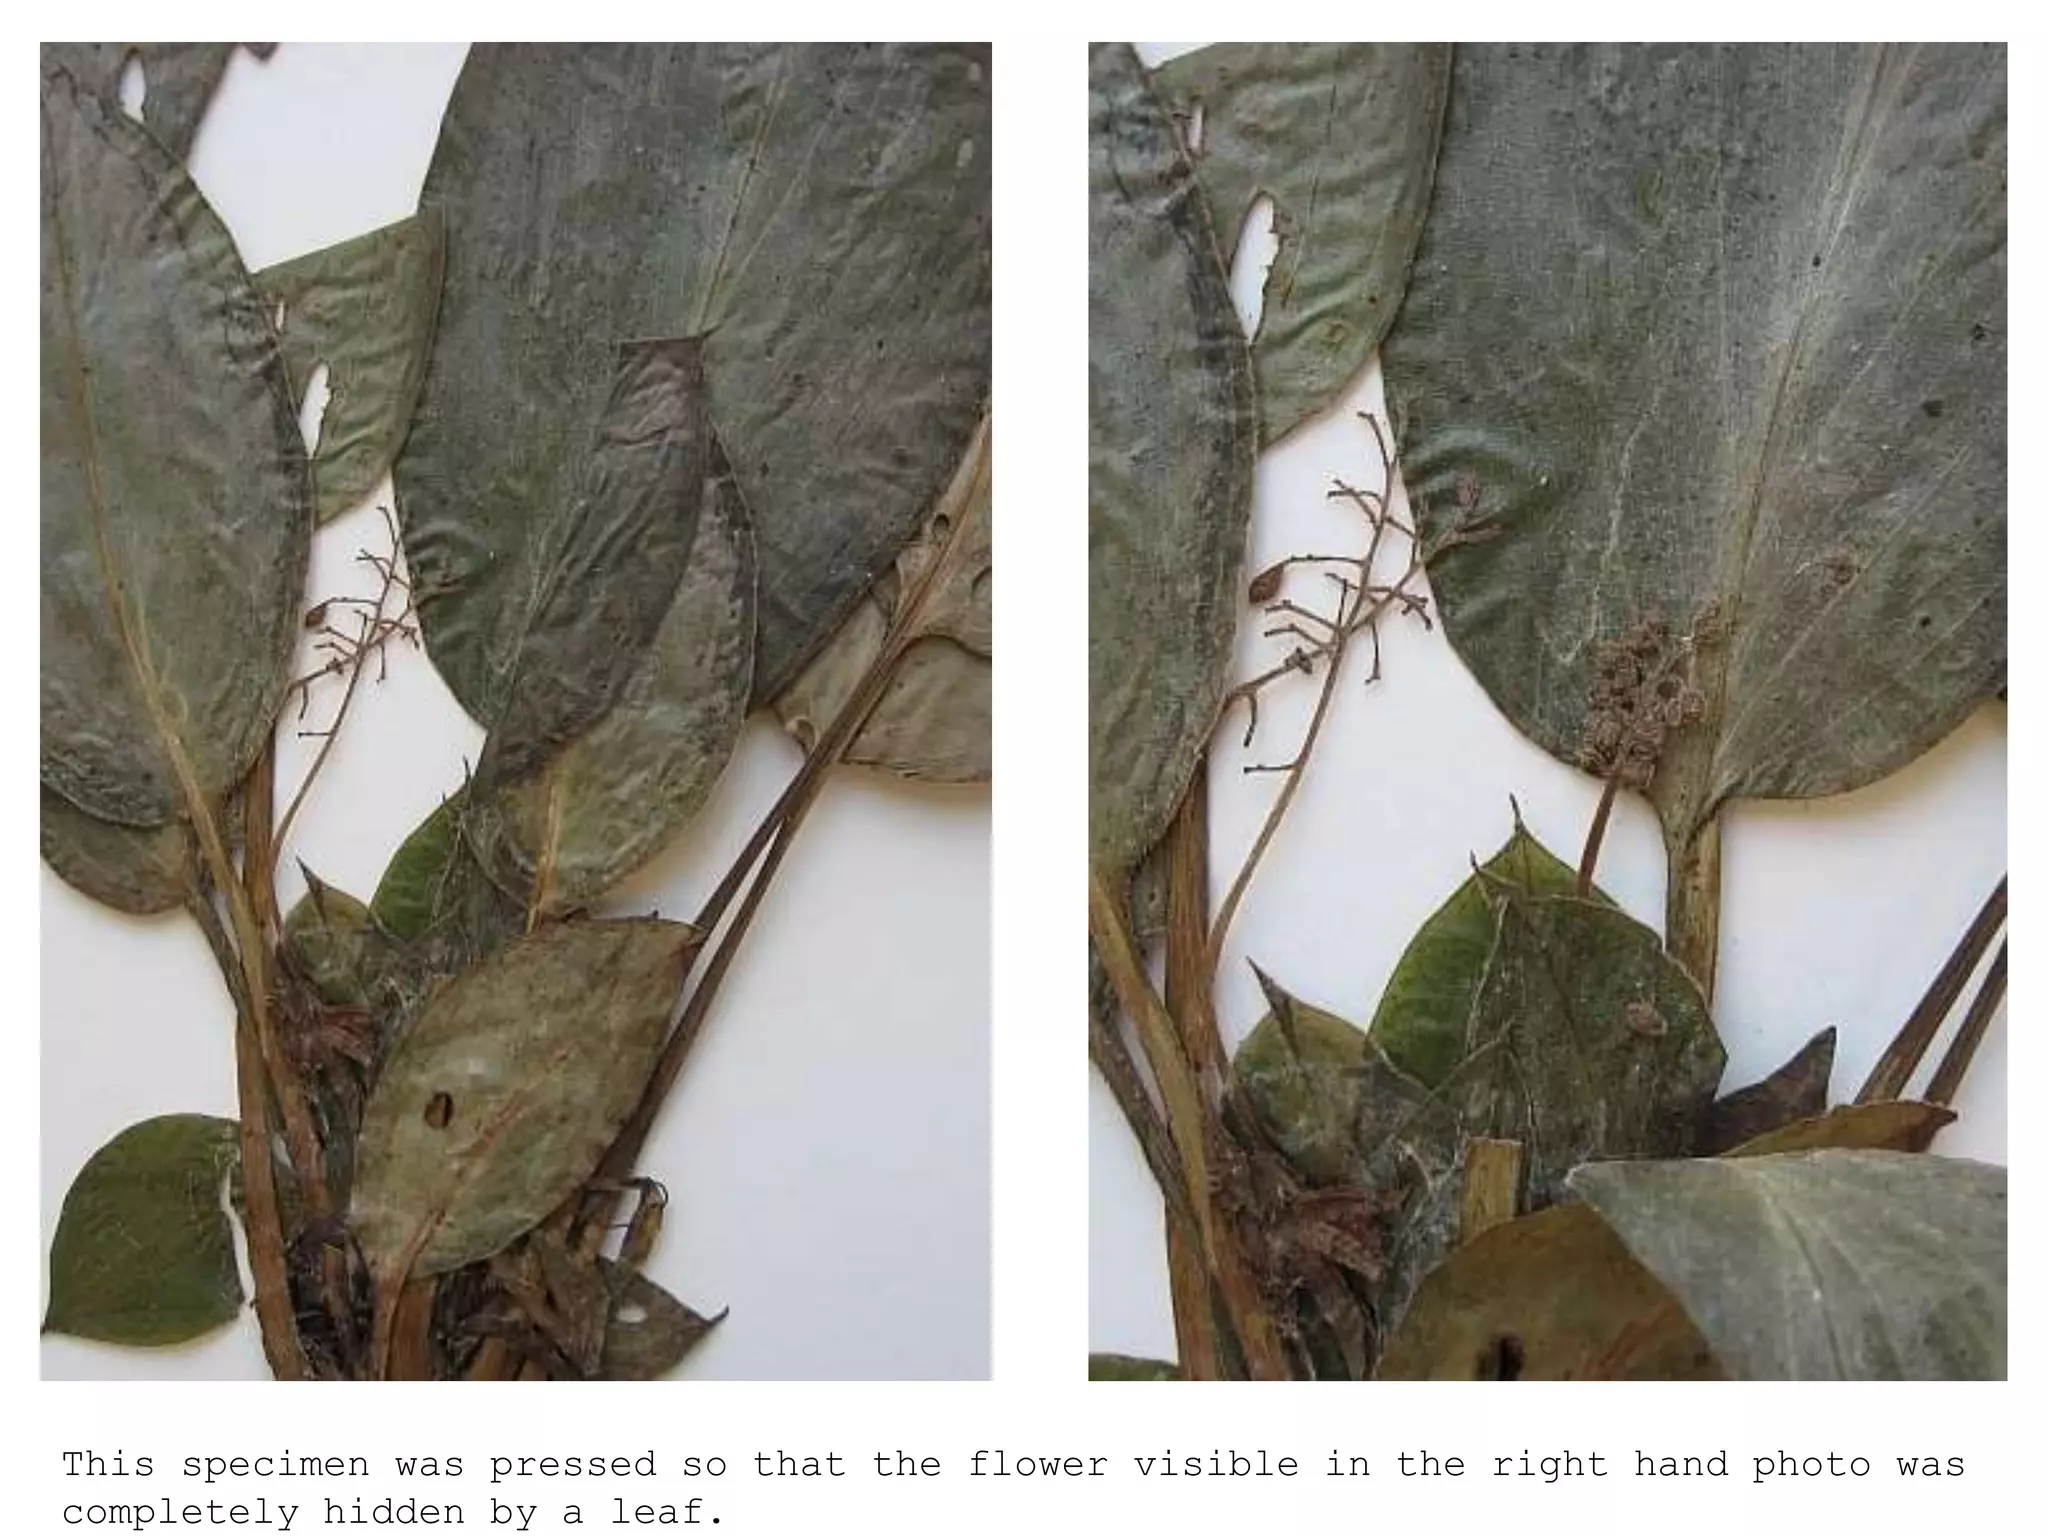
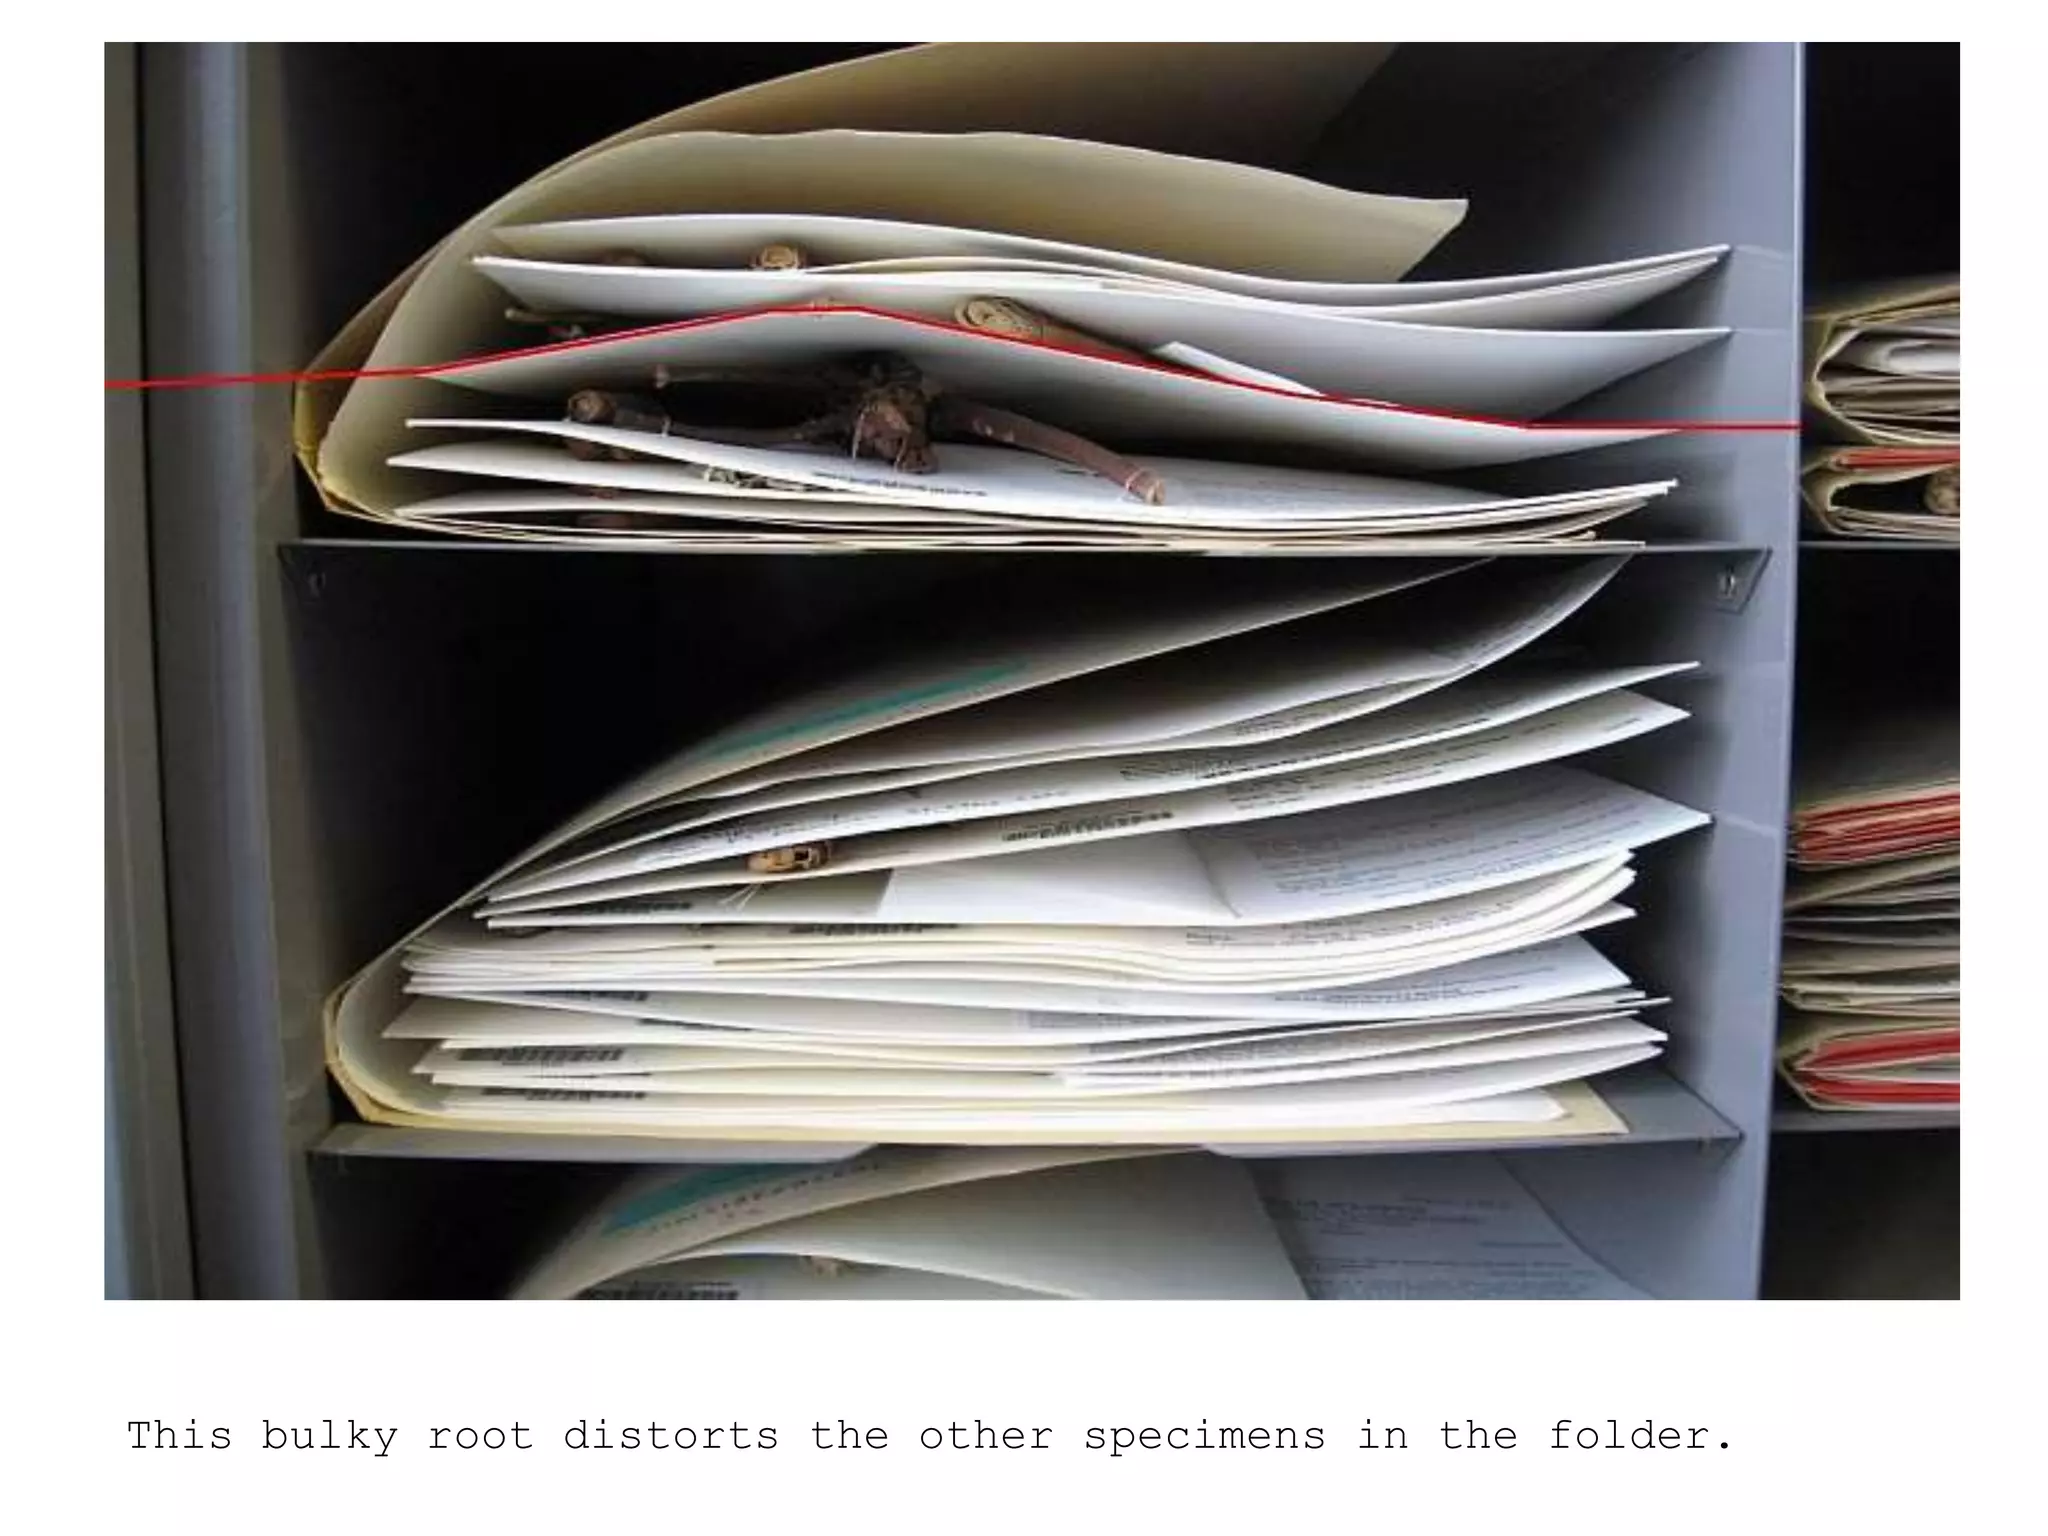
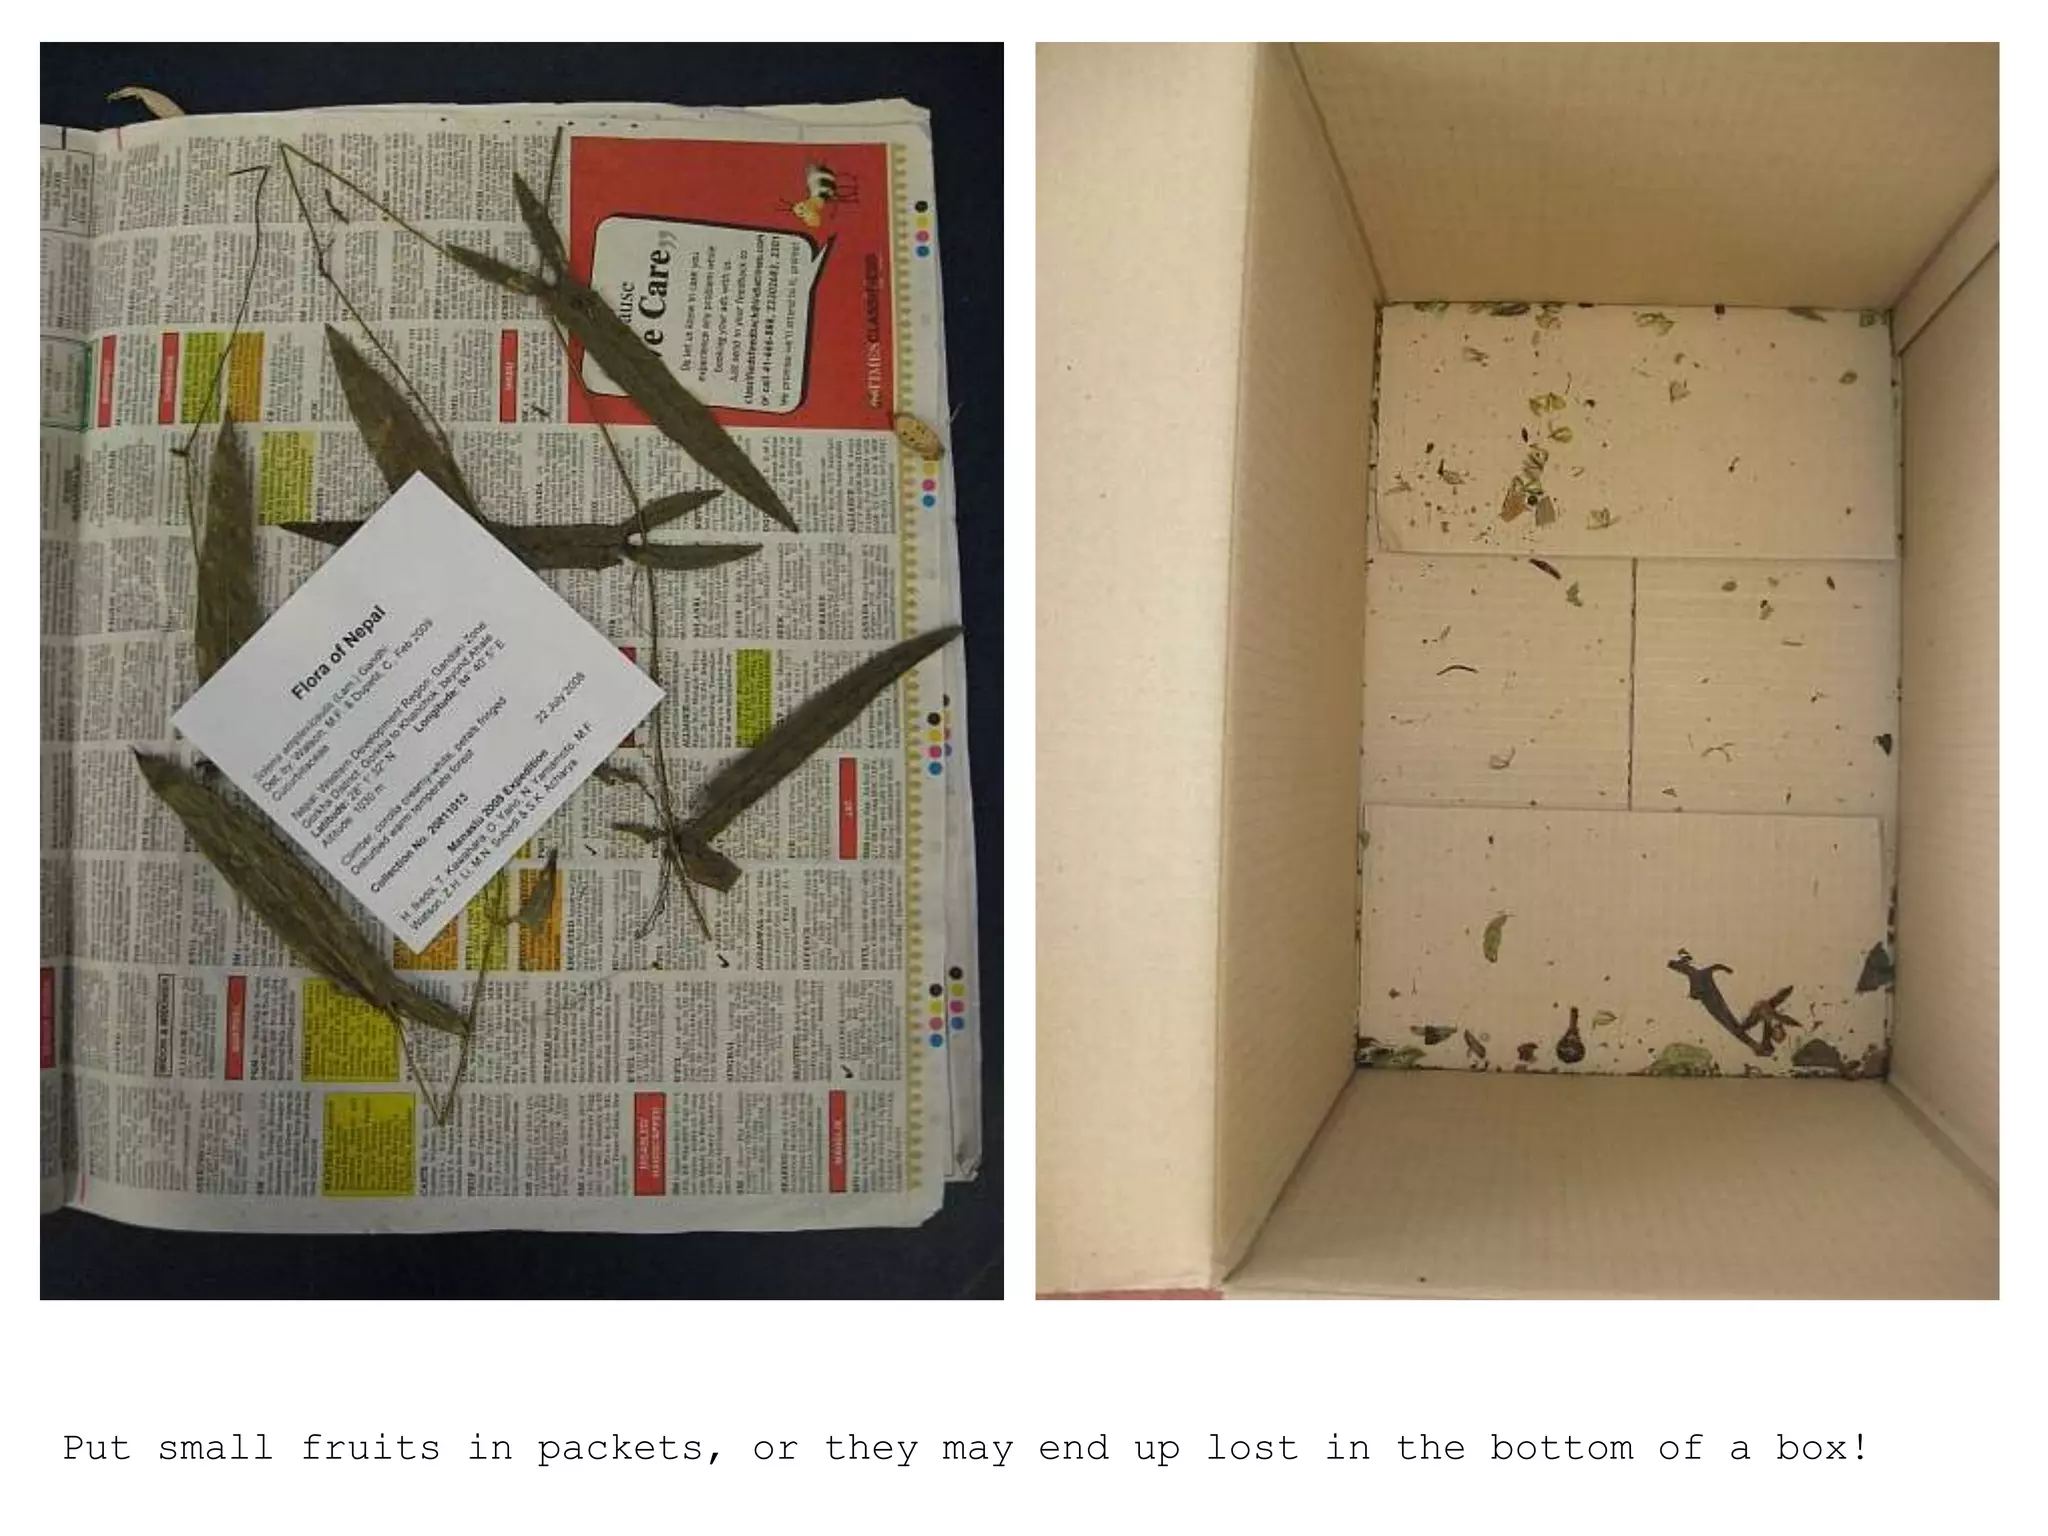
Field collections for
the herbarium
Why collect?
1) Provide resource material for plant
systematics studies.
2) Serve as a reference collection for
named taxa, known as a voucher
specimen.
a) Type specimen in formal naming
b) Reference for the identity of a taxon
-in systematic studies
-in field studies, e.g., floristic
surveys
How does one:
1) Obtain a specific plant(s) for a research
study
- Use label information from herbarium
specimens to find localities
- Use maps to find likely habitats
2) Do a complete inventory of plants for a field
survey or floristic study?
- Collect and identify every plant in a region
during different seasons and different
years.
Should you collect? What to
collect?
Generally DON’T collect “listed” taxa:
rare, endangered, or threatened
Must know ahead of time which these are!
When you collect, use “1 to 20” rule:
– For every herb you collect, make sure
there are at least 20 in the population.
– For every branch of a shrub or tree,
make sure there are at least 20 more.
How to collect?
Herbs: Must dig up at least one entire plant to
show root or rootstock (e.g., corm, bulb,
rhizome)
Shrubs, trees, vines: One branch sufficient.
Collect a representative specimen that shows
vegetative and reproductive parts (in flower,
fruit, cone, with sporangia, etc.)
How to collect?
Press plants:
Portable field press used in field
Transfer to standard herbarium press
1) Fold to fit fill up area
2) Cut to fit & to prevent too much overlap;
slice rootstocks; slice flowers, fruits to
show morph.
3) At least one leaf up, one down
4) Collect extra material, if possible.
5) Divide into 2 or more sheets, if necessary.
Cardboards: ca. 12” x 18”
Newspaper, ca. 11.5” x 16.5”
Tighten straps
Place in plant drier,
2-3 days
Remove and check if dry
(if it feels cool, not dry)
Plant Press
Herbarium card
Collection Data
Collection Data
Importance of recording color, even of pollen grains!
Liquid-Preserved Collections
Anatomy, embryology, palynology, etc.:
FAA (Formalin - Acetic Acid - Alcohol (ethanol)
Cytology (chromosome numbers):
Carnoy’s (100% ethanol : glacial acetic
acid)
Ultrastructure:
Gluteraldehyde, osmium tetroxide, formalin
Living Collections
Grow in greenhouse or botanic garden
Valuable for long-term studies
Collections for Molecular Studies
DNA: dried in silica gel
Allozymes: fresh material
1) Collecting the plants
• Choose good representatives of the plants
species
• Be careful that these plants must include root,
stem, flower and fruit
• Take notes and record by taking photos in the
field at the time of collection,
• Note these factors below:
“Date, collection number, location, habitat,
habit, special characteristics”
• Collect specimens in dry conditions, a
good time being mid-morning, after the
dew has dried but before the heat of the
day causes plants to wilt.
• If specimens are at all wet or you need to
wash soil off the roots then dry them
carefully before pressing.
• Use a pencil for these notes rather than a
pen because any damp/wetness can
cause ink to smudge and be unreadable
Materials for plant collecting:
• Plant press
• Plastic bags or nylon bag
• Garden secateurs & trowel
• Small note book & pencil
• Jeweller’s tags (optional)
• Camera (optional)
• GPS & altimeter (optional)
PRESSING AND DRYING
PRESSING & DRYING
- Plants must be clean before pressing
- They must also be put in a plastic bag or nylon bag, if it is hot
they must be watered to be fresh
- Place your plant between folded-out sheets of newspaper,
although flimsy or greaseproof paper is preferable for delicate
material
- Arrange the plant carefully, trying to avoid overlapping.
- When you have finished arranging the specimens within the
newspaper sheets (or whatever combination of papers you
have chosen), you then need to intersperse them between
corrugated card sheets to aid ventilation.
- Finally place everything in your press and tighten well.
• For the first two to four days you will need to check daily and change the
blotting paper and/or other surrounding papers, and retighten the press,
but as the plants dry these checks can become less frequent.
• Warmth may be used to improve the drying rate, An oven set at 50°C
may be used but the heat must be no higher, otherwise the specimen
will become very brittle and damaged.
• Pressing:
• Pasting:
• Herbarium sheet:
How good collecting can
make specimens quicker
to mount and easier to
preserve long term.
6 basic reminders:
1. The
herbarium
sheet is
42 x 26.5
cm.
Collect enough material to
show variation, but
remember that multiple
pieces take much longer to
mount.
Local newspapers may not be the same size as a herbarium sheet. If
specimens are too big they will have to be trimmed or folded which
again increases mounting time.
2. Collect enough
material, including some
for the capsule.
A single fruit or flower may easily be lost or damaged …
… especially if specimens are not
handled carefully.
If secured by glue, the fruit or flower may be
less easy to view.
Loose material for the capsule is vital if
specimens are glued down.
3. Arrange plants for
pressing so that all
important features are
displayed.
A poorly
pressed
specimen of
Pimpinella.
Rearranging
dried plant
material for
mounting is
fiddly and
time
consuming.
Poorly
pressed
material is
also more
prone to
damage once
in the
herbarium.
The same Pimpinella specimen after mounting.
This specimen was pressed so that the flower visible in the right hand photo was
completely hidden by a leaf.
Remember to press
the specimen so that
you can see both
upper and lower
surfaces of the
leaves.
4.Take care with fruits
and flowers.
Use waxed paper to press flowers to
prevent damaging fragile petals. The
flower on the left has also been dried
for too long or at too high a
temperature.
The curled leaves of this poorly pressed specimen were very fragile. It had to be
soaked and repressed before mounting, a time-consuming process!
5. Reduce bulk as far
as possible.
Remove excess foliage and split bulky fruits and roots whenever possible. Very
bulky material is difficult to store in the herbarium.
This bulky root distorts the other specimens in the folder.
6. Package specimens
carefully.
Put small fruits in packets, or they may end up lost in the bottom of a box!
Use cardboard to support bundles of pressed specimens and store them in strong
boxes (top left) to protect them before mounting.
This Gesner has been damaged in transit.
Summary:
The ‘gold standard specimen’ for
mounting and preservation:
•fits the sheet
•includes material for
the capsule
•has been pressed to
display fruit and
flowers
•is not too bulky
•arrives undamaged
So it is quick to
mount and easy to
preserve.

herbarium making.ppt

  • 1.
  • 2.
    Why collect? 1) Provideresource material for plant systematics studies. 2) Serve as a reference collection for named taxa, known as a voucher specimen. a) Type specimen in formal naming b) Reference for the identity of a taxon -in systematic studies -in field studies, e.g., floristic surveys
  • 3.
    How does one: 1)Obtain a specific plant(s) for a research study - Use label information from herbarium specimens to find localities - Use maps to find likely habitats 2) Do a complete inventory of plants for a field survey or floristic study? - Collect and identify every plant in a region during different seasons and different years.
  • 4.
    Should you collect?What to collect? Generally DON’T collect “listed” taxa: rare, endangered, or threatened Must know ahead of time which these are! When you collect, use “1 to 20” rule: – For every herb you collect, make sure there are at least 20 in the population. – For every branch of a shrub or tree, make sure there are at least 20 more.
  • 5.
    How to collect? Herbs:Must dig up at least one entire plant to show root or rootstock (e.g., corm, bulb, rhizome) Shrubs, trees, vines: One branch sufficient. Collect a representative specimen that shows vegetative and reproductive parts (in flower, fruit, cone, with sporangia, etc.)
  • 6.
    How to collect? Pressplants: Portable field press used in field Transfer to standard herbarium press 1) Fold to fit fill up area 2) Cut to fit & to prevent too much overlap; slice rootstocks; slice flowers, fruits to show morph. 3) At least one leaf up, one down 4) Collect extra material, if possible. 5) Divide into 2 or more sheets, if necessary.
  • 8.
    Cardboards: ca. 12”x 18” Newspaper, ca. 11.5” x 16.5” Tighten straps Place in plant drier, 2-3 days Remove and check if dry (if it feels cool, not dry) Plant Press
  • 9.
  • 10.
  • 11.
  • 12.
    Importance of recordingcolor, even of pollen grains!
  • 13.
    Liquid-Preserved Collections Anatomy, embryology,palynology, etc.: FAA (Formalin - Acetic Acid - Alcohol (ethanol) Cytology (chromosome numbers): Carnoy’s (100% ethanol : glacial acetic acid) Ultrastructure: Gluteraldehyde, osmium tetroxide, formalin
  • 14.
    Living Collections Grow ingreenhouse or botanic garden Valuable for long-term studies Collections for Molecular Studies DNA: dried in silica gel Allozymes: fresh material
  • 15.
    1) Collecting theplants • Choose good representatives of the plants species • Be careful that these plants must include root, stem, flower and fruit • Take notes and record by taking photos in the field at the time of collection, • Note these factors below: “Date, collection number, location, habitat, habit, special characteristics”
  • 16.
    • Collect specimensin dry conditions, a good time being mid-morning, after the dew has dried but before the heat of the day causes plants to wilt. • If specimens are at all wet or you need to wash soil off the roots then dry them carefully before pressing. • Use a pencil for these notes rather than a pen because any damp/wetness can cause ink to smudge and be unreadable
  • 17.
    Materials for plantcollecting: • Plant press • Plastic bags or nylon bag • Garden secateurs & trowel • Small note book & pencil • Jeweller’s tags (optional) • Camera (optional) • GPS & altimeter (optional)
  • 18.
  • 19.
    PRESSING & DRYING -Plants must be clean before pressing - They must also be put in a plastic bag or nylon bag, if it is hot they must be watered to be fresh - Place your plant between folded-out sheets of newspaper, although flimsy or greaseproof paper is preferable for delicate material - Arrange the plant carefully, trying to avoid overlapping. - When you have finished arranging the specimens within the newspaper sheets (or whatever combination of papers you have chosen), you then need to intersperse them between corrugated card sheets to aid ventilation. - Finally place everything in your press and tighten well.
  • 20.
    • For thefirst two to four days you will need to check daily and change the blotting paper and/or other surrounding papers, and retighten the press, but as the plants dry these checks can become less frequent. • Warmth may be used to improve the drying rate, An oven set at 50°C may be used but the heat must be no higher, otherwise the specimen will become very brittle and damaged.
  • 21.
  • 22.
  • 23.
  • 24.
    How good collectingcan make specimens quicker to mount and easier to preserve long term. 6 basic reminders:
  • 25.
    1. The herbarium sheet is 42x 26.5 cm. Collect enough material to show variation, but remember that multiple pieces take much longer to mount.
  • 26.
    Local newspapers maynot be the same size as a herbarium sheet. If specimens are too big they will have to be trimmed or folded which again increases mounting time.
  • 27.
    2. Collect enough material,including some for the capsule.
  • 28.
    A single fruitor flower may easily be lost or damaged …
  • 29.
    … especially ifspecimens are not handled carefully.
  • 30.
    If secured byglue, the fruit or flower may be less easy to view. Loose material for the capsule is vital if specimens are glued down.
  • 31.
    3. Arrange plantsfor pressing so that all important features are displayed.
  • 32.
    A poorly pressed specimen of Pimpinella. Rearranging driedplant material for mounting is fiddly and time consuming. Poorly pressed material is also more prone to damage once in the herbarium.
  • 33.
    The same Pimpinellaspecimen after mounting.
  • 34.
    This specimen waspressed so that the flower visible in the right hand photo was completely hidden by a leaf.
  • 35.
    Remember to press thespecimen so that you can see both upper and lower surfaces of the leaves.
  • 36.
    4.Take care withfruits and flowers.
  • 37.
    Use waxed paperto press flowers to prevent damaging fragile petals. The flower on the left has also been dried for too long or at too high a temperature.
  • 38.
    The curled leavesof this poorly pressed specimen were very fragile. It had to be soaked and repressed before mounting, a time-consuming process!
  • 39.
    5. Reduce bulkas far as possible.
  • 40.
    Remove excess foliageand split bulky fruits and roots whenever possible. Very bulky material is difficult to store in the herbarium.
  • 41.
    This bulky rootdistorts the other specimens in the folder.
  • 42.
  • 43.
    Put small fruitsin packets, or they may end up lost in the bottom of a box!
  • 44.
    Use cardboard tosupport bundles of pressed specimens and store them in strong boxes (top left) to protect them before mounting.
  • 45.
    This Gesner hasbeen damaged in transit.
  • 46.
    Summary: The ‘gold standardspecimen’ for mounting and preservation: •fits the sheet •includes material for the capsule •has been pressed to display fruit and flowers •is not too bulky •arrives undamaged So it is quick to mount and easy to preserve.