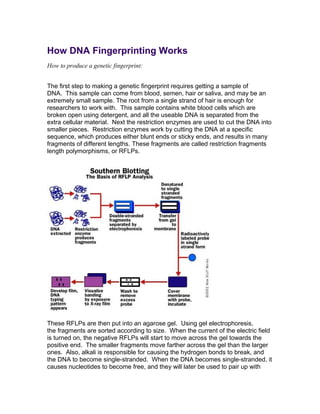
How DNA Fingerprinting Works 
How to produce a genetic fingerprint: 
The first step to making a genetic fingerprint requires getting a sample of 
DNA. This sample can come from blood, semen, hair or saliva, and may be an 
extremely small sample. The root from a single strand of hair is enough for 
researchers to work with. This sample contains white blood cells which are 
broken open using detergent, and all the useable DNA is separated from the 
extra cellular material. Next the restriction enzymes are used to cut the DNA into 
smaller pieces. Restriction enzymes work by cutting the DNA at a specific 
sequence, which produces either blunt ends or sticky ends, and results in many 
fragments of different lengths. These fragments are called restriction fragments 
length polymorphisms, or RFLPs. 
These RFLPs are then put into an agarose gel. Using gel electrophoresis, 
the fragments are sorted according to size. When the current of the electric field 
is turned on, the negative RFLPs will start to move across the gel towards the 
positive end. The smaller fragments move farther across the gel than the larger 
ones. Also, alkali is responsible for causing the hydrogen bonds to break, and 
the DNA to become single-stranded. When the DNA becomes single-stranded, it 
causes nucleotides to become free, and they will later be used to pair up with
probes. The gel is then covered by a piece of nylon and thin paper towels, which 
are used to absorb moisture from the gel. The DNA fragments get gently 
transferred from the gel to the surface of the nylon. This process is called 
blotting. 
Finally, radioactive probes get washed over the nylon surface. These probes will 
join to any DNA fragments that share the same composition. The final step to 
making a genetic fingerprint is to place a photographic film on top of the nylon 
surface. The probes leave marks on the film wherever they attached to the 
RFLPs. Dark bands will then show up when the film is developed, which marks 
the length of the RFLPs that were hybridized. Researchers are then able to read 
the fingerprint and match it to others. They do this by placing the xray on a light 
background, and comparing the RFLP lengths in the DNA from the crime scene, 
to the DNA of the suspect. 
When fingerprinting was a fairly new process, during 1984-1990, it could take as 
long as four to six weeks of lab work to complete and compare DNA 
fingerprinting evidence. Jeffreys was responsible for coming up with the original 
DNA fingerprinting technique and in November of 1991, he also was responsible 
for creating a better test that could obtain results in as little as two days.

How dna fingerprinting works

  • 1.
    How DNA FingerprintingWorks How to produce a genetic fingerprint: The first step to making a genetic fingerprint requires getting a sample of DNA. This sample can come from blood, semen, hair or saliva, and may be an extremely small sample. The root from a single strand of hair is enough for researchers to work with. This sample contains white blood cells which are broken open using detergent, and all the useable DNA is separated from the extra cellular material. Next the restriction enzymes are used to cut the DNA into smaller pieces. Restriction enzymes work by cutting the DNA at a specific sequence, which produces either blunt ends or sticky ends, and results in many fragments of different lengths. These fragments are called restriction fragments length polymorphisms, or RFLPs. These RFLPs are then put into an agarose gel. Using gel electrophoresis, the fragments are sorted according to size. When the current of the electric field is turned on, the negative RFLPs will start to move across the gel towards the positive end. The smaller fragments move farther across the gel than the larger ones. Also, alkali is responsible for causing the hydrogen bonds to break, and the DNA to become single-stranded. When the DNA becomes single-stranded, it causes nucleotides to become free, and they will later be used to pair up with
  • 2.
    probes. The gelis then covered by a piece of nylon and thin paper towels, which are used to absorb moisture from the gel. The DNA fragments get gently transferred from the gel to the surface of the nylon. This process is called blotting. Finally, radioactive probes get washed over the nylon surface. These probes will join to any DNA fragments that share the same composition. The final step to making a genetic fingerprint is to place a photographic film on top of the nylon surface. The probes leave marks on the film wherever they attached to the RFLPs. Dark bands will then show up when the film is developed, which marks the length of the RFLPs that were hybridized. Researchers are then able to read the fingerprint and match it to others. They do this by placing the xray on a light background, and comparing the RFLP lengths in the DNA from the crime scene, to the DNA of the suspect. When fingerprinting was a fairly new process, during 1984-1990, it could take as long as four to six weeks of lab work to complete and compare DNA fingerprinting evidence. Jeffreys was responsible for coming up with the original DNA fingerprinting technique and in November of 1991, he also was responsible for creating a better test that could obtain results in as little as two days.