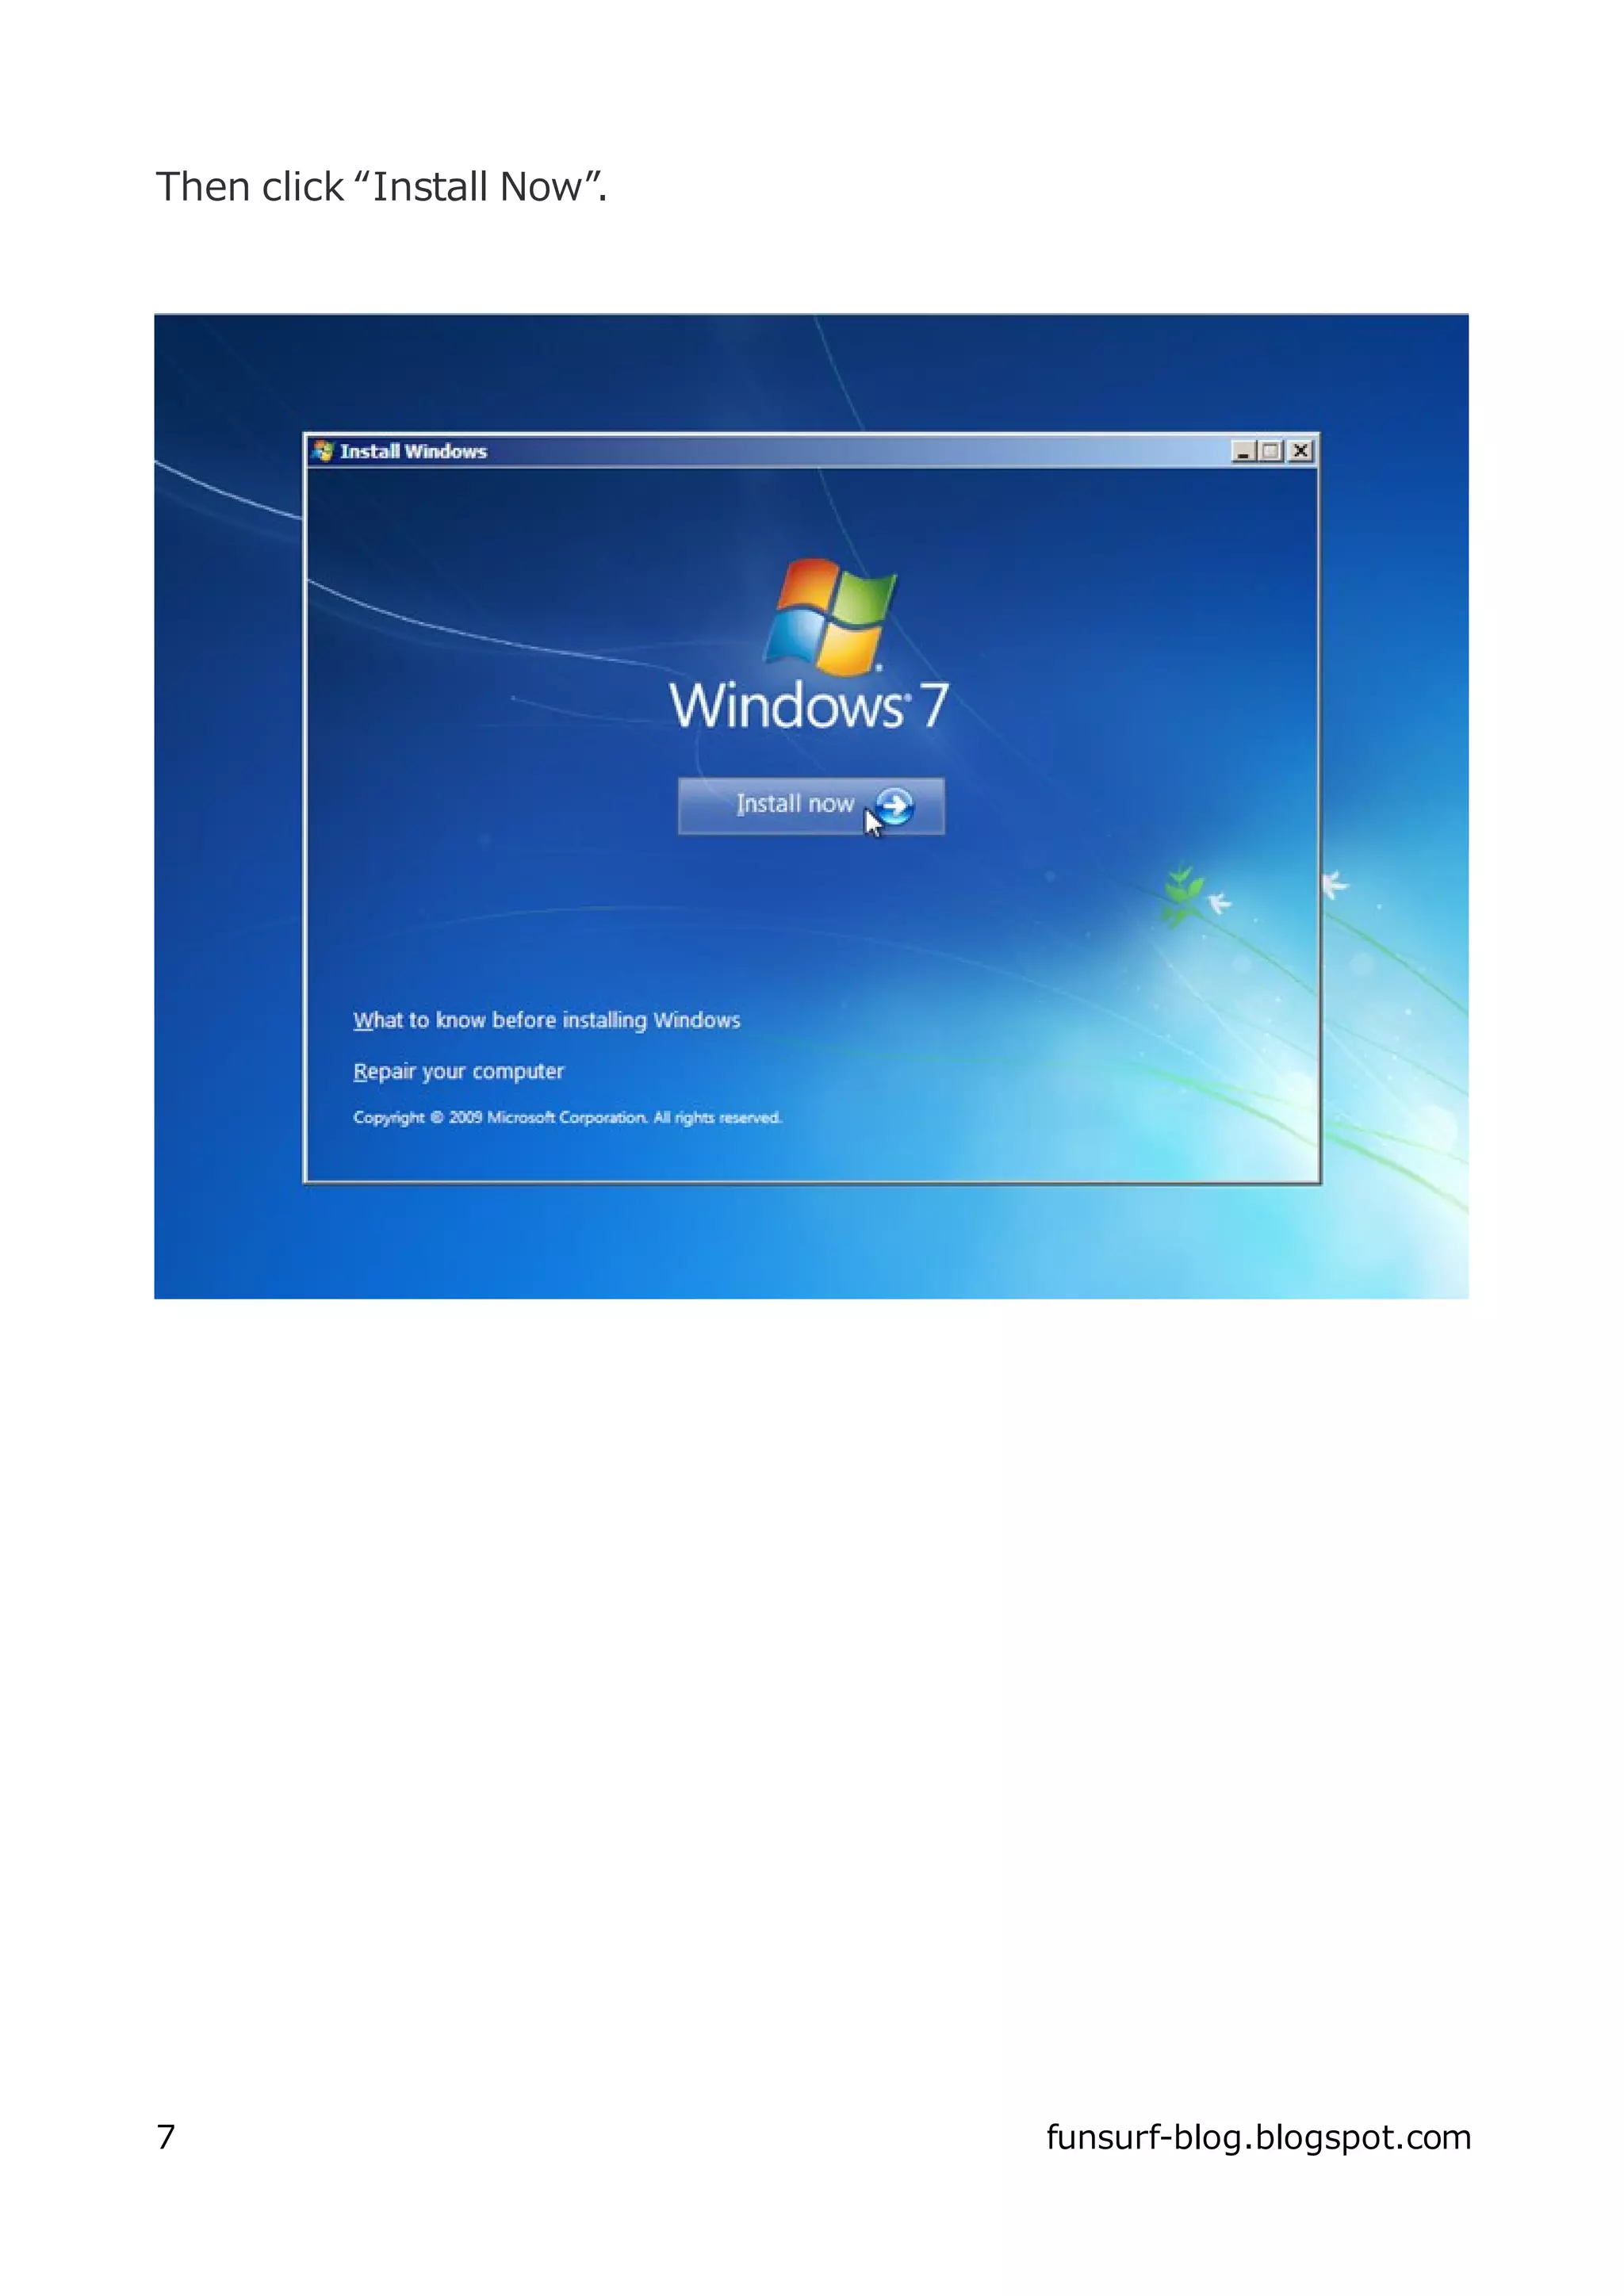
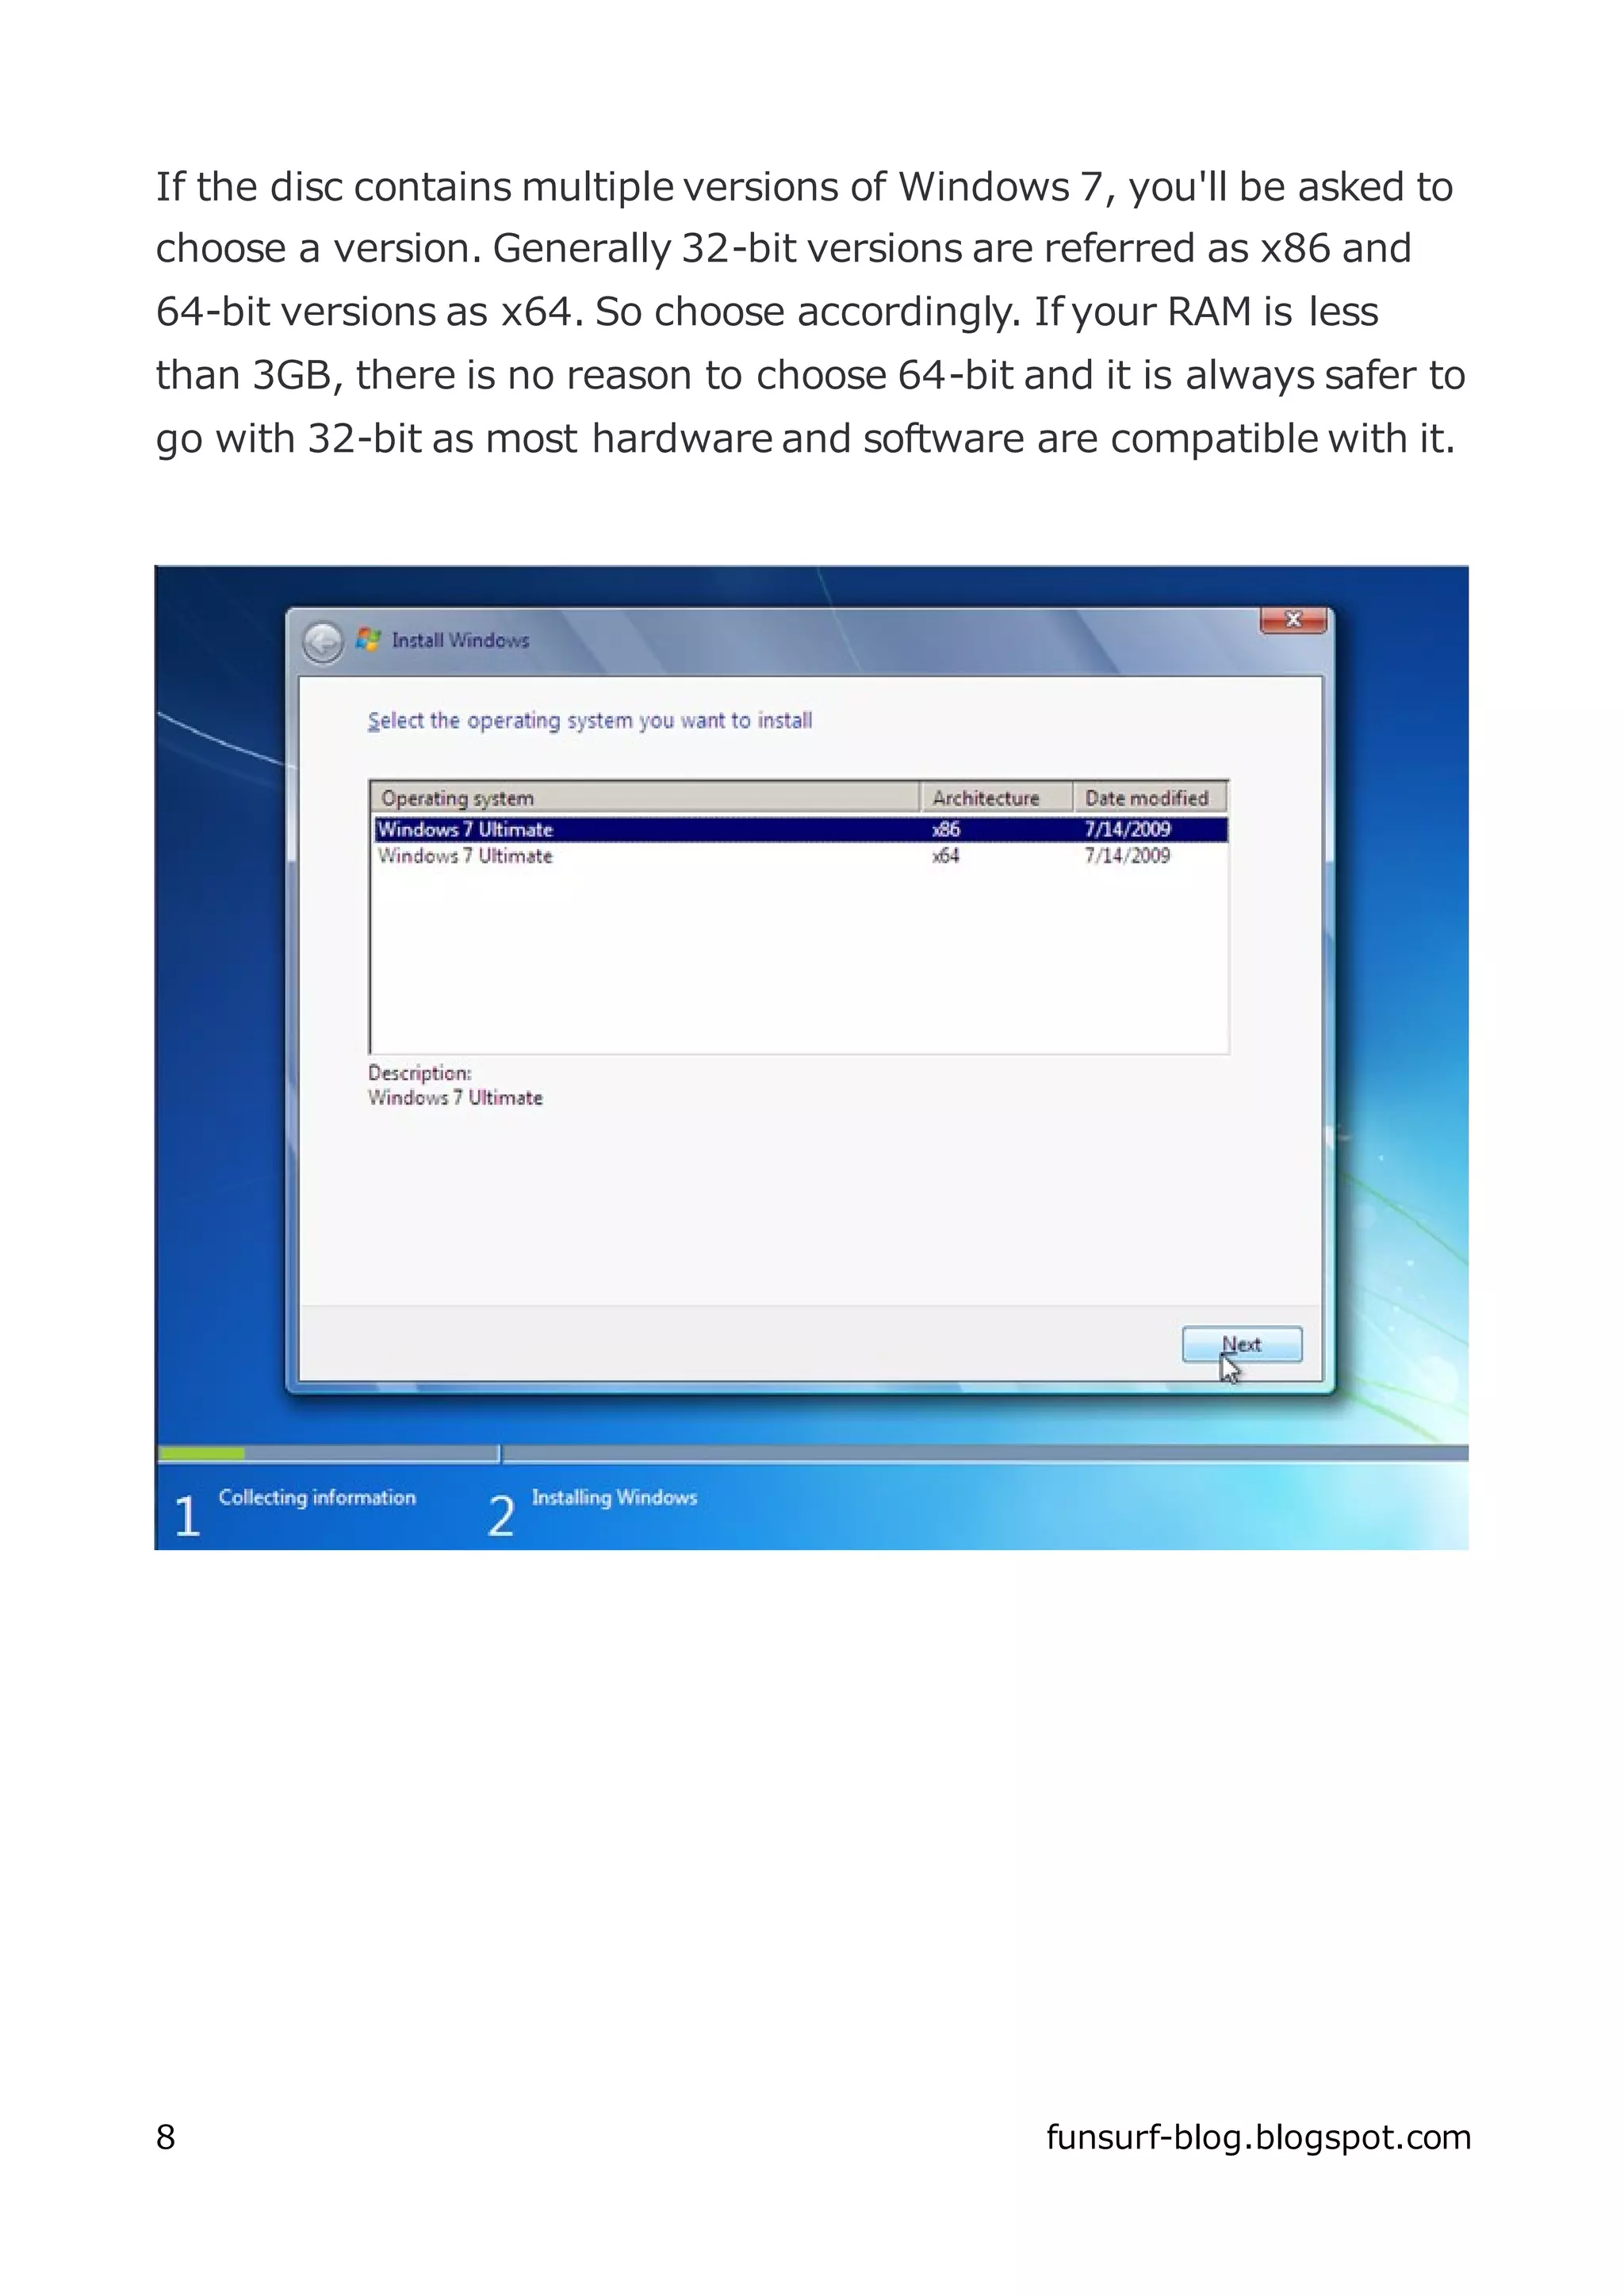
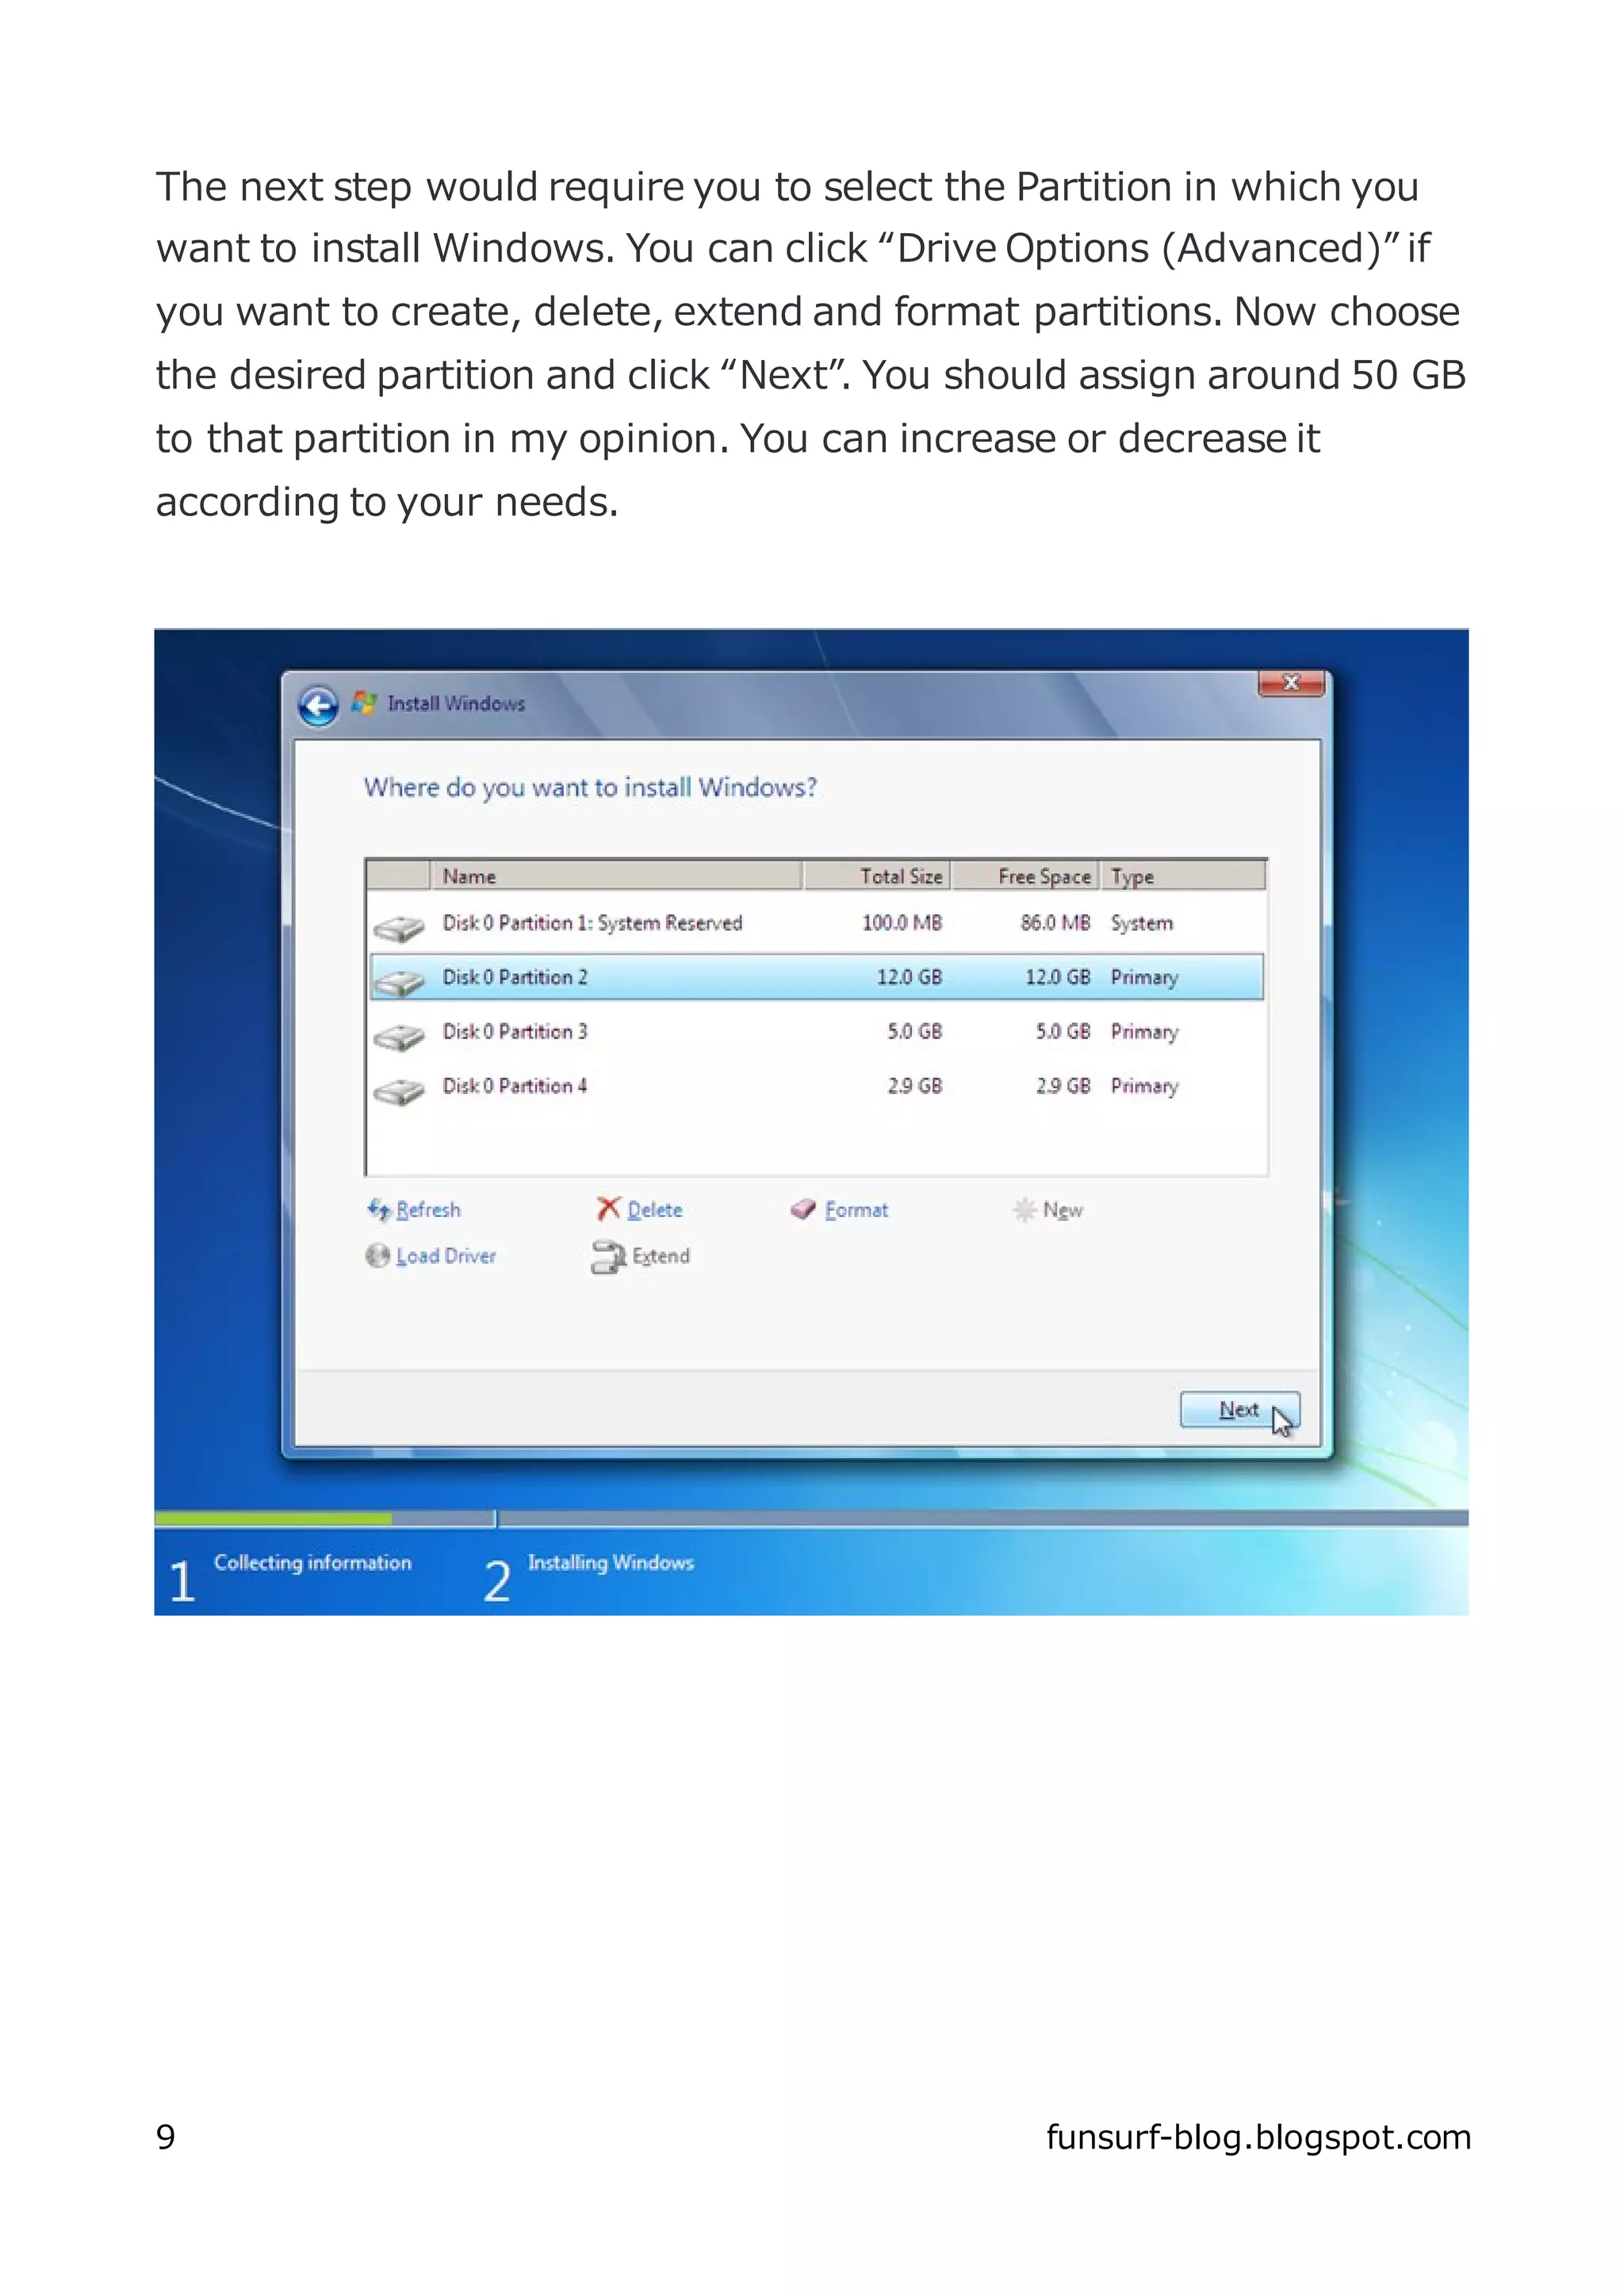
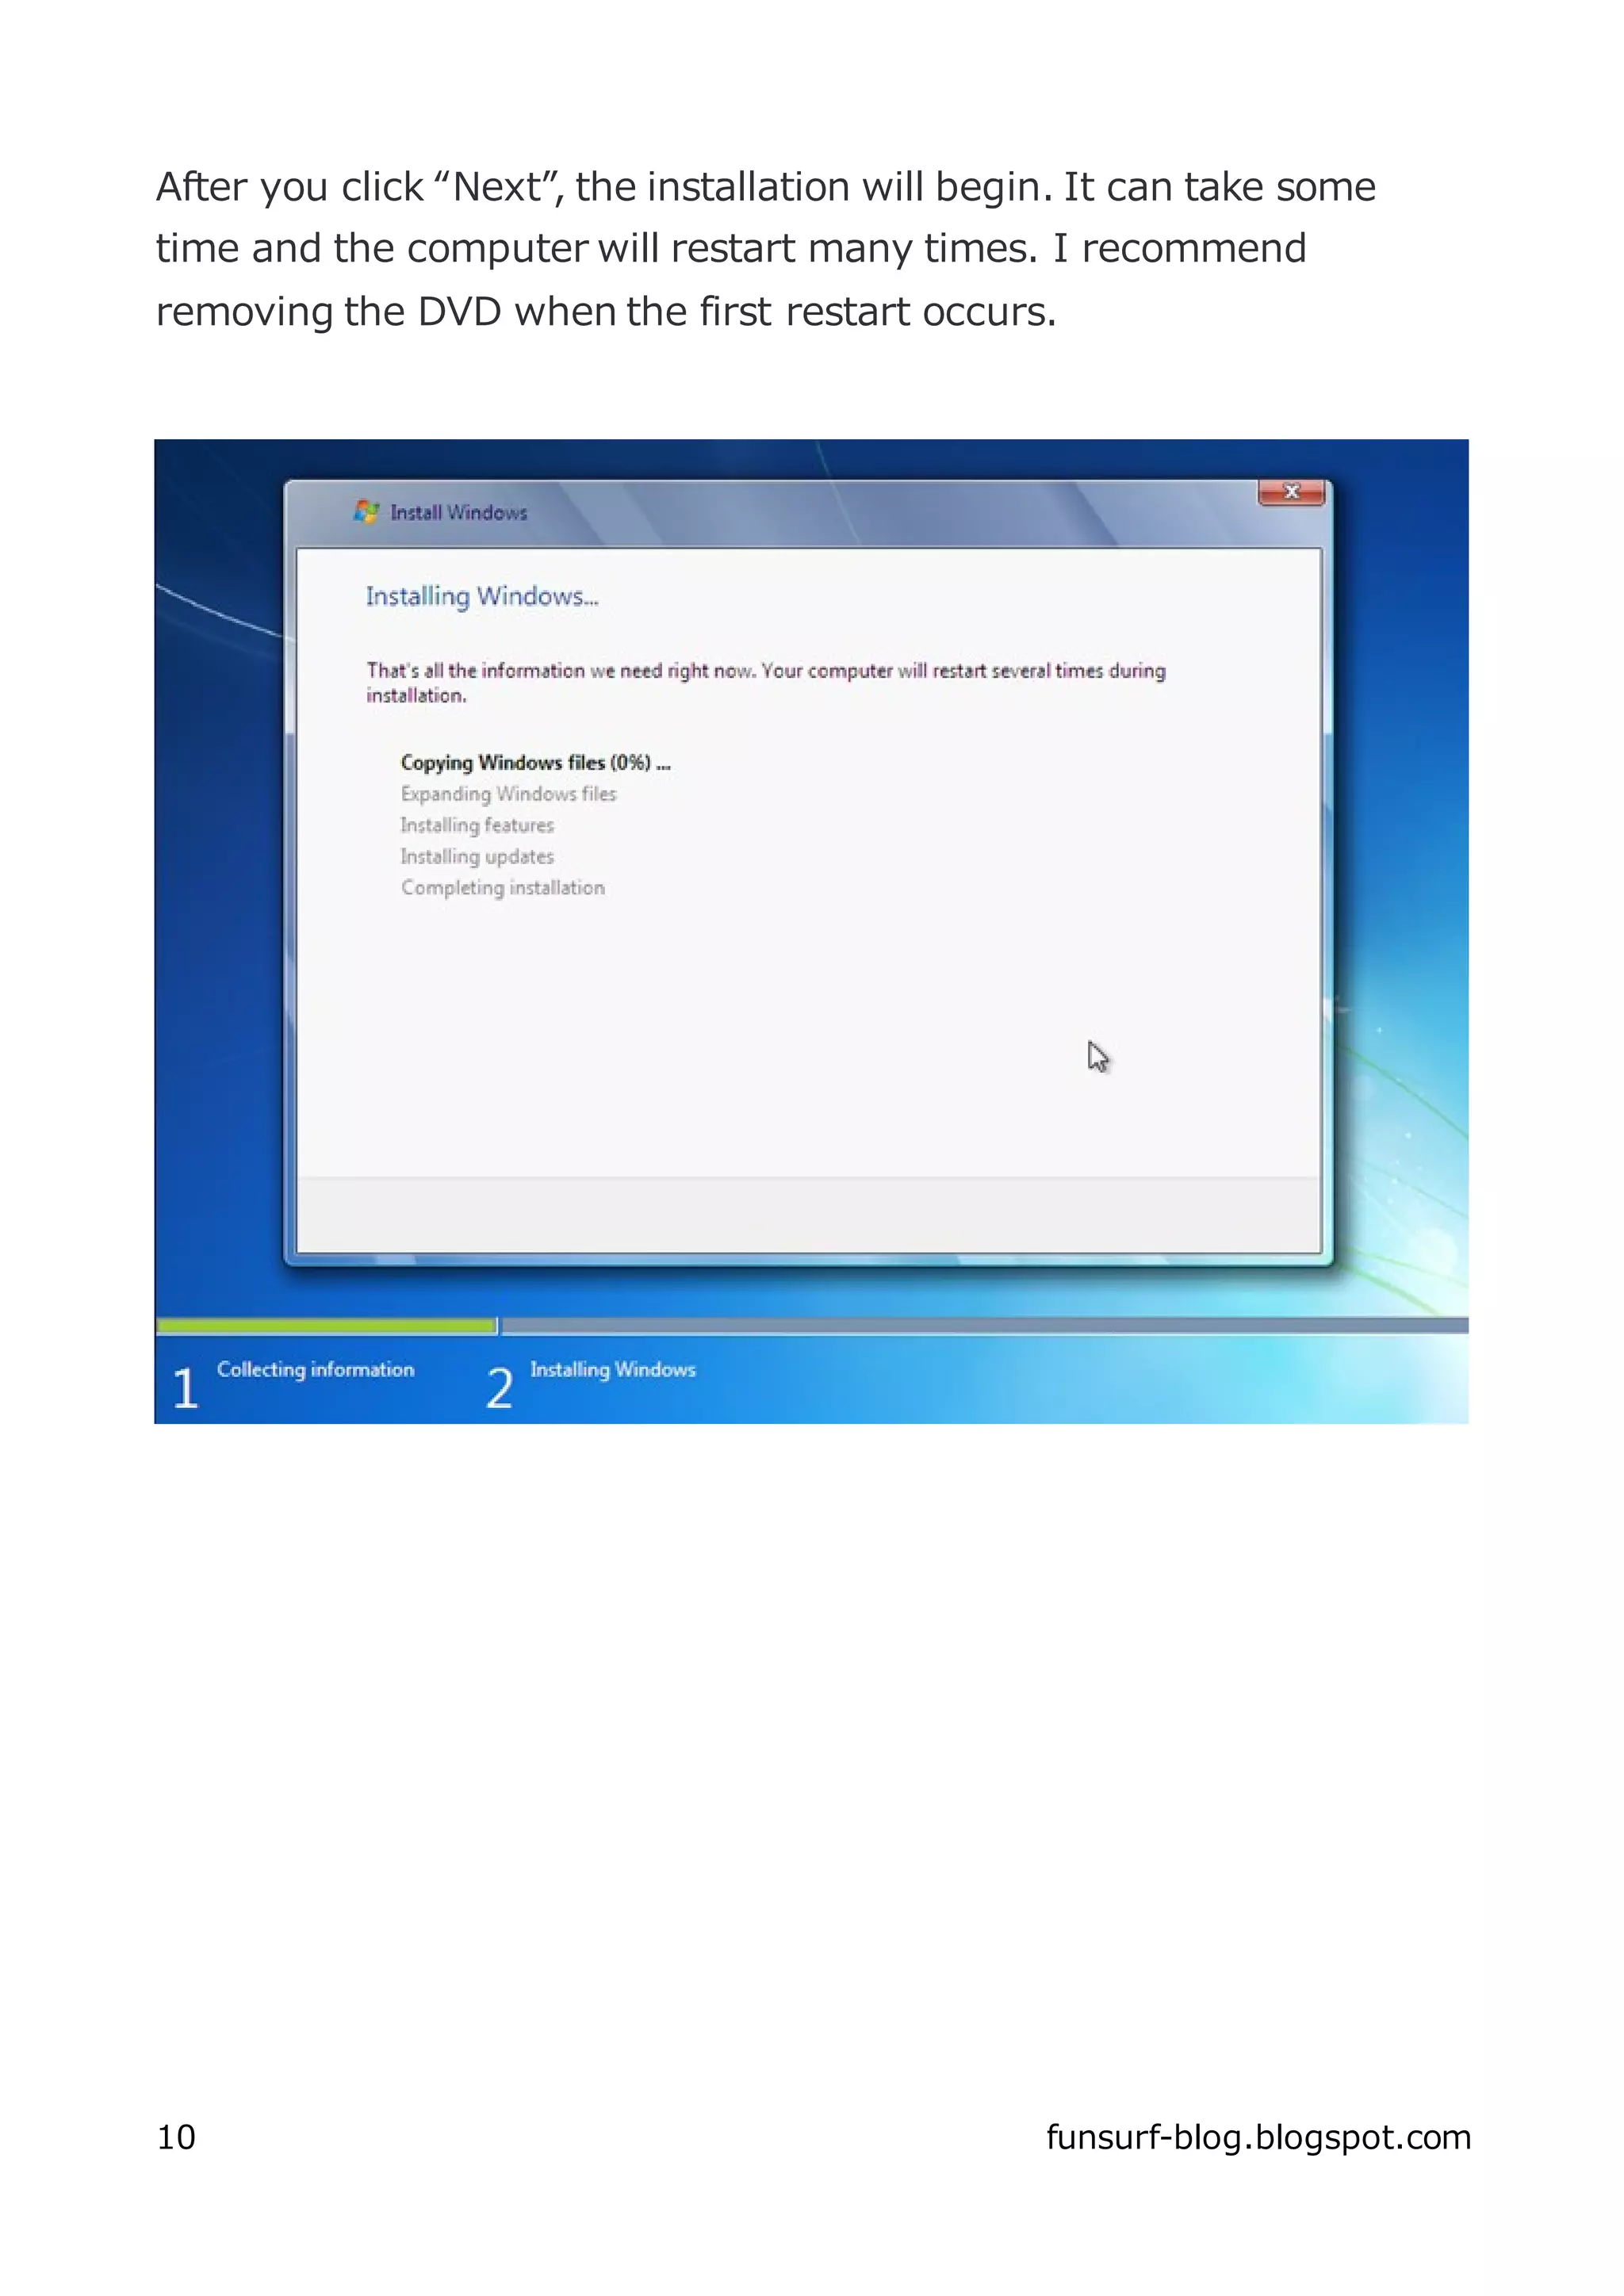
This document provides a guide to dual booting Windows and Linux operating systems on a computer. It discusses installing Windows first to allow Linux to detect it and set up dual booting. The guide covers installing Windows 7, including burning the ISO, selecting partitions, and completing the installation process. It then outlines installing Ubuntu and Fedora in subsequent chapters. The document concludes with tips for managing the bootloaders and removing or accessing partitions from each operating system.
How to create windows 10 bootable usb drive from iso using Command PromptViney Dhiman
In this slideshow, you will check slides showing you step by step instructions on how to create Windows 10 bootable USB drive from ISO using a command prompt.
Slides Credit: https://geekermag.com/how-to-make-windows-10-bootable-usb/
Note: If you want to use this slideshow anywhere, you're free to use it by giving credit to Slide's Credit link.
This PPT will show complete steps on how to install Windows 10 into a virtual machine such as VirtualBox. It covers everything from the initial creation of the VM to the final Windows setup screens after installation.
How to-create-a-dos-bootable-usb-pendriveparag dhok
If you are searching for how to create a bootable USB pendrive you might find this article useful.For computer booting we usually boot from a CD or DVD which is a traditional way for computer boot.There are many drawbacks using a CD or DVD for computer booting the bootable CD or DVD normally gets corrupted or become damaged as its very hard to maintain or keep safe from scratches.
So nowadays many professional and home users create bootable pen drive for installing new and fresh operating systems to their computer or laptops. You can find many articles on web when you google them but here I am going to share every possible way to make a bootable USB pen drive or flash drive.
How to Install Windows 10, 8 and 7 Without USB Drive or DVDViney Dhiman
In this slideshow you will see step by step guide on how to install Windows 7, Windows 8 and Windows 10 without any USB Drive or DVD. So, if you’re the one who want to try something different, then keep checking
Credits to this Slide:
http://whatswithtech.com/how-to-install-windows-10-without-usb-drive-or-dvd/
Files you require:
Daemon Tool:
http://www.daemon-tools.cc/downloads
Windows 10 Iso Image:
http://windows.microsoft.com/en-ca/windows/preview-iso
Installation of VMWare Workstation,Creation of VM image of base operating system,Installation of QEMU on Ubuntu 12.10,KVM on Ubuntu 12.10 and managing a VM on it,KVM and guest operating system on CentOS 6.3,Installing Guest OS in KVM using Command Line,Installation of VMware ESX Server,
The software installation track is composed of 11 phases. It covers creating ISO File, creating bootable disc, configuring the boot sequence of computer or laptop, partitioning the hard disk or disk drive, installing Microsoft Windows Operating System, installing Microsoft Office applications, installing Anti-Virus, installing web browser, installing Adobe Acrobat Reader, installing data Compression tool and computer hardware drivers installation.
Top 10 PC Maintenance Tasks That You Need To Remembersherireid89
Keeping PC maintained is important to make the Windows Pc running smoothly. But it is quite difficult, so here get the best PC maintenance tasks it will help you to keep your PC healthy...
What’s Windows Storage Spaces & storage pool? How to create them in Settings & Control Panel? From Windows 10 to Windows 11, what has changed to them?
This all about of how to Install the Windows 7 on your computer.
Just read the slides and I hope you will learn something from it.Just leave your messages so I can answer your questions. Thank you for Watching:)
by: Gomer Alcontin For More Info.
from: Paknaan Mandaue City Just Call:09436445862
Becoming Linux Expert Series-Install Linux Operating Systemskbansal222
Go to: https://www.udemy.com/becoming-linux-expert-series-install-linux-operating-system/?couponCode=coupon2701
First course in the series to install Linux Operating System.88% discount.only at $1.
1. Very basic course
2. charges only token money of $1. 88% discount.
3. This is the first course in the series of many courses which I will be doing on Linux Operating system. There are many OS available but we will see that why we choose Linux.
4. Go to: https://www.udemy.com/becoming-linux-expert-series-install-linux-operating-system/?couponCode=coupon2701
5. Only 100 coupons are avalable.
Request you to leave a review.
This manual is helpful to the users who want to install the open source ILMS Koha. This manual also very helpful for customising tips after installation.
Synthetic Fiber Construction in lab .pptxPavel ( NSTU)
Synthetic fiber production is a fascinating and complex field that blends chemistry, engineering, and environmental science. By understanding these aspects, students can gain a comprehensive view of synthetic fiber production, its impact on society and the environment, and the potential for future innovations. Synthetic fibers play a crucial role in modern society, impacting various aspects of daily life, industry, and the environment. ynthetic fibers are integral to modern life, offering a range of benefits from cost-effectiveness and versatility to innovative applications and performance characteristics. While they pose environmental challenges, ongoing research and development aim to create more sustainable and eco-friendly alternatives. Understanding the importance of synthetic fibers helps in appreciating their role in the economy, industry, and daily life, while also emphasizing the need for sustainable practices and innovation.
Read| The latest issue of The Challenger is here! We are thrilled to announce that our school paper has qualified for the NATIONAL SCHOOLS PRESS CONFERENCE (NSPC) 2024. Thank you for your unwavering support and trust. Dive into the stories that made us stand out!
How to Make a Field invisible in Odoo 17Celine George
It is possible to hide or invisible some fields in odoo. Commonly using “invisible” attribute in the field definition to invisible the fields. This slide will show how to make a field invisible in odoo 17.
The Roman Empire A Historical Colossus.pdfkaushalkr1407
The Roman Empire, a vast and enduring power, stands as one of history's most remarkable civilizations, leaving an indelible imprint on the world. It emerged from the Roman Republic, transitioning into an imperial powerhouse under the leadership of Augustus Caesar in 27 BCE. This transformation marked the beginning of an era defined by unprecedented territorial expansion, architectural marvels, and profound cultural influence.
The empire's roots lie in the city of Rome, founded, according to legend, by Romulus in 753 BCE. Over centuries, Rome evolved from a small settlement to a formidable republic, characterized by a complex political system with elected officials and checks on power. However, internal strife, class conflicts, and military ambitions paved the way for the end of the Republic. Julius Caesar’s dictatorship and subsequent assassination in 44 BCE created a power vacuum, leading to a civil war. Octavian, later Augustus, emerged victorious, heralding the Roman Empire’s birth.
Under Augustus, the empire experienced the Pax Romana, a 200-year period of relative peace and stability. Augustus reformed the military, established efficient administrative systems, and initiated grand construction projects. The empire's borders expanded, encompassing territories from Britain to Egypt and from Spain to the Euphrates. Roman legions, renowned for their discipline and engineering prowess, secured and maintained these vast territories, building roads, fortifications, and cities that facilitated control and integration.
The Roman Empire’s society was hierarchical, with a rigid class system. At the top were the patricians, wealthy elites who held significant political power. Below them were the plebeians, free citizens with limited political influence, and the vast numbers of slaves who formed the backbone of the economy. The family unit was central, governed by the paterfamilias, the male head who held absolute authority.
Culturally, the Romans were eclectic, absorbing and adapting elements from the civilizations they encountered, particularly the Greeks. Roman art, literature, and philosophy reflected this synthesis, creating a rich cultural tapestry. Latin, the Roman language, became the lingua franca of the Western world, influencing numerous modern languages.
Roman architecture and engineering achievements were monumental. They perfected the arch, vault, and dome, constructing enduring structures like the Colosseum, Pantheon, and aqueducts. These engineering marvels not only showcased Roman ingenuity but also served practical purposes, from public entertainment to water supply.
Palestine last event orientationfvgnh .pptxRaedMohamed3
An EFL lesson about the current events in Palestine. It is intended to be for intermediate students who wish to increase their listening skills through a short lesson in power point.
Welcome to TechSoup New Member Orientation and Q&A (May 2024).pdfTechSoup
In this webinar you will learn how your organization can access TechSoup's wide variety of product discount and donation programs. From hardware to software, we'll give you a tour of the tools available to help your nonprofit with productivity, collaboration, financial management, donor tracking, security, and more.
Acetabularia Information For Class 9 .docxvaibhavrinwa19
Acetabularia acetabulum is a single-celled green alga that in its vegetative state is morphologically differentiated into a basal rhizoid and an axially elongated stalk, which bears whorls of branching hairs. The single diploid nucleus resides in the rhizoid.
Embracing GenAI - A Strategic ImperativePeter Windle
Artificial Intelligence (AI) technologies such as Generative AI, Image Generators and Large Language Models have had a dramatic impact on teaching, learning and assessment over the past 18 months. The most immediate threat AI posed was to Academic Integrity with Higher Education Institutes (HEIs) focusing their efforts on combating the use of GenAI in assessment. Guidelines were developed for staff and students, policies put in place too. Innovative educators have forged paths in the use of Generative AI for teaching, learning and assessments leading to pockets of transformation springing up across HEIs, often with little or no top-down guidance, support or direction.
This Gasta posits a strategic approach to integrating AI into HEIs to prepare staff, students and the curriculum for an evolving world and workplace. We will highlight the advantages of working with these technologies beyond the realm of teaching, learning and assessment by considering prompt engineering skills, industry impact, curriculum changes, and the need for staff upskilling. In contrast, not engaging strategically with Generative AI poses risks, including falling behind peers, missed opportunities and failing to ensure our graduates remain employable. The rapid evolution of AI technologies necessitates a proactive and strategic approach if we are to remain relevant.
1. Guide to Dual Booting
Satyajit Sahoo
funsurf-blog.blogspot.com
2. Table of Contents
Chapter 1: Basics ........................................................................................... 2
How it works? .............................................................................................. 2
What is the need? .................................................................................... 2
What are the differences from Virtual Machine? ............................ 3
What are the disadvantages?............................................................. 3
What are the advantages? .................................................................. 3
Which distro to choose? ........................................................................ 3
Chapter 2: Installing Windows .................................................................... 5
Prerequisites ............................................................................................... 5
Installing Windows .................................................................................... 6
Chapter 3: Installing Ubuntu..................................................................... 16
Installing Ubuntu ..................................................................................... 16
Chapter 4: Installing Fedora..................................................................... 28
Installing Fedora ..................................................................................... 28
User Setup ................................................................................................ 39
Chapter 5: Last Bits ..................................................................................... 43
Add Linux to Windows Bootloader ................................................... 43
Making Windows Bootloader Default ............................................... 44
Restoring GRUB as Default .................................................................. 46
Restoring GRUB in an Unbootable Condition .............................. 47
Updating GRUB 2 .................................................................................. 48
Removing Windows................................................................................. 49
Removing Linux ........................................................................................ 50
Access Linux Partition in Windows ..................................................... 51
Linux is Not Windows ............................................................................. 52
1 funsurf-blog.blogspot.com
3. Chapter 1: Basics
I often come across people who don't know anything about dual
booting. Of course, I didn't know it at first. But now I'm often having
more than one OS in my laptop. So here is an effort to describe it,
and how it is done.
What is Dual Booting?
Dual-booting means having two operating systems on a computer at
the same time. You can call it multi-booting if you have more than
two operating systems. For example, I've Windows 7, Kubuntu and
Fedora installed in 3 different partitions in my laptop. When you dual-
boot, you can choose what operating system to choose when you
start your computer.
How it works?
Dual booting requires a program called bootloader. Most operating
systems include a bootloader. Windows uses its “Windows
Bootloader” while many Linux distros use “GRUB” and “GRUB 2”.
There exist many other bootloaders such as Lilo etc. When you start
your PC, bootloader is the first program that runs. It then displays the
list of operating systems installed to choose from. Some bootloaders
also have advanced features like terminal access and recovery tools.
What is the need?
Well, it depends upon your needs. Some like to use Linux, but there
might not be a Linux alternative of their favourite Windows software
and vice-versa. Some cannot leave Windows due to the fact that his
office website or banking websites require Internet Explorer. Some
also do it just for fun. There are many reasons, different for different
persons.
2 funsurf-blog.blogspot.com
4. What are the differences from Virtual Machine?
Using a virtual machine can be helpful as you can install another
operating system within your current operating system without
changing your partition structure. But it limits the power of both the
systems as the resources are divided. A dual-boot ensures that the
operating system can get the most of your hardware.
What are the disadvantages?
Particularly, I don't see any disadvantage of dual booting. One
disadvantage may be that dual-booting takes more space on your
hard drive. Also you are changing the bootloader configuration, so
any errors might make the system unusable. But that's unlikely to
happen as most systems handle the dual-boot efficiently and you
don't have anything to do manually that would cause error.
What are the advantages?
• Your operating system can use all your hardware unlike
virtualization, so no performance loss.
• Even if one operating system fails, you have the other system
for recovery purposes and data backup.
• You can enjoy the operating system you like without having to
completely uninstall the system you need.
Which distro to choose?
So, the problem here is there are literally thousands of choices. But
not every distro (Linux based distribution) will suit your test. Different
distros have different principles. Not every distro is newbie friendly.
Choosing the wrong distro could make you forget the idea of using
Linux. What should we do then?
The most user friendly distro so far is Linux Mint, based on the
popular distro Ubuntu. Linux Mint or Ubuntu can give you a good start
3 funsurf-blog.blogspot.com
5. into the world of Linux, primarily because of the great effort put into
making them as easy as possible to set up and not to mention its
large user base and software available.
But, there are other alternatives such as Fedora, Open Suse and
much more. Personally I think they are not really ready for a person
coming straight from the world of Windows.
4 funsurf-blog.blogspot.com
6. Chapter 2: Installing Windows
So, we discussed some basic things about dual booting in the
previous article. Here, we'll see the installation process of Windows.
Windows doesn't detect any other operating systems such as Linux.
So, to achieve a dual boot configuration, you should install Windows
first, so that Linux can easily setup a dual boot environment when it
detects previous Windows installation. If you already have Windows
installed, you can skip it. But if you have Linux installed, fear not, you
can proceed installing Windows as we would later describe the
procedure to add Linux to Windows boot menu.
Prerequisites
To install windows, you need to check if your hardware meets the
requirements of the version of Windows you are installing. You must
have the installation disc or ISO file of Windows. We've shown here,
how to install Windows 7 Ultimate. But the other versions should be
similar, and if you have ever installed Windows, then you know this
already!
5 funsurf-blog.blogspot.com
7. Installing Windows
Installing Windows is fairly easy. You first need to burn the Windows
7 ISO file to a DVD or create a bootable pen drive. Then insert the
disc and restart to boot from it. You might need to change the boot
order in the BIOS settings accordingly if you want to boot from
CD/DVD or Pen drive.
When you boot from the Windows 7 disc, you'll be prompted to select
the language and the country. After choosing appropriate values, click
“Next”.
6 funsurf-blog.blogspot.com
9. If the disc contains multiple versions of Windows 7, you'll be asked to
choose a version. Generally 32-bit versions are referred as x86 and
64-bit versions as x64. So choose accordingly. If your RAM is less
than 3GB, there is no reason to choose 64-bit and it is always safer to
go with 32-bit as most hardware and software are compatible with it.
8 funsurf-blog.blogspot.com
10. The next step would require you to select the Partition in which you
want to install Windows. You can click “Drive Options (Advanced)” if
you want to create, delete, extend and format partitions. Now choose
the desired partition and click “Next”. You should assign around 50 GB
to that partition in my opinion. You can increase or decrease it
according to your needs.
9 funsurf-blog.blogspot.com
11. After you click “Next”, the installation will begin. It can take some
time and the computer will restart many times. I recommend
removing the DVD when the first restart occurs.
10 funsurf-blog.blogspot.com
12. Then it will initialize services, configure drivers and so on.
11 funsurf-blog.blogspot.com
13. The next step is to ask for a Host name. It is not the same as
username, so don't get confused.
12 funsurf-blog.blogspot.com
14. Now you have to choose the Windows update settings.
13 funsurf-blog.blogspot.com
15. When it asks for your time zone, select your appropriate time zone
from the dropdown list.
14 funsurf-blog.blogspot.com
16. Now after some dialog boxes like asking for username, password etc.,
and the installation will finish. You might be prompted to Activate
Windows. You can skip the step if you don't have an internet
connection or want to activate it later. If you don't activate, Windows
will expire in 30 days.
Now after the installation finishes, you can start using Windows
normally.
15 funsurf-blog.blogspot.com
17. Chapter 3: Installing Ubuntu
In the previous article, we saw how to install Windows. Now the next
step is to install a Linux distro. We'll see how to install Ubuntu. Installing
Linux Mint is basically the same.
Installing Ubuntu
First, you have to download the Ubuntu ISO image from its website.
Then either burn it to a DVD or create a bootable pen drive using
Unetbootin. Then boot from the disc or pen drive. Then you'll be
given options to Try Ubuntu or Install Ubuntu. So let’s choose “Install
Ubuntu” and proceed.
16 funsurf-blog.blogspot.com
18. If you choose to try Ubuntu, you can experience Ubuntu from the CD
even without installing. But expect loss in performance and support
for graphics drivers in the Live CD environment. When you try
Ubuntu, you can install from the Live session by clicking on the
“Install Ubuntu” icon present on the desktop. It is recommended to
first try if Ubuntu works well on your hardware before installing.
17 funsurf-blog.blogspot.com
19. In the next step, you can check the boxes to automatically download
and install updates and multimedia codecs during the installation
process. This would require internet and can take longer if you have a
slow connectivity. You can absolutely skip installing and install them
after Ubuntu installation is complete. But without multimedia codecs,
you won’t be able to play proprietary media files like mp3.
18 funsurf-blog.blogspot.com
20. The next screen will give you different partition schemes. They may
vary according to your condition. For example we had only two
options. Generally, the options are,
1. Install Ubuntu Alongside Windows
2. Replace Windows 7 with Ubuntu
3. Use Entire Hard Disk
4.Something Else
To have more control over our partition scheme, we will choose
“Something Else”.
19 funsurf-blog.blogspot.com
21. The next screen will list all your partitions. You can create, edit,
delete and format your partitions here. choose a partition to install
Ubuntu. Ensure that the partition has no data on it as we are going to
format it.
20 funsurf-blog.blogspot.com
22. Select your partition and click “Change”. In the “Use as” field, choose
“Ext4 journaling file system”. Check the box “Format the partition”
and choose “Mount point” as “/”.
Linux was made in days when RAM was expensive and was designed
to be able to run in limited RAM. So if your RAM is less, says less than
1GB, you should create a SWAP partition in order to better utilise you
Hard Disk memory in limited RAM. You need another partition to use
as SWAP partition. You normally need a SWAP partition approximately
of size twice of your physical RAM. Say 2 GB in case of 1 GB RAM.
Select the partition you want to use as SWAP partition and click
“Change”. In the “Use as” field, choose “SWAP”. Remember that you
cannot store any data in the SWAP partition.
21 funsurf-blog.blogspot.com
23. Now click “Ok”. Then click “Install now” to begin installation.
22 funsurf-blog.blogspot.com
24. The next screen prompts you to choose the time zone. You can
conveniently click on the map to set your time zone.
23 funsurf-blog.blogspot.com
25. You'll be asked more information like keyboard layout and username,
password etc. while the installation continues in the background.
24 funsurf-blog.blogspot.com
26. After providing the required information, you'll be presented with a
slideshow describing some best aspects of Ubuntu.
25 funsurf-blog.blogspot.com
27. After the installation completes, you'll see an “Installation Complete”
dialog. Click “Restart Now” to restart your system.
26 funsurf-blog.blogspot.com
28. Now after restart, you'll be presented with the GRUB 2 boot menu
listing all your installed operating system. You'll find your previous
Window installation at the bottom.
Congratulations, you have set your dual boot configuration successfully.
27 funsurf-blog.blogspot.com
29. Chapter 4: Installing Fedora
Installing Fedora is little different from Ubuntu. Fedora uses
“Anaconda Installer” whereas Ubuntu uses “Ubiquity”. But the steps
are essentially the same. We are using the Live CD of the KDE Spin of
Fedora here to demonstrate the installation, but others are exactly
the same as they use the same installer.
Installing Fedora
After booting from the Live CD, you are taken to the normal desktop
session where you will find a “Install to Hard Drive” icon. Click on it
and you are ready to install.
28 funsurf-blog.blogspot.com
30. The installer will first ask you to choose your appropriate Keyboard.
For most international laptops and desktops, the U.S. English should
be selected. After selecting your keyboard, click next.
29 funsurf-blog.blogspot.com
31. The next screen will ask you to select the storage devices type. For
home setups, the “Basic Storage Devices” option should be correct.
Let’s select it and proceed.
30 funsurf-blog.blogspot.com
32. The next step will ask you to set the host name and domain name.
They are similar to your computer’s address and will be used to
identify your computer in a network.
31 funsurf-blog.blogspot.com
33. In the next screen, select your time zone either from the Map or from
the long list and click “Next”.
32 funsurf-blog.blogspot.com
34. Now you will be asked to enter a root password. Note that the root
password is different from the login password and will only be used
for administrative purposes.
In Ubuntu, there is no password set for the root account initially.
33 funsurf-blog.blogspot.com
35. Now let’s select the partition scheme. There are different options
which can be suitable in case of different situations. Choose a
predefined setup or go ahead and choose “Create Custom Layout”.
If you select any of the predefined options, by default Fedora will use
LVM (Logical Volume Management) for installation. LVM has more
features, but you have to do more work if you want to access LVM
from another distro which doesn’t support LVM out of the box, e.g. –
Ubuntu. You can also create a LVM in the custom option, but we will
use the simple ext4 partition to maintain compatibility with other
systems and for the sake of simplicity.
34 funsurf-blog.blogspot.com
36. It’s a good practice to create separate partitions for boot, home and
root. Having a different boot partition will ensure that you have
access to your other Operating Systems even if the root partition
becomes corrupt.
The method is similar to that of Ubuntu, but here we are just creating
additional partitions for boot, home and root. If your RAM is less, says
less than 1GB, you need to create a SWAP partition in order to better
utilise you Hard Disk memory in limited RAM. To create a SWAP
partition, select the file System as SWAP.
35 funsurf-blog.blogspot.com
37. Here is how our setup looks after creating all necessary partitions.
36 funsurf-blog.blogspot.com
38. In the next step, you’ll be presented with the bootloader setup. Here
you can see, add, edit and delete any other Operating Systems
Entries and also select your default Operating System.
Note that Fedora uses the old GRUB instead of GRUB 2 because of
some lacking features in GRUB 2. You can skip installing a bootloader
if you already use GRUB 2 or any other bootloader. But if you choose
LVM based partition for Fedora, GRUB 2 doesn’t support it yet. So you
need to use GRUB.
You should leave the bootloader installation location as is. It’s better
not to install the bootloader in any partition instead of MBR.
37 funsurf-blog.blogspot.com
39. The next screen will start the installation. Wait a couple of minutes for
the installation to finish. After completion of installation, you will get a
installation finish screen. Close it and restart the computer.
38 funsurf-blog.blogspot.com
40. User Setup
When you start Fedora for the first time, you will see the welcome
screen. Click forward to go to the next screen.
39 funsurf-blog.blogspot.com
41. Now you will see the create user screen. Enter the details and click
forward.
40 funsurf-blog.blogspot.com
42. The next screen will let you set the date and time. You can also
synchronize the time with a network server.
41 funsurf-blog.blogspot.com
43. Now after a couple of more dialogs, the login screen will appear. Now
you can start playing with Fedora.
42 funsurf-blog.blogspot.com
44. Chapter 5: Last Bits
Now we will see those last bits you need to know when you dual boot.
Add Linux to Windows Bootloader
The Linux bootloaders (e.g. - GRUB 2) offer much more features. But
you might want to use Windows bootloader as default. Or if you
installed/reinstalled Windows after installing Linux, the Windows
bootloader overwrites GRUB. So you need to add Linux to the bootloader
again.
43 funsurf-blog.blogspot.com
45. There is a nice software available called EasyBCD by Neosmart
Technologies, which is perfect for the task. First, download and install
EasyBCD. Run EasyBCD and go to the “Add New Entry” section. Here in
the “Linux/BSD” tab, select the bootloader type (“GRUB 2” in case of
latest versions of Ubuntu) and give it a name. Then click “Add Entry”.
Now, when you restart, you will have the boot entries displayed in
Windows Bootloader. Remember that this will only work if your default
bootloader is Windows bootloader.
Making Windows Bootloader Default
It is fairly easy. In EasyBCD, go to the “BCD Deployment” section. Here
under the “MBR Configuration Options”, select the type of Windows
bootloader and click “Write MBR”.
44 funsurf-blog.blogspot.com
47. Restoring GRUB as Default
If you want to restore GRUB, first add GRUB to Windows bootloader
with EasyBCD following the procedure given above. Then after you login
to Ubuntu, open Terminal from Applications > Accessories > Terminal or
Applications > System Tools > Terminal depending on your distribution.
Then issue the following command to install GRUB 2 to MBR (GRUB in
case of Fedora),
sudo grub-install /dev/sda
GRUB 2 cannot handle LVM that Fedora uses by default. So if you didn’t
use LVM and installed Fedora according to this guide, you can use GRUB
2 in Fedora. In case of Fedora, you should give the following command
to install GRUB 2 to MBR,
sudo grub2-install /dev/sda
46 funsurf-blog.blogspot.com
48. Restoring GRUB in an Unbootable Condition
If you screw up things, and your system becomes unbootabale, fear not.
Linux comes to rescue. You can use a Linux live CD to boot your
computer. Then you can install GRUB from there. But it is a bit
complicated and you will often not face such situation. So I’ll not explain
it here. You can find the solution in the internet. But one thing I would
like to mention that you have to first mount /dev by sudo mount --
bind /dev dev or similar, then chroot to the installed system and
restore GRUB as mentioned here. But really don’t go too deep here. I
mentioned it here because it was the thing I was doing wrong when I
was new.
47 funsurf-blog.blogspot.com
49. Updating GRUB 2
If your boot options are different than that displayed in GRUB 2, you
might need to update the GRUB 2 configuration. You can update GRUB 2
simply by issuing the following command in Terminal,
sudo update-grub
In Fedora, you have to use the following command instead,
grub2-mkconfig -o /boot/grub2/grub.cfg
48 funsurf-blog.blogspot.com
50. Removing Windows
If you ever want to remove Windows completely from your system, you
just need to format the Windows partition and then Update GRUB.
Remember that you should have GRUB as default bootloader.
If you don't see the “Format” option, you need to install “Disk Utility”.
Simply give the command in Terminal,
sudo apt-get install gnome-disk-utility
In case of Fedora you have to use,
su -c “yum install gnome-disk-utility”
49 funsurf-blog.blogspot.com
51. Removing Linux
Removing Linux completely is also easy. First you have to make
Windows bootloader default, if you don't, you won't be able to boot after
deleting Linux. Then just delete the Linux partition. To delete the
partition, go to Control Panel > System and Security > Administrative
Tools > Create and format hard disk partitions in Windows.
50 funsurf-blog.blogspot.com
52. When the Disk Management window opens, look for the Linux partition
and delete it.
Access Linux Partition in Windows
Windows, by default, uses NTFS file system, while Linux uses ext4 file
system. Linux can successfully detect NTFS file systems. But Windows
doesn't recognize ext4. You can use the ext2fsd driver for Windows to
be able to access Linux partitions from within Windows.
51 funsurf-blog.blogspot.com
53. Linux is Not Windows
Remember that Linux is not Windows. So don't expect it to be like
Windows. There would be a lot of differences which I’m not supposed to
explain here. If you have a will, you will automatically explore and
discover new things. And it will take you some time to learn. You might
need to search the internet for hours to tackle a problem; you might
need to do dirty command line stuffs. But all these will only make you
more efficient and productive. You might end up writing small scripts to
automate your tasks and show them off to your friends! You'll be
surprised when you know how much control Linux gives to you. So
enjoy dual booting.
52 funsurf-blog.blogspot.com