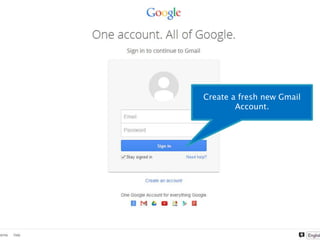
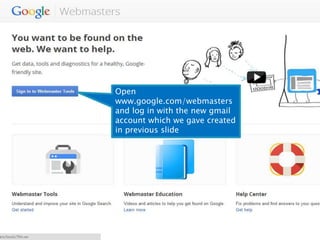
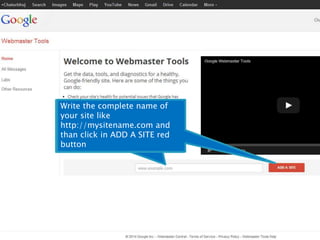
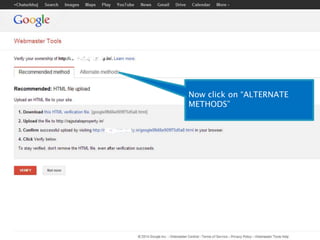
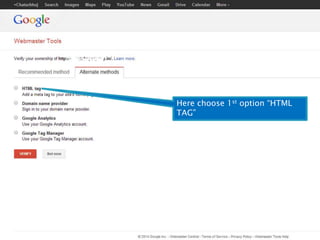
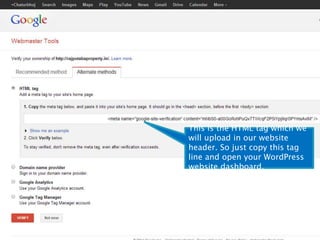
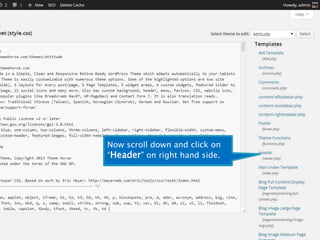
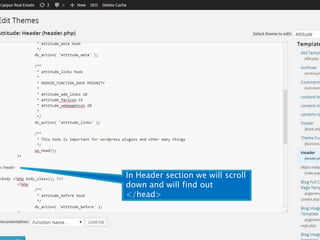
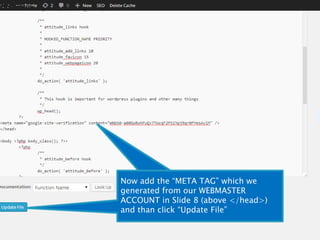
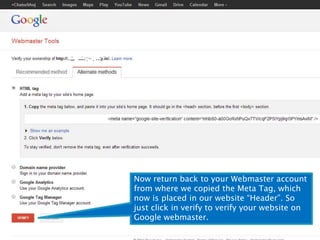
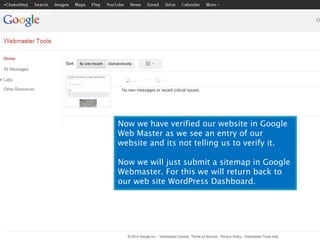
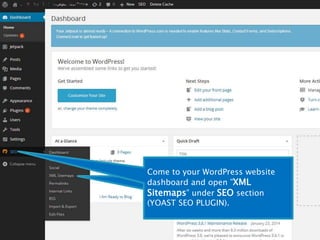
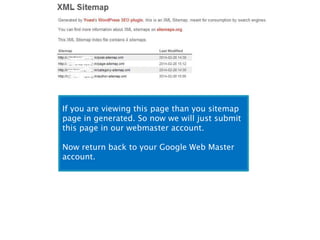
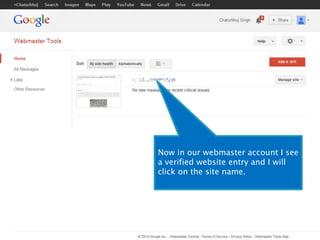
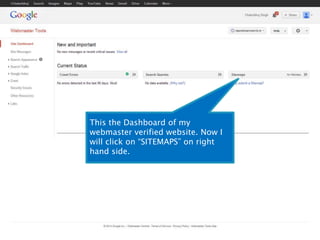
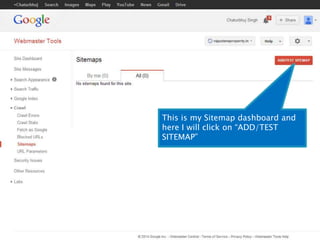
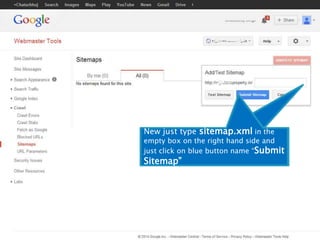
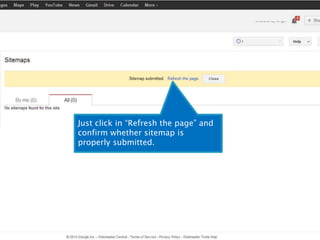
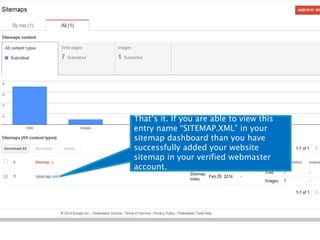
By Jatin Chhabra
Points to be covered 
 Creating a Webmaster Account 
 Verifying website in Webmaster 
 Adding a Sitemap in Verified Webmaster 
Account
Create a fresh new Gmail 
Account.
Open 
www.google.com/webmasters 
and log in with the new gmail 
account which we gave created 
in previous slide
Write the complete name of 
your site like 
http://mysitename.com and 
than click in ADD A SITE red 
button 
Open 
www.google.com/webmasters 
and log in with the new gmail 
account which we gave created 
in previous slide
Now click on “ALTERNATE 
METHODS”
Here choose 1st option “HTML 
TAG”
This is the HTML tag which we 
will upload in our website 
header. So just copy this tag 
line and open your WordPress 
website dashboard,
Now we will open our 
WordPress website Dashboard 
and will click on “Editor” under 
“Appearance” 
Now we will open our 
WordPress website Dashboard 
and will click on “Editor” under 
“Appearance”
Now scroll down and click on 
“Header” on right hand side.
In Header section we will scroll 
down and will find out 
</head>
In Header section we will scroll 
down and will find out 
</head> 
Now add the “META TAG” which we 
generated from our WEBMASTER 
ACCOUNT in Slide 8 (above </head>) 
and than click “Update File”
Now return back to your Webmaster account 
from where we copied the Meta Tag, which 
now is placed in our website “Header”. So 
just click in verify to verify your website on 
Google webmaster.
Now we have verified our website in Google 
Web Master as we see an entry of our 
website and its not telling us to verify it. 
Now we will just submit a sitemap in Google 
Webmaster. For this we will return back to 
our web site WordPress Dashboard.
Come to your WordPress website 
dashboard and open ”XML 
Sitemaps” under SEO section 
(YOAST SEO PLUGIN). 
Come to your WordPress 
website dashboard and open 
”XML Sitemaps” under SEO 
section (YOAST SEO PLUGIN).
Here we will include & exclude 
some pages, post, media, 
category etc, & this plugin will 
automatically generate a 
sitemap. So keep the settings 
same as in this slide and click 
“Save Changes” in the bottom. 
Here we will include & exclude 
some pages, post, media, 
category etc, & this plugin will 
automatically generate a 
sitemap. So keep the settings 
same as in this slide and click 
“Save Changes” in the bottom. 
Note: Once this plugin is 
activated than new post & 
pages will be added 
automatically. 
Note: Once this plugin is 
activated than new post & 
pages will be added 
automatically.
After Saving the xml sitemap page we 
will get this message. To check 
whether site map page is generated 
or not we will open our website and 
will just add /sitemap.xml like this 
Yoursitename.com/sitemap. 
xml
If you are viewing this page than you sitemap 
page in generated. So now we will just submit 
this page in our webmaster account. 
Now return back to your Google Web Master 
account.
Now in our webmaster account I see 
a verified website entry and I will 
click on the site name.
This the Dashboard of my 
webmaster verified website. Now I 
will click on “SITEMAPS” on right 
hand side.
This is my Sitemap dashboard and 
here I will click on “ADD/TEST 
SITEMAP”
New just type sitemap.xml in the 
empty box on the right hand side and 
just click on blue button name “Submit 
Sitemap”
Just click in “Refresh the page” and 
confirm whether sitemap is 
properly submitted.
That’s it. If you are able to view this 
entry name “SITEMAP.XML” in your 
sitemap dashboard than you have 
successfully added your website 
sitemap in your verified webmaster 
account.
That’s all 
folks…

Google webmaster guide for starters

  • 1.
  • 2.
    Points to becovered  Creating a Webmaster Account  Verifying website in Webmaster  Adding a Sitemap in Verified Webmaster Account
  • 3.
    Create a freshnew Gmail Account.
  • 4.
    Open www.google.com/webmasters andlog in with the new gmail account which we gave created in previous slide
  • 5.
    Write the completename of your site like http://mysitename.com and than click in ADD A SITE red button Open www.google.com/webmasters and log in with the new gmail account which we gave created in previous slide
  • 6.
    Now click on“ALTERNATE METHODS”
  • 7.
    Here choose 1stoption “HTML TAG”
  • 8.
    This is theHTML tag which we will upload in our website header. So just copy this tag line and open your WordPress website dashboard,
  • 9.
    Now we willopen our WordPress website Dashboard and will click on “Editor” under “Appearance” Now we will open our WordPress website Dashboard and will click on “Editor” under “Appearance”
  • 10.
    Now scroll downand click on “Header” on right hand side.
  • 11.
    In Header sectionwe will scroll down and will find out </head>
  • 12.
    In Header sectionwe will scroll down and will find out </head> Now add the “META TAG” which we generated from our WEBMASTER ACCOUNT in Slide 8 (above </head>) and than click “Update File”
  • 13.
    Now return backto your Webmaster account from where we copied the Meta Tag, which now is placed in our website “Header”. So just click in verify to verify your website on Google webmaster.
  • 14.
    Now we haveverified our website in Google Web Master as we see an entry of our website and its not telling us to verify it. Now we will just submit a sitemap in Google Webmaster. For this we will return back to our web site WordPress Dashboard.
  • 15.
    Come to yourWordPress website dashboard and open ”XML Sitemaps” under SEO section (YOAST SEO PLUGIN). Come to your WordPress website dashboard and open ”XML Sitemaps” under SEO section (YOAST SEO PLUGIN).
  • 16.
    Here we willinclude & exclude some pages, post, media, category etc, & this plugin will automatically generate a sitemap. So keep the settings same as in this slide and click “Save Changes” in the bottom. Here we will include & exclude some pages, post, media, category etc, & this plugin will automatically generate a sitemap. So keep the settings same as in this slide and click “Save Changes” in the bottom. Note: Once this plugin is activated than new post & pages will be added automatically. Note: Once this plugin is activated than new post & pages will be added automatically.
  • 17.
    After Saving thexml sitemap page we will get this message. To check whether site map page is generated or not we will open our website and will just add /sitemap.xml like this Yoursitename.com/sitemap. xml
  • 18.
    If you areviewing this page than you sitemap page in generated. So now we will just submit this page in our webmaster account. Now return back to your Google Web Master account.
  • 19.
    Now in ourwebmaster account I see a verified website entry and I will click on the site name.
  • 20.
    This the Dashboardof my webmaster verified website. Now I will click on “SITEMAPS” on right hand side.
  • 21.
    This is mySitemap dashboard and here I will click on “ADD/TEST SITEMAP”
  • 22.
    New just typesitemap.xml in the empty box on the right hand side and just click on blue button name “Submit Sitemap”
  • 23.
    Just click in“Refresh the page” and confirm whether sitemap is properly submitted.
  • 24.
    That’s it. Ifyou are able to view this entry name “SITEMAP.XML” in your sitemap dashboard than you have successfully added your website sitemap in your verified webmaster account.
  • 25.