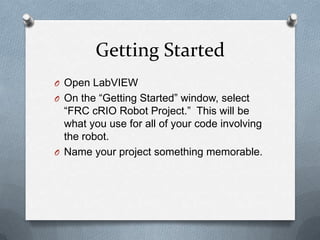
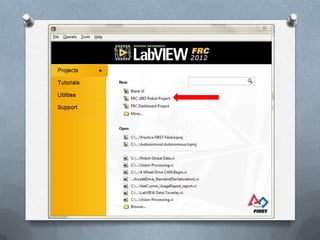
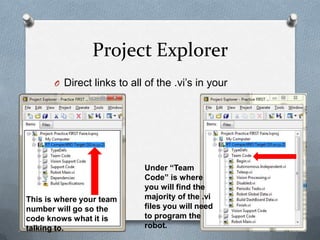
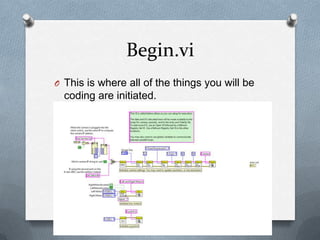
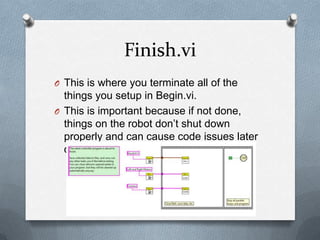
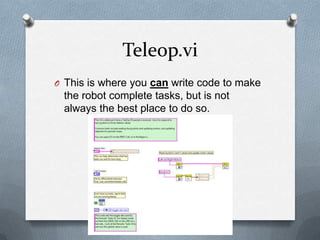
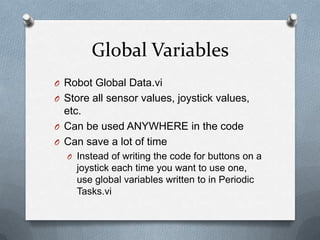
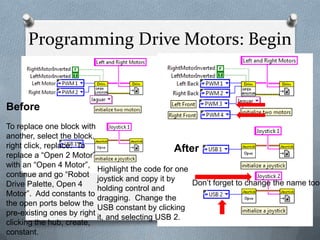
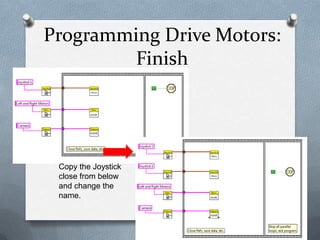
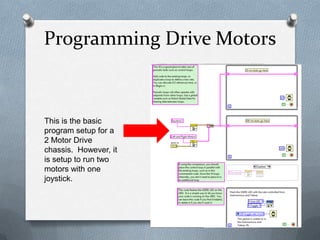
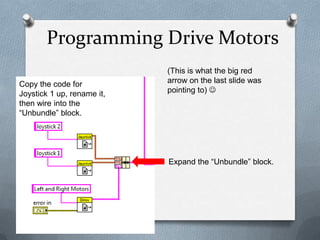
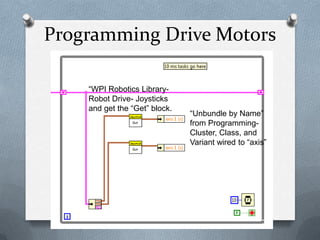
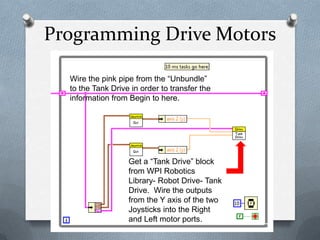
Basic LabVIEW
Kristina Landen
FRC 2093 Bowtie Brigade
knlanden@gmail.com
Who has heard of or used
LabVIEW before today?
Who has ever programmed in
another language before?
Has anyone ever programmed
for FRC before?
Overview
O What is LabVIEW?
O Get familiar
O Code 4 wheel tank drive by PWM
O Add actuator, controlled by buttons

O Global Variable benefits and usage
What is LabVIEW?
O Visual – no endless lines of code
O Easy to follow
O .vi – Virtual Instrument
Getting Familiar with
LabVIEW
At this point, I will leave the presentation, and go into
LabVIEW and explain things in there. The following
slides are what I covered.
Getting Started
O Open LabVIEW
O On the “Getting Started” window, select

“FRC cRIO Robot Project.” This will be
what you use for all of your code involving
the robot.
O Name your project something memorable.
Project Explorer
O Direct links to all of the .vi’s in your

program

This is where your team
number will go so the
code knows what it is
talking to.

Under “Team
Code” is where
you will find the
majority of the .vi
files you will need
to program the
robot.
Begin.vi
O This is where all of the things you will be

coding are initiated.
Finish.vi
O This is where you terminate all of the

things you setup in Begin.vi.
O This is important because if not done,
things on the robot don’t shut down
properly and can cause code issues later
on.
Teleop.vi
O This is where you can write code to make

the robot complete tasks, but is not
always the best place to do so.
Teleop.vi Continued
O You can put display messages to the

Driver Station here which will display
when Tele-operated mode is enabled.
This message is the name of the project
that I am working on.
Periodic Tasks.vi
O This is where I do the majority of my

programming
O Sensor data gathered here can be utilized
in Autonomous mode as well as in Teleoperated
O You can control how often sensors are
checked for data
This is where
you will be
putting code for
driving and
sensors.

If you plan to use pneumatics,
delete this Disable Structure
and fill in the refnum name and
set it up in Begin.vi and
Finish.vi.
Where Do I Get .vi’s?
O Right click – WPI Robotics Library
O WPI Robotics Library has all of the FIRST

related .vi’s needed for competition. You
will have to use .vi’s from the
“Programming” category to complete your
code.
WPI Robotics Library
Examples
O Where to find them
O How to adapt them to fit your code
In Each Example There Is…
O Initialization of ports and channels
O Closing of ports and channels
O The stuff that makes everything happen
O Bonus blinking lights, pretty graphs, and

other switches and dials
What We Have To Do…
O Recognize which part is which
O Figure out which part to put in our code
O Decide which parts to omit
O Replace inputs and outputs with Joysticks

and Motor blocks
Global Variables
O Robot Global Data.vi
O Store all sensor values, joystick values,

etc.
O Can be used ANYWHERE in the code
O Can save a lot of time
O Instead of writing the code for buttons on a

joystick each time you want to use one,
use global variables written to in Periodic
Tasks.vi
Let’s Program!!
By the end you will be able to…
O Program a 4 wheel tank or arcade drive

by PWM
O Program another actuator motor using
buttons
O Pass the name of your program to the
DriverStation
Programming Drive Motors: Begin

Before

To replace one block with
another, select the block,
right click, replace. To
After
replace a “Open 2 Motor”
with an “Open 4 Motor”,
Highlight the code for one
continue and go “Robot
joystick and copy it by
Don’t forget to change the name too!
Drive Palette, Open 4
holding control and
Motor”. Add constants to
dragging. Change the
the open ports below the
USB constant by clicking
pre-existing ones by right
it, and selecting USB 2.
clicking the hub, create,
constant.
Programming Drive Motors:
Finish

Copy the Joystick
close from below
and change the
name.
Programming Drive Motors

This is the basic
program setup for a
2 Motor Drive
chassis. However, it
is setup to run two
motors with one
joystick.
Programming Drive Motors
Copy the code for
Joystick 1 up, rename it,
then wire into the
“Unbundle” block.

(This is what the big red
arrow on the last slide was
pointing to) 

Expand the “Unbundle” block.
Programming Drive Motors
Tip: To expand a while
loop, hold control,
click, and drag where
you want more space.

Insert an “Unbundle”
block from
“Programming>Clust
er, Class, and
Variant>Unbundle”
and wire the input to
the pink pipe that
runs through the
while loop.
Programming Drive Motors
“WPI Robotics LibraryRobot Drive- Joysticks
and get the “Get” block.

“Unbundle by Name”
from ProgrammingCluster, Class, and
Variant wired to “axis”
Programming Drive Motors
Wire the pink pipe from the “Unbundle”
to the Tank Drive in order to transfer the
information from Begin to here.

Get a “Tank Drive” block
from WPI Robotics
Library- Robot Drive- Tank
Drive. Wire the outputs
from the Y axis of the two
Joysticks into the Right
and Left motor ports.
Thank You For Listening!!

Questions?

knlanden@gmail.com
503-853-6704

First fare 2013 basic-labview

  • 1.
    Basic LabVIEW Kristina Landen FRC2093 Bowtie Brigade knlanden@gmail.com
  • 2.
    Who has heardof or used LabVIEW before today?
  • 3.
    Who has everprogrammed in another language before?
  • 4.
    Has anyone everprogrammed for FRC before?
  • 5.
    Overview O What isLabVIEW? O Get familiar O Code 4 wheel tank drive by PWM O Add actuator, controlled by buttons O Global Variable benefits and usage
  • 6.
    What is LabVIEW? OVisual – no endless lines of code O Easy to follow O .vi – Virtual Instrument
  • 7.
    Getting Familiar with LabVIEW Atthis point, I will leave the presentation, and go into LabVIEW and explain things in there. The following slides are what I covered.
  • 8.
    Getting Started O OpenLabVIEW O On the “Getting Started” window, select “FRC cRIO Robot Project.” This will be what you use for all of your code involving the robot. O Name your project something memorable.
  • 10.
    Project Explorer O Directlinks to all of the .vi’s in your program This is where your team number will go so the code knows what it is talking to. Under “Team Code” is where you will find the majority of the .vi files you will need to program the robot.
  • 11.
    Begin.vi O This iswhere all of the things you will be coding are initiated.
  • 12.
    Finish.vi O This iswhere you terminate all of the things you setup in Begin.vi. O This is important because if not done, things on the robot don’t shut down properly and can cause code issues later on.
  • 13.
    Teleop.vi O This iswhere you can write code to make the robot complete tasks, but is not always the best place to do so.
  • 14.
    Teleop.vi Continued O Youcan put display messages to the Driver Station here which will display when Tele-operated mode is enabled. This message is the name of the project that I am working on.
  • 15.
    Periodic Tasks.vi O Thisis where I do the majority of my programming O Sensor data gathered here can be utilized in Autonomous mode as well as in Teleoperated O You can control how often sensors are checked for data
  • 16.
    This is where youwill be putting code for driving and sensors. If you plan to use pneumatics, delete this Disable Structure and fill in the refnum name and set it up in Begin.vi and Finish.vi.
  • 17.
    Where Do IGet .vi’s? O Right click – WPI Robotics Library O WPI Robotics Library has all of the FIRST related .vi’s needed for competition. You will have to use .vi’s from the “Programming” category to complete your code.
  • 18.
  • 19.
    Examples O Where tofind them O How to adapt them to fit your code
  • 20.
    In Each ExampleThere Is… O Initialization of ports and channels O Closing of ports and channels O The stuff that makes everything happen O Bonus blinking lights, pretty graphs, and other switches and dials
  • 21.
    What We HaveTo Do… O Recognize which part is which O Figure out which part to put in our code O Decide which parts to omit O Replace inputs and outputs with Joysticks and Motor blocks
  • 22.
    Global Variables O RobotGlobal Data.vi O Store all sensor values, joystick values, etc. O Can be used ANYWHERE in the code O Can save a lot of time O Instead of writing the code for buttons on a joystick each time you want to use one, use global variables written to in Periodic Tasks.vi
  • 23.
  • 24.
    By the endyou will be able to… O Program a 4 wheel tank or arcade drive by PWM O Program another actuator motor using buttons O Pass the name of your program to the DriverStation
  • 25.
    Programming Drive Motors:Begin Before To replace one block with another, select the block, right click, replace. To After replace a “Open 2 Motor” with an “Open 4 Motor”, Highlight the code for one continue and go “Robot joystick and copy it by Don’t forget to change the name too! Drive Palette, Open 4 holding control and Motor”. Add constants to dragging. Change the the open ports below the USB constant by clicking pre-existing ones by right it, and selecting USB 2. clicking the hub, create, constant.
  • 26.
    Programming Drive Motors: Finish Copythe Joystick close from below and change the name.
  • 27.
    Programming Drive Motors Thisis the basic program setup for a 2 Motor Drive chassis. However, it is setup to run two motors with one joystick.
  • 28.
    Programming Drive Motors Copythe code for Joystick 1 up, rename it, then wire into the “Unbundle” block. (This is what the big red arrow on the last slide was pointing to)  Expand the “Unbundle” block.
  • 29.
    Programming Drive Motors Tip:To expand a while loop, hold control, click, and drag where you want more space. Insert an “Unbundle” block from “Programming>Clust er, Class, and Variant>Unbundle” and wire the input to the pink pipe that runs through the while loop.
  • 30.
    Programming Drive Motors “WPIRobotics LibraryRobot Drive- Joysticks and get the “Get” block. “Unbundle by Name” from ProgrammingCluster, Class, and Variant wired to “axis”
  • 31.
    Programming Drive Motors Wirethe pink pipe from the “Unbundle” to the Tank Drive in order to transfer the information from Begin to here. Get a “Tank Drive” block from WPI Robotics Library- Robot Drive- Tank Drive. Wire the outputs from the Y axis of the two Joysticks into the Right and Left motor ports.
  • 32.
    Thank You ForListening!! Questions? knlanden@gmail.com 503-853-6704