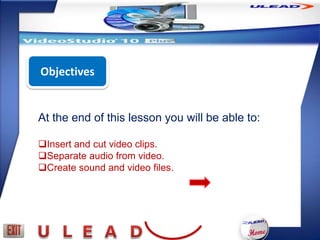
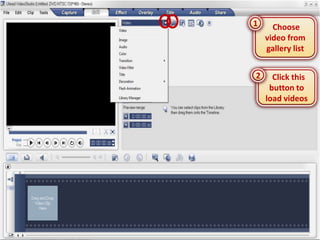
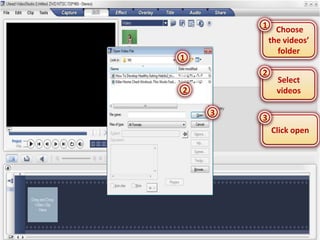
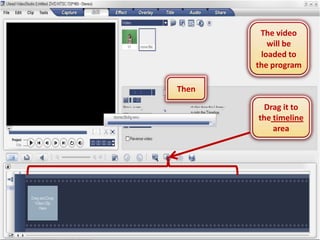
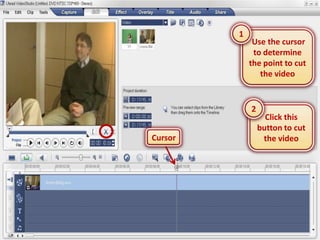
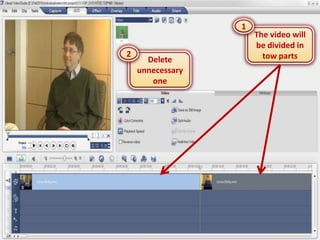
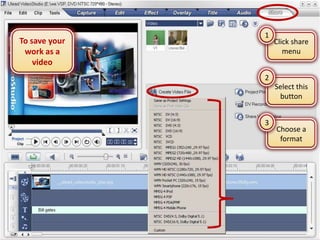
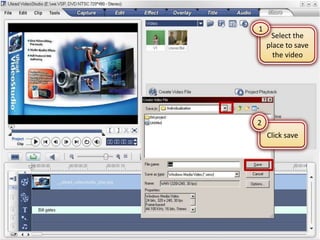
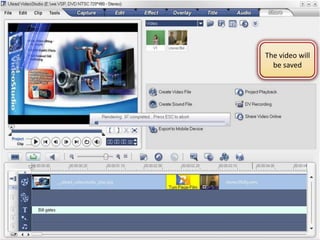
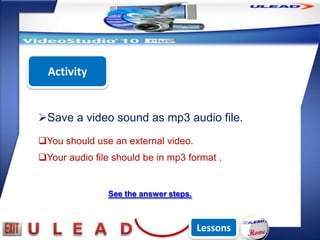
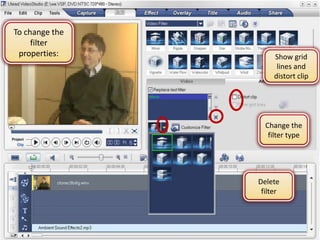
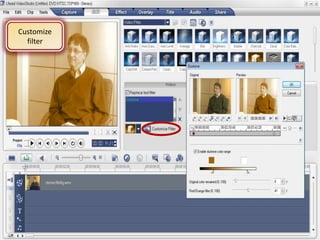
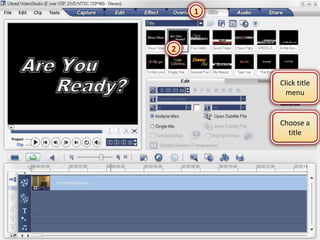
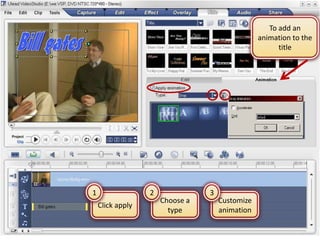
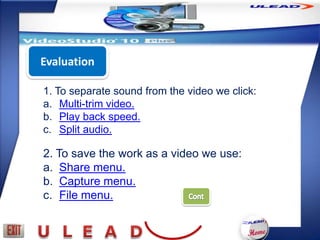
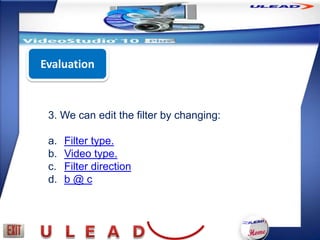
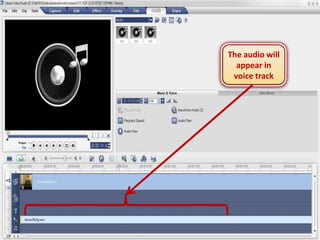
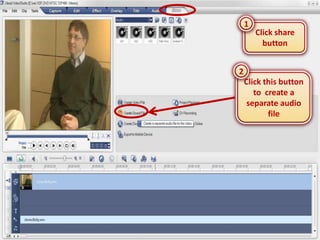
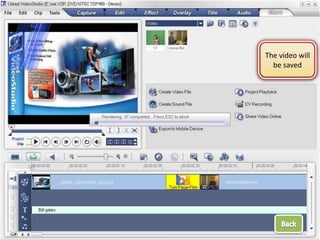
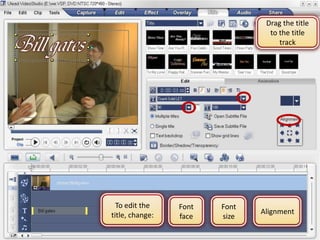
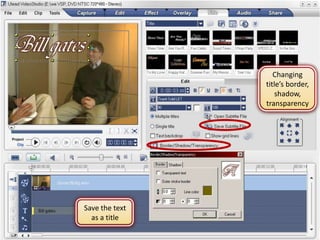
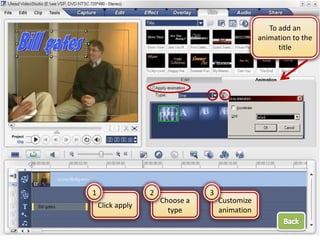
This Unit is designed for you to learn one of
the professional video creating and editing
programs which is ULEAD VIDEO STUDIO10 ..


The program designer is:
   Narjis ALHinai, email:

u083685@squ.edu.om
At the end of this Unit you will
be able to:
Insert and cut clips (video or audio).
Add and edit filters and titles.
Create sound and video files using share
menu.
Separate audio from video.
At first you have to enter
lessons gradually and try the
activity after each one and finally
you have to answer the
evaluation questions.

         Used to return to the home
         page.
        Used to exit the program.
Welcome to Ulead video studio
unit..
At the next pages you are going to
see how to use Ulead video studio
program to create a professional
video using edit, filter, title and
share menus provided in the
program.
To start the lessons click here.
Lesson 1


Lesson 2


Evaluation
Lesson 1


Activity
Objectives


At the end of this lesson you will be able to:

Insert and cut video clips.
Separate audio from video.
Create sound and video files.
1     Choose
    video from
    gallery list


2     Click this
     button to
    load videos
1 Choose
         the videos’
           folder
1
        2
             Select
2            videos

    3
        3
            Click open
The video
          will be
        loaded to
       the program

Then

        Drag it to
       the timeline
           area
1
              Use the cursor
              to determine
             the point to cut
                the video


             2
                   Click this
                 button to cut
Cursor            the video
1
                      The video will
                      be divided in
2                       tow parts
      Delete
    unnecessary
       one
After dragging
              the video to
              the timeline
                  area
Click this
 button
The audio will
  appear in
 voice track
1
        Click share
          button


2
    Click this button
       to create a
     separate audio
           file
1 Choose the
          place where
          to save the
             audio
1


         2
    2        Click save
1
To save your       Click share
 work as a            menu
    video
               2
                   Select this
                    button


               3
                   Choose a
                    format
1
     Select the
    place to save
      the video


2
    Click save
The video will
  be saved
Activity


Save a video sound as mp3 audio file.
You should use an external video.
Your audio file should be in mp3 format .


                See the answer steps.


                                        Lessons
Lesson 2


Activity
Objectives


At the end of this lesson you will be able to:

Add filter to the video.
Edit filters.
Add titles to the video.
Edit titles.
Select video
 filter from
 the gallery
1


           Choose one
        filter and drag it
         to the timeline
               area


2
To change the
     filter
 properties:         Show grid
                      lines and
                     distort clip


                  Change the
                   filter type


                Delete
                 filter
Customize
  filter
1


2


        Click title
          menu


        Choose a
          title
Drag the title
                                 to the title
                                    track


  To edit the    Font   Font
title, change:                 Alignment
                 face   size
Changing
                title’s border,
                    shadow,
                transparency


Save the text
  as a title
To add an
                                                 animation to the
                                                       title


1                 2              3
                      Choose a       Customize
    Click apply
                        type         animation
Activity


Add a white title with a red border and
drop animation to the video you have used
it in lesson 1.


            See the answer steps.


                                    Lessons
Evaluation

1. To separate sound from the video we click:
a. Multi-trim video.
b. Play back speed.
c. Split audio.

2. To save the work as a video we use:
a. Share menu.
b. Capture menu.
c. File menu.
Evaluation


 3. We can edit the filter by changing:

 a.   Filter type.
 b.   Video type.
 c.   Filter direction
 d.   b@c
Excellent.. This is the write answer.
Sooooory.. That was wrong.

 You can return to the lessons and
discover the write answer.
I hope that you understand the hall
unit.


Regards>>
After dragging
              the video to
              the timeline
                  area
Click this
 button
The audio will
  appear in
 voice track
1
        Click share
          button


2
    Click this button
       to create a
     separate audio
           file
1 Choose the
          place where
          to save the
             audio
1


         2
    2        Click save
1
To save your       Click share
 work as a            menu
    video
               2
                   Select this
                    button


               3
                   Choose a
                    format
1
     Select the
    place to save
      the video


2
    Click save
The video will
  be saved
Drag the title
                                 to the title
                                    track


  To edit the    Font   Font
title, change:                 Alignment
                 face   size
Changing
                title’s border,
                    shadow,
                transparency


Save the text
  as a title
To add an
                                                 animation to the
                                                       title


1                 2              3
                      Choose a       Customize
    Click apply
                        type         animation

Ulead Video Studio

  • 2.
    This Unit isdesigned for you to learn one of the professional video creating and editing programs which is ULEAD VIDEO STUDIO10 .. The program designer is: Narjis ALHinai, email: u083685@squ.edu.om
  • 3.
    At the endof this Unit you will be able to: Insert and cut clips (video or audio). Add and edit filters and titles. Create sound and video files using share menu. Separate audio from video.
  • 4.
    At first youhave to enter lessons gradually and try the activity after each one and finally you have to answer the evaluation questions.  Used to return to the home page.  Used to exit the program.
  • 5.
    Welcome to Uleadvideo studio unit.. At the next pages you are going to see how to use Ulead video studio program to create a professional video using edit, filter, title and share menus provided in the program. To start the lessons click here.
  • 6.
  • 7.
  • 8.
    Objectives At the endof this lesson you will be able to: Insert and cut video clips. Separate audio from video. Create sound and video files.
  • 9.
    1 Choose video from gallery list 2 Click this button to load videos
  • 10.
    1 Choose the videos’ folder 1 2 Select 2 videos 3 3 Click open
  • 11.
    The video will be loaded to the program Then Drag it to the timeline area
  • 12.
    1 Use the cursor to determine the point to cut the video 2 Click this button to cut Cursor the video
  • 13.
    1 The video will be divided in 2 tow parts Delete unnecessary one
  • 14.
    After dragging the video to the timeline area Click this button
  • 15.
    The audio will appear in voice track
  • 16.
    1 Click share button 2 Click this button to create a separate audio file
  • 17.
    1 Choose the place where to save the audio 1 2 2 Click save
  • 18.
    1 To save your Click share work as a menu video 2 Select this button 3 Choose a format
  • 19.
    1 Select the place to save the video 2 Click save
  • 20.
  • 21.
    Activity Save a videosound as mp3 audio file. You should use an external video. Your audio file should be in mp3 format . See the answer steps. Lessons
  • 22.
  • 23.
    Objectives At the endof this lesson you will be able to: Add filter to the video. Edit filters. Add titles to the video. Edit titles.
  • 24.
    Select video filterfrom the gallery
  • 25.
    1 Choose one filter and drag it to the timeline area 2
  • 26.
    To change the filter properties: Show grid lines and distort clip Change the filter type Delete filter
  • 27.
  • 28.
    1 2 Click title menu Choose a title
  • 29.
    Drag the title to the title track To edit the Font Font title, change: Alignment face size
  • 30.
    Changing title’s border, shadow, transparency Save the text as a title
  • 31.
    To add an animation to the title 1 2 3 Choose a Customize Click apply type animation
  • 32.
    Activity Add a whitetitle with a red border and drop animation to the video you have used it in lesson 1. See the answer steps. Lessons
  • 33.
    Evaluation 1. To separatesound from the video we click: a. Multi-trim video. b. Play back speed. c. Split audio. 2. To save the work as a video we use: a. Share menu. b. Capture menu. c. File menu.
  • 34.
    Evaluation 3. Wecan edit the filter by changing: a. Filter type. b. Video type. c. Filter direction d. b@c
  • 35.
    Excellent.. This isthe write answer.
  • 36.
    Sooooory.. That waswrong.  You can return to the lessons and discover the write answer.
  • 37.
    I hope thatyou understand the hall unit. Regards>>
  • 38.
    After dragging the video to the timeline area Click this button
  • 39.
    The audio will appear in voice track
  • 40.
    1 Click share button 2 Click this button to create a separate audio file
  • 41.
    1 Choose the place where to save the audio 1 2 2 Click save
  • 42.
    1 To save your Click share work as a menu video 2 Select this button 3 Choose a format
  • 43.
    1 Select the place to save the video 2 Click save
  • 44.
  • 45.
    Drag the title to the title track To edit the Font Font title, change: Alignment face size
  • 46.
    Changing title’s border, shadow, transparency Save the text as a title
  • 47.
    To add an animation to the title 1 2 3 Choose a Customize Click apply type animation