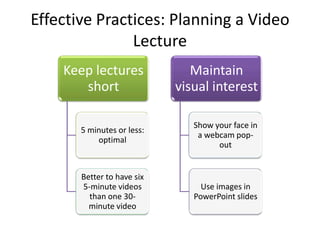
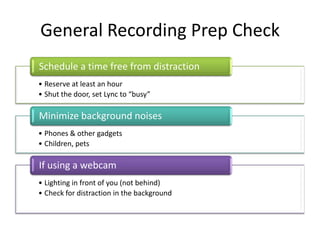
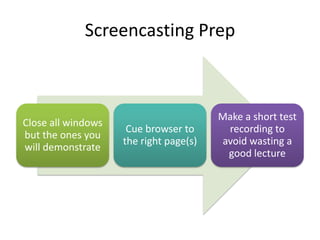
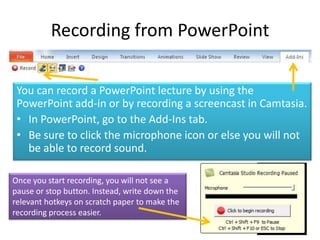
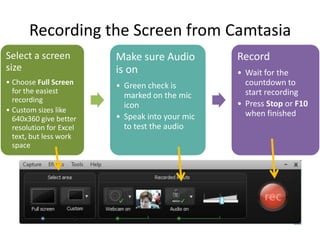
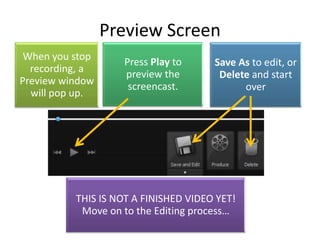
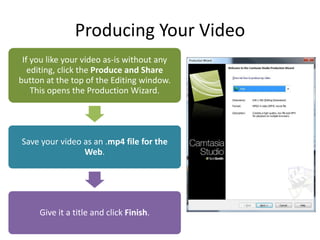
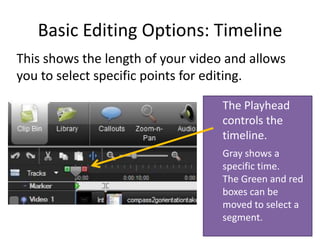
Camtasia 101:

          A Piece of Cake!


       Anne McKinney
College of Business eLearning
Effective Practices: Planning a Video
               Lecture
    Keep lectures              Maintain
       short                visual interest

                               Show your face in
       5 minutes or less:
                                a webcam pop-
           optimal
                                     out


       Better to have six
       5-minute videos           Use images in
         than one 30-          PowerPoint slides
         minute video
General Recording Prep Check
Schedule a time free from distraction
• Reserve at least an hour
• Shut the door, set Lync to “busy”

Minimize background noises
• Phones & other gadgets
• Children, pets

If using a webcam
• Lighting in front of you (not behind)
• Check for distraction in the background
Screencasting Prep


                                        Make a short test
Close all windows
                     Cue browser to      recording to
but the ones you
                    the right page(s)   avoid wasting a
will demonstrate
                                         good lecture
Recording from PowerPoint

 You can record a PowerPoint lecture by using the
 PowerPoint add-in or by recording a screencast in Camtasia.
 • In PowerPoint, go to the Add-Ins tab.
 • Be sure to click the microphone icon or else you will not
   be able to record sound.

Once you start recording, you will not see a
pause or stop button. Instead, write down the
relevant hotkeys on scratch paper to make the
recording process easier.
Recording the Screen from Camtasia
Select a screen          Make sure Audio         Record
size                     is on                   • Wait for the
• Choose Full Screen     • Green check is          countdown to
  for the easiest                                  start recording
  recording
                           marked on the mic
                           icon                  • Press Stop or F10
• Custom sizes like                                when finished
  640x360 give better    • Speak into your mic
  resolution for Excel     to test the audio
  text, but less work
  space
Preview Screen
 When you stop      Press Play to     Save As to edit, or
  recording, a      preview the        Delete and start
Preview window       screencast.            over
  will pop up.


          THIS IS NOT A FINISHED VIDEO YET!
           Move on to the Editing process…
Producing Your Video
 If you like your video as-is without any
   editing, click the Produce and Share
button at the top of the Editing window.
    This opens the Production Wizard.


Save your video as an .mp4 file for the
                Web.


     Give it a title and click Finish.
Basic Editing Options: Timeline
This shows the length of your video and allows
you to select specific points for editing.

                                   The Playhead
                                   controls the
                                   timeline.
                                   Gray shows a
                                   specific time.
                                   The Green and red
                                   boxes can be
                                   moved to select a
                                   segment.
Basic Editing: Trimming the Timeline
  Remove a section of the video by adjusting the
  green and red boxes to the beginning and end of
  the section you want to delete, then click on the
  scissors icon.

Red box moved                          Click on the
to select the                          scissors icon to
beginning of                           cut this section
the clip                               from the video
Basic Editing: Adding Title Clips
A Title Clip adds a basic slide of
text to your video for a few
seconds.
• Move the gray Playhead
  button to the spot where you
  want to place a title.
• Click the Title Clip button
  and +Add title clip.
Saving Your Video


                    Camtasia’s           Click the
                    default is to        Produce and
                    Save As a            share button
ALWAYS save         .camproj file
your video as                            • Follow the
                    • This filetype is     Production
an .mp4 file!                              Wizard steps to
                      only viewable
                      in Camtasia.         save as an .mp4
                                           for the web.
                      Boo!
Resources
• Learn how to do more with Camtasia Tutorials
  – http://www.techsmith.com/tutorial-camtasia.html


• Photo credit
  – Camtasia Cake: Creative Commons photo via Flickr
    by Betsy Weber

Camtasia made easy

  • 1.
    Camtasia 101: A Piece of Cake! Anne McKinney College of Business eLearning
  • 2.
    Effective Practices: Planninga Video Lecture Keep lectures Maintain short visual interest Show your face in 5 minutes or less: a webcam pop- optimal out Better to have six 5-minute videos Use images in than one 30- PowerPoint slides minute video
  • 3.
    General Recording PrepCheck Schedule a time free from distraction • Reserve at least an hour • Shut the door, set Lync to “busy” Minimize background noises • Phones & other gadgets • Children, pets If using a webcam • Lighting in front of you (not behind) • Check for distraction in the background
  • 4.
    Screencasting Prep Make a short test Close all windows Cue browser to recording to but the ones you the right page(s) avoid wasting a will demonstrate good lecture
  • 5.
    Recording from PowerPoint You can record a PowerPoint lecture by using the PowerPoint add-in or by recording a screencast in Camtasia. • In PowerPoint, go to the Add-Ins tab. • Be sure to click the microphone icon or else you will not be able to record sound. Once you start recording, you will not see a pause or stop button. Instead, write down the relevant hotkeys on scratch paper to make the recording process easier.
  • 6.
    Recording the Screenfrom Camtasia Select a screen Make sure Audio Record size is on • Wait for the • Choose Full Screen • Green check is countdown to for the easiest start recording recording marked on the mic icon • Press Stop or F10 • Custom sizes like when finished 640x360 give better • Speak into your mic resolution for Excel to test the audio text, but less work space
  • 7.
    Preview Screen Whenyou stop Press Play to Save As to edit, or recording, a preview the Delete and start Preview window screencast. over will pop up. THIS IS NOT A FINISHED VIDEO YET! Move on to the Editing process…
  • 8.
    Producing Your Video If you like your video as-is without any editing, click the Produce and Share button at the top of the Editing window. This opens the Production Wizard. Save your video as an .mp4 file for the Web. Give it a title and click Finish.
  • 9.
    Basic Editing Options:Timeline This shows the length of your video and allows you to select specific points for editing. The Playhead controls the timeline. Gray shows a specific time. The Green and red boxes can be moved to select a segment.
  • 10.
    Basic Editing: Trimmingthe Timeline Remove a section of the video by adjusting the green and red boxes to the beginning and end of the section you want to delete, then click on the scissors icon. Red box moved Click on the to select the scissors icon to beginning of cut this section the clip from the video
  • 11.
    Basic Editing: AddingTitle Clips A Title Clip adds a basic slide of text to your video for a few seconds. • Move the gray Playhead button to the spot where you want to place a title. • Click the Title Clip button and +Add title clip.
  • 12.
    Saving Your Video Camtasia’s Click the default is to Produce and Save As a share button ALWAYS save .camproj file your video as • Follow the • This filetype is Production an .mp4 file! Wizard steps to only viewable in Camtasia. save as an .mp4 for the web. Boo!
  • 13.
    Resources • Learn howto do more with Camtasia Tutorials – http://www.techsmith.com/tutorial-camtasia.html • Photo credit – Camtasia Cake: Creative Commons photo via Flickr by Betsy Weber