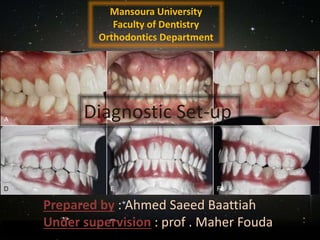
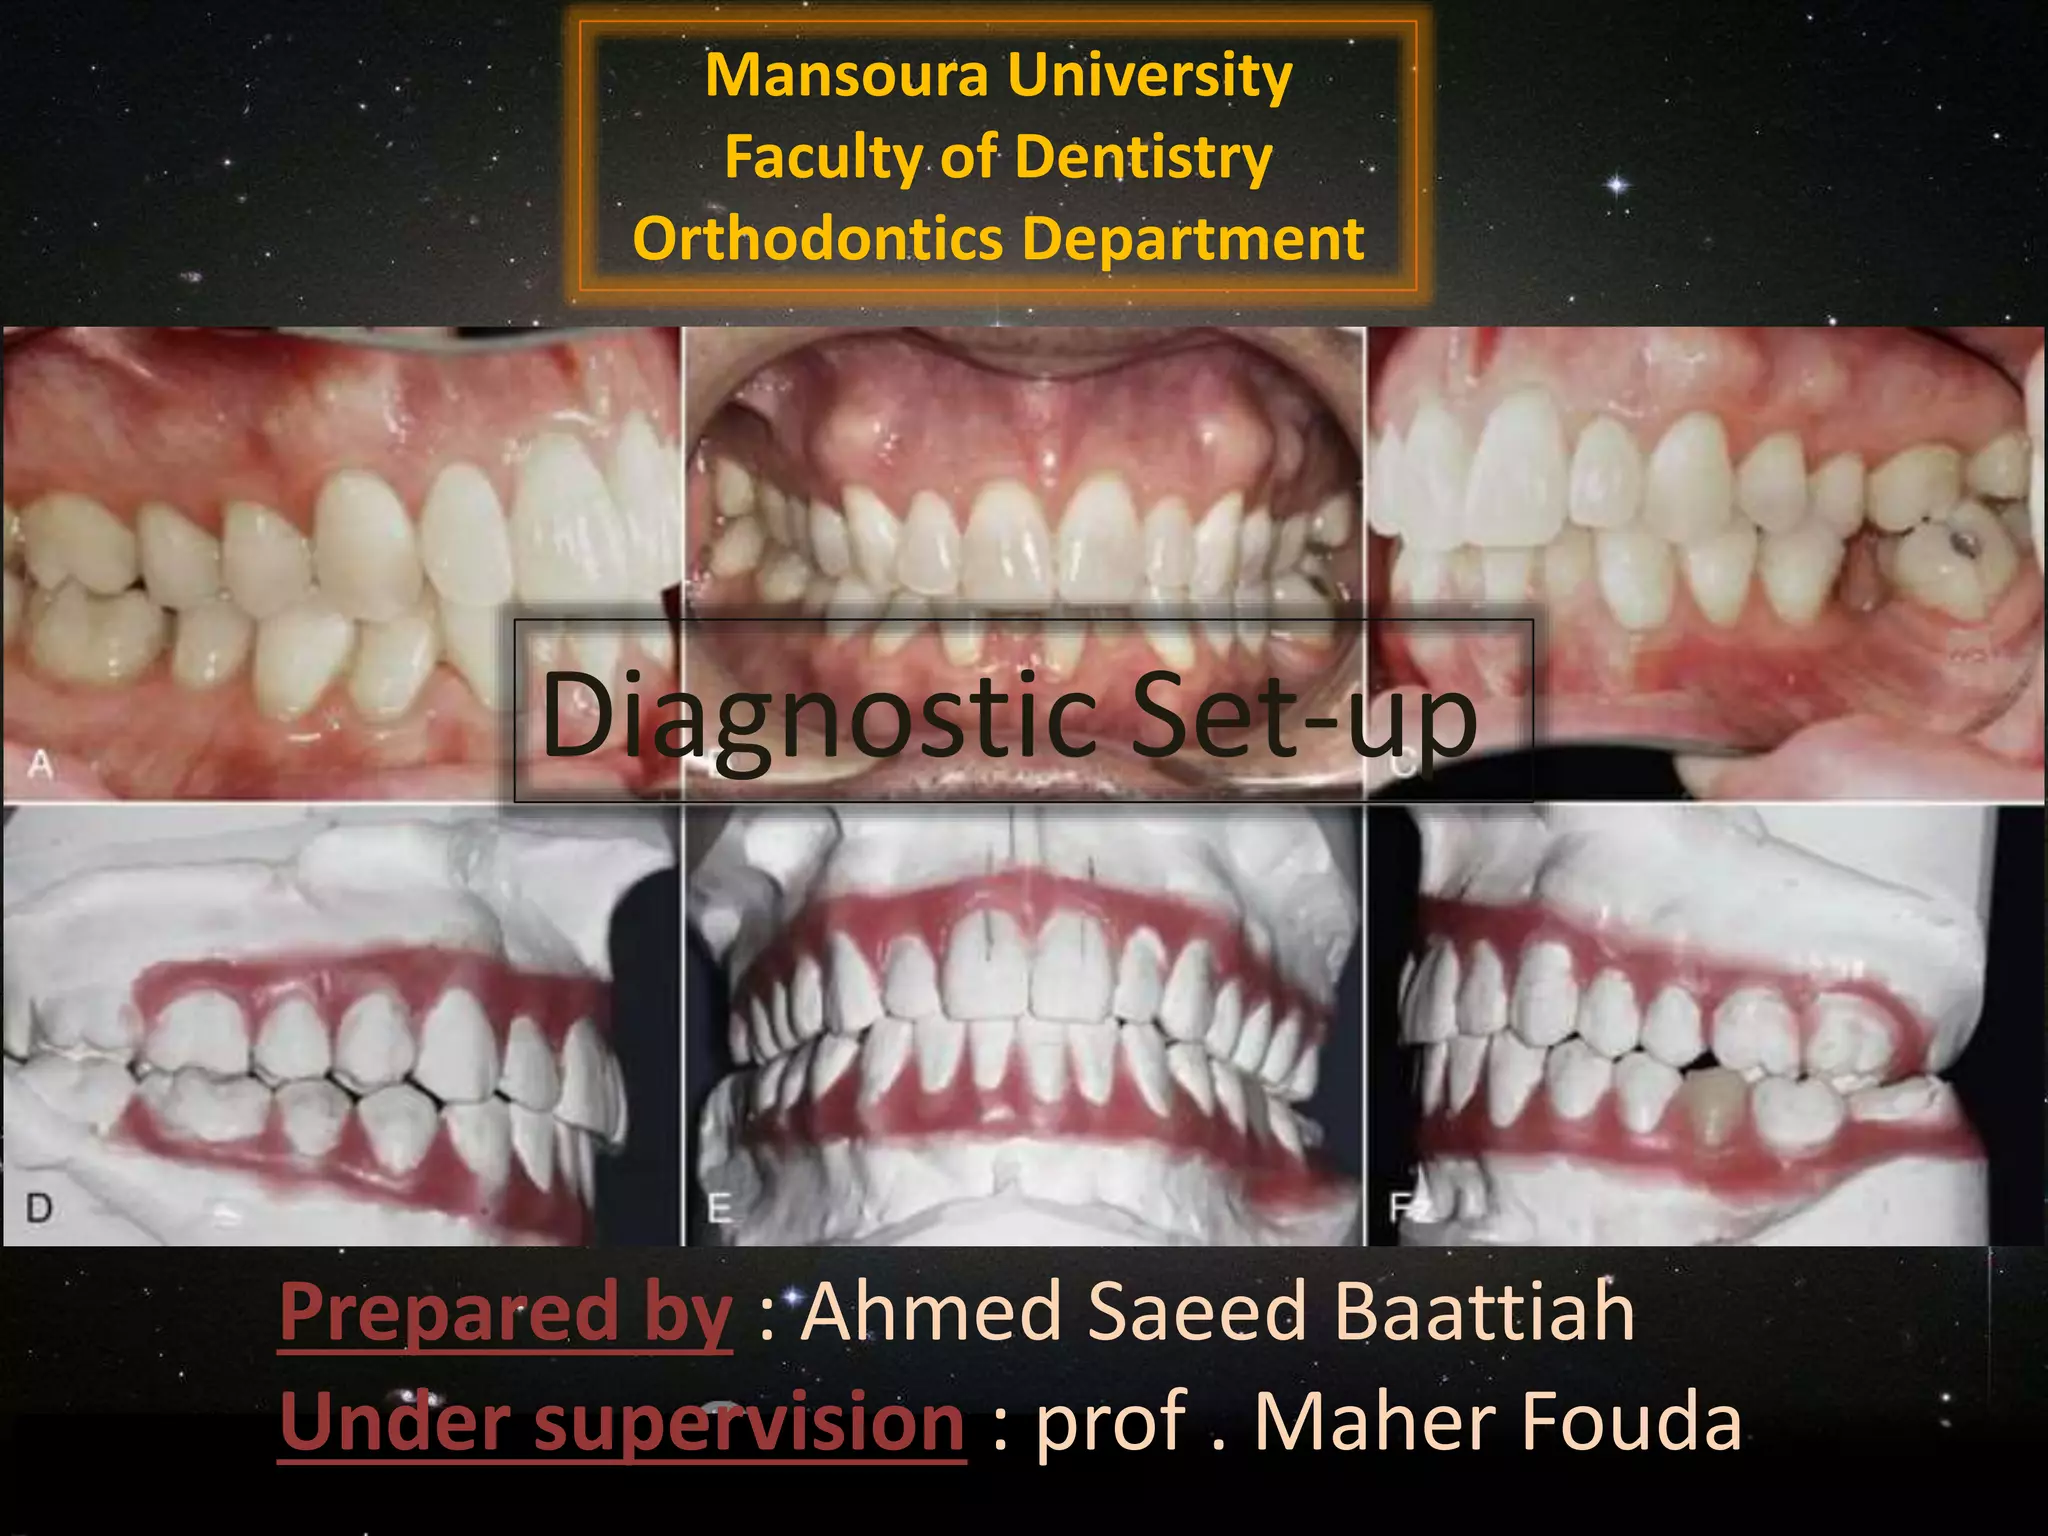
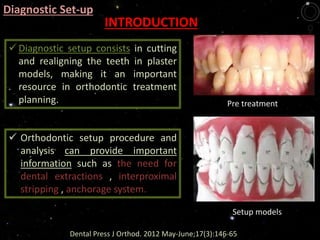
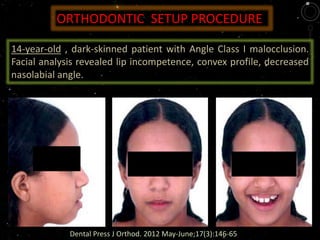
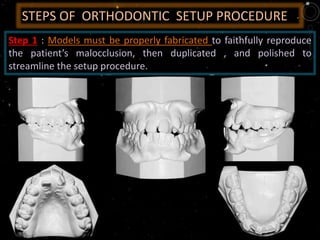
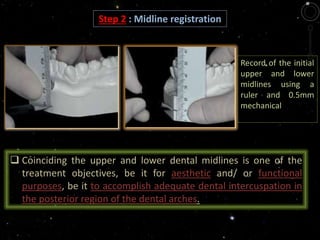
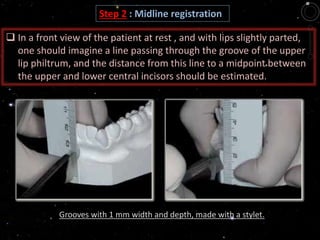
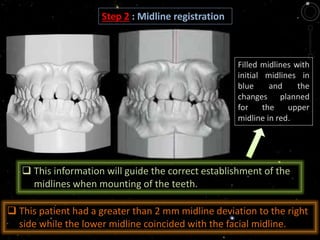
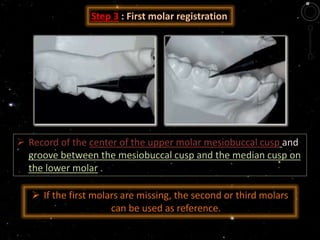
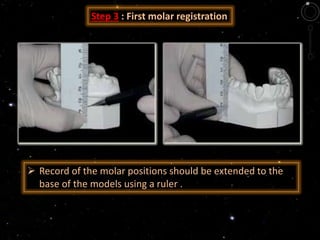
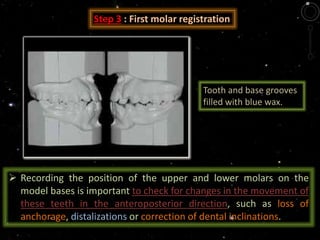
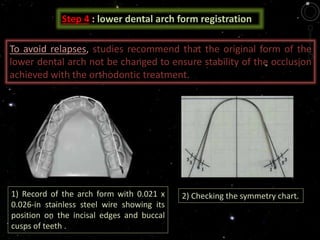
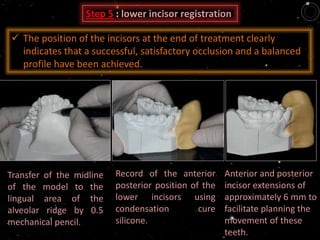
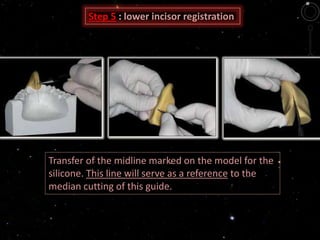
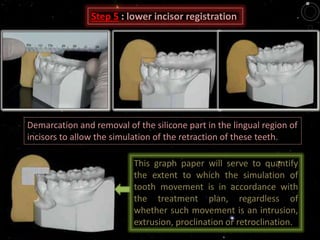
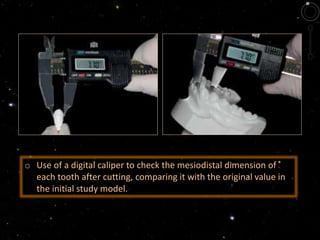
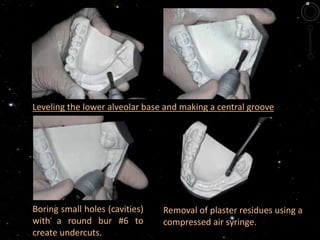
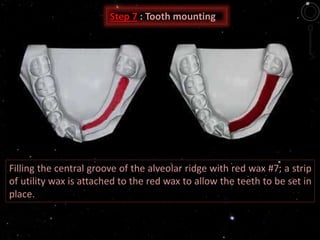
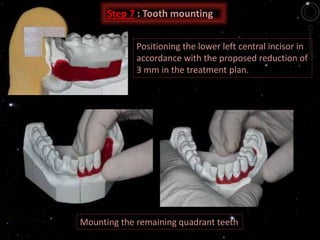
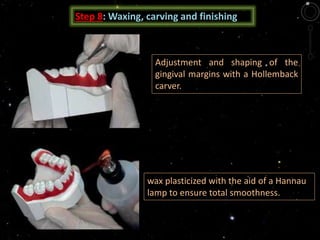
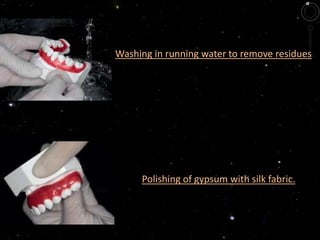
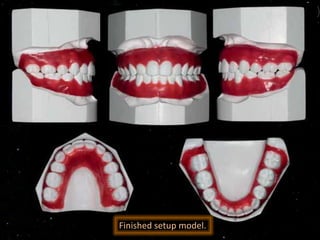
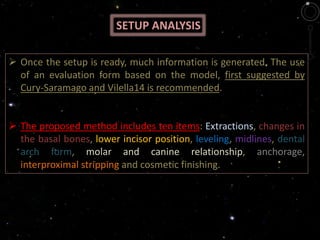
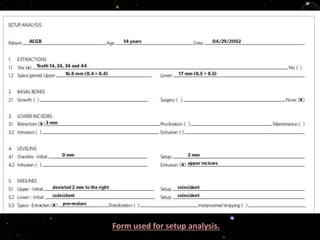
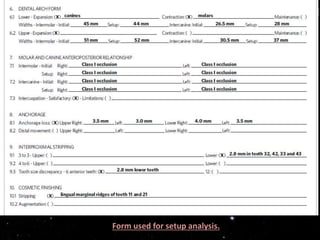
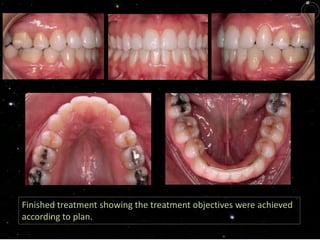
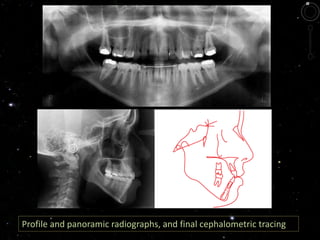
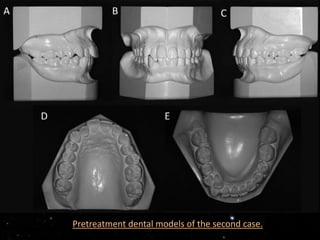
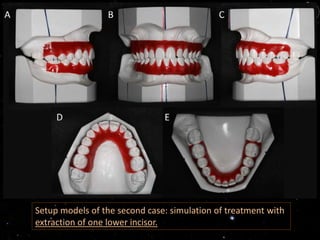
Diagnostic Set-up
Prepared by : Ahmed Saeed Baattiah
Under supervision : prof . Maher Fouda
Mansoura University
Faculty of Dentistry
Orthodontics Department
INTRODUCTION
In 1953, Kesling, after developing a tooth
positioner as an aid in finishing orthodontic
treatments, suggested that cutting and
repositioning the teeth in duplicate study
models of the malocclusions would allow
simulation of the results before starting
orthodontic treatment.
Dental Press J Orthod. 2012 May-June;17(3):146-65
Diagnostic Set-up
INTRODUCTION
Pre treatment
Setup models
Dental Press J Orthod. 2012 May-June;17(3):146-65
 Diagnostic setup consists in cutting
and realigning the teeth in plaster
models, making it an important
resource in orthodontic treatment
planning.
 Orthodontic setup procedure and
analysis can provide important
information such as the need for
dental extractions , interproximal
stripping , anchorage system.
Diagnostic Set-up
14-year-old , dark-skinned patient with Angle Class I malocclusion.
Facial analysis revealed lip incompetence, convex profile, decreased
nasolabial angle.
ORTHODONTIC SETUP PROCEDURE
Dental Press J Orthod. 2012 May-June;17(3):146-65
She had a Class I skeletal pattern (ANB=3°), with a good maxillo-
mandibular relationship (SNA=82 ‫؛‬and SNB=79°). She had a Class I
dental malocclusion, bimaxillary protrusion, upper and lower anterior
crowding, with discrepancy of -11.2 mm and -5.5 mm, respectively.
Her incisors were in an edge-to-edge relationship, proclined
(1-NA=28°, 1-NB=36°).
Initial panoramic X-ray, lateral cephalogram and cephalometric tracing.
STEPS OF ORTHODONTIC SETUP PROCEDURE
Step 1 : Models must be properly fabricated to faithfully reproduce
the patient’s malocclusion, then duplicated , and polished to
streamline the setup procedure.
Step 2 : Midline registration
Record of the initial
upper and lower
midlines using a
ruler and 0.5mm
mechanical
pencil
 Coinciding the upper and lower dental midlines is one of the
treatment objectives, be it for aesthetic and/ or functional
purposes, be it to accomplish adequate dental intercuspation in
the posterior region of the dental arches.
Step 2 : Midline registration
Grooves with 1 mm width and depth, made with a stylet.
 In a front view of the patient at rest , and with lips slightly parted,
one should imagine a line passing through the groove of the upper
lip philtrum, and the distance from this line to a midpoint between
the upper and lower central incisors should be estimated.
Midline grooves filled with heated wax in the lower and upper models
 The grooves corresponding to the initial midlines should be filled
with blue wax and heated in a dripper, and the registration of the
correct midlines targeted by the orthodontic treatment should be
performed using heated red wax.
Step 2 : Midline registration
Filled midlines with
initial midlines in
blue and the
changes planned
for the upper
midline in red.
 This information will guide the correct establishment of the
midlines when mounting of the teeth.
Step 2 : Midline registration
 This patient had a greater than 2 mm midline deviation to the right
side while the lower midline coincided with the facial midline.
Step 3 : First molar registration
 Record of the center of the upper molar mesiobuccal cusp and
groove between the mesiobuccal cusp and the median cusp on
the lower molar .
 If the first molars are missing, the second or third molars
can be used as reference.
 Record of the molar positions should be extended to the
base of the models using a ruler .
Step 3 : First molar registration
Tooth and base grooves
filled with blue wax.
Step 3 : First molar registration
 Recording the position of the upper and lower molars on the
model bases is important to check for changes in the movement of
these teeth in the anteroposterior direction, such as loss of
anchorage, distalizations or correction of dental inclinations.
Step 4 : lower dental arch form registration
1) Record of the arch form with 0.021 x
0.026-in stainless steel wire showing its
position on the incisal edges and buccal
cusps of teeth .
2) Checking the symmetry chart.
To avoid relapses, studies recommend that the original form of the
lower dental arch not be changed to ensure stability of the occlusion
achieved with the orthodontic treatment.
Step 5 : lower incisor registration
Transfer of the midline
of the model to the
lingual area of the
alveolar ridge by 0.5
mechanical pencil.
Record of the anterior
posterior position of the
lower incisors using
condensation cure
silicone.
Anterior and posterior
incisor extensions of
approximately 6 mm to
facilitate planning the
movement of these
teeth.
 The position of the incisors at the end of treatment clearly
indicates that a successful, satisfactory occlusion and a balanced
profile have been achieved.
Transfer of the midline marked on the model for the
silicone. This line will serve as a reference to the
median cutting of this guide.
Step 5 : lower incisor registration
Demarcation and removal of the silicone part in the lingual region of
incisors to allow the simulation of the retraction of these teeth.
Step 5 : lower incisor registration
This graph paper will serve to quantify
the extent to which the simulation of
tooth movement is in accordance with
the treatment plan, regardless of
whether such movement is an intrusion,
extrusion, proclination or retroclination.
Registration with silicone in the posterior region to maintain the
vertical dimension of the models when mounting the setup model.
Step 5 : lower incisor registration
Step 6 : Tooth identification and cutting
Tooth identification using 0.5 mm mechanical pencil to prevent
them from being confused when mounting the setup.
Step 6 : Tooth identification and cutting
Demarcation of a guideline for cutting the teeth in the model
base in both dental arches.
 For the removal of the upper and lower teeth, a line must be
drawn limiting the region of the alveolar ridge, approximately 5
mm from the cervical region of the teeth.
Step 6 : Tooth identification and cutting
spiral saw
Drilling in the area of the lower alveolar ridge on the horizontal line near
the midline for insertion of the thin spiral saw.
Horizontal and vertical sections in the lower alveolar ridge of the left
quadrant using thin spiral saw mounted on the frame of a bow saw.
Explorer #5 being used to heighten the interdental limits
After separating the block of teeth from the model; some finger pressure
should be applied to the stumps to separate teeth.
Stripping the tooth stumps with a steel bur, taking care to maintain the
mesial-distal dimension of each tooth, without removing the dentogingival
limit.
Making retentions in the stumps with a carborundum disk.
o Use of a digital caliper to check the mesiodistal dimension of
each tooth after cutting, comparing it with the original value in
the initial study model.
Leveling the lower alveolar base and making a central groove
Boring small holes (cavities)
with a round bur #6 to
create undercuts.
Removal of plaster residues using a
compressed air syringe.
Step 7 : Tooth mounting
Filling the central groove of the alveolar ridge with red wax #7; a strip
of utility wax is attached to the red wax to allow the teeth to be set in
place.
Positioning the lower left central incisor in
accordance with the proposed reduction of
3 mm in the treatment plan.
Mounting the remaining quadrant teeth
Step 7 : Tooth mounting
Checking for the correct tooth positions
using the archwire from the arch form
registration.
Setting the tooth stumps with heated red
wax #7
Mounting of teeth on the upper and
lower left side.
Checking to ensure maintenance of the vertical dimension, considering
the total height of the bases (initial and setup); if necessary, use of
posterior silicone record.
Mounting the left and right quadrants. The archwire registering the original
archform should be used to check the shape and symmetry of the lower
arch construction.
 When mounting the teeth one should follow the guidelines and
the six keys to a normal occlusion introduced by Andrews,
whereas the arch form and intercanine and intermolar widths
should be preserved.
Careful removal of the lower second molar, ensuring that the posterior
cutting is done exactly on the distal surface of the tooth.
 Once mounting is complete, the occlusion should be checked in
its contact points, marginal ridge height and axial inclination of
the anterior and posterior teeth.
Step 8: Waxing, carving and finishing
Adjustment and shaping of the
gingival margins with a Hollemback
carver.
wax plasticized with the aid of a Hannau
lamp to ensure total smoothness.
Polishing of gypsum with silk fabric.
Washing in running water to remove residues
Finished setup model.
SETUP ANALYSIS
 Once the setup is ready, much information is generated. The use
of an evaluation form based on the model, first suggested by
Cury-Saramago and Vilella14 is recommended.
 The proposed method includes ten items: Extractions, changes in
the basal bones, lower incisor position, leveling, midlines, dental
arch form, molar and canine relationship, anchorage,
interproximal stripping and cosmetic finishing.
Form used for setup analysis.
Finished treatment showing the treatment objectives were achieved
according to plan.
Profile and panoramic radiographs, and final cephalometric tracing
The Importance of the Diagnostic Setup in the
Orthodontic Treatment Plan
 In the first case, three diagnostic setups were made in order to
determine the treatment plan that best fitted the case and that
would bring the best results and stability for this specific
individual.
 The importance of the diagnostic setup appear by examining
the following two cases.
IJO. VOL. 23 .NO. 2. SUMMER 2012
 In the second case, one diagnostic setup was made to verify
whether the intended treatment plan would be able to be
carried out resulting in harmonic intraarch and interarch
relationships.
A healthy 11-year-old boy was brought by his parents for orthodontic
treatment in Rio de Janeiro, Brazil. At the initial orthodontic
evaluation he was already in the permanent dentition, with an Angle
Class I malocclusion and a small mandibular arch-length discrepancy
(-1.6 mm). The lateral cephalometric analysis showed a Class I
skeletal malocclusion (ANB, 4)
Pretreatment extra
oral photographs
First case
Pretreatment dental models of the first case.
Pretreatment cephalometric
radiograph of the first case.
Pretreatment cephalometric
tracing of the first case.
Protruded maxillary and mandibular incisors (1.NA= 27, 1.NB= 27;
IMPA= 91). The lower left central incisor showed some gingival
recession. The facial profile was convex. There was a tooth
discrepancy with a mandibular excess of 1.7 mm. Total discrepancy
of the lower arch was calculated by adding up the arch-length
discrepancy and the cephalometric discrepancy (-5,6 mm).
 In order to visualize the treatment results and to establish a
treatment plan with confidence, three diagnostic setups were
made with three alternative treatments :
 The treatment objectives for this patient were to enhance the
profile, align the teeth and maintain the Class I relationship. The
really small mandibular discrepancy made it difficult to decide for
extraction of either a mandibular incisor or of four first premolars.
 It is important to consider that this protrusion could worsen both
the facial profile, and the gingival recession on the left central
incisor, leading to an unfavorable result.
1) No extraction and mild protrusion of incisors
2) Extraction of four premolars with retraction of the
anterior teeth and mesialization of the posterior teeth
 The lower incisors were retracted 3 mm to their ideal position and the lower first
molars migrated mesially 3.5 mm each. In this alternative of treatment, the facial
profile would be altered, improving esthetics and making the face of the patient
more harmonious. Additionally, since the left lower central incisor would be
retracted, the gingival recession would tend to diminish.
3) Extraction of a mandibular incisor (the one with gingival recession).
 The lower incisors were minimally retracted (1 mm). The upper incisors were
submitted to a stripping process to eliminate tooth discrepancies created
by the extraction. The facial profile would be just slightly altered by the minimal
retraction provided in this treatment alternative, but the gingival recession would no
longer be a problem, since the affected tooth would be extracted.
Superimposition of the
original tracing (black)
and of the tracings of the
treatment options for the
first case:
1) No extraction (blue)
2) Four premolars
extraction (green)
3) One lower incisor
extraction (red)
Discussion
o In all of them, it is likely that a good occlusion be achieved, as
foreseen in the setups.
 However, only the option comprising the extraction of four
premolars would allow a retraction of the incisors and their
correct positioning on the basal bone.
 According to Tweed, mandibular incisors must be upright over the
basal bone if balance and harmony of facial proportions are to be
achieved in orthodontic treatment. This concept is confirmed in
Strang’s description of normal occlusion.
 Consequently, this was also the only option of treatment that
would affect the facial profile favorably. If this is an important
aspect for the patient and his parents, this should be the
alternative chosen.
Second case
A healthy 21-year-old woman came looking for orthodontic treatment
in Rio de Janeiro, Brazil. At the initial orthodontic evaluation she
presented an Angle Class I malocclusion and a mandibular arch-length
discrepancy of -2.4 mm. The lateral cephalometric analysis showed
a Class I skeletal malocclusion (ANB, 1), a harmonious facial growth.
Pretreatment extraoral photographs
Pretreatment dental models of the second case.
Pretreatment cephalometric
radiograph of the second case.
Pretreatment cephalometric tracing of
The second case.
Protruded maxillary and mandibular incisors (1.NA=35; 1.NB= 25;
IMPA= 93). There was a transposition between the lower right lateral
incisor and the lower right canine. The facial profile was slightly
convex. There was no tooth discrepancy. Total discrepancy of the
lower arch was calculated by adding up the arch-length discrepancy
and the cephalometric discrepancy (-8.4 mm).
Two treatment alternatives were considered:
1) Extraction of four premolars with retraction of the anterior
teeth and mesialization of the posterior teeth.
2) 2) Extraction of a mandibular incisor (the transposed one).
Setup models of the second case: simulation of treatment with
extraction of one lower incisor.
Superimposition of the
original tracing (black)
and of the tracings of the
treatment options for
the second case:
1) One lower incisor
extraction (red)
2) Four premolars
extraction (green).
 The treatment cephalometric simulation showed that the
extraction of four premolars and retraction of the anterior teeth
would provide a concave profile with retruded lips, which might
accentuate the already prominent nose of the patient.
 Therefore, the option of extraction of one lower incisor (the
transposed one) seemed more reasonable with the advantage of
favoring the mechanics by eliminating the need of correction of
the transposed incisor.
 However, this alternative would require a considerable amount of
stripping in the upper incisors and canines. A setup was helpful to
determine the amount of stripping necessary for each tooth and
the final best possible occlusion.
Discussion
Laugh
and
the world
laughs
with you
Diagnostic set up

Diagnostic set up

  • 1.
    Diagnostic Set-up Prepared by: Ahmed Saeed Baattiah Under supervision : prof . Maher Fouda Mansoura University Faculty of Dentistry Orthodontics Department
  • 2.
    INTRODUCTION In 1953, Kesling,after developing a tooth positioner as an aid in finishing orthodontic treatments, suggested that cutting and repositioning the teeth in duplicate study models of the malocclusions would allow simulation of the results before starting orthodontic treatment. Dental Press J Orthod. 2012 May-June;17(3):146-65 Diagnostic Set-up
  • 3.
    INTRODUCTION Pre treatment Setup models DentalPress J Orthod. 2012 May-June;17(3):146-65  Diagnostic setup consists in cutting and realigning the teeth in plaster models, making it an important resource in orthodontic treatment planning.  Orthodontic setup procedure and analysis can provide important information such as the need for dental extractions , interproximal stripping , anchorage system. Diagnostic Set-up
  • 4.
    14-year-old , dark-skinnedpatient with Angle Class I malocclusion. Facial analysis revealed lip incompetence, convex profile, decreased nasolabial angle. ORTHODONTIC SETUP PROCEDURE Dental Press J Orthod. 2012 May-June;17(3):146-65
  • 5.
    She had aClass I skeletal pattern (ANB=3°), with a good maxillo- mandibular relationship (SNA=82 ‫؛‬and SNB=79°). She had a Class I dental malocclusion, bimaxillary protrusion, upper and lower anterior crowding, with discrepancy of -11.2 mm and -5.5 mm, respectively.
  • 6.
    Her incisors werein an edge-to-edge relationship, proclined (1-NA=28°, 1-NB=36°).
  • 7.
    Initial panoramic X-ray,lateral cephalogram and cephalometric tracing.
  • 8.
    STEPS OF ORTHODONTICSETUP PROCEDURE Step 1 : Models must be properly fabricated to faithfully reproduce the patient’s malocclusion, then duplicated , and polished to streamline the setup procedure.
  • 9.
    Step 2 :Midline registration Record of the initial upper and lower midlines using a ruler and 0.5mm mechanical pencil  Coinciding the upper and lower dental midlines is one of the treatment objectives, be it for aesthetic and/ or functional purposes, be it to accomplish adequate dental intercuspation in the posterior region of the dental arches.
  • 10.
    Step 2 :Midline registration Grooves with 1 mm width and depth, made with a stylet.  In a front view of the patient at rest , and with lips slightly parted, one should imagine a line passing through the groove of the upper lip philtrum, and the distance from this line to a midpoint between the upper and lower central incisors should be estimated.
  • 11.
    Midline grooves filledwith heated wax in the lower and upper models  The grooves corresponding to the initial midlines should be filled with blue wax and heated in a dripper, and the registration of the correct midlines targeted by the orthodontic treatment should be performed using heated red wax. Step 2 : Midline registration
  • 12.
    Filled midlines with initialmidlines in blue and the changes planned for the upper midline in red.  This information will guide the correct establishment of the midlines when mounting of the teeth. Step 2 : Midline registration  This patient had a greater than 2 mm midline deviation to the right side while the lower midline coincided with the facial midline.
  • 13.
    Step 3 :First molar registration  Record of the center of the upper molar mesiobuccal cusp and groove between the mesiobuccal cusp and the median cusp on the lower molar .  If the first molars are missing, the second or third molars can be used as reference.
  • 14.
     Record ofthe molar positions should be extended to the base of the models using a ruler . Step 3 : First molar registration
  • 15.
    Tooth and basegrooves filled with blue wax. Step 3 : First molar registration  Recording the position of the upper and lower molars on the model bases is important to check for changes in the movement of these teeth in the anteroposterior direction, such as loss of anchorage, distalizations or correction of dental inclinations.
  • 17.
    Step 4 :lower dental arch form registration 1) Record of the arch form with 0.021 x 0.026-in stainless steel wire showing its position on the incisal edges and buccal cusps of teeth . 2) Checking the symmetry chart. To avoid relapses, studies recommend that the original form of the lower dental arch not be changed to ensure stability of the occlusion achieved with the orthodontic treatment.
  • 18.
    Step 5 :lower incisor registration Transfer of the midline of the model to the lingual area of the alveolar ridge by 0.5 mechanical pencil. Record of the anterior posterior position of the lower incisors using condensation cure silicone. Anterior and posterior incisor extensions of approximately 6 mm to facilitate planning the movement of these teeth.  The position of the incisors at the end of treatment clearly indicates that a successful, satisfactory occlusion and a balanced profile have been achieved.
  • 19.
    Transfer of themidline marked on the model for the silicone. This line will serve as a reference to the median cutting of this guide. Step 5 : lower incisor registration
  • 20.
    Demarcation and removalof the silicone part in the lingual region of incisors to allow the simulation of the retraction of these teeth. Step 5 : lower incisor registration This graph paper will serve to quantify the extent to which the simulation of tooth movement is in accordance with the treatment plan, regardless of whether such movement is an intrusion, extrusion, proclination or retroclination.
  • 21.
    Registration with siliconein the posterior region to maintain the vertical dimension of the models when mounting the setup model. Step 5 : lower incisor registration
  • 22.
    Step 6 :Tooth identification and cutting Tooth identification using 0.5 mm mechanical pencil to prevent them from being confused when mounting the setup.
  • 23.
    Step 6 :Tooth identification and cutting Demarcation of a guideline for cutting the teeth in the model base in both dental arches.  For the removal of the upper and lower teeth, a line must be drawn limiting the region of the alveolar ridge, approximately 5 mm from the cervical region of the teeth.
  • 24.
    Step 6 :Tooth identification and cutting spiral saw
  • 25.
    Drilling in thearea of the lower alveolar ridge on the horizontal line near the midline for insertion of the thin spiral saw. Horizontal and vertical sections in the lower alveolar ridge of the left quadrant using thin spiral saw mounted on the frame of a bow saw.
  • 26.
    Explorer #5 beingused to heighten the interdental limits After separating the block of teeth from the model; some finger pressure should be applied to the stumps to separate teeth.
  • 27.
    Stripping the toothstumps with a steel bur, taking care to maintain the mesial-distal dimension of each tooth, without removing the dentogingival limit. Making retentions in the stumps with a carborundum disk.
  • 28.
    o Use ofa digital caliper to check the mesiodistal dimension of each tooth after cutting, comparing it with the original value in the initial study model.
  • 29.
    Leveling the loweralveolar base and making a central groove Boring small holes (cavities) with a round bur #6 to create undercuts. Removal of plaster residues using a compressed air syringe.
  • 31.
    Step 7 :Tooth mounting Filling the central groove of the alveolar ridge with red wax #7; a strip of utility wax is attached to the red wax to allow the teeth to be set in place.
  • 32.
    Positioning the lowerleft central incisor in accordance with the proposed reduction of 3 mm in the treatment plan. Mounting the remaining quadrant teeth Step 7 : Tooth mounting
  • 33.
    Checking for thecorrect tooth positions using the archwire from the arch form registration. Setting the tooth stumps with heated red wax #7
  • 34.
    Mounting of teethon the upper and lower left side. Checking to ensure maintenance of the vertical dimension, considering the total height of the bases (initial and setup); if necessary, use of posterior silicone record.
  • 35.
    Mounting the leftand right quadrants. The archwire registering the original archform should be used to check the shape and symmetry of the lower arch construction.  When mounting the teeth one should follow the guidelines and the six keys to a normal occlusion introduced by Andrews, whereas the arch form and intercanine and intermolar widths should be preserved.
  • 36.
    Careful removal ofthe lower second molar, ensuring that the posterior cutting is done exactly on the distal surface of the tooth.  Once mounting is complete, the occlusion should be checked in its contact points, marginal ridge height and axial inclination of the anterior and posterior teeth.
  • 37.
    Step 8: Waxing,carving and finishing Adjustment and shaping of the gingival margins with a Hollemback carver. wax plasticized with the aid of a Hannau lamp to ensure total smoothness.
  • 38.
    Polishing of gypsumwith silk fabric. Washing in running water to remove residues
  • 39.
  • 40.
    SETUP ANALYSIS  Oncethe setup is ready, much information is generated. The use of an evaluation form based on the model, first suggested by Cury-Saramago and Vilella14 is recommended.  The proposed method includes ten items: Extractions, changes in the basal bones, lower incisor position, leveling, midlines, dental arch form, molar and canine relationship, anchorage, interproximal stripping and cosmetic finishing.
  • 41.
    Form used forsetup analysis.
  • 42.
    Form used forsetup analysis.
  • 43.
    Finished treatment showingthe treatment objectives were achieved according to plan.
  • 44.
    Profile and panoramicradiographs, and final cephalometric tracing
  • 46.
    The Importance ofthe Diagnostic Setup in the Orthodontic Treatment Plan  In the first case, three diagnostic setups were made in order to determine the treatment plan that best fitted the case and that would bring the best results and stability for this specific individual.  The importance of the diagnostic setup appear by examining the following two cases. IJO. VOL. 23 .NO. 2. SUMMER 2012  In the second case, one diagnostic setup was made to verify whether the intended treatment plan would be able to be carried out resulting in harmonic intraarch and interarch relationships.
  • 47.
    A healthy 11-year-oldboy was brought by his parents for orthodontic treatment in Rio de Janeiro, Brazil. At the initial orthodontic evaluation he was already in the permanent dentition, with an Angle Class I malocclusion and a small mandibular arch-length discrepancy (-1.6 mm). The lateral cephalometric analysis showed a Class I skeletal malocclusion (ANB, 4) Pretreatment extra oral photographs First case
  • 48.
    Pretreatment dental modelsof the first case.
  • 49.
    Pretreatment cephalometric radiograph ofthe first case. Pretreatment cephalometric tracing of the first case.
  • 50.
    Protruded maxillary andmandibular incisors (1.NA= 27, 1.NB= 27; IMPA= 91). The lower left central incisor showed some gingival recession. The facial profile was convex. There was a tooth discrepancy with a mandibular excess of 1.7 mm. Total discrepancy of the lower arch was calculated by adding up the arch-length discrepancy and the cephalometric discrepancy (-5,6 mm).  In order to visualize the treatment results and to establish a treatment plan with confidence, three diagnostic setups were made with three alternative treatments :  The treatment objectives for this patient were to enhance the profile, align the teeth and maintain the Class I relationship. The really small mandibular discrepancy made it difficult to decide for extraction of either a mandibular incisor or of four first premolars.
  • 51.
     It isimportant to consider that this protrusion could worsen both the facial profile, and the gingival recession on the left central incisor, leading to an unfavorable result. 1) No extraction and mild protrusion of incisors
  • 52.
    2) Extraction offour premolars with retraction of the anterior teeth and mesialization of the posterior teeth  The lower incisors were retracted 3 mm to their ideal position and the lower first molars migrated mesially 3.5 mm each. In this alternative of treatment, the facial profile would be altered, improving esthetics and making the face of the patient more harmonious. Additionally, since the left lower central incisor would be retracted, the gingival recession would tend to diminish.
  • 53.
    3) Extraction ofa mandibular incisor (the one with gingival recession).  The lower incisors were minimally retracted (1 mm). The upper incisors were submitted to a stripping process to eliminate tooth discrepancies created by the extraction. The facial profile would be just slightly altered by the minimal retraction provided in this treatment alternative, but the gingival recession would no longer be a problem, since the affected tooth would be extracted.
  • 54.
    Superimposition of the originaltracing (black) and of the tracings of the treatment options for the first case: 1) No extraction (blue) 2) Four premolars extraction (green) 3) One lower incisor extraction (red)
  • 55.
    Discussion o In allof them, it is likely that a good occlusion be achieved, as foreseen in the setups.  However, only the option comprising the extraction of four premolars would allow a retraction of the incisors and their correct positioning on the basal bone.  According to Tweed, mandibular incisors must be upright over the basal bone if balance and harmony of facial proportions are to be achieved in orthodontic treatment. This concept is confirmed in Strang’s description of normal occlusion.  Consequently, this was also the only option of treatment that would affect the facial profile favorably. If this is an important aspect for the patient and his parents, this should be the alternative chosen.
  • 56.
    Second case A healthy21-year-old woman came looking for orthodontic treatment in Rio de Janeiro, Brazil. At the initial orthodontic evaluation she presented an Angle Class I malocclusion and a mandibular arch-length discrepancy of -2.4 mm. The lateral cephalometric analysis showed a Class I skeletal malocclusion (ANB, 1), a harmonious facial growth. Pretreatment extraoral photographs
  • 57.
    Pretreatment dental modelsof the second case.
  • 58.
    Pretreatment cephalometric radiograph ofthe second case. Pretreatment cephalometric tracing of The second case.
  • 59.
    Protruded maxillary andmandibular incisors (1.NA=35; 1.NB= 25; IMPA= 93). There was a transposition between the lower right lateral incisor and the lower right canine. The facial profile was slightly convex. There was no tooth discrepancy. Total discrepancy of the lower arch was calculated by adding up the arch-length discrepancy and the cephalometric discrepancy (-8.4 mm). Two treatment alternatives were considered: 1) Extraction of four premolars with retraction of the anterior teeth and mesialization of the posterior teeth. 2) 2) Extraction of a mandibular incisor (the transposed one).
  • 60.
    Setup models ofthe second case: simulation of treatment with extraction of one lower incisor.
  • 61.
    Superimposition of the originaltracing (black) and of the tracings of the treatment options for the second case: 1) One lower incisor extraction (red) 2) Four premolars extraction (green).
  • 62.
     The treatmentcephalometric simulation showed that the extraction of four premolars and retraction of the anterior teeth would provide a concave profile with retruded lips, which might accentuate the already prominent nose of the patient.  Therefore, the option of extraction of one lower incisor (the transposed one) seemed more reasonable with the advantage of favoring the mechanics by eliminating the need of correction of the transposed incisor.  However, this alternative would require a considerable amount of stripping in the upper incisors and canines. A setup was helpful to determine the amount of stripping necessary for each tooth and the final best possible occlusion. Discussion
  • 63.