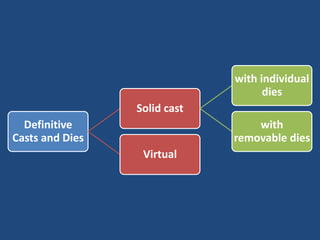
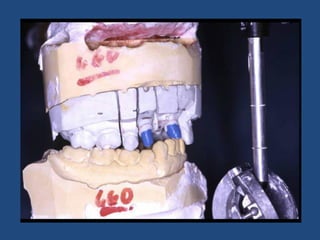
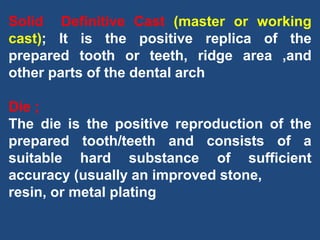
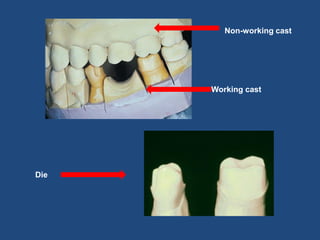
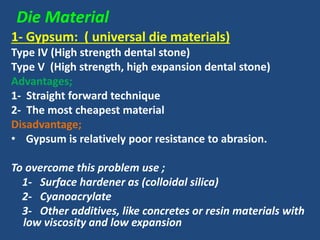
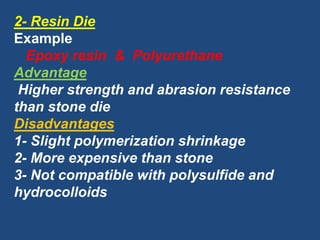
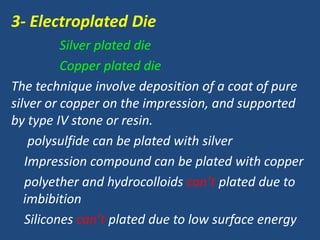
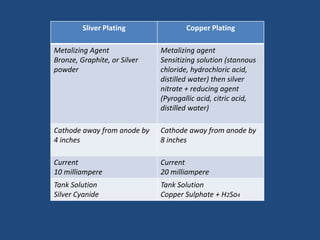
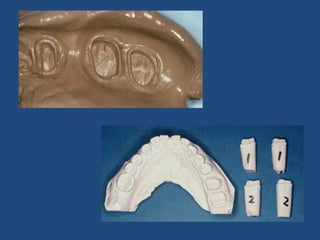
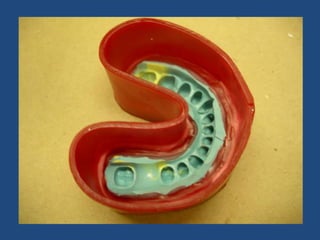
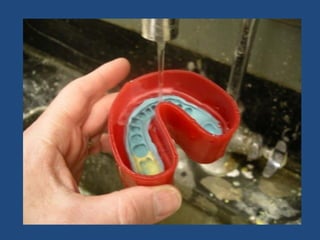
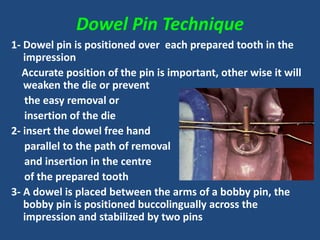
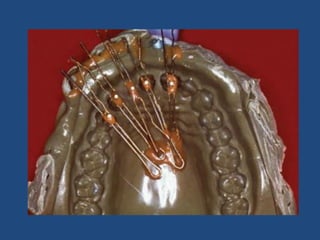
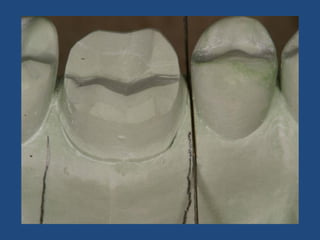
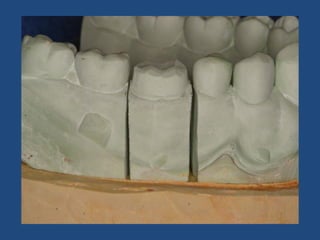
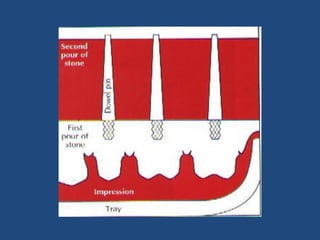
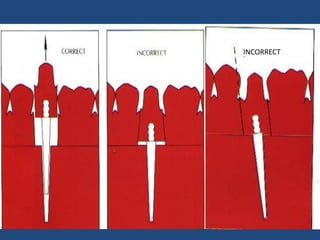
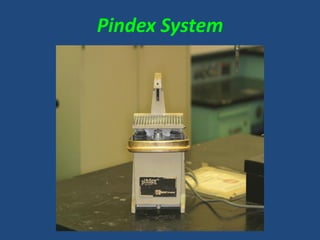
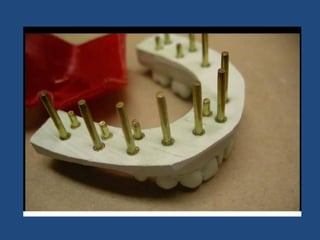
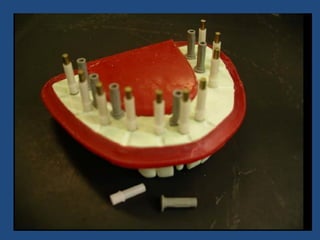
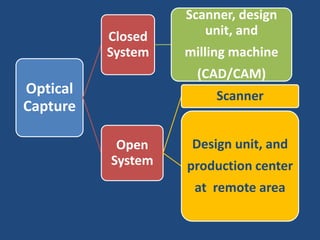
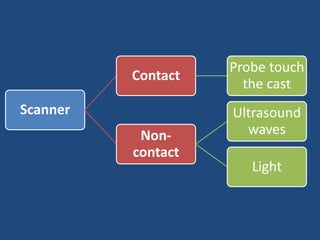
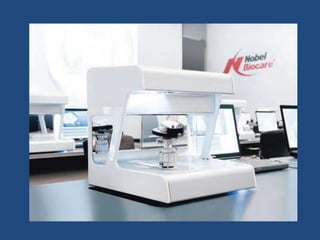
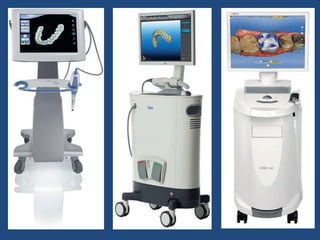
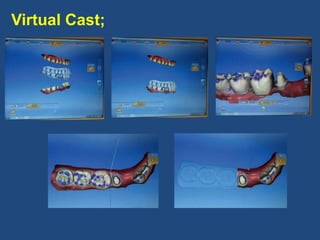
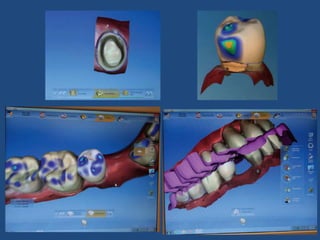
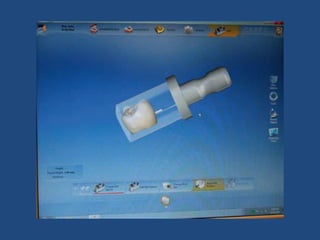
Definitive Casts and Dies
Dr. Hesham Ibrahim Othman
Professor and Head of Crowns and Bridges
Department, Al-Azhar University
Definitive
Casts and Dies
Solid cast
with individual
dies
with
removable dies
Virtual
Solid Definitive Cast (master or working
cast); It is the positive replica of the
prepared tooth or teeth, ridge area ,and
other parts of the dental arch
Die ;
The die is the positive reproduction of the
prepared tooth/teeth and consists of a
suitable hard substance of sufficient
accuracy (usually an improved stone,
resin, or metal plating
Working cast
Non-working cast
Die
Prerequisites
- It must be an exact reproduction of both
prepared and unprepared tooth surfaces.
- All the prepared and unprepared teeth
should voids free.
- All surfaces of any teeth involved in
anterior guidance and the occlusal surfaces
of all unprepared teeth must allow for precise
articulation of the opposing casts.
- All relevant soft tissues should be
reproduced in the definitive cast, including
all edentulous spaces and residual ridge
contours that will be involved in the fixed
prosthesis.
Requirements of the die(s)
1- It must produce the prepared tooth/teeth
exactly
2- All surfaces must be accurately
duplicated and no bubbles or voids
3- The remaining unprepared tooth
structure immediately cervical to finish
line (0.5 : 1.0 mm) should be discernible
on the die to help technician establish the
correct contour
4- Adequate access to the margin is
imperative
Requirements of die materials
1- Should have high mechanical strength to
withstand handling
2- Should have high stability and dimensional
accuracy
3- Should be compatible with the impression
materials
4- Should have good color contrast with other
materials being used
5- Should be compatible with the separating
medium that will be used
6- Easy wettable by wax
Die Material
1- Gypsum: ( universal die materials)
Type IV (High strength dental stone)
Type V (High strength, high expansion dental stone)
Advantages;
1- Straight forward technique
2- The most cheapest material
Disadvantage;
• Gypsum is relatively poor resistance to abrasion.
To overcome this problem use ;
1- Surface hardener as (colloidal silica)
2- Cyanoacrylate
3- Other additives, like concretes or resin materials with
low viscosity and low expansion
2- Resin Die
Example
Epoxy resin & Polyurethane
Advantage
Higher strength and abrasion resistance
than stone die
Disadvantages
1- Slight polymerization shrinkage
2- More expensive than stone
3- Not compatible with polysulfide and
hydrocolloids
3- Electroplated Die
Silver plated die
Copper plated die
The technique involve deposition of a coat of pure
silver or copper on the impression, and supported
by type IV stone or resin.
polysulfide can be plated with silver
Impression compound can be plated with copper
polyether and hydrocolloids can’t plated due to
imbibition
Silicones can’t plated due to low surface energy
Sliver Plating Copper Plating
Metalizing Agent
Bronze, Graphite, or Silver
powder
Metalizing agent
Sensitizing solution (stannous
chloride, hydrochloric acid,
distilled water) then silver
nitrate + reducing agent
(Pyrogallic acid, citric acid,
distilled water)
Cathode away from anode by
4 inches
Cathode away from anode by
8 inches
Current
10 milliampere
Current
20 milliampere
Tank Solution
Silver Cyanide
Tank Solution
Copper Sulphate + H2So4
4- Refractory Die (Ceramic Die)
A ceramic material composed of powder and liquid
mixed together and poured into the impression ,
after one hour separated and fired at 1000°C for
8 minutes to produce strong die used for all
ceramic restorations
Solid cast with individual dies
(multiple poor technique)
-The first pour, which is the most accurate,
is trimmed into a die with a handle of
sufficient length (similar to a tooth root)
- The second pour is mounted on an
articulator
- The wax pattern is started on the first pour
(the die) and is then transferred to the
articulated cast for refinement of axial
contours and occlusal anatomy
- When completed, this pattern is returned
to the die so that the margins can be
readapted immediately
before the pattern is invested
Advantages;
-minimal lab. Procedures
Disadvantages;
1- It may be difficult to transfer complex or
fragile wax patterns from cast to die
2- Seating the pattern on the definitive cast
may be problematic because the second
pour of some impression materials is
slightly larger than the first
3- The technique can be used only with
elastomeric impression materials
Solid cast with removable dies
Techniques For Removable Die
Dowel Pin Technique
Pindex System
Die-lock Tray technique
Preparation of the
impression for pouring
Trim the excess impression 5.0 mm above the finish
line and at the area of palate or tongue
Dowel Pin Technique
Dowel Pin Technique
1- Dowel pin is positioned over each prepared tooth in the
impression
Accurate position of the pin is important, other wise it will
weaken the die or prevent
the easy removal or
insertion of the die
2- insert the dowel free hand
parallel to the path of removal
and insertion in the centre
of the prepared tooth
3- A dowel is placed between the arms of a bobby pin, the
bobby pin is positioned buccolingually across the
impression and stabilized by two pins
4- Die stone is then poured
into the impression,
filling the impression of
the teeth and cover the
knurled end of the pin
5- Paper clips are set into
the stone before it set, to
provide retention for the
base which will be placed
later
6- these clips should be
placed in all parts of the
model that are not to be
removable from the
complete cast
7- When the stone has set, the
straight pins and the bobby
pin are removed from the
impression
8- A ball of soft wax is placed
on the tip of each dowel
9- A V-shape buccolingual
orientation grooves or a
round dimple is cut on each
die to aid in the complete
and accurate reseating of
the die during use
10- the stone around each
dowel should lubricated
with a thin coat of
petrolatum to permit easier
separation of the die from
the working cast
11- Pour another stone with
different color to make the
base of the cast
12- After complete setting of
the stone remove the cast
from the impression and
trim of the excess by
model trimmer
13- Use sharp knife to
uncover the spheres of
wax and remove them
14- When the stone become
hard and dry, use a saw
frame and blade to cut
through the first layer of
the stone, mesially and
distally to each die.
15- The cut should parallel to
each other or slight
occlusal diverge to the
path of
removal
16- Loosen the die gently
using an instrument handle
INCORRECT
17- Trim away any excess stone
gingival to the finish line
18- Ditching the die 0.5 : 1.0 mm
below the level of the finish
line for proper carving the
cervical wax pattern
19- Correction of defects
above the finish line
20- The finish line should be
colored with red pencil
21- Reseat the die on the
working cast, place wax ball
around the tips of the
dowel
22- Sock the cast in water and
mount it on the articulator,
using mounting plaster, and
after hardening of plaster
remove wax covering the
tip of the dowel
Pindex System
Pindex system consists of:
Special drill press
Brass dowel
plastic sleeves
Pour the impression in stone
Defects at critical areas (line or point angles,
and margins) should not be neglected
Separate the stone cast when set and trim
it to horse show shape
Trimmer
The base must be absolutely flat
1- Mark the location of each
dowel on the occlusal
surface (two dowels are
needed to stabilize each
segment)
2- Position the cast on the drill
stage, a light indicates the
location of the drill
- Clean the pin holes by air stream
-Try the pins and cement them in place with Cyanoacrylate
- Short locating dowels should be used on the lingual
surface
- Coat the dowels with petrolatum
to ensure clean separation
- Position the plastic sleeves
- Place the assembly into a special
rubber mold
- Put a piece of wax over a head
of each sleeve
- Make the second pour of stone
with different color into the
mold
- Marking the sawing cuts with
pencil
- Sawing the dies
- Reassemble to the base
- Finish the die (as discussed
before)
- Mount to the articulator
Di-Lock Technique
1- Pour the entire full arch impression with die
stone , respected to U-shaped arch, up to one
inch
2- After setting of the stone separate the U-shape
cast, trim the buccal and lingual to be fit
loosely into the Di-Lock tray
3- One or two horizontal grooves are placed on
the inner and outer aspect of the cast to
provide undercuts for holding the cast into the
other stone in the tray
It consists of 3 parts;
1- Base
2- Curved arm
3- Lock
4- Soak the base of the cast in
water for 5 min.
5- Mix a stone with different color
and fill ¾ of the tray
6- Seat the first cast to the tray.
The cervical margin of the teeth
should be above the periphery
of the tray by 4.0 mm, then
remove the excess cement
7- Disassemble the tray after
complete setting of the second
stone by lifting the back up, and
slide the buccal facing forward,
then slide the cast forward to
remove it from the base
8- By the use of frame and blade saw, cut
between the prepared dies by the
same way like dowel pin technique
9- Cutting extend ¾ of the way through
the stone cast
10- Use finger pressure to break the dies
11- finishing the die by the same way like
dowel pin technique
12- Reassemble the dies
and the other parts of
the cast in the tray
13- Die-Lock tray is ready
for the fabrication of the
wax pattern after
mounting on the
articulator
Virtual Definite casts and
Die Systems
Optical
Capture
Closed
System
Scanner, design
unit, and
milling machine
(CAD/CAM)
Open
System
Scanner
Design unit, and
production center
at remote area
Scanner
Contact
Probe touch
the cast
Non-
contact
Ultrasound
waves
Light
Virtual Cast;
Definitive casts and dies

Definitive casts and dies

  • 1.
    Definitive Casts andDies Dr. Hesham Ibrahim Othman Professor and Head of Crowns and Bridges Department, Al-Azhar University
  • 2.
    Definitive Casts and Dies Solidcast with individual dies with removable dies Virtual
  • 4.
    Solid Definitive Cast(master or working cast); It is the positive replica of the prepared tooth or teeth, ridge area ,and other parts of the dental arch Die ; The die is the positive reproduction of the prepared tooth/teeth and consists of a suitable hard substance of sufficient accuracy (usually an improved stone, resin, or metal plating
  • 5.
  • 6.
    Prerequisites - It mustbe an exact reproduction of both prepared and unprepared tooth surfaces. - All the prepared and unprepared teeth should voids free. - All surfaces of any teeth involved in anterior guidance and the occlusal surfaces of all unprepared teeth must allow for precise articulation of the opposing casts. - All relevant soft tissues should be reproduced in the definitive cast, including all edentulous spaces and residual ridge contours that will be involved in the fixed prosthesis.
  • 7.
    Requirements of thedie(s) 1- It must produce the prepared tooth/teeth exactly 2- All surfaces must be accurately duplicated and no bubbles or voids 3- The remaining unprepared tooth structure immediately cervical to finish line (0.5 : 1.0 mm) should be discernible on the die to help technician establish the correct contour 4- Adequate access to the margin is imperative
  • 8.
    Requirements of diematerials 1- Should have high mechanical strength to withstand handling 2- Should have high stability and dimensional accuracy 3- Should be compatible with the impression materials 4- Should have good color contrast with other materials being used 5- Should be compatible with the separating medium that will be used 6- Easy wettable by wax
  • 9.
    Die Material 1- Gypsum:( universal die materials) Type IV (High strength dental stone) Type V (High strength, high expansion dental stone) Advantages; 1- Straight forward technique 2- The most cheapest material Disadvantage; • Gypsum is relatively poor resistance to abrasion. To overcome this problem use ; 1- Surface hardener as (colloidal silica) 2- Cyanoacrylate 3- Other additives, like concretes or resin materials with low viscosity and low expansion
  • 10.
    2- Resin Die Example Epoxyresin & Polyurethane Advantage Higher strength and abrasion resistance than stone die Disadvantages 1- Slight polymerization shrinkage 2- More expensive than stone 3- Not compatible with polysulfide and hydrocolloids
  • 11.
    3- Electroplated Die Silverplated die Copper plated die The technique involve deposition of a coat of pure silver or copper on the impression, and supported by type IV stone or resin. polysulfide can be plated with silver Impression compound can be plated with copper polyether and hydrocolloids can’t plated due to imbibition Silicones can’t plated due to low surface energy
  • 12.
    Sliver Plating CopperPlating Metalizing Agent Bronze, Graphite, or Silver powder Metalizing agent Sensitizing solution (stannous chloride, hydrochloric acid, distilled water) then silver nitrate + reducing agent (Pyrogallic acid, citric acid, distilled water) Cathode away from anode by 4 inches Cathode away from anode by 8 inches Current 10 milliampere Current 20 milliampere Tank Solution Silver Cyanide Tank Solution Copper Sulphate + H2So4
  • 13.
    4- Refractory Die(Ceramic Die) A ceramic material composed of powder and liquid mixed together and poured into the impression , after one hour separated and fired at 1000°C for 8 minutes to produce strong die used for all ceramic restorations
  • 14.
    Solid cast withindividual dies (multiple poor technique) -The first pour, which is the most accurate, is trimmed into a die with a handle of sufficient length (similar to a tooth root) - The second pour is mounted on an articulator
  • 15.
    - The waxpattern is started on the first pour (the die) and is then transferred to the articulated cast for refinement of axial contours and occlusal anatomy - When completed, this pattern is returned to the die so that the margins can be readapted immediately before the pattern is invested
  • 17.
    Advantages; -minimal lab. Procedures Disadvantages; 1-It may be difficult to transfer complex or fragile wax patterns from cast to die 2- Seating the pattern on the definitive cast may be problematic because the second pour of some impression materials is slightly larger than the first 3- The technique can be used only with elastomeric impression materials
  • 18.
    Solid cast withremovable dies Techniques For Removable Die Dowel Pin Technique Pindex System Die-lock Tray technique
  • 19.
  • 21.
    Trim the excessimpression 5.0 mm above the finish line and at the area of palate or tongue
  • 23.
  • 27.
    Dowel Pin Technique 1-Dowel pin is positioned over each prepared tooth in the impression Accurate position of the pin is important, other wise it will weaken the die or prevent the easy removal or insertion of the die 2- insert the dowel free hand parallel to the path of removal and insertion in the centre of the prepared tooth 3- A dowel is placed between the arms of a bobby pin, the bobby pin is positioned buccolingually across the impression and stabilized by two pins
  • 29.
    4- Die stoneis then poured into the impression, filling the impression of the teeth and cover the knurled end of the pin 5- Paper clips are set into the stone before it set, to provide retention for the base which will be placed later 6- these clips should be placed in all parts of the model that are not to be removable from the complete cast
  • 30.
    7- When thestone has set, the straight pins and the bobby pin are removed from the impression 8- A ball of soft wax is placed on the tip of each dowel 9- A V-shape buccolingual orientation grooves or a round dimple is cut on each die to aid in the complete and accurate reseating of the die during use 10- the stone around each dowel should lubricated with a thin coat of petrolatum to permit easier separation of the die from the working cast
  • 31.
    11- Pour anotherstone with different color to make the base of the cast 12- After complete setting of the stone remove the cast from the impression and trim of the excess by model trimmer 13- Use sharp knife to uncover the spheres of wax and remove them
  • 32.
    14- When thestone become hard and dry, use a saw frame and blade to cut through the first layer of the stone, mesially and distally to each die. 15- The cut should parallel to each other or slight occlusal diverge to the path of removal 16- Loosen the die gently using an instrument handle
  • 37.
  • 38.
    17- Trim awayany excess stone gingival to the finish line 18- Ditching the die 0.5 : 1.0 mm below the level of the finish line for proper carving the cervical wax pattern 19- Correction of defects above the finish line
  • 39.
    20- The finishline should be colored with red pencil 21- Reseat the die on the working cast, place wax ball around the tips of the dowel 22- Sock the cast in water and mount it on the articulator, using mounting plaster, and after hardening of plaster remove wax covering the tip of the dowel
  • 41.
  • 42.
    Pindex system consistsof: Special drill press Brass dowel plastic sleeves
  • 43.
  • 44.
    Defects at criticalareas (line or point angles, and margins) should not be neglected
  • 45.
    Separate the stonecast when set and trim it to horse show shape
  • 46.
  • 47.
    The base mustbe absolutely flat
  • 49.
    1- Mark thelocation of each dowel on the occlusal surface (two dowels are needed to stabilize each segment) 2- Position the cast on the drill stage, a light indicates the location of the drill
  • 50.
    - Clean thepin holes by air stream -Try the pins and cement them in place with Cyanoacrylate - Short locating dowels should be used on the lingual surface
  • 53.
    - Coat thedowels with petrolatum to ensure clean separation - Position the plastic sleeves - Place the assembly into a special rubber mold - Put a piece of wax over a head of each sleeve - Make the second pour of stone with different color into the mold
  • 54.
    - Marking thesawing cuts with pencil - Sawing the dies - Reassemble to the base - Finish the die (as discussed before) - Mount to the articulator
  • 55.
  • 56.
    1- Pour theentire full arch impression with die stone , respected to U-shaped arch, up to one inch 2- After setting of the stone separate the U-shape cast, trim the buccal and lingual to be fit loosely into the Di-Lock tray 3- One or two horizontal grooves are placed on the inner and outer aspect of the cast to provide undercuts for holding the cast into the other stone in the tray
  • 57.
    It consists of3 parts; 1- Base 2- Curved arm 3- Lock
  • 58.
    4- Soak thebase of the cast in water for 5 min. 5- Mix a stone with different color and fill ¾ of the tray 6- Seat the first cast to the tray. The cervical margin of the teeth should be above the periphery of the tray by 4.0 mm, then remove the excess cement 7- Disassemble the tray after complete setting of the second stone by lifting the back up, and slide the buccal facing forward, then slide the cast forward to remove it from the base
  • 59.
    8- By theuse of frame and blade saw, cut between the prepared dies by the same way like dowel pin technique 9- Cutting extend ¾ of the way through the stone cast 10- Use finger pressure to break the dies 11- finishing the die by the same way like dowel pin technique
  • 60.
    12- Reassemble thedies and the other parts of the cast in the tray 13- Die-Lock tray is ready for the fabrication of the wax pattern after mounting on the articulator
  • 61.
    Virtual Definite castsand Die Systems
  • 62.
    Optical Capture Closed System Scanner, design unit, and millingmachine (CAD/CAM) Open System Scanner Design unit, and production center at remote area
  • 63.
  • 66.