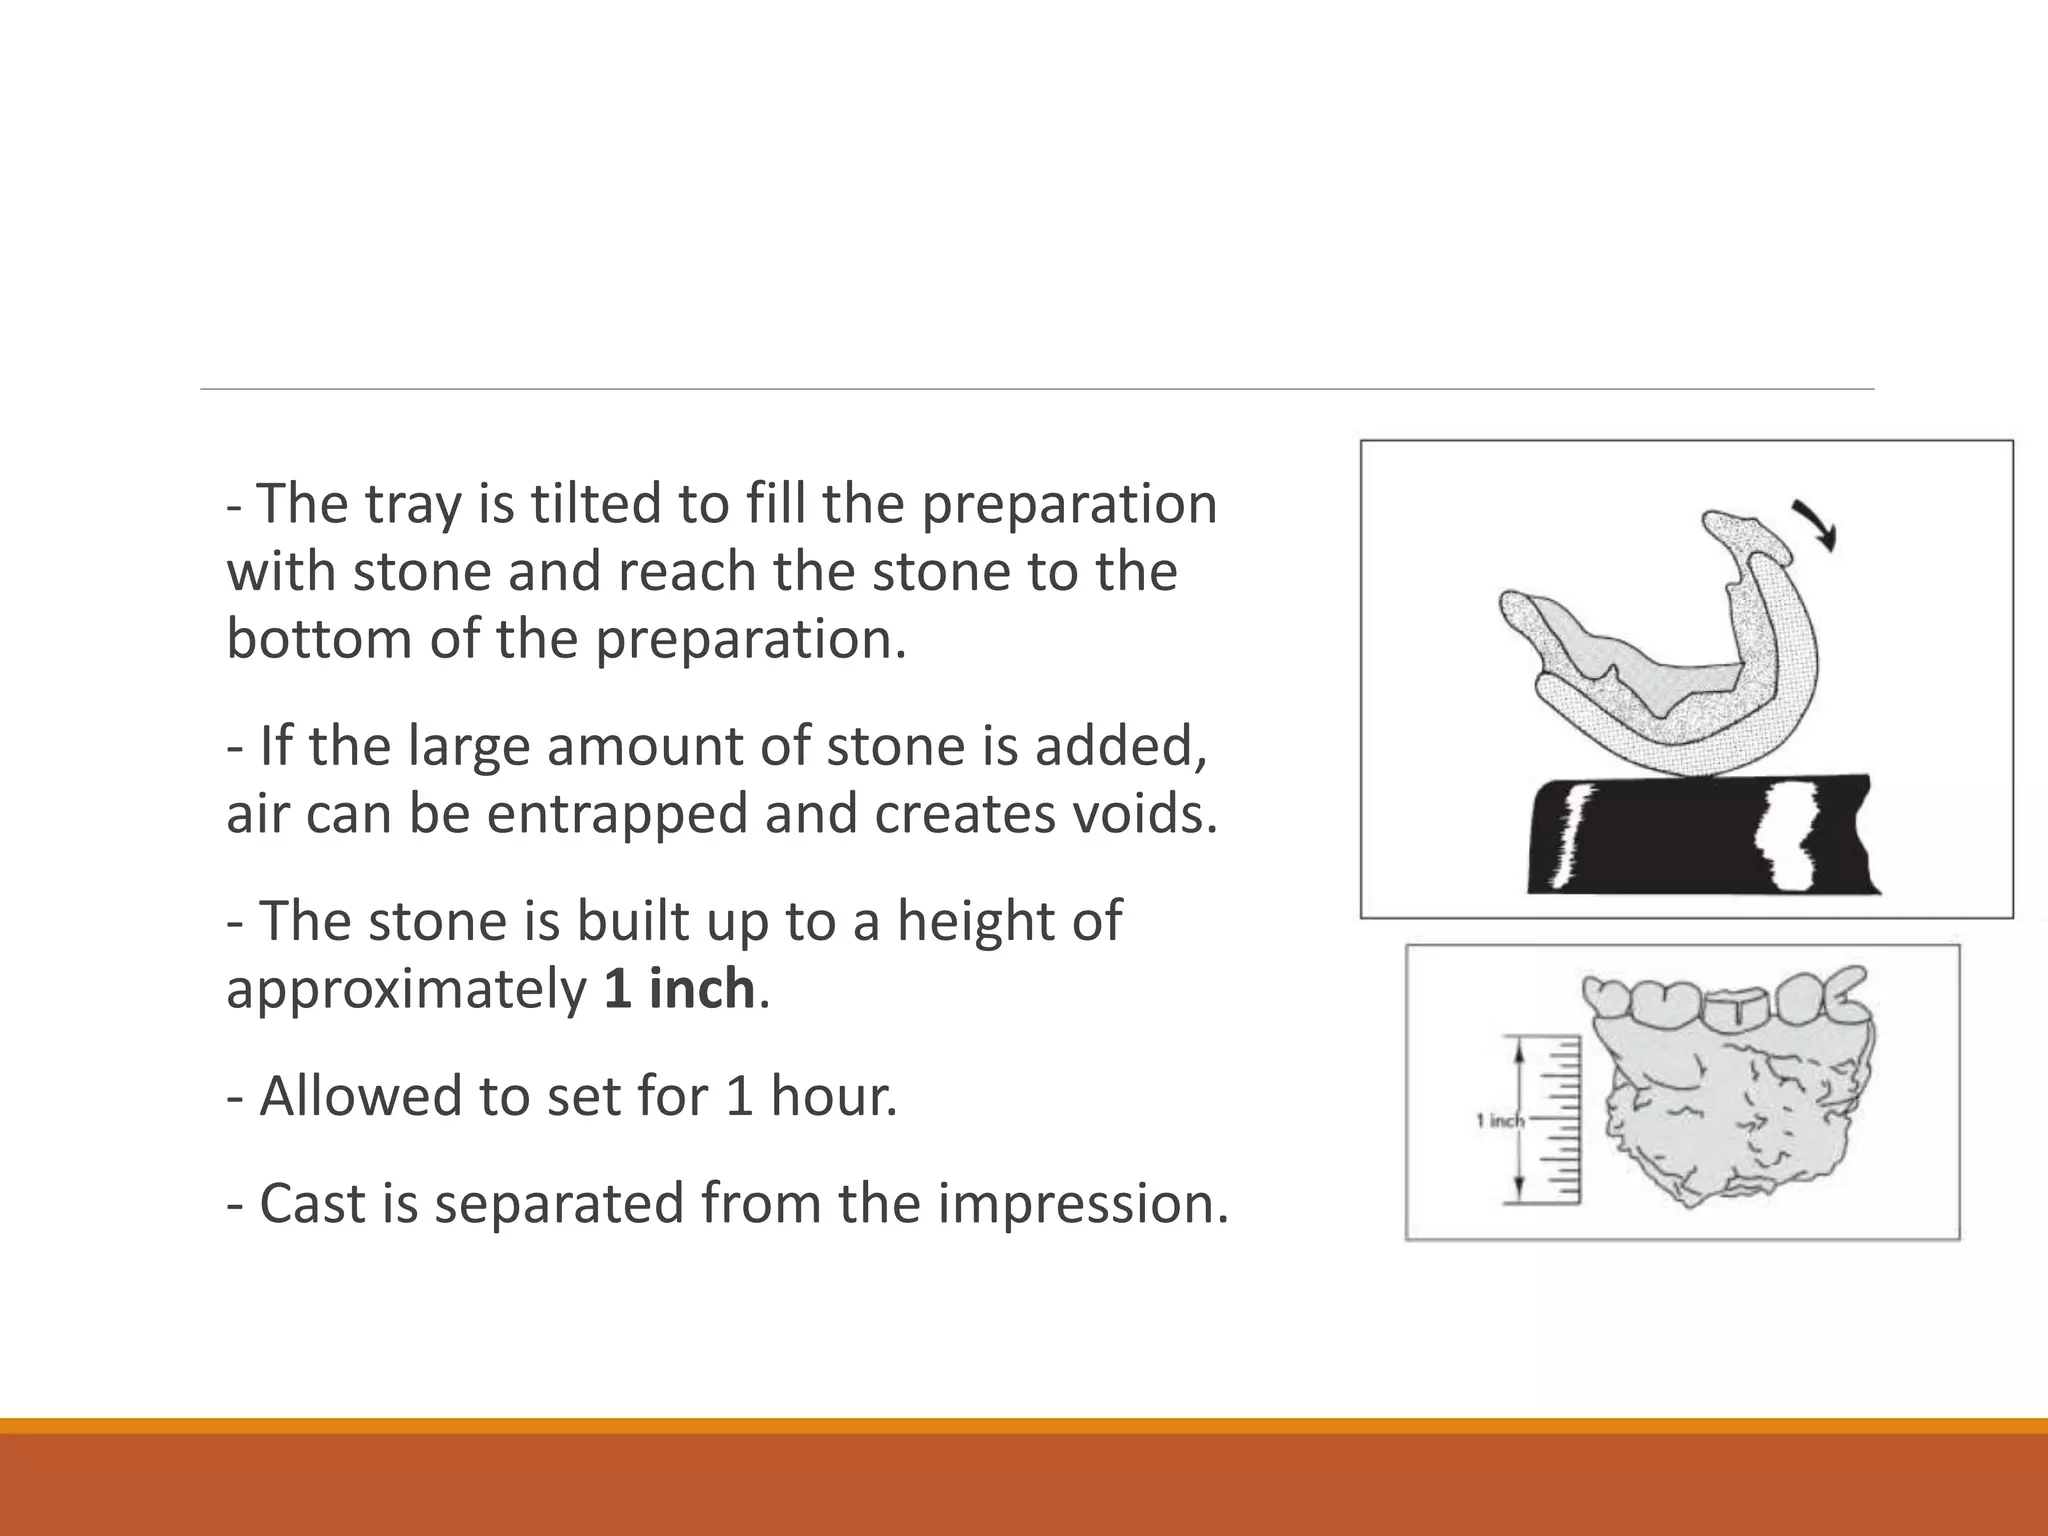
SlideShare a Scribd company logo
CASTING
PROCEDURES
D R . A A D I L T H I M W A L A
P G D E P T . O F C O N S . & E N D O .
P A R T I .
CONTENTS
•Defiinition
•History
•Casting procedures
•Preparation of working casts & dies
•Fabrication of wax patterns
•Spruing the wax pattern
•Investing the wax pattern
•Burnout of wax
•Casting of alloy
•Sand blasting & recovery
•Finishing & Polishing
•Casting defects
•Causes of defects
•Distortion
•Surface discoloration
•Incomplete casting
•Porosity
•Other casting defects
Definition
- Casting is defined as forming an object from the mold.
- GPT 8th Edn.
- Something that has been cast in a mold , an object formed by
the solidification of a fluid that has been cast into a refrectory
mold.
- GPT 9th Edn.
History
1891 – Martins Technique
- Filled the cavity with wax, removed and invested.
- After burn out poured the molten gold into mold.
-Asgar et al, 1988
1869 – Philbrook introduced the pressure casting method.
- Wax pattern formed directly into mouth and mounted on sprue
- Invested in metal ring and burnout and than alloy melted
Philips Science of Dental Materials- 12th Edn
1907 – Taggart’s presentation in the New York on fabrication of cast inlay
- First reported application of Lost-Wax Technique.
- Soon led to the casting Inlays, onlays, crowns, FPDs and framework of RPDs.
1932 – Classification of gold based alloys.
- Dental material group at the National Bureau of Standards surveyed the alloys
being used and classified as
Type- I (Soft)
Type- II (Medium)
Type- III (Hard)
Type- IV (Extra hard)
1950 – Abrahm Weinstein first produced commercially successful dental gold alloy
Philips Science of Dental Materials- 12th Edn
Steps in Casting
1) Preparation of working cast and dies-
Cast : Working cast is a cast that is mounted on an articulator.
Die : It is a model of the individual tooth on which the margins of the wax
pattern are finished.
- Requirements of good casts-
1. Must be free of bubbles
2. Must be free of distortion
3. Must be trimmed
Fundamentals of fixed Prosthodontics – Shillinberg 4th Edn.
Two basic working cast and die systems:-
1) Working cast with a separate die
2) Working cast with a removable die
1) Working cast with a separate die:
- Simple means of fabricating a working cast.
- No procedure required to create a die other than making a sectional
cast and full arch cast.
Fundamentals of fixed Prosthodontics – Shillinberg 4th Edn.
- Two pour technique is followed
Die is prepared from the first pour
Model is prepared by impression or the second pour of same
impression
Disadvantage:
- Stress during transfer of the was pattern from die to model
- Distortion of impression during removal of first cast
Technique:
-Type IV or Type V stone should be used for
fabrication of die
- Impression is washed under running water.
- Measured amount of water is placed in the bowl
- Die impression poured with 50 to 70 g of stone.
- 200 g for full arch impression
- Stone is added in the increments and vibrated.
- The tray is tilted to fill the preparation
with stone and reach the stone to the
bottom of the preparation.
- If the large amount of stone is added,
air can be entrapped and creates voids.
- The stone is built up to a height of
approximately 1 inch.
- Allowed to set for 1 hour.
- Cast is separated from the impression.
- Super-SeP (Kerr) is applied to protect the
prepared teeth to guard against the erosion when
cast is trimmed.
- There should be no stone duplicating soft tissue in
the periphery beyond the gingiva on cast.
- The cast is held by a base while it is cut down to
form a handle on the die.
- If held by preparation portion chances to get it
chipped.
- The handle should be larger in diameter and
octagonal in a cross section.
- The handle should be parallel to the long axis of
the tooth.
- It should approximately 1 inch long in the length to
facilitate a proper hold of the die.
- A pear shaped acrylic bur is used to trim the die
apical to the finish line.
- The apical area should be smooth and free of
ridges.
- The contour of the die apical to the finish line should
approximate the root.
- The wax pattern contacts, contours and occlusal morphology
is built up on working casts.
- Dies reserved for the final margination, detail adjustments ,
surface treatments and spruing.
2) Working cast with a removable die:
- Dies that can be removed form the cast.
- Convinient because wax patterns or copings need not be removed from
their respective dies.
Advantages
1. Saves time and effort by using one cast.
2. Eliminates dimentional disvrepencies.
3. Less distortion because not transferred.
Textbook of Operative Dentistry by Vimal Sikri-4th Edn.
Disadvantages:
1. Necessity for additional tools and equipments.
It should satisfy three requirments:
1. Must return to their original position.
2. Must remain stable.
3. Must be easy to mount on an articulator.
Two techniques for removable dies
1. Dowel pins
2. Strip technique
Dowel pins
- Methods to allow the repositioning of the die in the working cast.
- Most of these oriented in the impression before it is poured or
attached to the underside of the cast.
- Two systems are presented here
1) Straight dowel pins.
2) Pindex system.
Fundamentals of fixed Prosthodontics – Shillinberg 4th Edn.
1) Straight dowel pins:
- Dowel pins is positioned over each prepared tooth in the impression.
- Desired location of the pin can be marked and pins placed after
pouring with stone.
- Most accurate placement can be done by prepositioning the pins
before pouring the stone.
- There are devices made for precise positioning of dowels before
pouring.
- One such device utilizes putty on a movable table to hold an
impression in repeatable.
- Wire clips that can be stuck into the periphery of the
impression can be purchased or fashioned from the
orthodontic wire.
- Aneasthetic needles, bobby pins, paper clips, and paper
matches used to orient the dowel pins
Technique
- Dowel is placed between the arms of
bobby pin.
- Round side of the dowel in corrugations
and flat side against the flat arm of bobby
pins.
- Bobby pins positioned faciolingually
across the impression so that dowel is
centered over the preparation.
- Straight pin is pushed between the arms
of bobby pins and into the impression on
facial and lingual side.
- Dies stone is poured till the knurled end
of the pin.
- Paper clips added to stone and let it set ,
provide retention for base.
- After setting pins removed from the
impression.
- Small ball of utility was is placed on the
tip of dowel.
- 1-inch length and 0.5 inch diameter
plastic tube can be placed to identify after
base pour.
- ‘V’ shaped facio-lingual orientation groove
can be cut.
- Stone is then lubricated around each
dowel with petrolatum.
- A wet paper towel is placed into the open
lingual space.
- This will create a complete base for the
cast to be poured.
- After stone is set the cast is removed from
the impression.
- Wax at the end is located and removed
- A saw frame with a thin blade is used to
cut through the layer of die stone.
- An instrument handle is used to gently
tap on the end of the dowel to loosen the
die.
Pindex System
- Reverse drill press is used to create a
master cast with dies that can be removed
and replaced.
- Impression is poured without positioning
dowel pins.
- Machine accurately drills parallel holes
from the underside of a trimmed cast.
- Impression is poured mm of stone
beyond the edge of the tray.
- The bottom of cast trimmed on cast trimmer.
- The facio lingual width of cast should be approx.
20mm
- Pencil used to mark pins on occlusal surface of
teeth.
- Pencil marks are placed under illuminated dot.
- Thumbs used to stabilize the cast on work
tooth
- Debris removed from the pinholes with
brush.
- Cynoacrylates cemet is used to lute the pins
in their places.
- Short pin on palatal side and long pin on
buccal side.
- Sleeves placed over the pins.
- White on short pins and grey on long pins
- Long pins blocked with utility wax.
- Boxing wax is applied around the cast.
- Poured with stone.
- After setting of stone wax removed from the
pins.
- Pencil marks are made for saw cutting.
- Dies sectioned and removed.
Die Spacing:
- Main objective is to create room for the final casting-
cementing medium.
- Done to insure complete seating of the casting.
- Done using insoluble paints.
- Should be applied on the die to cover the axial walls,
cavity floor, and preparation surface short of the
circumferential tie constituents.
- Thickness should be 25 microns.
Modern Operative dentisty by Marzuck
WAX PATTERN FABRICATION
According to marzuck:
1. Create a wax mass and carve in the restoration shape.
2. Incrementally build by the restoration using was cones,
triangles, and drops.
3. Fabricate the pattern directly inraorally
4. Anatomic core technique.
Modern Operative dentisty by Marzuck
According to Anusavice
1. Direct method of wax pattern fabrication
2. Indirect method of wax pattern fabrication
Philips science of dental materials- 12th Edn.
Indications
-Tooth with easy accessibility
-Cavity preparation with minimal proximal extension.
-Cavity preparation where walls are flat, internal line angles are
sharp and gingival bevel is definite.
1) Direct method
Textbook of Operative Dentistry- Vimal sikri 4th Edn.
- Hold the stick of wax over the flame
and rotate it rapidly until it becomes
plastic.
- The soften wax shaped approximately
to the prepared cavity.
Materials used in dentistry: S. Mahalaxmi
- Insert the wax into the cavity and held
under finger pressure until it solidifies.
- The wax should be allowed to cool
gradually to mouth tempreture.
- Cold carving instrument should be used.
- Withdraw the patern carefully in the long
axis of the tooth
- The pattern shoud be touched as little as
possible with hands to avoid temperature.
Materials used in dentistry: S. Mahalaxmi
2) Indirect method
1) Incremental build up on cast.
2) Dipping method.
1) Incremetal build up:
- Suitable lubricant is applied
- Cusps with their tips are built up by addition of
wax.
- Triangular ridges of cusps are added and the
whole anatomy is produced
2) Dipping Method:
- The die can be dipped repeatedly in the hot liquid
wax
- Fossae and grooves then carved on the bulk of
wax usking PKT no. 1 and no. 4 instruments.
- Similar to functionally generated path technique.
- Pattern built with hard wax to the desired shape of the future
restoration.
- The patient is asked to go through all mandibular movements and
positions.
- Functionally generated quaderant tray and fast setting plaster is
carried to wax pattern and impression taken.
Anatomic Core Technique
Modern Operative Dentistry - Marzuck
- Anatomic core is tried in the quaderant.
- One die at a time filled with molten wax.
- The anatomic core is removed.
The next die is treated in the same way
SPRUING THE PATTERN
- Main objective is to create an inlet for the melt into the
investment mold created by the wax pattern.
- Should be formed when the pattern is on the die.
- It prevents mechanical stress.
- Helps in the proper removal of the molten wax.
- Helps to mount the pattern on the crucible former.
- Generally of three types
- Metal
- Plastic
- Wax
Modern Operative Dentistry - Marzuck
(Manapallil dental materials)
Desired characteristic of a sprue former:
1. Sprue former surface should be smooth to prevent any irregular
inlet walls.
2. Should not react with any other ingredient.
3. They should be cylindrical in shape to create perfect rounded inlet.
Textbook of Operative Dentistry- Vimal Sikri 4th Edn.
Diameter of the sprue:
- Most important fector.
- Dictates the speed by which the melt enters and fills the mold.
- The sprue diameter should be thicker than thickest part of the pattern.
- The diameter will be 8-18 gauge.
8 – 3mm
18 – 0.8mm
Length of the sprue:
- The end of the wax pattern away form the
sprue should be 1/8 – ¼ “ fro the end of the
ring.
- This allows the minimum thickness of
investment.
- Allows escape of mold gases.
- Larger ring, larger should be the sprue.
- Spatial location of pattern also influence the
length of sprue.
1/8 to ¼ “
Contemperory Fixed Prosthodontics - Rosenstiell
6 mm away
from the end
of ring
Number of sprue:
- Configurations of pattern affects the number of sprue.
Example:
-Pattern should decrease in dimension going from sprue end to
another
-One sprue in enough.
-If wax pattern have thin area between the sprue and the periphery,
the melt will solidify here.
-In such cases sprue should be used.
Location of the sprue:
- Should be attached to the bulkiest part of the
pattern
- This minimizes the effect of released residual
stresses.
- It will also ensure the tinner cross-section of the
mold.
- Should be atttahed to the least anatomical areas.
1) Areas of no grooves.
2) Cuspal anatomy
3) Fossae or ridges
- Proximal surface are the ideal location.
Angulation of the sprue former:
- Should never directed toward thin, delicate
cross section of the pattern.
- Melt should not hit these areas at 90 ֯ to
avoide fracture failure.
- Should be at 45֯ .
- At right angle it can create reverse flow of
metal.
45 ֯
- At right angle also create concavities
in the mold.
Contemporary Fixed Prsothodontics, Rosenteil 4th Edn.
The sprue-wax pattern joint:
- Most necessary when high velocity
ingeress is required.
- It should be flared to allow mold to enter
at more speed.
- Flaring gives the non obstructed flow of
molten metal by maximum dimension.
Reservior:
- Made 1-2 mm away from the joint.
- Dimension should far exceeding than
the thickest part of the thickest portion
of the pattern.
- Shape should be round or oval
Reservior
Venting:
- Always release of gases occur in the investment.
- This can be due to thickness of the investment.
- In such cases the proper investment should be chosen to give away the
waxes
- Proper thickness of investment and porosity in investment provide
adequate venting.
Removal of wax pattern & Sprue former:
- Possibilty of stressing the pattern during removal.
- Should be removed in the long axis of the tooth.
First choice:
Use the sprue former to remove the pattern.
Second choice:
Use two fingers on the both sides of the pattern.
Third choice:
- Formulate a suitable size of staple from
the paper staple or a wire.
- Staple is attached with help of sticky
wax to the farthest two end of the
pattern.
- It should be 45֯ to the pattern.
- Holding the pattern with staple it can be
removed on long axis of tooth.
FORMING THE CRICUBLE
- In most cases it is funnel shaped.
- Connected same way as the sprue is attached
to the pattern.
- Depth and inclination governed by the factors
governs by the diameter of sprue like-
Alloy density
Machine energy
Velocity
Porosity of investment.
- Made up of rubber, metal, or plastic.
- Modifications can be done by adding waxes.
- Junction between the sprue and crucible former is
covered with waxes.
Surface treatment of pattern
- Waxes are hydrophobic in nature.
- Difficult to wet them with water and investment liquid.
- It should be covered completely by investment to record all the details.
- Surface active agents (Soaps) are generally applied to the pattern.
- It reduces the surface tension, encourages the solid component, thus
provide closeness.
- Vibration also can be used during investing.
Placing the ring liner
- A ring liner is placed inside of the casting
ring.
- It should be short at one end.
- Earlier asbestos liners were used.
- Its use has been discontinued due to
health hazard from breathing its dust
Types of Non asbestos ring liners Used are:
— Fibrous ceramic aluminous silicate
— Cellulose (paper)
— Ceramic-cellulose combination
Functions of the Ring Liner:
1. Allows for mold expansion (acts as a cushion)
2. When the ring is transferred from the furnace to the casting machine
it reduces heat loss as it is a thermal insulator
3. Permits easy removal of the investment after casting.
INVESTMENT OF THE WAX PATTERN
- Main objective is to catch all the details of the
wax pattern.
- Investing materials
1) Gypsum bonded
2) Phosphate bonded
3) Ethyl silica bonded
Principles of investing:
1) Choice of the ring:
- For hygroscopic expansion technique- rubber ring is used.
- For thermal expansion- metal ring.
- Diameter and length of the ring should be selected to allow for
the desired dimension of the mold walls.
2) Preparation of the ring for non-confinement of the investment
expansion:
- in such cases rubber ring is used.
3) Assembling the ring and the crucible former:
- For low fusing class I and class II alloys it is possible to attach the stone
die to wax pattern and invest them together.
4) Preparation of the investment to mix:
- Distilled water or indicated liquid is used for mixing.
- Mechanical vaccum mixing used to lessen voids.
5) Adding the investment mix to the wax pattern
and filling the ring.
- Done under vibration of vaccum.
6) Facilitating the desired setting through
hygroscopic expansion during hardening the
investment.
7) Removal of solid or non burnable sprue
former:
- Crucible former detached from the ring.
- The sprue fomer if not going to be left in the
investment wax complex, removed.
Investment of the pattern
- Pattern invested with suitable investment material.
Two methods for investing the prepared pattern:
1) Manual investing
2) Vaccum investing
Textbook of Operative Dentistry: Vimal Sikri 4th Edn.
1) Manual investing:
- Water and powder incorporated in an appropriate ratio in a rubber
bowl.
- With hand spatula the mix is mixed in the rotating motion.
- Mixing is done for 1 minute.
- Placed on the vibrating table and stirred very slowly for 0 sec to
remove trapped air.
- Investment poured into the pattern.
- Allowed to set for 1 hour
2) Vaccum mixing:
- Investment is mixed in the vaccum mixer and
pattern invested under vaccum.
- Vaccum investing equipment available in the
market.
Method:
- Invest and water is taken bowl.
- Mix is placed in mixing unit.
- Unit is motor driven, and the air evacuated by
means of tube attached to the mixing unit form the
vaccum pump.
- Evacuation of air will reduce the possibility of
bubble formation
BURNOUT OF THE WAX
- It is the heating of the casting ring with the
invested wax pattern in the furnace.
Placement of ring in the burnout furnace:
- The invested casting ring is placed in a room
temperature.
- First placed on a rubber ceramic tray in
furnace, facing down to drain the wax.
- This slows molten wax to flow out.
Materials used in dentisty: S. Mahalaxmi
- Temperature is than increased , when reaches to 300 degree, the ring
is inverted.
- This allows the circulation of oxygen within the oven in the mold
cavity.
- Also inverting prevents the carbon formation
Two Stage burnout procedure
- Depend upon the sprue former used.
- For plastic sprue the two stage burnout is used.
- Plastic needs time to melt, first stage allows the softening of the
plastic.
- Second stage, the ring is inverted and placed with the sprue end
downward to allow total elimination.
Burnout tempratures
Type of investment Type of
expansion
Maximum temp. Time
Gypsum bonded Hygroscopic 500 C / 900 F 1 hr.
Gypsum bonded Thermal 700 C / 1200 F 1 hr
Phosphate bonded Thermal 700 – 1030 C 45
mins
Ethyl silica bonded Thermal 1090- 1130 C
Procedure for wax burnout
- Casting ring should be placed at the room temperature.
- The temperature should be gradually increased.
- Rapid heating generate steam, causing flaxing of the mold walls.
- Investments are poor conductors of heat.
- Placing directly in the heated furnace will result in the rapid change in
the temp. that can result in the flaxing or cracking the investment.
- Ring should be placed in the furnace for 45-90 minutes.
Time lapse b/w burnout and the wax:
- 1 minute may be allowed between removal of casting ring from the
burnout.
- To prevent the heat loss the casting ring is maintained at the max
temp.
Casting crucibles
-The alloy during melting placed in the
crucible.
- The crucible should
1. Not cause reaction with the alloy
resulting in contamination of alloy.
2. It should withstand the temp. of the
melting torch.
Crucibles used for dif types of alloys
Clay – High noble and noble alloys
Carbon – Noble alloys for crown
Aluminium – High fusing alloys
Quartz – High fusing alloys
- carbon crucible should not be used with high palladium, silver-palladium,
nickel–chromium, and cobalt-chromium alloys.
MELTING OF THE ALLOY
- Alloy should be heated as quickly as possible
to a completely molten state above its liquid
temp.
- At the same time, it should not be so hot
that it begins to oxidize or that crystallization
is delayed when it reaches the extremities of
the mold cavity.
- Gold alloys ball up and have a mirror like
shining surface that appears to be spinning.
Methods of casting
1) Torch melting
2) Vaccum casting machine
3) Casting using centrifugal machine
4) Induction casting machine
5) Direct current arc melting
1) Torch melting
- Fuel mostly used is a mixtures of natural or artificial gas
and air.
- The alloy melted using the reducing flame of gas torch.
- Torches are of two types
1) Single artificial tip:
- Concentrate more heat on the area.
2) Multiorifice tip:
- Distribute the heat over wider area enabling uniform
heating
- Used for casting metal ceramic.
Mixing zone
Cumbusion zone
Reducing zone
Oxidizing zone
Zones of flame
A properly adjusted torch develops adequate temperatures
of 870°C–1000°C for melting dental alloys whose melting
ranges are within these temperatures.
1) Mixing zone:
- Long cone emerging directly from the
nozzle of the torch.
- Air and gases are mixed in this zone
2) Combustion zone:
-Immediately surrounding the inner zone.
- Green in color and known as combustion
zone
-Gas and air are partially burned.
3) Reducing zone:
- Blue in color and located outside the combustion zone.
- Hottest part of the flame
- kept in contact with the alloy.
4) Oxidizing zone:
- Outermost zone of the flame
- Not used to melt the alloy
Centrifugal casting machine
- Various designs are available
- Molten metal forced into the mold by
centrifugal force.
- Force is created by spring wound.
- It is winding the arm of the casting
machine 2–5 turns.
- The crucible is attached to the free
arm also known as the broken arm.
- Spring is wound and locked.
- Once the alloy is melted after ring placement the spring is released.
- This initiates the rotational motion.
- Molten metal moves to the mold.
Induction casting
- Melted in electrical induction furnace
- Currents generated within metal and
resistance lead to heating of the metal.
- Induction heater consist of electromagnet
is used.
- High frequency current will melt the metal.
Arc melting
- Alloy is vaccum melted and cast by pressure in an
argon atmostphere.
- Currents produced between 2 electrodes.
- Temp generates are 4000 C .
- Alloy melts very quickly in this method.
- One of the advantage as alloy melts within
seconds.
Materials used in dentistry: S. Mahalaxmi
Vaccum Casting
- Titanium and its alloys require vaccum are
heating argon pressure casting.
- Melting point for titanium is 1071 C
- Vaccum is applied beneath the casting ring
and molten alloy can drawn into by suction
Divesting
- Removal of casting from the investment
mould.
- After divesting all the casting undergoes three
main steps
1) Quenching
2)Sand blasting.
3)Pickling.
1) Quenching:
- For noble metal alloys the ring is removed and
immediately quenched in water.
- Quenching enables the metal to burnish.
- Investment undergo violent reaction resulting
in the crumbling of the granular investment.
- This makes the casting to be removed easily.
2) Sand blasting:
- The oxide layer and any remaining
particles of investment are removed by
lightly air abrading.
- All surfaces abraded with a 50-μm
abrasive.
3) Pickling:
- After removal the castings covered by dark
oxides.
- Removed by the process called pickling.
- This involves soaking the casting in a hot acid
solution for several minutes.
- 50 % HCL is recommended for pickling.
Finishing & Polishing
- Clean all the debris, inner surface should be inspected first.
- Should never be tried on stone until inner surface is evaluated.
Technique:
- Gold being soft should be finished at slow speed.
- Initial contouring should be done with carbide burs.
- Silicone carbide green stone or heatless polymer stone.
- Finishing is done with Aluminium oxide (pink) stone or medium grade
impregnated rubber cups, wheels and points.
CASTING DEFECTS
- Errors in the procedure often results in defective castings.
- The casting in such a case may not fit or may have poor esthetic and
mechanical properties.
- Innumerable steps in casting may create many problems in casting
leads to casting defects.
1) Distortion
2) Surface roughness and other surface defects
3) Porosity
4) Incomplete casting
5) Contaminated casting
Distortion
- Distortion of wax pattern may occur during removal.
Causes:
- Thermal changes
- Improper handling during removal
- Distortion during storage
- Relaxation of stresses
- Distortion during removal of die
Textbook of Operative Dentistry: Vimal Sikri 4th ed
Prevention:
- Hard wax should be used, because soft wax is more susceptible to
temperature changes.
- Careful handling during removal of the pattern.
- Stresses can be minimized by softening the wax at uniform temp. of 50
C
- Wax should be added in smaller increments.
- Should be invested immediately.
Surface Roughness
- Surface roughness defined as finely spaced surface
imperfections.
Causes:
- Air bubbles on the wax pattern.
- Too rapid heating during burn-out.
- Higher water powder ratio gives rough casting.
- Prolonged heating of pattern.
Textbook of Operative Dentistry: Vimal Sikri 4th ed
- Foreign body inclusion.
- Larger particle size of silica.
- Too high or too low casting pressure.
- Excess surfactant.
Prevention:
- Proper burn out and adequate heating time.
- Smaller particle size of silica in the investment.
- Pressure should be 15 lbs/Sq. inch
- Proper water powder ratio.
- Air bubbles can be avoided by vibrating the mixture before and after
mixing
Noduls in casting:
- Large nodules due to air trapped during
casting.
- Multiple nodules because of inadequate
vaccum during investing.
- Improper brush technique
- Lack of surfactant
- Nodules on occlusal surface can be
because of excessive vibration.
Contemporary fixed prosthodontics: Rosenstiel 5th edn.
Avoided by:
- Even minute nodules can limit the seating of the
casting.
- When they are large or situated on a margin, they
usually necessitate remaking of the restoration.
- A binocular microscope is extremely helpful for
detecting and removing nodules.
- When small nodules present, they can often
be removed with a No. 4 or No. 2 round bur.
- A slight excess of metal should be removed
to ensure that the nodule does not interfere
with complete seating.
- Can be avoided by careful investing
technique.
- Use of a surfactant
- Vacuum spatulation, and careful coating of
the wax pattern with investment
Contemporary fixed prosthodontics: Rosenstiel 5th edn.
Fins:
- Caused by cracks in the investment that
have been filled with molten metal.
- Excessive casting force.
- Steam generated from too-rapid heating.
- Reheating an invested pattern.
Contemporary fixed prosthodontics: Rosenstiel 5th edn.
- Improperly situated pattern (too close to the
periphery of the casting ring)
- Rough handling of the ring after investing
- Premature heating (mold still wet)
- Increased water-to-powder ratio
Porosity
- It can be internal or external.
- External porosity can cause discoloration.
- Severe porosity at the tooth restoration
interphase can even cause secondary caries.
- Internal porosity weakens the restoration.
- They are categorized as
1) Solidification defects
A. Localized shrinkage porosity
B. Suck back porosity
C. Microporosity
2) Porosity due to gases
A. Pinhole porosity
B. Gas inclusions
3) Sub surface porosity
4) Back pressure porosity
1) Localized shrinkage porosity:
- Usually found near the sprue-
casting junction.
- Occurs when the cooling sequence is
increased and the sprue freezes
before the rest.
- Allows main molten metal to flow
into the mould.
- If sprue solidifies before the rest of
casting
Avoided by-
A. Using sprue of correct thickness
B. Attach sprue to thickest part of pattern
C. Flaring the sprue at the point of attachment or placing a reservoir
close to the wax pattern.
D. Placing sprue in such a way so that a hot spot formation is avoided.
E. Not using an excessively long sprue
F. Reducing the mold-melt temperature difference.
Textbook of operative dentistry : Vimal sikri 4th Edn.
2) Suckback porosity:
- Variation of shrink spot porosity.
- External void on crown apposite to sprue.
- Hot spot created by the hot metal impinging on
the mold wall.
- Sprue already solidified result in suck back
porosity.
- Avoided by reducing temp. different between
mold and molten alloy.
3) Micro porosity:
- Fine irregular void within casting
- Occur when casting cools too rapidly.
- Temp should be reduced gradually
Porosities due to gases-
1) Pin hole porosity:
- The metal absorbs gases when it is in molten state
- Upon solidification, the absorbed gases are expelled
- Casues tiny voids.
2) Gas inclusion porosity:
- Gas occluded from a poorly adjusted blowpipe flame.
- If the reducing zone of the flame is not used.
- larger than the pin hole type
2) Back Presure porosity:
- Caused by inadequate venting.
- Trapped gases within investment.
- Metal enters into mold they are pushed out and create pressure.
Avoided by:
- Using adequate casting force
- Using investment of adequate porosity
- Place pattern not more than 6 to 8 mm away from the end of the ring.
- Providing vents in large castings
3) Subsurface porosity:
- The exact reason for this has not been established.
- May be due to the simultaneous nucleation of solid grains.
- Can be avoided by controlling the rate at which the molten metal
enters the mold.
Incomplete casting
Causes:
- Insufficient alloy used.
- Alloy not able to enter thin parts of mold
- Mold is not heated to casting temperature.
- Premature solidification of alloy.
- Sprues are blocked with foreign bodies.
- Back pressure due to gases in mold cavity.
- Low casting pressure.
- Alloy not sufficiently molten or fluid.
- If compensation for shrinkage of alloy is not
done by adequate expansion of mold cavity.
- shrinkage of the impression material.
- If an area of wax is too thin (less than 0.3
mm)
- insufficient casting force
- inadequate heating of the metal
Avoided by:
- Use larger size of sprue former.
- Have casting temperature at least 150°F (57°C) above fusion
temperature of alloy.
- Mold should soak heat for approximately one hour at burnout
temperature.
- Mold should be removed from burnout oven and casting completed
within one minute.
- Use the adequate amount of force for casting
Shiny casting with rounded margins:
- When the wax is not completely eliminated, it
combines with oxygen or air in the mold cavity
forming carbon monoxide.
- gas prevents the oxidation of the surface of
the casting gold with the result the casting to
be shiny.
- The formation of gas in the mold is so rapid
that it also has a back pressure effect.
Pits in casting:
- Caused by residual debris in mold.
- Use of dirty wax.
- Loose debris in crucible.
Avoided by:
- Use clean, new wax for patterns and sprue.
- Use clean crucible for each casting.
Contaminated casting
A casting can be contaminated due to:
1. Oxidation, caused by:
—Overheating the alloy
—Use of oxidizing zone of flame
—Failure to use flux
2. Sulphur compounds, formed by the breakdown of the
investment when the ring is overheated.
Avoid by
—Not overheating alloy
—Use reducing zone of the flame
—Use flux.
Discoloration
- Contamination with copper during pickling.
- Contamination with mercury.
- By avoiding the use of steel tongs to hold casting during
pickling.
- If used then the tips of the tongs should be covered with
rubber.
- Castings should never be placed with amalgam dies or kept
on a table where amalgam scrap is present
Black Casting
Can be due to two reasons:
1. Overheating the investment above 700°C causes it to decompose liberating
sulphur or sulphur compounds. They readily combine with the metals in
gold alloy forming a sulfide film. This gives a dark casting which cannot be
cleaned by pickling.
2. A black casting can be also due to incomplete elimination of the wax pattern,
as a result of heating the mold at too low temperature. A carbonized wax
remains which sticks to the surface of the casting. It can be removed by
heating over a flame.
THANK YOU
References
1. Phillips science of dental materials 12th Edn.
2. Materials used in dentistry : S. Mahalaxmi.
3. Basic dental materials: John. J . Manapallil 3rd end.
4. Contemporary fixed prosthodontics: Rosentstiel 5th edn.
5. Fundamentals of fixed prosthodontics: Shillingberg 4th edn.
6. Textbook of operative dentistry, Vimal sikri 4th edn.
7. Modern Operative dentisty by Marzuck

More Related Content

What's hot

Investment materials
Investment materialsInvestment materials
Investment materials
Lama K Banna
 
CASTING PROCEDURES AND DEFECTS
CASTING PROCEDURES AND DEFECTSCASTING PROCEDURES AND DEFECTS
CASTING PROCEDURES AND DEFECTS
NAMITHA ANAND
 
Finishing and polishing materials
Finishing and polishing materialsFinishing and polishing materials
Finishing and polishing materials
Dr Arpita Dutta
 
Abrasive agents in dentistry
Abrasive agents in dentistryAbrasive agents in dentistry
Abrasive agents in dentistry
Dr. Arpit Viradiya
 
Direct filling gold
Direct filling goldDirect filling gold
Direct filling gold
Parth Thakkar
 
Casting Procedures & Casting Defects in Dentistry
Casting Procedures & Casting Defects in DentistryCasting Procedures & Casting Defects in Dentistry
Casting Procedures & Casting Defects in Dentistry
Jehan Dordi
 
Casting procedure
Casting procedureCasting procedure
Casting procedure
Rajan Kumar
 
Direct filling gold
Direct filling goldDirect filling gold
Direct filling gold
SauravShelke
 
Dental Ceramics and Porcelain fused to metal
Dental Ceramics and Porcelain fused to metal Dental Ceramics and Porcelain fused to metal
Dental Ceramics and Porcelain fused to metal
isabel
 
Denture Base Resin
Denture Base Resin Denture Base Resin
Denture Base Resin
Self employed
 
Setting expansion of Gypsum
Setting expansion of GypsumSetting expansion of Gypsum
Setting expansion of Gypsum
Parikshit Harnoor
 
Investing and Casting
Investing and CastingInvesting and Casting
Investing and Casting
Lina Nashawati
 
Dental casting investment material
Dental casting investment materialDental casting investment material
Dental casting investment material
Rajan Kumar
 
Investment materials
Investment materialsInvestment materials
Investment materials
payal singh
 
Heat cure acrylic
Heat cure acrylicHeat cure acrylic
Heat cure acrylic
Aamir Godil
 
Spruing,casting and investing
Spruing,casting and investingSpruing,casting and investing
Spruing,casting and investing
Mahmoud Nihad
 
Dental waxs
Dental waxsDental waxs
Dental waxs
shammasm
 
Casting defects in dentistry
Casting defects in dentistry Casting defects in dentistry
Casting defects in dentistry
DrAnuprabha Shrivastav
 
Investment materials
Investment materialsInvestment materials
Investment materials
Priyanka Makkar
 
Dental ceramics
Dental ceramicsDental ceramics
Dental ceramics
Nishu Priya
 

What's hot (20)

Investment materials
Investment materialsInvestment materials
Investment materials
 
CASTING PROCEDURES AND DEFECTS
CASTING PROCEDURES AND DEFECTSCASTING PROCEDURES AND DEFECTS
CASTING PROCEDURES AND DEFECTS
 
Finishing and polishing materials
Finishing and polishing materialsFinishing and polishing materials
Finishing and polishing materials
 
Abrasive agents in dentistry
Abrasive agents in dentistryAbrasive agents in dentistry
Abrasive agents in dentistry
 
Direct filling gold
Direct filling goldDirect filling gold
Direct filling gold
 
Casting Procedures & Casting Defects in Dentistry
Casting Procedures & Casting Defects in DentistryCasting Procedures & Casting Defects in Dentistry
Casting Procedures & Casting Defects in Dentistry
 
Casting procedure
Casting procedureCasting procedure
Casting procedure
 
Direct filling gold
Direct filling goldDirect filling gold
Direct filling gold
 
Dental Ceramics and Porcelain fused to metal
Dental Ceramics and Porcelain fused to metal Dental Ceramics and Porcelain fused to metal
Dental Ceramics and Porcelain fused to metal
 
Denture Base Resin
Denture Base Resin Denture Base Resin
Denture Base Resin
 
Setting expansion of Gypsum
Setting expansion of GypsumSetting expansion of Gypsum
Setting expansion of Gypsum
 
Investing and Casting
Investing and CastingInvesting and Casting
Investing and Casting
 
Dental casting investment material
Dental casting investment materialDental casting investment material
Dental casting investment material
 
Investment materials
Investment materialsInvestment materials
Investment materials
 
Heat cure acrylic
Heat cure acrylicHeat cure acrylic
Heat cure acrylic
 
Spruing,casting and investing
Spruing,casting and investingSpruing,casting and investing
Spruing,casting and investing
 
Dental waxs
Dental waxsDental waxs
Dental waxs
 
Casting defects in dentistry
Casting defects in dentistry Casting defects in dentistry
Casting defects in dentistry
 
Investment materials
Investment materialsInvestment materials
Investment materials
 
Dental ceramics
Dental ceramicsDental ceramics
Dental ceramics
 

Similar to CASTING PROCEDURES AND DEFECTS

8.working casts and dies
8.working casts and dies8.working casts and dies
8.working casts and dies
Lama K Banna
 
Definitive casts and dies
Definitive casts and diesDefinitive casts and dies
Definitive casts and dies
hesham1964
 
Working casts and dies
Working casts and diesWorking casts and dies
Working casts and dies
Lama K Banna
 
Lab procedures in fabrication of CPD- Dr Prathibha
Lab procedures in fabrication of CPD- Dr PrathibhaLab procedures in fabrication of CPD- Dr Prathibha
Lab procedures in fabrication of CPD- Dr Prathibha
Dr Prathibha Prasad
 
operative dentistry
operative dentistryoperative dentistry
operative dentistry
ddert
 
shlinberg casts and die 87-9-5
shlinberg casts and die 87-9-5shlinberg casts and die 87-9-5
shlinberg casts and die 87-9-5
Private Office
 
Wax patterns fabrication for fixed partial dentures
Wax patterns fabrication for fixed partial denturesWax patterns fabrication for fixed partial dentures
Wax patterns fabrication for fixed partial dentures
Shebin Abraham
 
Die materials and sysytem
Die materials and  sysytemDie materials and  sysytem
Die materials and sysytem
Dr.shiva sai vemula
 
Impression Techniques in Fixed partial denture
Impression Techniques in Fixed partial dentureImpression Techniques in Fixed partial denture
Impression Techniques in Fixed partial denture
Dr.Richa Sahai
 
LAB PROCEDURES IN CPD
LAB PROCEDURES IN CPDLAB PROCEDURES IN CPD
LAB PROCEDURES IN CPD
DiyaSharma39
 
custom tray.pptx
custom tray.pptxcustom tray.pptx
custom tray.pptx
reemeltyeb
 
working casts and dies.ppt
working casts and dies.pptworking casts and dies.ppt
working casts and dies.ppt
Shrimant Raman
 
Lab procedures in complete denture prosthodontics/prosthodontic courses
Lab procedures in complete denture prosthodontics/prosthodontic coursesLab procedures in complete denture prosthodontics/prosthodontic courses
Lab procedures in complete denture prosthodontics/prosthodontic courses
Indian dental academy
 
Lab procedures in complete denture prosthodontics/ dental education in india
Lab procedures in complete denture prosthodontics/ dental education in indiaLab procedures in complete denture prosthodontics/ dental education in india
Lab procedures in complete denture prosthodontics/ dental education in india
Indian dental academy
 
Diagnosis and Space analysis in Orthodontics.pptx
Diagnosis and Space analysis in Orthodontics.pptxDiagnosis and Space analysis in Orthodontics.pptx
Diagnosis and Space analysis in Orthodontics.pptx
ManuelKituzi
 
Working cast and dies /certified fixed orthodontic courses by Indian dental a...
Working cast and dies /certified fixed orthodontic courses by Indian dental a...Working cast and dies /certified fixed orthodontic courses by Indian dental a...
Working cast and dies /certified fixed orthodontic courses by Indian dental a...
Indian dental academy
 
COMPLEX AMALGAM RESTORATIONS.pptx
COMPLEX AMALGAM RESTORATIONS.pptxCOMPLEX AMALGAM RESTORATIONS.pptx
COMPLEX AMALGAM RESTORATIONS.pptx
DrDithykk
 
record_bases-.ppt
record_bases-.pptrecord_bases-.ppt
record_bases-.ppt
BVDU dental college Sangli
 
Record bases and Occlusal rims ppt
Record bases and Occlusal rims pptRecord bases and Occlusal rims ppt
Record bases and Occlusal rims ppt
Dr. Arbiya Anjum S
 
Laboratory procedures in rpd- Kelly
Laboratory procedures in rpd- KellyLaboratory procedures in rpd- Kelly
Laboratory procedures in rpd- Kelly
Kelly Norton
 

Similar to CASTING PROCEDURES AND DEFECTS (20)

8.working casts and dies
8.working casts and dies8.working casts and dies
8.working casts and dies
 
Definitive casts and dies
Definitive casts and diesDefinitive casts and dies
Definitive casts and dies
 
Working casts and dies
Working casts and diesWorking casts and dies
Working casts and dies
 
Lab procedures in fabrication of CPD- Dr Prathibha
Lab procedures in fabrication of CPD- Dr PrathibhaLab procedures in fabrication of CPD- Dr Prathibha
Lab procedures in fabrication of CPD- Dr Prathibha
 
operative dentistry
operative dentistryoperative dentistry
operative dentistry
 
shlinberg casts and die 87-9-5
shlinberg casts and die 87-9-5shlinberg casts and die 87-9-5
shlinberg casts and die 87-9-5
 
Wax patterns fabrication for fixed partial dentures
Wax patterns fabrication for fixed partial denturesWax patterns fabrication for fixed partial dentures
Wax patterns fabrication for fixed partial dentures
 
Die materials and sysytem
Die materials and  sysytemDie materials and  sysytem
Die materials and sysytem
 
Impression Techniques in Fixed partial denture
Impression Techniques in Fixed partial dentureImpression Techniques in Fixed partial denture
Impression Techniques in Fixed partial denture
 
LAB PROCEDURES IN CPD
LAB PROCEDURES IN CPDLAB PROCEDURES IN CPD
LAB PROCEDURES IN CPD
 
custom tray.pptx
custom tray.pptxcustom tray.pptx
custom tray.pptx
 
working casts and dies.ppt
working casts and dies.pptworking casts and dies.ppt
working casts and dies.ppt
 
Lab procedures in complete denture prosthodontics/prosthodontic courses
Lab procedures in complete denture prosthodontics/prosthodontic coursesLab procedures in complete denture prosthodontics/prosthodontic courses
Lab procedures in complete denture prosthodontics/prosthodontic courses
 
Lab procedures in complete denture prosthodontics/ dental education in india
Lab procedures in complete denture prosthodontics/ dental education in indiaLab procedures in complete denture prosthodontics/ dental education in india
Lab procedures in complete denture prosthodontics/ dental education in india
 
Diagnosis and Space analysis in Orthodontics.pptx
Diagnosis and Space analysis in Orthodontics.pptxDiagnosis and Space analysis in Orthodontics.pptx
Diagnosis and Space analysis in Orthodontics.pptx
 
Working cast and dies /certified fixed orthodontic courses by Indian dental a...
Working cast and dies /certified fixed orthodontic courses by Indian dental a...Working cast and dies /certified fixed orthodontic courses by Indian dental a...
Working cast and dies /certified fixed orthodontic courses by Indian dental a...
 
COMPLEX AMALGAM RESTORATIONS.pptx
COMPLEX AMALGAM RESTORATIONS.pptxCOMPLEX AMALGAM RESTORATIONS.pptx
COMPLEX AMALGAM RESTORATIONS.pptx
 
record_bases-.ppt
record_bases-.pptrecord_bases-.ppt
record_bases-.ppt
 
Record bases and Occlusal rims ppt
Record bases and Occlusal rims pptRecord bases and Occlusal rims ppt
Record bases and Occlusal rims ppt
 
Laboratory procedures in rpd- Kelly
Laboratory procedures in rpd- KellyLaboratory procedures in rpd- Kelly
Laboratory procedures in rpd- Kelly
 

Recently uploaded

Advanced Java[Extra Concepts, Not Difficult].docx
Advanced Java[Extra Concepts, Not Difficult].docxAdvanced Java[Extra Concepts, Not Difficult].docx
Advanced Java[Extra Concepts, Not Difficult].docx
adhitya5119
 
Main Java[All of the Base Concepts}.docx
Main Java[All of the Base Concepts}.docxMain Java[All of the Base Concepts}.docx
Main Java[All of the Base Concepts}.docx
adhitya5119
 
Philippine Edukasyong Pantahanan at Pangkabuhayan (EPP) Curriculum
Philippine Edukasyong Pantahanan at Pangkabuhayan (EPP) CurriculumPhilippine Edukasyong Pantahanan at Pangkabuhayan (EPP) Curriculum
Philippine Edukasyong Pantahanan at Pangkabuhayan (EPP) Curriculum
MJDuyan
 
NEWSPAPERS - QUESTION 1 - REVISION POWERPOINT.pptx
NEWSPAPERS - QUESTION 1 - REVISION POWERPOINT.pptxNEWSPAPERS - QUESTION 1 - REVISION POWERPOINT.pptx
NEWSPAPERS - QUESTION 1 - REVISION POWERPOINT.pptx
iammrhaywood
 
UGC NET Exam Paper 1- Unit 1:Teaching Aptitude
UGC NET Exam Paper 1- Unit 1:Teaching AptitudeUGC NET Exam Paper 1- Unit 1:Teaching Aptitude
UGC NET Exam Paper 1- Unit 1:Teaching Aptitude
S. Raj Kumar
 
How to Setup Warehouse & Location in Odoo 17 Inventory
How to Setup Warehouse & Location in Odoo 17 InventoryHow to Setup Warehouse & Location in Odoo 17 Inventory
How to Setup Warehouse & Location in Odoo 17 Inventory
Celine George
 
LAND USE LAND COVER AND NDVI OF MIRZAPUR DISTRICT, UP
LAND USE LAND COVER AND NDVI OF MIRZAPUR DISTRICT, UPLAND USE LAND COVER AND NDVI OF MIRZAPUR DISTRICT, UP
LAND USE LAND COVER AND NDVI OF MIRZAPUR DISTRICT, UP
RAHUL
 
RHEOLOGY Physical pharmaceutics-II notes for B.pharm 4th sem students
RHEOLOGY Physical pharmaceutics-II notes for B.pharm 4th sem studentsRHEOLOGY Physical pharmaceutics-II notes for B.pharm 4th sem students
RHEOLOGY Physical pharmaceutics-II notes for B.pharm 4th sem students
Himanshu Rai
 
Your Skill Boost Masterclass: Strategies for Effective Upskilling
Your Skill Boost Masterclass: Strategies for Effective UpskillingYour Skill Boost Masterclass: Strategies for Effective Upskilling
Your Skill Boost Masterclass: Strategies for Effective Upskilling
Excellence Foundation for South Sudan
 
ZK on Polkadot zero knowledge proofs - sub0.pptx
ZK on Polkadot zero knowledge proofs - sub0.pptxZK on Polkadot zero knowledge proofs - sub0.pptx
ZK on Polkadot zero knowledge proofs - sub0.pptx
dot55audits
 
What is Digital Literacy? A guest blog from Andy McLaughlin, University of Ab...
What is Digital Literacy? A guest blog from Andy McLaughlin, University of Ab...What is Digital Literacy? A guest blog from Andy McLaughlin, University of Ab...
What is Digital Literacy? A guest blog from Andy McLaughlin, University of Ab...
GeorgeMilliken2
 
Beyond Degrees - Empowering the Workforce in the Context of Skills-First.pptx
Beyond Degrees - Empowering the Workforce in the Context of Skills-First.pptxBeyond Degrees - Empowering the Workforce in the Context of Skills-First.pptx
Beyond Degrees - Empowering the Workforce in the Context of Skills-First.pptx
EduSkills OECD
 
A Independência da América Espanhola LAPBOOK.pdf
A Independência da América Espanhola LAPBOOK.pdfA Independência da América Espanhola LAPBOOK.pdf
A Independência da América Espanhola LAPBOOK.pdf
Jean Carlos Nunes Paixão
 
Wound healing PPT
Wound healing PPTWound healing PPT
Wound healing PPT
Jyoti Chand
 
Film vocab for eal 3 students: Australia the movie
Film vocab for eal 3 students: Australia the movieFilm vocab for eal 3 students: Australia the movie
Film vocab for eal 3 students: Australia the movie
Nicholas Montgomery
 
clinical examination of hip joint (1).pdf
clinical examination of hip joint (1).pdfclinical examination of hip joint (1).pdf
clinical examination of hip joint (1).pdf
Priyankaranawat4
 
The basics of sentences session 6pptx.pptx
The basics of sentences session 6pptx.pptxThe basics of sentences session 6pptx.pptx
The basics of sentences session 6pptx.pptx
heathfieldcps1
 
BÀI TẬP BỔ TRỢ TIẾNG ANH 8 CẢ NĂM - GLOBAL SUCCESS - NĂM HỌC 2023-2024 (CÓ FI...
BÀI TẬP BỔ TRỢ TIẾNG ANH 8 CẢ NĂM - GLOBAL SUCCESS - NĂM HỌC 2023-2024 (CÓ FI...BÀI TẬP BỔ TRỢ TIẾNG ANH 8 CẢ NĂM - GLOBAL SUCCESS - NĂM HỌC 2023-2024 (CÓ FI...
BÀI TẬP BỔ TRỢ TIẾNG ANH 8 CẢ NĂM - GLOBAL SUCCESS - NĂM HỌC 2023-2024 (CÓ FI...
Nguyen Thanh Tu Collection
 
বাংলাদেশ অর্থনৈতিক সমীক্ষা (Economic Review) ২০২৪ UJS App.pdf
বাংলাদেশ অর্থনৈতিক সমীক্ষা (Economic Review) ২০২৪ UJS App.pdfবাংলাদেশ অর্থনৈতিক সমীক্ষা (Economic Review) ২০২৪ UJS App.pdf
বাংলাদেশ অর্থনৈতিক সমীক্ষা (Economic Review) ২০২৪ UJS App.pdf
eBook.com.bd (প্রয়োজনীয় বাংলা বই)
 
ANATOMY AND BIOMECHANICS OF HIP JOINT.pdf
ANATOMY AND BIOMECHANICS OF HIP JOINT.pdfANATOMY AND BIOMECHANICS OF HIP JOINT.pdf
ANATOMY AND BIOMECHANICS OF HIP JOINT.pdf
Priyankaranawat4
 

Recently uploaded (20)

Advanced Java[Extra Concepts, Not Difficult].docx
Advanced Java[Extra Concepts, Not Difficult].docxAdvanced Java[Extra Concepts, Not Difficult].docx
Advanced Java[Extra Concepts, Not Difficult].docx
 
Main Java[All of the Base Concepts}.docx
Main Java[All of the Base Concepts}.docxMain Java[All of the Base Concepts}.docx
Main Java[All of the Base Concepts}.docx
 
Philippine Edukasyong Pantahanan at Pangkabuhayan (EPP) Curriculum
Philippine Edukasyong Pantahanan at Pangkabuhayan (EPP) CurriculumPhilippine Edukasyong Pantahanan at Pangkabuhayan (EPP) Curriculum
Philippine Edukasyong Pantahanan at Pangkabuhayan (EPP) Curriculum
 
NEWSPAPERS - QUESTION 1 - REVISION POWERPOINT.pptx
NEWSPAPERS - QUESTION 1 - REVISION POWERPOINT.pptxNEWSPAPERS - QUESTION 1 - REVISION POWERPOINT.pptx
NEWSPAPERS - QUESTION 1 - REVISION POWERPOINT.pptx
 
UGC NET Exam Paper 1- Unit 1:Teaching Aptitude
UGC NET Exam Paper 1- Unit 1:Teaching AptitudeUGC NET Exam Paper 1- Unit 1:Teaching Aptitude
UGC NET Exam Paper 1- Unit 1:Teaching Aptitude
 
How to Setup Warehouse & Location in Odoo 17 Inventory
How to Setup Warehouse & Location in Odoo 17 InventoryHow to Setup Warehouse & Location in Odoo 17 Inventory
How to Setup Warehouse & Location in Odoo 17 Inventory
 
LAND USE LAND COVER AND NDVI OF MIRZAPUR DISTRICT, UP
LAND USE LAND COVER AND NDVI OF MIRZAPUR DISTRICT, UPLAND USE LAND COVER AND NDVI OF MIRZAPUR DISTRICT, UP
LAND USE LAND COVER AND NDVI OF MIRZAPUR DISTRICT, UP
 
RHEOLOGY Physical pharmaceutics-II notes for B.pharm 4th sem students
RHEOLOGY Physical pharmaceutics-II notes for B.pharm 4th sem studentsRHEOLOGY Physical pharmaceutics-II notes for B.pharm 4th sem students
RHEOLOGY Physical pharmaceutics-II notes for B.pharm 4th sem students
 
Your Skill Boost Masterclass: Strategies for Effective Upskilling
Your Skill Boost Masterclass: Strategies for Effective UpskillingYour Skill Boost Masterclass: Strategies for Effective Upskilling
Your Skill Boost Masterclass: Strategies for Effective Upskilling
 
ZK on Polkadot zero knowledge proofs - sub0.pptx
ZK on Polkadot zero knowledge proofs - sub0.pptxZK on Polkadot zero knowledge proofs - sub0.pptx
ZK on Polkadot zero knowledge proofs - sub0.pptx
 
What is Digital Literacy? A guest blog from Andy McLaughlin, University of Ab...
What is Digital Literacy? A guest blog from Andy McLaughlin, University of Ab...What is Digital Literacy? A guest blog from Andy McLaughlin, University of Ab...
What is Digital Literacy? A guest blog from Andy McLaughlin, University of Ab...
 
Beyond Degrees - Empowering the Workforce in the Context of Skills-First.pptx
Beyond Degrees - Empowering the Workforce in the Context of Skills-First.pptxBeyond Degrees - Empowering the Workforce in the Context of Skills-First.pptx
Beyond Degrees - Empowering the Workforce in the Context of Skills-First.pptx
 
A Independência da América Espanhola LAPBOOK.pdf
A Independência da América Espanhola LAPBOOK.pdfA Independência da América Espanhola LAPBOOK.pdf
A Independência da América Espanhola LAPBOOK.pdf
 
Wound healing PPT
Wound healing PPTWound healing PPT
Wound healing PPT
 
Film vocab for eal 3 students: Australia the movie
Film vocab for eal 3 students: Australia the movieFilm vocab for eal 3 students: Australia the movie
Film vocab for eal 3 students: Australia the movie
 
clinical examination of hip joint (1).pdf
clinical examination of hip joint (1).pdfclinical examination of hip joint (1).pdf
clinical examination of hip joint (1).pdf
 
The basics of sentences session 6pptx.pptx
The basics of sentences session 6pptx.pptxThe basics of sentences session 6pptx.pptx
The basics of sentences session 6pptx.pptx
 
BÀI TẬP BỔ TRỢ TIẾNG ANH 8 CẢ NĂM - GLOBAL SUCCESS - NĂM HỌC 2023-2024 (CÓ FI...
BÀI TẬP BỔ TRỢ TIẾNG ANH 8 CẢ NĂM - GLOBAL SUCCESS - NĂM HỌC 2023-2024 (CÓ FI...BÀI TẬP BỔ TRỢ TIẾNG ANH 8 CẢ NĂM - GLOBAL SUCCESS - NĂM HỌC 2023-2024 (CÓ FI...
BÀI TẬP BỔ TRỢ TIẾNG ANH 8 CẢ NĂM - GLOBAL SUCCESS - NĂM HỌC 2023-2024 (CÓ FI...
 
বাংলাদেশ অর্থনৈতিক সমীক্ষা (Economic Review) ২০২৪ UJS App.pdf
বাংলাদেশ অর্থনৈতিক সমীক্ষা (Economic Review) ২০২৪ UJS App.pdfবাংলাদেশ অর্থনৈতিক সমীক্ষা (Economic Review) ২০২৪ UJS App.pdf
বাংলাদেশ অর্থনৈতিক সমীক্ষা (Economic Review) ২০২৪ UJS App.pdf
 
ANATOMY AND BIOMECHANICS OF HIP JOINT.pdf
ANATOMY AND BIOMECHANICS OF HIP JOINT.pdfANATOMY AND BIOMECHANICS OF HIP JOINT.pdf
ANATOMY AND BIOMECHANICS OF HIP JOINT.pdf
 

CASTING PROCEDURES AND DEFECTS

  • 1.
  • 2. CASTING PROCEDURES D R . A A D I L T H I M W A L A P G D E P T . O F C O N S . & E N D O . P A R T I .
  • 3. CONTENTS •Defiinition •History •Casting procedures •Preparation of working casts & dies •Fabrication of wax patterns •Spruing the wax pattern •Investing the wax pattern •Burnout of wax •Casting of alloy
  • 4. •Sand blasting & recovery •Finishing & Polishing •Casting defects •Causes of defects •Distortion •Surface discoloration •Incomplete casting •Porosity •Other casting defects
  • 5. Definition - Casting is defined as forming an object from the mold. - GPT 8th Edn. - Something that has been cast in a mold , an object formed by the solidification of a fluid that has been cast into a refrectory mold. - GPT 9th Edn.
  • 6. History 1891 – Martins Technique - Filled the cavity with wax, removed and invested. - After burn out poured the molten gold into mold. -Asgar et al, 1988 1869 – Philbrook introduced the pressure casting method. - Wax pattern formed directly into mouth and mounted on sprue - Invested in metal ring and burnout and than alloy melted Philips Science of Dental Materials- 12th Edn
  • 7. 1907 – Taggart’s presentation in the New York on fabrication of cast inlay - First reported application of Lost-Wax Technique. - Soon led to the casting Inlays, onlays, crowns, FPDs and framework of RPDs. 1932 – Classification of gold based alloys. - Dental material group at the National Bureau of Standards surveyed the alloys being used and classified as Type- I (Soft) Type- II (Medium) Type- III (Hard) Type- IV (Extra hard) 1950 – Abrahm Weinstein first produced commercially successful dental gold alloy Philips Science of Dental Materials- 12th Edn
  • 8. Steps in Casting 1) Preparation of working cast and dies- Cast : Working cast is a cast that is mounted on an articulator. Die : It is a model of the individual tooth on which the margins of the wax pattern are finished. - Requirements of good casts- 1. Must be free of bubbles 2. Must be free of distortion 3. Must be trimmed Fundamentals of fixed Prosthodontics – Shillinberg 4th Edn.
  • 9. Two basic working cast and die systems:- 1) Working cast with a separate die 2) Working cast with a removable die 1) Working cast with a separate die: - Simple means of fabricating a working cast. - No procedure required to create a die other than making a sectional cast and full arch cast. Fundamentals of fixed Prosthodontics – Shillinberg 4th Edn.
  • 10. - Two pour technique is followed Die is prepared from the first pour Model is prepared by impression or the second pour of same impression Disadvantage: - Stress during transfer of the was pattern from die to model - Distortion of impression during removal of first cast
  • 11. Technique: -Type IV or Type V stone should be used for fabrication of die - Impression is washed under running water. - Measured amount of water is placed in the bowl - Die impression poured with 50 to 70 g of stone. - 200 g for full arch impression - Stone is added in the increments and vibrated.
  • 12. - The tray is tilted to fill the preparation with stone and reach the stone to the bottom of the preparation. - If the large amount of stone is added, air can be entrapped and creates voids. - The stone is built up to a height of approximately 1 inch. - Allowed to set for 1 hour. - Cast is separated from the impression.
  • 13. - Super-SeP (Kerr) is applied to protect the prepared teeth to guard against the erosion when cast is trimmed. - There should be no stone duplicating soft tissue in the periphery beyond the gingiva on cast. - The cast is held by a base while it is cut down to form a handle on the die. - If held by preparation portion chances to get it chipped.
  • 14. - The handle should be larger in diameter and octagonal in a cross section. - The handle should be parallel to the long axis of the tooth. - It should approximately 1 inch long in the length to facilitate a proper hold of the die. - A pear shaped acrylic bur is used to trim the die apical to the finish line. - The apical area should be smooth and free of ridges.
  • 15. - The contour of the die apical to the finish line should approximate the root. - The wax pattern contacts, contours and occlusal morphology is built up on working casts. - Dies reserved for the final margination, detail adjustments , surface treatments and spruing.
  • 16. 2) Working cast with a removable die: - Dies that can be removed form the cast. - Convinient because wax patterns or copings need not be removed from their respective dies. Advantages 1. Saves time and effort by using one cast. 2. Eliminates dimentional disvrepencies. 3. Less distortion because not transferred. Textbook of Operative Dentistry by Vimal Sikri-4th Edn.
  • 17. Disadvantages: 1. Necessity for additional tools and equipments. It should satisfy three requirments: 1. Must return to their original position. 2. Must remain stable. 3. Must be easy to mount on an articulator. Two techniques for removable dies 1. Dowel pins 2. Strip technique
  • 18. Dowel pins - Methods to allow the repositioning of the die in the working cast. - Most of these oriented in the impression before it is poured or attached to the underside of the cast. - Two systems are presented here 1) Straight dowel pins. 2) Pindex system. Fundamentals of fixed Prosthodontics – Shillinberg 4th Edn.
  • 19. 1) Straight dowel pins: - Dowel pins is positioned over each prepared tooth in the impression. - Desired location of the pin can be marked and pins placed after pouring with stone. - Most accurate placement can be done by prepositioning the pins before pouring the stone. - There are devices made for precise positioning of dowels before pouring. - One such device utilizes putty on a movable table to hold an impression in repeatable.
  • 20. - Wire clips that can be stuck into the periphery of the impression can be purchased or fashioned from the orthodontic wire. - Aneasthetic needles, bobby pins, paper clips, and paper matches used to orient the dowel pins
  • 21. Technique - Dowel is placed between the arms of bobby pin. - Round side of the dowel in corrugations and flat side against the flat arm of bobby pins. - Bobby pins positioned faciolingually across the impression so that dowel is centered over the preparation. - Straight pin is pushed between the arms of bobby pins and into the impression on facial and lingual side.
  • 22. - Dies stone is poured till the knurled end of the pin. - Paper clips added to stone and let it set , provide retention for base. - After setting pins removed from the impression. - Small ball of utility was is placed on the tip of dowel. - 1-inch length and 0.5 inch diameter plastic tube can be placed to identify after base pour.
  • 23. - ‘V’ shaped facio-lingual orientation groove can be cut. - Stone is then lubricated around each dowel with petrolatum. - A wet paper towel is placed into the open lingual space. - This will create a complete base for the cast to be poured. - After stone is set the cast is removed from the impression.
  • 24. - Wax at the end is located and removed - A saw frame with a thin blade is used to cut through the layer of die stone. - An instrument handle is used to gently tap on the end of the dowel to loosen the die.
  • 25. Pindex System - Reverse drill press is used to create a master cast with dies that can be removed and replaced. - Impression is poured without positioning dowel pins. - Machine accurately drills parallel holes from the underside of a trimmed cast. - Impression is poured mm of stone beyond the edge of the tray.
  • 26. - The bottom of cast trimmed on cast trimmer. - The facio lingual width of cast should be approx. 20mm - Pencil used to mark pins on occlusal surface of teeth. - Pencil marks are placed under illuminated dot.
  • 27. - Thumbs used to stabilize the cast on work tooth - Debris removed from the pinholes with brush. - Cynoacrylates cemet is used to lute the pins in their places. - Short pin on palatal side and long pin on buccal side.
  • 28. - Sleeves placed over the pins. - White on short pins and grey on long pins - Long pins blocked with utility wax. - Boxing wax is applied around the cast. - Poured with stone. - After setting of stone wax removed from the pins. - Pencil marks are made for saw cutting. - Dies sectioned and removed.
  • 29. Die Spacing: - Main objective is to create room for the final casting- cementing medium. - Done to insure complete seating of the casting. - Done using insoluble paints. - Should be applied on the die to cover the axial walls, cavity floor, and preparation surface short of the circumferential tie constituents. - Thickness should be 25 microns. Modern Operative dentisty by Marzuck
  • 30. WAX PATTERN FABRICATION According to marzuck: 1. Create a wax mass and carve in the restoration shape. 2. Incrementally build by the restoration using was cones, triangles, and drops. 3. Fabricate the pattern directly inraorally 4. Anatomic core technique. Modern Operative dentisty by Marzuck
  • 31. According to Anusavice 1. Direct method of wax pattern fabrication 2. Indirect method of wax pattern fabrication Philips science of dental materials- 12th Edn.
  • 32. Indications -Tooth with easy accessibility -Cavity preparation with minimal proximal extension. -Cavity preparation where walls are flat, internal line angles are sharp and gingival bevel is definite. 1) Direct method Textbook of Operative Dentistry- Vimal sikri 4th Edn.
  • 33. - Hold the stick of wax over the flame and rotate it rapidly until it becomes plastic. - The soften wax shaped approximately to the prepared cavity. Materials used in dentistry: S. Mahalaxmi
  • 34. - Insert the wax into the cavity and held under finger pressure until it solidifies. - The wax should be allowed to cool gradually to mouth tempreture. - Cold carving instrument should be used. - Withdraw the patern carefully in the long axis of the tooth - The pattern shoud be touched as little as possible with hands to avoid temperature. Materials used in dentistry: S. Mahalaxmi
  • 35. 2) Indirect method 1) Incremental build up on cast. 2) Dipping method. 1) Incremetal build up: - Suitable lubricant is applied - Cusps with their tips are built up by addition of wax. - Triangular ridges of cusps are added and the whole anatomy is produced
  • 36. 2) Dipping Method: - The die can be dipped repeatedly in the hot liquid wax - Fossae and grooves then carved on the bulk of wax usking PKT no. 1 and no. 4 instruments.
  • 37. - Similar to functionally generated path technique. - Pattern built with hard wax to the desired shape of the future restoration. - The patient is asked to go through all mandibular movements and positions. - Functionally generated quaderant tray and fast setting plaster is carried to wax pattern and impression taken. Anatomic Core Technique Modern Operative Dentistry - Marzuck
  • 38. - Anatomic core is tried in the quaderant. - One die at a time filled with molten wax. - The anatomic core is removed. The next die is treated in the same way
  • 39. SPRUING THE PATTERN - Main objective is to create an inlet for the melt into the investment mold created by the wax pattern. - Should be formed when the pattern is on the die. - It prevents mechanical stress. - Helps in the proper removal of the molten wax. - Helps to mount the pattern on the crucible former. - Generally of three types - Metal - Plastic - Wax Modern Operative Dentistry - Marzuck (Manapallil dental materials)
  • 40. Desired characteristic of a sprue former: 1. Sprue former surface should be smooth to prevent any irregular inlet walls. 2. Should not react with any other ingredient. 3. They should be cylindrical in shape to create perfect rounded inlet. Textbook of Operative Dentistry- Vimal Sikri 4th Edn.
  • 41. Diameter of the sprue: - Most important fector. - Dictates the speed by which the melt enters and fills the mold. - The sprue diameter should be thicker than thickest part of the pattern. - The diameter will be 8-18 gauge. 8 – 3mm 18 – 0.8mm
  • 42. Length of the sprue: - The end of the wax pattern away form the sprue should be 1/8 – ¼ “ fro the end of the ring. - This allows the minimum thickness of investment. - Allows escape of mold gases. - Larger ring, larger should be the sprue. - Spatial location of pattern also influence the length of sprue. 1/8 to ¼ “
  • 43. Contemperory Fixed Prosthodontics - Rosenstiell 6 mm away from the end of ring
  • 44. Number of sprue: - Configurations of pattern affects the number of sprue. Example: -Pattern should decrease in dimension going from sprue end to another -One sprue in enough. -If wax pattern have thin area between the sprue and the periphery, the melt will solidify here. -In such cases sprue should be used.
  • 45. Location of the sprue: - Should be attached to the bulkiest part of the pattern - This minimizes the effect of released residual stresses. - It will also ensure the tinner cross-section of the mold.
  • 46. - Should be atttahed to the least anatomical areas. 1) Areas of no grooves. 2) Cuspal anatomy 3) Fossae or ridges - Proximal surface are the ideal location.
  • 47. Angulation of the sprue former: - Should never directed toward thin, delicate cross section of the pattern. - Melt should not hit these areas at 90 ֯ to avoide fracture failure. - Should be at 45֯ . - At right angle it can create reverse flow of metal. 45 ֯
  • 48. - At right angle also create concavities in the mold. Contemporary Fixed Prsothodontics, Rosenteil 4th Edn.
  • 49. The sprue-wax pattern joint: - Most necessary when high velocity ingeress is required. - It should be flared to allow mold to enter at more speed. - Flaring gives the non obstructed flow of molten metal by maximum dimension.
  • 50. Reservior: - Made 1-2 mm away from the joint. - Dimension should far exceeding than the thickest part of the thickest portion of the pattern. - Shape should be round or oval Reservior
  • 51. Venting: - Always release of gases occur in the investment. - This can be due to thickness of the investment. - In such cases the proper investment should be chosen to give away the waxes - Proper thickness of investment and porosity in investment provide adequate venting.
  • 52. Removal of wax pattern & Sprue former: - Possibilty of stressing the pattern during removal. - Should be removed in the long axis of the tooth. First choice: Use the sprue former to remove the pattern. Second choice: Use two fingers on the both sides of the pattern.
  • 53. Third choice: - Formulate a suitable size of staple from the paper staple or a wire. - Staple is attached with help of sticky wax to the farthest two end of the pattern. - It should be 45֯ to the pattern. - Holding the pattern with staple it can be removed on long axis of tooth.
  • 54. FORMING THE CRICUBLE - In most cases it is funnel shaped. - Connected same way as the sprue is attached to the pattern. - Depth and inclination governed by the factors governs by the diameter of sprue like- Alloy density Machine energy Velocity Porosity of investment.
  • 55. - Made up of rubber, metal, or plastic. - Modifications can be done by adding waxes. - Junction between the sprue and crucible former is covered with waxes.
  • 56. Surface treatment of pattern - Waxes are hydrophobic in nature. - Difficult to wet them with water and investment liquid. - It should be covered completely by investment to record all the details. - Surface active agents (Soaps) are generally applied to the pattern. - It reduces the surface tension, encourages the solid component, thus provide closeness. - Vibration also can be used during investing.
  • 57. Placing the ring liner - A ring liner is placed inside of the casting ring. - It should be short at one end. - Earlier asbestos liners were used. - Its use has been discontinued due to health hazard from breathing its dust Types of Non asbestos ring liners Used are: — Fibrous ceramic aluminous silicate — Cellulose (paper) — Ceramic-cellulose combination
  • 58. Functions of the Ring Liner: 1. Allows for mold expansion (acts as a cushion) 2. When the ring is transferred from the furnace to the casting machine it reduces heat loss as it is a thermal insulator 3. Permits easy removal of the investment after casting.
  • 59. INVESTMENT OF THE WAX PATTERN - Main objective is to catch all the details of the wax pattern. - Investing materials 1) Gypsum bonded 2) Phosphate bonded 3) Ethyl silica bonded
  • 60. Principles of investing: 1) Choice of the ring: - For hygroscopic expansion technique- rubber ring is used. - For thermal expansion- metal ring. - Diameter and length of the ring should be selected to allow for the desired dimension of the mold walls.
  • 61. 2) Preparation of the ring for non-confinement of the investment expansion: - in such cases rubber ring is used. 3) Assembling the ring and the crucible former: - For low fusing class I and class II alloys it is possible to attach the stone die to wax pattern and invest them together. 4) Preparation of the investment to mix: - Distilled water or indicated liquid is used for mixing.
  • 62. - Mechanical vaccum mixing used to lessen voids. 5) Adding the investment mix to the wax pattern and filling the ring. - Done under vibration of vaccum. 6) Facilitating the desired setting through hygroscopic expansion during hardening the investment.
  • 63. 7) Removal of solid or non burnable sprue former: - Crucible former detached from the ring. - The sprue fomer if not going to be left in the investment wax complex, removed.
  • 64. Investment of the pattern - Pattern invested with suitable investment material. Two methods for investing the prepared pattern: 1) Manual investing 2) Vaccum investing Textbook of Operative Dentistry: Vimal Sikri 4th Edn.
  • 65. 1) Manual investing: - Water and powder incorporated in an appropriate ratio in a rubber bowl. - With hand spatula the mix is mixed in the rotating motion. - Mixing is done for 1 minute. - Placed on the vibrating table and stirred very slowly for 0 sec to remove trapped air. - Investment poured into the pattern. - Allowed to set for 1 hour
  • 66. 2) Vaccum mixing: - Investment is mixed in the vaccum mixer and pattern invested under vaccum. - Vaccum investing equipment available in the market. Method: - Invest and water is taken bowl. - Mix is placed in mixing unit.
  • 67. - Unit is motor driven, and the air evacuated by means of tube attached to the mixing unit form the vaccum pump. - Evacuation of air will reduce the possibility of bubble formation
  • 68. BURNOUT OF THE WAX - It is the heating of the casting ring with the invested wax pattern in the furnace. Placement of ring in the burnout furnace: - The invested casting ring is placed in a room temperature. - First placed on a rubber ceramic tray in furnace, facing down to drain the wax. - This slows molten wax to flow out. Materials used in dentisty: S. Mahalaxmi
  • 69. - Temperature is than increased , when reaches to 300 degree, the ring is inverted. - This allows the circulation of oxygen within the oven in the mold cavity. - Also inverting prevents the carbon formation
  • 70. Two Stage burnout procedure - Depend upon the sprue former used. - For plastic sprue the two stage burnout is used. - Plastic needs time to melt, first stage allows the softening of the plastic. - Second stage, the ring is inverted and placed with the sprue end downward to allow total elimination.
  • 71. Burnout tempratures Type of investment Type of expansion Maximum temp. Time Gypsum bonded Hygroscopic 500 C / 900 F 1 hr. Gypsum bonded Thermal 700 C / 1200 F 1 hr Phosphate bonded Thermal 700 – 1030 C 45 mins Ethyl silica bonded Thermal 1090- 1130 C
  • 72. Procedure for wax burnout - Casting ring should be placed at the room temperature. - The temperature should be gradually increased. - Rapid heating generate steam, causing flaxing of the mold walls. - Investments are poor conductors of heat. - Placing directly in the heated furnace will result in the rapid change in the temp. that can result in the flaxing or cracking the investment. - Ring should be placed in the furnace for 45-90 minutes.
  • 73. Time lapse b/w burnout and the wax: - 1 minute may be allowed between removal of casting ring from the burnout. - To prevent the heat loss the casting ring is maintained at the max temp.
  • 74. Casting crucibles -The alloy during melting placed in the crucible. - The crucible should 1. Not cause reaction with the alloy resulting in contamination of alloy. 2. It should withstand the temp. of the melting torch.
  • 75. Crucibles used for dif types of alloys Clay – High noble and noble alloys Carbon – Noble alloys for crown Aluminium – High fusing alloys Quartz – High fusing alloys - carbon crucible should not be used with high palladium, silver-palladium, nickel–chromium, and cobalt-chromium alloys.
  • 76. MELTING OF THE ALLOY - Alloy should be heated as quickly as possible to a completely molten state above its liquid temp. - At the same time, it should not be so hot that it begins to oxidize or that crystallization is delayed when it reaches the extremities of the mold cavity. - Gold alloys ball up and have a mirror like shining surface that appears to be spinning.
  • 77. Methods of casting 1) Torch melting 2) Vaccum casting machine 3) Casting using centrifugal machine 4) Induction casting machine 5) Direct current arc melting
  • 78. 1) Torch melting - Fuel mostly used is a mixtures of natural or artificial gas and air. - The alloy melted using the reducing flame of gas torch. - Torches are of two types 1) Single artificial tip: - Concentrate more heat on the area. 2) Multiorifice tip: - Distribute the heat over wider area enabling uniform heating - Used for casting metal ceramic.
  • 79. Mixing zone Cumbusion zone Reducing zone Oxidizing zone Zones of flame A properly adjusted torch develops adequate temperatures of 870°C–1000°C for melting dental alloys whose melting ranges are within these temperatures.
  • 80. 1) Mixing zone: - Long cone emerging directly from the nozzle of the torch. - Air and gases are mixed in this zone 2) Combustion zone: -Immediately surrounding the inner zone. - Green in color and known as combustion zone -Gas and air are partially burned.
  • 81. 3) Reducing zone: - Blue in color and located outside the combustion zone. - Hottest part of the flame - kept in contact with the alloy. 4) Oxidizing zone: - Outermost zone of the flame - Not used to melt the alloy
  • 82. Centrifugal casting machine - Various designs are available - Molten metal forced into the mold by centrifugal force. - Force is created by spring wound. - It is winding the arm of the casting machine 2–5 turns. - The crucible is attached to the free arm also known as the broken arm.
  • 83. - Spring is wound and locked. - Once the alloy is melted after ring placement the spring is released. - This initiates the rotational motion. - Molten metal moves to the mold.
  • 84. Induction casting - Melted in electrical induction furnace - Currents generated within metal and resistance lead to heating of the metal. - Induction heater consist of electromagnet is used. - High frequency current will melt the metal.
  • 85. Arc melting - Alloy is vaccum melted and cast by pressure in an argon atmostphere. - Currents produced between 2 electrodes. - Temp generates are 4000 C . - Alloy melts very quickly in this method. - One of the advantage as alloy melts within seconds. Materials used in dentistry: S. Mahalaxmi
  • 86. Vaccum Casting - Titanium and its alloys require vaccum are heating argon pressure casting. - Melting point for titanium is 1071 C - Vaccum is applied beneath the casting ring and molten alloy can drawn into by suction
  • 87. Divesting - Removal of casting from the investment mould. - After divesting all the casting undergoes three main steps 1) Quenching 2)Sand blasting. 3)Pickling.
  • 88. 1) Quenching: - For noble metal alloys the ring is removed and immediately quenched in water. - Quenching enables the metal to burnish. - Investment undergo violent reaction resulting in the crumbling of the granular investment. - This makes the casting to be removed easily.
  • 89. 2) Sand blasting: - The oxide layer and any remaining particles of investment are removed by lightly air abrading. - All surfaces abraded with a 50-μm abrasive.
  • 90. 3) Pickling: - After removal the castings covered by dark oxides. - Removed by the process called pickling. - This involves soaking the casting in a hot acid solution for several minutes. - 50 % HCL is recommended for pickling.
  • 91. Finishing & Polishing - Clean all the debris, inner surface should be inspected first. - Should never be tried on stone until inner surface is evaluated. Technique: - Gold being soft should be finished at slow speed. - Initial contouring should be done with carbide burs. - Silicone carbide green stone or heatless polymer stone. - Finishing is done with Aluminium oxide (pink) stone or medium grade impregnated rubber cups, wheels and points.
  • 92. CASTING DEFECTS - Errors in the procedure often results in defective castings. - The casting in such a case may not fit or may have poor esthetic and mechanical properties. - Innumerable steps in casting may create many problems in casting leads to casting defects. 1) Distortion 2) Surface roughness and other surface defects 3) Porosity 4) Incomplete casting 5) Contaminated casting
  • 93. Distortion - Distortion of wax pattern may occur during removal. Causes: - Thermal changes - Improper handling during removal - Distortion during storage - Relaxation of stresses - Distortion during removal of die Textbook of Operative Dentistry: Vimal Sikri 4th ed
  • 94. Prevention: - Hard wax should be used, because soft wax is more susceptible to temperature changes. - Careful handling during removal of the pattern. - Stresses can be minimized by softening the wax at uniform temp. of 50 C - Wax should be added in smaller increments. - Should be invested immediately.
  • 95. Surface Roughness - Surface roughness defined as finely spaced surface imperfections. Causes: - Air bubbles on the wax pattern. - Too rapid heating during burn-out. - Higher water powder ratio gives rough casting. - Prolonged heating of pattern. Textbook of Operative Dentistry: Vimal Sikri 4th ed
  • 96. - Foreign body inclusion. - Larger particle size of silica. - Too high or too low casting pressure. - Excess surfactant. Prevention: - Proper burn out and adequate heating time. - Smaller particle size of silica in the investment. - Pressure should be 15 lbs/Sq. inch - Proper water powder ratio. - Air bubbles can be avoided by vibrating the mixture before and after mixing
  • 97. Noduls in casting: - Large nodules due to air trapped during casting. - Multiple nodules because of inadequate vaccum during investing. - Improper brush technique - Lack of surfactant - Nodules on occlusal surface can be because of excessive vibration. Contemporary fixed prosthodontics: Rosenstiel 5th edn.
  • 98. Avoided by: - Even minute nodules can limit the seating of the casting. - When they are large or situated on a margin, they usually necessitate remaking of the restoration. - A binocular microscope is extremely helpful for detecting and removing nodules.
  • 99. - When small nodules present, they can often be removed with a No. 4 or No. 2 round bur. - A slight excess of metal should be removed to ensure that the nodule does not interfere with complete seating. - Can be avoided by careful investing technique. - Use of a surfactant - Vacuum spatulation, and careful coating of the wax pattern with investment Contemporary fixed prosthodontics: Rosenstiel 5th edn.
  • 100. Fins: - Caused by cracks in the investment that have been filled with molten metal. - Excessive casting force. - Steam generated from too-rapid heating. - Reheating an invested pattern. Contemporary fixed prosthodontics: Rosenstiel 5th edn.
  • 101. - Improperly situated pattern (too close to the periphery of the casting ring) - Rough handling of the ring after investing - Premature heating (mold still wet) - Increased water-to-powder ratio
  • 102. Porosity - It can be internal or external. - External porosity can cause discoloration. - Severe porosity at the tooth restoration interphase can even cause secondary caries. - Internal porosity weakens the restoration.
  • 103. - They are categorized as 1) Solidification defects A. Localized shrinkage porosity B. Suck back porosity C. Microporosity 2) Porosity due to gases A. Pinhole porosity B. Gas inclusions 3) Sub surface porosity 4) Back pressure porosity
  • 104. 1) Localized shrinkage porosity: - Usually found near the sprue- casting junction. - Occurs when the cooling sequence is increased and the sprue freezes before the rest. - Allows main molten metal to flow into the mould. - If sprue solidifies before the rest of casting
  • 105. Avoided by- A. Using sprue of correct thickness B. Attach sprue to thickest part of pattern C. Flaring the sprue at the point of attachment or placing a reservoir close to the wax pattern. D. Placing sprue in such a way so that a hot spot formation is avoided. E. Not using an excessively long sprue F. Reducing the mold-melt temperature difference. Textbook of operative dentistry : Vimal sikri 4th Edn.
  • 106. 2) Suckback porosity: - Variation of shrink spot porosity. - External void on crown apposite to sprue. - Hot spot created by the hot metal impinging on the mold wall. - Sprue already solidified result in suck back porosity. - Avoided by reducing temp. different between mold and molten alloy.
  • 107. 3) Micro porosity: - Fine irregular void within casting - Occur when casting cools too rapidly. - Temp should be reduced gradually
  • 108. Porosities due to gases- 1) Pin hole porosity: - The metal absorbs gases when it is in molten state - Upon solidification, the absorbed gases are expelled - Casues tiny voids. 2) Gas inclusion porosity: - Gas occluded from a poorly adjusted blowpipe flame. - If the reducing zone of the flame is not used. - larger than the pin hole type
  • 109. 2) Back Presure porosity: - Caused by inadequate venting. - Trapped gases within investment. - Metal enters into mold they are pushed out and create pressure. Avoided by: - Using adequate casting force - Using investment of adequate porosity - Place pattern not more than 6 to 8 mm away from the end of the ring. - Providing vents in large castings
  • 110. 3) Subsurface porosity: - The exact reason for this has not been established. - May be due to the simultaneous nucleation of solid grains. - Can be avoided by controlling the rate at which the molten metal enters the mold.
  • 111. Incomplete casting Causes: - Insufficient alloy used. - Alloy not able to enter thin parts of mold - Mold is not heated to casting temperature. - Premature solidification of alloy. - Sprues are blocked with foreign bodies. - Back pressure due to gases in mold cavity. - Low casting pressure. - Alloy not sufficiently molten or fluid.
  • 112. - If compensation for shrinkage of alloy is not done by adequate expansion of mold cavity. - shrinkage of the impression material. - If an area of wax is too thin (less than 0.3 mm) - insufficient casting force - inadequate heating of the metal
  • 113. Avoided by: - Use larger size of sprue former. - Have casting temperature at least 150°F (57°C) above fusion temperature of alloy. - Mold should soak heat for approximately one hour at burnout temperature. - Mold should be removed from burnout oven and casting completed within one minute. - Use the adequate amount of force for casting
  • 114. Shiny casting with rounded margins: - When the wax is not completely eliminated, it combines with oxygen or air in the mold cavity forming carbon monoxide. - gas prevents the oxidation of the surface of the casting gold with the result the casting to be shiny. - The formation of gas in the mold is so rapid that it also has a back pressure effect.
  • 115. Pits in casting: - Caused by residual debris in mold. - Use of dirty wax. - Loose debris in crucible. Avoided by: - Use clean, new wax for patterns and sprue. - Use clean crucible for each casting.
  • 116. Contaminated casting A casting can be contaminated due to: 1. Oxidation, caused by: —Overheating the alloy —Use of oxidizing zone of flame —Failure to use flux 2. Sulphur compounds, formed by the breakdown of the investment when the ring is overheated. Avoid by —Not overheating alloy —Use reducing zone of the flame —Use flux.
  • 117. Discoloration - Contamination with copper during pickling. - Contamination with mercury. - By avoiding the use of steel tongs to hold casting during pickling. - If used then the tips of the tongs should be covered with rubber. - Castings should never be placed with amalgam dies or kept on a table where amalgam scrap is present
  • 118. Black Casting Can be due to two reasons: 1. Overheating the investment above 700°C causes it to decompose liberating sulphur or sulphur compounds. They readily combine with the metals in gold alloy forming a sulfide film. This gives a dark casting which cannot be cleaned by pickling. 2. A black casting can be also due to incomplete elimination of the wax pattern, as a result of heating the mold at too low temperature. A carbonized wax remains which sticks to the surface of the casting. It can be removed by heating over a flame.
  • 120. References 1. Phillips science of dental materials 12th Edn. 2. Materials used in dentistry : S. Mahalaxmi. 3. Basic dental materials: John. J . Manapallil 3rd end. 4. Contemporary fixed prosthodontics: Rosentstiel 5th edn. 5. Fundamentals of fixed prosthodontics: Shillingberg 4th edn. 6. Textbook of operative dentistry, Vimal sikri 4th edn. 7. Modern Operative dentisty by Marzuck