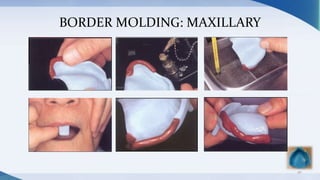
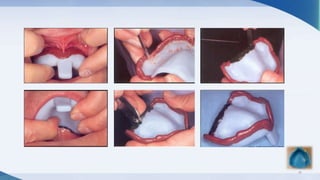
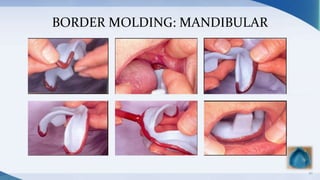
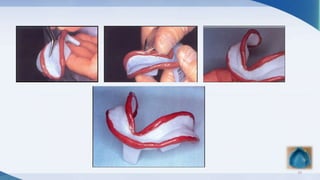
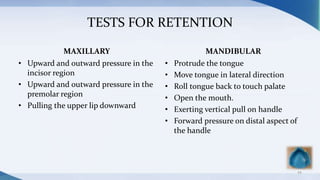
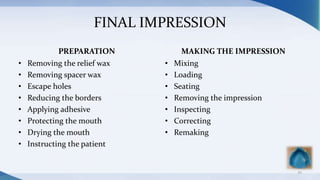
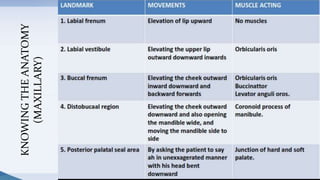
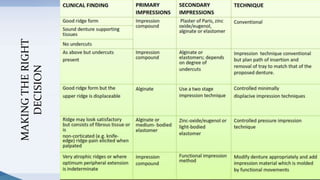
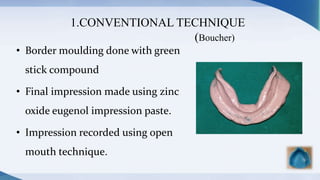
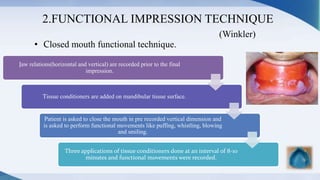
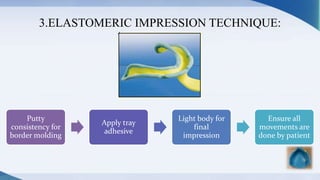
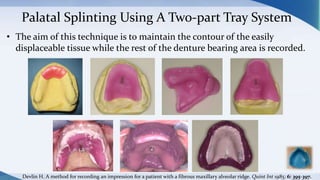
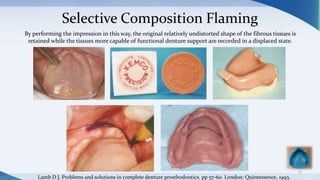
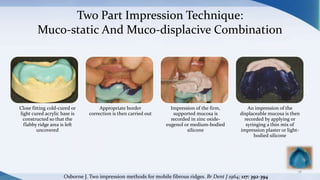
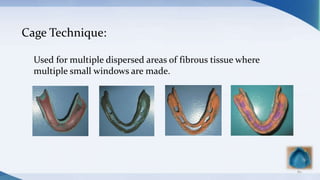
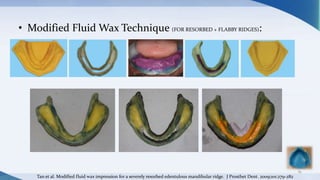
CLINICAL ASPECTS OF IMPRESSIONS
COMPLETE DENTURE PROSTHODONTICS
AAMIR GODIL
SECOND YEAR P.G.
DEPARTMENT OF PROSTHODONTICS
M.A.R.D.C.
“An ideal impression must be in the mind of a
dentist before it is in his hand. He must literally
make the impression rather than take it”
-M.M. Devan
2
IMPRESSION MATERIALS
THEORIES OF IMPRESSION MAKING
HISTORICAL BACKGROUND
PRINCIPLES OF IMPRESSIONS
IMPRESSIONS IN
COMPROMISED SITUATIONS
ANATOMICAL
CONSIDERATIONS
3
BORDER MOLDING
CLASSIFICATION OF
IMPRESSIONS
CLINICAL
CONSIDERATIONS
CONSIDERATIONS
ORAL
ANATOMY
BASIC AND
RELIABLE
TECHNIQUE
IMPRESSION
MATERIALS
SKILL OF THE
OPERATOR
PATIENT
MANAGEMENT
4
OBJECTIVES OF IMPRESSION MAKING
5
RETENTION STABILITY SUPPORT
ESTHETICS
PRESERVATION
OF REMAINING
STRUCTURES
RETENTION
ANATOMICAL
FACTORS
• SIZE OF
DENTURE
BEARING AREA
• QUALITY OF
DENTURE
BEARING AREA
PHYSIOLOGIC
FACTORS
• SALIVA: QUALITY
AND QUANTITY
PHYSICAL
FACTORS
• ADHESION
• COHESION
• INTERFACIAL
SURFACE
TENSION
• CAPILLARITY
• ATMOSPHERIC
PRESSURE AND
PERIPHERAL
SEAL
MECHANICAL
FACTORS.
• UNDERCUTS
• RETENTIVE
SPRINGS
• MAGNETIC
FORCES
• DENTURE
ADHESIVES
• SUCTION
CHAMBERS AND
DISCS
MUSCULAR
FACTORS
• NEUTRAL ZONE
• CORRECT
OCCLUSAL
PLANE
6
STABILITYFACTORSAFFECTING
STABILITY
VERTICAL HEIGHT OF RESIDUAL ALVEOLAR RIDGE
QUALITY OF SOFT TISSUE COVERING THE RIDGE
QUALITY OF IMPRESSION
LEVEL AND CONTOUR OF OCCLUSAL RIMS
ARRANGEMENT OF ARTIFICIAL TEETH
CONTOUR OF POLISHED SURFACES
7
SUPPORT
SNOW-SHOE
EFFECT
DISTRIBUTION
OF FORCES
OVER A LARGER
AREA
DENTURE BASE
SHOULD COVER
AS MUCH
DENTURE
BEARING AREA
AS POSSIBLE
8
ESTHETICS
WIDTH OF
THE SULCUS
9
PRESERVATION OF REMAINING STRUCTURES
• USE OF SELECTIVE PRESSURE TECHNIQUE FOR MAKING IMPRESSION
• AVOID OVER-EXTENSION
10
IMPRESSION MATERIALS
WHICH TO USE AND WHY?
11
BEFORE MAKING THE IMPRESSION
• Examination and conditioning of the patient and the
mouth.
• Complete case history
• Clinical examination
• Identifying and correcting adverse conditions
• Factors that complicate impression making
• Old denture wearer.
12
SELECTION OF IMPRESSION TECHNIQUE
• Clinical findings
• Experience of the dentist
• Availability of materials
• Patient related factors
– Time
– Undercuts
– Old denture wearer
13
WHAT ARE THE OPTIONS?
• Preliminary impression materials:
– impression compound
– alginate
• Final impression materials:
– alginate
– silicon based elastomers
– zinc-oxide eugenol impression paste
– impression plaster
– tissue conditioners
– waxes
14
IMPRESSION COMPOUND
• Easily correctable
• Can be border molded
• Not influenced by saliva
• Can be used as impression tray
• Can be scraped easily to provide relief
• Viscous
• Cannot record fine details
• Compound sticks used for border molding
• Inelastic
15
ALGINATE
• Elastic
• Primary and final impression
• Records good details
• Not correctable but easily remade
• Not dimensionally stable
• Does not adhere to tray
16
ELASTOMERIC IMPRESSION MATERIALS
• Elastic
• Fine details
• Hydrophobic
• Adhesive required
• Available in different viscosities
• Dimensionally stable
• Cannot be adjusted after set
• Prolonged setting time
17
ZINC OXIDE EUGENOL IMPRESSION PASTE
• Rigid and inelastic
• Adheres to tray
• Flows readily and records fine details
• Burning sensation and tissue irritation
• Dimensionally stable
• Bulk of the impression is minimal
• Flaking or breaking during trimming
18
IMPRESSION PLASTER
• Minimal pressure technique
• Flows readily and records fine details
• Rigid
• Wash impression
• Absorbs saliva
• Dimensionally accurate with anti expansion solution
19
TISSUE CONDITIONERS
• Functional impression
• Relatively expensive
20
WAXES
• Flow at mouth temperature
• Exert pressure
• Fine details not recorded
• Corrections can be made
21
IMPRESSIONS FOR COMPLETE
DENTURE FABRICATION
HOW?
22
PATIENT- OPERATOR POSITIONS
23
MAXILLARY MANDIBULAR
24
TRAY SELECTION POSITION BORDERS AT
HAMULAR NOTCH
CHECK CLEARANCE AT
FRENAL AREAS
ADJUST THE TRAY USING
PLIERS
SMOOTHEN THE TRAY
BORDERS
25
TRAY BUILD-UP USING UTILITY WAX
FOR MAXILLARY ALGINATE IMPRESSION
26
27
MANDIBULAR ALGINATE IMPRESSION
28
MARK RETROMOLAR PAD AREA AND ENSURE TRAY EXTENSION
29
PATIENT ASKED TO DO TONGUE
MOVEMENTS
GENTLY MOLD LABIAL AND BUCCAL
AREAS
PATIENT ASKED TO RAISE THE
TONGUE AND TRAY IS ROTATED
AND PLACED
IMPRESSION USING IMPRESSION COMPOUND
30
31
ALGINATE WASH IMPRESSION
COMMON FAULTS
MANDIBULAR
• Insufficient depth in posterior
lingual sulcus
• Insufficient depth in lingual,
labial and buccal sulci
• Edge of the tray showing
through the impression
• An asymmetrical impression
MAXILLARY
• Deficiency in the midline of
palatal vault
• Excess material extending
beyond posterior palatal border
of the tray
• Insufficient depth in one or
more region of sulci
• Tray flange exposure
32
PREPARATION FOR FINAL IMPRESSION
33
34
CHECKING TRAY EXTENSIONS
Visual examination
The diagnostic impression
Correction of over extension
Correction of under extension
35
36
TISSUE STOPS
• Prevent seating of the tray too superiorly or posteriorly
• Stabilize the tray
• Uniform thickness of the material
• Molar or cuspid areas
37
BORDER MOLDING
• The shaping of the border areas of an impression material
by functional or manual manipulation of the size of the
vestibule.
• Materials:
– Modelling compound sticks
– Auto-polymerizing acrylic resin
– Metallic pastes
– Elastomeric materials
– Impression waxes
38
• REQUIREMENTS:
– Have sufficient body
– Allow some pre-shaping of the borders
– Setting time 3-5minutes
– Retain adequate flow when seating in the mouth
– Allow finger placement of the material in to deficient parts after
seating of tray
– Not cause excessive displacement of tissues
– Readily trimmed and carved so that excess material can be carved and
borders shaped before the final impression is made
39
BORDER MOLDING: MAXILLARY
40
41
BORDER MOLDING: MANDIBULAR
42
43
TESTS FOR RETENTION
MAXILLARY
• Upward and outward pressure in the
incisor region
• Upward and outward pressure in the
premolar region
• Pulling the upper lip downward
MANDIBULAR
• Protrude the tongue
• Move tongue in lateral direction
• Roll tongue back to touch palate
• Open the mouth.
• Exerting vertical pull on handle
• Forward pressure on distal aspect of
the handle
44
FINAL IMPRESSION
PREPARATION
• Removing the relief wax
• Removing spacer wax
• Escape holes
• Reducing the borders
• Applying adhesive
• Protecting the mouth
• Drying the mouth
• Instructing the patient
MAKING THE IMPRESSION
• Mixing
• Loading
• Seating
• Removing the impression
• Inspecting
• Correcting
• Remaking
45
BORDER MOLDING
AND ANATOMIC CONSIDERATIONS
46
47
48
KNOWINGTHEANATOMY
(MAXILLARY)
49
50
KNOWINGTHEANATOMY
(MANDIBULAR)
51
MAKINGTHERIGHT
DECISION
SPECIAL CONSIDERATIONS
FOR IMPRESSION MAKING IN COMPLETE DENTURE PROSTHODONTICS
52
IMPRESSION TECHNIQUES
FOR RESORBED RIDGES
53
PROBLEMS ENCOUNTERED IN MAKING AN
IMPRESSION OF RESORBED MANDIBULAR RIDGE
• Mucosa : thin and atrophic
• Inadequate denture bearing areas
• Attachment of muscles near the crest of the ridge
• Interference of tongue
54
FINAL IMPRESSION TECHNIQUES TO MANAGE
RESORBED MANDIBULAR RIDGES:
1. Conventional technique
2. Functional impression technique
3. Elastomeric technique
4. Admix technique
5. Cocktail technique
6. All green technique
7. Flange technique
8. Modified Functional Impression Technique
1.CONVENTIONAL TECHNIQUE
(Boucher)
• Border moulding done with green
stick compound
• Final impression made using zinc
oxide eugenol impression paste.
• Impression recorded using open
mouth technique.
ADVANTAGES:
1.Easy handling
2.No dimensional change
3.Reproduction of fine details.
DISADVANTAGES:
1.Short manipulation time
2.Hardens quickly before the functional movements can be recorded.
2.FUNCTIONAL IMPRESSION TECHNIQUE
(Winkler)
• Closed mouth functional technique.
Jaw relations(horizontal and vertical) are recorded prior to the final
impression.
Tissue conditioners are added on mandibular tissue surface.
Patient is asked to close the mouth in pre recorded vertical dimension and
is asked to perform functional movements like puffing, whistling, blowing
and smiling.
Three applications of tissue conditioners done at an interval of 8-10
minutes and functional movements were recorded.
ADVANTAGES
1.Overall denture has better surface
contact
2.Improved retention
3.Interference due to tray handling is
eliminated
4.Less chances of over and under
extension as the movements are
performed by the patient
DISADVANTAGES
1.Restriction of tongue movement
therefore inaccurate recording of
lingual border.
2.Completely depended on patient.
3.ELASTOMERIC IMPRESSION TECHNIQUE:
Putty
consistency for
border molding
Apply tray
adhesive
Light body for
final
impression
Ensure all
movements are
done by patient
ADVANTAGES:
1.Single step border moulding.
2.Minute details are recorded due to the use
of light body addition silicone.
DISADVANTAGES:
1.Single step border moulding is technique
sensitive
2.Comparatively expensive.
•
4.ADMIX TECHNIQUE
(Mc Cord and Tyson)
• This reduces the potential discomfort arising from atrophic mucosa.
• Impression compound and green stick compound are mixed in the
ratio of 3 : 7 parts by weight are placed in a bowl of water at 60
degrees Celsius.
RATIONALE
Viscous admix of impression compound and green stick compound removes the soft
tissue folds and smoothens them over the mandibular bone.
ADVANTAGES:
1.Functional position of muscle are recorded in
single step.
2.Less chair time and economical.
• DISADVANTAGE:
1.Overextension of impression
• Kneaded to a homogenous mass that provides a working time of about
90 seconds.
• Wax spacer is removed; this homogenous mass is loaded and patient is
made to do various tongue movements.
5.COCKTAIL TECHNIQUE
• After making the primary impression, customized custom
tray is made with self cure acrylic resin.
• Rest are made on the custom tray with increased vertical
height, and impression compound softened and placed top
of mandibular rest.
• Patient is asked to close the mouth, so that mandibular
rests fit against the maxillary alveolar ridge.
• This would help in stabilisation of the tray during impression making
as it would prevent antero-posterior and medio-lateral displacement
of the tray.
• Impression and green stick compound are mixed in the ratio of 3:7
and loaded on the tissue surface.
• Patient is asked to perform functional movements and in this way
impression is recorded.
• ADVANTAGES:
1.Dislocating effect of muscles on the tray is avoided.
2.Rest made on the mandibular tray prevents displacement of the
tray.
6. ALL GREEN TECHNIQUE
• Green stick compound is kneaded to a homogenous mass and is loaded
on the special tray and border movements are done.
• Final impression made using zinc oxide eugenol paste.
7.FLANGE TECHNIQUE
(Lott And Levin)
• Labial and lingual borders are manipulated using Adaptol wax.
• Removal of excess wax from the inner surface of the tray.
• Carbide bur used to remove 1mm of resin from the crest of the ridge.
• Tray cleaned and painted with rubber base adhesive.
• Final impression made using polysulfide impression material.
8. MODIFIED FUNCTIONAL IMPRESSION TECHNIQUE
(CHANDRASHEKHARAN et AL)
69
1. Preparation of acrylic custom tray on primary cast with a window
over Atwood’s Class IV ridge.
2. Fabrication of a wax handle over the window.
3. Border molding of buccal and lingual flanges with A-silicone putty.
4. Trim the excess and overextended borders
5. Remove the wax handle
6. Inject light body A-silicone through the window
7. Final impression
Chandrashekharan et al. A Technique for Impressing the Severely Resorbed Mandibular Edentulous Ridge. Journal of Prosthodontics 00 (2011) 1–4 c 2011 by the American College of Prosthodontists
IMPRESSION TECHNIQUES
FOR FLABBY RIDGES
70
• A so-called ‘fibrous’ or ‘flabby’
ridge is a superficial area of mobile
soft tissue affecting the maxillary or
mandibular alveolar ridges.
• It can develop when hyperplastic
soft tissue replaces the alveolar
bone and is a common finding,
particularly in the upper anterior
region of long term denture
wearers.
71
APPROACHES TO MANAGEMENT OF FLABBY TISSUE
72
Surgical removal of fibrous tissue prior to conventional
prosthodontics
Implant retained prosthesis
Conventional prosthodontics without surgical intervention.
There are two impression principles which are reported to
overcome this problem:
• Mucodisplacive impression technique:
with the aim of compressing the loose flabby tissue to allow functional
support from it by replicating the contour of the ridge during
compression by occlusal forces.
• Mucostatic impression technique:
which aims to achieve support from the other firm areas of the arch and
maximizes retention.
73
R. W. I. Crawford, A. D. Walmsley. BRITISH DENTAL JOURNAL VOLUME 199 NO. 11 DEC 10 2005
One Part Impression Technique
(Sélective Perforation Tray)
74
A spaced special tray is fabricated from the primary cast for use with a low
viscosity impression material, such as impression plaster, low-viscosity
silicone or alginate.
Pressure on the unsupported, displaceable soft tissue can be minimised
further by the use of perforations in the tray overlying these areas
Lamb D J. Problems and solutions in complete denture prosthodontics. pp 57-60. London: Quintessence, 1993.
Controlled Lateral Pressure Technique
75
Tracing compound (green stick) is used to record the denture
bearing area using a correctly extended special tray.
A heated instrument is then used to remove the greenstick
related to the fibrous crestal tissues and the tray is perforated
in this region.
Light bodied silicone impression material is then syringed
onto the buccal and lingual aspects of the greenstick and the
impression gently inserted.
The excess material is extruded through the perforations and
theoretically the fibrous ridge will assume a resting central
position having been subjected to even lateral pressures.
Grant A A, Heath J R, McCord J F. Complete prosthodontics: problems, diagnosis and management. pp 90-92. London: Wolfe, 1994.
Palatal Splinting Using A Two-part Tray System
• The aim of this technique is to maintain the contour of the easily
displaceable tissue while the rest of the denture bearing area is recorded.
Devlin H. A method for recording an impression for a patient with a fibrous maxillary alveolar ridge. Quint Int 1985; 6: 395-397.
Selective Composition Flaming
77
By performing the impression in this way, the original relatively undistorted shape of the fibrous tissues is
retained while the tissues more capable of functional denture support are recorded in a displaced state.
Lamb D J. Problems and solutions in complete denture prosthodontics. pp 57-60. London: Quintessence, 1993.
Two Part Impression Technique:
Muco-static And Muco-displacive Combination
78
Close fitting cold-cured or
light cured acrylic base is
constructed so that the
flabby ridge area is left
uncovered
Appropriate border
correction is then carried out
Impression of the firm,
supported mucosa is
recorded in zinc oxide-
eugenol or medium-bodied
silicone
An impression of the
displaceable mucosa is then
recorded by applying or
syringing a thin mix of
impression plaster or light-
bodied silicone
Osborne J. Two impression methods for mobile fibrous ridges. Br Dent J 1964; 117: 392-394
Modifications:
• Window Technique:
– An alternative, described by Hobkirk, McCord and
Grant, involves removal of acrylic from a complete
special tray creating a window over the displaceable area.
– The advantage of a window design means that the
appropriate border correction can be undertaken and
checked around the entire sulcus before the second stage
of the impression is completed.
79
80
Cage Technique:
Used for multiple dispersed areas of fibrous tissue where
multiple small windows are made.
• Modified Fluid Wax Technique (FOR RESORBED + FLABBY RIDGES):
81
Tan et al. Modified fluid wax impression for a severely resorbed edentulous mandibular ridge. J Prosthet Dent. 2009;101:279-282
IMPRESSION TECHNIQUES
FOR LIMITED MOUTH OPENING AND MICROSTOMIA
82
83
Baker et al
(J Prosthet Dent 2000;84:241-4.)
• Hydrocolloid primary impression using sectional plastic stock tray.
• Fabrication of sectional light cure custom tray segment by segment
connected by horizontal hinge.
• Elastomeric impression is made with first half of the tray followed by
the second part.
• Approximate both the sections while making the second sectional
impression and close the horizontal hinge. Allow the impression to set.
• Remove the impression in sections.
• Evaluate- reassemble- pour
Colvenkar S
Journal of Prosthodontics 19 (2010) 161–165 c 2009
84
Moghadam BK
(J PROSTHET DENT 1992;67:23-5.)
• Make an impression of the left side of the mouth with irreversible
hydrocolloid by using tray No. 1
• Pour this impression with dental stone as soon as possible.
• Separate the cast from the impression when the stone has set.
• Make a 45-degree bevel with a sharp knife at the medial border of
the cast anteroposteriorly to increase the contact area of this cast
with the next pour
• Make an impression of the right side of the arch with irreversible
hydrocolloid by using tray No. 2.
• Position the cast made from the first impression in this impression
and stabilize the cast in the impression.
• Pour the impression containing the cast in dental stone.
• Separate the cast from the impression after the stone has set and
trim the borders.
85
McCord JF, Tyson KW, Blair IS. A sectional complete denture for a patient with microstomia. J Prosthet Dent 1989;61:645–7.
Luebke RJ
J Prosthet Dent 1984;52:135–7.
• A plastic tray was chosen by measuring the ridge with calipers and then cut in two sections with a disc
with the handle in the larger section.
• Three building blocks (toy) (LEGO Systems, Inc., Enfield, Conn) were selected to reapproximate
sectional trays as one unit which were fixed to the tray by the help of autopolymerising resin.
• Depending on whether the patient is dentulous or edentulous, polyether or zinc oxide eugenol paste was
used to make impressions.
• With the larger section tray, impression of two thirds of the arch was made after which the impression
was removed from the mouth, allowed to set and trimmed flush the edge of the tray using surgical blade.
• This was further repeated with second sectional tray and both were joined and poured
86
Cura et al
J Prosthet Dent 2003;89:540–3.
• Putty-type impression material can be manually dispensed intraorally to
serve as custom trays to make diagnostic maxillary and mandibular
impressions.
• Once the impression putty is placed onto the denture bearing areas, the
impression material was border moulded to the appropriate contour.
• The impression putty custom tray was removed after the material
polymerized. Impression material was loaded onto the silicone custom
trays and inserted intra orally.
87
88
Mandibular sectional stock tray to be joined with
acrylic hook and steel bur at the handle region.
A is the metal pin
B is the bend to hook around handle C
C is bent handle sections
D is the metal tubing within acrylic into which A will be fitted
E is the fins to approximate tray sections
Maxillary sectional tray locked at the
handle region with steel pins into
tubings and acrylic hook into bent
handles.
Hegde C. et al
Journal of Prosthodontic Research 56 (2012) 142–146
89
Foldable mandibular sectional tray with steel
burs and acrylic blocks which are folded while
inserting into the oral cavity and opened on
the arch to seat on the pins.
Anterior and posterior tray sections joined by steel burs
IMPRESSION TECHNIQUES
FOR PATIENT WITH GAG REFLEX
90
General Management and Useful Tips
• Call well rested patient
• Avoid patient visits - immediately after meals
- early morning appointment
• Calm environment
• Continuous reassurance to the patient
• One technique common to all
Shipmon and Massad described it as “CARING ATTITUDE FACTOR”
Behavioural Techniques
Behaviour modification
Objectives: Reduce anxiety and ‘‘unlearn’’ the behaviour that provoke
gagging.
Relaxation Distraction Suggestion
Systemic
Desensitization
Singer’s Desensitisation Technique
• Also called “marble technique”
• Involves 7 visits
1st visit: 5 marbles placed in mouth, patient instructed to keep them for 1 week
2nd visit: ability to tolerate marbles evaluated
3rd visit: before making impressions, topical anaesthetic applied , primary impression made, base plates
made with a rough finish
4th visit: lower base plate inserted , 3 marbles placed and a “training bead”
5th visit: upper base plate inserted , asked to discontinue marbles
6th visit: patient able to endure the presence of both base plates , occlusal rims constructed
Jaw relation taken , try in completed.
7th visit: completed lower denture inserted first + upper base plate + a training bead.
Next upper denture inserted
Singer JL. The marble technique : method for treating the hopeless gagger for complete dentures. J. Prosthet. Dent. 1973;8
Impression Technique
• If stock trays are used, a posterior dam can be constructed in the
tray using wax or silicone putty. This will help to prevent material
exuding from back of the tray.
• In patients with a history of gagging, consider using a less fluid
impression material with faster setting characteristics.
• Avoid overloading trays and initially seat the tray posteriorly.
• Use of sectional impression trays
IMPRESSION TECHNIQUES
FOR NEUTRAL ZONE
95
• The neutrocentric concept requires that posterior mandibular
denture teeth be arranged to occupy as central a location as
possible, relative to the denture foundation, without disturbing
adequate tongue function
• This tooth arrangement is said to facilitate mandibular denture
stability during occlusal loading
• The term neutral zone concept was coined by Beresin and
Schiesser in 1976. It is that region where forces imposed by the
tongue directed outward are neutralized by inwardly directed
forces originating from the cheeks and lips during normal
neuromuscular function.
96
97
Historically, different terminology has been loosely associated with this concept, including
• dead zone
• stable zone
• zone of minimal conflict
• zone of equilibrium
• zone of least interference
• biometric denture space
• denture space
• potential denture space
Arranging artificial teeth within the neutral zone achieves 2 important objectives:
(1) Prosthetic teeth do not interfere with normal muscle function
(2) Normal oral and perioral muscle activity imparts force against the complete dentures
that serves to stabilize and retain the prostheses rather than cause denture
displacement
98
• A soft material that can be molded by the action of the
tongue, cheek, and lips is used to establish the neutral
zone.
• Modelling compound softened at 65 0F is adapted to
the top of the lower tray and shaped similar to a wax
occlusion rim. The tray and modeling compound are
placed in the mouth, and the patient is instructed to
swallow.
• The actions of the muscles and tongue during
swallowing mold the soft compound into the neutral
zone and shape the polished surfaces of the denture.
• The modeling compound is allowed to harden in the
mouth sufficiently to prevent distortion and is placed
in cold water to harden for trimming.
• The modeling compound is trimmed so that the
occlusal plane is established approximately 1 to 2 mm
below the lateral border of the tongue when it is at rest.
99
SUMMARY
100
Thank You
101

Complete denture impressions

  • 1.
    CLINICAL ASPECTS OFIMPRESSIONS COMPLETE DENTURE PROSTHODONTICS AAMIR GODIL SECOND YEAR P.G. DEPARTMENT OF PROSTHODONTICS M.A.R.D.C.
  • 2.
    “An ideal impressionmust be in the mind of a dentist before it is in his hand. He must literally make the impression rather than take it” -M.M. Devan 2
  • 3.
    IMPRESSION MATERIALS THEORIES OFIMPRESSION MAKING HISTORICAL BACKGROUND PRINCIPLES OF IMPRESSIONS IMPRESSIONS IN COMPROMISED SITUATIONS ANATOMICAL CONSIDERATIONS 3 BORDER MOLDING CLASSIFICATION OF IMPRESSIONS CLINICAL CONSIDERATIONS
  • 4.
  • 5.
    OBJECTIVES OF IMPRESSIONMAKING 5 RETENTION STABILITY SUPPORT ESTHETICS PRESERVATION OF REMAINING STRUCTURES
  • 6.
    RETENTION ANATOMICAL FACTORS • SIZE OF DENTURE BEARINGAREA • QUALITY OF DENTURE BEARING AREA PHYSIOLOGIC FACTORS • SALIVA: QUALITY AND QUANTITY PHYSICAL FACTORS • ADHESION • COHESION • INTERFACIAL SURFACE TENSION • CAPILLARITY • ATMOSPHERIC PRESSURE AND PERIPHERAL SEAL MECHANICAL FACTORS. • UNDERCUTS • RETENTIVE SPRINGS • MAGNETIC FORCES • DENTURE ADHESIVES • SUCTION CHAMBERS AND DISCS MUSCULAR FACTORS • NEUTRAL ZONE • CORRECT OCCLUSAL PLANE 6
  • 7.
    STABILITYFACTORSAFFECTING STABILITY VERTICAL HEIGHT OFRESIDUAL ALVEOLAR RIDGE QUALITY OF SOFT TISSUE COVERING THE RIDGE QUALITY OF IMPRESSION LEVEL AND CONTOUR OF OCCLUSAL RIMS ARRANGEMENT OF ARTIFICIAL TEETH CONTOUR OF POLISHED SURFACES 7
  • 8.
    SUPPORT SNOW-SHOE EFFECT DISTRIBUTION OF FORCES OVER ALARGER AREA DENTURE BASE SHOULD COVER AS MUCH DENTURE BEARING AREA AS POSSIBLE 8
  • 9.
  • 10.
    PRESERVATION OF REMAININGSTRUCTURES • USE OF SELECTIVE PRESSURE TECHNIQUE FOR MAKING IMPRESSION • AVOID OVER-EXTENSION 10
  • 11.
  • 12.
    BEFORE MAKING THEIMPRESSION • Examination and conditioning of the patient and the mouth. • Complete case history • Clinical examination • Identifying and correcting adverse conditions • Factors that complicate impression making • Old denture wearer. 12
  • 13.
    SELECTION OF IMPRESSIONTECHNIQUE • Clinical findings • Experience of the dentist • Availability of materials • Patient related factors – Time – Undercuts – Old denture wearer 13
  • 14.
    WHAT ARE THEOPTIONS? • Preliminary impression materials: – impression compound – alginate • Final impression materials: – alginate – silicon based elastomers – zinc-oxide eugenol impression paste – impression plaster – tissue conditioners – waxes 14
  • 15.
    IMPRESSION COMPOUND • Easilycorrectable • Can be border molded • Not influenced by saliva • Can be used as impression tray • Can be scraped easily to provide relief • Viscous • Cannot record fine details • Compound sticks used for border molding • Inelastic 15
  • 16.
    ALGINATE • Elastic • Primaryand final impression • Records good details • Not correctable but easily remade • Not dimensionally stable • Does not adhere to tray 16
  • 17.
    ELASTOMERIC IMPRESSION MATERIALS •Elastic • Fine details • Hydrophobic • Adhesive required • Available in different viscosities • Dimensionally stable • Cannot be adjusted after set • Prolonged setting time 17
  • 18.
    ZINC OXIDE EUGENOLIMPRESSION PASTE • Rigid and inelastic • Adheres to tray • Flows readily and records fine details • Burning sensation and tissue irritation • Dimensionally stable • Bulk of the impression is minimal • Flaking or breaking during trimming 18
  • 19.
    IMPRESSION PLASTER • Minimalpressure technique • Flows readily and records fine details • Rigid • Wash impression • Absorbs saliva • Dimensionally accurate with anti expansion solution 19
  • 20.
    TISSUE CONDITIONERS • Functionalimpression • Relatively expensive 20
  • 21.
    WAXES • Flow atmouth temperature • Exert pressure • Fine details not recorded • Corrections can be made 21
  • 22.
  • 23.
  • 24.
    24 TRAY SELECTION POSITIONBORDERS AT HAMULAR NOTCH CHECK CLEARANCE AT FRENAL AREAS ADJUST THE TRAY USING PLIERS SMOOTHEN THE TRAY BORDERS
  • 25.
  • 26.
  • 27.
  • 28.
    MANDIBULAR ALGINATE IMPRESSION 28 MARKRETROMOLAR PAD AREA AND ENSURE TRAY EXTENSION
  • 29.
    29 PATIENT ASKED TODO TONGUE MOVEMENTS GENTLY MOLD LABIAL AND BUCCAL AREAS PATIENT ASKED TO RAISE THE TONGUE AND TRAY IS ROTATED AND PLACED
  • 30.
  • 31.
  • 32.
    COMMON FAULTS MANDIBULAR • Insufficientdepth in posterior lingual sulcus • Insufficient depth in lingual, labial and buccal sulci • Edge of the tray showing through the impression • An asymmetrical impression MAXILLARY • Deficiency in the midline of palatal vault • Excess material extending beyond posterior palatal border of the tray • Insufficient depth in one or more region of sulci • Tray flange exposure 32
  • 33.
    PREPARATION FOR FINALIMPRESSION 33
  • 34.
    34 CHECKING TRAY EXTENSIONS Visualexamination The diagnostic impression Correction of over extension Correction of under extension
  • 35.
  • 36.
  • 37.
    TISSUE STOPS • Preventseating of the tray too superiorly or posteriorly • Stabilize the tray • Uniform thickness of the material • Molar or cuspid areas 37
  • 38.
    BORDER MOLDING • Theshaping of the border areas of an impression material by functional or manual manipulation of the size of the vestibule. • Materials: – Modelling compound sticks – Auto-polymerizing acrylic resin – Metallic pastes – Elastomeric materials – Impression waxes 38
  • 39.
    • REQUIREMENTS: – Havesufficient body – Allow some pre-shaping of the borders – Setting time 3-5minutes – Retain adequate flow when seating in the mouth – Allow finger placement of the material in to deficient parts after seating of tray – Not cause excessive displacement of tissues – Readily trimmed and carved so that excess material can be carved and borders shaped before the final impression is made 39
  • 40.
  • 41.
  • 42.
  • 43.
  • 44.
    TESTS FOR RETENTION MAXILLARY •Upward and outward pressure in the incisor region • Upward and outward pressure in the premolar region • Pulling the upper lip downward MANDIBULAR • Protrude the tongue • Move tongue in lateral direction • Roll tongue back to touch palate • Open the mouth. • Exerting vertical pull on handle • Forward pressure on distal aspect of the handle 44
  • 45.
    FINAL IMPRESSION PREPARATION • Removingthe relief wax • Removing spacer wax • Escape holes • Reducing the borders • Applying adhesive • Protecting the mouth • Drying the mouth • Instructing the patient MAKING THE IMPRESSION • Mixing • Loading • Seating • Removing the impression • Inspecting • Correcting • Remaking 45
  • 46.
    BORDER MOLDING AND ANATOMICCONSIDERATIONS 46
  • 47.
  • 48.
  • 49.
  • 50.
  • 51.
  • 52.
    SPECIAL CONSIDERATIONS FOR IMPRESSIONMAKING IN COMPLETE DENTURE PROSTHODONTICS 52
  • 53.
  • 54.
    PROBLEMS ENCOUNTERED INMAKING AN IMPRESSION OF RESORBED MANDIBULAR RIDGE • Mucosa : thin and atrophic • Inadequate denture bearing areas • Attachment of muscles near the crest of the ridge • Interference of tongue 54
  • 55.
    FINAL IMPRESSION TECHNIQUESTO MANAGE RESORBED MANDIBULAR RIDGES: 1. Conventional technique 2. Functional impression technique 3. Elastomeric technique 4. Admix technique 5. Cocktail technique 6. All green technique 7. Flange technique 8. Modified Functional Impression Technique
  • 56.
    1.CONVENTIONAL TECHNIQUE (Boucher) • Bordermoulding done with green stick compound • Final impression made using zinc oxide eugenol impression paste. • Impression recorded using open mouth technique.
  • 57.
    ADVANTAGES: 1.Easy handling 2.No dimensionalchange 3.Reproduction of fine details. DISADVANTAGES: 1.Short manipulation time 2.Hardens quickly before the functional movements can be recorded.
  • 58.
    2.FUNCTIONAL IMPRESSION TECHNIQUE (Winkler) •Closed mouth functional technique. Jaw relations(horizontal and vertical) are recorded prior to the final impression. Tissue conditioners are added on mandibular tissue surface. Patient is asked to close the mouth in pre recorded vertical dimension and is asked to perform functional movements like puffing, whistling, blowing and smiling. Three applications of tissue conditioners done at an interval of 8-10 minutes and functional movements were recorded.
  • 59.
    ADVANTAGES 1.Overall denture hasbetter surface contact 2.Improved retention 3.Interference due to tray handling is eliminated 4.Less chances of over and under extension as the movements are performed by the patient DISADVANTAGES 1.Restriction of tongue movement therefore inaccurate recording of lingual border. 2.Completely depended on patient.
  • 60.
    3.ELASTOMERIC IMPRESSION TECHNIQUE: Putty consistencyfor border molding Apply tray adhesive Light body for final impression Ensure all movements are done by patient
  • 61.
    ADVANTAGES: 1.Single step bordermoulding. 2.Minute details are recorded due to the use of light body addition silicone. DISADVANTAGES: 1.Single step border moulding is technique sensitive 2.Comparatively expensive.
  • 62.
    • 4.ADMIX TECHNIQUE (Mc Cordand Tyson) • This reduces the potential discomfort arising from atrophic mucosa. • Impression compound and green stick compound are mixed in the ratio of 3 : 7 parts by weight are placed in a bowl of water at 60 degrees Celsius. RATIONALE Viscous admix of impression compound and green stick compound removes the soft tissue folds and smoothens them over the mandibular bone.
  • 63.
    ADVANTAGES: 1.Functional position ofmuscle are recorded in single step. 2.Less chair time and economical. • DISADVANTAGE: 1.Overextension of impression • Kneaded to a homogenous mass that provides a working time of about 90 seconds. • Wax spacer is removed; this homogenous mass is loaded and patient is made to do various tongue movements.
  • 64.
    5.COCKTAIL TECHNIQUE • Aftermaking the primary impression, customized custom tray is made with self cure acrylic resin. • Rest are made on the custom tray with increased vertical height, and impression compound softened and placed top of mandibular rest. • Patient is asked to close the mouth, so that mandibular rests fit against the maxillary alveolar ridge.
  • 66.
    • This wouldhelp in stabilisation of the tray during impression making as it would prevent antero-posterior and medio-lateral displacement of the tray. • Impression and green stick compound are mixed in the ratio of 3:7 and loaded on the tissue surface. • Patient is asked to perform functional movements and in this way impression is recorded. • ADVANTAGES: 1.Dislocating effect of muscles on the tray is avoided. 2.Rest made on the mandibular tray prevents displacement of the tray.
  • 67.
    6. ALL GREENTECHNIQUE • Green stick compound is kneaded to a homogenous mass and is loaded on the special tray and border movements are done. • Final impression made using zinc oxide eugenol paste.
  • 68.
    7.FLANGE TECHNIQUE (Lott AndLevin) • Labial and lingual borders are manipulated using Adaptol wax. • Removal of excess wax from the inner surface of the tray. • Carbide bur used to remove 1mm of resin from the crest of the ridge. • Tray cleaned and painted with rubber base adhesive. • Final impression made using polysulfide impression material.
  • 69.
    8. MODIFIED FUNCTIONALIMPRESSION TECHNIQUE (CHANDRASHEKHARAN et AL) 69 1. Preparation of acrylic custom tray on primary cast with a window over Atwood’s Class IV ridge. 2. Fabrication of a wax handle over the window. 3. Border molding of buccal and lingual flanges with A-silicone putty. 4. Trim the excess and overextended borders 5. Remove the wax handle 6. Inject light body A-silicone through the window 7. Final impression Chandrashekharan et al. A Technique for Impressing the Severely Resorbed Mandibular Edentulous Ridge. Journal of Prosthodontics 00 (2011) 1–4 c 2011 by the American College of Prosthodontists
  • 70.
  • 71.
    • A so-called‘fibrous’ or ‘flabby’ ridge is a superficial area of mobile soft tissue affecting the maxillary or mandibular alveolar ridges. • It can develop when hyperplastic soft tissue replaces the alveolar bone and is a common finding, particularly in the upper anterior region of long term denture wearers. 71
  • 72.
    APPROACHES TO MANAGEMENTOF FLABBY TISSUE 72 Surgical removal of fibrous tissue prior to conventional prosthodontics Implant retained prosthesis Conventional prosthodontics without surgical intervention.
  • 73.
    There are twoimpression principles which are reported to overcome this problem: • Mucodisplacive impression technique: with the aim of compressing the loose flabby tissue to allow functional support from it by replicating the contour of the ridge during compression by occlusal forces. • Mucostatic impression technique: which aims to achieve support from the other firm areas of the arch and maximizes retention. 73 R. W. I. Crawford, A. D. Walmsley. BRITISH DENTAL JOURNAL VOLUME 199 NO. 11 DEC 10 2005
  • 74.
    One Part ImpressionTechnique (Sélective Perforation Tray) 74 A spaced special tray is fabricated from the primary cast for use with a low viscosity impression material, such as impression plaster, low-viscosity silicone or alginate. Pressure on the unsupported, displaceable soft tissue can be minimised further by the use of perforations in the tray overlying these areas Lamb D J. Problems and solutions in complete denture prosthodontics. pp 57-60. London: Quintessence, 1993.
  • 75.
    Controlled Lateral PressureTechnique 75 Tracing compound (green stick) is used to record the denture bearing area using a correctly extended special tray. A heated instrument is then used to remove the greenstick related to the fibrous crestal tissues and the tray is perforated in this region. Light bodied silicone impression material is then syringed onto the buccal and lingual aspects of the greenstick and the impression gently inserted. The excess material is extruded through the perforations and theoretically the fibrous ridge will assume a resting central position having been subjected to even lateral pressures. Grant A A, Heath J R, McCord J F. Complete prosthodontics: problems, diagnosis and management. pp 90-92. London: Wolfe, 1994.
  • 76.
    Palatal Splinting UsingA Two-part Tray System • The aim of this technique is to maintain the contour of the easily displaceable tissue while the rest of the denture bearing area is recorded. Devlin H. A method for recording an impression for a patient with a fibrous maxillary alveolar ridge. Quint Int 1985; 6: 395-397.
  • 77.
    Selective Composition Flaming 77 Byperforming the impression in this way, the original relatively undistorted shape of the fibrous tissues is retained while the tissues more capable of functional denture support are recorded in a displaced state. Lamb D J. Problems and solutions in complete denture prosthodontics. pp 57-60. London: Quintessence, 1993.
  • 78.
    Two Part ImpressionTechnique: Muco-static And Muco-displacive Combination 78 Close fitting cold-cured or light cured acrylic base is constructed so that the flabby ridge area is left uncovered Appropriate border correction is then carried out Impression of the firm, supported mucosa is recorded in zinc oxide- eugenol or medium-bodied silicone An impression of the displaceable mucosa is then recorded by applying or syringing a thin mix of impression plaster or light- bodied silicone Osborne J. Two impression methods for mobile fibrous ridges. Br Dent J 1964; 117: 392-394
  • 79.
    Modifications: • Window Technique: –An alternative, described by Hobkirk, McCord and Grant, involves removal of acrylic from a complete special tray creating a window over the displaceable area. – The advantage of a window design means that the appropriate border correction can be undertaken and checked around the entire sulcus before the second stage of the impression is completed. 79
  • 80.
    80 Cage Technique: Used formultiple dispersed areas of fibrous tissue where multiple small windows are made.
  • 81.
    • Modified FluidWax Technique (FOR RESORBED + FLABBY RIDGES): 81 Tan et al. Modified fluid wax impression for a severely resorbed edentulous mandibular ridge. J Prosthet Dent. 2009;101:279-282
  • 82.
    IMPRESSION TECHNIQUES FOR LIMITEDMOUTH OPENING AND MICROSTOMIA 82
  • 83.
    83 Baker et al (JProsthet Dent 2000;84:241-4.) • Hydrocolloid primary impression using sectional plastic stock tray. • Fabrication of sectional light cure custom tray segment by segment connected by horizontal hinge. • Elastomeric impression is made with first half of the tray followed by the second part. • Approximate both the sections while making the second sectional impression and close the horizontal hinge. Allow the impression to set. • Remove the impression in sections. • Evaluate- reassemble- pour
  • 84.
    Colvenkar S Journal ofProsthodontics 19 (2010) 161–165 c 2009 84
  • 85.
    Moghadam BK (J PROSTHETDENT 1992;67:23-5.) • Make an impression of the left side of the mouth with irreversible hydrocolloid by using tray No. 1 • Pour this impression with dental stone as soon as possible. • Separate the cast from the impression when the stone has set. • Make a 45-degree bevel with a sharp knife at the medial border of the cast anteroposteriorly to increase the contact area of this cast with the next pour • Make an impression of the right side of the arch with irreversible hydrocolloid by using tray No. 2. • Position the cast made from the first impression in this impression and stabilize the cast in the impression. • Pour the impression containing the cast in dental stone. • Separate the cast from the impression after the stone has set and trim the borders. 85 McCord JF, Tyson KW, Blair IS. A sectional complete denture for a patient with microstomia. J Prosthet Dent 1989;61:645–7.
  • 86.
    Luebke RJ J ProsthetDent 1984;52:135–7. • A plastic tray was chosen by measuring the ridge with calipers and then cut in two sections with a disc with the handle in the larger section. • Three building blocks (toy) (LEGO Systems, Inc., Enfield, Conn) were selected to reapproximate sectional trays as one unit which were fixed to the tray by the help of autopolymerising resin. • Depending on whether the patient is dentulous or edentulous, polyether or zinc oxide eugenol paste was used to make impressions. • With the larger section tray, impression of two thirds of the arch was made after which the impression was removed from the mouth, allowed to set and trimmed flush the edge of the tray using surgical blade. • This was further repeated with second sectional tray and both were joined and poured 86
  • 87.
    Cura et al JProsthet Dent 2003;89:540–3. • Putty-type impression material can be manually dispensed intraorally to serve as custom trays to make diagnostic maxillary and mandibular impressions. • Once the impression putty is placed onto the denture bearing areas, the impression material was border moulded to the appropriate contour. • The impression putty custom tray was removed after the material polymerized. Impression material was loaded onto the silicone custom trays and inserted intra orally. 87
  • 88.
    88 Mandibular sectional stocktray to be joined with acrylic hook and steel bur at the handle region. A is the metal pin B is the bend to hook around handle C C is bent handle sections D is the metal tubing within acrylic into which A will be fitted E is the fins to approximate tray sections Maxillary sectional tray locked at the handle region with steel pins into tubings and acrylic hook into bent handles. Hegde C. et al Journal of Prosthodontic Research 56 (2012) 142–146
  • 89.
    89 Foldable mandibular sectionaltray with steel burs and acrylic blocks which are folded while inserting into the oral cavity and opened on the arch to seat on the pins. Anterior and posterior tray sections joined by steel burs
  • 90.
  • 91.
    General Management andUseful Tips • Call well rested patient • Avoid patient visits - immediately after meals - early morning appointment • Calm environment • Continuous reassurance to the patient • One technique common to all Shipmon and Massad described it as “CARING ATTITUDE FACTOR”
  • 92.
    Behavioural Techniques Behaviour modification Objectives:Reduce anxiety and ‘‘unlearn’’ the behaviour that provoke gagging. Relaxation Distraction Suggestion Systemic Desensitization
  • 93.
    Singer’s Desensitisation Technique •Also called “marble technique” • Involves 7 visits 1st visit: 5 marbles placed in mouth, patient instructed to keep them for 1 week 2nd visit: ability to tolerate marbles evaluated 3rd visit: before making impressions, topical anaesthetic applied , primary impression made, base plates made with a rough finish 4th visit: lower base plate inserted , 3 marbles placed and a “training bead” 5th visit: upper base plate inserted , asked to discontinue marbles 6th visit: patient able to endure the presence of both base plates , occlusal rims constructed Jaw relation taken , try in completed. 7th visit: completed lower denture inserted first + upper base plate + a training bead. Next upper denture inserted Singer JL. The marble technique : method for treating the hopeless gagger for complete dentures. J. Prosthet. Dent. 1973;8
  • 94.
    Impression Technique • Ifstock trays are used, a posterior dam can be constructed in the tray using wax or silicone putty. This will help to prevent material exuding from back of the tray. • In patients with a history of gagging, consider using a less fluid impression material with faster setting characteristics. • Avoid overloading trays and initially seat the tray posteriorly. • Use of sectional impression trays
  • 95.
  • 96.
    • The neutrocentricconcept requires that posterior mandibular denture teeth be arranged to occupy as central a location as possible, relative to the denture foundation, without disturbing adequate tongue function • This tooth arrangement is said to facilitate mandibular denture stability during occlusal loading • The term neutral zone concept was coined by Beresin and Schiesser in 1976. It is that region where forces imposed by the tongue directed outward are neutralized by inwardly directed forces originating from the cheeks and lips during normal neuromuscular function. 96
  • 97.
  • 98.
    Historically, different terminologyhas been loosely associated with this concept, including • dead zone • stable zone • zone of minimal conflict • zone of equilibrium • zone of least interference • biometric denture space • denture space • potential denture space Arranging artificial teeth within the neutral zone achieves 2 important objectives: (1) Prosthetic teeth do not interfere with normal muscle function (2) Normal oral and perioral muscle activity imparts force against the complete dentures that serves to stabilize and retain the prostheses rather than cause denture displacement 98
  • 99.
    • A softmaterial that can be molded by the action of the tongue, cheek, and lips is used to establish the neutral zone. • Modelling compound softened at 65 0F is adapted to the top of the lower tray and shaped similar to a wax occlusion rim. The tray and modeling compound are placed in the mouth, and the patient is instructed to swallow. • The actions of the muscles and tongue during swallowing mold the soft compound into the neutral zone and shape the polished surfaces of the denture. • The modeling compound is allowed to harden in the mouth sufficiently to prevent distortion and is placed in cold water to harden for trimming. • The modeling compound is trimmed so that the occlusal plane is established approximately 1 to 2 mm below the lateral border of the tongue when it is at rest. 99
  • 100.
  • 101.

Editor's Notes

  • #51 MODIOLUS: Orbicularis oris Buccinator Levator anguli oris Depressor anguli oris Zygomaticus major Risorius Platysma Levator labii superioris
  • #57 Easy and can be done with limited clinical expertise Only limited functional movements can be recorded since material sets quickly
  • #59 Easy to use. Can be used on existing dentures ‘All movements done by patient, cannot be employed in patients who have lost neuromuscular control Tissue conditioners: Introduced in the year 1967 by KYDD And Mandley They are soft denture materials applied on the fitting surface of the denture and they act as temporary cushion which minimize transfer of excessive masticatory forces to the underlying tissue. Remain plastic from 24-36 hours Should be changed once in 3 days :pink viscuous COE-SOFT Apart from this light body polysulfide can also be used.
  • #61 Single step border molding can be used in uncooperative patients or patients with atrophic mucosa who cannot withstand warmth of modelling compound or burning sensation due to final impression materials like ZOE However, the borders may be thicker due to the consistency of the putty
  • #62 Smith et al described a technique using a polyether impression material for border moulding the complete denture impression trays. The major advantages of this technique were that the border moulding could be accomplished in one step and that the patient’s functional movement was used in forming the borders Tan et al. [19] concluded that polyether impression material requires less time to complete the border moulding process; the border recorded was longer and of less operator variability when compared with modelling plastic.
  • #65 Follows dynamic impression technique for the construction of tray. Primary impression:alginate Tray is made and perforated and is extended within the limits of muscular activity Then stops are made on the try using green stick modelling compound Madibular rest is constructed on the tray surface
  • #77 First described by Osborne in 1964 for use in the mandible, this is a popular technique described by many authors as it ensures that pressure exerted by the tray does not cause distortion of the mobile tissues. Modified by Devlin
  • #93 RELAXATION Relaxation abolishes gag reflex Patient should be made comfortable with the surroundings. Provide assurance in a calm atmosphere. Avoiding obvious display of instruments, using soothing pictures an music in reception areas and surgeries. DISTRACTION Temporarily diverts patients attention Techniques employed: Deep rhythemic breathing (Hoad reddick) Breathe rhythemically through nose and rhythemically tap right foot on floor(Kovats) Engage patient in a conversation of special interest to the patient (Landa) Ask the patient to hold one leg in air, as muscles get fatigued more concious efforts will be required to hold the leg in that position(Krol) SUGGESTION Distraction technique refined by adding an element of suggestion Patient must be informed that retching will not occur during distraction activity Use of visual imagary & hypnosis SYSTEMIC DESENSITIZATION In this technique patient is gradually exposed to some aversive stimuli. And then Duration, intensity & frequency of stimulus is slowly increased Ex: Singer technique