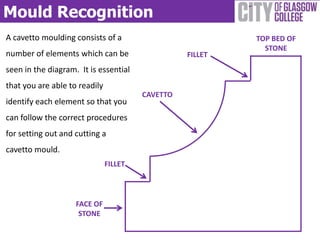
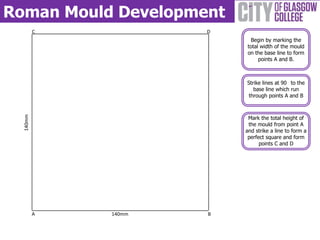
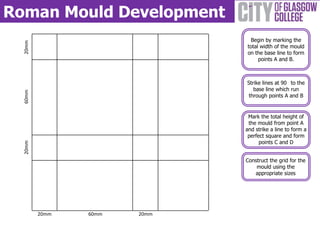
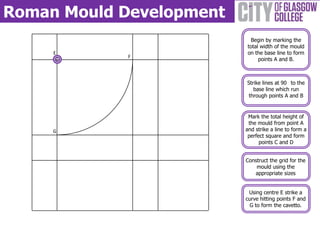
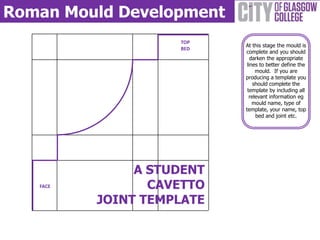
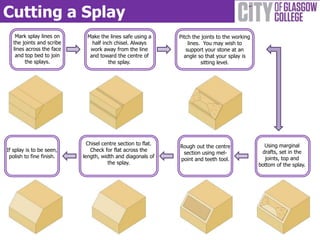
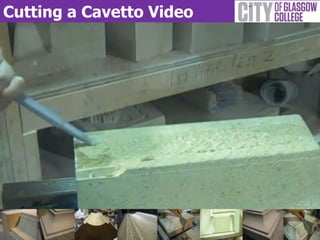
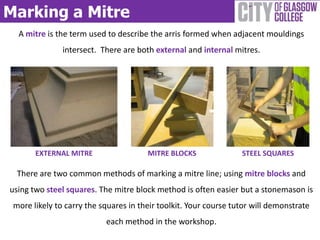
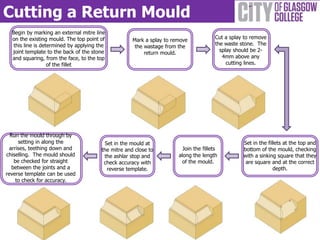
Cutting a Cavetto Mould
Introduction for Stonemasons


                               Stonemasonry Department 2012
Mould Recognition
A cavetto moulding consists of a                           TOP BED OF
                                                             STONE
number of elements which can be                   FILLET
seen in the diagram. It is essential
that you are able to readily
                                        CAVETTO
identify each element so that you
can follow the correct procedures
for setting out and cutting a
cavetto mould.
                               FILLET


                    FACE OF
                     STONE
Roman Mould Development
                           Begin by marking the
                          total width of the mould
                          on the base line to form
                               points A and B.


  A        140mm     B
Roman Mould Development
                           Begin by marking the
                          total width of the mould
                          on the base line to form
                               points A and B.


                          Strike lines at 90 to the
                             base line which run
                           through points A and B
  140mm


          A   140mm   B
Roman Mould Development
          C           D
                           Begin by marking the
                          total width of the mould
                          on the base line to form
                               points A and B.


                          Strike lines at 90 to the
                             base line which run
                           through points A and B
  140mm


                           Mark the total height of
                           the mould from point A
                          and strike a line to form a
                           perfect square and form
                                points C and D


          A   140mm   B
Roman Mould Development
                               Begin by marking the
  20mm


                              total width of the mould
                              on the base line to form
                                   points A and B.


                              Strike lines at 90 to the
                                 base line which run
  60mm


                               through points A and B


                               Mark the total height of
                               the mould from point A
                              and strike a line to form a
                               perfect square and form
                                    points C and D
  20mm


                              Construct the grid for the
                                  mould using the
                                 appropriate sizes


         20mm   60mm   20mm
Roman Mould Development
                           Begin by marking the
                          total width of the mould
     E                    on the base line to form
            F
                               points A and B.


                          Strike lines at 90 to the
                             base line which run
                           through points A and B


                           Mark the total height of
                           the mould from point A
     G                    and strike a line to form a
                           perfect square and form
                                points C and D


                          Construct the grid for the
                              mould using the
                             appropriate sizes


                           Using centre E strike a
                          curve hitting points F and
                            G to form the cavetto.
Roman Mould Development
                    TOP
                           At this stage the mould is
                    BED
                           complete and you should
                              darken the appropriate
                            lines to better define the
                                mould. If you are
                           producing a template you
                               should complete the
                            template by including all
                             relevant information eg
                               mould name, type of
                           template, your name, top
                                bed and joint etc.


               A STUDENT
   FACE          CAVETTO
          JOINT TEMPLATE
Cutting a Splay
    Mark splay lines on     Make the lines safe using a       Pitch the joints to the working
   the joints and scribe      half inch chisel. Always            lines. You may wish to
   lines across the face     work away from the line             support your stone at an
    and top bed to join      and toward the centre of           angle so that your splay is
        the splays.                   the splay.                        sitting level.


                             Chisel centre section to flat.                                       Using marginal
                                                              Rough out the centre
If splay is to be seen,       Check for flat across the                                          drafts, set in the
                                                               section using mel-
 polish to fine finish.    length, width and diagonals of                                         joints, top and
                                                              point and teeth tool.
                                      the splay.                                                bottom of the splay.
Cutting a Cavetto
    Hold template to top bed and face of              Mark template to both              Cut a splay to remove
   stone, making sure to align it properly           joints and scribe across            the waste stone. The
   by holding a straight edge against the            the top bed and face to               splay should be 2-
   aligned face and bringing the template                join the profiles.                 4mm above any
         to meet the straight edge.                                                           cutting lines.


   Run the mould through by
  setting in along the arrises,           Set in the mould on                                       Set in the fillets at the top and
                                         both joints and check             Join the fillets         bottom of the mould, checking
 teething down and chiselling.
The mould should be checked               accuracy with joint            along the length           with a sinking square that they
for straight between the joints               and reverse                  of the mould.             are square and at the correct
and a reverse template can be                  templates.                                                         depth.
  used to check for accuracy.
Cutting a Cavetto Video
Marking a Mitre
  A mitre is the term used to describe the arris formed when adjacent mouldings
               intersect. There are both external and internal mitres.


       EXTERNAL MITRE                  MITRE BLOCKS               STEEL SQUARES

  There are two common methods of marking a mitre line; using mitre blocks and
using two steel squares. The mitre block method is often easier but a stonemason is
 more likely to carry the squares in their toolkit. Your course tutor will demonstrate
                           each method in the workshop.
Cutting a Return Mould
  Begin by marking an external mitre line
  on the existing mould. The top point of                                              Cut a splay to remove
                                                     Mark a splay to remove
   this line is determined by applying the                                             the waste stone. The
                                                      the wastage from the
  joint template to the back of the stone                                                splay should be 2-
                                                          return mould.
  and squaring, from the face, to the top                                                 4mm above any
                   of the fillet                                                            cutting lines.


  Run the mould through by
      setting in along the                Set in the mould at                                     Set in the fillets at the top and
  arrises, teething down and            the mitre and close to           Join the fillets         bottom of the mould, checking
chiselling. The mould should             the ashlar stop and           along the length           with a sinking square that they
    be checked for straight              check accuracy with             of the mould.             are square and at the correct
   between the joints and a                reverse template.                                                    depth.
reverse template can be used
     to check for accuracy.
Developed by The Stonemasonry Department
          City of Glasgow College
                    2012

Cutting a cavetto mould

  • 1.
    Cutting a CavettoMould Introduction for Stonemasons Stonemasonry Department 2012
  • 2.
    Mould Recognition A cavettomoulding consists of a TOP BED OF STONE number of elements which can be FILLET seen in the diagram. It is essential that you are able to readily CAVETTO identify each element so that you can follow the correct procedures for setting out and cutting a cavetto mould. FILLET FACE OF STONE
  • 3.
    Roman Mould Development Begin by marking the total width of the mould on the base line to form points A and B. A 140mm B
  • 4.
    Roman Mould Development Begin by marking the total width of the mould on the base line to form points A and B. Strike lines at 90 to the base line which run through points A and B 140mm A 140mm B
  • 5.
    Roman Mould Development C D Begin by marking the total width of the mould on the base line to form points A and B. Strike lines at 90 to the base line which run through points A and B 140mm Mark the total height of the mould from point A and strike a line to form a perfect square and form points C and D A 140mm B
  • 6.
    Roman Mould Development Begin by marking the 20mm total width of the mould on the base line to form points A and B. Strike lines at 90 to the base line which run 60mm through points A and B Mark the total height of the mould from point A and strike a line to form a perfect square and form points C and D 20mm Construct the grid for the mould using the appropriate sizes 20mm 60mm 20mm
  • 7.
    Roman Mould Development Begin by marking the total width of the mould E on the base line to form F points A and B. Strike lines at 90 to the base line which run through points A and B Mark the total height of the mould from point A G and strike a line to form a perfect square and form points C and D Construct the grid for the mould using the appropriate sizes Using centre E strike a curve hitting points F and G to form the cavetto.
  • 8.
    Roman Mould Development TOP At this stage the mould is BED complete and you should darken the appropriate lines to better define the mould. If you are producing a template you should complete the template by including all relevant information eg mould name, type of template, your name, top bed and joint etc. A STUDENT FACE CAVETTO JOINT TEMPLATE
  • 9.
    Cutting a Splay Mark splay lines on Make the lines safe using a Pitch the joints to the working the joints and scribe half inch chisel. Always lines. You may wish to lines across the face work away from the line support your stone at an and top bed to join and toward the centre of angle so that your splay is the splays. the splay. sitting level. Chisel centre section to flat. Using marginal Rough out the centre If splay is to be seen, Check for flat across the drafts, set in the section using mel- polish to fine finish. length, width and diagonals of joints, top and point and teeth tool. the splay. bottom of the splay.
  • 10.
    Cutting a Cavetto Hold template to top bed and face of Mark template to both Cut a splay to remove stone, making sure to align it properly joints and scribe across the waste stone. The by holding a straight edge against the the top bed and face to splay should be 2- aligned face and bringing the template join the profiles. 4mm above any to meet the straight edge. cutting lines. Run the mould through by setting in along the arrises, Set in the mould on Set in the fillets at the top and both joints and check Join the fillets bottom of the mould, checking teething down and chiselling. The mould should be checked accuracy with joint along the length with a sinking square that they for straight between the joints and reverse of the mould. are square and at the correct and a reverse template can be templates. depth. used to check for accuracy.
  • 11.
  • 12.
    Marking a Mitre A mitre is the term used to describe the arris formed when adjacent mouldings intersect. There are both external and internal mitres. EXTERNAL MITRE MITRE BLOCKS STEEL SQUARES There are two common methods of marking a mitre line; using mitre blocks and using two steel squares. The mitre block method is often easier but a stonemason is more likely to carry the squares in their toolkit. Your course tutor will demonstrate each method in the workshop.
  • 13.
    Cutting a ReturnMould Begin by marking an external mitre line on the existing mould. The top point of Cut a splay to remove Mark a splay to remove this line is determined by applying the the waste stone. The the wastage from the joint template to the back of the stone splay should be 2- return mould. and squaring, from the face, to the top 4mm above any of the fillet cutting lines. Run the mould through by setting in along the Set in the mould at Set in the fillets at the top and arrises, teething down and the mitre and close to Join the fillets bottom of the mould, checking chiselling. The mould should the ashlar stop and along the length with a sinking square that they be checked for straight check accuracy with of the mould. are square and at the correct between the joints and a reverse template. depth. reverse template can be used to check for accuracy.
  • 14.
    Developed by TheStonemasonry Department City of Glasgow College 2012