This document provides a user guide for CPanel, describing how to use its various features. It covers logging in and out of CPanel, managing email accounts, FTP access, file and domain management, backups, MySQL, and more. Step-by-step instructions are provided for common tasks like adding email accounts, FTP users, databases and more. The guide also explains how to configure options, delete items, and get help.


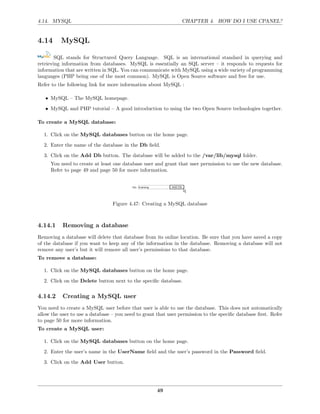

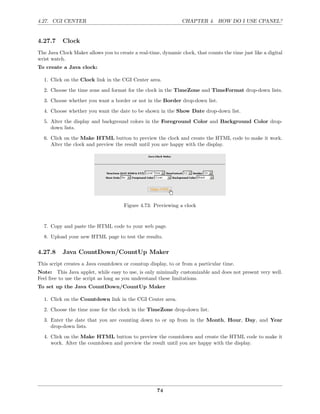
![4.27. CGI CENTER CHAPTER 4. HOW DO I USE CPANEL?
Figure 4.74: Making a Java countdown
5. Copy and paste the HTML code to your web page.
6. Upload your new HTML page to test the results.
4.27.9 CGI EMail
CGI EMail is a simple, easy-to-use script that takes the results of any form and sends them to you via e-mail.
Because it is already installed, minimal configuration is required to successfully use the script.
The following steps provide quick summarized instructions for CGI EMail. Be sure to read the CGI user
guide for detailed instructions on using CGI EMail.
To configure CGI EMail:
1. Create an HTML form with a number of named input fields. Refer to this page for more detailed
information of the action component of the form.
2. Create an e-mail template (a .txt file) that displays the format in which you want your form information
displayed in the e-mail. Make sure all your form name codes are one word and in square brackets [].
3. Upload the .txt and form files to your site.
4. Go to your cgi-bin directory and change the file permissions on cgiecho and cgie-mail to 755.
5. Test the script. The cgiecho script is designed for testing online, so you do not have to wait for e-mail
to be sent or received.
4.27.10 FormMail Clone
One of the most popular form to e-mail scripts available is FormMail, by Matt Wright. The script can be
setup very quickly, and provides a number of customization options. CPanel was written a clone of FormMail
which operates in the same manner.
The following steps provide quick installation instructions for FormMail Clone. Be sure to read the FormMail
README file for more detailed information about customizing FormMail Clone.
Refer to the FormMail documentation for more information about customizing the FormMail clone script.
To set up FormMail Clone:
1. Create the form on your web page, with the following fields:
<form action="http://www.yourdomain.com/cgi-sys/FormMail.cgi" method="POST">
<input type="hidden" name="recipient" value="e-mail@yourdomain.com">
<input type="hidden" name="subject" value="Feedback from web site">
<input type="hidden" name="redirect" value="http://www.yourdomain.com/thankyou.htm">
2. Upload the web page and test the form. Refer to the FormMail documentation first if you have any
questions about using the FormMail script.
75](https://image.slidesharecdn.com/cpanel-user-guide1122/85/CPanel-User-Guide-76-320.jpg)