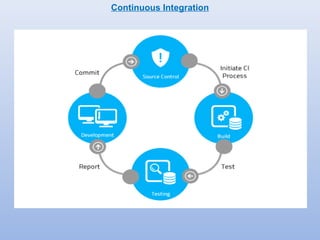
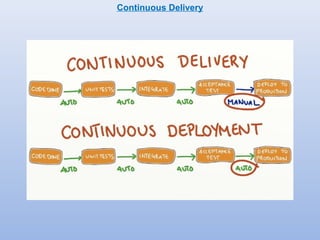
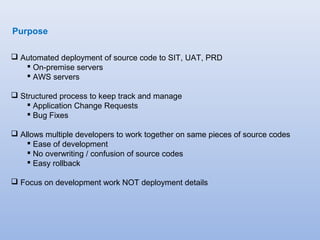
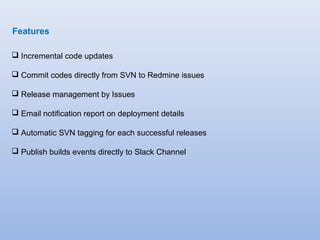
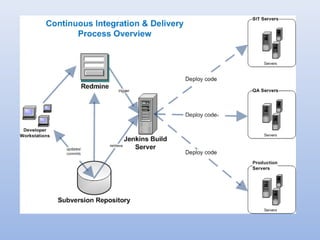
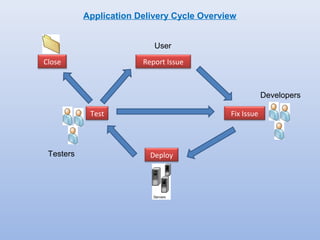
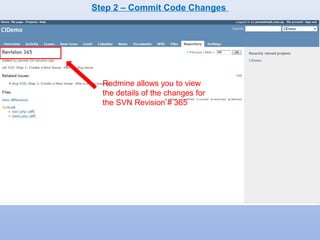
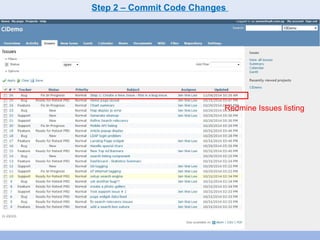
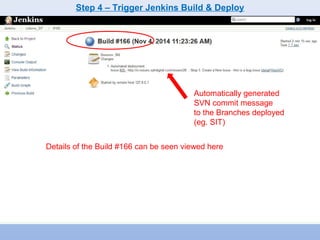
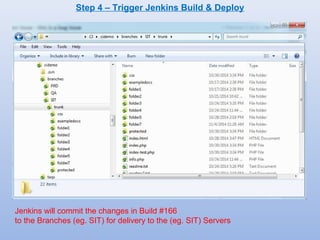
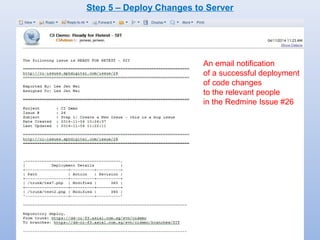
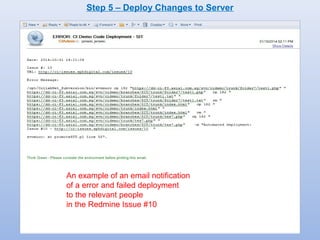
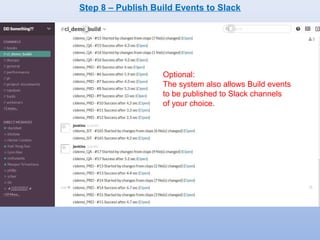
Continuous integration 
& 
Continuous Delivery 
. 
Phase i 
lee Jen Wei 
25 nov 2014
What is Continuous Integration 
& Continuous Delivery?
Continuous Integration
Continuous Delivery
Where are we?
We Are Here
Let’s begin the Continuous Journey . . .
Purpose 
 Automated deployment of source code to SIT, UAT, PRD 
 On-premise servers 
 AWS servers 
 Structured process to keep track and manage 
 Application Change Requests 
 Bug Fixes 
 Allows multiple developers to work together on same pieces of source codes 
 Ease of development 
 No overwriting / confusion of source codes 
 Easy rollback 
 Focus on development work NOT deployment details
Features 
 Incremental code updates 
 Commit codes directly from SVN to Redmine issues 
 Release management by Issues 
 Email notification report on deployment details 
 Automatic SVN tagging for each successful releases 
 Publish builds events directly to Slack Channel
Tools 
 Deployment hooks and scripts 
 Ruby 
 Perl 
 Shell scripts 
 Code Versioning 
 Currently: CollabNet SubversionEdge v1.8.x 
 Coming soon: Git 
 Issue tracking and release management 
 Redmine v2.5.x 
 Jenkins Continuous Integration 
 Numerous plugins 
 automated builds tools 
 functional/load/performance testing tools 
 reports and notifications 
 integrations 
 etc
An Overview.
Commit Code 
Changes 
Step 1: 
Step 2: 
Create New Issue 
Step 3: 
Set Issue Status to 
Promote Code 
Step 4: 
Trigger Build & 
Deploy 
Step 6: 
Testing 
Step 7: 
Auto Tagging 
Backup 
Step 5: 
Deploy Changes 
to Servers 
Continuous Delivery Process
Report Issue 
Fix Issue 
Deploy 
Test 
Close 
User 
Developers 
Application Delivery Cycle Overview 
Testers
Screen Captures
Redmine Issue Status Transitions 
NNeeww 
FFixix i nin P Proroggreressss 
PPeennddiningg C Cooddee P Prorommootitoionn S SITIT 
RReeaaddyy f ofor rR Reetetests tS SITIT 
PPeennddiningg C Cooddee P Prorommootitoionn U UAATT 
RReeaaddyy f ofor rR Reetetests tU UAATT 
PPeennddiningg C Cooddee P Prorommootitoionn P PRRDD 
RReeaaddyy f ofor rR Reetetests tP PRRDD 
RReesosolvlveedd 
deploy 
deploy 
deploy
Step 1 – Create a New Issue 
Click on Create to create a new issue
Step 1 – Create a New Issue 
Take note of the Issue #. 
It will be used later.
Step 2 – Commit Code Changes 
Input the Issue # here 
i.e. “ref #26“
Step 2 – Commit Code Changes 
Notice that the Status 
has changed from “New” 
The SVN changes previously 
committed using the keyword “ref #” 
instructs the SVN Revision 
to be linked to the Redmine Issue
Step 2 – Commit Code Changes 
Redmine allows you to view 
the details of the changes for 
the SVN Revision # 365
Step 2 – Commit Code Changes 
Redmine Issues listing
Step 3 – Promote Code 
Change the Status to Promote 
code changes in Issue #26 to 
the next environment. 
eg. SIT in this case.
Step 4 – Trigger Jenkins Build & Deploy 
A build #166 is triggered 
in Jenkins when the 
Status is set to 
Pending Promote
Step 4 – Trigger Jenkins Build & Deploy 
Automatically generated 
SVN commit message 
to the Branches deployed 
(eg. SIT) 
Details of the Build #166 can be seen viewed here
Step 4 – Trigger Jenkins Build & Deploy 
Jenkins will commit the changes in Build #166 
to the Branches (eg. SIT) for delivery to the (eg. SIT) Servers
Step 5 – Deploy Changes to Server 
A SSH connection inside the SIT Server 
Changes are deployed to the actual Servers (eg. SIT) 
from the SVN Branches Repository (eg. SIT)
Step 5 – Deploy Changes to Server 
An email notification 
of a successful deployment 
of code changes 
to the relevant people 
in the Redmine Issue #26
Step 5 – Deploy Changes to Server 
An example of an email notification 
of a error and failed deployment 
to the relevant people 
in the Redmine Issue #10
Step 6 - Testing 
Upon a successful Build or Deployment 
the Redmine Issue Status will be 
set to the “Ready for Retest” status
Step 7 – Auto Tagging Backup 
In a successful Post-Build/Deployment, an automated Tagging will be committed 
under the SVN Repository folder: 
-> tags -> last-successful -> environment 
for backups as well as a means for rollback of released code versions.
Step 8 – Publish Build Events to Slack 
Optional: 
The system also allows Build events 
to be published to Slack channels 
of your choice.
Vision & Possibilities 
1. To address the shortcoming of the more rigid 1st generation Mantis 
Deployment system. 
2. To put many projects that are still deploying codes manually on a flexible, 
automated deployment system, as well as a systematic and trackable release 
management. 
3. To relieve developers the laborious and unorganised manual work of 
accessing servers for code deployment and concentrate on more productive 
development work. 
4. To improve the time-to-market of application features and bug fixes without 
sacrificing quality. More quality releases in a shorter time. 
5. To give teams intending to embrace Agile, Scrum, Test-driven Development 
methodology, Automated Unit Testing, DevOps, etc, a tool to aid in their 
cause.
Vision & Possibilities 
6. To provide mobile developments a tool for automated simulation testing of 
different devices. 
7. To enable teams embracing AWS Cloud computing a systematic framework 
to fully automate the deployment of infrastructures and system administration 
operations. 
8. To allow teams to make use of container tools like Docker to develop 
applications that are much more portable and efficient across deployment 
environments. 
9. To provide for teams to eventually be able to fully automate the functional and 
performance testing of their apps that seamlessly integrates with release 
management. 
10.To eventually be able to have a true Continuous Integration system that fully 
automates release management and delivery, hence saving time, improving 
productivity and efficiency with a peace of mind.
Continuous Integration & Delivery

Continuous Integration & Delivery

  • 1.
    Continuous integration & Continuous Delivery . Phase i lee Jen Wei 25 nov 2014
  • 2.
    What is ContinuousIntegration & Continuous Delivery?
  • 3.
  • 4.
  • 5.
  • 6.
  • 7.
    Let’s begin theContinuous Journey . . .
  • 8.
    Purpose  Automateddeployment of source code to SIT, UAT, PRD  On-premise servers  AWS servers  Structured process to keep track and manage  Application Change Requests  Bug Fixes  Allows multiple developers to work together on same pieces of source codes  Ease of development  No overwriting / confusion of source codes  Easy rollback  Focus on development work NOT deployment details
  • 9.
    Features  Incrementalcode updates  Commit codes directly from SVN to Redmine issues  Release management by Issues  Email notification report on deployment details  Automatic SVN tagging for each successful releases  Publish builds events directly to Slack Channel
  • 10.
    Tools  Deploymenthooks and scripts  Ruby  Perl  Shell scripts  Code Versioning  Currently: CollabNet SubversionEdge v1.8.x  Coming soon: Git  Issue tracking and release management  Redmine v2.5.x  Jenkins Continuous Integration  Numerous plugins  automated builds tools  functional/load/performance testing tools  reports and notifications  integrations  etc
  • 11.
  • 13.
    Commit Code Changes Step 1: Step 2: Create New Issue Step 3: Set Issue Status to Promote Code Step 4: Trigger Build & Deploy Step 6: Testing Step 7: Auto Tagging Backup Step 5: Deploy Changes to Servers Continuous Delivery Process
  • 14.
    Report Issue FixIssue Deploy Test Close User Developers Application Delivery Cycle Overview Testers
  • 15.
  • 16.
    Redmine Issue StatusTransitions NNeeww FFixix i nin P Proroggreressss PPeennddiningg C Cooddee P Prorommootitoionn S SITIT RReeaaddyy f ofor rR Reetetests tS SITIT PPeennddiningg C Cooddee P Prorommootitoionn U UAATT RReeaaddyy f ofor rR Reetetests tU UAATT PPeennddiningg C Cooddee P Prorommootitoionn P PRRDD RReeaaddyy f ofor rR Reetetests tP PRRDD RReesosolvlveedd deploy deploy deploy
  • 17.
    Step 1 –Create a New Issue Click on Create to create a new issue
  • 18.
    Step 1 –Create a New Issue Take note of the Issue #. It will be used later.
  • 19.
    Step 2 –Commit Code Changes Input the Issue # here i.e. “ref #26“
  • 20.
    Step 2 –Commit Code Changes Notice that the Status has changed from “New” The SVN changes previously committed using the keyword “ref #” instructs the SVN Revision to be linked to the Redmine Issue
  • 21.
    Step 2 –Commit Code Changes Redmine allows you to view the details of the changes for the SVN Revision # 365
  • 22.
    Step 2 –Commit Code Changes Redmine Issues listing
  • 23.
    Step 3 –Promote Code Change the Status to Promote code changes in Issue #26 to the next environment. eg. SIT in this case.
  • 24.
    Step 4 –Trigger Jenkins Build & Deploy A build #166 is triggered in Jenkins when the Status is set to Pending Promote
  • 25.
    Step 4 –Trigger Jenkins Build & Deploy Automatically generated SVN commit message to the Branches deployed (eg. SIT) Details of the Build #166 can be seen viewed here
  • 26.
    Step 4 –Trigger Jenkins Build & Deploy Jenkins will commit the changes in Build #166 to the Branches (eg. SIT) for delivery to the (eg. SIT) Servers
  • 27.
    Step 5 –Deploy Changes to Server A SSH connection inside the SIT Server Changes are deployed to the actual Servers (eg. SIT) from the SVN Branches Repository (eg. SIT)
  • 28.
    Step 5 –Deploy Changes to Server An email notification of a successful deployment of code changes to the relevant people in the Redmine Issue #26
  • 29.
    Step 5 –Deploy Changes to Server An example of an email notification of a error and failed deployment to the relevant people in the Redmine Issue #10
  • 30.
    Step 6 -Testing Upon a successful Build or Deployment the Redmine Issue Status will be set to the “Ready for Retest” status
  • 31.
    Step 7 –Auto Tagging Backup In a successful Post-Build/Deployment, an automated Tagging will be committed under the SVN Repository folder: -> tags -> last-successful -> environment for backups as well as a means for rollback of released code versions.
  • 32.
    Step 8 –Publish Build Events to Slack Optional: The system also allows Build events to be published to Slack channels of your choice.
  • 34.
    Vision & Possibilities 1. To address the shortcoming of the more rigid 1st generation Mantis Deployment system. 2. To put many projects that are still deploying codes manually on a flexible, automated deployment system, as well as a systematic and trackable release management. 3. To relieve developers the laborious and unorganised manual work of accessing servers for code deployment and concentrate on more productive development work. 4. To improve the time-to-market of application features and bug fixes without sacrificing quality. More quality releases in a shorter time. 5. To give teams intending to embrace Agile, Scrum, Test-driven Development methodology, Automated Unit Testing, DevOps, etc, a tool to aid in their cause.
  • 35.
    Vision & Possibilities 6. To provide mobile developments a tool for automated simulation testing of different devices. 7. To enable teams embracing AWS Cloud computing a systematic framework to fully automate the deployment of infrastructures and system administration operations. 8. To allow teams to make use of container tools like Docker to develop applications that are much more portable and efficient across deployment environments. 9. To provide for teams to eventually be able to fully automate the functional and performance testing of their apps that seamlessly integrates with release management. 10.To eventually be able to have a true Continuous Integration system that fully automates release management and delivery, hence saving time, improving productivity and efficiency with a peace of mind.