
Recommended
More Related Content
What's hot
What's hot (20)
Viewers also liked
Viewers also liked (20)
Similar to Computer Systems Servicing COC1-COC2
Similar to Computer Systems Servicing COC1-COC2 (20)
Recently uploaded
Recently uploaded (20)
Computer Systems Servicing COC1-COC2
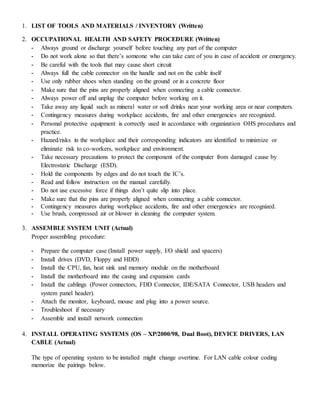
- 1. 1. LIST OF TOOLS AND MATERIALS / INVENTORY (Written) 2. OCCUPATIONAL HEALTH AND SAFETY PROCEDURE (Written) - Always ground or discharge yourself before touching any part of the computer - Do not work alone so that there’s someone who can take care of you in case of accident or emergency. - Be careful with the tools that may cause short circuit - Always full the cable connector on the handle and not on the cable itself - Use only rubber shoes when standing on the ground or in a concrete floor - Make sure that the pins are properly aligned when connecting a cable connector. - Always power off and unplug the computer before working on it. - Take away any liquid such as mineral water or soft drinks near your working area or near computers. - Contingency measures during workplace accidents, fire and other emergencies are recognized. - Personal protective equipment is correctly used in accordance with organization OHS procedures and practice. - Hazard/risks in the workplace and their corresponding indicators are identified to minimize or eliminate risk to co-workers, workplace and environment. - Take necessary precautions to protect the component of the computer from damaged cause by Electrostatic Discharge (ESD). - Hold the components by edges and do not touch the IC’s. - Read and follow instruction on the manual carefully. - Do not use excessive force if things don’t quite slip into place. - Make sure that the pins are properly aligned when connecting a cable connector. - Contingency measures during workplace accidents, fire and other emergencies are recognized. - Use brush, compressed air or blower in cleaning the computer system. 3. ASSEMBLE SYSTEM UNIT (Actual) Proper assembling procedure: - Prepare the computer case (Install power supply, I/O shield and spacers) - Install drives (DVD, Floppy and HDD) - Install the CPU, fan, heat sink and memory module on the motherboard - Install the motherboard into the casing and expansion cards - Install the cablings (Power connectors, FDD Connector, IDE/SATA Connector, USB headers and system panel header). - Attach the monitor, keyboard, mouse and plug into a power source. - Troubleshoot if necessary - Assemble and install network connection 4. INSTALL OPERATING SYSTEMS (OS – XP/2000/98, Dual Boot), DEVICE DRIVERS, LAN CABLE (Actual) The type of operating system to be installed might change overtime. For LAN cable colour coding memorize the pairings below.
- 2. 5. CONFIGURE AND PRINT (Actual)
- 3. - Click on the start menu and click Control Panel - When the control panel window opens you will see items in either Category View (Continue with step #3) or Classic View (Skip to item #4) - Find and double click on the Network and Internet Connection icon. - Next, find and double click on the Network and Internet Connection icons. A window will open with all network connections available on the computed (wired and wireless) - Find the network connection you want to manually configure, right click on it and select Properties from the pop-up menu - In the connection properties window, under the section labelled “This connection used the following items:” find the Internet Protocol (TCP/IP) item and double click it. - A new window will open; select the second radio button which is labelled “Use the following IP Address”. - Enter the appropriate IP Address (192.168.0.1); subnet mask usually 255.255.255.0 and the gateway (the router or the proxy server address). - The next part of the windows will now have a radio button selected which is labelled “Use the following DNS server addresses” - If you need to access the internet, enter the address provided by your ISP; if you do not have that information you can use the Open DNS server IP (208.67.222.222 and 208.67.220.220). - After entering the required information, click the OK button twice and close the control panel window. CHANGING WORKGROUP AND COMPUTER NAME: - Start > Settings > Control Panel > System > Computer Name tab > Change Tab > Type new Computer Name and Workgroup > OK, OK, OK, restart - Start > Settings > Control Panel > Printer and Faxes > Add Printer (Printer Tasks) > Add Printer Wizard >Next > Select “A network printer, or …. “ > Next > Browse Printer > Next > Select Installed Network Printer > Next > Yes > Finish! Note: Turn of your firewall before installing printer
- 4. - Right click folder to share > Properties > Sharing Tab > Network Sharing and Security(Click “If you understand the Security Risk…”) > Just Enable Sharing > OK > Select share this folder on the network > OK SHARING PRINTER - Start > Settings > Control Panel > Printer and Faxes > Right Click Installed Printer > Sharing > Share this printer > OK 6. QUESTIONING/INTERVIEW (Oral) - Most of the questions will be on troubleshooting but anything around the subject matter can be asked. You also need to master the parts of the computer particularly of the Main Circuit Board or the Mother Board and their specific functions and cable colour-coding. 1. Back Panel Connectors & Ports Connectors and ports for connecting the computer to external devices such as display ports, audio ports, USB ports, Ethernet ports, PS/2 ports etc. See image below for a close-up view. 2. PCI Slots PCI: Peripheral Component Interconnect Slot for older expansion cards such as sound cards, network cards,
- 5. connector cards. See image below for a close-up view. Have been largely replaced by PCI-Express x1 slots (see motherboard parts #3 below). 3. PCI Express x1 Slots Slot for modern expansion cards such as sound cards, network cards (Wi-Fi, Ethernet, Bluetooth), connector cards (USB, FireWire, eSATA) and certain low-end graphics cards. See image below for a close-up view. 4. PCI Express x16 Slot Slot for discrete graphic cards and high bandwidth devices such as top-end solid state drives. See image below for a close-up view. 5. Northbridge Also known as Memory Controller Hub (MCH). Chipset that allows the CPU to communicate with the RAM and graphics card. Beginning from Intel Sandy Bridge in 2011, this motherboard component is no longer present as it has been integrated within the CPU itself. 6. CPU Socket Insert CPU here. 7. ATX 12V Power Connector Connects to the 4-pin power cable of a power supply unit which supplies power to the CPU. 8. Front Panel USB 2.0 Connectors Connects to USB 2.0 ports at the front or top of a computer case. 9. Front Panel Connectors Connects to the power switch, reset switch, power LED, hard drive LED and front audio ports of a computer case. See image above for a close-up view. 10. IDE Connector Connects to older hard drive disks and optical drives for data transfer. See image above for a close-up view. Have been replaced over by SATA connectors (see motherboard component #13 below). 11. CMOS Battery Supplies power to store BIOS settings and keep the real-time clock running. See image above for a close-up view. The CMOS battery found on most motherboards is the CR2032 lithium coin cell.
- 6. 12. Southbridge Also known as the Input/Output Controller Hub (ICH). Chipset that allows the CPU to communicate with PCI slots, PCI-Express x 1 slots (expansion cards), SATA connectors (hard drives, optical drives), USB ports (USB devices), Ethernet ports and on-board audio. 13. SATA Connectors Connects to modern hard disk drives, solid state drives and optical drives for data transfer. See image above for a close-up view. 14. Fan Headers Supplies power to the CPU heat sink fan and computer case fans. See image above for a close-up view. 15. RAM Slots Insert RAM here. 16. ATX Power Connector Connects to the 24-pin ATX power cable of a power supply unit which supplies power to the motherboard. 17. mSATA Connector Connects to a mSATA solid state drive. In most cases, this SSD is used as cache to speed up hard disk drives, but it's possible to re-purpose it as a regular hard drive. 18. Front Panel USB 3.0 Connector Connects to USB 3.0 ports at the front or top of the computer case. 19. Power & Reset Button Onboard button to turn on, turn off and reboot the computer.
- 7. - BASIC TROUBLESHOOTING Beep code trouble shooting Component Isolation RAM Isolation Equipment Isolation - 5’S Sort – Clearly distinguish needed items from unneeded and eliminate the latter. Straighten – Keep needed items in the correct place to allow for easy and immediate retrieval Shine – Keep the workplace neat and clean Standardize – The method by which sort, straighten, shine are made habitual. Sustain – Maintain established procedures - Acronyms ATX – Advance Technology Extended SDRAM – Synchronous Dynamic Random Access Memory DRAM – Dynamic Random Access Memory EDO RAM – Extended Data Output Random Access Memory SIMM – Single Inline Memory Module DIMM – Double Inline Memory Module RIMM – Rambus Inline Memory Module
- 8. USB – Universal Serial Bus IEEE – Institute of Electrical and Electronics Engineer ISA – Industry Standard Architecture PCI – Peripheral Component Interconnect EISA – Extended Industry Standard Architecture VESA – Video Electronics Standard Association IDE – Integrated Drive Electronics SCSI – Small Computer System Interface DDR – Double Data Rate UDMA – Ultra Direct Memory Access North bridge chipset – memory controller hub (MCH) or integrated memory controller (IMCH). Handles communications among the CPU, RAM, BIOS ROM, and PCI Express (or AGP) video cards, and the Southbridge. South bridge chipset - Input/Output Controller Hub (ICH). - 10’S SORT SANITIZE SWEEP SYSTEMATIZE SELD DESCIPLINE SUSTAIN SAFETY SEPARATE STANDARD SAVE THE ENVIRONMENT How to Make ISO File from CD, DVD, or Blu-ray Disc? You are here: Tutorials > How to Make ISO File from CD, DVD, or Blu-ray Disc? PowerISO can make an ISO file from a CD, DVD, or Blu-ray disc. PowerISO do a sector-by-sector copying. All information in the disc, including the boot information, will be copied. You can launch the iso maker using the main program or the shell context menu. Usage1: Make ISO file using the main program: Run PowerISO. Click "Copy" button on toolbar, then choose "Make CD / DVD / BD Image File..." from the popup menu.
- 9. PowerISO shows ISO Maker dialog. Choose the CD / DVD driver which holds the disc you want to copy. Choose the output file name, and set output format to ISO. Click "OK" to make iso file from the selected disc. Usage2: Make ISO file using the shell context menu: Open "My Computer" and select the drive which holds the disc you want to copy.. Right-click on the drive selected, the shell context menu will popup. Choose the menu "Make Image File". The "ISO maker" dialog will display. Choose the output file name, and set output format to ISO. Click "OK" to start making. Copyright 2004-2015 Power Software Ltd. All rights reserved.
- 10. Start Installing ISOs and Installers/Distributions Yumi Select an Unlisted ISO Now comes the fun part, to start putting everything together. Load up Yumi and select your flash drive. To get the drive started the first thing I installed is the ISO I created from a Dell Windows XP CD. Scroll down to “Windows XP Installer” listed in step 2 under distributions. Next click on Browse under step 3 and select the ISO you created for your Windows XP ISO. After that click next and Yumi will begin to install the Windows XP Installer along with Grub4Dos. Yumi will use a combination of Grub4Dos and Syslinux for this custom boot. After Yumi has installed the Windows XP Installer you can move on to adding additional Windows Installers. Next we’re going to add Windows 7 installer, select Yes to add more after the Windows XP is complete or just reload the Yumi application. Scroll down and select “Try an Unlisted ISO”, DO NOT SELECT Windows Vista/7/8 Installer, again DO NOT SELECT Windows Vista/7/8 Installer. Yumi Multiboot Install Windows If you choose that option instead of Try an Unlisted ISO, Yumi will install the Windows Vista/7/8 file to the root of the flash drive, and you DO NOT want that. It will work just fine if you install it as an unlisted ISO. So select Try an Unlisted ISO and then browse to your Windows ISO, then proceed with installation and you should see something similar to the image on the left. As you can see Yum is installing Windows 7 to
- 11. D:multibootISOSWIN7_MSDN.iso, which is what we want instead of having Yumi install it to the root of the flash drive. Continue to repeat this process for all the ISO files you want to install such as Windows and any other ISOs that are NOT listed in the Yumi list (Windows EXCLUDED). ALWAYS INSTALL WINDOWS ISO BY SELECTING TRY AN UNLISTED ISO. Multiboot USB Qemu Now that you have all your ISOs installed that you want to use it’s time to fire up Qemu and test the drive out. Once we have tested and made sure the drive is functional we will then proceed to customizing the boot menu descriptions, wording, and even background. Load up the file I had to download from the beginning, Multiboot USB. Select the “Qemu” tab, select the amount of RAM you want to use and then click “Boot USB”. The screenshot has the text not looking correctly and that’s because under Windows 8 I set it to increase the size of everything so some applications that are not dynamic have issues like this, but that doesn’t have anything to do with functionality, it still works fine. After you click Boot USB another window should open which will be a Qemu session that will attempt to boot the flash drive. You should then see a screen with the Yumi background and a heading saying “Your Universal MultiBoot Installer”. If you hit enter on “Directly Bootable ISOs or Windows XP” it should bring you to the Grub4Dos screen where you should see 3 options for Windows XP and then an option for each of the Windows ISOs and any other ISOs we added using “Try Unlisted ISO” … don’t worry about the wording we will customize that next. Play around with it and make sure everything works, if you have problems try booting the flash drive on another computer to make sure it isn’t Qemu that is causing the problem. Remember how to run Qemu like this as you will be using it frequently when changing around the wording and backgrounds.