
Recommended
More Related Content
What's hot
What's hot (20)
Similar to Components of a computer system
Similar to Components of a computer system (20)
Recently uploaded
Recently uploaded (20)
Components of a computer system
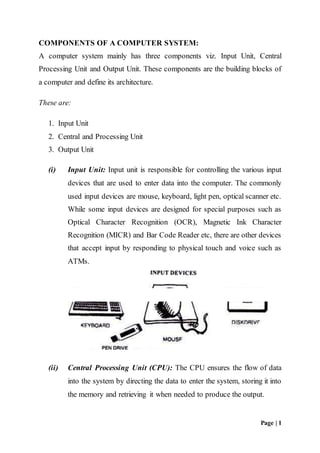
- 1. Page | 1 COMPONENTS OF A COMPUTER SYSTEM: A computer system mainly has three components viz. Input Unit, Central Processing Unit and Output Unit. These components are the building blocks of a computer and define its architecture. These are: 1. Input Unit 2. Central and Processing Unit 3. Output Unit (i) Input Unit: Input unit is responsible for controlling the various input devices that are used to enter data into the computer. The commonly used input devices are mouse, keyboard, light pen, optical scanner etc. While some input devices are designed for special purposes such as Optical Character Recognition (OCR), Magnetic Ink Character Recognition (MICR) and Bar Code Reader etc, there are other devices that accept input by responding to physical touch and voice such as ATMs. (ii) Central Processing Unit (CPU): The CPU ensures the flow of data into the system by directing the data to enter the system, storing it into the memory and retrieving it when needed to produce the output.
- 2. Page | 2 (iii) Output Unit: It controls various output devices like printer, graphic plotter, speech synthesizer, monitor (also known as Visual Display Unit or VDU) to produce the desired output and present it to the user. It ensures the convertibility of output into human readable form that is understandable by the user. STEPS TO BOOT AND SHUT DOWN A COMPUTER Boot a Computer: Step 1: Press the start button on the CPU tower. Step 2: Wait while the computer boots. When the computer has finished booting, it will show a dialogue box that will ask for a user name and password.
- 3. Page | 3 Step 3: Enter your user name and password, and then click "OK." Step 4: Your computer is now ready to use. Shut Down a Computer: Step 1: To shut down your computer, click "Start" on the Main menu. Step 2: Highlight and click on "Shut Down." Step 3: You will see a gray dialogue box. Click "Shutdown," Then click "OK." Step 4: Please wait while your computer shuts down. HOW TO FORMULATE A PASSWORD ON A COMPUTER 1. Click the "Start" button. Click "Control Panel," and then click 2. Click your account name in the list, and then click "Create a 3. Enter a password in the text bars. To create a strong password, create a combination of random 4. Type a password hint into the text bar, and then click "Create password." 5. Reboot your computer and log in to your account with your new password. HOW TO SEARCH FOR MATERIALS ON THE INTERNET 1. Select a search engine. At the top of any page on your browser (the window that you open to use the internet), type the phrase “search engines” into the Search Bar to attain access to several different internet sites that specifically aid in searching. 2. After typing in whatever you want to search, press the Enter key on the keyboard of your computer.
- 4. Page | 4 3. Choose a few of the most specific or relevant keywords or phrases to describe your topic. Utilize synonyms. Type your choice of words into the Search Bar offered by your chosen search engine. Generally, capitalization and punctuation are not needed. Search engines usually disregard minor words such as "the, and, to, etc." 4. Click Search or press the Enter key on your keyboard. HOW TO COMPOSE AND SEND AND E – MAIL You’ll need: A computer with active internet connection. An email account set up and ready to send and receive emails. Follow these step-by-step instructions to send an email Step 1: Log in to your Gmail account so that you are on the dashboard (main page) of your mail account. Step 2: Click Compose. Step 3: A new blank email window will open up. In the ‘To’ box, type in the email address of the recipient. Step 4: You might want to include someone else in your email to ‘keep them in the loop’. You can do this by clicking Cc or Bcc, which will open another field. ‘Cc’ means ‘carbon copy’ and ‘Bcc’ means ‘blind carbon copy’. Adding an email address to the ‘Cc’ field means that that person will receive a copy of the email and all the other recipients will see their email address. If an email address is put into the 'Bcc’ field, the person will get a copy of the email but no other recipient will see that address.
- 5. Page | 5 Step 5: The subject field allows you to give the recipient an idea of the topic of your email, like a heading. You don’t have to put anything in the subject box, but it can help when viewing and sorting email. Step 6: Email text can be formatted in a similar way to text in a word document. You can change the font style, colour and size using the formatting icons. You can also create bullet points and check the spelling of your email. Choose your formatting from the menu shown. Step 7: Type your message in the main body field of your email. Step 8: When you’re happy with your email, click the blue Send button at the bottom of the compose window. Step 9: The email you’ve sent will now be stored in the ‘Sent Mail’ folder on your Gmail dashboard. You may have to run your mouse pointer over the Inbox folder link to see the other folders. Step 10: You may start an email but then decide to come back to it later rather than sending it straightaway. Gmail saves your drafts automatically. So you can simply close the email and the unfinished email will be saved to your ‘Drafts’ folder. When you decide that you’re ready to send it, you can retrieve it from the ‘Drafts’ folder by clicking Drafts and then clicking the correct item in the ‘Drafts’ folder list. Finish the email and click send as normal. HOW TO FORMAT DISKETTE 1. Insert the floppy disk. Make sure that the disk is inserted before you go looking for it on your computer. Ensure that the disk is inserted right side-up. Make sure that the disk lock is not engaged before inserting the disk. When formatting a disk, all the information contained on it will be erased, so make sure you've backed up anything you need to save.
- 6. Page | 6 2. Open up your Computer/My Computer/This PC window. The label for this window will be different depending on the version of Windows you are running. In Windows XP, it is called My Computer and can be accessed from the Start menu. In Windows Vista and 7, it is called Computer and can be accessed from the Start menu. In Windows 8 it is called This PC and can be accessed from the taskbar. 3. Right-click on the disk. You should see the disk in your list of drives. It should have a floppy disk icon, though not all Windows versions show the same thing. Floppy drives are usually B: or A: 4. Select "Format" and choose your settings. This will open the Format window. You can use this window to choose your format settings before beginning. Capacity - This should be set to 3.5", 1.44 MB. Most users can leave this as is. File system - This should be set to FAT. Most users can leave this as is, unless you are formatting the disk for use with a specific file system. FAT is supported on Windows, Mac, and Linux. Allocation unit size - This should be set to Default allocation size. Most users can leave this at default. Volume label - Choose a name for the disk that will appear when it is inserted. Try to keep it to 16 characters or less. Format options. You can select "Quick Format" to format the disk quicker, but the data will not be securely deleted. The speed gains for quick formatting a floppy disk are negligible, so you're probably best leaving this unchecked. You can also choose to create an MS-DOS start-up disk, which is useful if you're troubleshooting an older machine, but you won't be able to use the disk for storage.
- 7. Page | 7 5. Start the format. Once you've selected your options, click Start to begin the format process. Click OK to confirm. You monitor the progress by looking at the bar at the bottom of the window.