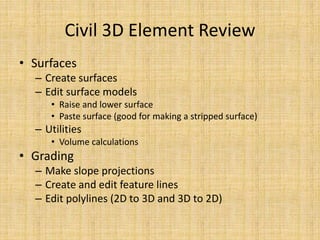
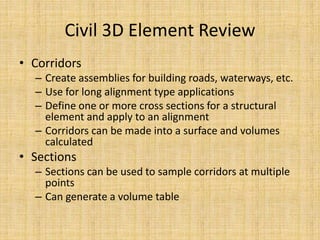
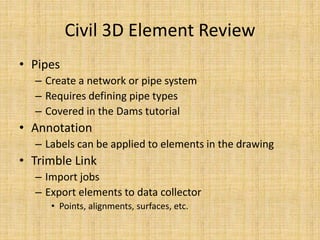
Introduction to AutoCAD and
Civil 3D
Justin Bonnema, PE
USDA-NRCS ANMT
Brookings, SD
Goals for First Training
• Increase familiarity with AutoCAD and Civil 3D
• Help get you started and enable you to use
the programs for what you need them for
• Answer any questions that you have
• Prepare for more specific trainings yet to
come
Things to Know About This Training
• If you have a question – ASK!
• There are always multiple ways to do the same thing –
use the one(s) that work best for you
• Keep in mind the goal of what you are using
AutoCAD/Civil 3D for
• Use help sources
– Online training, AutoCAD help, Google, call trainers
• This program can be as simple or as complicated as you
would like it to be
• Spend time using the program and, whenever possible,
with other people who use the program
NRCS and Civil 3D
• http://nrcs.rguidelibrary.com/LoginForm.spr
– Training by Andrew Walther and Mike Carris
• http://forum.nrcsknowledge.com/
– NRCS online CAD community
• https://nrcs.sc.egov.usda.gov/st/ndcsmc/CAD/default.aspx
– Standard drawings from many states
– Getting started videos
– Setup instructions for AutoCAD/Civil 3D
• NRCS tab/menu in AutoCAD
• Drawing templates
– National
– State customized for waterway, dam, AWMS
• License Management
– Borrowlicense, returnlicense commands
– Or Help (top right hand corner) – About AutoCAD – Product Information
Options
• Type “options” in
command line or use
application toolbar
button
• Scroll through different
tabs that allow for
many options to be
changed
• Files – reference
material locations
• Display – how things
look
• Open and Save
– Note the autosave
feature
Customization
• AutoCAD and Civil 3D are highly customizable
• Use of workspaces and the CUI command
• Toolbars vs. icons vs. menus vs. commands
• Civil 3D command settings
• Templates
• Tool Palettes
• Properties
• Ribbon
Basic Drafting Concepts
• AutoCAD works in 3D, usually view in 2D
• Civil 3D allows for automatic updating!
• Civil 3D enables planning and drafting of 3D components
using grading, corridors, etc.
• Surface models constructed from survey points
• Layer management has a lot of functionality
• Prospector is the main Civil 3D window
• Discuss polylines, 2D polylines, 3D polylines, feature lines
• Blocks
• Snaps, osnaps, grids
• Properties window
• Tool palettes
Civil 3D Element Review
• Survey
– Manage jobs, figure prefix databases, networks
– Automatic linework (figures)
• Points
– Create points manually
– Import points and export points
– Manage points and point groups
Civil 3D Element Review
• Surfaces
– Create surfaces
– Edit surface models
• Raise and lower surface
• Paste surface (good for making a stripped surface)
– Utilities
• Volume calculations
• Grading
– Make slope projections
– Create and edit feature lines
– Edit polylines (2D to 3D and 3D to 2D)
Civil 3D Element Review
• Alignments
– Define lines, curves, or geometry to use for
profiles, corridors, and sections
– Can construct or define from existing polylines
• Profiles
– Show surface model elevations along alignments
(cross sections)
– Use profiles for design in the case of corridors –
such as in the example of a grassed waterway
Civil 3D Element Review
• Corridors
– Create assemblies for building roads, waterways, etc.
– Use for long alignment type applications
– Define one or more cross sections for a structural
element and apply to an alignment
– Corridors can be made into a surface and volumes
calculated
• Sections
– Sections can be used to sample corridors at multiple
points
– Can generate a volume table
Civil 3D Element Review
• Pipes
– Create a network or pipe system
– Requires defining pipe types
– Covered in the Dams tutorial
• Annotation
– Labels can be applied to elements in the drawing
• Trimble Link
– Import jobs
– Export elements to data collector
• Points, alignments, surfaces, etc.

Introduction_to_Auto_CAD_and_Civil_3D.pptx

  • 1.
    Introduction to AutoCADand Civil 3D Justin Bonnema, PE USDA-NRCS ANMT Brookings, SD
  • 2.
    Goals for FirstTraining • Increase familiarity with AutoCAD and Civil 3D • Help get you started and enable you to use the programs for what you need them for • Answer any questions that you have • Prepare for more specific trainings yet to come
  • 3.
    Things to KnowAbout This Training • If you have a question – ASK! • There are always multiple ways to do the same thing – use the one(s) that work best for you • Keep in mind the goal of what you are using AutoCAD/Civil 3D for • Use help sources – Online training, AutoCAD help, Google, call trainers • This program can be as simple or as complicated as you would like it to be • Spend time using the program and, whenever possible, with other people who use the program
  • 4.
    NRCS and Civil3D • http://nrcs.rguidelibrary.com/LoginForm.spr – Training by Andrew Walther and Mike Carris • http://forum.nrcsknowledge.com/ – NRCS online CAD community • https://nrcs.sc.egov.usda.gov/st/ndcsmc/CAD/default.aspx – Standard drawings from many states – Getting started videos – Setup instructions for AutoCAD/Civil 3D • NRCS tab/menu in AutoCAD • Drawing templates – National – State customized for waterway, dam, AWMS • License Management – Borrowlicense, returnlicense commands – Or Help (top right hand corner) – About AutoCAD – Product Information
  • 6.
    Options • Type “options”in command line or use application toolbar button • Scroll through different tabs that allow for many options to be changed • Files – reference material locations • Display – how things look • Open and Save – Note the autosave feature
  • 7.
    Customization • AutoCAD andCivil 3D are highly customizable • Use of workspaces and the CUI command • Toolbars vs. icons vs. menus vs. commands • Civil 3D command settings • Templates • Tool Palettes • Properties • Ribbon
  • 8.
    Basic Drafting Concepts •AutoCAD works in 3D, usually view in 2D • Civil 3D allows for automatic updating! • Civil 3D enables planning and drafting of 3D components using grading, corridors, etc. • Surface models constructed from survey points • Layer management has a lot of functionality • Prospector is the main Civil 3D window • Discuss polylines, 2D polylines, 3D polylines, feature lines • Blocks • Snaps, osnaps, grids • Properties window • Tool palettes
  • 9.
    Civil 3D ElementReview • Survey – Manage jobs, figure prefix databases, networks – Automatic linework (figures) • Points – Create points manually – Import points and export points – Manage points and point groups
  • 10.
    Civil 3D ElementReview • Surfaces – Create surfaces – Edit surface models • Raise and lower surface • Paste surface (good for making a stripped surface) – Utilities • Volume calculations • Grading – Make slope projections – Create and edit feature lines – Edit polylines (2D to 3D and 3D to 2D)
  • 11.
    Civil 3D ElementReview • Alignments – Define lines, curves, or geometry to use for profiles, corridors, and sections – Can construct or define from existing polylines • Profiles – Show surface model elevations along alignments (cross sections) – Use profiles for design in the case of corridors – such as in the example of a grassed waterway
  • 12.
    Civil 3D ElementReview • Corridors – Create assemblies for building roads, waterways, etc. – Use for long alignment type applications – Define one or more cross sections for a structural element and apply to an alignment – Corridors can be made into a surface and volumes calculated • Sections – Sections can be used to sample corridors at multiple points – Can generate a volume table
  • 13.
    Civil 3D ElementReview • Pipes – Create a network or pipe system – Requires defining pipe types – Covered in the Dams tutorial • Annotation – Labels can be applied to elements in the drawing • Trimble Link – Import jobs – Export elements to data collector • Points, alignments, surfaces, etc.