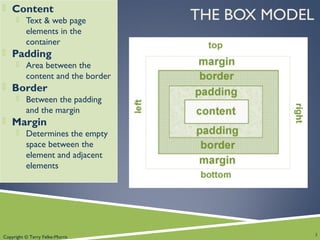
Copyright © Terry Felke-Morris
WEB DEVELOPMENT & DESIGN
FOUNDATIONS WITH HTML5
Chapter 6
Key Concepts
1Copyright © Terry Felke-Morris
Copyright © Terry Felke-Morris
LEARNING OUTCOMES
In this chapter, you will learn how to ...
 Describe and apply the CSS Box Model
 Configure margin with CSS
 Configure float with CSS
 Configure relative and absolute positioning with CSS
 Create two-column page layouts using CSS
 Configure navigation in unordered lists and style with CSS
 Add interactivity to hyperlinks with CSS pseudo-classes
 Configure web pages with HTML5 structural elements,
including section, header, hgroup, nav, aside, and footer
2
Copyright © Terry Felke-Morris
THE BOX MODEL
 Content
 Text & web page
elements in the
container
 Padding
 Area between the
content and the border
 Border
 Between the padding
and the margin
 Margin
 Determines the empty
space between the
element and adjacent
elements
3
Copyright © Terry Felke-Morris
CONFIGURE MARGIN WITH CSS
 The margin property
 Related properties:
 margin-top, margin-right, margin-left, margin-bottom
 Configures empty space between the element and adjacent
elements
 Syntax examples
h1 { margin: 0; }
h1 { margin: 20px 10px; }
h1 { margin: 10px 30px 20px; }
h1 { margin: 20px 30px 0 30px; }
Copyright © Terry Felke-Morris
CONFIGURE PADDING WITH CSS
 The padding property
 Related properties:
 padding-top, padding-right, padding-left,
padding-bottom
 Configures empty space between the content of the HTML
element (such as text) and the border
 Syntax examples
h1 { padding: 0; }
h1 { padding : 20px 10px; }
h1 { padding : 10px 30px 20px; }
h1 { padding : 20px 30px 0 30px; }
Copyright © Terry Felke-Morris
BOX MODEL IN ACTION
6
Copyright © Terry Felke-Morris
NORMAL FLOW
 Browser display of elements in the order they are
coded in the Web page document
Copyright © Terry Felke-Morris
RELATIVE POSITIONING
Changes the location of
an element in relation to
where it would otherwise
appear
8
h1 { background-color:#cccccc;
padding: 5px;
color: #000000; }
#myContent { position: relative;
left: 30px;
font-family: Arial,sans-serif; }
h1 { background-color:#cccccc;
padding: 5px;
color: #000000; }
#myContent { position: relative;
left: 30px;
font-family: Arial,sans-serif; }
Copyright © Terry Felke-Morris
ABSOLUTE POSITIONING
Precisely specifies the location of an
element in the browser window
h1 { background-color: #cccccc;
padding: 5px;
color: #000000; }
#content {position: absolute;
left: 200;
top: 100;
font-family: Arial,sans-serif;
width: 300; }
h1 { background-color: #cccccc;
padding: 5px;
color: #000000; }
#content {position: absolute;
left: 200;
top: 100;
font-family: Arial,sans-serif;
width: 300; }
9
Copyright © Terry Felke-Morris
ABSOLUTE POSITIONING EXAMPLE
Copyright © Terry Felke-Morris
h1 { background-color:#cccccc;
padding:5px;
color: #000000;
}
p { font-family:Arial,sans-serif;
}
#yls {float:right;
margin: 0 0 5px 5px;
border: solid;
}
FLOAT PROPERTY
 Elements that seem to
“float" on the right or
left side of either the
browser window or
another element are
often configured using
the float property.
11
Copyright © Terry Felke-Morris
CLEAR PROPERTY
 Useful to “clear” or
terminate a float
 Values are left, right, and
both
The h2 text
is displayed
in normal
flow.
The h2 text
is displayed
in normal
flow.
clear: left; was
applied to the h2.
Now the h2 text
displays AFTER the
floated image.
clear: left; was
applied to the h2.
Now the h2 text
displays AFTER the
floated image.
Copyright © Terry Felke-Morris
OVERFLOW PROPERTY
 Intended to configure the
display of elements on a Web
page.
 However, it is useful to “clear”
or terminate a float before the
end of a container element
 Values are auto, hidden, and
scroll
The
background
does not
extend as far
as you’d
expect.
The
background
does not
extend as far
as you’d
expect.
overflow: auto;
was applied to the div
that contains the image
and paragraph. Now the
background extends and
the h2 text displays
AFTER the floated image.
overflow: auto;
was applied to the div
that contains the image
and paragraph. Now the
background extends and
the h2 text displays
AFTER the floated image.
Copyright © Terry Felke-Morris
CHECKPOINT
1. List the components of the box model
from innermost to outermost.
2. Describe the difference between
relative and absolute positioning.
3. Describe the purpose of the CSS float
property.
14
Copyright © Terry Felke-Morris
DISPLAY PROPERTY
 Configures how and if an element is displayed
 display: none;
 The element will not be displayed.
 display: block;
 The element is rendered as a block element – even if it is actually
an inline element, such as a hyperlink.
 display: inline;
 The element will be rendered as an inline element – even if it is
actually a block element – such as a <li>.
 You’ll work with the display property later in the chapter.
15
Copyright © Terry Felke-Morris
CSS PAGE LAYOUT
TWO COLUMNS (LEFT NAV)
Copyright © Terry Felke-Morris
CSS PAGE LAYOUT
TWO COLUMNS (TOP LOGO, LEFT NAV)
Copyright © Terry Felke-Morris
CONFIGURE
HYPERLINKS IN
AN UNORDERED LIST
 Vertical Navigation
<div id="leftcolumn">
<ul>
<li><a href="index.html">Home</a></li>
<li><a href="menu.html">Menu</a></li>
<li><a href="directions.html">Directions</a></li>
<li><a href="contact.html">Contact</a></li>
</ul>
</div>
 CSS removes the list marker and underline:
#leftcolumn ul { list-style-type: none; }
#leftcolumn a { text-decoration: none; }
18
Copyright © Terry Felke-Morris
CONFIGURE
HYPERLINKS IN
AN UNORDERED LIST
 Horizontal Navigation
HTML:
<div id="nav">
<ul>
<li><a href="index.html">Home</a></li>
<li><a href="menu.html">Menu</a></li>
<li><a href="directions.html">Directions</a></li>
<li><a href="contact.html">Contact</a></li>
</ul>
</div>
 CSS removes the list marker, removes the underline, adds padding, and
configures the list items for inline display.
#nav ul { list-style-type: none;}
#nav a { text-decoration: none;
padding-right: 10px; }
#nav li { display: inline; }
19
Copyright © Terry Felke-Morris
CSS PSEUDO-CLASSES
Pseudo-classes and the anchor element
◦ link – default state
for a hyperlink
◦ visited –a hyperlink that
has been visited
◦ focus – triggered when
the hyperlink has focus
◦ hover – triggered when
the mouse moves over the hyperlink
◦ active – triggered when the hyperlink is being clicked
a:link {color:#000066;}
a:visited {color:#003366;}
a:focus {color:#FF0000;}
a:hover {color:#0099CC;}
a:active {color:#FF0000;}
a:link {color:#000066;}
a:visited {color:#003366;}
a:focus {color:#FF0000;}
a:hover {color:#0099CC;}
a:active {color:#FF0000;}
Copyright © Terry Felke-Morris
CSS
PSEUDO-CLASSES
a:link { color: #ff0000; }
a:hover { text-decoration: none;
color: #000066; }
21
Copyright © Terry Felke-Morris
DECIDING TO CONFIGURE A CLASS OR ID
 Configure a class:
 If the style may apply to more than one element on a page
 Use the . (dot) notation in the style sheet.
 Use the class attribute in the HTML.
 Configure an id:
 If the style is specific to only one element on a page
 Use the # notation in the style sheet.
 Use the id attribute in the HTML.
22
Copyright © Terry Felke-Morris
CHOOSING A NAME FOR A CLASS OR AN ID
A class or id name should be descriptive of the
purpose:
◦ such as nav, news, footer, etc.
◦ Bad choice for a name: redText, bolded, blueborder, etc.
The the 10 most commonly used class names are:
footer, menu, title, small, text, content,
header, nav, copyright, and button
Source: http://code.google.com/webstats
23
Copyright © Terry Felke-Morris
CSS DEBUGGING TIPS
 Manually check syntax errors
 Use W3C CSSValidator to check syntax errors
 http://jigsaw.w3.org/css-validator/
 Configure temporary background colors
 Configure temporary borders
 Use CSS comments to find the unexpected
/* the browser ignores this code */
 Don’t expect your pages to look exactly the same in all
browsers!
 Be patient!
24
Copyright © Terry Felke-Morris
CHECKPOINT
1. Open the chapter6/practice/index.html file from Hands-On Practice
6.5 in a browser. Resize the browser window. Describe what happens.
What type of page design layout (ice, jello, or liquid) is being used?
2. Describe one CSS debugging tip that you have found helpful.
3. Describe how to choose whether to configure an HTML element
selector, create a class, or create an id when working with CSS.
25
Copyright © Terry Felke-Morris
HTML5 STRUCTURAL ELEMENTS
 Header Element
 contains the headings of either a web page
document or an area in the document such as a
section or article.
 Hgroup Element
 contains two or more heading elements (h1, h2, and
so on)
26
Copyright © Terry Felke-Morris
HTML5 STRUCTURAL ELEMENTS
 Header Element
 Hgroup Element
Example:
<header>
<hgroup>
<h1>Lighthouse&nbsp;Island&nbsp;Bistro</h1>
<h2>the best coffee on the coast</h2>
</hgroup>
</header>
27
Copyright © Terry Felke-Morris
MORE HTML5 ELEMENTS
 Nav Element
 contains a section of navigation hyperlinks
 block display
 Footer Element
 contains the footer content of a web page or specific area (such as a
section or article) on a web page
 block display
 Aside Element
 contains a sidebar, a note, or other tangential content
 block display
28
Copyright © Terry Felke-Morris
MORE HTML5 ELEMENTS
 Section Element
 contains a “section” of a document, such as a chapter or topic
 block display
 Article Element
 contains an independent entry, such as a blog posting, comment, or e-
zine article that could stand on its own
 block display
 Time Element
 represents a date or a time
 could be useful to date articles or blog posts
 inline display
29
Copyright © Terry Felke-Morris
CHECKPOINT
1. Describe a reason to use HTML5 structural elements instead of div
elements for some page areas.
2. Describe the purpose of the article element.
3. Describe the purpose of the hgroup element.
30
Copyright © Terry Felke-Morris
SUMMARY
 This chapter introduced you to the
box model, CSS pseudo-classes,
configuring two-column page layouts
with CSS, and HTML5 structural
elements.
31

Chapter 6 - Web Design

  • 1.
    Copyright © TerryFelke-Morris WEB DEVELOPMENT & DESIGN FOUNDATIONS WITH HTML5 Chapter 6 Key Concepts 1Copyright © Terry Felke-Morris
  • 2.
    Copyright © TerryFelke-Morris LEARNING OUTCOMES In this chapter, you will learn how to ...  Describe and apply the CSS Box Model  Configure margin with CSS  Configure float with CSS  Configure relative and absolute positioning with CSS  Create two-column page layouts using CSS  Configure navigation in unordered lists and style with CSS  Add interactivity to hyperlinks with CSS pseudo-classes  Configure web pages with HTML5 structural elements, including section, header, hgroup, nav, aside, and footer 2
  • 3.
    Copyright © TerryFelke-Morris THE BOX MODEL  Content  Text & web page elements in the container  Padding  Area between the content and the border  Border  Between the padding and the margin  Margin  Determines the empty space between the element and adjacent elements 3
  • 4.
    Copyright © TerryFelke-Morris CONFIGURE MARGIN WITH CSS  The margin property  Related properties:  margin-top, margin-right, margin-left, margin-bottom  Configures empty space between the element and adjacent elements  Syntax examples h1 { margin: 0; } h1 { margin: 20px 10px; } h1 { margin: 10px 30px 20px; } h1 { margin: 20px 30px 0 30px; }
  • 5.
    Copyright © TerryFelke-Morris CONFIGURE PADDING WITH CSS  The padding property  Related properties:  padding-top, padding-right, padding-left, padding-bottom  Configures empty space between the content of the HTML element (such as text) and the border  Syntax examples h1 { padding: 0; } h1 { padding : 20px 10px; } h1 { padding : 10px 30px 20px; } h1 { padding : 20px 30px 0 30px; }
  • 6.
    Copyright © TerryFelke-Morris BOX MODEL IN ACTION 6
  • 7.
    Copyright © TerryFelke-Morris NORMAL FLOW  Browser display of elements in the order they are coded in the Web page document
  • 8.
    Copyright © TerryFelke-Morris RELATIVE POSITIONING Changes the location of an element in relation to where it would otherwise appear 8 h1 { background-color:#cccccc; padding: 5px; color: #000000; } #myContent { position: relative; left: 30px; font-family: Arial,sans-serif; } h1 { background-color:#cccccc; padding: 5px; color: #000000; } #myContent { position: relative; left: 30px; font-family: Arial,sans-serif; }
  • 9.
    Copyright © TerryFelke-Morris ABSOLUTE POSITIONING Precisely specifies the location of an element in the browser window h1 { background-color: #cccccc; padding: 5px; color: #000000; } #content {position: absolute; left: 200; top: 100; font-family: Arial,sans-serif; width: 300; } h1 { background-color: #cccccc; padding: 5px; color: #000000; } #content {position: absolute; left: 200; top: 100; font-family: Arial,sans-serif; width: 300; } 9
  • 10.
    Copyright © TerryFelke-Morris ABSOLUTE POSITIONING EXAMPLE
  • 11.
    Copyright © TerryFelke-Morris h1 { background-color:#cccccc; padding:5px; color: #000000; } p { font-family:Arial,sans-serif; } #yls {float:right; margin: 0 0 5px 5px; border: solid; } FLOAT PROPERTY  Elements that seem to “float" on the right or left side of either the browser window or another element are often configured using the float property. 11
  • 12.
    Copyright © TerryFelke-Morris CLEAR PROPERTY  Useful to “clear” or terminate a float  Values are left, right, and both The h2 text is displayed in normal flow. The h2 text is displayed in normal flow. clear: left; was applied to the h2. Now the h2 text displays AFTER the floated image. clear: left; was applied to the h2. Now the h2 text displays AFTER the floated image.
  • 13.
    Copyright © TerryFelke-Morris OVERFLOW PROPERTY  Intended to configure the display of elements on a Web page.  However, it is useful to “clear” or terminate a float before the end of a container element  Values are auto, hidden, and scroll The background does not extend as far as you’d expect. The background does not extend as far as you’d expect. overflow: auto; was applied to the div that contains the image and paragraph. Now the background extends and the h2 text displays AFTER the floated image. overflow: auto; was applied to the div that contains the image and paragraph. Now the background extends and the h2 text displays AFTER the floated image.
  • 14.
    Copyright © TerryFelke-Morris CHECKPOINT 1. List the components of the box model from innermost to outermost. 2. Describe the difference between relative and absolute positioning. 3. Describe the purpose of the CSS float property. 14
  • 15.
    Copyright © TerryFelke-Morris DISPLAY PROPERTY  Configures how and if an element is displayed  display: none;  The element will not be displayed.  display: block;  The element is rendered as a block element – even if it is actually an inline element, such as a hyperlink.  display: inline;  The element will be rendered as an inline element – even if it is actually a block element – such as a <li>.  You’ll work with the display property later in the chapter. 15
  • 16.
    Copyright © TerryFelke-Morris CSS PAGE LAYOUT TWO COLUMNS (LEFT NAV)
  • 17.
    Copyright © TerryFelke-Morris CSS PAGE LAYOUT TWO COLUMNS (TOP LOGO, LEFT NAV)
  • 18.
    Copyright © TerryFelke-Morris CONFIGURE HYPERLINKS IN AN UNORDERED LIST  Vertical Navigation <div id="leftcolumn"> <ul> <li><a href="index.html">Home</a></li> <li><a href="menu.html">Menu</a></li> <li><a href="directions.html">Directions</a></li> <li><a href="contact.html">Contact</a></li> </ul> </div>  CSS removes the list marker and underline: #leftcolumn ul { list-style-type: none; } #leftcolumn a { text-decoration: none; } 18
  • 19.
    Copyright © TerryFelke-Morris CONFIGURE HYPERLINKS IN AN UNORDERED LIST  Horizontal Navigation HTML: <div id="nav"> <ul> <li><a href="index.html">Home</a></li> <li><a href="menu.html">Menu</a></li> <li><a href="directions.html">Directions</a></li> <li><a href="contact.html">Contact</a></li> </ul> </div>  CSS removes the list marker, removes the underline, adds padding, and configures the list items for inline display. #nav ul { list-style-type: none;} #nav a { text-decoration: none; padding-right: 10px; } #nav li { display: inline; } 19
  • 20.
    Copyright © TerryFelke-Morris CSS PSEUDO-CLASSES Pseudo-classes and the anchor element ◦ link – default state for a hyperlink ◦ visited –a hyperlink that has been visited ◦ focus – triggered when the hyperlink has focus ◦ hover – triggered when the mouse moves over the hyperlink ◦ active – triggered when the hyperlink is being clicked a:link {color:#000066;} a:visited {color:#003366;} a:focus {color:#FF0000;} a:hover {color:#0099CC;} a:active {color:#FF0000;} a:link {color:#000066;} a:visited {color:#003366;} a:focus {color:#FF0000;} a:hover {color:#0099CC;} a:active {color:#FF0000;}
  • 21.
    Copyright © TerryFelke-Morris CSS PSEUDO-CLASSES a:link { color: #ff0000; } a:hover { text-decoration: none; color: #000066; } 21
  • 22.
    Copyright © TerryFelke-Morris DECIDING TO CONFIGURE A CLASS OR ID  Configure a class:  If the style may apply to more than one element on a page  Use the . (dot) notation in the style sheet.  Use the class attribute in the HTML.  Configure an id:  If the style is specific to only one element on a page  Use the # notation in the style sheet.  Use the id attribute in the HTML. 22
  • 23.
    Copyright © TerryFelke-Morris CHOOSING A NAME FOR A CLASS OR AN ID A class or id name should be descriptive of the purpose: ◦ such as nav, news, footer, etc. ◦ Bad choice for a name: redText, bolded, blueborder, etc. The the 10 most commonly used class names are: footer, menu, title, small, text, content, header, nav, copyright, and button Source: http://code.google.com/webstats 23
  • 24.
    Copyright © TerryFelke-Morris CSS DEBUGGING TIPS  Manually check syntax errors  Use W3C CSSValidator to check syntax errors  http://jigsaw.w3.org/css-validator/  Configure temporary background colors  Configure temporary borders  Use CSS comments to find the unexpected /* the browser ignores this code */  Don’t expect your pages to look exactly the same in all browsers!  Be patient! 24
  • 25.
    Copyright © TerryFelke-Morris CHECKPOINT 1. Open the chapter6/practice/index.html file from Hands-On Practice 6.5 in a browser. Resize the browser window. Describe what happens. What type of page design layout (ice, jello, or liquid) is being used? 2. Describe one CSS debugging tip that you have found helpful. 3. Describe how to choose whether to configure an HTML element selector, create a class, or create an id when working with CSS. 25
  • 26.
    Copyright © TerryFelke-Morris HTML5 STRUCTURAL ELEMENTS  Header Element  contains the headings of either a web page document or an area in the document such as a section or article.  Hgroup Element  contains two or more heading elements (h1, h2, and so on) 26
  • 27.
    Copyright © TerryFelke-Morris HTML5 STRUCTURAL ELEMENTS  Header Element  Hgroup Element Example: <header> <hgroup> <h1>Lighthouse&nbsp;Island&nbsp;Bistro</h1> <h2>the best coffee on the coast</h2> </hgroup> </header> 27
  • 28.
    Copyright © TerryFelke-Morris MORE HTML5 ELEMENTS  Nav Element  contains a section of navigation hyperlinks  block display  Footer Element  contains the footer content of a web page or specific area (such as a section or article) on a web page  block display  Aside Element  contains a sidebar, a note, or other tangential content  block display 28
  • 29.
    Copyright © TerryFelke-Morris MORE HTML5 ELEMENTS  Section Element  contains a “section” of a document, such as a chapter or topic  block display  Article Element  contains an independent entry, such as a blog posting, comment, or e- zine article that could stand on its own  block display  Time Element  represents a date or a time  could be useful to date articles or blog posts  inline display 29
  • 30.
    Copyright © TerryFelke-Morris CHECKPOINT 1. Describe a reason to use HTML5 structural elements instead of div elements for some page areas. 2. Describe the purpose of the article element. 3. Describe the purpose of the hgroup element. 30
  • 31.
    Copyright © TerryFelke-Morris SUMMARY  This chapter introduced you to the box model, CSS pseudo-classes, configuring two-column page layouts with CSS, and HTML5 structural elements. 31