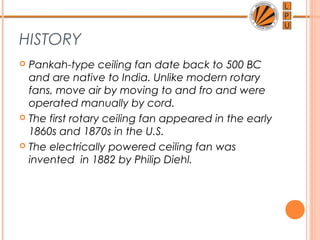
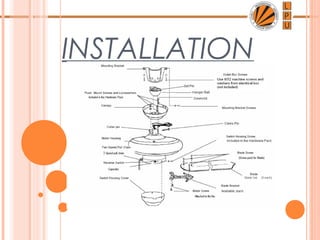
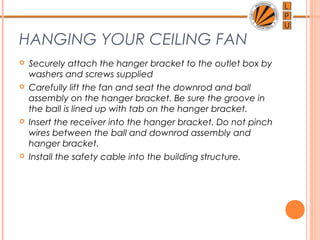
CEILING FAN
WORKING AND
INSTALLATION
By – Mohd Yameen
11709057
CONTENT
o Introduction
o History
o Working
o Principle
o Components
o Installation
o Airflow
INTRODUCTION
 A ceiling fan is a device suspended from the
ceiling of a room, which employs hub-mounted
rotating paddles to circulate air.
 First electrically powered fan was invented in
1882 by Philip Diehl.
 Crompton Greaves Ltd is the leading
manufacturer of fans
HISTORY
 Pankah-type ceiling fan date back to 500 BC
and are native to India. Unlike modern rotary
fans, move air by moving to and fro and were
operated manually by cord.
 The first rotary ceiling fan appeared in the early
1860s and 1870s in the U.S.
 The electrically powered ceiling fan was
invented in 1882 by Philip Diehl.
WORKING
In a ceiling fan there is a single phase capacitor start
and run motor. There is main
(running ) winding and
auxiliary (starting) winding in
the fan. Starting winding has
capacitor in its series. Due to
this capacitor single phase
is divided in two phase and
a rotating magnetic field is produced and due to
internal reaction motor start to rotate.
PRINCIPLE
If a current carrying
conductor is placed
in a magnetic field it
experience a force
and start to rotate.
The direction of
rotation can be
found by Fleming’s
Left Hand Rule

COMPONENTS
KEY COMPONENTS
 Electric Motor – Capacitor Start & Run, rated at
230V,50Hz
 Blades – Usually made of Aluminum sheets, 120
degree and normally 3-4 blades
 Blade Flanges
 Canopy/Switch Cup
 Suspension/Down rod
 Ball Bearing
 Terminal Box (L,N & E)
 Speed Regulator
INSTALLATION
PUTTING YOUR FAN TOGETHER
 Pass the three motor leads through the opening in the
canopy and coupling cover of fan.
 Remove the two set screws from the motor coupling.
Remove the hairpin clip & washer from the clevis pin
and remove clevis pin from downrod.
 Insert the downrod through the center opening in the
canopy and route the motor leads through the hanger
ball/ downrod assembly.
 Align the clevis pin holes in the downrod with the holes in
the motor coupling. The clevis pin must pass through the
holes in the motor coupling and the downrod
HANGING YOUR CEILING FAN
 Securely attach the hanger bracket to the outlet box by
washers and screws supplied
 Carefully lift the fan and seat the downrod and ball
assembly on the hanger bracket. Be sure the groove in
the ball is lined up with tab on the hanger bracket.
 Insert the receiver into the hanger bracket. Do not pinch
wires between the ball and downrod assembly and
hanger bracket.
 Install the safety cable into the building structure.
AIRFLOW DIRECTION
Operation in Summer
 In warm weather, the reverse switch
should be set to produce a downward
flow of air. The constant, gentle breeze
will transfer heat from your body; thus,
you will feel cooler even if the
temperature remains unchanged.
 For summer cooling, set the speed control on medium or
fast speed. This will provide sufficient airflow to
accomplisha cooling effect.
AIRFLOW DIRECTION
Operation in Winters
 Winter comfort requires a different
approach. Because warm air rises
the air close to the ceiling is always warmer-by perhaps
15¢XF-than the air close to the floor. To prevent heat
from hovering where it does little good, move the
reverse switch to create an upward airflow.
 Set the variable speed control fast enough to break up
the air stratification, but slow enough not to create a
draft. By keeping the heat circulating, the heater will not
have to operate as often to keep you warm.
CONCLUSION
 Provide comfort
 Uses surprisingly little electricity
 Lower your electricity bill
THANK YOU

Ceiling fan(working and installation)

  • 1.
  • 2.
    CONTENT o Introduction o History oWorking o Principle o Components o Installation o Airflow
  • 3.
    INTRODUCTION  A ceilingfan is a device suspended from the ceiling of a room, which employs hub-mounted rotating paddles to circulate air.  First electrically powered fan was invented in 1882 by Philip Diehl.  Crompton Greaves Ltd is the leading manufacturer of fans
  • 4.
    HISTORY  Pankah-type ceilingfan date back to 500 BC and are native to India. Unlike modern rotary fans, move air by moving to and fro and were operated manually by cord.  The first rotary ceiling fan appeared in the early 1860s and 1870s in the U.S.  The electrically powered ceiling fan was invented in 1882 by Philip Diehl.
  • 5.
    WORKING In a ceilingfan there is a single phase capacitor start and run motor. There is main (running ) winding and auxiliary (starting) winding in the fan. Starting winding has capacitor in its series. Due to this capacitor single phase is divided in two phase and a rotating magnetic field is produced and due to internal reaction motor start to rotate.
  • 6.
    PRINCIPLE If a currentcarrying conductor is placed in a magnetic field it experience a force and start to rotate. The direction of rotation can be found by Fleming’s Left Hand Rule 
  • 7.
  • 8.
    KEY COMPONENTS  ElectricMotor – Capacitor Start & Run, rated at 230V,50Hz  Blades – Usually made of Aluminum sheets, 120 degree and normally 3-4 blades  Blade Flanges  Canopy/Switch Cup  Suspension/Down rod  Ball Bearing  Terminal Box (L,N & E)  Speed Regulator
  • 9.
  • 10.
    PUTTING YOUR FANTOGETHER  Pass the three motor leads through the opening in the canopy and coupling cover of fan.  Remove the two set screws from the motor coupling. Remove the hairpin clip & washer from the clevis pin and remove clevis pin from downrod.  Insert the downrod through the center opening in the canopy and route the motor leads through the hanger ball/ downrod assembly.  Align the clevis pin holes in the downrod with the holes in the motor coupling. The clevis pin must pass through the holes in the motor coupling and the downrod
  • 11.
    HANGING YOUR CEILINGFAN  Securely attach the hanger bracket to the outlet box by washers and screws supplied  Carefully lift the fan and seat the downrod and ball assembly on the hanger bracket. Be sure the groove in the ball is lined up with tab on the hanger bracket.  Insert the receiver into the hanger bracket. Do not pinch wires between the ball and downrod assembly and hanger bracket.  Install the safety cable into the building structure.
  • 12.
    AIRFLOW DIRECTION Operation inSummer  In warm weather, the reverse switch should be set to produce a downward flow of air. The constant, gentle breeze will transfer heat from your body; thus, you will feel cooler even if the temperature remains unchanged.  For summer cooling, set the speed control on medium or fast speed. This will provide sufficient airflow to accomplisha cooling effect.
  • 13.
    AIRFLOW DIRECTION Operation inWinters  Winter comfort requires a different approach. Because warm air rises the air close to the ceiling is always warmer-by perhaps 15¢XF-than the air close to the floor. To prevent heat from hovering where it does little good, move the reverse switch to create an upward airflow.  Set the variable speed control fast enough to break up the air stratification, but slow enough not to create a draft. By keeping the heat circulating, the heater will not have to operate as often to keep you warm.
  • 14.
    CONCLUSION  Provide comfort Uses surprisingly little electricity  Lower your electricity bill
  • 15.