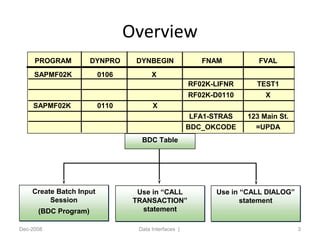
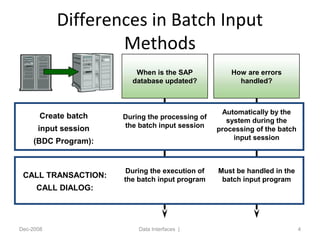
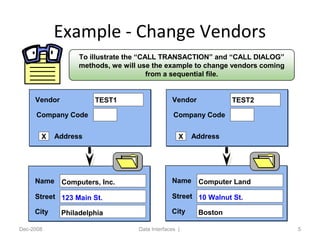
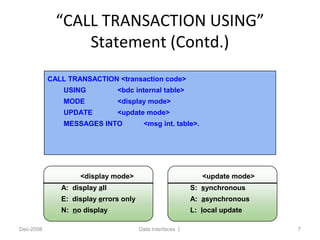
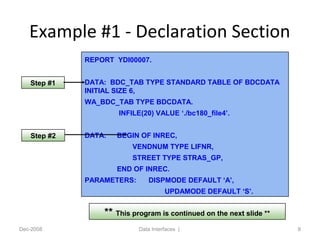
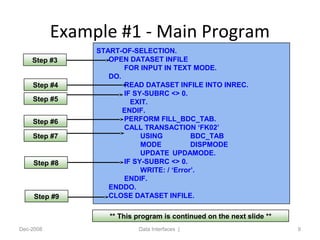
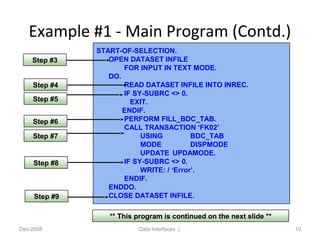
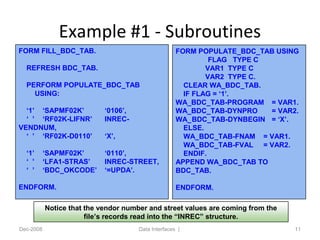
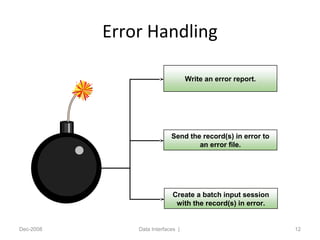
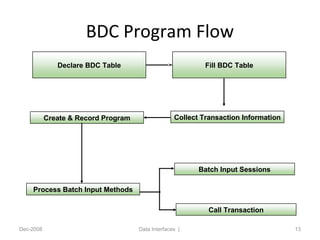
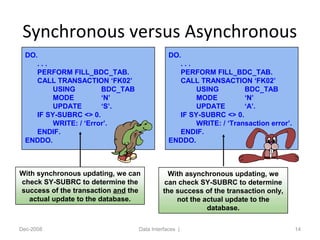
This document describes the Call Transaction Method for batch input in SAP. It discusses how to use the CALL TRANSACTION statement to execute a transaction from a batch input program. Errors are not handled automatically and must be addressed in the program. An example shows how to declare a BDC table, populate it from a sequential file, and call transaction FK02 to update vendor data asynchronously or synchronously. Synchronous updating allows checking for errors while asynchronous does not guarantee the database is updated.
As an ABAP Developer, we often have to develop ABAP reports that displays some data from the database. SAP provides a set of ALV (ABAP List Viewer) function modules which can be put into use to embellish the output of a report. Object oriented ALV is more robust and is more advanced when compared to Traditional ALV.
Beginner's Guide: Programming with ABAP on HANAAshish Saxena
The focus of this blog is to present an overview of the new programming techniques in ABAP after the introduction of HANA database. The focus will be towards providing a guideline on why and how an ABAP developer should start transitioning its code to use the new coding technique’s.
InstructionsManagement Tools Assignment Part 1 and Part 2Additiona.docxnormanibarber20063
InstructionsManagement Tools Assignment Part 1 and Part 2Additional Notes:1) All Journal Entries MUST include the "Explanation" line.Due Dates2) All Debit account entry lines MUST be fully left-justified.Assignment Part 1 - Due at the end of Unit 2 (40 Points)3) All Credit account entry lines MUST be indented 4 or 5 spaces, UNIFORMLY.Assignment Part 2 - Due at the end of Unit 3 (40 Points)4) You will be required to create at least ONE additional general Ledger Account to accommodate a few Journal Entires.5) You may creat one "Miscellaneous Expense" account in the General Ledger to accommodate all of the otherwise unspecified entries, OR you may create 2 or 3 new G/L accounts. For example "Utilities."6) Be sure that you use proper formatting when you create the Financial Statements. For example, all underlining and "$" signs must be properly formatted.7) These templates are NOT fully "pre-formatted". You must re-format them for proper presentation in many places.MAKE SURE TO COMPLETE ALL REQUIREMENTS WHICH ARE LISTED BELOW.There are 9 Sheets in the Workbook including this one.All of the Information you need for the Project is located in this Workbook.RequirementsSheet in WorkbookAssignment Part 1 Due in Unit 02Requirement 1 - Prepare the Journal Entries in the General JournalJounral Entries<-- VERY IMPORTANT NOTE: You must revise the General Ledger in Unit 3 to include the Adjusting & Closing Entries.Requirement 2 - Post Journal Entries to the General LedgerGeneral LedgerRequirement 3 - Prepare a Trial BalanceTrial BalanceAssignment Part 2 - Due in Unit 3Requirement 4 - Prepare the Adjusting EntriesAdjusting EntriesRequirement 5 - Post Adjusting Entries to the General LedgerGeneral LedgerRequirement 6 - Prepare an Adjusted Trial BalanceAdjusted TBRequirement 7 - Prepare the Financial StatementsFinancial StatementsRequirement 8 - Prepare the Closing EntriesClosing EntriesRequirement 9 - Post Closing Entries to the General LedgerGeneral LedgerRequirement 10 - Prepare the Post Closing Trial BalancePost Closing TB
Journal Entries-Due in Unit 2Prepare journal entries to record the June transactions in the General Journal below.General JournalDateDescription(Account Name)DebitCreditNote: Remember that Debits must equal Credits - All of your Journal Entries should balance.
General Ledger - Due in Unit 2This Sheet will be used for Requirements 2, 5 and 9 GENERAL LEDGERACCOUNT:CASHACCOUNTNO. 11YEARPOST. BALANCEMONTHDAYITEMREF.DEBITCREDITDEBITCREDIT20101ACCOUNT:ACCOUNTS RECEIVABLEACCOUNTNO. 12POST. BALANCEDATEITEMREF.DEBITCREDITDEBITCREDIT20--ACCOUNT:SUPPLIESACCOUNTNO. 14POST. BALANCEDATEITEMREF.DEBITCREDITDEBITCREDIT20--ACCOUNT:PREPAID RENTACCOUNTNO. 15POST. BALANCEDATEITEMREF.DEBITCREDITDEBITCREDIT20--ACCOUNT:PREPAID INSURANCEACCOUNTNO. 16POST. BALANCEDATEITEMREF.DEBITCREDITDEBITCREDIT20--ACCOUNT:OFFICE EQUIPMENTACCOUNTNO. 18POST. BALA.
This book guides the beginner to start up with Embedded C programming using MP LAB . This Book covers all interfacing examples with pic micro controller and guides beginners to develop projects on PIC micro controller
PT1420 Modules in Flowchart and Visual Basic .docxamrit47
PT1420: Modules in Flowchart and Visual Basic
Page 1
This lab requires you to think about the steps that take place in a program by designing a
flowchart. Use an application such as Raptor or Visio. Read the following program prior to
completing the lab.
Data Communications Corp wants a small program that will calculate the cost of UTP it
installs for their clients. Write a program that will ask the user to input the name of the
client and the number of feet of cable installed. The program should then calculate and
display a final bill. Cost per foot of UTP is .21 cents. Be sure to add on a tax of 6%. Final
bill should include the total cost and client name. Be sure to add modules to your
program.
Step 1: In main, create a module called declareVariables() that will set your variables to 0 or “ “.
Click the Call Symbol on the Left and Drag and Drop to the flow lines between Start and Stop.
Double click on the Call Symbol and type the name of your first module. For example, type
declareVariables in the Enter Call box. Do not put the ( ) when using Raptor. Click the Done
button. A new box will pop up that will ask you to create a new tab. Click Yes. A new tab will be
created for your new method. Notice the new Tab called declareVariables.
Watch the Help Video 4-2 to see how to add modules and initialize variables in Raptor and
Visio.
PT1420: Modules in Flowchart and Visual Basic
Page 2
Step 2: Continue this process to add your additional methods, which are inputData(),
calcCosts(), and displayBill(). Main should look like this:
In Raptor
In Visio
Start
End
declareVariables()
inputData()
calcCosts()
displayBill()
Step 3: Click on the inputData module and add the necessary code to input clientName and
feetUTP. Watch the Help Video 4-2 to see how to input variables in Raptor and Visio.
Step 4: Click the calcCosts module and add the necessary code to compute calculations. Watch
the Help Video 4-2 to see how to add calculations in Raptor and Visio.
Step 5: Click the displayBill module and add the necessary code to display the clientName and
totalCost to the screen. Watch the Help Video 4-2 to see how to display variables in Raptor and
Visio.
PT1420: Modules in Flowchart and Visual Basic
Page 3
Step 6: If you are using Raptor, you can run your program. Click Run, then Execute to Finish. For
your input, enter a client name such as Bumpco Inc and ...
2. Objectives
• The participants will be able to:
– Describe the Call Transaction Method for Batch
Input.
– Differentiate the different batch input methods.
Dec-2008 Data Interfaces | 2
3. Overview
Dec-2008 Data Interfaces | 3
PROGRAM DYNPRO DYNBEGIN FNAM FVAL
SAPMF02K 0106 X
RF02K-LIFNR TEST1
RF02K-D0110 X
SAPMF02K 0110 X
LFA1-STRAS 123 Main St.
BDC_OKCODE =UPDA
BDC Table
Create Batch Input
Session
(BDC Program)
Create Batch Input
Session
(BDC Program)
Use in “CALL
TRANSACTION”
statement
Use in “CALL
TRANSACTION”
statement
Use in “CALL DIALOG”
statement
Use in “CALL DIALOG”
statement
4. Differences in Batch Input
Methods
Dec-2008 Data Interfaces | 4
When is the SAP
database updated?
How are errors
handled?
Create batch
input session
(BDC Program):
During the processing of
the batch input session
Automatically by the
system during the
processing of the batch
input session
CALL TRANSACTION:
CALL DIALOG:
During the execution of
the batch input program
Must be handled in the
batch input program
5. Example - Change Vendors
Dec-2008 Data Interfaces | 5
Name
Street
Computers, Inc.
123 Main St.
City Philadelphia
Vendor
Company Code
TEST1
AddressX
Vendor
Company Code
TEST2
AddressX
Name
Street
Computer Land
10 Walnut St.
City Boston
To illustrate the “CALL TRANSACTION” and “CALL DIALOG”
methods, we will use the example to change vendors coming
from a sequential file.
6. “CALL TRANSACTION USING”
Statement
Dec-2008 Data Interfaces | 6
CALL TRANSACTION <transaction code>
USING <bdc internal table>
MODE <display mode>
UPDATE <update mode>
MESSAGES INTO <msg int. table>.
<display mode>
A: display all
E: display errors only
N: no display
<update mode>
S: synchronous
A: asynchronous
7. “CALL TRANSACTION USING”
Statement (Contd.)
Dec-2008 Data Interfaces | 7
CALL TRANSACTION <transaction code>
USING <bdc internal table>
MODE <display mode>
UPDATE <update mode>
MESSAGES INTO <msg int. table>.
<display mode>
A: display all
E: display errors only
N: no display
<update mode>
S: synchronous
A: asynchronous
L: local update
8. Example #1 - Declaration Section
Dec-2008 Data Interfaces | 8
REPORT YDI00007.
DATA: BDC_TAB TYPE STANDARD TABLE OF BDCDATA
INITIAL SIZE 6,
WA_BDC_TAB TYPE BDCDATA.
INFILE(20) VALUE ‘./bc180_file4’.
DATA: BEGIN OF INREC,
VENDNUM TYPE LIFNR,
STREET TYPE STRAS_GP,
END OF INREC.
PARAMETERS: DISPMODE DEFAULT ‘A’,
UPDAMODE DEFAULT ‘S’.
** This program is continued on the next slide **
Step #1
Step #2
9. Example #1 - Main Program
Dec-2008 Data Interfaces | 9
START-OF-SELECTION.
OPEN DATASET INFILE
FOR INPUT IN TEXT MODE.
DO.
READ DATASET INFILE INTO INREC.
IF SY-SUBRC <> 0.
EXIT.
ENDIF.
PERFORM FILL_BDC_TAB.
CALL TRANSACTION ‘FK02’
USING BDC_TAB
MODE DISPMODE
UPDATE UPDAMODE.
IF SY-SUBRC <> 0.
WRITE: / ‘Error’.
ENDIF.
ENDDO.
CLOSE DATASET INFILE.
** This program is continued on the next slide **
Step #3
Step #4
Step #5
Step #6
Step #7
Step #8
Step #9
10. Example #1 - Main Program (Contd.)
Dec-2008 Data Interfaces | 10
START-OF-SELECTION.
OPEN DATASET INFILE
FOR INPUT IN TEXT MODE.
DO.
READ DATASET INFILE INTO INREC.
IF SY-SUBRC <> 0.
EXIT.
ENDIF.
PERFORM FILL_BDC_TAB.
CALL TRANSACTION ‘FK02’
USING BDC_TAB
MODE DISPMODE
UPDATE UPDAMODE.
IF SY-SUBRC <> 0.
WRITE: / ‘Error’.
ENDIF.
ENDDO.
CLOSE DATASET INFILE.
** This program is continued on the next slide **
Step #3
Step #4
Step #5
Step #6
Step #7
Step #8
Step #9
11. Example #1 - Subroutines
Dec-2008 Data Interfaces | 11
FORM FILL_BDC_TAB.
REFRESH BDC_TAB.
PERFORM POPULATE_BDC_TAB
USING:
‘1’ ‘SAPMF02K’ ‘0106’,
‘ ’ ‘RF02K-LIFNR’ INREC-
VENDNUM,
‘ ’ ‘RF02K-D0110’ ‘X’,
‘1’ ‘SAPMF02K’ ‘0110’,
‘ ’ ‘LFA1-STRAS’ INREC-STREET,
‘ ’ ‘BDC_OKCODE’ ‘=UPDA’.
ENDFORM.
FORM POPULATE_BDC_TAB USING
FLAG TYPE C
VAR1 TYPE C
VAR2 TYPE C.
CLEAR WA_BDC_TAB.
IF FLAG = ‘1’.
WA_BDC_TAB-PROGRAM = VAR1.
WA_BDC_TAB-DYNPRO = VAR2.
WA_BDC_TAB-DYNBEGIN = ‘X’.
ELSE.
WA_BDC_TAB-FNAM = VAR1.
WA_BDC_TAB-FVAL = VAR2.
ENDIF.
APPEND WA_BDC_TAB TO
BDC_TAB.
ENDFORM.
Notice that the vendor number and street values are coming from the
file’s records read into the “INREC” structure.
12. Error Handling
Dec-2008 Data Interfaces | 12
Write an error report.
Send the record(s) in error to
an error file.
Create a batch input session
with the record(s) in error.
13. BDC Program Flow
Dec-2008 Data Interfaces | 13
Declare BDC Table Fill BDC Table
Collect Transaction InformationCreate & Record Program
Process Batch Input Methods
Batch Input Sessions
Call Transaction
14. Synchronous versus Asynchronous
Dec-2008 Data Interfaces | 14
DO.
. . .
PERFORM FILL_BDC_TAB.
CALL TRANSACTION ‘FK02’
USING BDC_TAB
MODE ‘N’
UPDATE ‘S’.
IF SY-SUBRC <> 0.
WRITE: / ‘Error’.
ENDIF.
ENDDO.
DO.
. . .
PERFORM FILL_BDC_TAB.
CALL TRANSACTION ‘FK02’
USING BDC_TAB
MODE ‘N’
UPDATE ‘A’.
IF SY-SUBRC <> 0.
WRITE: / ‘Transaction error’.
ENDIF.
ENDDO.
With synchronous updating, we can
check SY-SUBRC to determine the
success of the transaction and the
actual update to the database.
With asynchronous updating, we
can check SY-SUBRC to determine
the success of the transaction only,
not the actual update to the
database.
15. Demonstration
• Creation of a custom BDC program and
changing customer address with transaction
XD02 (Change Customer) using the Call
transaction method.
Dec-2008 Data Interfaces | 15
16. Practice
• Creation of a custom BDC program and
changing customer address with transaction
XD02 (Change Customer) using the Call
transaction method.
Dec-2008 Data Interfaces | 16
17. Summary
• If you use the “CALL TRANSACTION” or “CALL
DIALOG” statement, errors are not handled
automatically by the system. Errors must be
handled in the batch input program.
• The “CALL TRANSACTION” statement executes
an online program. When this transaction is
completed, processing returns to the “calling”
program.
Dec-2008 Data Interfaces | 17
18. Questions
• What are the different batch input methods
present in SAP for data upload?
• What is the difference between synchronous
and asynchronous update?
Dec-2008 Data Interfaces | 18
Editor's Notes
In a batch input program, the contents of the BDC table can be used three ways to perform the data transfer to the SAP system:
Use the BDC table to create a batch input session.
In this case, the batch input program is often called a BDC program.
Use the BDC table in a “CALL TRANSACTION USING” statement.
Use the BDC table in a “CALL DIALOG” statement (outdated).
In chapter 5, we covered the first method – creating a batch input session with the contents of the BDC table.
In this chapter, we will cover the batch input method – using the BDC table in the “CALL TRANSACTION USING”.
When you perform batch input, you will generally be deciding between the first two methods – creating a batch input session or using the “CALL TRANSACTION USING” statement.
Two questions illustrate the main differences between creating a batch input session and using the “CALL TRANSACTION/DIALOG”:
When is the SAP database updated?
How are errors handled?
When is the SAP database updated?
If you create a batch input session in a BDC program, the SAP database is updated during the processing of the batch input session, not the execution of the BDC program.
If you use the “CALL TRANSACTION” or “CALL DIALOG” statement, the SAP database is updated during the execution of the batch input program. In other words, the timing issue we covered in the previous chapter is not an issue with these two alternatives because the database is updated during the execution of the batch input program.
How are errors handled?
If you create a batch input session in a BDC program, errors are handled automatically by the system during the processing of the batch input session. Errors are recorded in a log and with the batch input session error is kept.
If you use the “CALL TRANSACTION” or “CALL DIALOG” statement, errors are not handled automatically by the system. Errors must be handled in the batch input program.
To illustrate the “CALL TRANSACTION” and “CALL DIALOG” methods, we will use the example to change vendors coming from a sequential file on the application server.
In chapter 5, we used this example to create a batch input session. In this chapter, we will first use this example with the “CALL TRANSACTION” method. Then, we will use it with the “CALL DIALOG” method.
The “CALL TRANSACTION” statement executes an online program. When this transaction is completed, processing returns to the “calling” program. To perform batch input with the “CALL TRANSACTION” statement, the “USING” addition is required to send the contents of the BDC table to the transaction:
CALL TRANSACTION &lt;transaction code&gt;
USING&lt;bdc table&gt;
[MODE&lt;display mode&gt;]
[UPDATE&lt;update mode&gt;]
[MESSAGES INTO &lt;mssg int. table&gt;] .
The &lt;bdc table&gt; must be declared “LIKE BDCDATA”.
The only required addition for batch input is “USING”. The other additions are only valid in conjunction with the “USING” addition.
The &lt;display mode&gt; determines how the transaction will be processed: ‘A’ (display all), ‘E’ (display errors only), or ‘N’ (no display). The default is ‘A’.
The &lt;update mode&gt; determines how database update will occur: ‘S’ (synchronous) or ‘A’ (asynchronous) or L (local update). The default is ‘A’.
Synchronous updating indicates that an update is completed for the transaction before processing returns to the “calling” program.
Asynchronous updating indicates that processing returns to the “calling” program immediately after the transaction is completed, even before the update is completed.
Local update indicates that updates of the called program are executed in such a way as if the SET UPDATE TASK LOCAL statement had been executed in it.
System messages issued during the transaction can be stored in the &lt;msg int. table&gt;. This internal table must be declared “LIKE BDCMSGCOLL”.
To perform batch input using the “CALL TRANSACTION USING” statement with multiple records from a sequential file on the application server, perform the following steps in a batch input program:
Step #1: Create the BDC table.
This internal table must be declared “TYPE BDCDATA”.
Step #2: Define the structure in which the file’s records will be read.
This structure should match the structure of the file’s records.
The sequential file we are reading has the same format as the one from chapter 5 (see page 12 of chapter 5). It is structured in lines, so we will open it “IN TEXT MODE”.
These steps are continued on the next page.
Steps to perform batch input using the “CALL TRANSACTION USING” statement (continued from previous page):
Step #3: Open the file “FOR INPUT”.
Step #4: Read a record from the file into the structure.
To read the complete file, you must code the “READ DATASET” statement in a DO loop.
Step #5: Code a way out (EXIT) of the DO loop.
If SY-SUBRC is not 0, the end of the file has already been reached.
Step #6: Fill the BDC table with the appropriate data for the transaction (see next page).
This step will be executed for each record in the sequential file.
Step #7: Insert a transaction’s data (from the BDC table) into the transaction directly by using the “CALL TRANSACTION USING” statement.
This step will be executed for each record in the sequential file.
The display mode determines how this transaction is processed (i.e., will you see the transaction’s screens or not).
Step #8: Check SY-SUBRC to determine if an error occurred during the transaction (SY-SUBRC &lt;&gt; 0).
The system does not automatically handle these errors like it does during the processing of a batch input session. You must handle these errors in the program (see page 8).
Step #9: Close the file.
The two subroutines above are used to fill the BDC table. These two subroutines are executed just before the BDC table’s contents are passed to the transaction with the “CALL TRANSACTION USING” statement.
With the “CALL TRANSACTION USING” statement (and the “CALL DIALOG” statement), errors are not handled automatically by the system. Therefore, you must handle these errors in the batch input program.
After a “CALL TRANSACTION USING” statement (or a “CALL DIALOG” statement), the value of SY-SUBRC indicates the success or failure of the transaction:
If SY-SUBRC is zero, the transaction (or dialog module) was successful.
If SY-SUBRC is not zero, the transaction (or dialog module) was not successful.
You can handle an error in many ways:
Write an error report.
Send the record(s) in error to an error file.
Create a batch input session with the record(s) in error.
This list of error handling methods is not complete. The exact method chosen will depend on your specific requirements. Also, these methods can be combined (i.e., you can create an error report and send the records in error to an error file).
In the “CALL TRANSACTION USING” statement, you can specify the update mode as synchronous or asynchronous. To restate the difference:
Synchronous updating indicates that an update is completed for the transaction before processing returns to the “calling” program.
Asynchronous updating indicates that processing returns to the “calling” program immediately after the transaction is completed, even before the update is completed.
The difference in these update modes creates a trade-off between the execution speed and the meaning of the return code.
With respect to the execution speed:
Synchronous updating is slower than asynchronous updating because processing does not return to the “calling” program until the update is complete.
Remember that the update mode when processing batch input sessions is always synchronous.
With respect to the meaning of the return code:
The return code (SY-SUBRC) after synchronous updating indicates the success or failure of the actual update. The return code after asynchronous updating only indicates the success or failure of the transaction, not the update.