Building an openfiler storage in vmware vsphere 5.0 lab
•
1 like•417 views

Buliding Openfiler iSCSI storage in VMware vSphere 5.0 lab To know more about trainings provided by VEPSUN Technologies visit http://www.vepsun.in/

Recommended
Recommended
More Related Content
What's hot
What's hot (14)
Viewers also liked
Viewers also liked (15)
Similar to Building an openfiler storage in vmware vsphere 5.0 lab
Similar to Building an openfiler storage in vmware vsphere 5.0 lab (20)
Recently uploaded
Recently uploaded (20)
Building an openfiler storage in vmware vsphere 5.0 lab
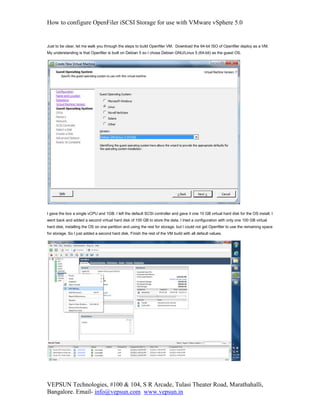
- 1. How to configure OpenFiler iSCSI Storage for use with VMware vSphere 5.0 VEPSUN Technologies, #100 & 104, S R Arcade, Tulasi Theater Road, Marathahalli, Bangalore. Email- info@vepsun.com www.vepsun.in Just to be clear, let me walk you through the steps to build Openfiler VM. Download the 64-bit ISO of Openfiler deploy as a VM. My understanding is that Openfiler is built on Debian 5 so I chose Debian GNU/Linux 5 (64-bit) as the guest OS. I gave the box a single vCPU and 1GB. I left the default SCSI controller and gave it one 10 GB virtual hard disk for the OS install. I went back and added a second virtual hard disk of 100 GB to store the data. I tried a configuration with only one 100 GB virtual hard disk, installing the OS on one partition and using the rest for storage, but I could not get Openfiler to use the remaining space for storage. So I just added a second hard disk. Finish the rest of the VM build with all default values.
- 2. How to configure OpenFiler iSCSI Storage for use with VMware vSphere 5.0 VEPSUN Technologies, #100 & 104, S R Arcade, Tulasi Theater Road, Marathahalli, Bangalore. Email- info@vepsun.com www.vepsun.in Before powering on the VM for the first time, right-click the VM and go to Edit Settings Add a second hard drive of 100 GB using default values for everything else. Installing Openfiler 2.99 Turn on the Openfiler VM and load the ISO. Reboot into the ISO and Openfiler. Press enter or just wait a few seconds for it to continue from the first page.
- 3. How to configure OpenFiler iSCSI Storage for use with VMware vSphere 5.0 VEPSUN Technologies, #100 & 104, S R Arcade, Tulasi Theater Road, Marathahalli, Bangalore. Email- info@vepsun.com www.vepsun.in Press “Next” to start the installation. Press “Next” after choosing your language. You may get a warning because the installer recognizes an uninitialized hard drive. Realize you’ll be losing data if it’s present on the hard drive and press “Yes” to continue. On the partition page, both hard drives you added are checked by default as installation drives. You’ll want to uncheck the 100 GB hard drive labeled sdb. We’ll configure this later. You may want to check the box next to “Review and modify portioning layout.” Click “Next.” You’ll get another warning about losing any data present on your hard drives. This is, of course, ok since we know they’re new drives. Click “Yes” to continue. If you checked the box to review the partitioning layout, you can see the dives you added, labeled /dev/sda for the 10 GB hard drive where you’ll install Openfiler and, scrolling down, you’ll see 100 GB of free space where your data will go. Click “Next” to continue.
- 4. How to configure OpenFiler iSCSI Storage for use with VMware vSphere 5.0 VEPSUN Technologies, #100 & 104, S R Arcade, Tulasi Theater Road, Marathahalli, Bangalore. Email- info@vepsun.com www.vepsun.in Your data drive is labeled as /dev/sdb and you can see there’s 100 GB free.
- 5. How to configure OpenFiler iSCSI Storage for use with VMware vSphere 5.0 VEPSUN Technologies, #100 & 104, S R Arcade, Tulasi Theater Road, Marathahalli, Bangalore. Email- info@vepsun.com www.vepsun.in Choosing the default EXTLINUX boot loader work fine. Go ahead and click “Next.” On the networking page, go ahead and check the box next to each network interface, eth0 and eth1. Highlight each of them in turn and click “Edit” to configure your IP settings. So I’ll configure it to have an IP address in that subnet. I disabled IPv6 support because I know I’m not using it. You can leave it enabled if you want. It won’t hurt anything. Add in default gateway and DNS information here. Click “Next” when finished.
- 6. How to configure OpenFiler iSCSI Storage for use with VMware vSphere 5.0 VEPSUN Technologies, #100 & 104, S R Arcade, Tulasi Theater Road, Marathahalli, Bangalore. Email- info@vepsun.com www.vepsun.in Feel free to configure a time zone and “Next” when done. And finally, enter a root password. Press “Next” when done. If you’re happy with your choices so far, click “Next” to actually install Openfiler. You’ll see Openfiler formatting your configured partitions as requested. Your 100 GB data partition will be formatted by ESXi for VMFS3 later on when you add storage to your hosts. Once the installation is finished, click “Reboot” and we’ll start configuring Openfiler. Configuring a Single LUN with Multiple iSCSI Targets The boot loader screen below is what you’ll see each time Openfiler boots. Either press enter to continue or wait the allotted time and Openfiler will start automatically.
- 7. How to configure OpenFiler iSCSI Storage for use with VMware vSphere 5.0 VEPSUN Technologies, #100 & 104, S R Arcade, Tulasi Theater Road, Marathahalli, Bangalore. Email- info@vepsun.com www.vepsun.in Once you see the screen below, you can close the console to the Openfiler VM. You’ll mainly work from Openfiler’s web interface, not the command line below. Take note of the web administration address give below. It’s HTTPS and you have to specify port
- 8. How to configure OpenFiler iSCSI Storage for use with VMware vSphere 5.0 VEPSUN Technologies, #100 & 104, S R Arcade, Tulasi Theater Road, Marathahalli, Bangalore. Email- info@vepsun.com www.vepsun.in 446. The IP address of the web interface is the IP address of the network interface, eth0. From a computer connected to your front-end network, type in the address to the Openfiler web interface. In this case, I typed in https://10.240.1.105:446. Your web browser may holler about an untrusted certificate. Just ignore it and continue on. Once at the Openfiler web login screen, enter the default username and password of “openfiler” and “password” without the quotes.
- 9. How to configure OpenFiler iSCSI Storage for use with VMware vSphere 5.0 VEPSUN Technologies, #100 & 104, S R Arcade, Tulasi Theater Road, Marathahalli, Bangalore. Email- info@vepsun.com www.vepsun.in Once logged in, let’s start configuring! On the top menu, go to “System.” Scroll down and enter your ESXi host information into the Network Access Configuration. The purpose of this blog post is to show you how to configure shared storage using Openfiler so you should have at least two ESXi hosts. In my test lab, I have three, so I have three items to configure on this page. You can put anything you like in the “Name” column, but I put something descriptive that lets me know for what device I’m configuring access. Be careful here. As I mentioned at the beginning of my post in the mistakes I made section, for shared storage, you’ll want to specify an exact host for which you’ll want to allow access. This means specifying the IP addresses of the network adapters on each ESXi host you’ll be using for iSCSI traffic under the “Network/Host” column. For each ESXi host, under the “Netmask” column, be sure to use 255.255.255.255. You can only add or delete one item at a time, pressing update after each change.
- 10. How to configure OpenFiler iSCSI Storage for use with VMware vSphere 5.0 VEPSUN Technologies, #100 & 104, S R Arcade, Tulasi Theater Road, Marathahalli, Bangalore. Email- info@vepsun.com www.vepsun.in When you have your ESXi hosts configured, click “Volumes” on the top menu, then “Block Devices” on the menu on the right, then click on your second hard drive, /dev/sdb. Scroll down to create a partition. The only change you need to make is to make the “Partition Type” Physical Volume instead of the default Extended Partition. Click “Create” after making this change. After creating your partition, you can see it created above. Click “Add Volume.”
- 11. How to configure OpenFiler iSCSI Storage for use with VMware vSphere 5.0 VEPSUN Technologies, #100 & 104, S R Arcade, Tulasi Theater Road, Marathahalli, Bangalore. Email- info@vepsun.com www.vepsun.in Scroll down and fill in the information for creating a volume. Give it any Volume Name you like. I chose the very original “filer1″ with a Volume Description of “data.” Be sure to move the Required Space slider all the way to the right and fill up your entire partition. If you leave the default setting of 32 MB (which is ridiculously small), you’ll run into problems later. Also, be sure to change the Filesystem/Volume Type to block(iSCSI,FC,etc). Click “Create” when finished. Click “Volume Groups” in the right hand menu and fill in the required information. A volume group name of volume1 should be fine. Check the box next to your /dev/sdb1 and click “Add Volume Group.”
- 12. How to configure OpenFiler iSCSI Storage for use with VMware vSphere 5.0 VEPSUN Technologies, #100 & 104, S R Arcade, Tulasi Theater Road, Marathahalli, Bangalore. Email- info@vepsun.com www.vepsun.in In the overhead menu, click on “Services.” Notice that the iSCSI Targer service is set to “Stopped” by default. You won’t be able to add iSCSI Targets without starting this service. Go ahead and click on “Start” to start the service. You’ll see that the iSCSI Target service is now running.
- 13. How to configure OpenFiler iSCSI Storage for use with VMware vSphere 5.0 VEPSUN Technologies, #100 & 104, S R Arcade, Tulasi Theater Road, Marathahalli, Bangalore. Email- info@vepsun.com www.vepsun.in Click on “Volumes” in the top menu then click on iSCSI Targets in the right hand menu. This should bring you to the screen below where you can start adding iSCSI targets. Under the heading, “Add new iSCSI Target,” click the “Add” button as many times as you have ESXi hosts. In my case, I have three ESXi hosts, so I clicked “Add” three times to create three iSCSI targets. If you have two ESXi hosts, you’ll create two iSCSI targets. Each ESXi host will connect to a single iSCSI target. We’ll make sure that each iSCSI target you create gets mapped to the same LUN. Once you have your iSCSI targets created, you’ll need to configure each one. You can see all your created iSCSI targets if you expand the drop down box. I created three targets so I see three targets. Each target will make use of the circled menus: Target Configuration, LUN Mapping, and Network ACL. For consistency, choose the top-most iSCSI target from the drop down list. In this
- 14. How to configure OpenFiler iSCSI Storage for use with VMware vSphere 5.0 VEPSUN Technologies, #100 & 104, S R Arcade, Tulasi Theater Road, Marathahalli, Bangalore. Email- info@vepsun.com www.vepsun.in case, I’ll choose the target whose last two digits are “9b.” Click the “Change” button next to the target to switch to that target’s settings. Click the LUN Mapping item. The LUN Mapping screen is where you map iSCSI Targets to iSCSI LUNs. We’ve created a single LUN, so the only option we have is to map our first iSCSI target to our only iSCSI LUN. Click the “Map” button on this screen. Next, click the “Network ACL” menu. Notice the iSCSI target name, the long string starting with “iqn.” IQN stands for iSCSI Qualified Name. It’s just a unique way of addressing an iSCSI device, similar in purpose to a MAC address. You’ll also see each item you listed under the Network Access Configuration page. By default, each ESXi host listed is denied access to all iSCSI targets. You’ll have to explicitly tell Openfiler which ESXi host you’ll want to have access to which iSCSI target. For simplicity, we’ll
- 15. How to configure OpenFiler iSCSI Storage for use with VMware vSphere 5.0 VEPSUN Technologies, #100 & 104, S R Arcade, Tulasi Theater Road, Marathahalli, Bangalore. Email- info@vepsun.com www.vepsun.in configure the first ESXi host to connect to the first iSCSI target, the second ESXi host to connect to the second iSCSI target, and third ESXi host to connect to the third iSCSI target. The Network ACL screen is where you’ll actually mask ESXi hosts from iSCSI targets. Since we’re working on the first iSCSI target, we’ll configure the first ESXi host, esx01, to “Allow” in the Access column. We’ll leave the other hosts set to deny. When we click the “Update” button, we’ve now masked the first iSCSI target so that only the first ESXi host can see it. The other two hosts cannot. Follow this process for the other two iSCSI targets. Click on “Target Configuration” from the top menu. Use the drop down list to highlight the second iSCSI target. Click “Change.” Click on “LUN Mapping” from the top menu. Simply click, “Map,” and click on “Network ACL” from the top menu. For the second host, esx02 in this case, choose “Allow” from the drop down menu in the Access column. Leave the other two ESXi hosts set to deny. Finally, configure the last iSCSI target. Click on “Target Configuration” from the top menu. Use the drop down list to highlight the third iSCSI target. Click “Change.” Click on “LUN Mapping” from the top menu. Click, “Map,” and click on “Network ACL” from the top menu. For the third host, esx03, choose “Allow” from the drop down menu in the Access column. Leave the other two ESXi hosts set to deny. Although you’re done for the moment, don’t close your web browser. You’ll need to access the IQNs of the iSCSI targets you created. You are done configuring Openfiler for shared storage. The final step is to configure each ESXi host in your environment to “see” their respective iSCSI targets and thus the shared storage to which each iSCSI target is mapped. Configuring ESXi 5.0 Software iSCSI Storage Adapters Using your vSphere client, connect to your vCenter Server. In the screenshot below, I’m viewing the first ESXi host, esx01, and I’m on the Configuration tab viewing the Storage Adapters. You can see I’ve highlighted the built-in VMware iSCSI Software Adapter. By highlighting the iSCSI adapter, I can now modify its properties. In the box below the adapters list, click on “Properties.”
- 16. How to configure OpenFiler iSCSI Storage for use with VMware vSphere 5.0 VEPSUN Technologies, #100 & 104, S R Arcade, Tulasi Theater Road, Marathahalli, Bangalore. Email- info@vepsun.com www.vepsun.in Clicking “Properties” brings up the iSCSI Initiator Properites dialogue box. If you aren’t already using the iSCSI software initiator, you’ll first have to enable it. Do this by clicking, “Configure.” In the General Properties dialogue box that appears, check the box next to “Enabled,” and click “OK” to close the General Properties dialogue box. Since you still have your web browser open to Openfiler, go back to Volumes, iSCSI Targets. Choose the first iSCSI target from the drop down list and click change. Click on Network ACL from the top menu. You’ll see the IQN of the iSCSI target at the top of the page. You need to copy this IQN, everything in between the quotes, into the iSCSI Initiator Properties of your first ESXi host. You can either write down the IQN number and type it into the iSCSI Initiator Properties, or you can simply copy and paste. Obviously, you’ll reduce the chances of mis-typing if you copy and paste.
- 17. How to configure OpenFiler iSCSI Storage for use with VMware vSphere 5.0 VEPSUN Technologies, #100 & 104, S R Arcade, Tulasi Theater Road, Marathahalli, Bangalore. Email- info@vepsun.com www.vepsun.in Back in the vSphere client and the iSCSI Initiator Properties dialogue box, click on the Static Discovery tab and click the “Add” button at the bottom. The Add Static Target Server dialogue box appears. Enter the IP address of the Openfiler box. Remember, Openfiler has two network cards; one for the management network and one for iSCSI traffic. In this exercise, the IP address of my Openfiler management NIC is 10.240.1.205 and the IP address of my Openfiler iSCSI NIC is 172.16.1.205. Enter Openfiler’s iSCSI NIC address in the iSCSI Server edit box and the IQN of the first iSCSI target. The port number should be left at its default 3260 value. Click “OK” when finished and after a few seconds, your configuration should appear in the Static Discovery tab under “Discovered or manually entered iSCSI targets:.” Finally, click “Close” at the bottom of this screen.
- 18. How to configure OpenFiler iSCSI Storage for use with VMware vSphere 5.0 VEPSUN Technologies, #100 & 104, S R Arcade, Tulasi Theater Road, Marathahalli, Bangalore. Email- info@vepsun.com www.vepsun.in A message box will appear. Read it and click “Yes.” If everything’s working as it should, after a few seconds you should see Openfiler populate as a device. In the picture below, I already had one Openfiler iSCSI VM running and connected, but this exercise is adding a second Openfiler iSCSI VM.
- 19. How to configure OpenFiler iSCSI Storage for use with VMware vSphere 5.0 VEPSUN Technologies, #100 & 104, S R Arcade, Tulasi Theater Road, Marathahalli, Bangalore. Email- info@vepsun.com www.vepsun.in You can also manually rescan by right-clicking the iSCSI Software Adapter and choosing “Rescan” or by clicking “Rescan All ” in the upper right hand corner. The “Rescan All ” option takes a bit longer than right clicking the iSCSI adapter because it rescans not one, but all of your adapters for new devices.